Eryone ER-20 User manual

⑧
⑨
⑥
①
12
④
③
⑤
⑦②
11
10
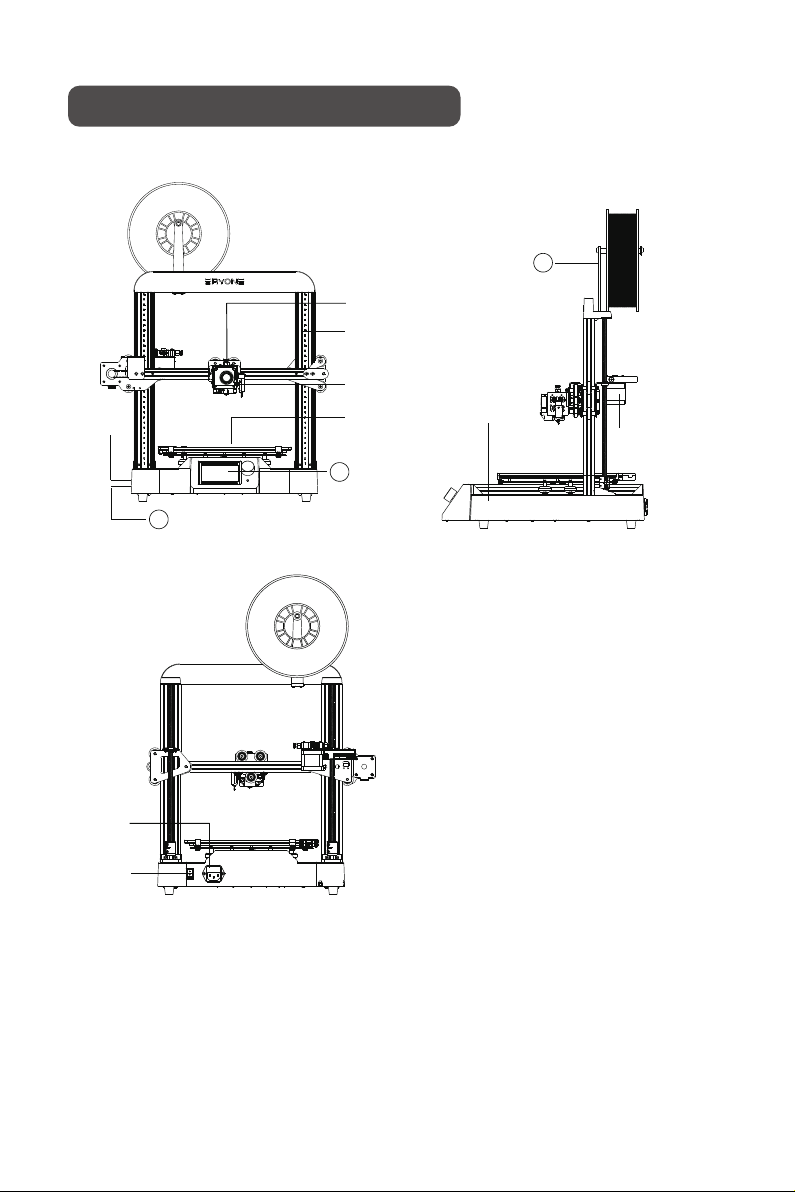
Quick Assembly-Overview ① Base frame② Printing surface③ Extruder④ Gantry frame⑤ Ery Sensor⑥ Extruder stepper motor⑦ SD card slot⑧ Power switch⑨ Power cable port⑩ LCD screen⑪ USB cable port⑫ Filament holder1

① ②
③ ④
PrepareAssembly Steps① Base frame half assembly② Gantry frame half assembly③ Lead screw④ All-in-one toolkit packWe have prepared “ER20 Assembly Guide” of the video for you, it is saved in the SD card in the printer. Please open “ER20 Assembly Guide Video” folder for reference.If you lost the SD card, please visit our youtube channel www.youtube.com/eryone3d2
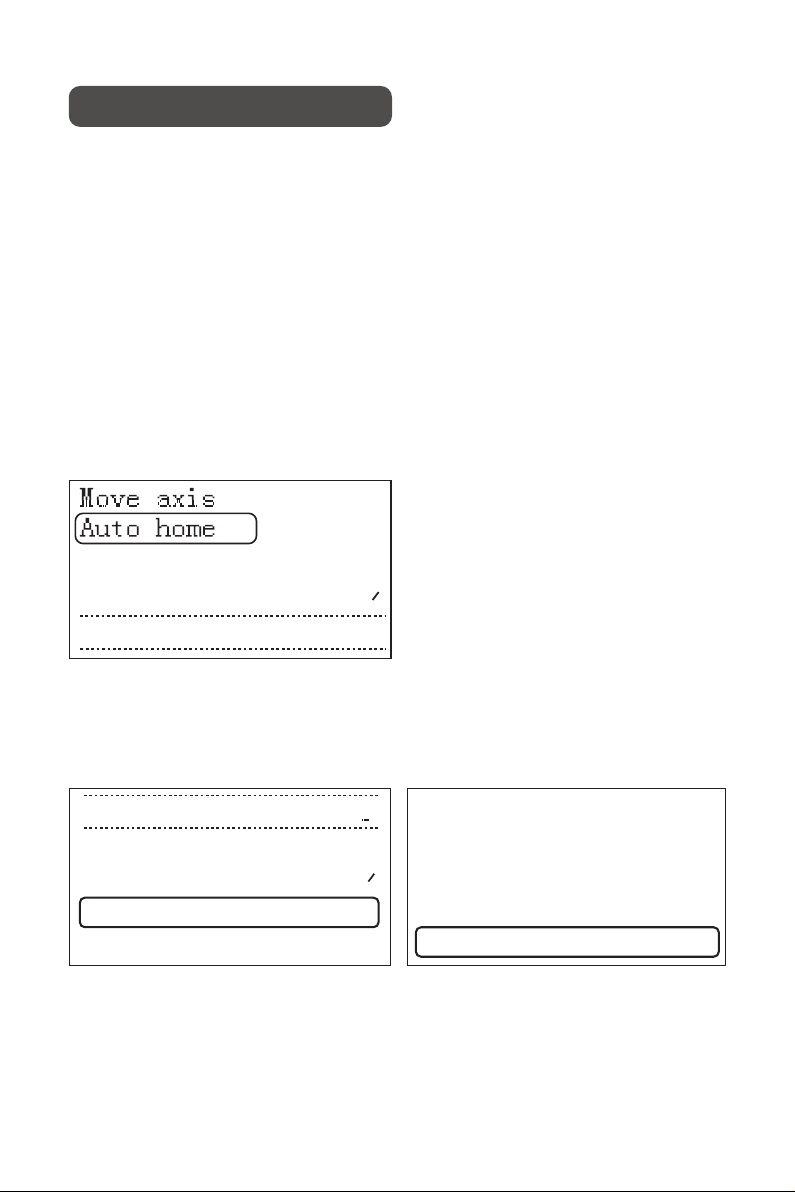
Calibration can help you achieve excellent print results, so read this section carefully, or you may cause printer damage and print failure.Prepare a standard piece of A4 paper and lay the printer flat The ER-20 3D printer firmware turns on the automatic leveling function by default. The sensor Eryone developed enables the machine to automatically level. We can Level the printer easily by calibrating.Auto leveling❶ Preparation Home the printer to default location. ❷ Auto Home Click the LCD and click “Configuration” to enter“Calibrate Z” menu then level the printer according to the instructions.❸ Calibrate Z axis. Calibration and Print
Fade Height: 0
Level Bed
Disable steppers
→
Cablibrate Z
Probe Z Offset:
-2.90
Main
Advance Settings
Bl Touch
→
→
→
Chanfe Media
About Printer
Configuration
Change Filament
Print from Media
→
→
→
→
→
3

Quick AssemblyCalibration And PrintSafety InformationPrinter SpecificationsPackagingScreen Menu IntroductionDriver Installation And Software SlicingFirmware UpdateTrouble shooting And Printer Maintenance135678172326Table of Content 4

Safety Information●The Printer can be only used with the power adapters supplied by this company,or the printer might be damaged● Components included in this package may be damaged by electrostatic discharge (ESD) Electrostatic discharge (ESD) wristbands are recommended, to ESD’s harm on the printer● To avoid being exposed to high temperature burns, don’t touch heated bed and nozzle of the printer with your hands when the printer is working ● Minors need to be accompanied by a guardian to use the printer and Keep away from children as much as possible so as not to cause harm to them● Printers must be kept away from water and exposure to rain● The printer is designed to work properly at an ambient temperature between 10℃ and 32℃,and humidity between 20% and 50%,Operating outside those limits may result in low quality models.● Please ensure that the distance between the nozzle and the hot bed is at least 0.05mm, so as to avoid damage of the nozzle caused by the impact of the nozzle on the heated bed● In any installation step, if you have any questions, please contact us to get technical support● Do not start the printer until you have finished assembling it. Otherwise, permanent damage to the printer may be causedand harm the user.● After completing the installation of the components, please refer to the manual instructions again and check whether the cables are installed in place and whether any metal screws are loose or fall off● Make sure the printer power is turned off before installing or removing printer component.● Keep this manual is for future reference● Eryone company reserves the right of final interpretation.5

Molding Technology
Printing Size
Printing Precision
X/Y/Z axis positioning precision
Filament diameter
Nozzle diameter
Recommended printing speed
Filament
Average noise
File Format
Files
Operation system
Firmware
File transfer
Power supply input
Power supply output
Standby power consumption
Printer Size
Package Size
N.W.
G.W.
Maximum Nozzle temperature
Maximum heated bed temperature
Recommended nozzle heating time(20~180℃)
Recommended heated bed heating time(25~60℃)
Operating temperature
Non-operating temperature
FDM
250x220x200mm
0.05mm
12.5μm/12.5μm/2.5μm
1.75mm
0.4mm
40-70mm/s
PLA, PETG,TPU,etc
49dB
GCODE
WIN/MAC/LINUX
Marlin
USB/SD card
115/230 VAC 50/60HZ
+24V 14.5A MAX
12W
396x446.5x449mm
575x540x240mm
8kg
12.5kg
260 ℃100 ℃10 ~
~
32℃
0 32 ℃.STL, .OBJ, .ADE, .AMF
~1m in
~3m in
Printer SpecificationsPrinter and its parameters Software ParametersElectronic ParametersPhysical ParametersTemperaturesEnvironment6

Please check the packaging list of your printer. It should contain the following:□ Printer □ All-in-one toolkit pack: □ Install screw □ SD card+knob+USB Cable □ Filament holder □ Tool kit □ Extra gift □ Spare screws □ Printer user manual □ PLA filamentIf the above items are damaged or missing, please contact the sales staff in time Packaging7
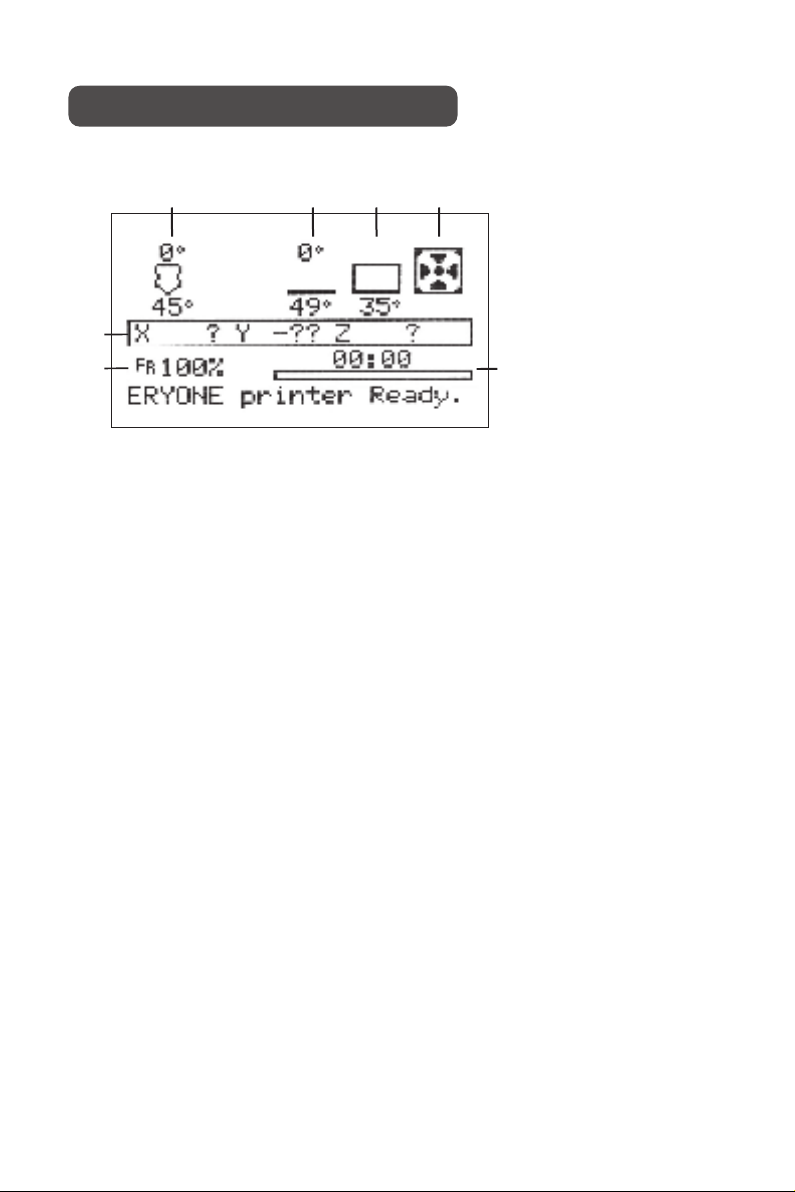
Screen Menu IntroductionMain LCD menu① Nozzle temperature display section② Heated bed Temperature display section③ Motherboard temperature display section④ Hotend cooling fan display section ⑤ Nozzle coordination display section⑥ Printing basic speed rate⑦ Printing progress display sectionSince the firmware of the printer may be updated in the future, the menu may not be consistent with the actual screen display, please refer to the actual menu and refer to the latest version of the manual.Please go to Eryone's website to download the latest version of the manual: www.eryone.com ③④②①⑤⑥⑦8

LCD layout□Motion □Move Axis □Move X □Move 10mm □Move 1mm □Move 0.1mm □Move Y □Move 10mm □Move 1mm □Move 0.1mm □Move Z □Move 10mm □Move 1mm □Move 0.1mm □Move 0.025mm □Extruder □Move 10mm □Move 1mm □Move 0.1mm □Auto Home □Level Bed □Bed leveling: On □Fade Height: □Disable Steppers □Temperature □Nozzle □Bed □Fan Speed □Preheat PLA □Preheat PLA □Preheat PLA End □Preheat PLA Bed9

□Preheat ABS □Preheat ABS □Preheat ABS End □Preheat ABS Bed □Cooldown □Configuration □Advanced Settings □Set Home offsets □Velocity □Vmax X □Vmax Y □Vmax Z □Vmax E □Vmax Min □VTrav Min □Acceleration □Accel □A-Retract □A-Travel □Amax X □Amax Y □Amax Z □Amax E □Jerk □Probe offsets □Probe X offs □Probe Y offs □Probe Z offsets □Steps/mm □Xsteps/mm □Ysteps/mm □Zsteps/mm □Esteps/mm 10

□TMC Drivers □Driver Current □Sensorless Homing □Stepping Mode □Temperature □Autotemp □Min □Max □Fact □Filament □E in mm3 □Unload mm □Load mm □Initialize EEPROM □Probe Z offset □Calibrate Z □BLTouch □Outage Recovery □Preheat PLA Conf □Preheat ABS Conf □Store Settings □Load Settings □Restore Defaults □Change Filament □Preheat PLA □Preheat ABS □Preheat Custom □About Printer □Printer info □Board info □Thermistors□Change Media□Print from Media11

□ Bed: Heated bed temperature parameters setting.□ Fan speed: Fan speed control.□ Nozzle: Nozzle temperature parameter setting.Nozzle cooling fan speed setting, using PWM to adjust fan speed, the parameters are 0~255, corresponding to running at a rate percentage of 0~100%.Generally do not let its speed below 20%, otherwise situation that fans can not work properly might appear.□ Preheat PLA: Preheat menu. Preheat the nozzle, heated bed, or both. When using this feature, the heating component will enter the heating state according to the PLA preheating parameters preset in the firmware.■ Motion:Printer motion parts control menu to move every axis.Motion Menu ■ Temperature: Menu for nozzle temperature, heated bed temperature and cooling fan speed□ Move axis: Move each axis □ Move X: 3 type of mode,10mm/1mm/0.1mm □ Move X: 3 type of mode,10mm/1mm/0.1mm □ Move Z: 4 type of mode,10mm/1mm/0.1mm/0.025mm □ Move E: Extruder extrusion filament (need Preheat first), 3 type of mode,10mm/1mm/0.1mm □ Auto home: Auto home all three axes of the printer XYZ □ Level Bed: Using this feature to auto level the printer(The offset point needs to be set first, This will be explained on the Probe Z Offset menu) □ Fade Height: Fade the amount of Mesh Based Compensation over a specified height. At the specified height, no correction is applied and natural printer kinematics take over. If no number is specified for the command, 10mm is assumed to be reasonable.□ Disable the Stepper: After the stepper motor is disabled, the motor self-lock function is unlocked and the stepping motor can be moved manually□ Bed leveling: Enable the auto bed leveling or not(Default enable)12

□ Preheat ABS: Preheat menu. Preheat the nozzle, heated bed, or both. When using this feature, the heating component will enter the heating state according to the ABS preheating parameters preset in the firmware.□ Advanced Settings:Advanced parameter setting menu □ Set Home offsets: Sets the current printer's coordinate value as the home offsets□ Velocity:Printer speed parameter control menu□ Acceleration: Acceleration control menu□ Jerk:Accelerating arc parameter setting■ Configuration:This menu is the most complicated part of the LCD menu. It is recommended that you do not change any parameters in this menu if you are unclear. Advanced Settings includes advanced parameter setting, autoleveling sensor parameter setting, etc□ Vmax X: X-axis movement speed upper limit□ Vmax Y: Z-axis movement speed upper limit□ Vmax Z: Z-axis movement speed upper limit□ Vmax E: Upper limit of the rotation speed of the extruder□ Vmax Min: Maximum value of Printer moving speed □ Vtrav Min E: Minimum value of Printer deadhead moving speed□ Accel: The overall acceleration value of the printer □ A-Retract: Printer extruder motor retract acceleration setting□ A-Travel: Printer travel acceleration maximum value setting□ A max X:X axis moving acceleration maximum value setting□ A max Y: Y axis moving acceleration maximum value setting□ A max Z: Z axis moving acceleration maximum value setting□ A max E: Extruder acceleration maximum value setting13

□ Probe offsets: Auto Leveling sensor offset setting□ Steps/mm: Number of steps of motor rotation per millimeter printer moves□ TMC Drivers:stepper motor driver setting□ Probe X offs:Auto Leveling sensor X axis offset setting□ Probe Y offs:Auto Leveling sensor Y axis offset setting□ Probe Z offs:Auto Leveling sensor Z axis offset setting □ X Steps/mm: Number of steps of motor rotation per millimeter printer X axis moves. The parameter is related to the type of motor, the numberof teeth and the pitch of the synchronous wheel The parameter is related to the type of motor, the number of teeth and the pitch of the synchronous wheel □ Y steps/mm: Number of steps of motor rotation per millimeter printer Y axis moves□ Z steps/mm: Number of steps of motor rotation per millimeter printer Z axis moves. The parameter is related to motor type and Z-axis screw type□ E steps/mm: Number of steps of motor rotation per millimeter printerextruder rotates, the parameter is related to motor type and feeder gear type□ X Steps/mm:TMC drivers current setting □ Stepping Mode: Switch the working mode of the stepper motor driver, on means silent mode on, off means silent mode off□ Sensorless Homing: Infinite Limit switch function Settings, mainly to adjust the X/Y axis of the stepper motor driver sensitivity. The sensitivity of the driver to the resistance when the XY axis moving and homing.It should be noted that too high the value is likely to lead to higher sensitivity value, resulting in failure of the homing.14

□ Temperature: This option is related to the automatic temperature adjustment function setting □ Temperature: Filament setting□ Initialize EEPROM: Initializes the EEPROM data□ Autotemp: Whether to turn on automatic temperature adjustment (off by default) □ Min: Minimum value of automatic temperature adjustment □ Max:Maximum value of automatic temperature adjustment □ Fact: Automatic temperature adjustment temperature coefficient(related to firmware)□ E in mm3: This function is used to measure the consumption of filaments. Whether mm3 is used as the unit or not, off by default. □ Probe Z offset:□ Unload mm:Extruder unload length □ Load mm : Extruder load length Auto leveling sensor key parameter。Adjusting this parameter can change the offset height of the sensor,Offset point refers to the height between the nozzle and the hot bed by moving the Z-axis to 0 after the printer is returned to its position with the automatic leveling sensor. □ Calibrate Z: Auto leveling sensor calibration menu. Entering this menu can quickly adjust the offset height of the sensor without using other menus for homing and other operations. □ Bltouch: Ery sensor control menu. Enter this menu to check whether the function of the sensor is normal. □ Outage Recovery: Power resume print menu. You can turn it on or off.On by default .□ Preheat PLA conf: Preheating parameter configuration menu for printer PLA. On this menu you can adjust the heating temperature values of the nozzle and the heated bed. 15

■ Change Filament: This menu can be used in the printing process of the printer to help users quickly replace the filament.□ Preheat PLA: This menu differs from the Temperature menu , the refueling after using the preset PLA's preheating parameters■ About Printer: This button includes information about this printer.□ Printer info:Printer firmware information□ Board info:Printer motherboard information□ Thermistors: Printer thermistors information■ Change the Media: Replace the printed SD card (This option is notavailable on The ER-20) ■ Change the Media: Select the slice file from the SD card□ Preheat ABS: This menu differs from the Temperature menu , the refueling after using the preset ABS's preheating parameters □ Preheat custom: This menu allows the operator to customize the temperature parameters for preheating and refueling.□ Preheat ABS conf: Printer ABS preheating parameters configuration menu. On this menu you can adjust the heating temperature values of the nozzle and the heated bed.□ Store Setting: Save the currently unsaved parameters to the printer.Load Setting: Load printer default parameters□ Restore Defaults: Reset printer factory parameters16

First we need to install our driver on our computer. If your system is WIN10, you can enter the device driver management → update the driver, so that the driver will be installed automatically1. You can import the driver for this printer from the SD card surface, located in: /USB Driver/ . Then install the driver according to the corresponding computer operating system2. Of course, you can also visit this link to get the new version of the driver:http://www.wch.cn/download/ch341ser_exe.html 3. Manual installation Guide https://sparks.gogo.co.nz/ch340.html WIN10 installation successful exampleInstall the driver and slicing17

1. Download the slicing software Download link: https://ultimaker.com/software/ultimaker-cura2. Import of slicing software profiles1) You can find the slicing software default parameters from the SD card, Located in the root directory /ER-20 Cura Profiles/, (if you don't know how to import slice parameters, there is a video on the SD card that comes with the machine for reference)2) Visit this link to get the latest slicing software profileshttps://www.eryone.com/forum/viewtopic.php?f=9&t=179Open the slicing software and clickPreferences→Configure add a new printerSlice the model 18
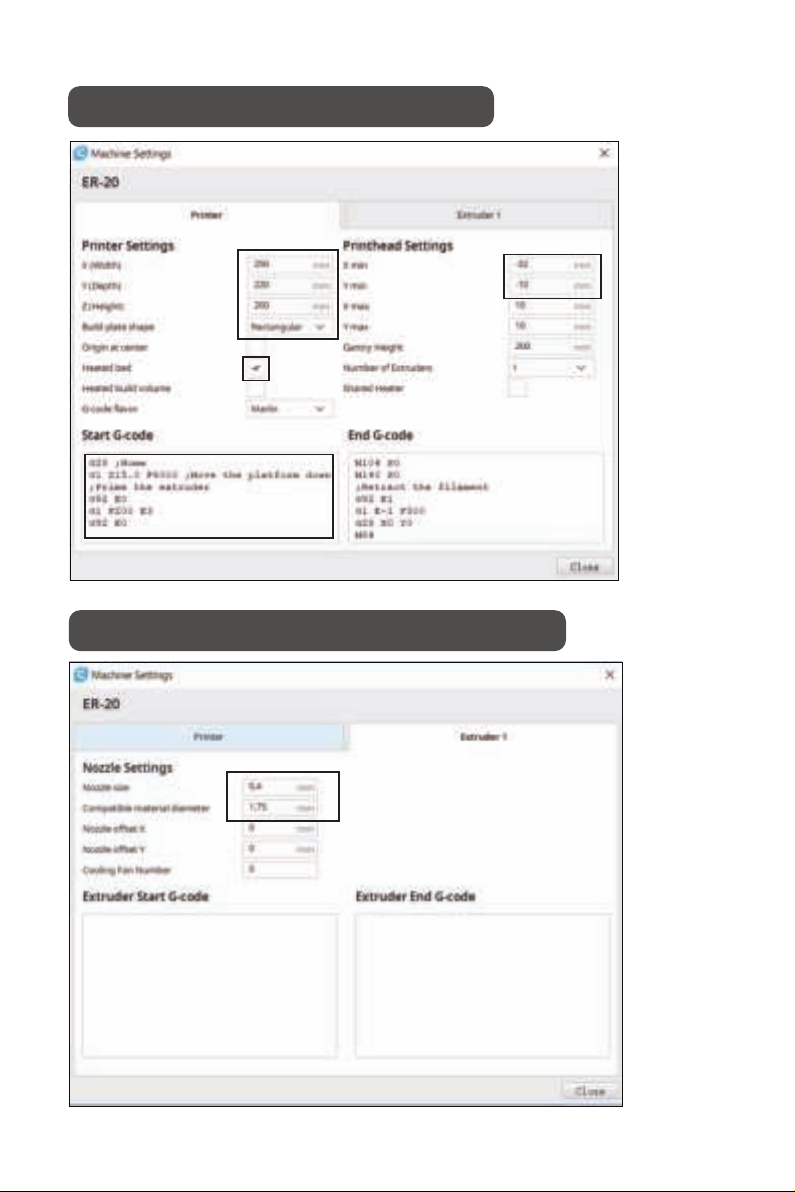
Set basic printer parametersSet print header basic parameters 19
Other manuals for ER-20
3
Table of contents
Other Eryone 3D Printer manuals


