Eryone Thinker SE User manual

Eryone Thinker SE
User Manual
Shenzhen Eryone Technology Co .,Ltd.
WhatsApp: +86 13670143392

1
Notices
Safety compliance
Protection
Legal
The printer must not be exposed to water or rain, or damage may occur. Do not
pull out the USB cable when loading a digital model, or the model data maybe lost.
When using the
Extruder function, keep at least 50mm between the nozzle and the platform. If too
close, the nozzle may get blocked. The printer is designed to work properly at an
ambient temperature between 10℃and 32℃and humidity of between 20% and
50%; Operating outside those limits may result in low quality models.
The printer can be only used with the power adapters supplied by this company, or
the product maybe damaged, with a risk of re. To avoid burning, or model defor-
mation, do not touch the model. Nozzle, or the platform by hand, or any other part
of the body, while the printer is working or immediately after it has nished printing.
There is a slight smell from ABS when it is being extruded. The smell is, however,
not too unpleasant. Operation in a well-ventilated room but draught free. Draughts
can aect warping of ABS prints. When ABS is burnt is release toxic fumes. Always
have adult supervision when Children are present. Please keep small printed parts
away from young children, choking hazards! There are several safety issues, small
tools and HOT objects and most parts used in connection with the 3D printer. Tie
back long hair and loose clothing.
Check the power input of power supply unit. You can choose either 110V or 220V
according to the Power regulation in your country.
Eryone makes no warranty of any kind with regard to this material, including, but
not limited to, the implied warrants of merchantability and tness for a particular
purpose. Eryone should not be liable for errors contained herein or for incidental
or consequential damages in connection with the furnishing, performance, or use
of this material. Changes or modications to the system not expressly approved
by Eryone, the party responsible for compliance, could avoid the user`s authority
for use. This document is protected by copyright. All right reserved. No part of this
document maybe photocopied, reproduced or translated into another language
without the prior written consent of Eryone.
© Copyright 2018 Shenzhen Eryone technology Limited. All rights reserved.

Notices ------------------------------------------------------------------------------------------------
1. Overview of Eryone Thinker SE--------------------------------------------------------------
1.1 A glance of Thinker SE---------------------------------------------------------------------
2. Specications -------------------------------------------------------------------------------------
3. Printer assembly----------------------------------------------------------------------------------
4. First steps ------------------------------------------------------------------------------------------
4.1Test before print ------------------------------------------------------------------------------
-Movement test --------------------------------------------------------------------------------
-Preheat hotend and heated bed----------------------------------------------------------
-Load the lament------------------------------------------------------------------------------
4.2 Manual levelling-------------------------------------------------------------------------------
4.2.1 Levelling gantry frame---------------------------------------------------------------
4.2.2 Levelling the heated bed ------------------------------------------------------------
5. Printing ---------------------------------------------------------------------------------------------
5.1 Install the driver-------------------------------------------------------------------------------
5.2 Setting your 3d printer---------------------------------------------------------------------
5.3 Load printing model------------------------------------------------------------------------
5.4 Slice the model------------------------------------------------------------------------------
5.5 Printing via SD card------------------------------------------------------------------------
6. LCD layout----------------------------------------------------------------------------------------
7. Special function of Eryone Thinker SE ---------------------------------------------------
Table of contents
1
4
4
5
6
6
6
6
6
7
8
8
8
9
9
10
12
12
13
14
15
2

8. FAQ-Common assembly issues ------------------------------------------------------------
8.1 X carriage loose --------------------------------------------------------------------------
8.2 Z axis stuck----------------------------------------------------------------------------------
9. FAQ-Print problem------------------------------------------------------------------------------
9.1 Filament doesn't stick to the heated bed--------------------------------------------
9.2 Extruder under extrusion----------------------------------------------------------------
10.FAQ-Error messages--------------------------------------------------------------------------
10.1 Mintemp error -----------------------------------------------------------------------------
10.2 Maxtemp error----------------------------------------------------------------------------
10.3 Thermal runaway-------------------------------------------------------------------------
*Add the auto level sensor-----------------------------------------------------------------------
16
16
16
17
17
17
17
17
17
17
17
3
4
1. Overview of Eryone Thinker SE
Please carefully read and understand the contents of this user manual before you
use Eryone Thinker SE. Failure to read the manual may lead to personal injury,
damage to Thinker SE.
Learn everything about Using your Eryone Thinker SE by following the instructions
in this user manual, you will nd that using 3D printer is such an easy thing.
You might be familiar with 3D printers, however, it is still essential to read this user
manual carefully in order to make you understand Eryone Thinker SE well.
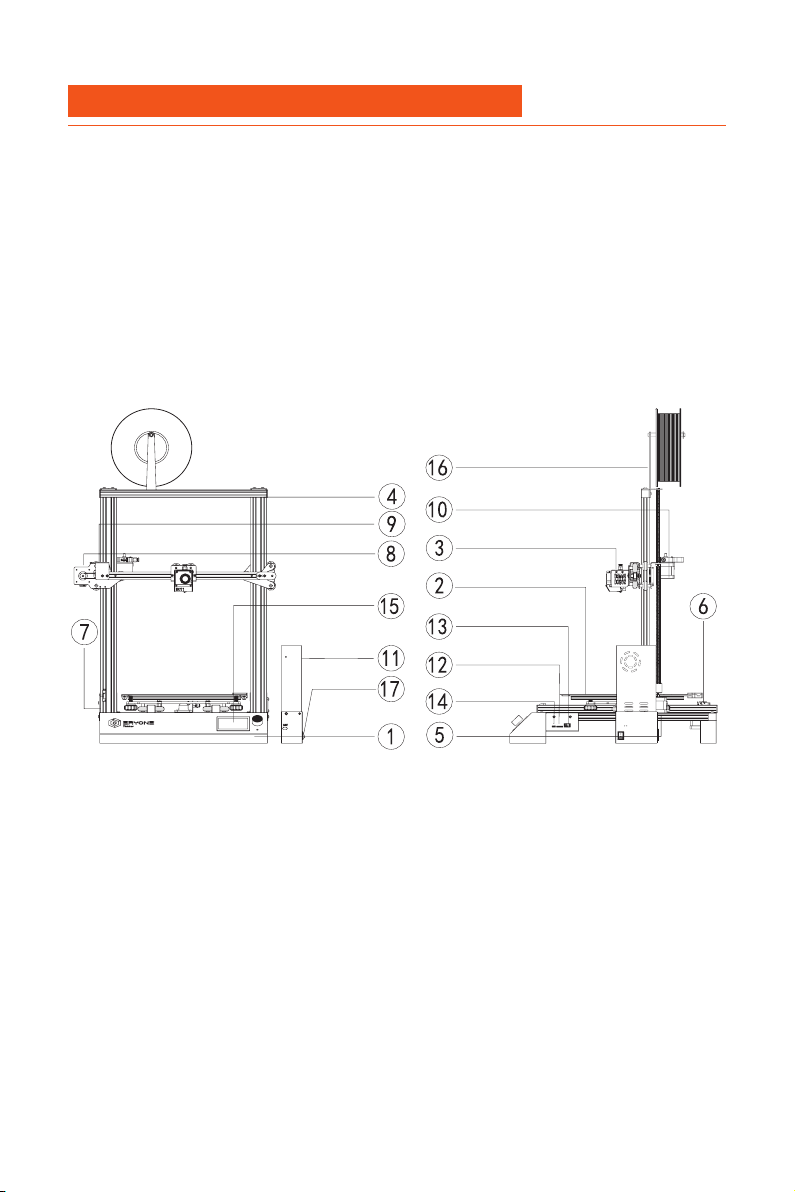
1.1 A Glance of Thinker SE
1. Base frame
2. Printing surface
3. Extruder
4. Gantry frame
5. Z stepper motor
6. Y stepper motor
7. Z axis limit switch
8. X stepper motor
9. X axis limit switch
10. Extruder stepper motor
11. Power supply unit
12. Micro SD card slot
13. Power supply unit port
14. Micro USB port
15. LCD display
16. Filament holder
17. Power switch

5
2. Specications
Printer and printing properties
Software
Electrical
Physical dimensions
Temperature
Environmental conditions
Print technology
Build volume
Print precision
X, Y, Z accuracy
Filament diameter
Default nozzle diameter
Print speed
Filament support
Average operating sound
Power supply unit input
Power supply unit output
Printer operating voltage
Printer operating current
Standby power
Desktop space
Shipping dimension
Nett weight
Gross weight
Nozzle max temperature
Heated bed max temperature
Nozzle heating time(20℃ ~180℃ )
Heated bed heating time(25℃ ~60℃ )
Operating environment
Non-operating environment
Slicer software support
Print le type
Supported OS
Firmware type
File transfer
Fused Filament Fabrication(FDM)
300mm x 300mm x 400mm
0.05mm
12.5 μm / 12.5μm / 2.5μm
1.75mm
0.4mm
30mm/s~145mm/s
PLA, PETG, ABS,TPU,etc
~49dBA
100~135V/200V~264V 6A
50~60Hz
24V/14.5A,350W
24V
13A
~15W
510*415*652mm
675 x 550 x 240mm
9.3kg
13.6kg
250℃
100℃
~1min
3min
10~32℃
0~32℃
Cura, Simply3D, Prusa slic3r,
Repetier-host,etc
GCO,GCODE
Windows/Mac OS/Linux
Marlin(open source)
USB print/Stand-alone SD card print
6
3. Printer Assembly
4. First steps
For the Eryone Thinker SE 3d printer, we suggest you following the “Eryone Thinker SE
Quick Starter Guide”
After a successful completion, continue to the next step.
Assembly guide video: https://www.youtube.com/c/Eryone3D
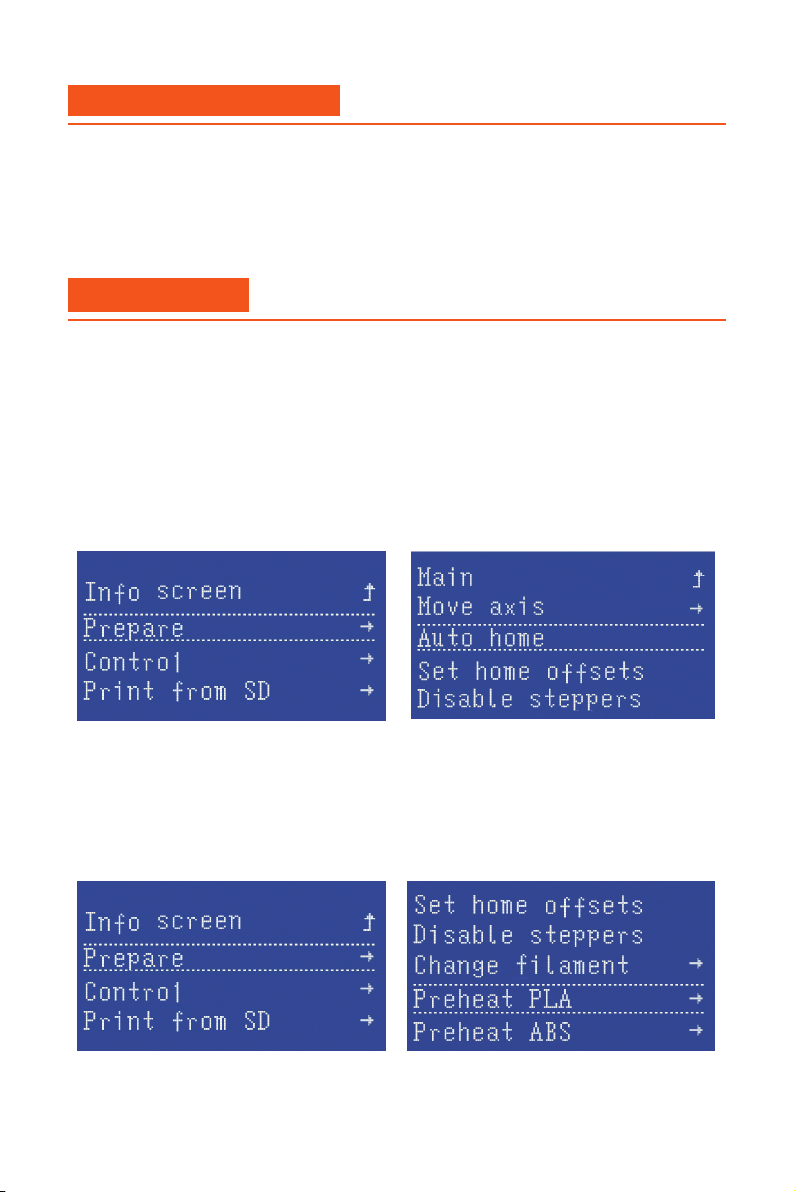
4.1Test before print
About the LCD layout, you can refer chapter 6.
Click LCD button :
LCD→Prepare→Auto home
Then the 3d printer all axis will home all axis by hitting the limit switch.
Click LCD button:
LCD→Prepare→Preheat PLA→Preheat PLA
Then the 3d printer hotend and heated bed will heat to the correct temperature.
-Movement test
-Preheat hotend and heated bed
7
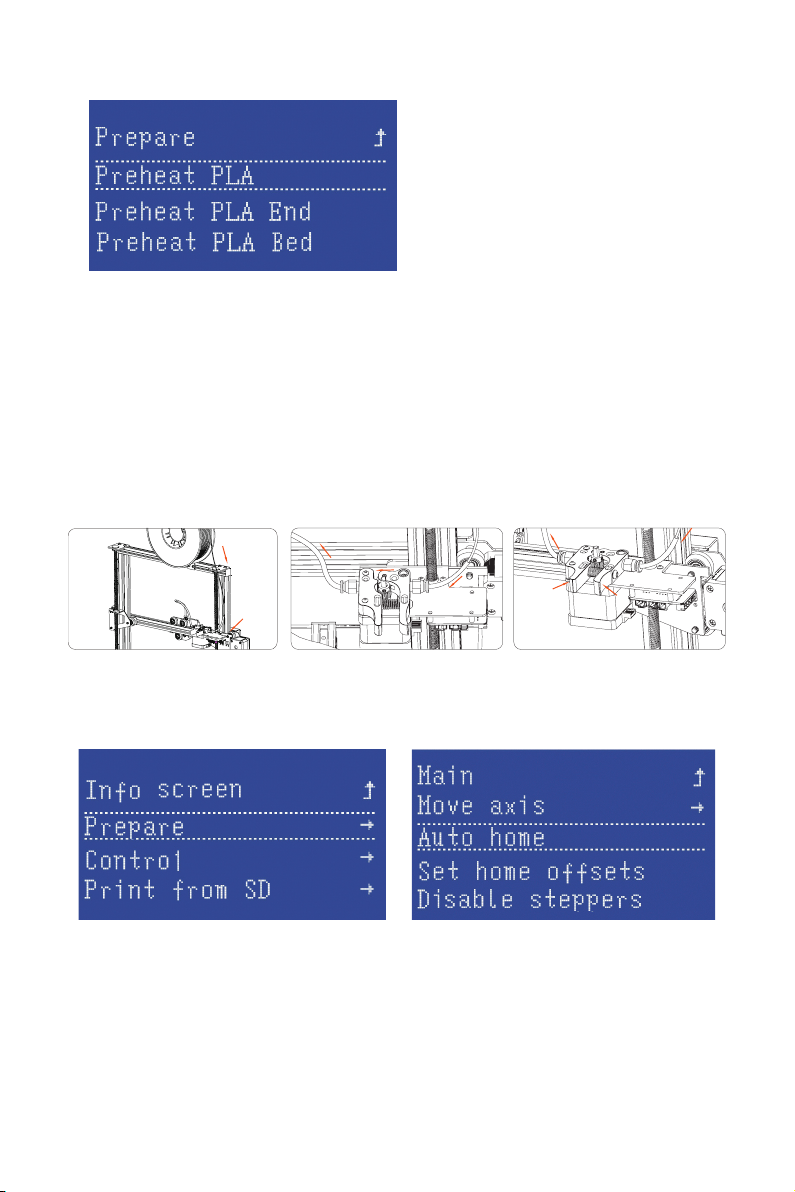
Note: The extruder will not work until the temperature is higher than 170℃.
(Temperature protection feature)
Preheat your hotend at rst. Click your LCD button→Prepare→Preheat PLA End.
Insert lament into the Teon tube. When the lament goes though extruder block,
with one hand press the handle, make sure the lament can go though the slot of
the gear, then guide lament in by hand till lament starts to string from the hotend.
After pushing the lament into the bottom of hotend,
click LCD button→Prepare→Auto home.
When homing the axis is nished. You can click LCD button→Prepare→Change
lament
Choose “Preheat PLA” the hotend will heating then you need to click the LCD but-
ton to continue.
You can click” Purge more” a few times till the lament comes out of the nozzle.
-Load the lament
8
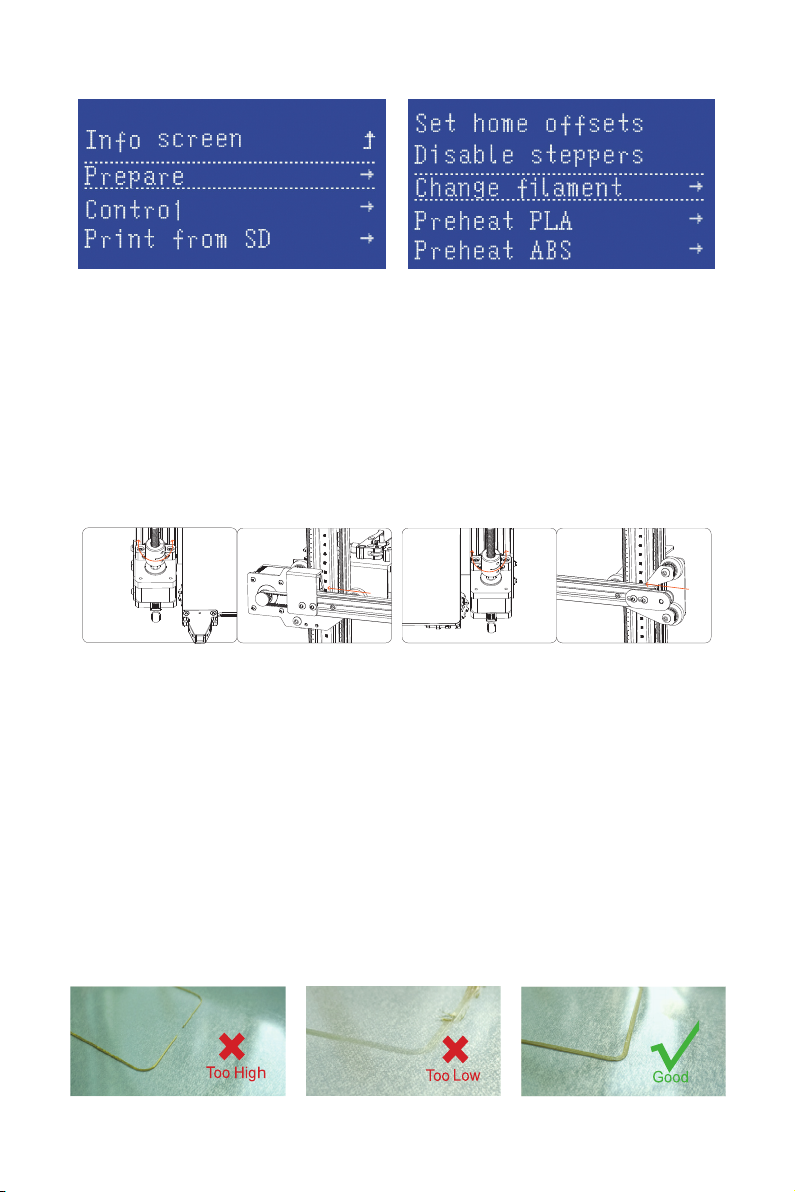
4.2 Manual levelling
4.2.1 Levelling gantry frame
4.2.2 Levelling the heated bed
To make 3d printer have better printing result, levelling bed before printing.You can
refer to these steps to levelling the 3d printer.
Before you levelling the heated bed, please make sure gantry frame is perpen-
dicular to Z axis aluminum extrusions, you can calibrate the couplers to make the
frame same scale on both Z axis aluminum extrusions.
The recommended distance between the nozzle and printing surface is
0.05~0.1mm(Thickness of A4 paper). There are 4 knobs under the heated bed,
by which you can tighten or loosen the springs to reduce or increase the distance
between the nozzle and printing surface. The distance from nozzle will increase if
you tighten knobs, otherwise, it will decrease distance from nozzle.
Step1: Click “Prepare”→“Auto home”→“Disable steppers”
Step2: Manually move the extruder to the 1st right hand corner of the heated bed,
you need to place a piece of A4 paper between the nozzle and the heated bed,
ne-tuning until you feel slight friction from the paper when you pull on it(Repeat
for all 4 corners and centre of the bed)
36mm
36mm
(Right) (Left)
�$
9
5.1 Install the driver
Connect Eryone Thinker SE to your PC/laptop via USB cable. Normally the driver
will be installed automatically, the same way as you use your keyboard. If your PC
can’t get the driver automatically, please insert the SD card to your PC with SD
card reader(Package included it).
Copy the drivers to your PC and install it.(Refer to link: https://sparks.gogo.co.nz/
ch340.html)
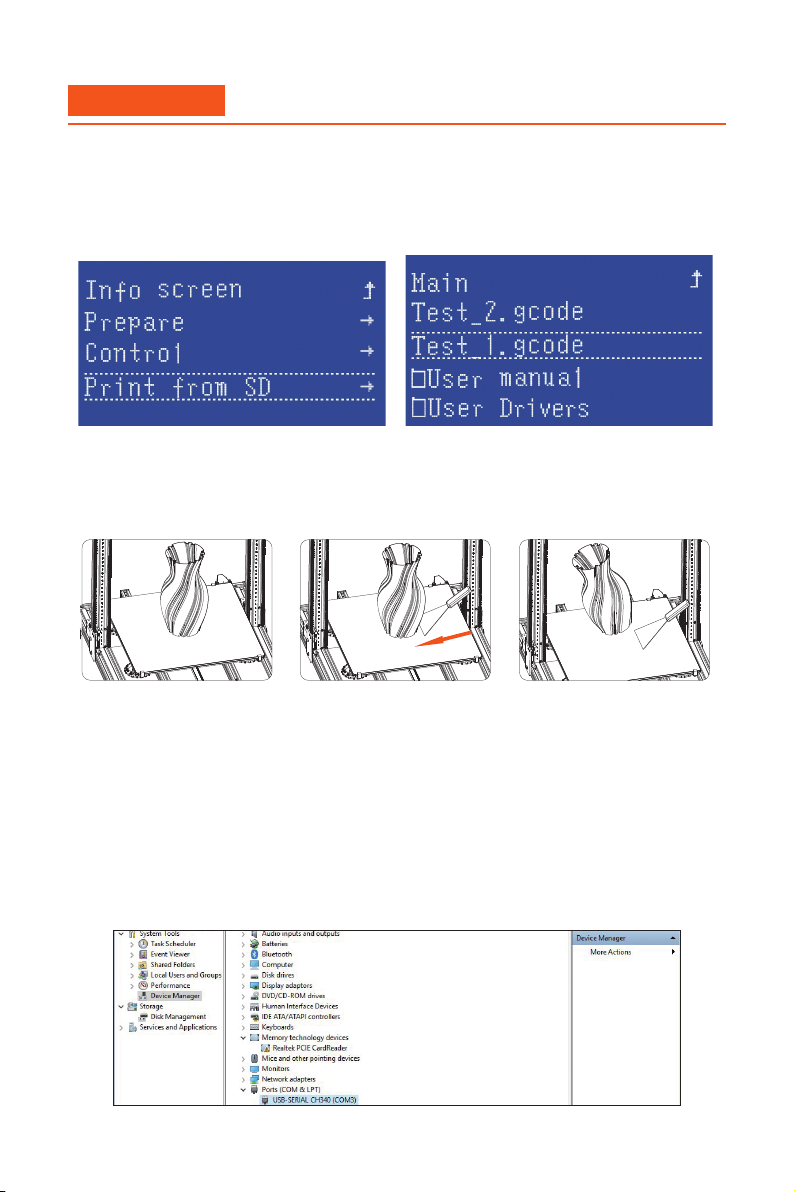
After downloading and installation, you will find the corresponding serial port in
windows “Device manager”
The printer is now ready to print, we can print the test gcode at rst.
1) You need to insert the SD card to printer.
2) Then click LCD button→Print from SD card→Select “Test_1.gcode”
After test model is complete. You need to learn how to slice till les to be able to
print your own model.
Removing a stuck 3d print from the print surface
Turn the heat o on your heated bed and wait for it to cool. The closer to room
temperature, the easier it will be to remove.
Recommended temperature: Lower than 40°C
5. Printing

10
5.2 Setting your 3D printer
Copy these code to your Start-Gcode area:
1.Open the Cura then add the new printer :
Click “Custom” →“Custom FFF printer” then input your printer name
G28 ;Home
M205 X8.00 Y8.00 Z0.40 E1.50 ; sets the jerk limits
G1 Z10 F1000;
G1 Y-3 F1000;Move Y axis
G1 X100 Z0.2 E6 F1000;lines
G1 X150 E12 F1000;lines
For the End Gcode, you can use the default of the Cura
2.Set the correct values on machine settings
Eryone thinker SE

11
3.Set the correct nozzle size and lament diameter
The printer prole and lament prole is on your SD card. :Proles\Cura 4.0\
Or this link: http://dwz1.cc/a2BtbPv
4.Import the printer prole
5.Import the lament prole to Cura:

12
Click this icon to import the stl le
When you import the stl le nished, you need to adjust your model.
Move your model:
Left click the model→Click the arrow to adjust your model
Red arrow is X axis,Green arrow is Y axis,Blue arrow is Z axis
5.3 Load printing model
5.4 Slice the model
If you nd the model is too small or too big
You can click this icon to scaling your model:
Scale
Eryone thinker SE

13
Power on your 3d printer at rst. Insert the SD card into the printer then click LCD
button.Click the menu “Print from SD card “ and choose the le you saved. When
the printer is up to temperature the print will begin.
5.5 Printing via SD card
If you nd that the model is not placed well. Then you can click rotation icon to
adjust it.
After that, you can click the slice icon and you can save it to SD card
Rotation

14
This section is for LCD layout. Items not mentioned below are not used for the
common print setup-you should not change any of the unmentioned items unless
you are absolutely sure what you are doing.
(The LCD layout based on the latest rmware) Please click the link below to get
the latest rmware: http://dwz1.cc/1obP362
□ Info screen
□ Prepare
□ Move axis
□ Move X
□ Move Y
□ Move Z
□ Auto home
□ Store settings
□ Set Home osets
□ Disable steppers
□ Change lament
□ Preheat PLA
□ Preheat PLA End
□ Preheat PLA Bed
□ Preheat ABS
□ Preheat ABS End
□ Preheat ABS Bed
□ Control
□Temperature
□ Nozzle
□ Bed
□ Fan Speed 1 :
□ Fan Speed 2 :
□ Fan Speed 3 :
□ Auto temp
□ MIN
□ Max
□ Fact
□ PID-P
□ PID-I
□ PID-D
□ Preheat PLA conf
□ Preheat ABS conf
6. LCD layout

15
□ Motion
□ Velocity
□ Acceleration
□ Jerk
□ Steps/mm
□ Filament
□ E in mm3
□ Unload mm
□ Load mm
□ Store settings
□ Load settings
□ Restore failsafe
□ Initialize EEPROM
□ Print from SD
7. Special Function of Eryone Thinker SE
We choose TMC2208 as stepper motor driver and quite fans but powerful which
dramatically decreases the noise and improve the printing quality as well. The av-
erage operational noise is 49dBA, working aside the 3D printer is not only
a dream.
The base and gantry of this 3D printer have been pre-assembled, what you need
to do is put those two parts together and wire a few interfaces.
The printing volume is 300*300*400mm, with carefully-selected components, after
3 steps installation, the printer will be printing pretty well, almost no need to
calibrate.
Super quiet
Assembly nished within 10 minutes
Large Volume and high quality
Power failure resume feature: Built-in supercapacitor and circuit designing, the
mainboard will store the height value of Z-axis when the power o. When the pow-
er system resume, the printer can resume the print.
Power failure protection
16
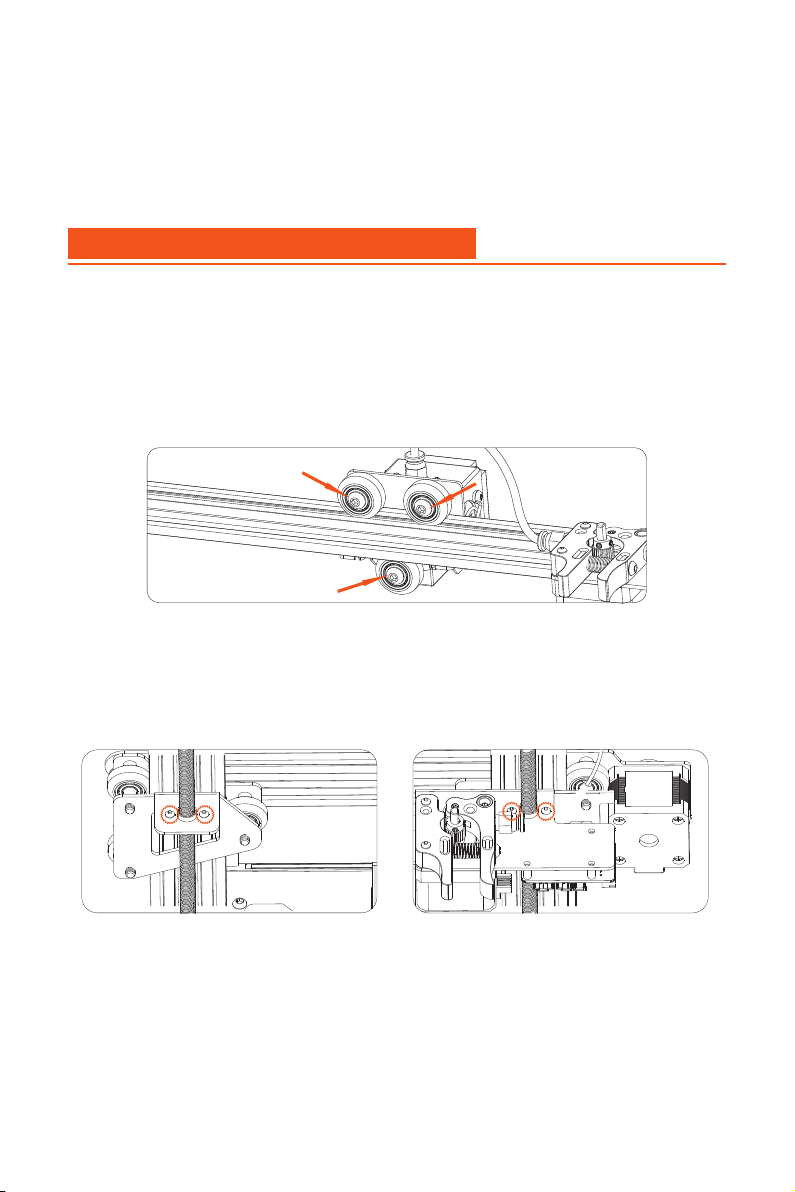
8. FAQ-Common Assembly issues
If you nd your X carriage is loose. You can use the wrench to tight the nut and
this will remove wobble and slack in the X carriage.
Refer to our forum to get more info if the problem is not listed or the solutions
doesn’t work : https://eryone.com/forum
1) Check if the stepper motor cable is loose
2) You need to check your wires at rst. If it is ok, you can loosen the brass nut
screw a little, this will help it move correctly.
3) Add the lubricant oil to the T8 rod
With pre-designed interface for BLtouch and proximity switch, update Eryone
Thinker SE rmware to enable the auto-leveling function is easily.
8.1 X carriage loose
8.2 Z axis stuck
Compatible with auto-leveling sensors(Not included sensor)

17
10.FAQ-Error messages
The mintemp error occurs when at least one of the temperature readouts of the
hotend or the heated bed drops below 5°C. It is a safety feature which prevents
the printer from overheating in case of a fault.
If you nd this info occurs on your LCD, you can:
1) Check your thermistor wires are tight inserted to the correct port
2) Check your thermistor wires are damaged or not
The maxtemp error occurs when at least one of the temperature readouts of the
hotend or the heated bed more than the limit values.
Check if the thermistor cable is not damaged and look for any overtightened zip-
ties around the cables leading to the electronics board.
Please click to this link to get the guide: http://dwz1.cc/DSeUTP3
(Package doesn’t include the sensor,you can purchase it by yourself)
This error occurs when the temperature of he hotend or heated bed can’t be raise
to the correct temperature and has been heating for a long period. The rmware
protect feature will activate and error will appear on the LCD.
1) You can add the silicone sock to the heated block
2) You need to check your cable is tight and not damaged.
It is an common issue for all FDM 3d printer. You can try to:
1) Check your lament moving or not;
2) Check your lament temperature is correct;
The dierent PLA lament brands have dierent required temperatures, you should
refer to this then re-slice if needed;
3) Clean the hotend with cleaning needle
Preheat the hotend to 240°C(You can click the LCD button then choose ”Preheat
ABS End” )
10.1 Mintemp error
10.2 Maxtemp error
*.Add the auto level sensor
10.3 Thermal runaway
9.2 Extruder under extrusion
It is a common issue for newcomer. Check your lament type at rst.Then re-level
your heated bed (Refer to the chapter 4.2), you can also use the “Z babystep fea-
ture”.When it is printing, double click LCD button→tune the distance between the
nozzle and heated bed
9. FAQ-Print problem
9.1 Filament doesn’t stick to the heated bed

You can feel free to contact us via
Shenzhen Eryone Technology Co., Ltd.
Facebook:
https://www.facebook.com/groups/247271792709370
Youtube:
https://www.youtube.com/c/Eryone3D
Email:
2F, building B, Hongwan Technology Park, Gushu community Bao`an District,
Shenzhen city, Guangdong Province, China
Table of contents
Other Eryone 3D Printer manuals


