ESBE TPH114 Series User manual

- ITALIANO -
THW01B0001EV 027284 150716 1
CRONOTERMOIGROSTATO DIGITALE SETTIMANALE A BATTERIE
GENERALITÀ
Questo dispositivo è un cronotermoigrostato digitale a batterie
settimanale per il controllo della temperatura ambiente e dell’umidità
relativa su tre livelli: Comfort, Ridotto o Off/Antigelo.
ll dispositivo può essere impiegato sia in impianti di riscaldamento che
raffrescamento.
Il cronotermoigrostato è dotato di un ampio display retroilluminato per
la visualizzazione di tutte le indicazioni funzionali, il programma orario
impostato, la temperatura ambiente rilevata, l’umidità relativa rilevata
o, a scelta, dell’ora corrente.
Offre la possibilità di impostare no a 7 programmi distinti, uno per
ogni giorno della settimana, con tempo di intervento minimo di 1/2 ora
nell’arco delle 24 ore.
Inoltre il dispositivo offre la possibilità di impostare il valore della
temperatura di Antigelo, il controllo del punto di rugiada e la
regolazione dell’Offset del sensore.
MESSA IN FUNZIONE
Alla prima messa in funzione:
- Inserire le pile rispettando le polarità indicate nell’apposito vano
(vedi paragrafo ‘INSERIMENTO/SOSTITUZIONE BATTERIE’).
- Regolare l’ora ed il giorno della settimana corrente.
- Impostare la modalità di funzionamento del cronotermoigrostato
(parametro utente ‘ H-C ’): Riscaldamento (impostato in fabbrica) o
Raffrescamento.
Regolazione ora e giorno corrente
Per regolare l’orologio del cronotermoigrostato eseguire le seguenti
operazioni:
1. Aprire lo sportellino che da’ accesso al vano pile.
2. Tenere premuto per almeno 2 secondi il pulsante ‘OK’, le cifre
dell’ora lampeggiano.
3. Regolare l’ora con i tasti ‘ ’ e ‘ ’.
4. Confermare con ‘OK’, le cifre dei minuti lampeggiano.
5. Regolare i minuti con i tasti ‘ ’ e ‘ ’.
6. Confermare con ‘OK’; il display visualizza la scritta ’dAY’ ed il
quadratino relativo al giorno della settimana corrente lampeggia.
7. Regolare il giorno della settimana corrente con i tasti ‘ ’ e ‘ ’
(il giorno corrente viene evidenziato con un quadratino attorno al
numero corrispondente al giorno della settimana, 1 Lunedi’ .. 7
Domenica )
8. Confermare con ‘OK’; l’uscita dalla regolazione dell’ora e del giorno
è automatico.
Visualizzazione Ora / Temperatura / Umidità
Premendo ciclicamente il pulsante ‘ ‘ si possono visualizzare sul
display alternativamente l’ora corrente, la temperatura ambiente (in
°C) rilevata dal sensore interno, contradistinta dall’icona ‘ ‘, la
temperatura ambiente (in °C) rilevata dalla sonda remota (se collegata)
contradistinta dall’icona ‘ ‘ e l’umidità ambiente (in %RH) rilevata
dal sensore interno, contradistinta dall’icona ‘ ‘.
Le temperature e l’umidità rilevate vengono visualizzate corrette dal
valore di Offset impostato.
Nota: Nel caso in cui il parametro ‘ rEG ‘ sia stato impostato su
‘In ‘, ma viene rilevato un’errore sul sensore interno, il display
visualizzerà la scritta ‘ SEnS E xx ‘.
In questa situazione la regolazione verrà automaticamente
interrotta ed entrambi i relè verranno posti in posizione
Normalmente Aperta.
Nel caso in cui il parametro ‘ rEG ‘ sia stato impostato su ‘ Out
‘ ma la sonda remota non è stata collegata o è danneggiata il
display visualizzerà rispettivamente la scritta ‘ SEnS OPEN ‘
oppure ‘ SEnS SHrt ‘ con l’icona ‘ ‘ accesa.
ATTENZIONE: Il cronotermoigrostato, al ne di ottimizzare la
durata delle batterie, effettua la lettura dei sensori e i controlli
di errore ogni 3 minuti o alla pressione del tasto ‘Ok’ e di
conseguenza, decide l’attivazione o disattivazione del relè.
L’eventuale indicazione di errore deve scomparire entro 3 minuti
o alla pressione del tasto ‘Ok’. Se l’indicazione non scompare
allora sono stati rilevati dei problemi sui sensori.
Regolazione temperatura/umidità di Comfort e Riduzione
Durante il normale funzionamento il display visualizza la temperatura
e l’umidità ambiente rilevata e l’icona relativa alla modalità di
regolazione corrente ‘ ‘ oppure ‘ ‘.
Il cronotermoigrostato rileva la temperatura ambiente dal sensore
interno oppure esterno (a seconda dell’impostazione effettuata nel
parametro utente ‘ rEG ‘), mentre la rilevazione dell’umidità avviene solo
sul sensore interno.
L’icona ‘ ‘ lampeggiante indica che la regolazione (temperatura o
umidità) avviene sul sensore interno, mentre l’icona ‘ ‘ lampeggiante
indica che la regolazione (solo temperatura) avviene sulla sonda remota.
L’attivazione del relè che controlla il sistema per la gestione della
umidità ambiente è segnalata sul display mediante l’accensione
dell’icona ‘ ‘.
L’attivazione del relè che controlla il sistema per la gestione del
riscaldamento/raffreddamento ambiente è segnalata sul display
mediante l’accensione dell’icona ‘ ’ per il riscaldamento e dell’icona
‘ ’ per il raffreddamento.
Per la regolazione procedere come segue:
- Visualizzare l’ora corrente.
- Premere una sola volta il tasto ‘ ’ o ‘ ’: il display visualizza la
temperatura di comfort impostata (contraddistinta dall’icona ‘ ‘)
e l’icona ‘SET °C‘ (a indicare che si sta visualizzando la temperatura
di setpoint).
- Premere i tasti ‘ ’ e ‘ ’ per modicare la temperatura di
setpoint visualizzata.
- Premere il tasto ‘ ‘; il display visualizza la temperatura di
riduzione impostata (contraddistinta dall’icona ‘ ‘) e l’icona ‘SET
°C‘ (a indicare che si sta visualizzando la temperatura di setpoint).
- Premere i tasti ‘ ’ e ‘ ’ per modicare la temperatura di
setpoint visualizzata.
- Premere il tasto ‘ ‘; il display visualizza l’umidità di comfort
impostata (contraddistinta dall’icona ‘ ‘) e l’icona ‘SET %RH‘ (a
indicare che si sta visualizzando l’umidità di setpoint).
- Premere i tasti ‘ ’ e ‘ ’ per modicare l’umidità di setpoint
visualizzata.
- Premere il tasto ‘ ‘; il display visualizza l’umidità di riduzione
impostata (contraddistinta dall’icona ‘ ‘) e l’icona ‘SET %RH‘ (a
indicare che si sta visualizzando l’umidità di setpoint).
- Premere i tasti ‘ ’ e ‘ ’ per modicare l’umidità di setpoint
visualizzata.
- Premere il tasto ‘ ‘ oppure dopo alcuni secondi di inattività, il
display ritorna a visualizzare la temperatura ambiente memorizzando
i valori impostati.
Nota: Normalmente, per avere la regolazione notturna, la
temperatura / umidità di riduzione dovranno avere un valore
inferiore a quella di comfort.
Il cronotermoigrostato effettuerà la regolazione della temperatura
ambiente in modalità di comfort o riduzione in accordo con il
programma orario impostato (vedere paragrafo ‘IMPOSTAZIONE
PARAMETRI UTENTE‘).
Controllo del punto di rugiada
Il punto di rugiada (gestito nel parametro utente ‘ C-dP ’), rappresenta
la temperatura al di sotto della quale si verica la formazione di
condensa sulle superci e dipende dalla temperatura e umidità
presente in ambiente.
ATTENZIONE
- Il controllo del punto di rugiada è attivo solo se il parametro
utente ‘ C-dp ’ (controllo del Punto di Rugiada) è stato attivato.
- Il controllo del punto di rugiada viene gestito solo in modalità di
raffreddamento e/o deumidicazione.
- Se sono vere le condizioni sopra elencate, il comando del
raffreddatore e del deumidicatore, in base al punto di rugiada,
avranno la priorità rispetto alla normale regolazione (ovvero con il
controllo del punto di rugiada disabilitato).
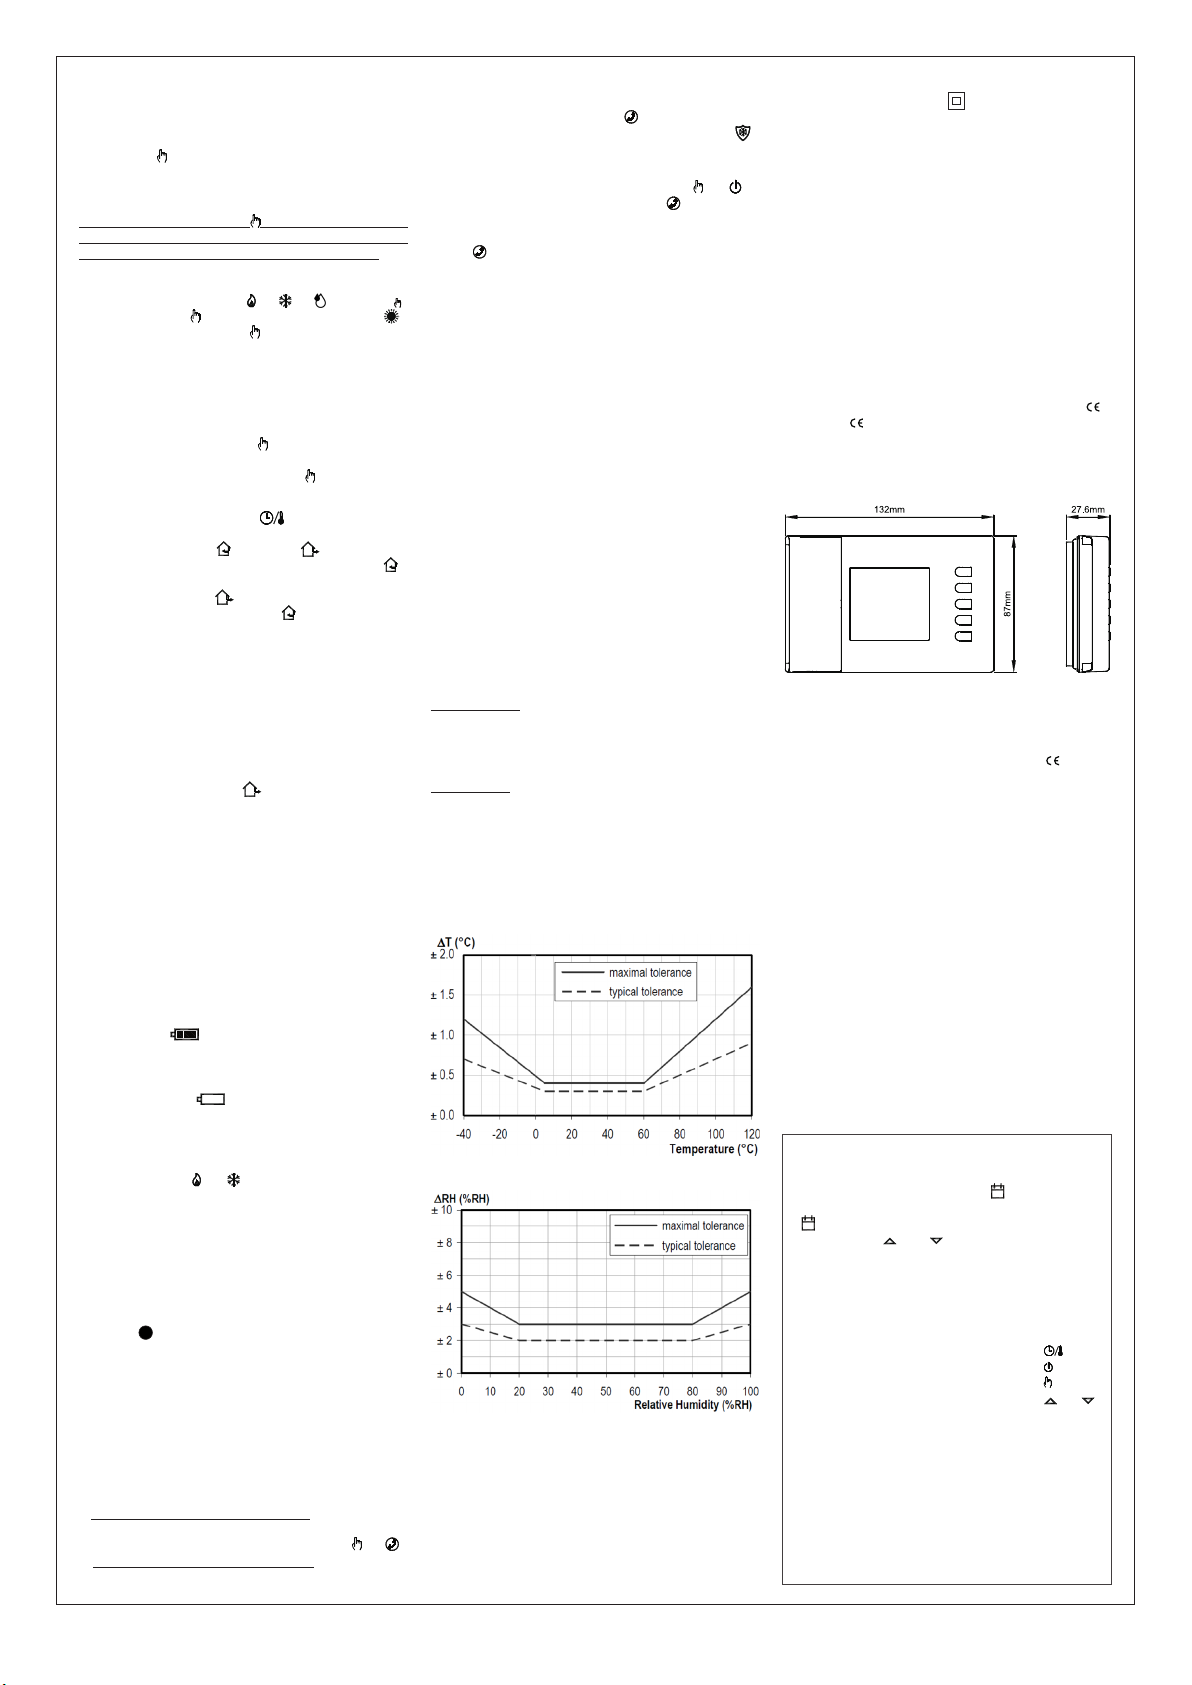
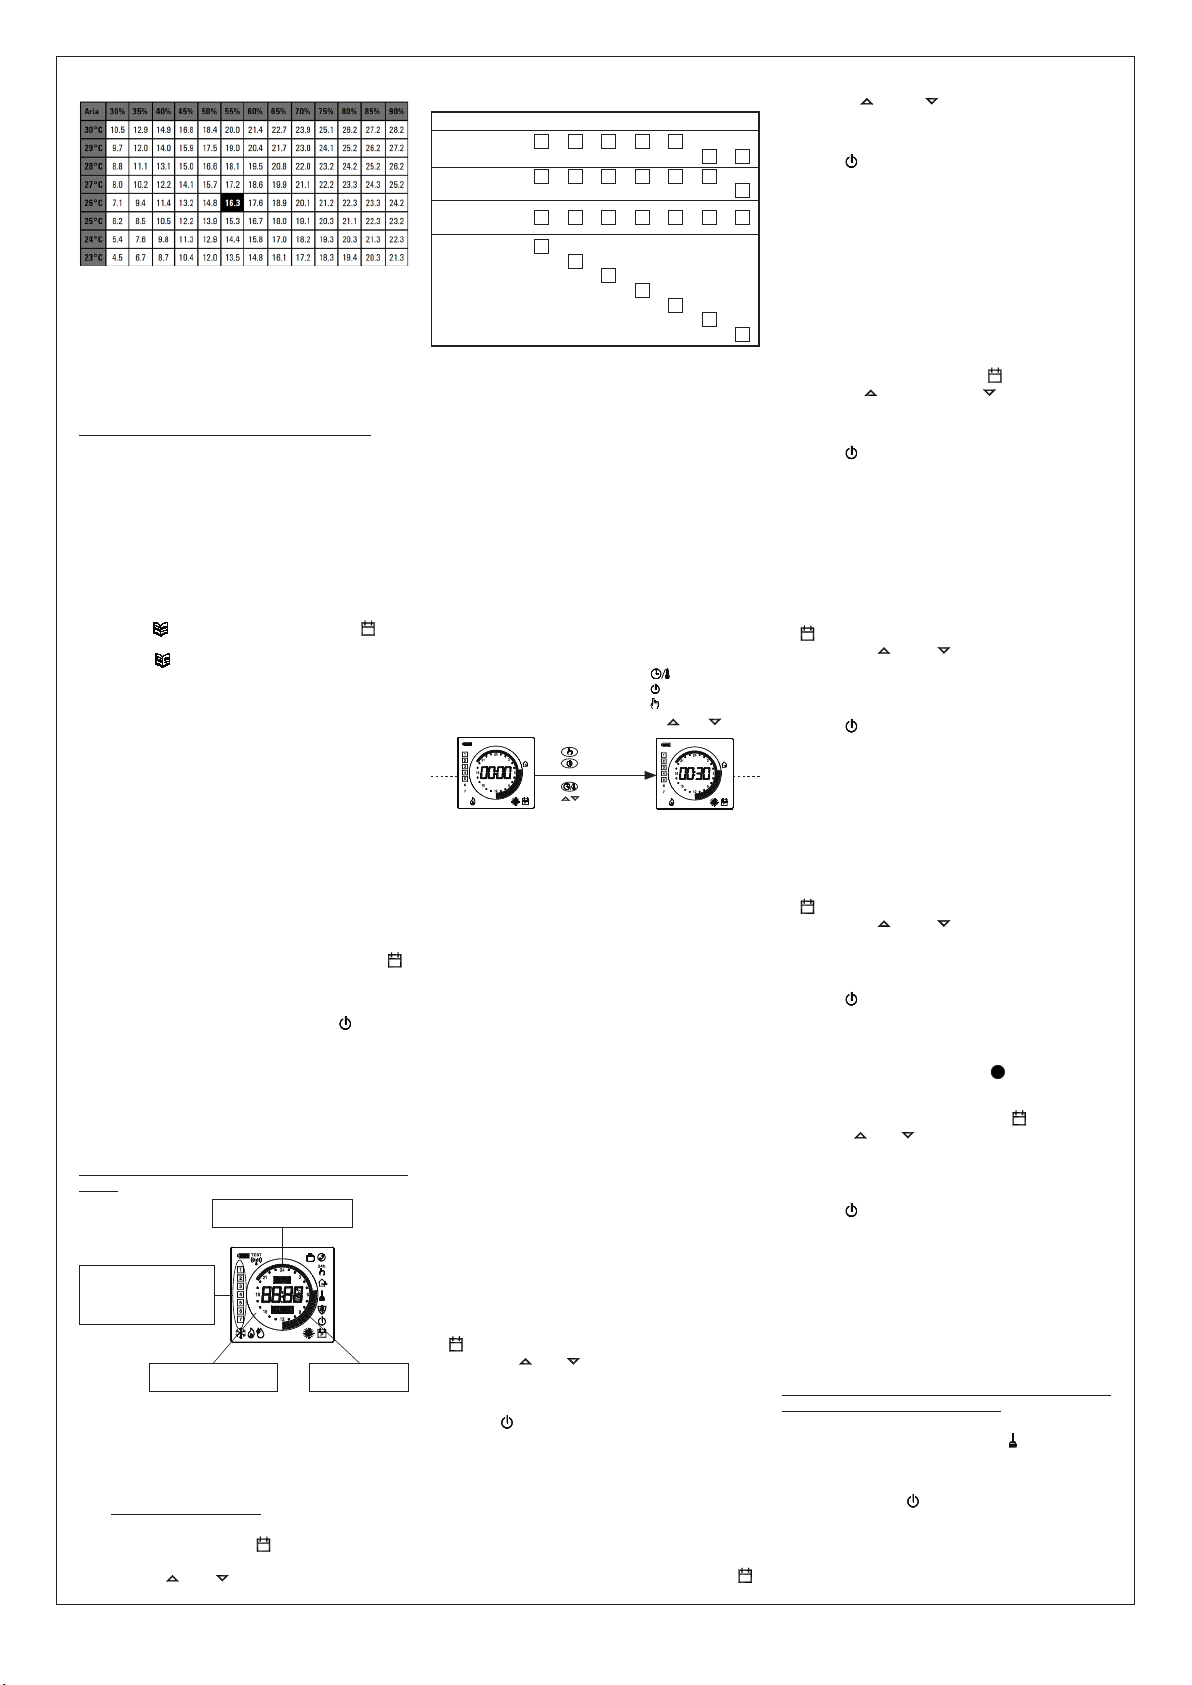
Nella tabella sottostante (tabella 1) viene mostrato il valore del punto
di rugiada (espresso in °C), in funzione della Temperatura ambiente e
dell’Umidità Relativa, espressa in ‘%RH’.
Tabella 1
Nota: il punto di rugiada, evidenziato nella tabella, si riferisce alle
condizioni ambientali considerate come ottimali in estate:
Punto di rugiada = 16.3°C, con temperatura ambiente pari a
26.0°C, e umidità ambiente pari a 55.0%RH.
ATTENZIONE
- Sulle superci con temperatura minore o uguale a quella del
punto di rugiada calcolato C-dP, si formerà la condensa.
- Ilcalcolodelpunto di rugiadavieneeffettuatoautomaticamente
dall’apparecchio al variare delle condizioni ambientali.
Per tutti i dettagli vedere il paragrafo “ ‘C-dP’ GESTIONE DEL
PUNTO DI RUGIADA “.
Algoritmo Safety Control
Mediante l’algoritmo “Safety Control” vengono gestiti i due relè per il
controllo del termostato e dell’igrostato.
L’algoritmo consente di non attivare simultaneamente i due relè, al ne
di non gravare sulla linea elettrica in fase di avvio (spunto) dei sistemi
per il controllo della temperatura e della umidità.
In pratica l’attivazione viene gestita in maniera tale da non avere
sovrapposizioni nell’attivazione dei due comandi.
IMPOSTAZIONE PARAMETRI UTENTE
Per entrare nella regolazione dei parametri del cronotermoigrostato,
procedere come segue:
1. Premere il tasto ‘ ‘; il display visualizzerà l’icona ‘ P‘ (in basso
a destra) e la scritta ‘ PrOG ‘.
2. Premere ripetutamente il tasto ‘ ‘ per scorrere tra i parametri utente:
Impostazione Programma Orario ‘ PrOG ’
Impostazione Antigelo ‘ AFr ’
Impostazione Differenziale ‘ HYS ’
Impostazione Funzione di Ottimizzazione ‘ OPt ’
Impostazione Offset del sensore interno ‘ OFS1 ’
Impostazione Offset della sonda remota ‘ OFS2 ’
Impostazione Sonda di regolazione ‘ rEG ’
Impostazione programma Pulizie ‘ CLE ’
Impostazione programma Vacanze ‘ HOL ’
Impostazione riscaldamento o raffrescamento ‘ H-C ’
Impostazione isteresi igrostato ‘ HYH ’
Impostazione Offset del sensore di umidità ‘ OFSH ’
Impostazione Deumidicazione o Umidicazione ‘ dE-H ’
Controllo del punto di rugiada ‘ C-dp ’
Cadenza di attivazione del controllo del punto di rugiada ‘ Cndp ’
Contatore delle ore di accensione del termostato ‘ Cntr ’
Impostazione dati di Default ‘ dFLt ’
3. Premere il tasto ‘OK’ per entrare in modica del parametro
selezionato; l’icona ‘ P‘ lampeggia.
4. Congurare i dati relativi ad ogni singolo parametro, come illustrato
nel seguito.
5. Per uscire dalla programmazione dei parametri utente, premere il
tasto ‘ ’ oppure attendere 10 secondi senza premere alcun tasto.
‘ PrOG ‘: IMPOSTAZIONE PROGRAMMA ORARIO
Normalmente la fascia circolare di trattini del display mostra
la modalità di funzionamento (Comfort, riduzione, Off/antigelo)
del cronotermoigrostato, mentre la fascia verticale di sinistra
mostra il giorno della settimana corrente (1 Lunedì .. 7 Domenica)
evidenziato con un quadratino attorno al numero a cui si riferisce la
programmazione.
Per facilitare l’operazione di programmazione è sufciente ricordare
la seguente regola:
Modalità di riduzione:
un trattino acceso (interno).
Modalità di comfort:
due trattini accesi.
Modalità spento / antigelo:
nessun trattino acceso.
Giorni della settimana:
1 Lunedì .. 7 Domenica.
Il quadratino indica il giorno
o il gruppo di giorni corrente.
Per impostare il programma orario proseguire come descritto nel
seguito.
Nota: Si uscirà dalla regolazione senza memorizzare il
programma impostato se per più di 10 secondi non si
preme alcun tasto, oppure confermando in sequenza le
impostazioni mediante il pulsante ‘OK’ senza effettuare
alcuna modica.
1. Selezionare il parametro ‘PrOG’ e premere il tasto ‘OK’: il display
visualizza la scritta ‘dAy’, l’icona ‘ P‘ ed i quadratini corrispondenti
al giorno o al gruppo di giorno lampeggianti.
2. Premere i tasti ‘ ’ e ‘ ’ per impostare la combinazione di giorni
da programmare.
Di seguito vengono elencate le quattro combinazioni disponibili:
ESBE Series TPH114

- ITALIANO -
THW01B0001EV 027284 150716 2
temperatura ambiente, qualora non sia stato abilitato il parametro
utente ‘ C-dP ‘ (punto di rugiada).
Per regolare il differenziale eseguire le seguenti operazioni:
1. Selezionare il parametro ‘ HYS ’ e premere il tasto ‘ OK ’.
2. Il display visualizza la temperatura precedentemente impostata e
l’icona ‘ P‘ lampeggiante.
3. Premere i tasti ‘ ‘ e ‘ ‘ per modicare il valore (compreso
tra 0.1°C .. 5.0°C); ogni modica viene memorizzata
automaticamente.
4. Per ritornare alla lista dei parametri utente, premere il tasto ‘ OK ’.
5. Per uscire dall’impostazione dei parametri utente e ripristinare il
normale funzionamento, premere il tasto ‘ ‘ oppure attendere 10
secondi senza premere alcun tasto.
‘OPt’ IMPOSTAZIONE FUNZIONE DI OTTIMIZZAZIONE
La funzione di ottimizzazione consiste nella possibilità di attivare
il riscaldamento o raffrescamento in anticipo rispetto all’orario
programmato, in modo da ottenere all’orario programmato la
temperatura impostata.
In sostanza il cronotermoigrostato calcola il tempo necessario all’ambiente
per raggiungere la temperatura desiderata e, di conseguenza, anticipa
l’accensione programmata del tempo necessario per raggiungere lo scopo.
L’anticipo viene calcolato in base al gradiente medio delle ultime
24 ore con un massimo di 60 minuti di anticipo.
Per regolare la funzione di ottimizzazione eseguire le seguenti operazioni:
1. Selezionare il parametro ‘OPt’ e premere il tasto ‘OK’.
2. Il display visualizza ‘ on ‘ oppure ‘ Off ‘e l’icona ‘ P‘ lampeggiante.
3. Premere i tasti ‘ ‘ per attivare (on) o ‘ ‘ per disattivare (Off) la
funzione; ogni modica viene memorizzata automaticamente.
4. Per ritornare alla lista dei parametri utente, premere il tasto ‘ OK ’.
5. Per uscire dall’impostazione dei parametri utente e ripristinare il
normale funzionamento, premere il tasto ‘ ‘ oppure attendere 10
secondi senza premere alcun tasto.
‘OFS1’ IMPOSTAZIONE OFFSET DEL SENSORE DI
TEMPERATURA INTERNO
Tramite questo parametro è possibile correggere la temperatura
rilevata dal sensore interno, di ±5°C, in modo da correggere eventuali
errori sistematici di lettura dovuti ad un eventuale posizionamento
del cronotermoigrostato in zone inadatte a rilevare la temperatura
dell’ambiente. Il dispositivo esce dalla fabbrica con l’Offset impostato
a 0.0°C.
Per regolare la temperatura di Offset del sensore interno eseguire le
seguenti operazioni:
1. Selezionare il parametro ‘ OFS1 ’ e premere il tasto ‘ OK ’.
2. Il display visualizza la temperatura di Offset precedentemente
impostata e l’icona ‘ P‘ lampeggiante.
3. Premere i tasti ‘ ‘ e ‘ ‘ per modicare il valore (compreso
tra -5.0°C .. +5.0°C); ogni modica viene memorizzata
automaticamente.
4. Per ritornare alla lista dei parametri utente, premere il tasto ‘ OK ’.
5. Per uscire dall’impostazione dei parametri utente e ripristinare il
normale funzionamento, premere il tasto ‘ ‘ oppure attendere 10
secondi senza premere alcun tasto.
‘OFS2’ IMPOSTAZIONE OFFSET DELLA SONDA DI
TEMPERATURA REMOTA
Tramite questo parametro è possibile correggere la temperatura
rilevata dalla sonda remota, di ±5°C, in modo da correggere eventuali
errori sistematici di lettura dovuti ad un eventuale posizionamento della
sonda remota in zone inadatte a rilevare la temperatura dell’ambiente.
Il dispositivo esce dalla fabbrica con l’Offset impostato a 0.0°C.
Per regolare la temperatura di Offset della sonda remota eseguire le
seguenti operazioni:
1. Selezionare il parametro ‘ OFS2 ’ e premere il tasto ‘ OK ’.
2. Il display visualizza la temperatura di Offset precedentemente
impostata e l’icona ‘ P‘ lampeggiante.
3. Premere i tasti ‘ ‘ e ‘ ‘ per modicare il valore (compreso
tra -5.0°C .. +5.0°C); ogni modica viene memorizzata
automaticamente.
4. Per ritornare alla lista dei parametri utente, premere il tasto ‘ OK ’.
5. Per uscire dall’impostazione dei parametri utente e ripristinare il
normale funzionamento, premere il tasto ‘ ‘ oppure attendere 10
secondi senza premere alcun tasto.
‘rEG’ IMPOSTAZIONE SONDA DI REGOLAZIONE
Con questo parametro si denisce se la sonda da usare per la regolazione
della temperatura ambiente è quella interna al cronotermoigrostato
oppure quella remota collegata al connettore ‘ B‘ di Fig. 6.
Per impostare questo parametro eseguire le seguenti operazioni:
1. Selezionare il parametro ‘ rEG ’ e premere il tasto ‘ OK ’.
2. Il display visualizza ‘ In ‘ oppure ‘ Out ‘ e l’icona ‘ P‘ lampeggiante.
3. Premere i tasti ‘ ‘ e ‘ ‘ per modicare il valore (In: sensore
interno - Out: sonda remota); ogni modica viene memorizzata
automaticamente.
4. Per ritornare alla lista dei parametri utente, premere il tasto ‘ OK ’.
5. Per uscire dall’impostazione dei parametri utente e ripristinare il
normale funzionamento, premere il tasto ‘ ‘ oppure attendere 10
secondi senza premere alcun tasto.
ATTENZIONE: Se la sonda di regolazione è impostata sulla
sonda esterna ‘ Out ‘, in caso di guasto o assenza della sonda, la
regolazione della temperatura verrà automaticamente spostata
sulla sonda interna, pur rimanendo il parametro impostato su
‘ Out ‘.
‘CLE’ IMPOSTAZIONE PROGRAMMA PULIZIE
Questo programma è particolarmente utile quando vengono fatte le
pulizie e si aprono le nestre rendendo inutile sia il riscaldamento che il
raffreddamento dei locali. In queste condizioni entrambi i relè vengono
bloccati in Off per un periodo pari a due ore.
Nota: L’accesso al programma pulizie, NON è consentito quando è
attivo il ‘ programma vacanze ‘.
Per attivare il programma pulizie selezionare il parametro ‘ CLE ’ e
premere il tasto ‘ OK ’: sul display compare l’icona ‘ ‘ lampeggiante
e, al posto dell’orologio, viene visualizzato il tempo mancante al
ripristino del normale funzionamento.
Si ritorna alla precedente modalità di funzionamento dopo due ore
oppure effettuando una nuova pressione del tasto ‘ ’.
‘HOL’ IMPOSTAZIONE PROGRAMMA VACANZE
Nel caso in cui si desideri assentarsi per un periodo relativamente
lungo è consigliabile attivare il Programma Vacanze che permette di
sospendere il modo attivo di funzionamento per il numero di ore (da 1
a 95) oppure di giorni (da 4 a 99) desiderato.
Al termine del conteggio, ore oppure giorni, il cronotermoigrostato
si riporterà nel modo di funzionamento precedente l’attivazione del
Programma Vacanze. Durante lo spegnimento, se il dispositivo è stato
impostato in modalità Riscaldamento, sarà comunque sempre attiva
la funzione antigelo e sul display verrà visualizzato il simbolo ‘ ‘ e
il conto alla rovescia del tempo rimanente al termine del programma.
Nota: L’accesso al programma vacanze, NON è consentito quando è
attivo il ‘ programma pulizia ‘.
Per attivare il programma vacanze procedere come segue:
1. Selezionare il parametro ‘ HOL ’ e premere il tasto ‘ OK ’; il display
visualizza il simbolo ‘ ‘, l’indicazione ‘ h 00 ‘ e l’icona ‘ P‘
lampeggiante.
2. Premere i tasti ‘ ’ e ‘ ’ per regolare il tempo di vacanza; ogni
modica viene memorizzata automaticamente.
Fino a 95 ore la programmazione è indicata in ore e il display mostrerà
‘ h XX ‘. Superando tale valore si passerà automaticamente alla
programmazione del tempo di vacanze in giorni e il display mostrerà
‘ d XX ‘. Sarà possibile incrementare o decrementare l’ora o il giorno
di una unità alla volta, con valori compresi tra 1 .. 95 ore e 4 .. 99
giorni.
3. Per attivare il programma vacanze per il tempo impostato, premere
nuovamente il pulsante ‘ OK ’ oppure attendere 10 secondi senza
premere alcun tasto; il display visualizza l’icona ‘ ’ lampeggiante
e il tempo residuo allo scadere del periodo di vacanza.
Se non è stato impostato il tempo di durata delle vacanze (h:00),
si uscirà dalla regolazione e si tornerà al normale funzionamento
premendo il tasto ‘ OK ’ oppure ‘ ‘ oppure attendendo 10 secondi
senza premere alcun tasto.
4. Per uscire dalla funzione vacanza e ripristinare il normale
funzionamento, premere il tasto ‘ ‘.
‘H-C’ IMPOSTAZIONE RISCALDAMENTO/RAFFRESCAMENTO
Questa impostazione consente di invertire la logica di funzionamento
del relè del termostato a seconda che si stia pilotando un dispositivo di
riscaldamento o di raffrescamento.
ATTENZIONE:
- Modicando la logica di funzionamento del relè, i valori dei
setpoint verranno automaticamente riportati ai valori di
default per la modalità impostata.
- Il cronotermoigrostato esce dalla fabbrica impostato in
modalità di riscaldamento.
Per modicare la logica di funzionamento deve essere seguita la
seguente procedura:
1. Selezionare il parametro ‘ H-C ’ e premere il tasto ‘ OK ’; il display
visualizza la modalità di regolazione corrente e l’icona ‘ P‘
lampeggiante.
2. Premere i tasti ‘ ’ e ‘ ’ per selezionare la modalità di regolazione
desiderata; ogni modica viene memorizzata automaticamente.
‘ HEAt ‘: Riscaldamento
‘ COOL ‘: Raffrescamento
3. Per ritornare alla lista dei parametri utente, premere il tasto ‘ OK ’.
4. Per uscire dall’impostazione dei parametri utente e ripristinare il
normale funzionamento, premere il tasto ‘ ‘ oppure attendere 10
secondi senza premere alcun tasto.
Durante il normale funzionamento, l’attivazione della modalità di
riscaldamento viene segnalata dall’icona ‘ ‘ accesa mentre, al
contrario l’attivazione della modalità raffrescamento viene segnalata
dall’icona ‘ ‘ sempre accesa.
‘HYH’ IMPOSTAZIONE DIFFERENZIALE IGROSTATO
L’impostazione di questo parametro consente di denire l’isteresi, in
%RH, che viene applicata al cronotermoigrostato per la regolazione
dell’umidità ambiente, qualora non sia stato abilitato il parametro
utente ‘ C-dP ‘ (punto di rugiada).
Per regolare il differenziale eseguire le seguenti operazioni:
1. Selezionare il parametro ‘ HYH ’ e premere il tasto ‘ OK ’.
2. Il display visualizza il valore precedentemente impostato e l’icona
‘ P‘ lampeggiante.
3. Premere i tasti ‘ ‘ e ‘ ‘ per modicare il valore (compreso
tra 0.5%RH .. 10.0%RH); ogni modica viene memorizzata
automaticamente.
4. Per ritornare alla lista dei parametri utente, premere il tasto ‘ OK ’.
5. Per uscire dall’impostazione dei parametri utente e ripristinare il
normale funzionamento, premere il tasto ‘ ‘ oppure attendere 10
secondi senza premere alcun tasto.
‘OFSH’ IMPOSTAZIONE OFFSET DEL SENSORE DI UMIDITA’
INTERNO
Tramite questo parametro è possibile correggere il valore dell’umidità
(Lu)
II° combinazione
di giorni 7
234561
I° combinazione
di giorni 76
2345
1
2
3
4
5
6
7
1
IV° combinazione
di giorni
(Programma
Giorno per Giorno)
5671234
III° combinazione
di giorni
(Ve)(Gi)(Me)(Ma) (Do)(Sa)
Nota: Per ogni combinazione di giorni, il programma che si
imposterà sarà uguale per tutti i giorni di ogni singolo
gruppo.
3. Premere il tasto ‘ OK ‘ per confermare l’impostazione effettuata; il
display visualizza il programma orario precedentemente impostato per il
giorno o gruppo di giorni impostato e le ore 00.00 (cursore lampeggiante
sull’intervallo compreso tra le ore 00.00 e le ore 00.30).
4. Impostare la modalità di funzionamento.
Peragevolarel’operazionediprogrammazione,ilcronotermoigrostato
esce dalla fabbrica preimpostato con la seguente fascia oraria:
FASCIA ORARIA PREIMPOSTATA
Modalità comfort Modalità riduzione
6.00 .. 8.00 8.00 .. 11.00
11.00 .. 13.00 13.00 .. 17.00
17.00 .. 23.00 23.00 .. 6.00
In alternativa, se la fascia oraria preimpostata non rappresenta
la programmazione desiderata è possibile variarla manualmente
procedendo come segue:
5. Ad ogni intervallo orario (ogni trattino corrisponde a mezz’ora)
impostare la modalità di regolazione premendo uno dei seguenti
tasti:
Modalità di Comfort: Premere il tasto ‘ ‘.
Spento / antigelo: Premere il tasto ‘ ‘.
Modalità di Riduzione: Premere il tasto ‘ ‘.
Spostamento cursore orario: Premere il tasto ‘ ’ o ‘ ‘.
Conferma
Riduzione
Spento
Comfort
Ad ogni pressione del tasto che imposta la modalità di regolazione,
il cursore orario si sposta automaticamente sulla mezz’ora
successiva.
6. Impostato il programma orario per il giorno o per il gruppo di giorni
selezionato, premere il tasto ‘ OK ’.
Il display visualizzerà il programma orario del giorno o dei gruppi di
giorni successivi no a coprire l’intera settimana.
7. Impostato il programma per l’intera settimana, premere il tasto
‘OK’. Il cronotermoigrostato memorizza il programma impostato
e sul display viene visualizzata la scritta ‘MEMO’ e si uscirà
automaticamente dalla regolazione del programma orario.
ATTENZIONE
- Se si desidera riportare la programmazione oraria
all’impostazione di fabbrica, è necessario accedere al
parametro utente ‘dFLt’ (impostazione dati di default); in
questo caso tutti i parametri utente saranno resettati ai
valori impostati in fabbrica.
- Se si esce dalla programmazione oraria senza aver premuto
il tasto ‘OK’, ovvero non si abilita la fase di memorizzazione,
NON verrà effettuata la memorizzazione del programma
orario e verrà reimpostato il programma precedente.
La memorizzazione avviene solo se viene abilitata la fase di
memorizzazione contraddistinta dalla scritta ‘MEMO’.
‘AFr’ IMPOSTAZIONE ANTIGELO
La funzione di Antigelo consente di selezionare una temperatura
minima che viene mantenuta quando il cronotermoigrostato è
spento, in modo tale da preservare l’ambiente e l’impianto qualora la
temperatura ambiente scende al di sotto del valore impostato.
Il dispositivo esce dalla fabbrica con l’antigelo impostato a +3°C.
ATTENZIONE: La funzione è attiva solo se il dispositivo è stato
impostato in modalità Riscaldamento.
Per regolare la temperatura di Antigelo eseguire le seguenti operazioni:
1. Selezionare il parametro ‘AFr’ e premere il tasto ‘OK’.
2. Il display visualizza la temperatura di Antigelo precedentemente
impostata e l’icona ‘ P‘ lampeggiante.
3. Premere i tasti ‘ ‘ e ‘ ‘ per modicare il valore (compreso
tra OFF, 0,5°C..25°C); ogni modica viene memorizzata
automaticamente.
4. Per ritornare alla lista dei parametri utente, premere il tasto ‘ OK ’.
5. Per uscire dall’impostazione dei parametri utente e ripristinare il
normale funzionamento, premere il tasto ‘ ‘ oppure attendere 10
secondi senza premere alcun tasto.
‘HYS’ IMPOSTAZIONE DIFFERENZIALE
L’impostazione di questo parametro consente di denire l’isteresi, in
°C, che viene applicata al cronotermoigrostato per la regolazione della

- ITALIANO -
THW01B0001EV 027284 150716 3
normale funzionamento, premere il tasto ‘ ‘ oppure attendere 10
secondi senza premere alcun tasto.
ATTENZIONE
Quando viene visualizzata la modalità di regolazione ‘d-EF’,
‘d-EC’ o ‘d-FP‘ verrà visualizzato alternativamente il valore del
punto di rugiada (dP) calcolato.
Limitazioni del controllo del punto di rugiada
- Se il controllo del punto di rugiada è attivato in ‘ d-EF ‘ o ‘ d-EC ‘,
il parametro ‘ rEG ‘ (sonda di regolazione della temperatura
ambiente), verrà automaticamente impostato sulla sonda interna.
La temperatura del punto di rugiada verrà calcolata in base alla
temperatura rilevata dalla sonda interna, mentre la temperatura del
softto o del pavimento verrà calcolata sulla sonda esterna.
- Se il controllo del punto di rugiada è attivato in ‘ d-FP ‘ la sonda di
regolazione coinciderà con la sonda interna, mentre la sonda esterna
consentirà solo la visualizzazione della temperatura rilevata.
- La temperatura del punto di rugiada verrà calcolata sempre in
base alla temperatura rilevata dalla sonda interna. Accedendo al
parametro ‘ rEG ‘ sul display verrà mostrata l’indicazione ‘ indP ‘ con
l’icona ‘ SET%RH ‘ lampeggiante. Se si vuole modicare la sonda di
regolazione si devono variare le impostazioni del controllo del punto
di rugiada.
- Il controllo del punto di rugiada è attivo solo se l’apparecchio è
impostato su raffreddamento e deumidicazione. In caso contrario non
sarà consentito l’accesso al parametro ‘ C-dP ‘ e verrà visualizzato, al
tentativo di accesso, ‘ nOdP ‘.
- Il controllo del punto di rugiada viene effettuato a intervalli regolari,
in base a quanto impostato nel parametro ‘ cndP ‘, con cadenza da
3 minuti no ad un massimo di 27 minuti.
- Se il controllo del punto di rugiada è attivato, alla ripartenza da uno
stato di OFF, pulizie o vacanze, oppure al cambio del parametro
‘ d-EF ‘, ‘ d-EC ‘ o ‘ d-FP ‘ l’apparecchio ripartirà per 1 minuto con
i relè in posizione NC. al ne di evitare attivazioni repentine. Dopo
verrà attivata la normale regolazione.
Per maggiori dettagli sui parametri interessati al controllo del punto di
rugiada, vedere i paragra successivi.
d-EF’ Controllo del punto di rugiada con sonda esterna su
impianti a pavimento
Se la funzione di controllo del punto di rugiada è attivata, parametro
‘C-dP’ impostato su ‘d-EF’, il cronotermoigrostato controlla i
dispositivi di raffreddamento e deumidicazione in base al confronto
tra il valore della temperatura del punto di rugiada e il valore letto dalla
sonda esterna, applicando le impostazioni della modalità di regolazione
d-EF.
Il seguente graco descrive la modalità di controllo del punto di rugiada.
HYdP
isteresi
PRIORITA’
TERMOSTATO
PRIORITA’
DEUMIDIFICATORE
PRIORITA’
dp raffreddatore
deumidicatore
TE+SMF TE+SMF+ HYdP0 °C
HYdP
isteresi PRIORITA’
dp
dp
Dove:
dP: punto di rugiada (vedere tabella 1).
TE: Temperatura esterna rilevata
SMF: incremento del punto di rugiada impostato nel sottoparametro
‘ d-EF ‘.
HYdP: isteresi del punto di rugiada pari a 0,5°C (non modicabile).
‘d-EC’ Controllo del punto di rugiada con sonda esterna su
impianti a softto metallico
Se la funzione di controllo del punto di rugiada è attivata, parametro ‘C-
dP’ impostato su ‘d-EC’, il cronotermoigrostato controlla i dispositivi
di raffreddamento e deumidicazione in base al confronto tra il valore
della temperatura del punto di rugiada e il valore letto dalla sonda
esterna, applicando le impostazioni della modalità di regolazione d-EC.
Il seguente graco descrive la modalità di controllo del punto di rugiada.
HYdP
isteresi
PRIORITA’
TERMOSTATO
PRIORITA’
DEUMIDIFICATORE
PRIORITA’
dp raffreddatore
deumidicatore
TE+SMC TE+SMC+ HYdP0 °C
HYdP
isteresi PRIORITA’
dp
dp
Dove:
dP: punto di rugiada (vedere tabella 1).
TE: Temperatura esterna rilevata
SMC: incremento del punto di rugiada impostato nel sottoparametro
‘ d-EC ‘.
HYdP: isteresi del punto di rugiada pari a 0,5°C (non modicabile).
‘d-FP’ Controllo del punto di rugiada su punti ssi
Se la funzione di controllo del punto di rugiada, ‘C-dP’, è attivata su ‘d-
FP’, il cronotermoigrostato controlla i dispositivi di raffreddamento
e deumidicazione in base al confronto tra il valore della temperatura
del punto di rugiada calcolato, e i valori di temperatura relativi ai punti
di rugiada impostati nei sottoparametri ‘TF1’, e ‘TF2’.
Il seguente graco descrive la modalità di controllo del punto di rugiada.
HYdP
isteresi OFF
PRIORITA’
TERMOSTATO raffreddatore
deumidicatore
TF10 °C
HYdP
isteresi
PRIORITA’
DEUMIDIFI-
CATORE
dP
TF2
ON
TF1 - HYdP
Dove:
dP: punto di rugiada (vedere tabella 1).
TF1: seconda soglia inferiore del punto di rugiada (espressa in °C).
TF2: prima soglia inferiore del punto di rugiada (espressa in °C).
HYdP: isteresi del punto di rugiada pari a 0,5°C (non modicabile).
Individuata la temperatura del punto di rugiada (tabella 1) che si vuole
rispettare, si andranno ad impostare le soglie ‘TF1’ e ‘TF2’ al ne di
ottenere una regolazione del sistema tale da evitare la formazione di
condensa.
Esempio:
dP > TF1 = entra in funzione il sistema di deumidicazione,
mantenendo attivo il sistema di raffreddamento se
eventualmente già attivato.
Successivamente se si verica la seguente situazione:
dP > TF2 = il sistema di deumidicazione resta attivo, ma viene
disattivato il sistema di raffreddamento.
Questo controllo permette, una volta che il valore di ‘TF2’ viene
impostato inferiormente alla temperatura minima della supercie
raffreddante, di evitare la formazione della condensa sulla supercie
per qualsiasi valore di temperatura ed umidità relativa dell’aria.
ATTENZIONE
- Il massimo valore di ‘TF1’ sarà autolimitato al valore di ‘TF2’
meno 0,2°C.
- Il valore di ‘TF2’ dovrà sempre essere impostato con un valore
inferiore alla temperatura minima raggiunta dalla supercie
raffreddante da controllare o comunque della supercie più
fredda presente in ambiente.
- La differenza tra il valore di ‘TF2’ e la temperatura minima
della supercie più fredda in ambiente andrà valutata, da
personale qualicato, a seconda della tipologia di impianto,
della inerzia termica e delle varie condizioni ambientali.
In genere viene consigliato minimo 1°C per gli impianti a
pavimento e 3°C per il softto metallico.
‘CndP’ Cadenza di attivazione del controllo del punto di rugiada
Mediante questo parametro è possibile impostare il tempo minimo,
espresso in minuti, che deve trascorrere tra due possibili azioni
consecutive dei relè di uscita, a seguito dell’intervento della funzione
‘ c-dP ‘.
Il tempo di intervento è incrementabile a passi di 3 minuti; il tempo
di intervento verrà reinizializzato ad ogni variazione della modalità di
regolazione del punto di rugiada (‘ d-EF ’, ‘ d-EC ’ o ‘ d-FP ‘).
‘Cntr’ CONTATORE ATTIVAZIONE RELE’ DEL TERMOSTATO
Tramite questo parametro è possibile visualizzare il contattore delle
ore di attivazione del relè del termostato relative al giorno corrente.
Allo scadere della mezzanotte del giorno corrente il contatore viene
automaticamente azzerato.
Procedere come segue:
1. Selezionare il parametro ‘ Cntr ’ e premere il tasto ‘ OK ’; il
dispositivo visualizza le ore di attivazione del relè del termostato
alternativamente alla scritta ‘ Cntr ’ + l’icona ‘ P‘.
2. Per ritornare alla lista dei parametri utente, premere il tasto ‘ OK ’.
3. Per uscire dall’impostazione dei parametri utente e ripristinare il
normale funzionamento, premere il tasto ‘ ‘ oppure attendere 10
secondi senza premere alcun tasto.
‘dFLt’ IMPOSTAZIONE DATI DI DEFAULT
Tramite questo parametro è possibile effettuare il reset dei parametri
utente in modo da portare tutti i parametri ai valori di default impostati
in fabbrica.
Procedere come segue:
1. Selezionare il parametro ‘ dFLt ’ e premere il tasto ‘ OK ’; il
dispositivo imposta automaticamente i dati di default ed il display
visualizza la scritta ‘ -dF- ‘ e l’icona ‘ P‘ lampeggiante.
2. Per ritornare alla lista dei parametri utente, premere il tasto ‘ OK ’.
3. Per uscire dall’impostazione dei parametri utente e ripristinare il
normale funzionamento, premere il tasto ‘ ‘ oppure attendere
10 secondi senza premere alcun tasto.
ATTENZIONE!
L’impostazione dei Dati di Default azzererà tutte le
impostazioni fatte dall’Utente, quali ad esempio Programma
Orario, Estate/Inverno, Set-Point e tutti gli altri dati
programmabili.
SPEGNIMENTO - FUNZIONE ANTIGELO
Per disattivare il cronotermoigrostato premere il tasto ‘ ‘.
Il display mostrera’ la scritta ‘ OFF ’.
Se il cronotermoigrostato e’ stato impostato in modalità di
riscaldamento sara’ attiva la funzione antigelo e sul display comparirà
il simbolo ‘ ‘; in tal caso la temperatura ambiente sarà regolata
rilevata dal sensore interno, di ±5%RH, in modo da correggere
eventuali errori sistematici di lettura dovuti ad un eventuale
posizionamento del cronotermoigrostato in zone inadatte a rilevare
l’umidità dell’ambiente. Il dispositivo esce dalla fabbrica con l’Offset
impostato a 0.0%RH.
Per regolare il valore dell’Offset del sensore interno eseguire le
seguenti operazioni:
1. Selezionare il parametro ‘ OFS1 ’ e premere il tasto ‘ OK ’.
2. Il display visualizza il valore dell’Offset precedentemente impostato
e l’icona ‘ P‘ lampeggiante.
3. Premere i tasti ‘ ‘ e ‘ ‘ per modicare il valore (compreso
tra -5.0%RH .. +5.0%RH); ogni modica viene memorizzata
automaticamente.
4. Per ritornare alla lista dei parametri utente, premere il tasto ‘ OK ’.
5. Per uscire dall’impostazione dei parametri utente e ripristinare il
normale funzionamento, premere il tasto ‘ ‘ oppure attendere 10
secondi senza premere alcun tasto.
‘dE-H’ IMPOSTAZIONE DEUMIDIFICAZIONE / UMIDIFICAZIONE
Questa impostazione consente di invertire la logica di funzionamento
del relè dell’igrostato a seconda che si stia pilotando un dispositivo di
deumidicazione o di umidicazione.
ATTENZIONE:
- La funzione di deumidicazione non è attiva in modalità
riscaldamento.
- Modicando la logica di funzionamento del relè, i valori dei
setpoint verranno automaticamente riportati ai valori di
default per la modalità impostata.
- Il cronotermoigrostato esce dalla fabbrica impostato in
modalità di deumidicazione.
Per modicare la logica di funzionamento deve essere seguita la
seguente procedura:
1. Selezionare il parametro ‘ dE-H ’ e premere il tasto ‘ OK ’; il display
visualizza la modalità di regolazione corrente e l’icona ‘ P‘
lampeggiante.
2. Premere i tasti ‘ ’ e ‘ ’ per selezionare la modalità di regolazione
desiderata; ogni modica viene memorizzata automaticamente.
‘ dEUM ‘: Deumidicazione
‘ HUMI ‘: Umidicazione
3. Per ritornare alla lista dei parametri utente, premere il tasto ‘ OK ’.
4. Per uscire dall’impostazione dei parametri utente e ripristinare il
normale funzionamento, premere il tasto ‘ ‘ oppure attendere 10
secondi senza premere alcun tasto.
Durante il normale funzionamento, l’attivazione della modalità di
deumidicazione o di umidicazione viene segnalata dall’icona ‘ ‘
accesa.
‘C-dP’ GESTIONE DEL PUNTO DI RUGIADA
Tramite questo parametro è possibile abilitare / congurare il controllo
del Punto di Rugiada al ne di evitare la formazione della condensa
superciale.
Per impostare questo parametro procedere come segue:
1. Selezionare il parametro ‘ C-dP ’ e premere il tasto ‘ OK ’; il display
visualizza l’impostazione corrente e l’icona ‘ P‘ lampeggiante.
2. Premere i tasti ‘ ’ e ‘ ’ per selezionare la modalità di regolazione
desiderata; ogni modica viene memorizzata automaticamente.
Le modalità di regolazione sono le seguenti:
OFF: Controllo del punto di rugiada disabilitato.
d-EF: Controllo del punto di rugiada con sonda remota su impianti
a pavimento.
d-EC: Controllo del punto di rugiada con sonda remota su softto
metallico.
d-FP: Controllo del punto di rugiada abilitato su punti ssi; la
regolazione può avvenire su sensore interno o sonda remota (da
impostare nel parametro ‘ rEG ’).
Per ogni modalità di regolazione, che attiva la gestione del punto di
rugiada, è possibile modicare l’impostazione di fabbrica proseguendo
come segue:
3. Selezionata la modalità di regolazione adatta al tipo di impianto da
gestire, premere il tasto ‘ OK ’.
4. Premere i tasti ‘ ‘ e ‘ ‘ per modicare il valore; ogni modica
viene memorizzata automaticamente.
Nel caso in cui venga selezionato il parametro ‘ d-FP ‘, premendo il
tasto ‘OK‘, si ha la possibilità di modicare, tramite i tasti ‘ ‘ e ‘
‘, le due soglie per evitare che la temperatura raggiunga il punto
di rugiada:
TF1: seconda soglia inferiore del punto di rugiada (espressa in °C).
TF2: prima soglia inferiore del punto di rugiada (espressa in °C).
Per modicare il valore delle due soglie, selezionare TF1 o TF2 e
premere il tasto ‘ OK ’ e successivamente tramite i tasti ‘ ‘ e
‘ ‘ per modicare il valore; ogni modica viene memorizzata
automaticamente.
Modalità di
regolazione
Eventuali
sottoparametri
Range di
regolazione
OFF - -
d-EF SMF 1.0°C .. 10.0°C
d-EC SMC 1.0°C .. 10.0°C
d-FP
TF1 5.0°C .. 24.8°C
(Limite TF1=TF2-0.2°C)
TF2 5.2°C .. 25.0°C
5. Per ritornare alla lista dei parametri utente, premere il tasto ‘ OK ’
e successivamente il tasto ‘ ‘.
6. Per uscire dall’impostazione dei parametri utente e ripristinare il
- ITALIANO -
THW01B0001EV 027284 150716 4
ISTRUZIONI RAPIDE PER L’IMPOSTAZIONE DEL
PROGRAMMA ORARIO
• Premere il tasto ‘ P ’.
• Il dispaly visualizza ‘ PrOG ’ con l’icona ‘ P‘ accesa.
• Premere il tasto ‘ OK ’; il display visualizza la scritta ‘ dAY ‘, l’icona
‘ P‘ ed i quadratini corrispondenti ai giorni lampeggianti.
• Premere i tasti ‘ ‘ e ‘ ‘ per scegliere una delle quattro
combinazioni di giorni preimpostate.
• Premere il tasto ‘ OK ’ per confermare la scelta effettuata.
• Il display visualizza le ore 00:00 con il relativo trattino, in alto a
sinistra, lampeggiante.
• Premere uno dei seguenti tasti a seconda della modalità di
regolazione della temperatura che si vuole impostare:
Modalità di Comfort: Premere il tasto ‘ ‘.
Spento / antigelo: Premere il tasto ‘ ‘.
Modalità di Riduzione: Premere il tasto ‘ ‘.
Spostamento cursore orario: Premere il tasto ‘ ‘ e ‘ ‘.
Ad ogni pressione del tasto che imposta la modalità di regolazione,
il cursore orario si sposta automaticamente sulla mezz’ora
successiva.
• Impostato il programma orario per il giorno o per il gruppo di giorni
selezionato, premere il tasto ‘ OK ’.
Il display visualizzerà il programma orario del giorno o dei gruppi di
giorni successivi no a coprire l’intera settimana.
• Impostato il programma per l’intera settimana, premere il tasto
‘OK’. Il cronotermoigrostato memorizza il programma impostato
e sul display viene visualizzata la scritta ‘MEMO’ e si uscirà
automaticamente dalla regolazione del programma orario.
Classe di protezione contro le
scosse elettriche: II ( )
Numero di cicli manuali: 1.000
Numero di cicli automatici: 100.000
Tipo di azione: 1CU
Indice di tracking: PTI 175
Situazione di polluzione: 2 (normale)
Categoria di sovratensione: II
Temperatura di funzionamento: 0°C .. +40°C
Temperatura di stoccaggio: -10°C .. +50°C
Limiti di umidità: 20% .. 80% RH non condensante
Contenitore: Materiale: ABS+PC V0 autoestinguente
Colore: Bianco segnale (RAL 9003)
Grigio chiaro (RAL 7035)
Peso: ~ 156 gr.
CLASSIFICAZIONE SECONDO REGOLAMENTO 2013.811.CE
Classe: I
Contributo all’efcienza energetica: 1%
RIFERIMENTI NORMATIVI
Il prodotto è conforme alle seguenti norme (EMC 2004/108/ e
LVD 2006/95/ ):
EN-60730-1 (2011)
EN-60730-2-7 (2010)
EN-60730-2-9 (2010)
DIMENSIONI
GARANZIA
Nell’ottica di un continuo sviluppo dei propri prodotti, il costruttore si
riserva il diritto di apportare modiche a dati tecnici e prestazioni senza
preavviso. Il consumatore è garantito contro i difetti di conformità
del prodotto secondo la Direttiva Europea 1999/44/ nonché il
documento sulla politica di garanzia del costruttore. Su richiesta è
disponibile presso il venditore il testo completo della garanzia.
secondo il valore impostato per la temperatura di antigelo (vedi
paragrafo ‘IMPOSTAZIONE PARAMETRI UTENTE‘).
FUNZIONAMENTO AUTOMATICO / MANUALE 24h/
MANUALE PERMANENTE
Con il tasto ‘ ‘, il cronotermoigrostato può essere forzato a
regolare la temperatura ambiente e l’umidità indipendentemente dalla
programmazione oraria effettuata, secondo la temperatura e l’umidità
di comfort impostata.
Premendo ripetutamente il tasto ‘ ‘, si passa in modo alternato
da Automatico a Manuale 24 ore, da Manuale 24 ore a Manuale
Permanente, e da Manuale Permanente si ritorna in Automatico.
Durante il funzionamento in manuale il display non visualizza il
programma orario, ma soltanto la temperatura ambiente, lo stato dei
relè (eventuale accensione simboli ‘ ‘ o ‘ ‘ o ‘ ‘), il simbolo ‘
24h
‘
(manuale 24h) oppure ‘ ‘ (manuale permanente) ed il simbolo ‘ ‘.
Premendo una prima volta il tasto ‘ ‘ si attiva la modalità Manuale
24 ore ed il cronotermoigrostato resta in manuale no alle ore 23:59,
dopodichè ritorna nel modo Automatico.
Nota: Se è attivo lo stato di Manuale 24h e viene attivato il programma
Vacanze, allo scadere della funzione Vacanze, se sono state superate
le ore 23.59, il cronotermoigrostato ritornerà al funzionamento
Automatico seguendo il programma orario impostato.
Premendo ancora una volta il tasto ‘ ‘ si forza il funzionamento in
modalità Manuale Permanente il cronotermoigrostato resta in manuale
ntanto che non si preme nuovamente il tasto ‘ ‘.
VISUALIZZAZIONE ORA / TEMPERATURA / UMIDITA’
Premendo ciclicamente il pulsante ‘ ‘ si possono visualizzare
sul display l’ora corrente con l’icona relativa alla sonda di regolazione
della temperatura (interna ‘ ‘ o esterna ‘ ‘), la temperatura
ambiente rilevata dal sensore interno, contradistinta dall’icona ‘ ‘,
la temperatura ambiente rilevata dalla sonda remota (se collegata)
contradistinta dall’icona ‘ ‘, l’umidità ambiente rilevata dal
sensore interno, contradistinta dall’icona ‘ ‘.
Le temperature e l’umidità rilevate vengono visualizzate corrette del
valore di Offset impostato.
Nota: Nel caso in cui il parametro ‘ rEG ‘ sia stato impostato su ‘
In ‘, ma viene rilevato un’errore sul sensore interno, il display
visualizzerà la scritta ‘ SEnS E xx ‘. Inquesta situazione la
regolazione verrà automaticamente interrotta ed entrambi i relè
verranno posti in posizione Normalmente Aperta.
Nel caso in cui il parametro ‘ rEG ‘ sia stato impostato su ‘ Out ‘ ma
la sonda remota non è stata collegata o è danneggiata il display
visualizzerà rispettivamente la scritta ‘ SEnS OPEN ‘ oppure
‘ SEnS SHrt ‘ con l’icona ‘ ‘ accesa.
ATTENZIONE:
- Il cronotermoigrostato, al ne di ottimizzare la durata delle
batterie, rileva la temperatura ambiente ogni 3 minuti e, di
conseguenza, decide l’attivazione o disattivazione dei relè.
- Per effettuare un refresh istantaneo premere brevemente il
pulsante ‘OK’.
RETROILLUMINAZIONE
L’accensione della retroilluminazione del display si verica in seguito
alla pressione di un qualsiasi tasto.
Lo spegnimento è automatico dopo 20 secondi dall’ultima pressione
del tasto.
INSERIMENTO / SOSTITUZIONE BATTERIE
Il display mostra costantemente lo stato di carica delle batterie
tramite il simbolo ‘ ‘.
La carica delle batterie è massima se all’interno del simbolo tutti e tre
gli indicatori di livello sono accesi.
Al contrario le batterie sono scariche e devono essere sostituite se
lampeggia il simbolo ‘ ‘ (completamente vuoto). In questo
caso entrambi i relè vengono posti in posizione di sicurezza (N.C.)
ed il display visualizza alternativamente l’ora (o la temperatura o
l’umidità) e la scritta ‘BATT’; contemporaneamente verrà mostrata
l’icona ‘TEST’ lampeggiante. Se le batterie non vengono sostituite a
breve, anche i simboli ‘ ‘ o ‘ ‘ lampeggieranno ad indicare che il
dispositivo è bloccato.
Per la sostituzione procedere come segue:
1. Aprire lo sportellino che da’ accesso al vano pile (Fig. 1).
2. Estrarre le pile eventualmente facendo leva con un utensile.
3. Inserire le nuove pile che devono essere alcaline da 1.5V tipo AA.
4. Controllare l’esattezza dell’orario ed eventualmente reimpostarlo.
COLLEGAMENTO AD INTERFACCIA TELEFONICA
Il cronotermoigrostato offre la possibilità di poter collegare al
connettore ‘ B‘ di Fig. 6 un’interfaccia telefonica con funzionamento
continuo (relè a tenuta).
L’utilizzo di una idonea interfaccia telefonica non necessita di alcuna
impostazione sul cronotermoigrostato; per l’utilizzo dell’interfaccia
telefonica si rimanda al relativo manuale istruzioni.
Tramite l’interfaccia telefonica è possibile Spegnere il
cronotermoigrostato oppure Attivarlo in modalità Manuale
Permanente.
A seconda dei comandi ricevuti dall’interfaccia telefonica
il cronotermoigrostato agirà in base alla seguente logica di
funzionamento:
1. Contatto chiuso dell’interfaccia telefonica:
Il cronotermoigrostato forza il funzionamento in modalità ‘Manuale
Permanente’: sul display vengono visualizzati i simboli ‘ ‘ e ‘ ‘.
2. Contatto aperto dell’interfaccia telefonica, dopo (e solo dopo)
una precedente chiusura, se non sono intervenuti comandi da
tastiera (Manuale/Off):
Il cronotermoigrostato viene spento e sul display compare la scritta
‘OFF‘ e viene visualizzato il simbolo ‘ ‘. Qualora fosse attiva la
funzione di ‘Antigelo’ sul display viene visualizzato il simbolo ‘ ‘.
ATTENZIONE: I comandi da tastiera sono sempre prioritari
rispetto ai comandi ricevuti dall’interfaccia telefonica.
Se sul cronotermoigrostato viene premuto il pulsante ‘ ‘ o ‘ ‘, il
dispositivo modicherà il proprio stato e l’icona ‘ ‘ lampeggerà ad
indicare che il comando da interfaccia è stato forzato da un comando
da tastiera.
L’icona ‘ ‘ smetterà di lampeggiare se l’interfaccia telefonica invierà
al cronotermoigrostato il medesimo comando effettuato da tastiera
oppure se l’interfaccia telefonica verrà resettata.
In tale condizione lo stato imposto da tastiera non verrà variato, e il
cronotermoigrostato si predisporrà a ricevere un eventuale nuovo
comando.
ATTENZIONE
Se si invia da interfaccia telefonica un comando di spegnimento
al cronotermoigrostato (contatto aperto dell’interfaccia
telefonica), è opportuno vericare che tale comando sia stato
eseguito dal cronotermoigrostato, eseguendo la seguente
procedura di riallineamento:
1. Vericare tramite le funzioni dell’interfaccia telefonica che
il contatto sia aperto eventualmente inviando un comando di
spegnimento.
2. Inviare all’interfaccia telefonica un comando di chiusura del
contatto (il cronotermoigrostato si accende).
3. Vericare tramite le funzioni dell’interfaccia telefonica che il
contatto sia chiuso.
4. Inviare all’interfaccia telefonica un comando di apertura del
contatto (il cronotermoigrostato si spegne).
Durante tale sequenza non dovranno intervenire comandi da
tastiera in quanto sono prioritari rispetto ai comandi da interfaccia.
CARATTERISTICHE TECNICHE
Alimentazione: 2 x 1,5V, pile alcaline (Tipo AA)
Durata Batterie: >1 anno
Spegnimento retroilluminazione: 20 secondi da ultima pressione
Sezione termostato
Campo regolazione: comfort: 5°C .. 40°C
ridotta: 5°C .. 40°C
Differenziale asimmetrico: 0,1°C .. 5°C (Default 0,2°C)
Portata contatti relè termostato: 5(1)A @ 250V~ SPDT
Sezione igrostato
Campo regolazione: comfort: 10%RH .. 95%RH
ridotta: 10%RH .. 95%RH
Differenziale: 0,5%RH .. 10.0%RH (Default 2.0%RH)
Portata contatti relè igrostato: 5(1)A @ 250V~ SPDT
Tipo di sensore: Interno (temperatura / umidità)
Saturazione lettura umidità: Temp. sonda <10.0%RH (- - - -).
Temp. sonda >90.0%RH (E E E E).
Precisione temperatura (-40°C .. 120°C):
Precisione umidità (0%RH .. 100%RH @25°C):
Risoluzione: 0.1°C. (-9.9°C .. 50°C)
0.1%RH (10%RH .. 90%RH)
Offset sensore interno: Temp.: ± 5.0°C. (Default 0.0°C)
Umidità: ± 5.0% RH. (Default 0.0°C)
Tipo di sonda remota: NTC 10K Ohm ±1% @ 25°C (opzionale)
Offset sonda remota: ± 5.0°C. (Default 0.0°C)
Antigelo: OFF / 0.5°C .. 25.0°C (Default 3.0°C)
Punto di rugiada: OFF / d-EF / d-EC / d-FP (Default d-FP)
Ingresso Interfaccia Ext: Segnale continuo di tipo On/Off.
Grado di protezione: IP 30
- ITALIANO -
THW01B0001EV 027284 150716 5
INSTALLAZIONE
ATTENZIONE
- Per una corretta regolazione della temperatura ambiente si
consiglia di installare il cronotermoigrostato a circa 1,5 m
dal pavimento e lontano da fonti di calore, correnti d’aria o da
pareti particolarmente fredde (ponti termici).
- E’ obbligatorio, al ne di garantire la sicurezza elettrica,
ssare il corpo del cronotermoigrostato alla piastra a muro
tramite le due viti (in dotazione) che trovano sede all’interno
del vano portapile.
- Qualora il carico pilotato dal relè del cronotermoigrostato
funzioni a tensione di rete, è necessario che il collegamento
avvenga tramite un interruttore onnipolare conforme alle
norme vigenti e con distanza di apertura dei contatti di
almeno 3 mm in ciascun polo.
- L’installazione ed il collegamento elettrico del termostato
devono essere eseguiti da personale qualicato ed in
conformità alle leggi vigenti.
- Prima di effettuare qualsiasi collegamento accertarsi che la
rete elettrica sia scollegata.
L’installazione del dispositivo è prevista per il montaggio in scatole
di derivazione da incasso (o da parete) standard da due o tre moduli
oppure direttamente sulla parete utilizzando i tasselli in dotazione.
Per installare il dispositivo eseguire le seguenti operazioni:
Fig. 2
Sganciare la piastra a muro innestata sotto la base del
cronotermoigrostato come indicato in Fig. 2.
1
2
1
Fissare la piastra direttamente sulla parete o su scatole di
derivazione da 2 o 3 moduli tramite le due sedi per viti con
interasse 60 mm oppure 85mm facendo attenzione a fare
passare i cavi nella feritoia come indicato in Fig. 3.
2
Fig. 3
Inserire le batterie nel vano batterie (Idi Fig. 1); vedi paragrafo
‘INSERIMENTO/SOSTITUZIONE BATTERIE’.
6
Avvicinare il cronotermoigrostato alla piastra a muro facendo
dapprima coincidere i dentini della base con gli appositi fori
della piastra e successivamente esercitare sul dispositivo una
pressione verso il lato sinistro no a far scattare i dentini
plastici della piastra.
4
2
1
Fig. 7
Fissare il corpo del cronotermoigrostato alla piastra a muro
tramite la vite in dotazione che trova sede all’interno del vano
portapile (Fig. 8).
5
Fig. 6
Eseguire i collegamenti elettrici facendo passare i li tramite
l’apertura rettangolare della piastra a muro (Fig. 3), seguendo lo
schema di collegamento di Fig. 4 o Fig. 5.
3
BIANCO
INTERFACCIA
TELEFONICA
SONDA
REMOTA
ROSSO
NERO
CARICO
CARICO
RELE’
IGROSTATO
RELE’
TERMOSTATO
Fig. 4
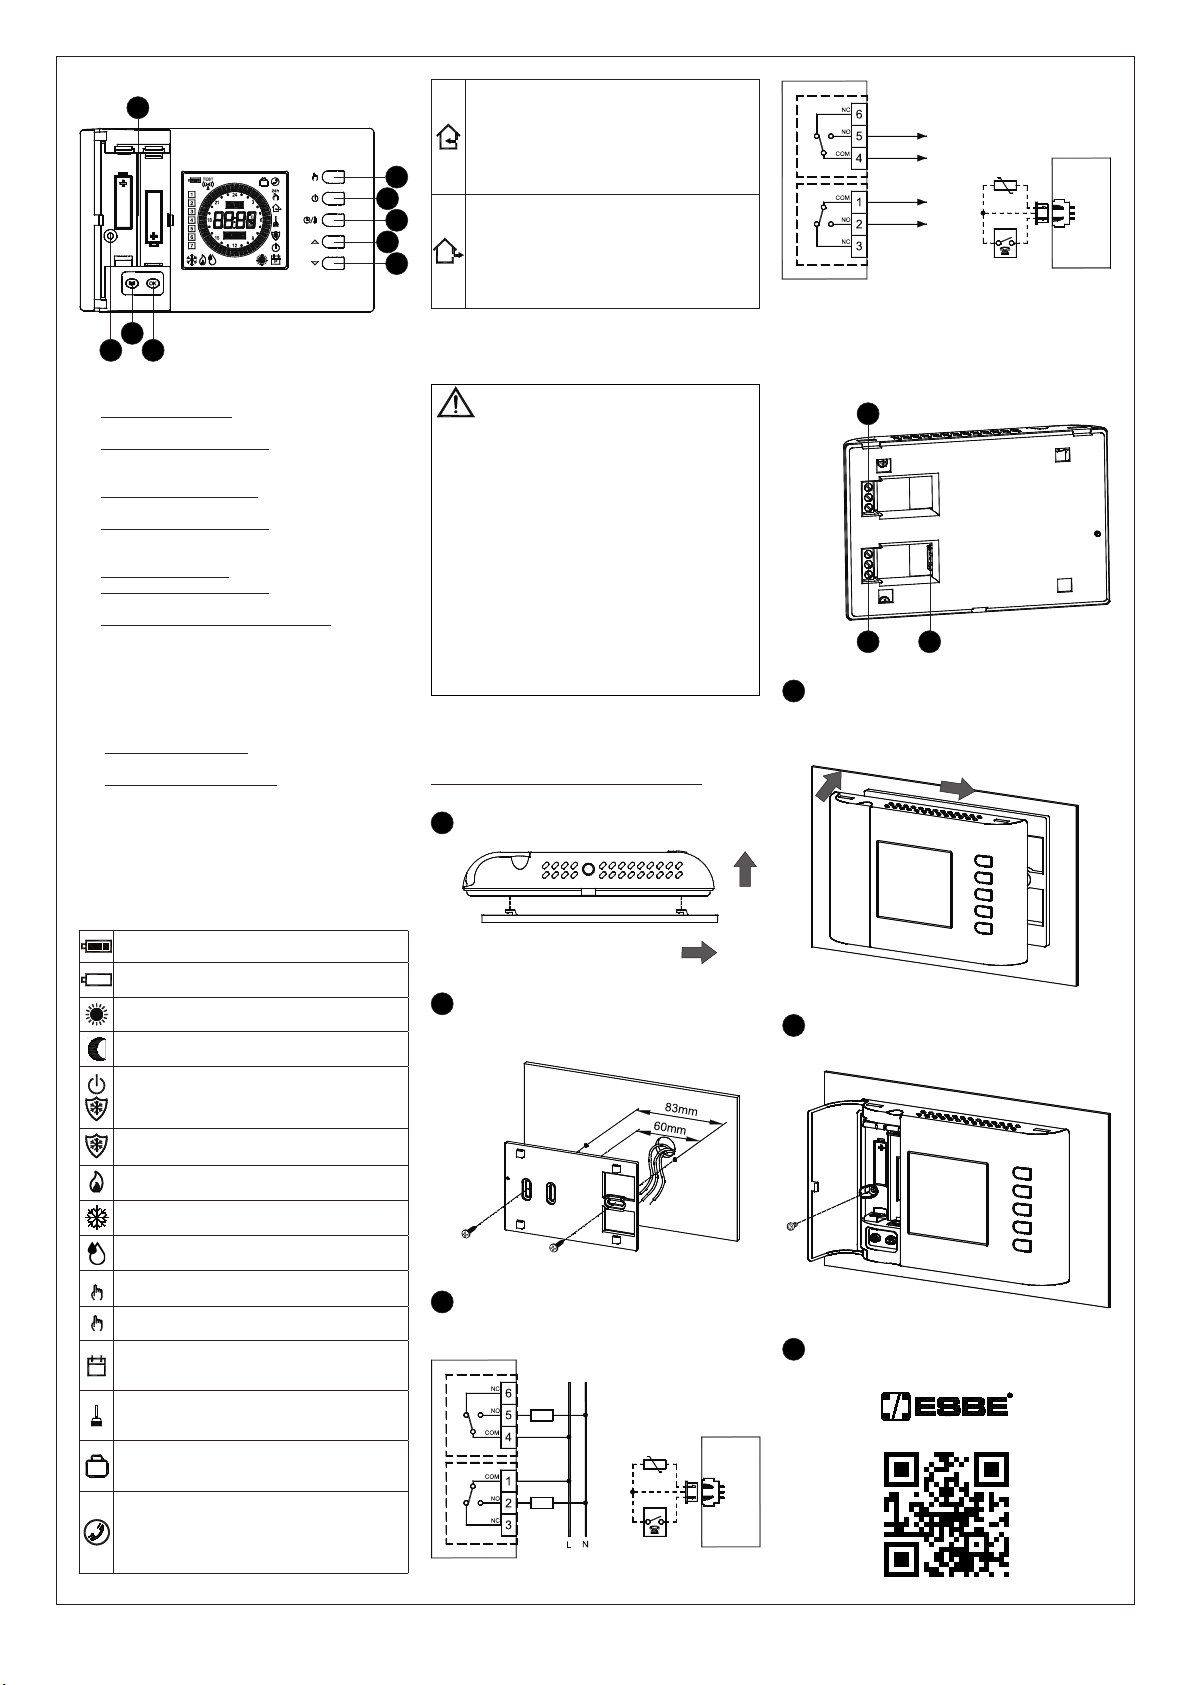
DESCRIZIONE DEI COMANDI
Fig. 1
FGH
I
BA
C
DE
LEGENDA
ATasto dalla doppia funzione:
- Nel normale funzionamento attiva la funzione Manuale 24 ore /
Manuale Permanente / Automatico.
- In ‘Impostazione Programma orario‘, imposta la regolazione della
temperatura in modalità di Riduzione.
BTasto dalla doppia funzione:
- Nel normale funzionamento accende o spegne il
cronotermoigrostato.
- In ‘Impostazione Programma orario‘, imposta la regolazione della
temperatura in modalità Spento/Antigelo.
CTasto dalla tripla funzione:
- Nel normale funzionamento visualizza l’ora oppure la temperatura.
- In ‘Impostazione Programma orario‘, imposta la regolazione della
temperatura in modalità Comfort.
- In ‘Impostazione temperature di Set-Point’, visualizza la
temperatura di Comfort oppure di Riduzione.
D Modica le temperature di setpoint e i parametri di congurazione
(incrementando il valore).
E Modica le temperature di setpoint e i parametri di congurazione
(decrementando il valore).
FAccede alla lista dei parametri utente.
GTasto dalla doppia funzione:
- Nel normale funzionamento aggiorna i dati rilevati dal
cronotermoigrostato.
- In ‘Impostazione parametri utente‘, accede alla modica del
parametro selezionato e successivamente conferma il valore
modicato.
H Sede viti per il ssaggio del corpo del cronotermoigrostato alla
piastra a muro.
IVano Portabatterie.
INDICAZIONI DISPLAY
Di seguito viene indicato il signicato dei simboli che possono apparire
a display:
Indicazione dello stato di carica delle batterie.
Lampeggiante:
Batterie scariche; sostituire le batterie.
Regolazione della temperatura in modalità di Comfort.
Regolazione della temperatura in modalità di Riduzione.
Regolazione della temperatura in modalità Spento/Antigelo.
cronotermoigrostato spento: funzione antigelo inserita, il
display visualizza la scritta OFF.
Attivazione in modalità riscaldamento.
Attivazione in modalità raffrescamento.
Attivazione in modalità deumidicazione oppure
umidicazione.
24h
Regolazione della temperatura in modalità di Comfort per
24 ore
24h
Regolazione della temperatura in modalità di Comfort
permanente
P
Fissa: Indica l’accesso ai parametri utente
Lampeggiante: Indica la possibilità di modicare il parametro
utente selezionato
Lampeggiante:
Programma pulizie attivato (il display visualizza il tempo ri-
manente)
Lampeggiante:
Programma vacanze attivato (il display visualizza il tempo
rimanente)
Fissa:
Indica un’azione da parte dell’interfaccia telefonica.
Lampeggiante:
Indica che il comando da interfaccia telefonica è stato
forzato da un comando da tastiera sul cronotermoigrostato.
Collegare l’eventuale sonda remota o interfaccia telefonica
al connettore ‘C’ indicato in Fig. 6. Il carico della sezione
termostato va collegato alla morsettiera ‘A’ indicato in
Fig. 6, mentre il carico della sezione igrostato va collegato alla
morsettiera ‘B’ indicato in Fig. 6.
Fig. 6
A C
B
Fissa:
La temperatura visualizzata è quella rilevata dal sensore
interno, ma la regolazione della temperatura avviene
mediante la sonda remota.
Lampeggiante:
La visualizzazione e la regolazione della temperatura
ambiente avviene mediante l’utilizzo del sensore interno.
Fissa:
La temperatura visualizzata è quella rilevata dalla sonda
remota, ma la regolazione della temperatura avviene
mediante il sensore interno.
Lampeggiante:
La visualizzazione e la regolazione della temperatura
ambiente avviene mediante l’utilizzo della sonda remota. Fig. 5
BIANCO
INTERFACCIA
TELEFONICA
SONDA
REMOTA
ROSSO
NERO
ALLA CALDAIA / RAFFRESCATORE
RELE’
IGROSTATO
RELE’
TERMOSTATO
AL DEUMIDIFICATORE / UMIDIFICATORE
www.esbe.eu
- ENGLISH -
THW01B0001EV 027284 150716 6
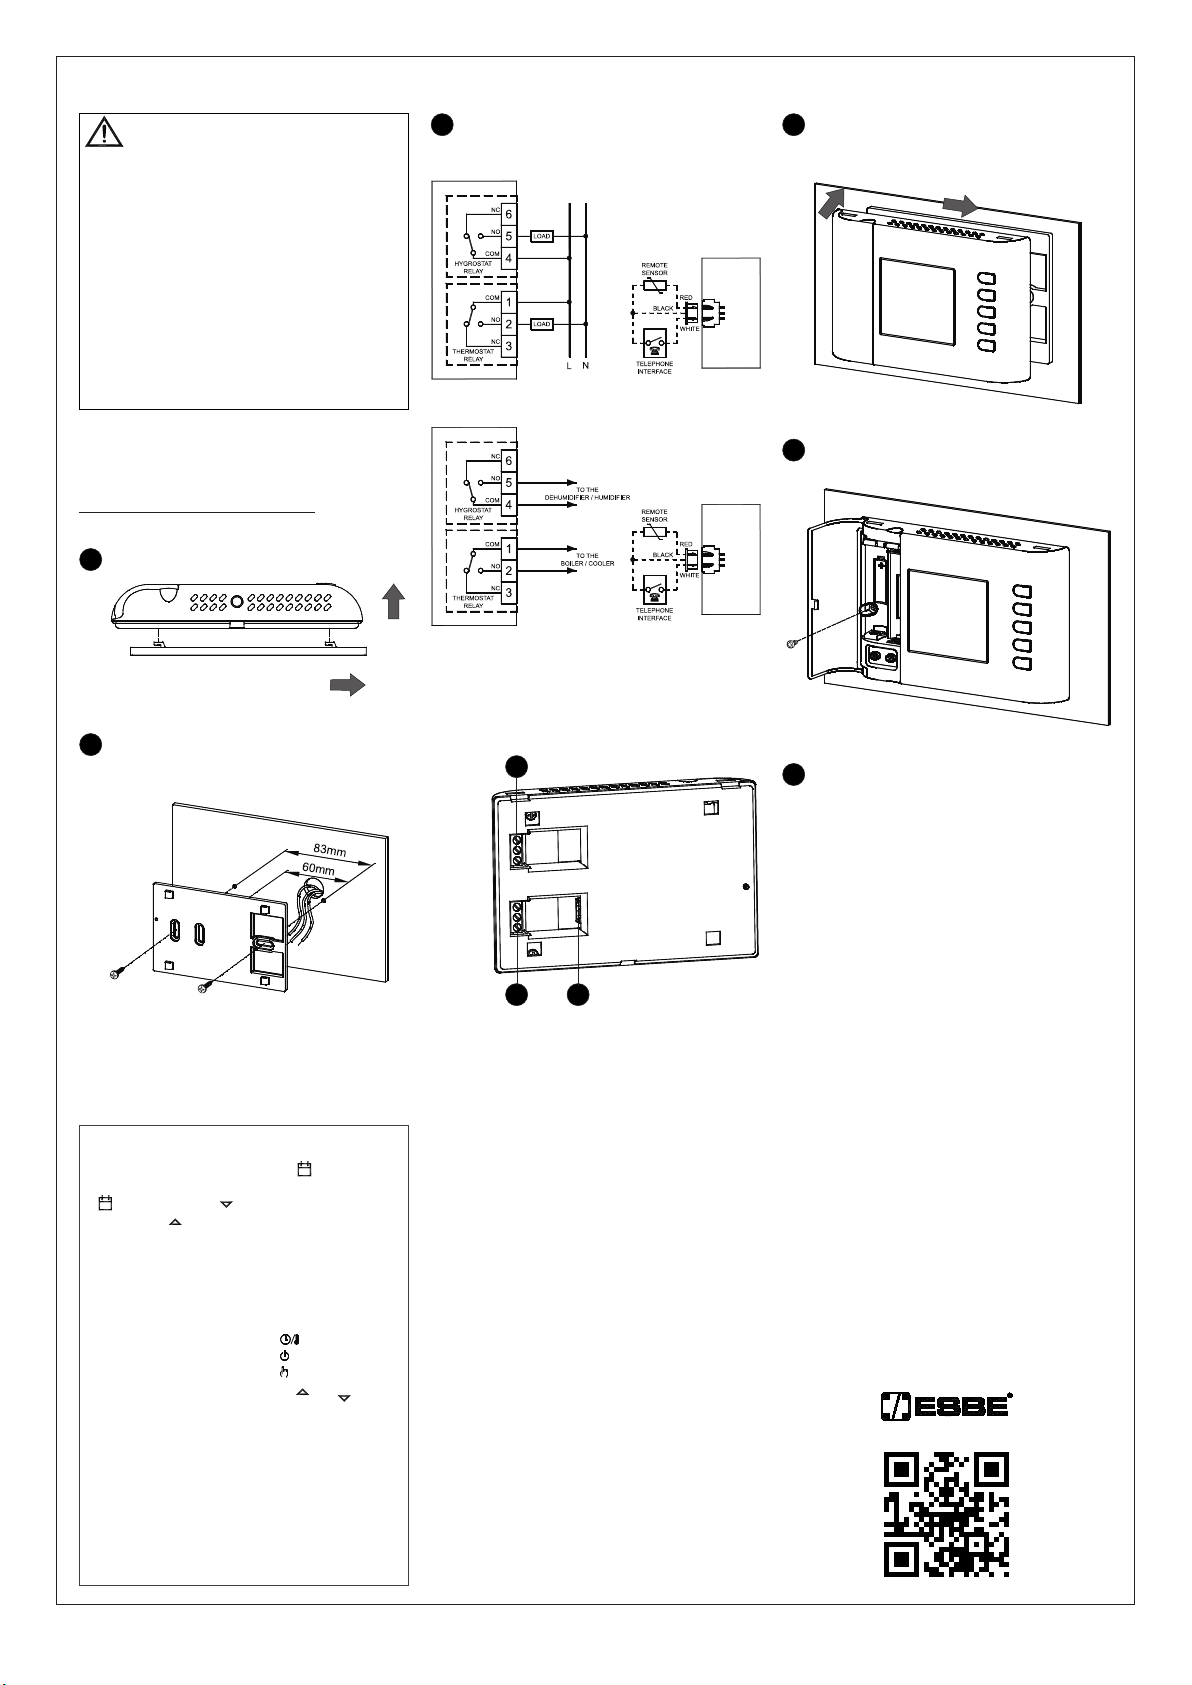
INSTALLATION
WARNING
- To adjust properly room temperature, install the thermostat
far from heat sources, airstreams or particularly cold walls
(thermal bridges).
- In order to grant the electrical safety, it is mandatory to
screw the programmable thermo-hygrostat body to the wall
mount plate through the two screws supplied which must be
mounted in the battery holder.
- If the load controlled by the relay of the programmable
thermo-hygrostat operates with mains voltage, the
connection must be made via an omnipolar switch complying
with current standards and with a contact opening of at least
3 mm in each pole.
- Installation and electrical wirings of this appliance must be
made by qualied technicians and in compliance with the
current standards.
- Before wiring the appliance be sure to turn the mains power off.
The device is designed to be installed in a standard recess (or wall)
mounted junction box with two or three modules or else directly on
the wall using the screw anchors provided.
To install the device carry out the following steps:
Release the wall mount plate tted under the base of the
programmable thermo-hygrostat as shown in Fig. 2.
Fig. 2
1
2
1
Fix the plate directly on the wall or onto 2 or 3 module junction
boxes by means of the two holes for screws (distance between
centres: 60 mm or 85mm), taking care to pass the wires
through the opening as shown in Fig. 3.
2
Fig. 3
Move the thermostat to the wall plate by tting rst the teeth
of the base with the relevant holes of the plate and then exert
a pressure on the device to the left side until the plastic teeth
of the plate snap.
4
2
1
Fig. 7
Secure the bodyof the programmable thermostat to the wall
plate using the supplied screw that is located inside the battery
compartment (Fig.8).
5
Fig. 8
Insert the batteries in the battery compartment (Iin Fig. 1);
see paragraph ‘ HOW TO INSERT/REPLACE THE BATTERIES ’.
6
QUICK GUIDE FOR SETTING THE TIME SCHEDULE
• Press button ‘ P ’.
• The display shows ‘ PrOG ’ with the icon ‘ P‘ turned on.
• Press key ‘ OK ’: the display shows the word ‘ dAY ’, the icon
‘ P‘ and the squares corresponding to the ashing days.
• Press buttons ‘ ‘ and ‘ ‘ in order to choose one of the four
days combinations available as pre-set.
• Press button ‘ OK ’ to conrm the choice.
• The display shows hour 00:00 with the relevant dash, in the upside
right, ashing.
• Press one of the following buttons to select the temperature
regulation level desired:
Comfort mode: Press the ‘ ‘ button.
Off / Antifreeze: Press the ‘ ‘ button.
Economy mode: Press the ‘ ‘ button.
Moving the time cursor: Press button ‘ ’ or ‘ ‘.
Each time the button which sets the regulation mode is depressed,
the time cursor automatically jumps into the next half hour.
• Once the time schedule for the day or group of days selected has
been set, press button ‘ OK ’.
The display will show the time schedule for the next day or group
of days until the whole week has been covered.
• Once the time schedule for the whole week has been set, press
button ‘ OK ’. The programmable thermo-hygrostat will store the
program into its memory and the word ‘ MEMO ’ is shown on the
display, then it will automatically quit the time schedule setting
procedure.
Connect the remote sensor (if present) or the phone interface
to connector ‘C’ shown in Fig. 6. The load for the thermostat
section must be wired to the terminal block ‘A’ shown in Fig. 6,
meanwhile the load for the hygrostat section must be wired to
the terminal block ‘B’ shown in Fig. 6.
Fig. 6
A C
B
Make electrical wirings by passing the wires through the
rectangular opening in the wall plate (Fig. 3), and according to
the diagram in Fig. 4 or Fig. 5.
3
Fig. 4
Fig. 5
www.esbe.eu

- ENGLISH -
THW01B0001EV 027284 150716 7
GENERALITIES
This device is a battery powered weekly digital programmable
thermo-hygrostat for the control of room temperature and relative
humidity on three levels: Comfort, Economy or Off / Antifreeze.
The device can be used in heating and cooling plants.
The programmable thermo-hygrostat has a large backlit LCD display
for all functional indications, the program schedule set, the room
temperature reading, the relative humidity reading, or, as desired, the
actual time.
Allows to set up to 7 different programs, one for each day of the
week, with a minimum intervention time of 1/2 hour over 24 hours.
In addition, the device offers the possibility of setting the Antifreeze
temperature value, dew point control and sensor Offset value
adjustment.
DESCRIPTION OF CONTROLS
Fig. 1
FGH
I
BA
C
DE
LEGEND
AButton with double function:
- In normal operation: activates the function 24 hours Manual /
Permanent Manual / Automatic.
- In schedule programming: sets the regulation temperature into
Economy mode.
BButton with double function:
- In normal operation: turns on and off the programmable thermo-
hygrostat.
- In schedule programming: sets the regulation temperature into
Off / Antifreeze mode.
CButton with triple function:
- In normal operation: displays current time or temperature.
- In schedule programming: sets the regulation temperature into
Comfort mode.
- In ‘Set-Point temperatures settings’, shows either the Comfort or
the Economy temperature.
D Changes the setpoint temperature and the conguration
parameters (increasing the value).
E Changes the setpoint temperature and the conguration
parameters (decreasing the value).
FGives access to the user parameters list.
GButton with double function:
- In normal operation updates the values sampled by the
thermostat.
- In ‘User parameters settings’, enables the selected parameter
modication and conrms the modied value.
H Screw hole for xing the programmable thermo-hygrostat body to
the wall mount plate.
IBattery compartment.
DISPLAY SYMBOLS
In the following is explained the meaning of some symbols which may
appear on the display:
Battery status indication.
Flashing:
Batteries discharged; replace batteries.
Temperature regulation in Comfort mode.
Temperature regulation in Economy mode.
Temperature regulation in Off / Antifreeze mode.
Chronostat off: antifreeze function active, the display shows
‘OFF’.
Heating mode enabled.
Cooling mode enabled.
Activation in de-humidication or humidication.
24h
Temperature regulation in Comfort mode for 24 hours.
24h
Permanent temperature regulation in Comfort mode.
P
Fixed: shows access to the user parameters
Flashing: means that the selected user parameter can be
modied
Flashing:
Cleaning program active (the remaining time is shown on the
display).
Flashing:
Vacation program active (the remaining time is shown on the
display).
Fixed:
Indicates that the telephone interface is active.
Flashing:
Indicates that the remote command received by the
telephone interface has been overridden by another local
request through the chronostat buttons.
Fixed:
The temperature shown on the display is the one measured
by the internal sensor, yet the temperature regulation takes
place according to the remote sensor.
Flashing:
Both temperature shown and room temperature regulation
refer to the internal sensor.
Fixed:
The temperature shown on the display is the one measured
by the remote sensor, yet the temperature regulation takes
place according to the internal sensor.
Flashing:
Both temperature shown and room temperature regulation
refer to the remote sensor.
STARTING UP
When starting up for the rst time:
- Insert the batteriesobserving the polarity markings shown
in the battery compartment (see ‘INSERTION / BATTERIES
REPLACEMENT’).
- Set the time and day of the current week.
- Set the operating mode of the thermostat (user parameter ‘C-H’):
Heating (factory set) or Cooling.
Setting the current time and day
To set the clock of the programmable thermo-hygrostat carry out the
following steps:
1. Open the ap of the battery compartment.
2. Keep the ‘OK’ button pressed for at least 2 seconds; the hour digits
will start ashing.
3. Set the hour using buttons ‘ ’ and ‘ ’.
4. Conrm by pressing ‘OK’; the minute digits will start ashing.
5. Set the minutes using buttons ‘ ’ and ‘ ’.
6. Conrm with ‘OK’; the display shows the word ’dAY’ and the
square symbol corresponding to the current day ashes.
7. Set the current day of the week using buttons ‘ ’ and ‘ ’
(the current day is highlighted by a box surrounding the number
corresponding to the day of the week, 1 Monday .. 7 Sunday )
8. Conrm by pressing ‘OK’; the output of the time and day setting is
automatic.
Time/Temperature/Humidity Display
By repeatedly pressing the ‘ ‘ the display can alternately show
the actual time, the room temperature (in °C) read by the internal
sensor, distinguished by the ‘ ‘ icon, the room temperature (in
°C) read by the remote probe (if connected) distinguished by the
‘ ‘ icon and the room humidity (in %RH) read by the internal
sensor, distinguished by the ‘ ‘ icon.
The temperature and humidity readings are displayed corrected by the
Offset value set.
Note:
If the ‘ rEG ’ parameter is set at ‘ In ‘, but an error is detected on the
internal sensor, the display will show ‘ SEnS E xx ’. In this situation
the adjustment will be automatically interrupted and both relays will
be placed in the Normally Open position.
If the ‘ rEG ’ parameter has been set at ‘ Out ‘ but the remote
probe has not been connected or is damaged, the display will show
the respective wording ‘ SEnS OPEN ‘ or ‘ SEnS SHrt ‘ with the
‘ ‘ icon on.
ATTENTION: In order to optimise battery duration, the
programmable thermo-hygrostat performs sensor readings
and error controls every 3 minutes or when ‘Ok’ is pressed and
consequently, decides on activation or deactivation of the relay.
Any error message must disappear within 3 minutes or on
pressing the ‘Ok’ key. If the message does not disappear then
problems have been detected on the sensors.
Comfort and Economy temperatures/humidity adjustment
During normal operation, the display shows the room temperature
and humidity reading and the icon relative to the current setting mode
‘ ‘ or ‘ ‘.
The programmable thermo-hygrostat reads the room temperature
from the internal or external sensor (depending on the setting made in
the ‘ rEG ’ parameter), while the humidity is only read on the internal
sensor.
The ashing ‘ ‘ icon indicates that the adjustment (temperature or
humidity) takes place on an internal sensor, while the ashing ‘ ‘
icon indicates that the adjustment (temperature only) takes place on
the remote probe.
Activation of the relay that controls the room humidity management
system is indicated on the display by switch-on of the ‘ ‘ icon.
The activation of the relay that controls the room heating/cooling
management system is indicated on the display by the switch-on of
the ‘ ’ icon for heating and the ‘ ’ icon for cooling.
Proceed as follows to adjust:
- Display the actual time.
- Press the ‘ ’ or ‘ ’ key once: the display shows the comfort
temperature set (distinguished by ‘ ‘ icon) and the ‘ SET °C ’ icon
(indicating that the setpoint temperature is being displayed).
- Press the ‘ ’ and ‘ ’ keys to modify the setpoint temperature
displayed.
- Press the ‘ ‘ key, the display shows the economy temperature
set (distinguished by the ‘ ‘ icon and the ‘ SET °C ’ icon (indicating
that the setpoint temperature is being displayed).
- Press the ‘ ’ and ‘ ’ keys to modify the setpoint temperature
displayed.
- Press the ‘ ‘ key, the display shows the comfort humidity set
(distinguished by the ‘ ‘ icon) and the ‘ SET %RH ’ icon (indicating
that the setpoint humidity is being displayed).
- Press the ‘ ’ and ‘ ’ keys to modify the setpoint humidity
displayed.
- Press the ‘ ‘ key, the display shows the economy humidity set
(distinguished by the ‘ ‘ icon) and the ‘SET %RH’ icon (indicating
that the setpoint humidity is being displayed).
- Press the ‘ ’ and ‘ ’ keys to modify the setpoint humidity
displayed.
- Press the ‘ ‘ key or after a few seconds of inactivity, the display
goes back to showing the room temperature, memorising the values
set.
Note: Normally, in order to have night -time adjustment, the
economy temperature/humidity must have a value lower than
the comfort value.
The programmable thermo-hygrostat will adjust the room temperature
in comfort or economy mode in agreement with the hourly program set
(see ‘ USER PARAMETER SETTING ‘ paragraph).
Dew point control
The dew point (managed in the user parameter ‘ C-dP ’), represents
the temperature below which condensate forms on the surfaces and
depends on the temperature and humidity present in the room.
ATTENTION
- The dew point control is only active if the ‘ C-dp ’ (Dew Point
control) parameter has been activated.
- The dew point control is only managed in cooling and/or
dehumidication mode.
- If the conditions listed above are true, on the basis of the dew
point, the cooler and dehumidier command will have priority
with respect to normal adjustment (i.e. with dew point control
disabled).
The table blow (table 1) shows the dew point value (expressed in °C),
depending on the room temperature and relative humidity, expressed
as ‘ %RH ’.
BATTERY POWERED WEEKLY DIGITAL PROGRAMMABLE THERMO-HYGROSTAT
ESBE Series TPH114
- ENGLISH -
THW01B0001EV 027284 150716 8
programmed.
In the following the four available combinations are listed:
(Mo)
2nd combination
of days 7
234561
1st combination
of days 76
2345
1
2
3
4
5
6
7
1
4th combination
of days
(Schedule
Day by Day)
5671234
3rd combination
of days
(Fr(Th)(We)(To) (Su)(Sa)
Note: For each day combination, the time schedule set will be
the same for all days within each single group.
3. Press the ‘ OK ‘ button to conrm the setting made; the display will
show the schedule previously programmed for the set day or group
of days and the time 00.00 (cursor ashing on the interval between
00.00 and 00.30).
4. Set the operating mode.
To facilitate the programming operation, the thermostat is factory
preset with the following time intervals:
TIME INTERVALS PRESET
Comfort mode Economy mode
6.00 .. 8.00 8.00 .. 11.00
11.00 .. 13.00 13.00 .. 17.00
17.00 .. 23.00 23.00 .. 6.00
Alternatively, if the preset time interval doesn’t t the required
needs, you can change it manually as follows:
5. For every time interval (each dash corresponds to a half hour) set
the operating mode by pressing one of the following buttons:
Comfort mode: Press the ‘ ‘ button.
Off / Antifreeze: Press the ‘ ‘ button.
Economy mode: Press the ‘ ‘ button.
Moving the time cursor: Press button ‘ ’ or ‘ ‘.
Conrm
Economy
Off
Comfort
Each time the button which sets the regulation mode is depressed,
the time cursor automatically jumps into the next half hour.
6. After programming the schedule for the day or group of days
selected, press the ‘ OK ’ button.
The display will show the program schedule for the next day or
groups of days until the whole week is covered.
7. After programming the schedule for the entire week, press the ‘ OK
’ button. The programmable thermo-hygrostat will memorize the
schedule set and the word ‘MEMO’ will appear on the display; the
device will automatically exit the schedule programming mode.
WARNING
- If you want to reset the time intervals to factory settings,
please reach the user parameter ’ dFLt ’ (the default data); In
this case, all user parameters will be reset to factory settings.
- If you exit the time programming without pressing the ’ OK ’
button, or you do not save the settings, the time program will
NOT be saved in memory and the previous program will be
restored.
Changes are stored in memory only when the if you enable
this operation with the phase characterized by the word
’MEMO’.
‘ AFr ’ ANTIFREEZE SETTING
The Antifreeze function allows you to select a minimum temperature to
be maintained when the programmable thermo-hygrostat is off, so as to
protect both the room and the equipment when the room temperature
falls below the set value. The device leaves the factory with the
Antifreeze function set on 3°C.
IMPORTANT: the function is active only when the device has
been set in the heating mode.
To set the Antifreeze temperature, carry out the following steps:
1. Select the parameter ‘ AFr ’ and press the ‘ OK ’ button.
2. The display shows the Antifrost temperature previously set and the
‘ P‘ icon ashes.
3. Press buttons ‘ ‘ and ‘ ‘ to change the setting (between OFF,
0.5°C..25°C); every change will be automatically memorized.
4. To return to the list of user parameters, press the ‘OK’ button.
5. To exit the user parameters setting and resume normal operation,
press the ‘ ‘ button or wait 10 seconds without pressing any
key.
‘HYS’ SETTING THE HYSTERESIS
Setting this parameter allows to dene the hysteresis, in °C, which
is applied to the programmable thermo-hygrostat to adjust the room
temperature, whenever the ‘ C-dP ‘ (dew point) user parameter has
not been enabled.
To adjust the hysteresis perform the following steps:
1. Select the parameter ‘ HYS ’ and press ‘ OK ’.
2. The display shows the previously set temperature and the ‘ P‘
icon ashes.
3. Press the ‘ ‘ and ‘ ‘ to change the value (between
0.1 °C .. 5.0 °C); each change is automatically saved.
4. To return to the list of user parameters, press the ‘OK’ button.
5. To exit the user parameter settings and resume normal operation,
press the ‘ ‘ button or wait 10 seconds without pressing any key.
‘ OPt ’ OPTIMIZATION SETTING
The optimization function consists in the option of turning on the
heating or cooling earlier than the scheduled time in order to reach the
set temperature by the scheduled time.
The programmable thermo-hygrostat calculates the time necessary
in order to reach the desired temperature and turns on the heating
in advance accordingly, by the amount of time necessary to achieve
the target.
The amount of time in advance may be 60 minutes at most and is
calculated based on the average gradient of the previous 24 hours.
To set the optimization function carry out the following steps:
1. Select the parameter ‘OPt’ and press the ‘OK’ button.
2. The display shows ‘on’ or ‘Off’ and the ‘ P‘ icon ashes.
3. Press button ‘ ‘ to activate (On) or ‘ ‘ to deactivate (Off) the
function; every change will be automatically memorized.
4. To return to the list of user parameters, press the ‘OK’ button.
5. To exit the user parameter settings and resume normal operation,
press the ‘ ‘ button or wait 10 seconds without pressing any key.
‘ OFS1 ’ INTERNAL SENSOR OFFSET SETTING
With this parameter it is possible to correct the temperature reading
of the internal sensor by ±5°C in order to correct any systematic
reading errors due to the positioning of the programmable thermo-
hygrostat in areas unsuitable for measuring the room temperature.
The device leaves the factory with the Offset set at 0.0°C.
To adjust the Offset value for the internal sensor, carry out the
following steps:
1. Select the ‘ OFS1 ’ parameter and press the ‘ OK ’ button.
2. The display shows the Offset temperature previously set and the
‘ P‘ icon ashes.
3. Press buttons ‘ ‘ and ‘ ‘ to modify the setting (range:
-5.0°C .. +5.0°C); every change will be automatically stored
in memory.
4. To return to the list of user parameters, press the ‘OK’ button.
5. To exit the user parameter settings and resume normal operation,
press the ‘ ‘ button or wait 10 seconds without pressing any key.
‘ OFS2 ’ REMOTE SENSOR OFFSET SETTING
With this parameter it is possible to correct the temperature reading of
the remote sensor by ±5°C in order to correct any systematic reading
errors due to the positioning of the remote sensor in areas unsuitable
for measuring the room temperature. The device leaves the factory
with the Offset set at 0.0°C.
To adjust the Offset value for the remote sensor, carry out the
following steps:
1. Select the ‘ OFS1 ’ parameter and press the ‘ OK ’ button.
2. The display shows the Offset temperature previously set and the
‘ P‘ icon ashes.
3. Press buttons ‘ ‘ and ‘ ‘ to modify the setting (range:
-5.0°C .. +5.0°C); every change will be automatically stored
in memory.
4. To return to the list of user parameters, press the ‘OK’ button.
5. To exit the user parameter settings and resume normal operation,
press the ‘ ‘ button or wait 10 seconds without pressing any key.
‘ rEG ’ REGULATION SENSOR CHOICE SETTING
This parameter sets whether the room temperature regulation is made
based on the programmable thermo-hygrostat internal sensor or the
remote sensor connected to the connector ‘ B‘ in Fig. 6.
For this parameter setting please nd these directions:
1. Select parameter ‘ rEG ’ then press key ‘ OK ’
2. The display shows ‘In’ or ‘Out’ and the icon ‘ P‘ ashes.
3. Press keys ‘ ‘ and ‘ ‘ to change the value (In: internal sensor -
Out: remote sensor); each change is automatically stored in
memory.
4. To return to the list of user parameters, press the ‘OK’ button.
5. To exit the user parameter settings and resume normal operation,
press the ‘ ‘ button or wait 10 seconds without pressing any key.
WARNING: When the regulation is set according to the remote
sensor ‘ Out ‘ and in case this sensor is missing or broken, the
temperature regulation will be performed according to the
internal sensor, even if the parameter remains set on ‘ Out ‘.
‘CLE’ SETTING CLEANING PROGRAM
This program is useful when the house is being cleaned and the
windows are opened thus making both the heating and cooling of the
premises unnecessary. In these conditions, the relays are blocked in
Off for two hours.
Note: Access to the cleaning program is NOT allowed when the
programmable thermostat is in ‘holiday mode’.
To activate the cleaning program, select the parameter ‘CLE’ and
press the ’OK’ button: the display shows the ‘ ‘ icon ashing and,
in place of the clock, the time remaining before returning to normal
operation is shown.
The device will go back to the previous operating mode after two
hours or if you press the ‘ ’ button again.
‘HOL’ SET HOLIDAY PROGRAM
If you intend to be away for a relatively long period it is advisable
to activate the Vacation Program, which will suspend the active
operating mode for the desired number of hours (from 1 to 95) or
Table 1
Note: the dew point, highlighted in the table, refers to the
environmental conditions considered excellent in the summer:
Dew point = 16.3°C, with room temperature at 26.0°C and
room humidity equal to 55.0%RH.
ATTENTION
- Condensate will form on the surfaces with temperature lower
than or equal to that of the dew point calculated C-dP.
- The dew point is calculated automatically by the equipment when
environmental conditions change.
For all details see ‘ ‘ C-dP ’ DEW POINT MANAGEMENT ‘.
Safety Control Algorithm
The ‘ Safety Control ‘ algorithm is used to manage the two relays
controlling the thermostat and the programmable thermo-hygrostat.
The algorithm allows not to activate the two relays simultaneously,
so as not to burden the electric line in the start-up phase (peak) of the
temperature and humidity control systems.
Practically, the activation is manages in a way not to have overlapping
on activation of the two commands.
SETTING THE USER PARAMETERS
To enter the mode for setting the programmable thermo-hygrostat
parameters, proceed as follows:
1. Press the ‘ ‘ button; the display will show the ‘ P‘ icon
(bottom right) and the word ‘ PrOG ‘.
2. Press the ‘ ‘ button repeatedly to scroll through the user
parameters:
Schedule Programming ‘ PrOG ’
Antifreeze Setting ‘ AFr ’
Hysteresis Setting ‘ HYS ’
Optimization Function Setting ‘ OPt ’
Internal sensor Offset setting ‘ OFS1 ’
Remote sensor Offset setting ‘ OFS2 ’
Regulation sensor choice setting ‘ rEG ’
House hold program Setting ‘ CLE ’
Vacation program Setting ‘ HOL ’
Setting heating or cooling ‘ H-C ’
Programmable thermo-hygrostat hysteresis setting ‘ HYH ’
Setting humidity sensor Offset ‘ OFSH ’
Setting Dehumidication or Humidication ‘ dE-H ’
Dew point control ‘ C-dp ’
Rate of check on dew point ‘ Cndp ’
Thermostat on time timer ‘ Cntr ’
Reset to default data ‘ dFLt ’
3. Press the ‘OK’ button to modify the selected parameter; the ‘ P‘
icon ashes.
4. Congure the data associated with each individual parameter as
illustrated below.
5. To quit from the user parameters setting, press key ‘ ’ or wait 10
seconds wothout pressing any key.
‘ PrOG ‘: SCHEDULE PROGRAMMING
Usually the circular band of dashes in the display shows the operating
mode (Comfort, Economy, Off / antifrost) of the thermostat, while
the vertical strip on the left shows the current day of the week
(1=Monday .. 7=Sunday) high lighted with a square around the
number to which it relates programming.
To facilitate the programming operation it is sufcient to remember
this rule:
Economy mode:
one dash lit (internal).
Comfort mode:
two dashes lit.
Off/Antifreeze mode:
no dashes lit.
Days of the week:
1 Monday .. 7 Sunday.
The box indicates the
current day or group of days.
To set the program schedule proceed as described below:
Note: You will exit the programming mode without memorizing
the programmed schedule if more than 10 seconds elapse
and you do not press any button; or else you can conrm
the settings in sequence by pressing the ‘OK’ button
without making any changes.
1. Select parameter ‘ PrOG ’ and press button ‘ OK ’: the display
shows the word ‘ dAy ’, icon ‘ P‘ and the square symbols
corresponding to the current day or group of ashes.
2. Press buttons ‘ ’ and ‘ ’ to set the combination of days to be
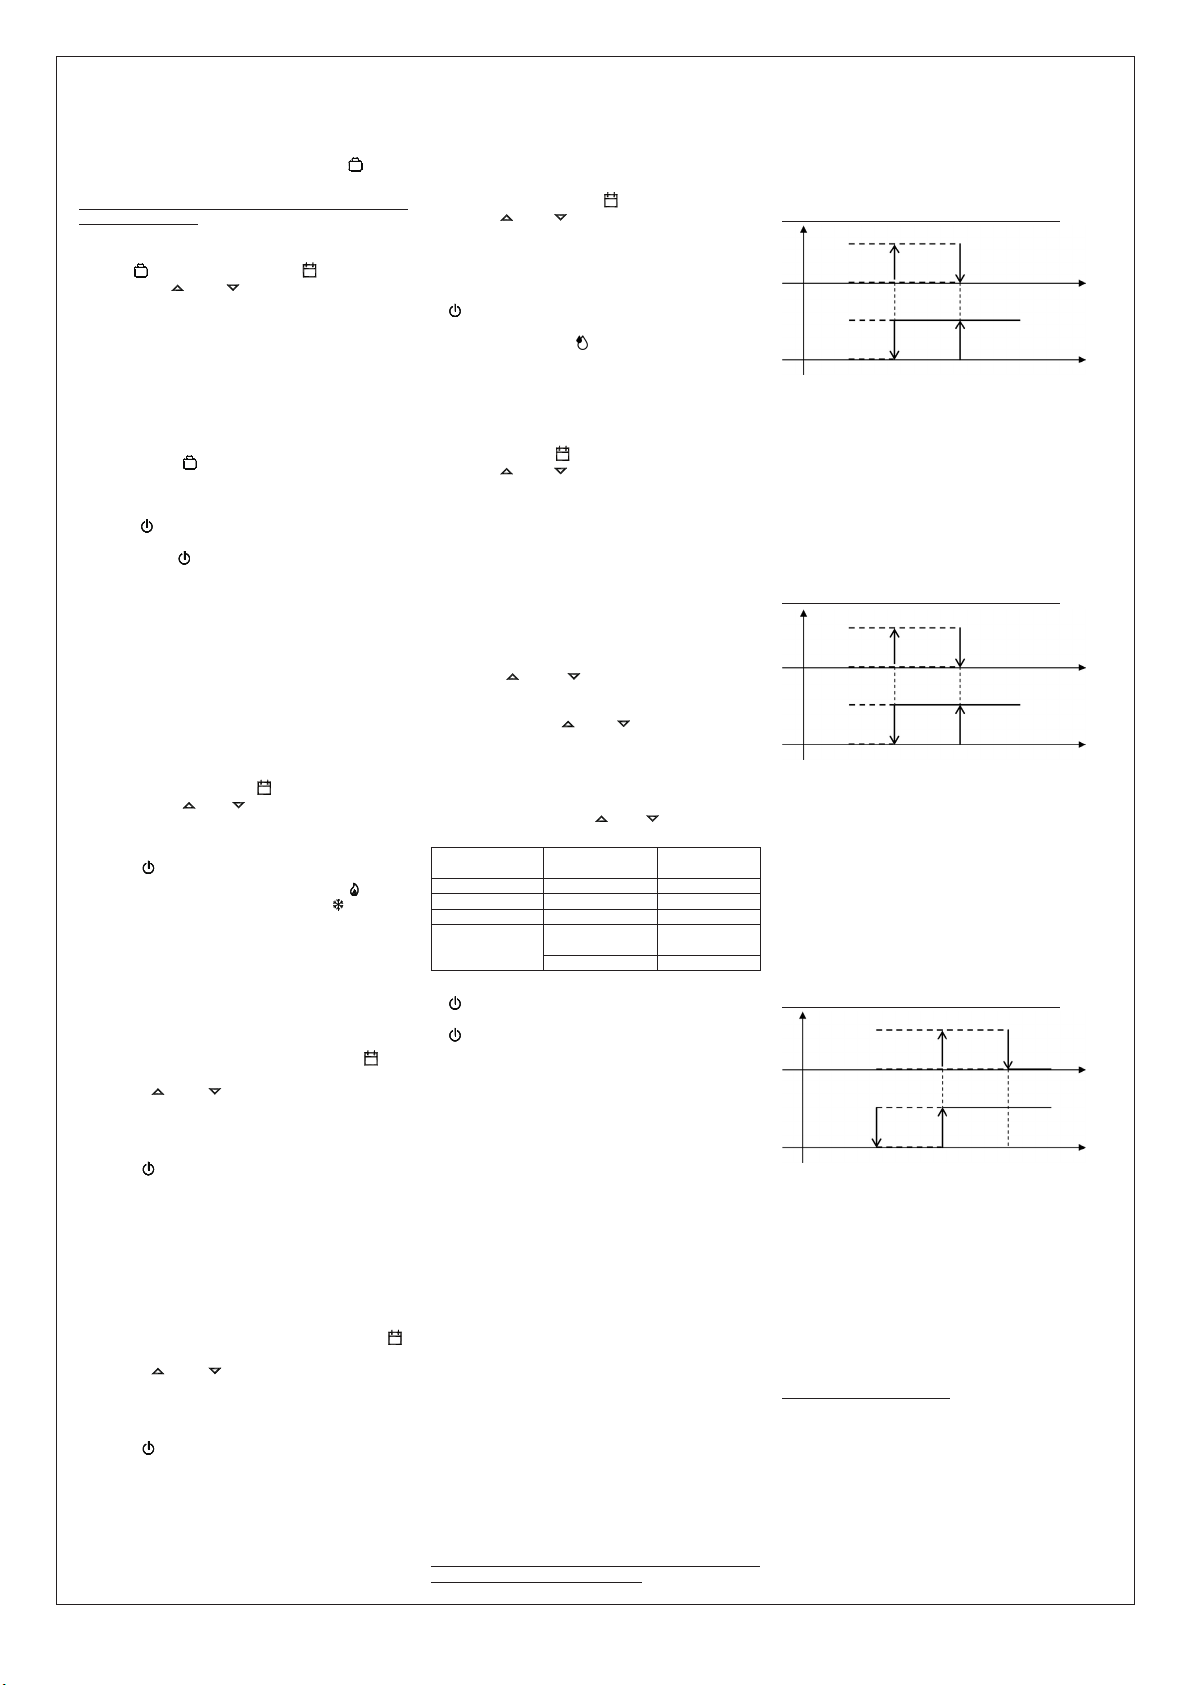
- ENGLISH -
THW01B0001EV 027284 150716 9
- By modifying the relay operating logic, the setpoint values
will be automatically taken back to the default values for the
mode set.
- The programmable thermo-hygrostat leaves the factory set in
the dehumidifying mode.
The procedure below must be followed to modify the operating logic:
1. Select parameter ‘ dE-H ’ and press ‘ OK ’; the display will show the
actual adjustment mode and the ‘ P‘ icon will ash.
2. Press the ‘ ’ and ‘ ’ keys to select the desired adjustment
mode; every modication is memorised automatically.
‘ dEUM ‘: Dehumidication
‘ HUMI ‘: Humidication
3. To go back to the list of user parameters, press ‘ OK ’.
4. To exit user parameters setting and restore normal operation, press
‘ ‘ or do not press any key for 10 seconds.
During normal operation, dehumidication or humidication mode
activation is indicated by the ‘ ‘ icon on.
‘C-dP’ DEW POINT MANAGEMENT
Using this parameter it is possible to enable/congure the Dew Point
control in order to prevent the formation of surface condensate.
Proceed as follows to set this parameter:
1. Select parameter ‘ C-dP ’ and press ‘ OK ’; the display will show the
actual setting and the ‘ P‘ icon will ash.
2. Press the ‘ ’ and ‘ ’ keys to select the desired adjustment
mode; every modication is memorised automatically.
The adjustment modes are the same:
OFF: Dew point control disabled.
d-EF: Dew point control with remote probe on underoor plants.
d-EC: Dew point control with remote probe on metal ceiling.
d-FP: Dew point control enabled on foxed points; adjustment can take
place on internal sensor or remote sensor (to set in the ‘ rEG ’
parameter).
For every adjustment mode, which activates dew point management,
it is possible to modify the factory setting by proceeding as follows:
3. On selection of the adjustment mode suitable for the plant to be
managed, press ‘ OK ’.
4. Press the ‘ ‘ and ‘ ‘ keys to modify the value; every
modication is memorised automatically.
If the ‘ d-FP ’ parameter is selected, by pressing ‘ OK ‘, sit
is possible to use the ‘ ‘ and ‘ ‘ keys to modify the two
thresholds in order to prevent the temperature reaching the dew
point:
TF1: second lower threshold of the dew point (expressed in °C).
TF2: rst lower threshold of the dew point (expressed in °C).
To modify the value of the two thresholds, select TF1 or TF2 and
press ‘ OK ’ and then use the ‘ ‘ and ‘ ‘ keys to modify the
value; every modication is memorised automatically.
Adjustment
mode
Any
sub-parameters
Range of
adjustment
OFF - -
d-EF SMF 1.0°C .. 10.0°C
d-EC SMC 1.0°C .. 10.0°C
d-FP
TF1 5.0°C .. 24.8°C
(Limit TF1=TF2-0.2°C)
TF2 5.2°C .. 25.0°C
5. To go back to the list of user parameters, press ‘ OK ’ and then the
‘ ‘ key.
6. To exit user parameters setting and restore normal operation, press
‘ ‘ or do not press any key for 10 seconds.
WARNING
When the regulation modes ‘d-EF’, ‘d-EC’ o ‘d-FP‘ are shown, the
calculated dew-point (dP) value will be alternately shown.
Dew point control limitations
- When the dew point control is active in modes ‘d-EF‘ or ‘d-EC‘,
the parameter ‘rEG‘ (room temperature regulation sensor) will be
automatically set to the internal sensor. The dew point temperature
will be calculated according to the temperature measured by the
internal sensor, meanwhile the ceiling or oor temperatures will be
calculated based on the remote sensor.
- When the dew point regulation is active in mode ‘d-FP‘ the
regulation sensor will be the internal one, meanwhile the external
sensor will only be used for the measured temperature.
- The dew-point temperature will always be calculated according
to the temperature measured by the internal sensor. Once the
parameter ‘rEG‘ is reached, the label ‘indP‘ will be shown on the
display, together with the ‘SET%RH‘ icon ashing. If the regulation
sensor has to be modied, the settings for the dew-point control
must rst be modied.
- The dew-point regulation is active only when the regulator is set on
cooling and dehumidication.Otherwise the access to parameter ‘C-dP‘
will not be allowed and the label ‘nOdP‘ will be shown instead.
- The dew-point measurement is taken on a regular basis, according
to the value set in the parameter ‘cndP‘, from 3 minutes up to a
maximum of 27 minutes.
- When the dew-point regulation is activated either when restarting
from the states OFF, housekeeping or vacations, or when
parameters ‘d-EF‘, ‘d-EC‘ or ‘d-FP‘ have been changed; in this case
the regulator will restart for 1 minute with all relays in NC position,
in order to avoid sudden activations. After this phase the normal
regulation will be activated.
For further details regarding the parameters involved in the control of
the dew point, see the following paragraphs.
d-EF’ Dew point control with external probe on underoor
plants.
When the dew point regulation is active with the ‘C-dP’ parameter
set on ‘d-EF’, the regulator will control both systems attached for the
cooling and de-humidication according to the comparison between
the dew-point temperature and the temperature measured by the
external sensor, thus applying the settings of the regulation ‘d-EF’
regulation.
The following graphics describe the dew point control mode.
HYdP
hysteresis
PRIORITY ON
THERMOSTAT
PRIORITY ON
DEHUMIDIFIER
PRIORITY ON
dp cooler
dehumidier
TE+SMF TE+SMF+ HYdP0 °C
HYdP
hysteresis PRIORITY ON
dp
dp
Where:
dP: dew point (see table 1).
TE: External temperature measured
SMF: dew point increase set in the sub-parameter ‘ d-EF ‘.
HYdP: dew point hysteresis equal to 0.5°C (cannot be modied).
‘d-EC’ Dew point control with external probe on metal ceiling.
When the dew point regulation is active with the ‘C-dP’ parameter
set on ‘d-EC’, the regulator will control both systems attached for the
cooling and de-humidication according to the comparison between
the dew-point temperature and the temperature measured by the
external sensor, thus applying the settings of the regulation ‘d-EC’
regulation.
The following graphics describe the dew point control mode.
HYdP
hysteresis
PRIORITY ON
THERMOSTAT
PRIORITY ON
DEHUMIDIFIER
PRIORITY ON
dp cooler
dehumidier
TE+SMC TE+SMC+ HYdP0 °C
HYdP
hysteresis PRIORITY ON
dp
dp
Dove:
dP: dew point (see table 1).
TE: External temperature measured
SMC: incremento del punto di rugiada impostato nel sottoparametro
‘ d-EC ‘.
HYdP: dew point hysteresis equal to 0.5°C (cannot be modied).
‘d-FP’ dew point control on xed points
If the dew point control function, ‘ C-dP ’, is activated on ‘ d-FP
’, the programmable thermo-hygrostat controls the cooling and
dehumidication devices on the basis of the comparison of the
temperature value of the dew point calculated and the temperature
values relative to the dew points set in the sub-parameters ‘ TF1 ’
and ‘ TF2 ’.
The following graphics describe the dew point control mode.
HYdP
hysteresis OFF
PRIORITY ON
THERMOSTAT cooler
dehumidier
TF10 °C
HYdP
hysteresis
PRIORITY ON
DEHUMIDI-
FIER
dP
TF2
ON
TF1 - HYdP
Dove:
dP: dew point (see table 1).
TF1: second lower threshold of the dew point (expressed in °C).
TF2: rst lower threshold of the dew point (expressed in °C).
HYdP: dew point hysteresis equal to 0.5°C (cannot be modied).
On identication of the dew point temperature (table 1) which is to be
respected, thresholds ‘ TF1 ’ and ‘ TF2 ’ will be set in order to obtain
system adjustment such to prevent the formation of condensate.
Example:
dP > TF1 = the dehumidication system starts to operate,
maintaining the cooling system active if it has already
been activated.
The following situation then occurs:
dP > TF2 = the dehumidication system remains active, but the
cooling system is deactivated.
Once the value of ‘ TF2 ’ is set lower than the minimum temperature
of the cooling surface, this control allows to prevent the formation of
condensate on the surface for any temperature and relative humidity
value of the air.
ATTENTION
- The maximum value of ‘ TF1 ’ will be self-limited to ‘ TF2 ’ less
0.2°C.
- The ‘ TF2 ’ value must always be set with a value lower than
the minimum temperature reached by the cooling surface to
days (from 1 to 99).
At the end of the set number of hours or days, the programmable
thermo-hygrostat will go back into the operating mode it was in prior
to activation of the Vacation Program. While it is off, and in case the
device has been set to Heating mode, the antifrost function will be in
any case active, and the display will show the symbol ‘ ‘ and the
countdown of the time remaining to the end of the program.
Note: Access to the vacation program will NOT be enabled while the
‘ cleaning program ‘ is on.
To activate the vacation program proceed as follows:
1. Select the parameter ’HOL’ and press ’OK’; the display shows the
symbol ‘ ‘, the indication ’h 00’ and the ‘ P‘ icon ashing.
2. Press buttons ‘ ‘ and ‘ ‘ to set the vacation time; every
change will be automatically memorized.
Up to 95 hours, the programming is indicated in hours and the
display will show ‘ h XX ‘.
Once that value is exceeded, the device will automatically switch to
the mode for programming the vacation time in days and display will
show ‘ d XX ‘. It will be possible to increase or decrease the hour
or day by one unit at a time, with values ranging from 1 .. 95 hours
and 4 .. 99 days.
3. To activate the holiday program for a given time, press again the
‘OK’ button or wait 10 seconds without pressing any key; the
display showsthe ‘ ’ icon ashing and the time remaining to the
end of the holiday period.
If you have not set the time duration of the holiday (h:00), you can
exit the adjustment and return to normal operation by pressing the
‘ OK ’ or ‘ ‘ or by waiting 10 seconds without pressing any key.
4. To deactivate the vacation function and resume normal operation,
press the button ‘ ‘.
‘H-C’ HEATING / COOLING SETTING
This setting is used to invert the operating logic of the thermostat
relay according to whether a heating or air conditioning unit is being
controlled.
ATTENTION:
- By modifying the relay operating logic, the setpoint values
will be automatically taken back to the default values for the
mode set.
- The programmable thermo-hygrostat leaves the factory set in
the heating mode.
To modify the operating logic, carry out the following procedure:
1. Select the parameter ’ H-C ’ and press ’ OK ’; the display shows the
current adjustment mode and the ‘ P‘ icon ashes.
2. Press thebuttons ‘ ’ and ‘ ’ to select thedesired adjustment;
each change isautomatically saved.
3. To return to the list of user parameters, press the ‘ OK ’ button.
4. To exit the user parameter settings and resume normal operation,
press the ‘ ‘ button or wait 10 seconds without pressing any key.
During normal operation, if the heating mode is on, the ‘ ‘ icon will
remain lit, whereas if the cooling mode is on, the ‘ ‘ will remain
steadily lit.
‘HYH’ SETTING HYGROSTAT HYSTERESIS
Setting this parameter allows to dene the hysteresis, in %RH, which
is applied to the programmable thermo-hygrostat to adjust the room
humidity, whenever the ‘ C-dP ‘ (dew point) user parameter has not
been enabled.
To adjust the differential, perform the following operations:
1. Select the ‘ HYH ’ parameter and press ‘ OK ’.
2. The display will show the previously set value and the ‘ P‘ icon
will ash.
3. Press the ‘ ‘ and ‘ ‘ keys to modify the value (between
0.5%RH .. 10.0%RH); every modication is memorised
automatically.
4. To return to the list of user parameters, press the ‘OK’ button.
5. To exit the user parameter settings and resume normal operation,
press the ‘ ‘ button or wait 10 seconds without pressing any key.
‘OFSH’ INTERNAL HUMIDITY SENSOR OFFSET SETTING
With this parameter it is possible to correct the humidity reading of
the internal sensor by ±5%RH in order to correct any systematic
reading errors due to the positioning of the programmable thermo-
hygrostat in areas unsuitable for measuring the room humidity. The
device leaves the factory with the Offset set at 0.0%RH.
To adjust the Offset value for the internal sensor, carry out the
following steps:
1. Select the ‘ OFS1 ’ parameter and press ‘ OK ’.
2. The display will show the previously set Offset value and the ‘ P‘
icon will ash.
3. Press the ‘ ‘ and ‘ ‘ keys to modify the value (between
-5.0%RH .. +5.0%RH); every modication is memorised
automatically.
4. To return to the list of user parameters, press the ‘OK’ button.
5. To exit the user parameter settings and resume normal operation,
press the ‘ ‘ button or wait 10 seconds without pressing any key.
‘dE-H’ DEHUMIDIFICATION/HUMIDIFICATION SETTING
This setting is used to invert the operating logic of the programmable
thermo-hygrostat relay according to whether a dehumidication or
humidication device is being controlled.
ATTENTION:
- The dehumidication function is not active in the heating
mode.

- ENGLISH -
THW01B0001EV 027284 150716 10
control or however than the coolest surface present in the
room.
- The difference between the value of ‘ TF2 ’ and the minimum
temperature of the coldest surface in the room will be
assessed by qualied staff, according to the type of plant,
thermal inertia and the various environmental conditions.
Generally, a minimum of 1°C is recommended for underoor
plants and 3°C for metal ceilings.
‘CndP’ Rate of check for the dew-point regulation
This parameter allows to set the minimum time, in minutes, which
must elapse between two consecutive activations of the output
relays, caused by the ‘ c-dP ‘ function intervention.
This time interval can be set in steps of 3 minutes; itwill be re-
initialised every time the dew-point regulation mode is changed by the
user (‘ d-EF ’, ‘ d-EC ’ or ‘ d-FP ‘).
‘Cntr’ THERMOSTAT RELAY ACTIVATION TIMER
Using this parameter it is possible to display the thermostat
relay activation time meter relative to the actual day. The timer is
automatically reset at midnight.
Proceed as follows:
1. Select the ‘ Cntr ’ parameter and press ‘ OK ’, the device displays
the hours of activation of the thermostat relay alternating with the
wording ‘ Cntr ’ + the ‘ P‘ icon.
2. To go back to the list of user parameters, press ‘ OK ’ and then the
‘ ‘ key.
3. To exit user parameters setting and restore normal operation, press
‘ ‘ or do not press any key for 10 seconds.
‘dFLt’ SET DEFAULT DATA
With this parameterit ispossible to resetuser parametersin order
tobring back all theparameters to thefactory defaults.
Proceed as follows:
1. Select the parameter ’dFLt’ and press ’OK’; the device
automatically sets the default data and the display will show ’-dF-’
and the ‘ P‘ icon ashes.
2. To return to the list of user parameters, press the ‘OK’ button.
3. To exit the user parameter settings and resume normal operation,
press the ‘ ‘ button or wait 10 seconds without pressing any key.
WARNING!
Restoring the Default Data will reset all settings made by the
user, such as Time Program, Heating/Cooling, Set-Points and all
other programmable data.
SWITCHING OFF - ANTIFREEZE FUNCTION
To deactivate the programmable thermo-hygrostat press the ‘ ‘
button.
The display will show the word ‘ OFF ’.
If the programmable thermo-hygrostat has been set in the heating
mode, the Antifreeze function will be active and the ‘ ‘ symbol
will appear on the display; in such a case the room temperature will be
controlled based on the value set for the Antifreeze temperature (see
paragraph ‘SETTING THE USER PARAMETERS‘).
AUTOMATIC OPERATION / 24H MANUAL / PERMANENT
MANUAL OVERRIDE FUNCTION
With the ‘ ‘ key, the programmable thermo-hygrostat may be forced
to adjust the room temperature and humidity according to the comfort
temperature and humidity set, regardless of the time programming
settings.
By pressing the ‘ ‘, button repeatedly you can switch from
Automatic to 24 hour Manual, from 24 hour Manual to Permanent
Manual and from Permanent Manual back to Automatic.
During operation in manual mode, the display does not show the time
program, but only the room temperature, the status of the relays (any
switch-on of the ‘ ‘ or ‘ ‘ or ‘ ‘ symbols), the ‘
24h
‘ symbol
(manual 24h) or ‘ ‘ (permanent manual) and the ‘ ‘ symbol.
Pressing the ‘ ‘ button once will activate the 24 hour Manual mode
and the programmable thermo-hygrostat will remain in this mode
until the time 23:59 is reached, after which it will go back into the
Automatic mode.
Note: If the device is set in the 24h Manual mode and the Vacation
program is activated, after the Vacation period has elapsed, if it is
past the time 23.59, the programmable thermo-hygrostat will go back
into the Automatic mode and follow the set program schedule.
Pressing the ‘ ‘ button a second time will switch the programmable
thermo-hygrostat into the Permanent Manual mode and it will remain
in this mode until you press the ‘ ‘ button again.
TIME/TEMPERATURE/HUMIDITY DISPLAY
By repeatedly pressing the ‘ ‘ button, the display can show the
actual time with the icon relative to the temperature adjustment probe
(internal ‘ ‘ or external ‘ ‘), the room temperature read by the
internal sensor, distinguished by the ‘ ‘ icon, the room temperature
read by the remote probe (if connected) distinguished by the ‘ ‘
icon and the room humidity read by the internal sensor, distinguished
by the ‘ ‘ icon.
The temperature and humidity readings are displayed corrected by the
Offset value set.
Note: If the ‘ rEG ’ parameter is set at ‘ In ’, but an error is detected
on the internal sensor, the display will show ‘ SEnS E xx ’. In
this situation the adjustment will be automatically interrupted
and both relays will be placed in the Normally Open position.
If the ‘ rEG ’ parameter has been set at ‘ Out ‘ but the remote
probe has not been connected or is damaged, the display will
show the respective wording ‘ SEnS OPEN ‘ or ‘ SEnS SHrt ‘
with the ‘ ‘ icon on.
ATTENTION:
- In order to optimise battery duration, the programmable thermo-
hygrostat reads the room temperature every 3 minutes and,
consequently, decides on activation or deactivation of the relays.
- Press the ‘ OK ’ button briey to perform an instant refresh.
BACKLIGHTING
The display backlight turns on whenever and button is pressed. It
turns off automatically 20 seconds after the last pressing of a button.
HOW TO INSERT / REPLACE BATTERIES
The battery charge status is constantly displayed by means of the
‘ ‘ symbol. The battery charge is at a maximum if all three level
indicators are lit inside the symbol. If the ‘ ‘ symbol (completely
empty) ashes, it means that the batteries are depleted and must be
replaced. In this case, both the relays are placed in the safety position
(N.C.) and the display alternately shows the time (or temperature or
humidity) and the word ‘ BATT ’. If the batteries are not replaced as
soon as possible, the ‘ ‘ or ‘ ‘ symbols will also ash indicating
that the device is blocked.
To replace the batteries proceed as follows:
1. Open the ap of the battery compartment (Fig. 1).
2. Remove the batteries, prying them out with the aid of a tool if
necessary.
3. Insert the new batteries, which must be alkaline 1.5V type AA.
4. Check for correct time and date and eventually reset it.
CONNECTION TO A TELEPHONE INTERFACE
The programmable thermostat allows to connect a telephone interface
with continuous operation (latching relay) to the connector ‘ B‘ in
Fig. 6.
Use of a suitable telephone interface does not require any setting to be
made on the programmable thermo-hygrostat; for directions on using
the telephone interface see the instruction manual provided.
Via a telephone interface it is possible to turn the programmable
thermo-hygrostat Off or turn it On in the Permanent Manual mode.
Depending on the commands received from the telephone interface the
programmable thermo-hygrostat will act according to the following
operating logic:
1. Telephone interface contact closed:
The programmable thermo-hygrostat will switch into the
‘Permanent Manual’ mode: the ‘ ‘ and ‘ ‘ symbols will be
shown on the display.
2. Telephone interface contact open, after (and only after) a
previous closure, if no buttons have been pressed (Manual/Off):
The programmable thermo-hygrostat will be switched off and the
word ‘OFF‘ will be displayed along with the ‘ ‘ symbol. If the
‘Antifreeze’ function is active the ‘ ‘ symbol will be displayed.
IMPORTANT: the commands input by pressing the control
buttons will always have priority over the commands received
from the telephone interface.
If you press the ‘ ‘ or ‘ ‘ button on the programmable thermo-
hygrostat, the device will change its status and the ‘ ‘ icon will
ash to indicate that the interface command has been overridden by a
command input with a control button.
The ‘ ‘ icon will stop ashing if the telephone interface sends the
programmable thermo-hygrostat the same command as the one made
with the button or if the telephone interface is reset. In such a case the
status set by means of the control button will not be changed and the
programmable thermo-hygrostat will be ready to receive a new command.
IMPORTANT
If an Off command is sent to the programmable thermo-
hygrostat via the telephone interface (contact open), it is a
good idea to check that the command has been executed by the
programmable thermo-hygrostat by carrying out the following
realignment procedure:
1. Using the functions of the telephone interface, check that the
contact is open, sending an Off command if necessary.
2. Send a command to the telephone interface to close the
contact (the programmable thermo-hygrostat will turn on).
3. Using the functions of the telephone interface, check that the
contact is closed.
4. Send a command to the telephone interface to open the
contact (the programmable thermo-hygrostat will turn off).
During this sequence no commands should be input with
the control buttons as they have priority over the interface
commands.
TECHNICAL CHARACTERISTICS
Power supply: 2 x 1.5V, alkaline batteries (Type AA)
Battery life: >1 year
Backlight turns off: 20 sec. after the last pressing of a button
Thermostat section
Range of adjustment:comfort: 5°C .. 40°C
economy: 5°C .. 40°C
Asymmetrical differential: 0,1°C .. 5°C (Default 0,2°C)
Thermostat relay
contacts capacity: 5(1)A 250V~ SPDT
Hygrostat section
Range of adjustment:comfort: 10%RH .. 95%RH
economy: 10%RH .. 95%RH
Differential: 0,5%RH .. 10.0%RH (Default 2.0%RH)
Hygrostat relay
contacts capacity: 5(1)A 250V~ SPDT
Sensor type: Internal (temperature/humidity)
Humidity reading saturation: Probe temp. <10.0%RH (- - - -)
Probe temp. >90.0%RH (E E E E).
Temperature accuracy (-40°C .. 120°C):
Humidity accuracy (0%RH .. 100%RH @25°C):
Resolution: 0.1°C. (-9.9°C .. 50°C)
0.1%RH (10%RH .. 90%RH)
Internal sensor Offset:
Temp.: ± 5.0°C. (Default 0.0°C)
Humidity: ± 5.0% RH. (Default 0.0°C)
Remote probe type: NTC 10K Ohm ±1% @ 25°C (optional)
Remote probe Offset: ± 5.0°C. (Default 0.0°C)
Antifreeze: OFF / 0.5°C .. 25.0°C (Default 3.0°C)
Dew point: OFF / d-EF / d-EC / d-FP (Default d-FP)
Ext. Interface Input: On/Off type continuous signal.
Protection rating: IP 30
Class of protection against
electric shock: II ( )
Number of manual cycles: 1,000
Number of automatic cycles: 100,000
Type of action: 1CU
Tracking index: PTI 175
Pollution situation: 2 (normal)
Overvoltage category: II
Operating temperature: 0°C .. +40°C
Storage temperature: -10°C .. +50°C
Humidity limits: 20% .. 80% RH non-condensing
Enclosure: Material: ABS+PC V0 self-extinguishing
Colour: Signal white (RAL 9003)
Light grey (RAL 7035)
Weight: ~ 156 gr.
CLASSIFICATION UNDER REG. 2013.811.EC
Class: I
Contribution to energy efciency: 1%
NORMATIVE REFERENCES
The product complies with the following standards (EMC 2004/108/EC
and LVD 2006/95/EC):
EN-60730-1 (2011)
EN-60730-2-7 (2010)
EN-60730-2-9 (2010)
DIMENSIONS
WARRANTY
In the view of a constant development of their products, the
manufacturer reserves the right for changing technical data and
features without prior notice. The consumer is guaranteed against any
lack of conformity according to the European Directive 1999/44/EC as
well as to the manufacturer’s document about the warranty policy. The
full text of warranty is available on request from the seller.
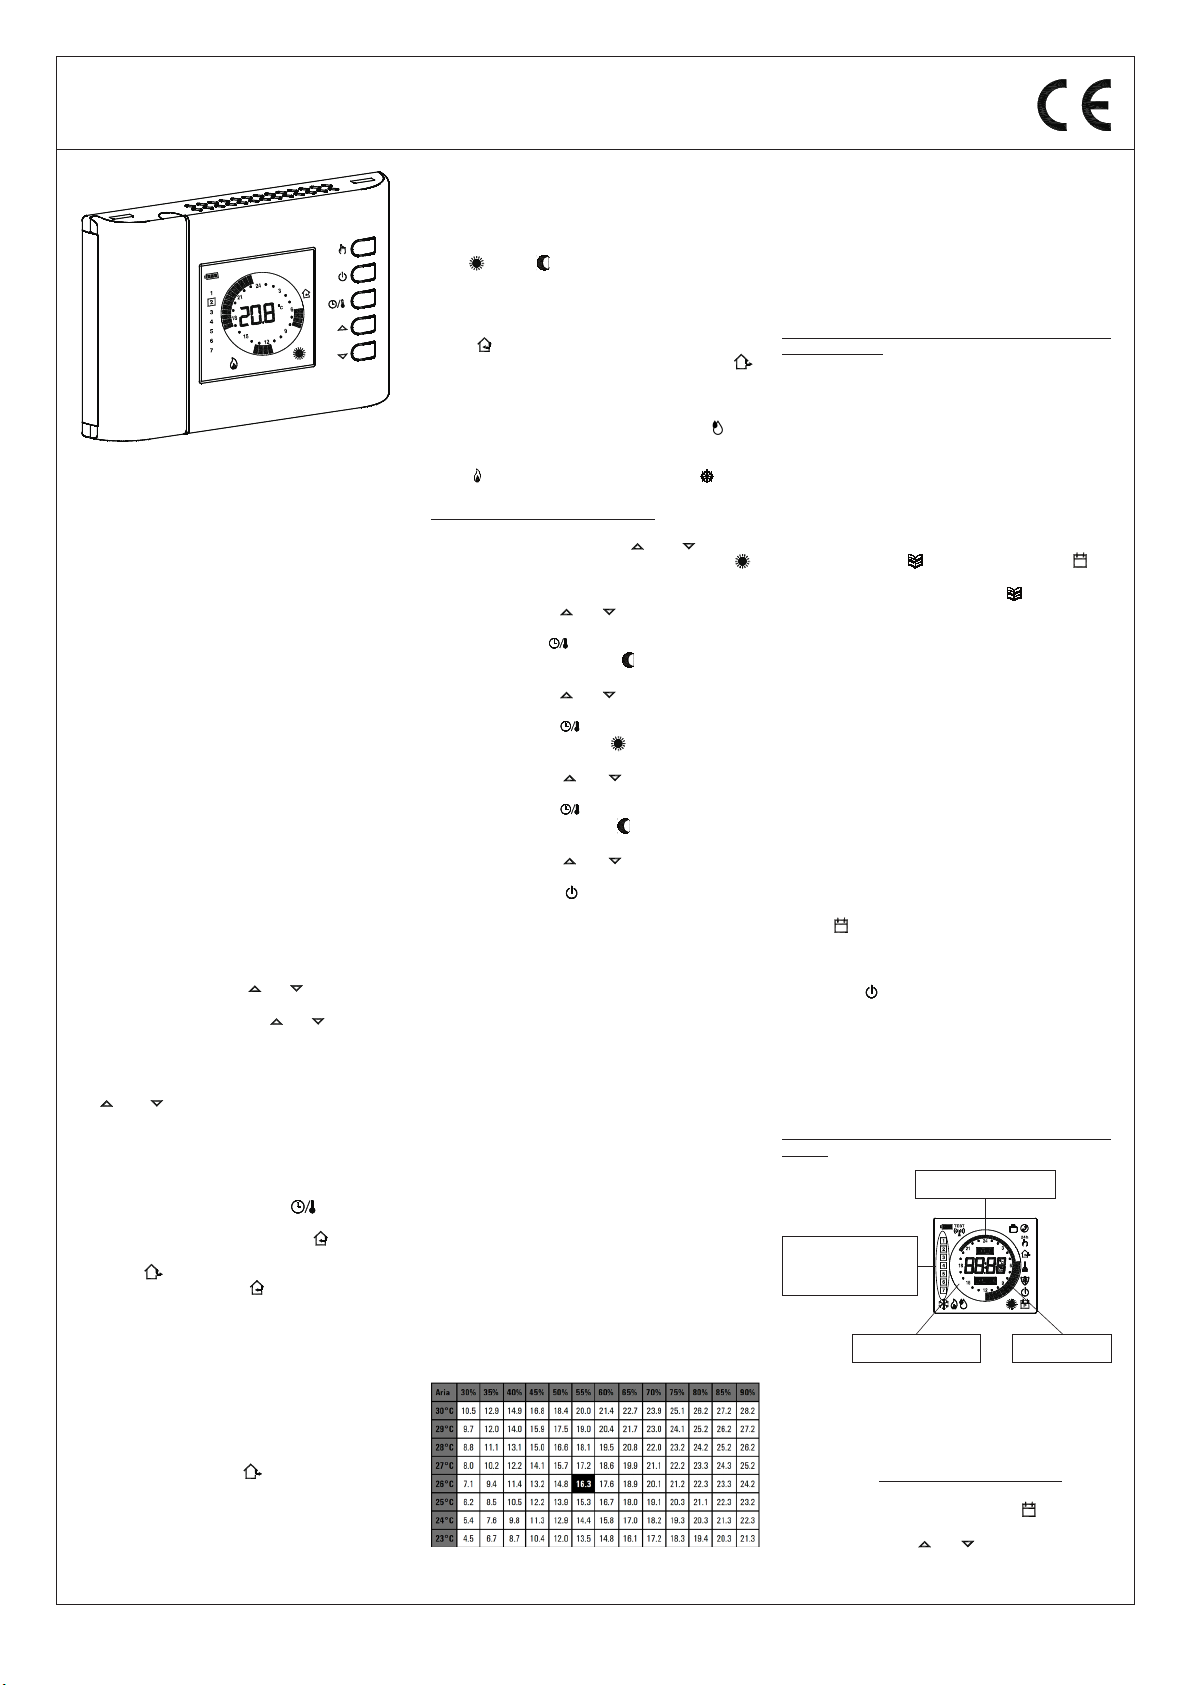
- FRANÇAIS -
THW01B0001EV 027284 150716 11
GÉNÉRALITÉS
Ce dispositif est un chrono-thermo-hygrostat digital à batteries
hebdomadaire pour le contrôle de la température ambiante et de
l’humidité relative sur trois niveaux: Confort, Réduit ou arrêt/Antigel.
Le dispositif peut être utilisé tant pour des systèmes de chauffage que
de refroidissement.
Le chrono-thermo-hygrostat est équipé d’un grand afcheur
rétro-illuminé pour la visualisation de toutes les indications de
fonctionnement, le programme horaire établi, la température ambiante
et l’humidité relative relevées ou, au choix, l’heure.
Il offre la possibilité d’établir jusque 7 programmes distincts, un par
jour de la semaine, avec un temps d’intervention minimal d’une demi-
heure dans l’arc des 24 heures.
En plus le dispositif offre la possibilité d’établir la valeur de la
température d’Antigel, le contrôle du point de rosée et le réglage du
décalage relatif du capteur.
MISE EN MARCHE
À la première mise en marche :
- Introduire les piles à leur place en respectant les polarités indiquées
(voir paragraphe ‘INSERTION/REMPLACEMENT DES BATTERIES’).
- Régler l’heure et la date.
- Choisir la modalité de fonctionnement du chrono-thermo-hygrostat
(paramètre utilisateur ‘H-C’): Chauffage (choix réglé à la sortie
d’usine) ou Refroidissement.
Réglage de l’heure et du jour courants
Pour régler l’horloge du chrono-thermo-hygrostat, effectuer les
opérations suivantes :
1. Ouvrir le volet d’accès au logement des piles.
2. Appuyer pendant au moins 2 secondes le bouton ‘ OK ‘, les chiffres
de l’heure clignotent.
3. Régler l’heure avec les touches ‘ ’ et ‘ ’.
4. Conrmer avec la touche ‘ OK ‘, les chiffres des minutes clignotent.
5. Régler les minutes avec les touches ‘ ’ et ‘ ’.
6. Conrmer avec la touche ‘OK’; l’afcheur montre l’inscription
’dAY’ et le carré de sélection relatif au jour de la semaine en cours
clignote.
7. Régler le jour de la semaine courante avec les touches
‘ ’ et ‘ ’ (le jour courant est mis en évidence avec un
carré autour du chiffre correspondant au jour de la semaine,
1 lundi .. 7 dimanche).
8. Conrmer avec ‘ OK ‘, la sortie du réglage de l’heure et du jour est
automatique.
Visualisation Heure / Température / Humidité
En appuyant cycliquement sur la touche ‘ ‘ on peut afcher
alternativement l’heure courante, la température ambiante (en °C)
relevée par le capteur interne, signalé par l’icône ‘ ‘, la température
ambiante (en °C) relevée par la sonde à distance (si connectée) signalée
par l’icône ‘ ‘ et l’humidité ambiante (en %RH) relevée par le
capteur interne, signalé par l’icône ‘ ‘. Les température et humidité
relevées sont afchées déjà corrigées de la valeur du décalage relatif
prédéterminée.
Note: Dans le cas où le paramètre ‘ rEG ‘ est réglé sur ‘ In ‘, mais une
erreur est détectée sur le capteur interne, l’afcheur indiquera
‘ SEnS E xx ‘. Dans ce cas, la régulation sera interrompe
automatiquement et les deux relais seront placés en position
Normalement Ouverte.
Dans le cas où le paramètre ‘ rEG ‘ est réglé sur ‘ Out ‘ mais
la sonde à distance n’est pas connectée où est endommagée
l’afcheur indiquera respectivement ‘ SEnS OPEN ‘ ou bien
‘ SEnS SHrt ‘ avec l’icône ‘ ‘ allumée.
ATTENTION : pour optimiser la durée des batteries, le chrono-
thermo-hygrostat effectue la lecture des capteurs et le contrôle
des erreurs toutes les 3 minutes ou bien après appui sur la touche
‘Ok’ et en conséquence, décide de l’activation ou la désactivation
du relais.
L’éventuelle indication d’erreur devrait disparaître après 3
minutes ou bien à l’appui sur la touche ‘Ok’. Si l’indication ne
disparaît pas, des problèmes ont été détectés sur les capteurs.
Réglage température/humidité de confort et réduction
Durant le fonctionnement normal l’afcheur montre la température
et l’humidité ambiante relative et l’icône relative au mode de réglage
actuel ‘ ‘ ou bien ‘ ‘.
Le chrono-thermo-hygrostat relève la température ambiante grâce au
capteur interne ou bien à un capteur à distance (selon la programmation
du paramètre utilisateur ‘ rEG ‘), alors que la mesure de l’humidité se fait
seulement grâce au capteur interne.
L’icône ‘ ‘ clignote pour indiquer que le réglage (température ou
humidité) doit se faire sur le capteur interne, alors que l’icône ‘ ‘
clignote pour indiquer que le réglage (seulement pour la température)
doit se faire sur la sonde à distance.
L’activation du relais qui contrôle le système pour la gestion de
l’humidité ambiante est signalée sur l’afcheur par l’icône ‘ ‘.
L’activation du relais qui contrôle le système pour la gestion du
chauffage/refroidissement ambiante est signalée sur l’afcheur par
l’icône ‘ ’ allumée pour le chauffage et par l’icône ‘ ’ pour le
refroidissement.
Effectuer le réglage selon la procédure suivante :
- Afcher l’heure actuelle.
- Appuyer une seule fois sur la touche ‘ ’ ou ‘ ’: l’afcheur
montre la température de confort réglée (signalée par l’icône ‘ ‘)
et l’icône ‘ SET °C ‘ (à indiquer que la température de consigne est
afchée).
- Appuyer sur les touches ‘ ’ et ‘ ’ pour modier la température
de consigne afchée.
- Appuyer sur la touche ‘ ‘; l’afcheur montrera la température de
réduction réglée (signalée par l’icône ‘ ‘) et l’icône ‘ SET °C ‘ (à
indiquer que la température de consigne est afchée).
- Appuyer sur les touches ‘ ’ et ‘ ’ pour modier la température
de consigne afchée.
- Appuyer sur la touche ‘ ‘; l’afcheur montrera l’humidité de
confort réglée (signalée par l’icône ‘ ‘) et l’icône ‘ SET %RH ‘ (à
indiquer que l’humidité de consigne est afchée).
- Appuyer sur les touches ‘ ’ et ‘ ’ pour modier l’humidité de
consigne afchée.
- Appuyer sur la touche ‘ ‘; l’afcheur montrera l’humidité de
réduction réglée (signalée par l’icône ‘ ‘) et l’icône ‘ SET %RH ‘ (à
indiquer que l’humidité de consigne est afchée).
- Appuyer sur les touches ‘ ’ et ‘ ’ pour modier l’humidité de
consigne afchée.
- Appuyer sur la touche ‘ ‘ ou bien après quelques secondes
d’inactivité, l’afcheur revient à la température ambiante tout en
ayant mémorisé les valeurs dénies.
Note: Normalement, pour avoir la régulation nocturne, la
température / humidité de réduction devront avoir une valeur
inférieure à celle de confort.
Le chrono-thermo-hygrostat effectuera la régulation de la température
ambiante en mode confort ou réduction en accord avec le programme
horaire déni (voir paragraphe ‘RÉGLAGE DES PARAMÈTRES
UTILISATEUR).
Contrôle du point de rosée
Le point de rosée (géré par le paramètre utilisateur ‘ C-dP ’), représente
la température sous laquelle il y a formation de condensation sur les
supercies et dépend de la température et de l’humidité présentes
dans l’ambiance.
ATTENTION
- Le contrôle du Point de Rosée est activé seulement si le paramètre
utilisateur ‘ C-dp ’ (contrôle du Point de Rosée) a été activé.
- Le contrôle du point de rosée est géré seulement en mode
refroidissement et/ou déshumidication.
- Si les conditions ci-dessus sont remplies, la commande du
refroidisseur et du déshumidicateur, selon le point de rosée, aura
la priorité respectivement à la régulation normale (c’est-à-dire le
contrôle du point de rosée déshabilité).
Dans le tableau ci-dessous (tableau 1) on peut voir la valeur du point
de rosée (exprimée en °C), en fonction de la température ambiante et
de l’humidité relative, exprimée en ‘%RH’.
Tableau 1
Note: le point de rosée, mis en évidence dans le tableau, tient
compte de conditions climatiques considérées comme
optimales en été :
Point de rosée = 16.3°C, avec température ambiante de
26.0°C, et humidité ambiante de 55.0%RH.
ATTENTION
- Sur les supercies avec température mineure ou égale au point de
rosée calculé C-dP, se formera la condensation
- Le calcul du point de rosée est effectué automatiquement par
l’appareil quand les conditions environnementales varient.
Pour tous les détails voir le paragraphe “ ‘C-dP’ GESTION DU
POINT DE ROSÉE “.
Algorithme Safety Control
Les deux relais pour le contrôle du thermostat et de l’hygrostat sont
gérés grâce à l’algorithme “Safety Control”
L’algorithme permet de ne pas activer simultanément les deux relais,
de manière à ne pas surcharger la ligne électrique en phase de départ
des systèmes pour le contrôle de la température et de l’humidité.
En pratique l’activation est gérée de manière à ne pas avoir de
superpositions dans l’activation des deux commandes.
RÉGLAGES DES PARAMETRES DE L’UTILISATEUR
Pour effectuer le réglage des paramètres du chrono-thermo-hygrostat,
agir de la manière suivante :
1. Appuyer sur la touche ‘ ‘, l’afcheur montrera l’icône ‘ P‘ (en
bas à droite) et l’inscription ‘ PrOG ‘.
2. Appuyer à plusieurs reprises sur la touche ‘ ‘ pour se déplacer
entre les paramètres de l’utilisateur :
Réglage du programme horaire ‘ PrOG ’
Réglage de l’antigel ‘ AFr ’
Réglage différentiel ‘ HYS ’
Réglage des fonctions d’optimisation ‘ OPt ’
Conguration Offset du capteur interne ‘ OFS1 ’
Conguration Offset de la sonde à distance ‘ OFS2 ’
Conguration de la Sonde de réglage ‘ rEG ’
Réglage programme nettoyage ‘ CLE ’
Réglage programme Vacances ‘ HOL ’
Réglage chauffage ou refroidissement ‘ H-C ’
Réglage hystérésis hygrostat ‘ HYH ’
Réglage Offset du capteur d’humidité ‘ OFSH ’
Réglage déshumidication ou humidication ‘ dE-H ’
Contrôle du point de rosée ‘ C-dp ’
Fréquence d’activation du contrôle du point de rosée ‘ Cndp ’
Compteur des heures d’allumage du thermostat ‘ Cntr ’
Réglage données par défaut ‘ dFLt ’
3. Appuyer sur la touche ‘ P ‘ pour modier le paramètre sélectionné ;
l’icône ‘ P‘ clignote.
4. Congurer les données relatives à chaque paramètre, comme
illustré ci-après.
5. Pour sortir de la programmation des paramètres utilisateur, appuyer
sur la touche ‘ ’ ou bien attendre 10 secondes sans appuyer sur
aucune touche.
‘ PrOG ‘: RÉGLAGE DU PROGRAMME HORAIRE
Normalement l’anneau de tirets de l’afcheur montre la modalité de
fonctionnement (Confort, réduction, Off/antigel) du chrono-thermo-
hygrostat alors que la bande verticale de gauche montre le jour actuel
de la semaine (1 Lundi .. 7 Dimanche) mis en évidence par un carré sur
le numéro auquel se rapporte la programmation.
Pour faciliter l’opération de programmation il suft de retenir la règle
suivante :
Mode réduit :
un tiret allumé (interne).
Mode confort :
deux tirets allumés.
Mode arrêt/antigel :
aucun tiret allumé.
Jours de la semaine : 1
lundi .. 7 dimanche. Le carré
indique le jour ou le groupe
de jours courant.
Pour établir le programme horaire, suivre comme décrit ci-après :
Remarque : on sortira du réglage sans enregistrer le programme
établi si aucune touche n’est appuyée pendant plus
de 10 secondes, ou bien en conrmant de manière
séquentielle les réglages au moyen du bouton
‘ OK ‘ sans effectuer aucune modication.
1. Sélectionner le paramètre ‘PrOG’ et appuyer sur la touche ‘OK’:
l’afcheur montre l’inscription ‘dAy’, l’icône ‘ P‘ et les carrés
autour du jour ou du groupe de jours correspondants clignotent.
2. Appuyer sur les touches ‘ ’ et ‘ ’ pour établir la combinaison
de jours à programmer.
Ci-dessous la liste des 4 combinaisons disponibles :
CHRONO-THERMO-HYGROSTAT DIGITAL HEBDOMADAIRE À PILES
ESBE Series TPH114
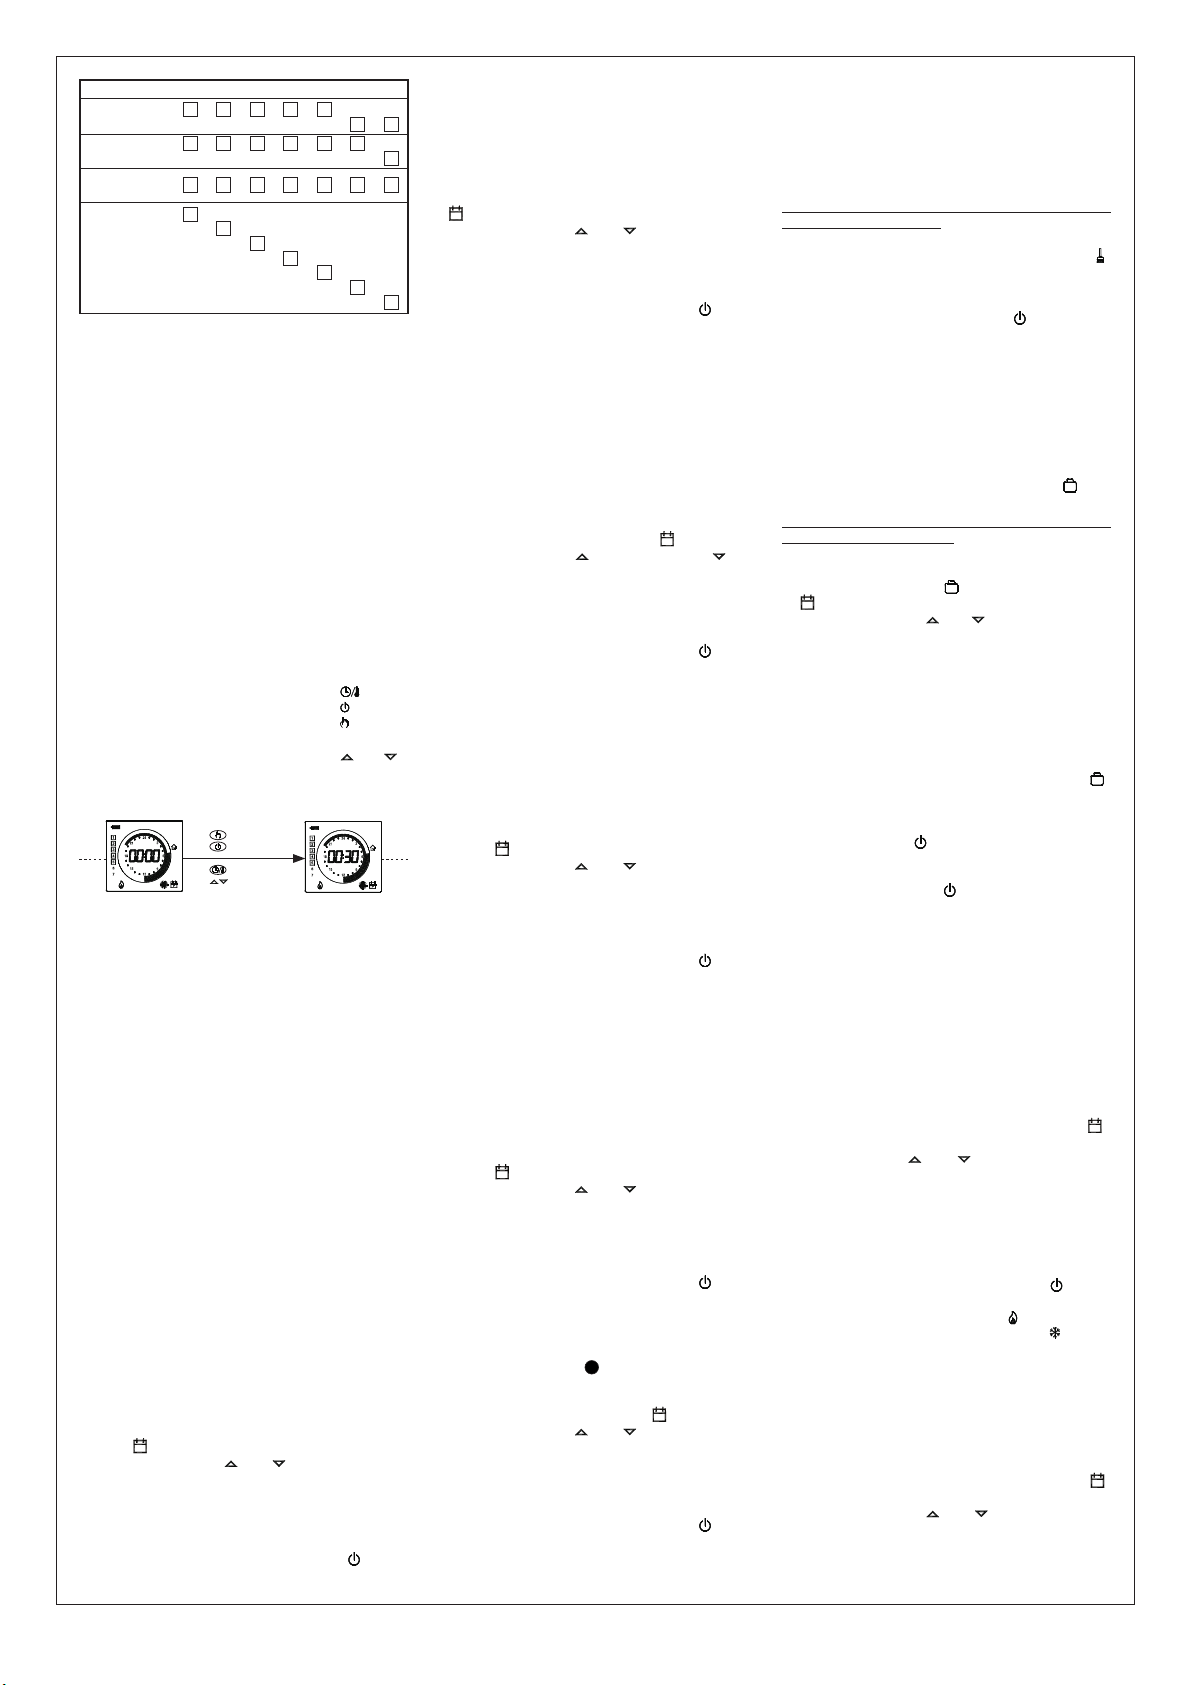
- FRANÇAIS -
THW01B0001EV 027284 150716 12
‘HYS’ RÉGLAGE DIFFÉRENTIEL
Le réglage de ce paramètre consent de dénir l’hystérésis, en °C,
qui est appliquée au chrono-thermo-hygrostat pour la régulation de la
température ambiante, si le paramètre utilisateur ‘ C-dP ‘ (point de
rosée) n’a pas été habilité.
Pour régler le différentiel exécuter les opérations suivantes :
1. Sélectionner le paramètre ‘ HYS ’ et appuyer sur la touche ‘ OK ’.
2. L’afcheur montre la température précédemment réglée et l’icône
‘ P‘ clignotante.
3. Appuyer sur les touches ‘ ‘ et ‘ ‘ pour modier la valeur
(comprise entre 0.1°C .. 5.0°C); chaque modication est
automatiquement mémorisée.
4. Pour revenir à la liste des paramètres, appuyer sur la touche ‘ OK ’.
5. Pour sortir du réglage des paramètres de l’utilisateur et revenir
au fonctionnement normal, appuyer sur la touche ‘ ‘ ou bien
attendre 10 secondes sans appuyer sur aucune touche.
‘OPt’ RÉGLAGE DE LA FONCTION D’OPTIMISATION
La fonction d’optimisation offre la possibilité d’activer le chauffage à
l’avance sur l’horaire programmé, de façon à obtenir la température
établie à l’heure programmée.
Essentiellement, le chrono-thermo-hygrostat calcule le temps
nécessaire pour atteindre la température souhaitée des lieux et anticipe
en conséquence l’allumage programmé du temps requis pour atteindre
le but.
L’avance est calculée selon le gradient moyen des dernières 24 heures,
avec un maximum de 60 minutes d’avance.
Pour régler la fonction d’optimisation, effectuer les opérations suivantes :
1. Sélectionner le paramètre ‘ OPt ‘ et appuyer sur la touche ‘ OK ‘.
2. L’afcheur montre ‘ on ‘ ou ‘ Off ‘ et l’icône ‘ P‘ clignotante.
3. Appuyer sur les touches ‘ ‘ pour activer (on) ou ‘ ‘ pour
désactiver (Off) la fonction ; toute modication est enregistrée
automatiquemen
4. Pour revenir à la lista des paramètres de l’utilisateur appuyer sur la
touche ‘ OK ’.
5. Pour sortir du réglage des paramètres de l’utilisateur et revenir
au fonctionnement normal, appuyer sur la touche ‘ ‘ ou bien
attendre 10 secondes sans appuyer sur aucune touche.
‘OFS1’ CONFIGURATION OFFSET DU CAPTEUR INTERNE
Avec ce paramètre il est possible de corriger la température relevée par
le capteur interne, de ±5°C, an de corriger les éventuelles erreurs
systématiques de lecture dues à un positionnement du thermostat
dans des zones inappropriées pour relever la température de la pièce.
Le dispositif sort de l’usine avec l’Offset conguré à 0.0°C.
Pour régler la température d’Offset du capteur interne, effectuer les
opérations suivantes:
1. Sélectionner le paramètre ‘ OFS1 ’ et appuyer sur la touche ‘ OK ’.
2. L’écran afchera la température d’Offset précédemment congurée
et l’icône ‘ P‘ clignotante.
3. Appuyer sur les touches ‘ ‘ et ‘ ‘ pour modier la valeur
(comprise entre -5.0°C .. +5.0°C) ; toute modication est
mémorisée automatiquement.
4. Pour revenir à la lista des paramètres de l’utilisateur appuyer sur la
touche ‘ OK ’.
5. Pour sortir du réglage des paramètres de l’utilisateur et revenir
au fonctionnement normal, appuyer sur la touche ‘ ‘ ou bien
attendre 10 secondes sans appuyer sur aucune touche.
‘OFS2’ CONFIGURATION OFFSET DE LA SONDE À DISTANCE
Avec ce paramètre il est possible de corriger la température
ambiante relevée par la sonde à distance, de ±5°C, an de
corriger les éventuelles erreurs systématiques de lecture dues à un
positionnement du thermostat dans des zones inappropriées pour
relever la température de la pièce. Le dispositif sort de l’usine avec
l’Offset conguré à 0.0°C.
Pour régler la température d’Offset de la sonde à distance, effectuer
les opérations suivantes:
1. Sélectionner le paramètre ‘ OFS2 ’ et appuyer sur la touche ‘ OK ’.
2. L’écran afchera la température d’Offset précédemment congurée
et l’icône ‘ P‘ clignotante.
3. Appuyer sur les touches ‘ ‘ et ‘ ‘ pour modier la valeur
(comprise entre -5.0°C .. +5.0°C) ; toute modication est
mémorisée automatiquement.
4. Pour revenir à la lista des paramètres de l’utilisateur appuyer sur la
touche ‘ OK ’.
5. Pour sortir du réglage des paramètres de l’utilisateur et revenir
au fonctionnement normal, appuyer sur la touche ‘ ‘ ou bien
attendre 10 secondes sans appuyer sur aucune touche.
‘rEG’ CONFIGURATION DE LA SONDE DE RÉGLAGE
Avec ce paramètre on dénit si la sonde à utiliser pour le réglage de la
température ambiante est la sonde interne du thermostat ou bien cella
à distance reliée au connecteur ‘ B‘ de Fig. 6.
Pour congurer ce paramètre, exécuter les opérations suivantes:
1. Sélectionner le paramètre ‘ rEG ’ et appuyer sur la touche ‘ OK ’.
2. L’écran afchera ‘ In ‘ ou ‘ Out ‘ et l’icône ‘ P‘ clignotante.
3. Appuyer sur les touches ‘ ‘ et ‘ ‘ p o u r m o d i e r l a v a l e u r
(In: capteur interne - Out: sonde à distance); toute modication
est mémorisée automatiquement.
4. Pour revenir à la lista des paramètres de l’utilisateur appuyer sur la
touche ‘ OK ’.
5. Pour sortir du réglage des paramètres de l’utilisateur et revenir
au fonctionnement normal, appuyer sur la touche ‘ ‘ ou bien
attendre 10 secondes sans appuyer sur aucune touche.
ATTENTION: Si la sonde de réglage est congurée sur la sonde
externe ‘Out’, en cas de panne ou d’absence de la sonde, le
réglage de la température sera automatiquement déplacé sur la
sonde interne, même si le paramètre reste conguré sur ‘Out’.
‘CLE’ RÉGLAGE DU PROGRAMME NETTOYAGE
Ce programme est particulièrement utile pour les moment de
nettoyage quand on ouvre les fenêtres rendant inutile le chauffage et
le refroidissement des locaux. Dans ces conditions les deux relais sont
bloqués sur Off pour une période de deux heures.
Note: L’accès au programme nettoyage, N’EST PAS permis quand le ‘
programme vacances ‘ est activé.
Pour activer le programme nettoyage sélectionner le paramètre ‘ CLE ’
et appuyer sur la touche ‘ OK ’: sur l’afcheur apparaît l’icône ‘ ‘
clignotante et, à la place de l’horloge, on voit le temps qui manque au
retour au fonctionnement normal.
On retourne au mode de fonctionnement précédent au bout de deux
heures ou en appuyant à nouveau sur la touche ‘ ’.
‘HOL’ RÉGLAGE DU PROGRAMME VACANCES
Si on souhaite s’absenter pendant une période de temps relativement
longue, il est conseillé d’activer le programme Vacances qui permet de
suspendre le mode de fonctionnement actif pour un certain nombre
d’heures (de 1 à 95) ou de jours (de 4 à 99).
Au terme du comptage, des heures ou des jours, le chrono-thermo-
hygrostat se remettra au mode de fonctionnement précédent
l’activation du programme vacances. Durant l’arrêt, si le dispositif
a été réglé en mode Chauffage, la fonction Antigel restera de toute
façon toujours activée et l’afcheur montre le symbole ‘ ‘ et le
compte à rebours du temps restant pour arriver à la n du programme.
Remarque : l’accès au programme vacances N’EST PAS permis quand
le ‘ programme Nettoyage ‘ est actif.
Pour activer le programme vacances procéder de la manière suivante :
1. Sélectionner le paramètre ‘ HOL ’ et appuyer sur la touche ‘ OK ’;
l’afcheur montre le symbole ‘ ‘, l’indication ‘ h 00 ‘ et l’icône
‘ P‘ clignotante.
2. Appuyer sur les touches ‘ ’ et ‘ ’ pour régler le temps de
vacances ; toute modication est enregistrée automatiquement.
Jusqu’à 95 heures, la programmation est indiquée en heures
et l’afcheur montrera ‘ h XX ‘. Si cette valeur est dépassée,
on passera automatiquement à la programmation du temps de
vacances en jours et l’afcheur montrera ‘ d XX ‘. Il sera possible
d’augmenter ou de diminuer l’heure et le jour d’une unité à la fois,
avec des valeurs comprises entre 0 et 95 heures et 4 et 99 jours.
3. Pour activer le programme vacances durant le temps requis, appuyer
de nouveau sur la touche ‘ OK ’ ou bien attendre 10 secondes
sans appuyer sur aucune touche, l’afcheur montre l’icône ‘ ’
clignotante et le temps restant à l’expiration de la période vacances.
Si le temps de vacances n’a pas été programmé (h:00), pour sortir
du réglage et revenir au fonctionnement normal, appuyer sur la
touche ‘ OK ’ ou bien ‘ ‘ ou bien attendre 10 secondes sans
appuyer sur aucune touche.
4. Pour sortir de la fonction vacances et rétablir le fonctionnement
normal, appuyer sur la touche ‘ ‘.
‘H-C’ RÉGLAGE CHAUFFAGE/REFROIDISSEMENT
Ce réglage consent d’invertir la logique de fonctionnement du relais
du thermostat selon le dispositif de chauffage ou de refroidissement
qu’il pilote.
ATTENTION :
- En modiant la logique de fonctionnement du relais les
valeurs des points de consigne seront automatiquement
reportées aux valeurs de default pour le mode choisi.
- Le chrono-thermo-hygrostat sort d’usine réglé sur mode
chauffage.
Pour modier la logique de fonctionnement il faut effectuer la
procédure suivante :
1. Sélectionner le paramètre ‘ H-C ’ et appuyer sur la touche ‘ OK ’ ;
l’afcheur montre le mode de réglage actuel et l’icône ‘ P‘
clignotante.
2. Appuyer les touches ‘ ’ et ‘ ’ pour sélectionner le mode
de réglage désiré, chaque modication sera mémorisée
automatiquement.
‘ HEAt ‘: Chauffage
‘ COOL ‘: Refroidissement
3. Pour revenir à la liste des paramètres de l’utilisateur, appuyer sur la
touche ‘ OK ’.
4. Pour sortir du réglage des paramètres de l’utilisateur et revenir
au fonctionnement normal, appuyer sur la touche ‘ ‘ ou bien
attendre 10 secondes sans appuyer sur aucune touche.
Durant le fonctionnement normal, l’icône ‘ ‘ allumée indique
l’activation du mode chauffage, tandis que l’icône ‘ ‘ allumée
indique l’activation du mode refroidissement.
‘HYH’ RÉGLAGE DIFFÉRENTIEL HYGROSTAT
Le réglage de ce paramètre consent de dénir l’hystérésis, en %RH,
qui est appliquée au chrono-thermo-hygrostat pour la régulation de
l’humidité ambiante, si le paramètre utilisateur ‘ C-dP ‘ (point de rosée)
n’a pas été habilité.
Pour régler le différentiel, exécuter les opérations suivantes :
1. Sélectionner le paramètre ‘ HYH ’ et appuyer sur la touche ‘ OK ’.
2. L’afcheur montre la valeur précédemment dénie et l’icône ‘ P‘
clignotante.
3. Appuyer sur les touches ‘ ‘ et ‘ ‘ pour modier la valeur
(comprise entre 0.5%RH .. 10.0%RH); chaque modication est
mémorisée automatiquement.
4. Pour revenir à la liste des paramètres de l’utilisateur, appuyer sur la
touche ‘ OK ’.
(Lu)
II° combinaison
de jours 7
234561
I° combinaison
de jours 76
2345
1
2
3
4
5
6
7
1
IV° combinaison
de jours
(Programme jour
par jour)
5671234
III° combinaison
de jours
(Ve)(Gi)(Me)(Ma) (Do)(Sa)
Note: Pour chaque combinaison de jours, le programme qui sera
établi sera égal pour tous les jours de chaque groupe.
3. Appuyer sur la touche ‘ OK ‘ pour conrmer le réglage effectué ;
l’afcheur montrera le programme horaire précédemment établi
pour le jour ou le groupe de jours réglés et les heures 00:00 (curseur
clignotant sur l’intervalle compris entre les heures 00:00 et 00:30).
4. Régler le mode de fonctionnement.
Pour faciliter l’opération de programmation, le chrono-thermo-
hygrostat sort d’usine préréglé avec la tranche horaire suivante :
TRANCHE HORAIRE PRÉRÉGLÉE
Mode confort Mode réduit
6.00 .. 8.00 8.00 .. 11.00
11.00 .. 13.00 13.00 .. 17.00
17.00 .. 23.00 23.00 .. 6.00
Si les programmations préréglées par tranches horaires ne
représentent pas la programmation désirée, on peut varier celle-ci
manuellement selon la procédure suivante :
5. À chaque intervalle horaire (chaque tiret correspond à une demi-
heure) établir le mode de réglage en appuyant sur une des touches
suivantes :
Modalité de Confort : Appuyer sur la touche ‘ ‘.
Éteint / antigel : Appuyer sur la touche ‘ ‘.
Modalité de Réduction : Appuyer sur la touche ‘ ‘.
Déplacement du curseur
horaire : Appuyer sur la touche ‘ ’ ou ‘ ‘.
A chaque pression de la touche qui établit la modalité de réglage,
le curseur horaire se déplace automatiquement sur la demi-heure
suivante.
Conrmation
Réduit
Éteint
Comfort
6. Une fois que le programme horaire pour le jour ou pour le groupe de
jours sélectionné est établi, appuyer sur la touche ‘ OK ‘.
L’afcheur montrera le programme horaire du jour ou des groupes
de jours successifs jusqu’à couvrir la semaine complète.
7. Dès que le programme pour la semaine complète est établi, appuyer
sur la touche ‘ OK ‘ : Le chrono-thermo-hygrostat enregistre le
programme établi et l’afcheur montre l’inscription ‘ MEMO ‘,
ensuite on sortira automatiquement du réglage du programme
horaire.
ATTENTION
- Si on désire reporter la programmation horaire comme à
la sortie d’usine , il faut accéder au paramètre utilisateur
‘dFLt’ (Réglage de données par défaut); de cette façon
tous les paramètres utilisateur seront automatiquement
reprogrammés aux valeurs réglées en usine.
- Si on sort de la programmation horaire sans avoir appuyer
sur la touche ‘OK’, c’est-à-dire sans faire partir la phase de
mémorisation, celle-ci NE sera PAS effectuée et le chrono
restera dans le programme enregistré précédemment.
La mémorisation a lieu seulement quand on habilite la phase
de mémorisation signalée par l’inscription ‘MEMO’.
‘AFr’ RÉGLAGE DE L’ANTIGEL
La fonction antigel permet de sélectionner une température minimale
qui est maintenue lorsque le chrono-thermo-hygrostat est éteint, de
manière à préserver les lieux et le système quand la température
ambiante descend au-dessous de la valeur établie.
En sortie d’usine, la valeur de la température d’antigel est réglée à + 3 °C.
ATTENTION : la fonction est active seulement si le dispositif a
été réglé en mode chauffage.
Pour régler la température d’antigel effectuer les opérations suivantes :
1. Sélectionner le paramètre ‘ AFr ‘ et appuyer sur la touche ‘ OK ‘.
2. L’afcheur montre la température Antigel réglée précédemment et
l’icône ‘ P‘ clignotante.
3. Appuyer sur les touches ‘ ‘ et ‘ ‘ pour modier la valeur
(comprise entre OFF, 0,5 °C .. 25 °C) ; toute modication est
enregistrée automatiquement.
4. Pour revenir à la liste des paramètres utilisateur, appuyer sur la
touche ‘ OK ’.
5. Pour sortir du réglage des paramètres de l’utilisateur et revenir
au fonctionnement normal, appuyer sur la touche ‘ ‘ ou bien
attendre 10 secondes sans appuyer sur aucune touche.
- FRANÇAIS -
THW01B0001EV 027284 150716 13
6. Pour sortir du réglage des paramètres utilisateur et revenir au
fonctionnement normal, appuyer sur la touche ‘ ‘ ou bien
attendre 10 secondes sans appuyer sur aucune touche.
ATTENTION
Quand les modes de réglage ‘d-EF’, ‘d-EC’ ou ‘d-FP‘ sont afchés,
l’afcheur alterne à ceux-ci la vision de la valeur du point de
rosée (dP) calculée.
Limitations du contrôle du point de rosée
- Sile contrôle du point de rosée est activé en ‘ d-EF ‘ ou ‘ d-EC ‘,le
paramètre ‘ rEG ‘ (sonde de réglage de la température ambiante),
sera automatiquement xé par la sonde interne. La température
du point de rosée sera calculée sur la température relevée par la
sonde interne, alors que la température au plafond ou au sol seront
calculées sur la sonde externe.
- Si le contrôle du point de rosée est actif en ‘ d-FP ‘ la sonde
deréglage sera bien la sonde interne, mais la sonde externe
permettra seulement l’afchage de la température relevée.
- La température du point de rosée sera toujours calculée sur la
température relevée par la sonde interne. Si on veut modier la
sonde de réglage il faut changer les paramètres de contrôle du point
de rosée. Pour cela, accéder au paramètre ‘ rEG ‘ et l’afcheur
montrera ‘ indP ‘avec l’icône ‘ SET%RH ‘ clignotante.
- Le contrôle du point de rosée est actif seulement si l’appareil est
programmé sur refroidissement et déshumidication. Dans le cas
contraire l’accès au paramètre ‘ C-dP ‘ ne sera pas consenti et une
éventuelle tentative d’accès sera suivie du message, ‘ nOdP ‘.
- Le contrôle du point de rosée est effectué à intervalles réguliers,
qui peuvent aller de 3 minutesà 27 minutes maximum selon la
programmation du paramètre ‘ cndP ‘.
- Si le contrôle du point de rosée est activé, au redémarrage après
arrêt (OFF), nettoyage ou vacances ou après variation d’un des
paramètres ‘ d-EF ‘, ‘ d-EC ‘ ou ‘ d-FP ‘ l’appareil repartira pour une
minute avec les relais en position NC pour éviter des activations
inattendues. Après quoi le réglage reprend normalement.
Pour de plus amples détails sur les paramètres concernant le contrôle
du point de rosée, voir les paragraphes suivants.
d-EF’ Contrôle du point de rosée avec la sonde externe sur une
installation au sol
Si la fonction de contrôle du point de rosée est activée avec le
paramètre ‘ C-dP ’ positionné sur ‘ d-EF ’, le chrono-thermo-hygrostat
contrôle les dispositifs de refroidissement et de déshumidication
en confrontant la valeur de la température du point de rosée avec la
valeur lue par la sonde externe et en appliquant les paramètres xés
grâce au réglage ‘ d-EF ‘.
Le graphique suivant décrit le mode de contrôle du point de rosée.
HYdP
Hystérésis
PRIORITÉ
THERMOSTAT
PRIORITÉ DÉS
HUMIDIFICATEUR
PRIORITÉ
dp refroidisseur
déshumidicateur
TE+SMF TE+SMF+ HYdP0 °C
HYdP
Hystérésis PRIORITÉ
dp
dp
Où :
dP : point de rosée (voir tableau 1).
TE : température externe relevée.
SMF : augmentation du point de rosée déni par le sous-paramètre
‘ d-EF ‘.
HYdP : hystérésis de 0,5°C du point de rosée (non modiable).
‘d-EC’ Contrôle du point de rosée avec sonde externe sur
installation à plafond métallique
Si la fonction de contrôle du point de rosée est activée avec le
paramètre ‘ C-dP ’ positionné sur ‘ d-EC ’, le chrono-thermo-hygrostat
contrôle les dispositifs de refroidissement et de déshumidication
en confrontant la valeur de la température du point de rosée avec la
valeur lue par la sonde externe et en appliquant les paramètres xés
grâce au réglage ‘ d-EC ‘.
Le graphique suivant décrit le mode de contrôle du point de rosée.
HYdP
Hystérésis
PRIORITÉ
THERMOSTAT
PRIORITÉ DÉS
HUMIDIFICATEUR
PRIORITÉ
dp refroidisseur
déshumidicateur
TE+SMC TE+SMC+ HYdP0 °C
HYdP
Hystérésis PRIORITÉ
dp
dp
Où :
dP: point de rosée (voir tableau 1).
TE: température externe relevée.
SMC: augmentation du point de rosée déni par le sous-paramètre
‘ d-EC ‘.
HYdP: Hystérésis de 0,5°C du point de rosée (non modiable).
‘d-FP’ Contrôle du point de rosée sur points xes
Si la fonction de contrôle du point de rosée, ‘ C-dP ’, est activée
sur ‘ d-FP ’, le chrono-thermo-hygrostat contrôle les dispositifs de
refroidissement et de déshumidication en confrontant la valeur de la
température du point de rosée calculée avec les valeurs de température
relatives aux points de rosée dénis par les sous-paramètres ‘ TF1 ’,
et ‘ TF2 ’.
Le graphique suivant décrit le mode de contrôle du point de rosée.
HYdP
Hystérésis OFF
PRIORITÉ
THERMOSTAT refroidisseur
déshumidicateur
TF10 °C
HYdP
Hystérésis
PRIORITÉ
DÉS HUMIDI-
FICATEUR
dP
TF2
ON
TF1 - HYdP
Où :
dP: Point de rosée (voir tableau 1).
TF1: Second seuil inférieur du point de rosée (exprimé en °C).
TF2: Premier seuil inférieur du point de rosée (exprimé en °C).
HYdP: Hystérésis de 0,5°C du point de rosée (non modiable).
Une fois trouvée la température du point de rosée (tableau 1) à
respecter, il faut xer les seuils ‘ TF1 ’ et ‘ TF2 ’ pour obtenir un
réglage du système qui évitera la formation de condensation.
Exemple :
dP > TF1 = entre en fonction le système de déshumidication, tout
en maintenant actif le système de refroidissement si
celui-ci est déjà activé.
Successivement si la situation suivante se vérie :
dP > TF2 = le système de déshumidication reste actif mais le
système de refroidissement est désactivé.
Quand ‘ TF2 ’ est xé sur une valeur inférieure à la température
minimum de la supercie refroidissante, le contrôle permet d’éviter
la formation de condensation sur la supercie pour n’importe quelle
valeur de température et humidité relative dans l’air.
ATTENTION
- La valeur maximale de ‘TF1’ sera autolimité à la valeur de
‘TF2’ moins 0,2°C.
- La valeur de ‘TF2’ devra toujours être inférieure à la
température minimale rejointe par la supercie refroidissante
ou par la supercie la plus froide dans l’ambiance de toute
façon.
- La différence entre la valeur de ‘TF2’ et la température
minimale de la supercie la plus froide dans l’ambiance
devra être évaluée par une personne qualiée, selon le type
d’installation, l’inertie thermique et les différentes conditions
de l’ambiance. En général il est conseillé que cette différence
soit de 1°C pour les installations au sol et de 3°C pour un
plafond métallique.
‘CndP’ Fréquence d’activation du contrôle du point de rosée
Ce paramètre permet de xer le temps minimum, exprimé en minutes,
qui doit s’écouler entre deux actions consécutives des relais de sortie
après intervention de la fonction ‘ c-dP ‘.
Ce temps d’action peut être augmenté par pas de 3 minutes et se
remettra à zéro à chaque changement de modalité de réglage du point
de rosée (‘ d-EF ’, ‘ d-EC ’ o ‘ d-FP ‘).
‘Cntr’ COMPTEUR D’ACTIVATION DU RELAIS DU THERMOSTAT
Par ce paramètre on peut afche le compteur des heures d’activation
du relais du thermostat relatif à la journée en cours. À minuit de la
journée en cours le compteur est automatiquement remis à zéro.
Procéder comme suit :
1. Sélectionner le paramètre ‘ Cntr ’ et appuyer sur la touche ‘ OK ’;
le dispositif afche les heures d’activation du relais du thermostat
alternativement à l’indication ‘ Cntr ’ + l’icône ‘ P‘.
2. Pour revenir à la liste des paramètres utilisateur, appuyer sur la
touche ‘ OK ’.
3. Pour sortir du réglage des paramètres utilisateur et faire repartir
le fonctionnement normal, appuyer sur la touche ‘ ‘ ou bien
attendre 10 secondes sans appuyer sur aucune touche.
‘dFLt’ RÉGLAGE DES DONNÉES PAR DÉFAUT
Avec ce paramètre on effectue la remise aux valeurs de défaut réglées
à la sortie d’usine de tous les paramètres de l’utilisateur.
Procéder selon les indications suivantes :
1. Sélectionner le paramètre ‘ dFLt ’ et appuyer sur la touche ‘ OK ’ ;
le dispositif retourne automatiquement aux valeurs de défaut et
l’afcheur montre l’inscription ‘ -dF- ‘ et l’icône ‘ P‘ clignote.
2. Pour revenir à la liste des paramètres de l’utilisateur, appuyer sur la
touche ‘ OK ’.
3. Pour sortir du réglage des paramètres de l’utilisateur et revenir
au fonctionnement normal, appuyer sur la touche ‘ ‘ ou bien
attendre 10 secondes sans appuyer sur aucune touche.
ATTENTION!
Le réglage des valeurs de défaut annule tous les réglages faits
par l’utilisateur, comme par exemple Programme Horaire,
Été/Hiver, Point de consigne et toutes les autres données
programmées.
EXTINCTION - FONCTION ANTIGEL
Pour désactiver le chrono-thermo-hygrostat appuyer sur la touche ‘
‘.
L’afcheur montrera l’inscription ‘ OFF ‘.
Si le chrono-thermo-hygrostat a été réglé en mode chauffage, la
fonction antigel sera active et sur l’afcheur on pourra visualiser le
5. Pour sortir du réglage des paramètres de l’utilisateur et revenir
au fonctionnement normal, appuyer sur la touche ‘ ‘ ou bien
attendre 10 secondes sans appuyer sur aucune touche.
‘OFSH’ RÉGLAGE OFFSET DU CAPTEUR D’HUMIDITÉ INTERNE
Grâce à ce paramètre on peut corriger la valeur d’humidité relevée
par le capteur interne, de ±5%RH, de façon à corriger d’éventuelles
erreurs systémiques de lecture dues à un éventuel positionnement du
chrono-thermo-hygrostat en zone inadaptée à relever l’humidité de
l’ambiance. Le dispositif sort d’usine avec l’Offset réglé sur 0.0%RH.
Pour régler la valeur de l’Offset du capteur interne, suivre les
opérations ci-dessous :
1. Sélectionner le paramètre ‘ OFS1 ’ et appuyer sur la touche ‘ OK ’.
2. L’afcheur montrera la valeur de l’Offset précédemment dénie et
l’icône ‘ P‘ clignotante.
3. Appuyer sur les touches ‘ ‘ et ‘ ‘ pour modier la valeur
(comprise entre -5.0%RH .. +5.0%RH); chaque modication est
mémorisée automatiquement.
4. Pour revenir à la liste des paramètres de l’utilisateur, appuyer sur la
touche ‘ OK ’.
5. Pour sortir du réglage des paramètres de l’utilisateur et revenir
au fonctionnement normal, appuyer sur la touche ‘ ‘ ou bien
attendre 10 secondes sans appuyer sur aucune touche.
‘dE-H’ RÉGLAGE DÉSHUMIDIFICATION / HUMIDIFICATION
Ce réglage consent d’invertir la logique de fonctionnement du relais de
l’hygrostat selon le dispositif piloté déshumidicateur ou humidicateur.
ATTENTION :
- La fonction de déshumidication n’est pas disponible en mode
chauffage.
- En modiant la logique de fonctionnement du relais, les valeurs
du point de consigne seront automatiquement reportées aux
valeurs de default pour le mode déni.
- Le chrono-thermo-hygrostat sort d’usine réglé sur mode de
déshumidication.
Pour modier la logique de fonctionnement il faut suivre la procédure
suivante :
1. Sélectionner le paramètre ‘ dE-H ’ et appuyer sur la touche ‘ OK ’;
l’afcheur montre le mode de régulation actuel et l’icône ‘
P
‘
clignotante.
2. Appuyer sur les touches ‘ ’ et ‘ ’ pour sélectionner le
mode de régulation désiré, chaque modication est mémorisée
automatiquement.
‘ dEUM ‘: Déshumidication
‘ HUMI ‘: Humidication
3. Pour revenir à la liste des paramètres utilisateur, appuyer sur la
touche ‘ OK ’.
4. Pour sortir du réglage des paramètres utilisateur et faire repartir le
fonctionnement normal, appuyer sur la touche ‘ ‘ ou bien attendre
10 secondes sans appuyer sur aucune touche.
Pendant le fonctionnement normal, l’activation de la déshumidication
ou de l’humidication est signalée par l’icône ‘ ‘ allumée.
‘C-dP’ GESTION DU POINT DE ROSÉE
Par ce paramètre on peut habiliter / congurer le contrôle du Point de
Rosée de manière à éviter la formation de condensation supercielle.
Pour régler ce paramètre suivre les instructions suivantes :
1. Sélectionner le paramètre ‘ C-dP ’ et appuyer sur la touche ‘ OK ’;
l’afcheur montre le réglage actuel et l’icône ‘
P
‘ clignotante.
2. Appuyer sur les touches ‘ ’ et ‘ ’ pour sélectionner le
mode de réglage désiré, chaque modication est mémorisée
automatiquement.
Les modes de réglage sont les suivants :
OFF: Contrôle du point de rosée déshabilité.
d-EF: Contrôle du point de rosée avec sonde à distance sur
installation de chauffage au sol
d-EC: Contrôle du point de rosée avec sonde à distance pour plafond
métallique
d-FP: Contrôle du point de rosée habilité sur points xes ; le réglage
peut avoir lieu sur capteur interne ou sur sonde à distance (à
dénir sur le paramètre ‘ rEG ’).
Pour chaque mode de réglage activant la gestion du point de rosée,
on peut modier le réglage de sortie d’usine selon ce qui suit :
3. Sélectionner le mode de réglage adapté au type d’installation à gérer,
appuyer sur la touche ‘ OK ’.
4. Appuyer sur les touches ‘ ‘ et ‘ ‘ pour modier la valeur ;
chaque modication est mémorisée automatiquement.
Dans le cas où le paramètre ‘ d-FP ‘ est sélectionné, en appuyant sur
la touche ‘ OK ‘, on peut modier, avec es touches ‘ ‘ et ‘ ‘, les
deux seuils pour éviter que la température rejoigne le point de rosée.
TF1: second seuil inférieur du point de rosée (exprimé en °C).
TF2: premier seuil inférieur du point de rosée (exprimé en °C).
Pour modier la valeur des deux seuils, sélectionner TF1 ou TF2,
appuyer sur la touche ‘ OK ’ et successivement avec les touches
‘ ‘ et ‘ ‘ pour modier la valeur, chaque modication est
mémorisée automatiquement.
Mode
de réglage
Éventuels
sous-paramètres
Plage
de réglage
OFF - -
d-EF SMF 1.0°C .. 10.0°C
d-EC SMC 1.0°C .. 10.0°C
d-FP
TF1 5.0°C .. 24.8°C
(Limite TF1=TF2-0.2°C)
TF2 5.2°C .. 25.0°C
5. Pour revenir à la liste des paramètres utilisateur, appuyer sur la
touche ‘ OK ’ et successivement sur la touche ‘ ‘.

- FRANÇAIS -
THW01B0001EV 027284 150716 14
Humidité : ± 5.0% RH. (Default 0.0°C)
Type de sonde à distance
(en option) : NTC 10K Ohm ±1% @ 25°C
Offset sonde à distance : ± 5.0°C. (Default 0.0°C)
Antigel : OFF / 0.5°C .. 25.0°C (Default 3.0°C)
Point de rosée : OFF / d-EF / d-EC / d-FP (Default d-FP)
Entrée Interface Ext : Signal continu de type On/Off.
Indice de protection : IP 30
Classe d’isolement : II ( )
Nombre de cycles manuels : 1.000
Nombre de cycles automatiques :100.000
Type d’action : 1CU
Indice de localisation : PTI 175
Niveau de pollution : 2 (normal)
Catégorie de surtension : II
Température de fonctionnement :0 ºC .. +40 ºC
Température de stockage : -10 ºC .. +50 ºC
Limites d’humidité : 20 % .. 80 % HR sans condensation
Boîtier : matériel : ABS+PC V0 auto extinguible
couleur : Blanc (RAL 9003)
Gris clair (RAL 7035)
Poids : ~ 156 gr.
NORMES DE RÉFÉRENCE
Le produit est conforme aux normes suivantes (EMC 2004/108/ et
LVD 2006/95/ ) :
EN-60730-1 (2011)
EN-60730-2-7 (1991)
EN-60730-2-9 (1995)
DIMENSIONS
GARANTIE
Dans l’optique d’un développement continu de ses produits, le
constructeur se réserve le droit d’apporter sans préavis, des
modications aux données techniques et aux prestations de ces
derniers. Selon la Directive Européenne 1999/44/ et le document qui
reporte la politique de garantie du constructeur, le consommateur est
protégé contre les défauts de conformité du produit. Le texte complet de
la garantie est disponible auprès du vendeur sur demande.
symbole ‘ ‘, dans ce cas la température ambiante sera réglée selon
la valeur établie pour la température d’antigel (voir le paragraphe ‘
RÉGLAGE DES PARAMÈTRES DE L’UTILISATEUR ‘).
FONTIONNEMENT AUTOMATIQUE/ MANUELLE 24H /
MANUELLE PERMANENTE
Avec la touche ‘ ‘, le chrono-thermo-hygrostat peut être forcé à
régler la température ambiante et l’humidité indépendamment de la
programmation horaire effectuée, selon la température et l’humidité
de confort dénie.
En appuyant à plusieurs reprises sur la touche ‘ ‘, on passe
alternativement du mode Automatique au mode Manuel 24 heures,
de Manuel 24 heures à Manuel permanent et de Manuel permanent on
retourne en Automatique.
Durant le fonctionnement en manuel, l’afcheur ne montre pas le
programme horaire, mais seulement la température ambiante, l’état
du relais (éventuellement certains symboles comme ‘ ‘ ou ‘ ‘ ou
‘ ‘), le symbole ‘
24h
‘ (manuel 24h) ou bien ‘ ‘ (manuel permanent)
et le symbole ‘ ‘.
En appuyant une première fois sur la touche ‘ ‘, le mode Manuel 24
heures s’active et le chrono-thermo-hygrostat reste en mode Manuel
jusqu’à l’heure 23:59, il retourne ensuite dans le mode Automatique.
Remarque : si le programme Vacances est activé pendant que le mode
Manuel 24 h est actif, à la n de la fonction Vacances, si l’heure
23:59 a été dépassée, le chrono-thermo-hygrostat retournera au mode
de fonctionnement Automatique suivant le programme horaire établi.
En appuyant encore unefois sur la touche ‘ ‘ on force le fonctionnement
en mode Manuel permanent ; le chrono-thermo-hygrostat reste en mode
Manuel jusqu’à ce que la touche ‘ ‘ soit appuyée à nouveau.
AFFICHAGE HEURE / TEMPÉRATURE / HUMIDITÉ
En appuyant cycliquement sur le bouton ‘ ‘ on peut afcher
l’heure courante avec l’icône relative à la sonde de réglage de la
température (interne ‘ ‘ ou externe ‘ ‘), la température
ambiante relevée par le capteur interne, signalé par l’icône ‘ ‘, la
température ambiante relevée par la sonde à distance (si connectée)
signalée par l’icône ‘ ‘, l’humidité ambiante relevée par le capteur
interne, signalé par l’icône ‘ ‘.
Les température et humidité relevées seront afchées corrigées de la
valeur de Offset déterminée.
Note: Si le paramètre ‘ rEG ‘ a été réglé sur ‘ In ‘, mais une erreur
est relevée sur le capteur interne, l’afcheur montre l’indication
‘ SEnS E xx ‘. Dans cette situation, la régulation sera
automatiquement interrompe et les deux relais seront mis en
position Normalement Ouverte.
Si le paramètre ‘ rEG ‘ a été réglé sur ‘ Out ‘ mais la sonde à
distance n’est pas connectée ou est endommagée, l’afcheur
montrera respectivement l’indication ‘ SEnS OPEN ‘ ou bien
‘ SEnS SHrt ‘ avec l’icône ‘ ‘ allumée.
ATTENTION :
- Pour optimiser la durée des batteries, le chrono-thermo-
hygrostat, relève la température ambiante toutes les 3 minutes
et, en conséquence, décide l’activation ou la désactivation du
relais.
- Pour effectuer une actualisation instantanée, appuyer
brièvement sur la touche ‘OK’.
RÉTROÉCLAIRAGE
Le rétroéclairage de l’afcheur s’allume à la suite d’une pression sur
n’importe quelle touche. L’extinction se produit automatiquement
20 secondes après la dernière pression sur la touche.
INSERTION/REMPLACEMENT DES BATTERIES
L’afcheur montre constamment l’état de la charge des batteries à
travers le symbole ‘ ‘.
La charge des batteries est à son maximum si à l’intérieur du symbole
tous les trois indicateurs de niveau son allumés.
Au contraire, les batteries sont déchargées et doivent être remplacées
si le symbole ‘ ‘ clignote (complètement vide). Dans ce cas les
deux relais se mettent en position de sécurité (N.C.) et l’afcheur
montre alternativement l’heure (ou la température ou bien l’humidité)
et l’indication ‘ BATT ’; de même l’icône ‘ TEST ’ s’afche en
clignotant. Si les batteries ne sont pas remplacées rapidement, les
symboles ‘ ‘ ou ‘ ‘ commenceront à clignoter pour indiquer que
le dispositif est bloqué.
Pour le remplacement, procéder de la manière suivante :
1. Ouvrir le volet d’accès au logement des piles (Fig. 4).
2. Extraire les piles en faisant levier avec un outil approprié.
3. Insérer les piles neuves, qui doivent être du type 1,5 V AA alcalines.
4. Contrôler l’exactitude de l’heure et la régler éventuellement.
BRANCHEMENT À UNE INTERFACE TÉLÉPHONIQUE
Le chrono-thermo-hygrostat offre la possibilité de brancher au
connecteur ‘ B‘ en Fig. 6 une interface téléphonique dont le relais de
sortie maintienne l’état demandé (fermé ou ouvert) pour tout le temps
nécessaire (non à impulsion).
L’utilisation d’une interface téléphonique appropriée n’exige aucun
réglage sur le chrono-thermo-hygrostat ; pour l’utilisation de l’interface
téléphonique se référer au manuel d’instructions correspondant.
À travers l’interface téléphonique il est possible d’éteindre ou d’activer
le chrono-thermo-hygrostat en mode Manuel permanent.
En fonction des commandes reçues par l’interface téléphonique, le
chrono-thermo-hygrostat agira selon la logique de fonctionnement
suivante :
1. Contact de l’interface téléphonique fermé :
le chrono-thermo-hygrostat force le fonctionnement en mode ‘ Manuel
permanent ‘ : sur l’afcheur on visualise les symboles ‘ ‘ et ‘ ‘.
2. Contact ouvert de l’interface téléphonique, après (et
uniquement après) une fermeture précédente, s’il n’y a pas des
commandes depuis le clavier (Manuel/Arrêt) : L e
chrono-thermo-hygrostat est éteint et sur l’afcheur on visualise
l’inscription ‘ OFF ‘ et le symbole ‘ ‘. Si la fonction ‘ Antigel ‘ est
active, sur l’afcheur on visualisera le symbole ‘ ‘.
ATTENTION : les commandes du clavier sont toujours
prioritaires par rapport aux commandes reçues à travers
l’interface téléphonique.
Si les boutons ‘ ‘ ou ‘ ‘, sont appuyés sur le chrono-thermo-
hygrostat, le dispositif modiera son état et l’icône ‘ ‘ clignotera
pour indiquer que la commande de l’interface a été forcée par une
commande du clavier. L’icône ‘ ‘ arrêtera de clignoter si l’interface
téléphonique envoie au chrono-thermo-hygrostat la même commande
effectuée au clavier ou si l’interface téléphonique est réinitialisée.
Dans ces conditions, l’état établi par le clavier ne sera pas modié
et le chrono-thermo-hygrostat sera prêt à recevoir une éventuelle
nouvelle commande.
ATTENTION
Si une commande d’extinction est envoyée au chrono-thermo-
hygrostat à travers l’interface téléphonique, (contact ouvert de
l’interface téléphonique), il est convenable de vérier que cette
commande soit réalisée par le chrono-thermo-hygrostat, par le
biais de la procédure de réalignement suivante :
1. Vérier au moyen des fonctions de l’interface téléphonique
que le contact est ouvert, en envoyant éventuellement une
commande d’extinction.
2. Envoyer à l’interface téléphonique une commande de
fermeture du contact (le chrono-thermo-hygrostat s’allume).
3. Vérier au moyen des fonctions de l’interface téléphonique
que le contact est fermé.
4. Envoyer à l’interface téléphonique une commande d’ouverture
du contact (le chrono-thermo-hygrostat s’éteint).
Au cours de cette séquence, il ne doit pas y avoir de commandes
au clavier car elles sont prioritaires par rapport aux commandes
de l’interface.
CARACTERISTIQUES TECHNIQUES
Alimentation : 2 piles alcalines de 1,5 V (type AA)
Durée de vie des batteries : >1 an
Extinction du rétroéclairage : 20 secondes après le dernier appui sur
n’importe quelle touche
Section thermostat
Plage de réglage : confort : 5°C .. 40°C
réduit : 5°C .. 40°C
Différentiel asymétrique : 0,1°C .. 5°C (Default 0,2°C)
Portée des contacts
relais thermostat : 5(1)A @ 250V~ SPDT
Section hygrostat
Plage de réglage : confort : 10%RH .. 95%RH
réduit : 10%RH .. 95%RH
Différentiel : 0,5%RH .. 10.0%RH (Default 2.0%RH)
Portée des contacts
relais hygrostat : 5(1)A @ 250V~ SPDT
Type de capteur : Interne (température / humidité)
Saturation lecture humidité : Temp. sonde <10.0%RH (- - - -).
Temp. sonde >90.0%RH (E E E E).
Précision température (-40°C .. 120°C):
Précision humidité (0%RH .. 100%RH @25°C):
Résolution : 0.1°C. (-9.9°C .. 50°C)
0.1%RH (10%RH .. 90%RH)
Offset capteur interne : Temp.: ± 5.0°C. (Default 0.0°C)
INSTRUCTIONS RAPIDES POUR L’ORGANISATION DU
PROGRAMME HORAIRE
• Appuyer sur la touche ‘ P ’.
• L’écran afche ‘ PrOG ’ avec l’icône ‘ P‘ allumée.
• Appuyer sur la touche ‘ OK ’; l’afcheur montre l’inscription
‘ dAY ‘, l’icône ‘ P‘ et les carrés autour des jours correspondants
clignotent.
• Appuyer sur les touches ‘ ‘ e ‘ ‘ pour choisir une des quatre
combinaisons de jours prédénies.
• Appuyer sur la touche ‘ OK ’ pour conrmer le choix effectué.
• L’écran afche l’heure 00:00 avec le tiret, en haut à gauche,
clignotant.
• Appuyer sur une des touches suivantes en fonction des modes de
réglage de la température que l’on veut régler :
Modalité de Confort : Appuyer sur la touche ‘ ‘.
Éteint / antigel : Appuyer sur la touche ‘ ‘.
Modalité de Réduction : Appuyer sur la touche ‘ ‘.
Déplacement du curseur
horaire : Appuyer sur la touche ‘ ‘ ou ‘ ‘.
À chaque pression de la touche qui établit la modalité de réglage,
le curseur horaire se déplace automatiquement sur la demi-heure
suivante.
• Une fois que le programme horaire pour la journée ou pour le groupe
de jours sélectionnés est établi, appuyer sur la touche ‘ OK ’.
L’écran afche le programme horaire du jour ou des groupes de
jours successifs jusqu’à couvrir la semaine entière.
• Une fois que le programme pour la semaine complète est établi,
appuyer sur la touche ‘ OK ’. Le chrono-thermo-hygrostat mémorise
le programme établi, sur l’écran s’afche l’inscription ‘ MEMO ’
et l’on sortira automatiquement du réglage du programme horaire.
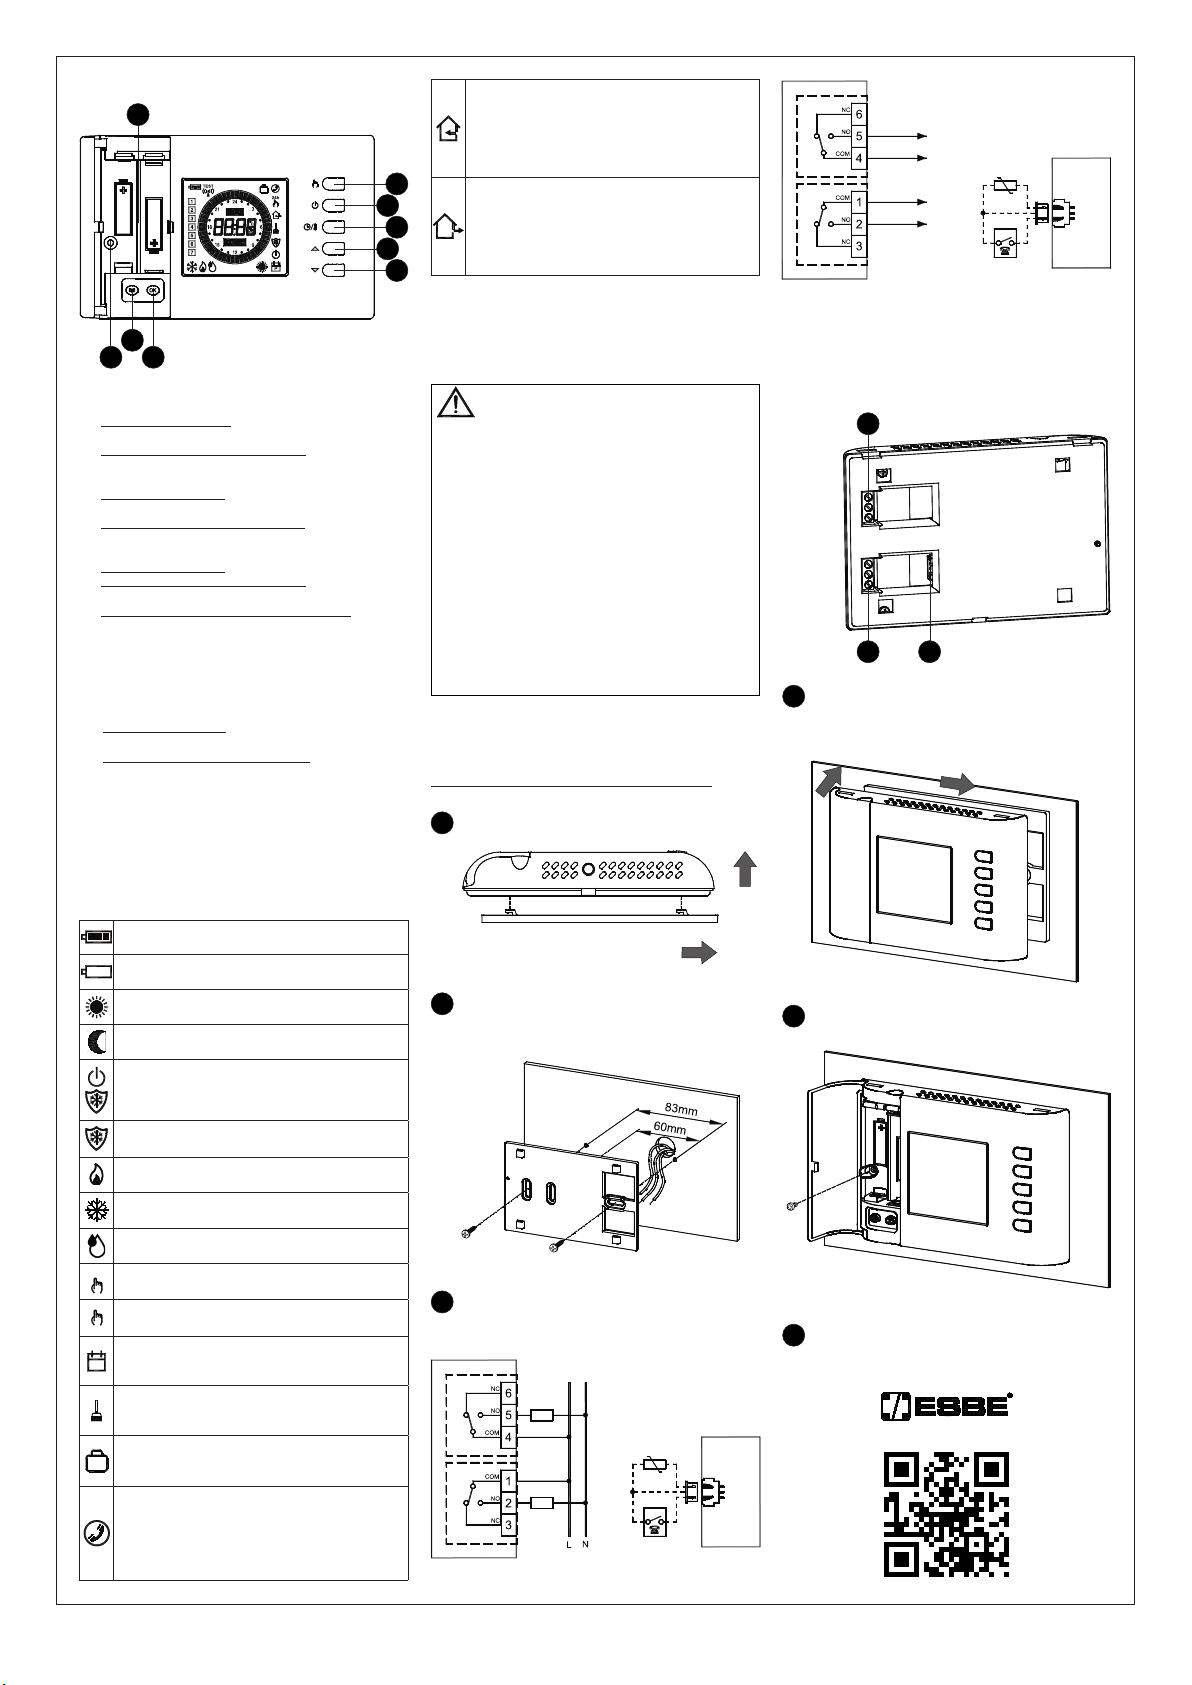
- FRANÇAIS -
THW01B0001EV 027284 150716 15
LEGENDA
ATouche à double fonction:
- En fonctionnement normal elle active la fonction Manuel 24
heures / Manuel Permanent / Automatique.
- Dans ‘ Paramétrage du Programme horaire ‘, elle établit le réglage
des températures en modalité Réduction.
BTouche à double fonction:
- En fonctionnement normal elle allume ou éteint le chrono-thermo-
hygrostat.
- Dans ‘ Paramétrage du Programme horaire ‘, elle établit le réglage
des températures en modalité Éteint /Antigel.
CTouche de la triple fonction
- En fonctionnement normal afche l’heure ou la température.
- Dans ‘ Paramétrage du Programme horaire ‘, elle établit le réglage
des températures en modalité Confort.
- Dans ‘Réglage de la température du point de consigne’, s’afche la
température de Confort ou bien celle de réduction.
D Modie les températures des points de consigne et les paramètres de
conguration (augmentant la valeur).
E Modie les températures des points de consigne et les paramètres de
conguration (diminuant la valeur).
FAccès à la liste des paramètres de l’utilisateur.
GTouche de la double fonction :
- En fonctionnement normal met à jour les données relevées par le
chrono-thermo-hygrostat.
- En ‘Réglage des paramètres de l‘utilisateur‘, permet l’accès à la
modication du paramètre sélectionné et successivement conrma
la valeur modiée.
HLogement des batteries.
I Position des vis pour la xation du corps du thermostat à la base de
xation murale.
DESCRIPTION DES COMMANDES
Fig. 7
FGH
I
BA
C
DE
INDICATIONS DE L’ÉCRAN
On trouve ci-dessous la signication des symboles qui peuvent
apparaître sur l’écran :
Indication de l’état de charge des batteries.
Clignotant :
Batteries déchargées; remplacer les batteries.
Réglage de la température en modalité Confort.
Réglage de la température en modalité Réduction.
Réglage de la température en modalité Éteint/Antigel.
Chrono-thermo-hygrostat éteint : fonction antigel insérée,
l’écran afche l’inscription OFF.
Activation en modalité chauffage.
Activation en modalité refroidissement.
Activation en modalité déshumidication ou humidication.
24h
Réglage de la température en modalité Confort pour 24
heures.
24h
Réglage de la température en modalité Confort permanent.
P
Fixe : indique l’accès aux paramètres de l’utilisateur.
Clignotante : Indique la possibilité de modier le paramètre
utilisateur sélectionné.
Clignotant :
Programme de nettoyage activé (l’écran afche le temps
restant).
Clignotant :
Programme des vacances activé (l’écran afche le temps
restant).
Fixe :
Indique une action entreprise par l’interface téléphonique.
Clignotant :
Indique que la commande de l’interface téléphonique a été
forcée par une commande du clavier sur le chrono-thermo-
hygrostat.
Fixe : La température afchée est celle relevée par le
capteur interne mais le réglage de la température s’effectue
avec la sonde à distance.
Clignotante : L’afchage et le réglage de la température
ambiante s’effectuent avec l’utilisation du capteur interne.
Fixe : La température afchée est celle relevée par la sonde
à distance mais le réglage de la température s’effectue avec
le capteur interne.
Clignotante : L’afchage et le réglage de la température
ambiante s’effectuent avec l’utilisation de la sonde à
distance.
INSTALLATION
ATTENTION
- Pour un réglage correct de la température, il est conseillé
d’installer le thermostat éloigné des sources de chaleur,
courants d’air ou des parois particulièrement froides (ponts
thermiques).
- Pour garantir la sécurité électrique, il est obligatoire de xer
le corps du thermostat sur la base de xation murale avec les
deux vis (en dotation) qui se trouvent dans le compartiment
des piles.
- Dans le cas où la charge pilotée par le relais du chrono-
thermo-hygrostat fonctionne avec le secteur, il faut que
le branchement se réalise au moyen d’un interrupteur
multipolaire, conforme aux normes en vigueur et avec un
écartement des contacts d’au moins 3 mm à chaque pôle.
- L’installation et le branchement électrique du dispositif
doivent être réalisés par un personnel qualié et en
conformité aux lois en vigueur.
- Avant d’effectuer tout type de branchement, s’assurer que le
réseau électrique soit hors tension.
L’installation du dispositif est prévue pour le montage en boîtier de
dérivation encastrable (ou mural) standard de deux ou trois modules ou
directement sur le mur en utilisant les chevilles fournies.
Pour installer le dispositif, réaliser les opérations suivantes :
Fig. 2
Décrocher la plaque murale enfoncée sous la base du chrono-
thermo-hygrostat comme indiquée dans la Fig. 1.
1
2
1
Fixer la plaque directement au mur ou dans le boîtier de dérivation
de 2 ou 3 modules à travers les deux orices pour vis avec un
entraxe de 60 mm ou 85 mm, en faisant attention à faire passer
les câbles par la fente, comme indiqué dans la Fig. 2.
2
Fig. 3
Insérer les batteries dans le logement des batteries (Ide la
Fig. 1) ; voir le paragraphe ‘ INSERTION/REMPLACEMENT DES
BATTERIES ‘.
6
Approcher le chrono-thermo-hygrostat de la plaque murale,
faire d’abord coïncider les dents de la base avec les fentes
correspondantes sur la plaque et successivement exercer une
pression sur le dispositif vers la gauche jusqu’au déclenchement
d’insertion des dents en plastique dans la plaque de xation.
4
2
1
Fig. 7
Fixer le corps di chrono-thermo-hygrostat à la plaque murale par
la vis inclue dans la confection et qui se trouve à l’intérieur du
compartiment des piles (Fig. 6).
5
Fig. 8
Exécuter les connexions électriques en faisant passer les ls
à travers l’ouverture rectangulaire de la plaquette de xation
au mur (Fig. 3), suivant le schéma de connexion de la Fig. 4
ou Fig. 5.
3
BLANC
INTERFACE
TÉLÉPHONIQUE
SONDE A
DISTANCE
ROUGE
NOIR
CHARGE
CHARGE
RELAIS
HYGROSTAT
RELAIS
THERMOSTAT
Fig. 4
Connecter ou une sonde à distance ou bien une interface
téléphonique au connecteur ‘ C’ indiqué sur la Fig. 6. La charge
correspondante au thermostat doit être connectée à la borne
‘ A’ indiquée sur la Fig. 6, alors que la charge correspondante
à l’hygrostat doit être connectée à la borne ‘ B’ indiquée sur
la Fig. 6.
Fig. 6
A C
B
Fig. 5
BLANC
INTERFACE
TÉLÉPHONIQUE
SONDE A
DISTANCE
ROUGE
NOIR
À LA CHAUDIÈRE / REFROIDISSEUR
RELAIS
HYGROSTAT
RELAIS
THERMOSTAT
AU DÉSHUMIDIFICATEUR / HUMIDIFICATEUR
www.esbe.eu
This manual suits for next models
1
Table of contents
Languages:
Other ESBE Thermostat manuals


Popular Thermostat manuals by other brands


EPH Controls
EPH Controls COMBIPACK4 Installation and operation guide

Lux Products
Lux Products PSD111 SERIES Installation and operating instructions

Smart temp
Smart temp 44-101 manual

Hot Yoga Heating
Hot Yoga Heating HYH-32-P user manual

Pro1 Technologies
Pro1 Technologies T601-2 installation manual

Honeywell
Honeywell ST772 User instructions