manuals.online logo
Brands
  1. Home
  2. •
  3. Brands
  4. •
  5. esotec
  6. •
  7. Outdoor Light
  8. •
  9. esotec Solar lightstone Manual

esotec Solar lightstone Manual

3. Operation and intended use
The solar light as well as the solar module are designed for year-round
outdoor use.
Keep the solar module snow-free during the winter months to ensure
proper operation. If possible, the solar module should face South and be
placed in a shade-free area. North sides (of buildings, etc.) are not suitable
for solar products. The light colour of the globe has two different settings.
The built-in rechargeable battery pack is charged by the external solar
cell. The light automatically switches on at dusk and switches off at dawn.
Light is produced by high-performance LEDs (light-emitting diodes). These
LEDs guarantee high luminosity at a low rate of power consumption and a
lifetime of over 50,000 hours.
Note: The battery may be insufficiently charged by sunlight if longer peri-
ods without sunlight occur. This does not mean, however, that the solar
light is faulty. Simply wait for the next sunny day and the light will work
once again.
As a rule, the battery pack should be replaced once every 2 years.
4. Using the light for the first time
1. Carefully remove the parts from the packaging.
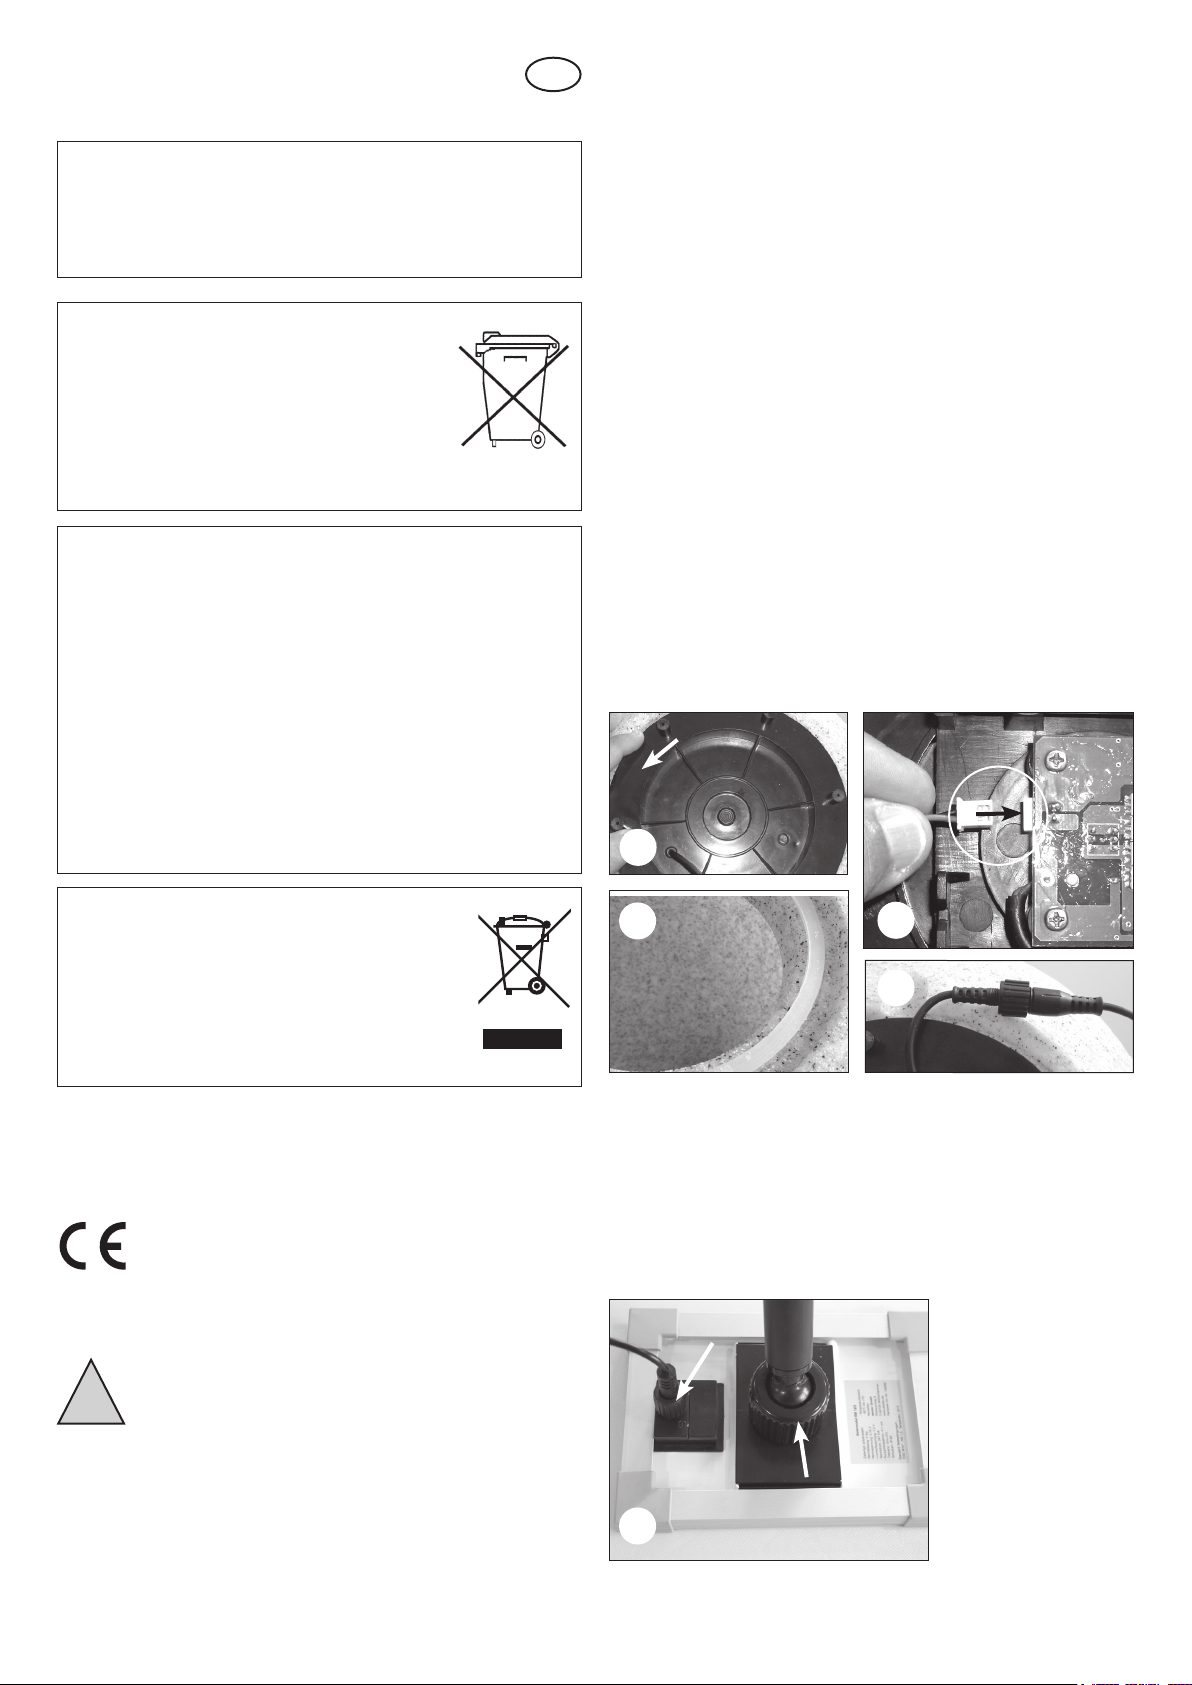
2. Screw the base carefully in a counter-clockwise direction (Figure 1).
3. Plug the connector from the battery pack into the socket on the circuit
board (Figure 2).
Caution: Once the connector is plugged in, the LEDs start to light up.
To avoid damage to the eyes, do not look directly at the light.
Note: The plug connector is touch-safe and protected against inverse
polarity. Do not use excessive force when inserting the connector.
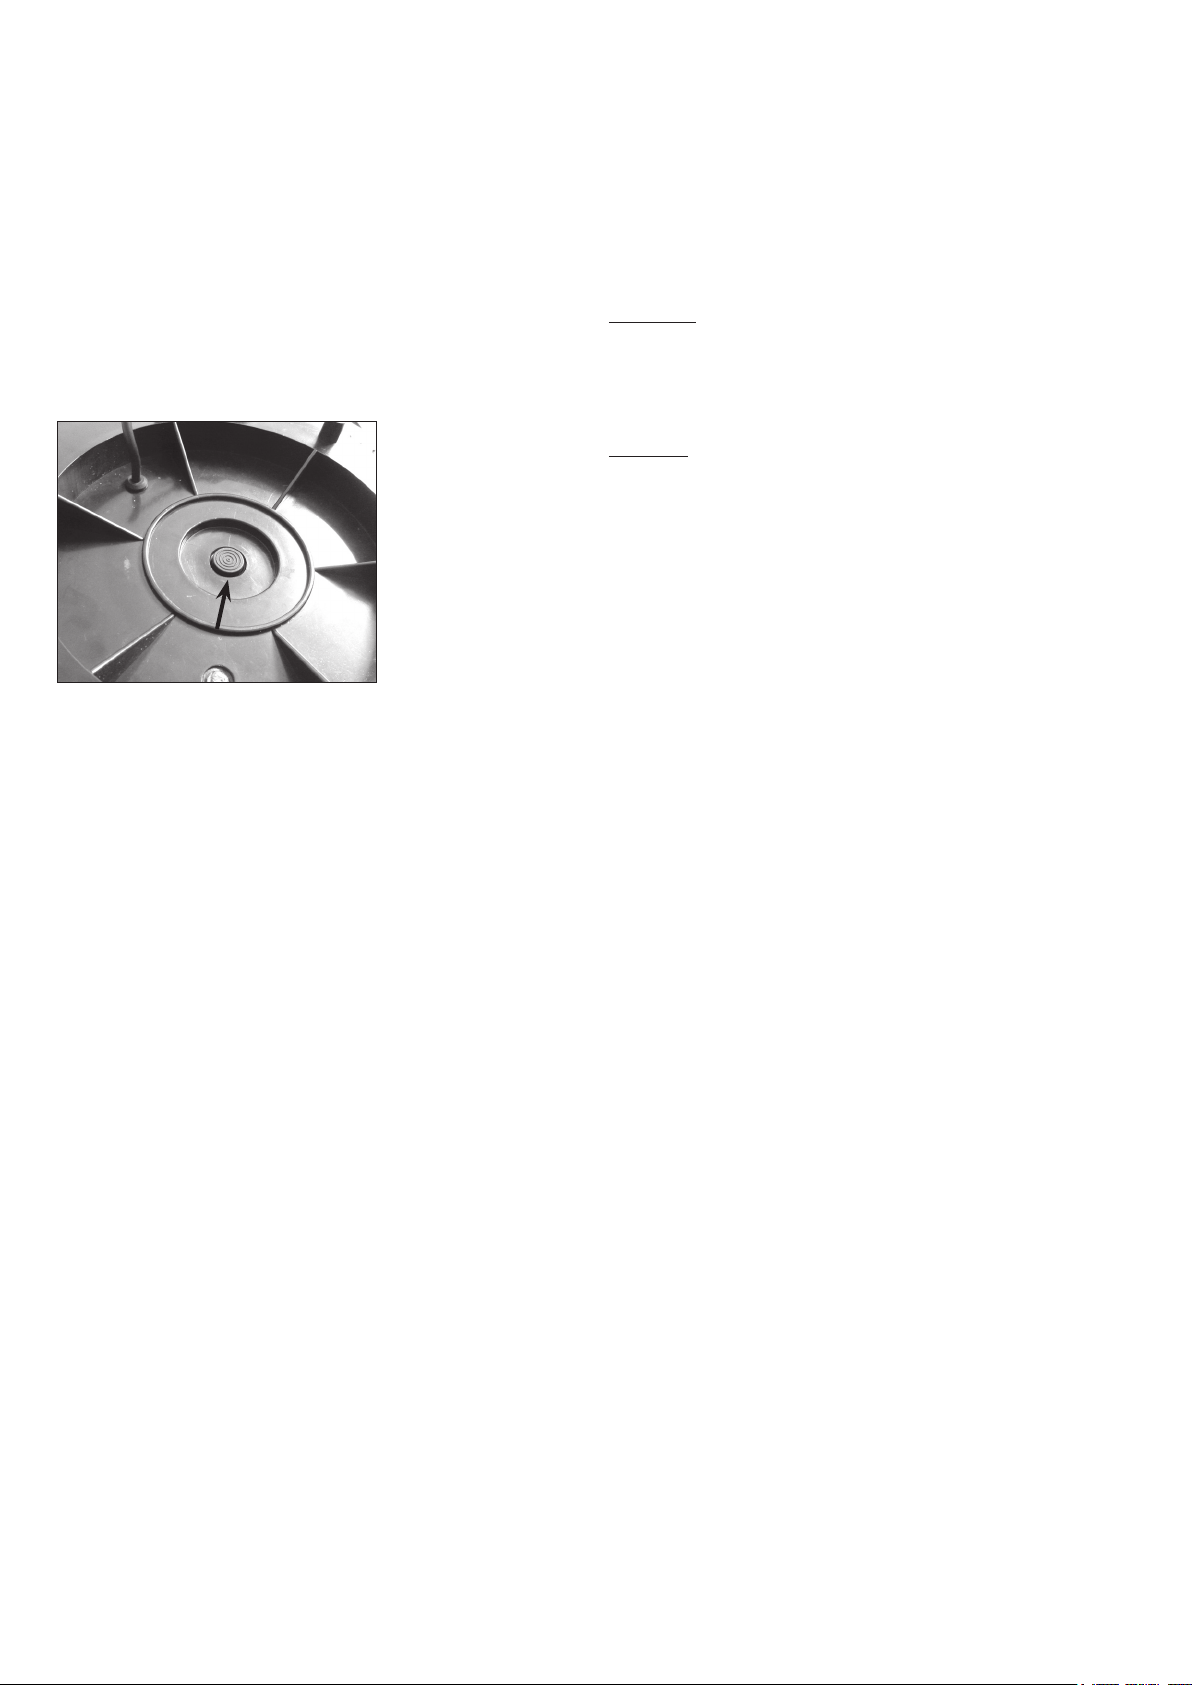
4. Screw the base clockwise back onto the globe. Ensure that the seal is
in the correct position (Figure 3).
5. Now take the solar module cable and insert the connector into the
socket of the solar light extension cable and screw the union nut tight
(Figure 4).
6. Now find a sunny spot within reach of the cable to place the solar modu-
le.
7. Plug the connector on the other end of the cable into the socket at the
back of the solar module and screw the union nut tight (Figure 5).
Using Instructions
Solar lightstone
1. Introduction
Dear customer, we thank you for purchasing the Solar Globelight.
With this Solar Light you have purchased a product that complies with the
latest and most up-to-date technology.
This product complies with the European and National
Standards. The relevant certificates of conformity are
deposited with the manufacturer.
To preserve this standard and in order to maintain safety
you must adhere to the use instructions!
2. Security Instructions
In the event of any problems arising or damage occur-
ring from not following these instructions, the warranty
is deemed cancelled. The manufacturer will not be held
responsible for any claims or damages arising from the
misuse of this product.
- For safety reasons and in order to maintain standards (CE) you are pro-
hibited from altering or changing any component in the product.
- Please follow the instructions very carefully.
- For commercial applications due care and attention must be paid to the
Health and Safety Standards in your jurisdiction.
Battery take-back
- Batteries must not be discarded into domestic waste.
- The consumer is legally required to return batteries
after use, e.g. to public collecting centers or to battery
distributors.
- Contaminant-containing batteries are labeled with the
sign “crossed-out trashcan“ and one of the chemical
symbols. Used batteries should be disposed environ-
mentally friendly and should not be discarded into
domestic waste. Your dealer is legally required to take
back old batteries.
Li-Ion
GB
Customer support:
If you have problems or questions regarding this product, simply contact us!
esotec GmbH, Industriegebiet Weberschlag 9, D-92729 Weiherhammer
Monday to Friday 9 am to 12 noon and 1 pm to 4 pm.
By phone: +49 9605-92206-0 WEEE: DE59284711
By e-mail for ordering spare parts: [email protected]
Internet: www.esotec.de
Rechargeable battery notes
- Rechargeable batteries should not be played with by children. Never
leave rechargeable batteries lying around; they could be swallowed
by children or pets.
- Rechargeable batteries must never be short-circuited, disassembled
or thrown into fire. This leads to a danger of explosion!
- Leaking or damaged rechargeable batteries can cause chemical
burns when they come into contact with skin. For this reason, please
make use of suitable protective gloves.
- Rechargeable batteries should only be replaced by structurally iden-
tical rechargeable batteries from the same manufacturer. Normal
batteries must not be used since these are not rechargeable.
- Make sure the rechargeable batteries are inserted with the correct
polarity.
- For long periods of time of non-use (for example, storage), remove
the inserted rechargeable batteries to avoid damages via the leaking
rechargeable batteries.
Disposal:
Dear customer,
please cooperate in avoiding waste. When you intend to
dispose of the product in future, please consider that it
contains valuable raw materials suited for recycling.
Therefore, do not dispose it of with domestic waste but
bring it to a collection point for the recycling of waste
electrical and electronic equipment.
Thank you very much for your cooperation!
!
Connection
solar module
Ball joint
5.
1.
2.
3.
4.
Note: The light should now be dark during daylight. The solar module also
has a twilight sensor function. If the solar module is in darkness, then the
voltage of the solar module drops and the light will switch on automatically.
8. The solar module can be placed on the ground using the ground spike.
The position of the spherical joint can be adjusted for best alignment
towards the sun.
Note: Illumination time is highly dependent on the intensity and duration
of sunlight (solar irradiation) during the day. Illumination time is generally
expected to be less during the winter months. Should the light not switch
on on the first evening, please wait for a sunny day.
5. Colour setting
The light has 2 different colour settings. These are selected using the
button underneath the light (Centre). Press the button to select the option
you want.
5.1. Light color changes every minute
The light color changes every minute slowly between every color.
5.2. Fix the lighting color
When you want to fix the lighting color to permanent light, please press
the switch on the bottom of the light. To start color changing please push
the switch again.
6. Replacing the battery pack
As a rule, the battery pack must be replaced every 2 years with a new
one of the same size and type. It is a 3.7 V/1800 mAh lithium-ion battery.
Replacement batteries are obtainable from your dealer or the manufac-
turer.
The following is the correct procedure for replacing the battery:
1. Loosen the connections at the bottom of the lamp.
2. Rotate the bottom of the globe counter-clockwise.
3. Remove the battery pack connector plug from the circuit board and
remove the used battery from its bracket.
4. Replace the battery with a new, identical battery.
5. Close the lamp in the reverse order used to open it, and remember to
reconnect the solar module cable.
Note: Used batteries, whether rechargeable or not, must be disposed of
in an environmentally friendly manner and should not be disposed of in
domestic rubbish bins. Your dealer is obliged by law to accept old batteries
for disposal.
7. Troubleshooting
Lamp does not switch on at nightfall.
- An ambient light source (e.g. street light) simulates natural light in the
solar module and prevents the light from switching on automatically.
Place the solar module in a darker place.
Lamp does not switch on at nightfall, or switches on only briefly.
- Check the connector plugs on the solar module cable and battery are
properly connected.
- Battery is weak or faulty. Replace the battery at least once every 2
years.
Solarpanel:
Solar panel: 2 Wp crystalline
Nominal voltage: 5.76 V
Nominal current: 347 mA
IP Rating: IP 65
Temperature range: -30°C to +70°C
Ball Light:
Battery: Li-Ion 3,7 V/ 1800 mAh
Lamps: LED ´s
Luminescent white: 4500 K
Light material: PE
IP Rating: IP 65
Protection class: III
Temperature range: -10°C to +40°C
Charge time until fully charged: Approx. 6 hours in full sunshine
Illumination time when fully charged: Up to 20 hours
9. Spare parts
In the internet www.esotec.de
- Replacement 3.6 V/1800 mAh
Li-Ion battery pack Manufacturer Part No.: 901004
- 5 m solar panel extension cable Manufacturer Part No.: 101740
- 2 Wp solar panel: Manufacturer Part No.: 130062
- Stone out of PC plastic Manufacturer Part No.: 901806
- Replacement seal: Manufacturer Part No.: 901802
- Base complete with electronics,
battery excluded: Manufacturer Part No.: 901804
Version 11-2015
Copyright esotec GmbH
button

This manual suits for next models

1

Other esotec Outdoor Light manuals

esotec Power Light Manual

esotec

esotec Power Light Manual

esotec Verla 50 Manual

esotec

esotec Verla 50 Manual

esotec Cube 30 Parts list manual

esotec

esotec Cube 30 Parts list manual

esotec Solar Globe Light multicolor 20 User manual

esotec

esotec Solar Globe Light multicolor 20 User manual

esotec Alu-Line User manual

esotec

esotec Alu-Line User manual

esotec 102090 User manual

esotec

esotec 102090 User manual

esotec 102104 Manual

esotec

esotec 102104 Manual

esotec Yanara 31 Manual

esotec

esotec Yanara 31 Manual

esotec Wave Manual

esotec

esotec Wave Manual

Popular Outdoor Light manuals by other brands

Nemo FOX Assembly instructions

Nemo

Nemo FOX Assembly instructions

LIGMAN AUG-10062 installation manual

LIGMAN

LIGMAN AUG-10062 installation manual

Lighting Technologies NBR 42 LED manual

Lighting Technologies

Lighting Technologies NBR 42 LED manual

John Lewis 70684119 instruction manual

John Lewis

John Lewis 70684119 instruction manual

Gama Sonic GS-104 instruction manual

Gama Sonic

Gama Sonic GS-104 instruction manual

Jula 422-225 installation instructions

Jula

Jula 422-225 installation instructions

CANARMNA LPL22A30 manual

CANARMNA

CANARMNA LPL22A30 manual

Tracon Electric CHR Series user manual

Tracon Electric

Tracon Electric CHR Series user manual

Corvi Street Light 25 manual

Corvi

Corvi Street Light 25 manual

IKEA NAVLINGE quick start guide

IKEA

IKEA NAVLINGE quick start guide

Ingo Maurer MAX. KUGLER instructions

Ingo Maurer

Ingo Maurer MAX. KUGLER instructions

MELINERA 288560 Operation and safety notes

MELINERA

MELINERA 288560 Operation and safety notes

Kichler Lighting 15503-BK instructions

Kichler Lighting

Kichler Lighting 15503-BK instructions

Adesso Garrett Assembly instruction

Adesso

Adesso Garrett Assembly instruction

Herstal Archi Mini Harlekin quick start guide

Herstal

Herstal Archi Mini Harlekin quick start guide

WE-EF PLS420 LED Installation and maintenance instructions

WE-EF

WE-EF PLS420 LED Installation and maintenance instructions

Kenroy Home GLOBAL 32904 Use and care guide

Kenroy Home

Kenroy Home GLOBAL 32904 Use and care guide

LED's light 1000565 operating manual

LED's light

LED's light 1000565 operating manual

manuals.online logo
manuals.online logoBrands
  • About & Mission
  • Contact us
  • Privacy Policy
  • Terms and Conditions

Copyright 2025 Manuals.Online. All Rights Reserved.