3. Intended Use
The solar module built into the upper part converts sunlight into electricity. The
built-in battery is charged with this energy.
The light can be operated in three different modes depending on the time of
year and the installation location. These operating modes can be conveniently
selected using a button on the PIR sensor.
When the battery is empty, the light switches off automatically. The solar light
is suitable for year-round outdoor use. The nighttime lighting duration is heavily
dependent on the amount of sunlight and the angle of incidence on the solar
module during the day. Solar lights must always be placed in the sunlight
without shadows. Operation on the north side or in the shade of trees or
bushes is not recommended!
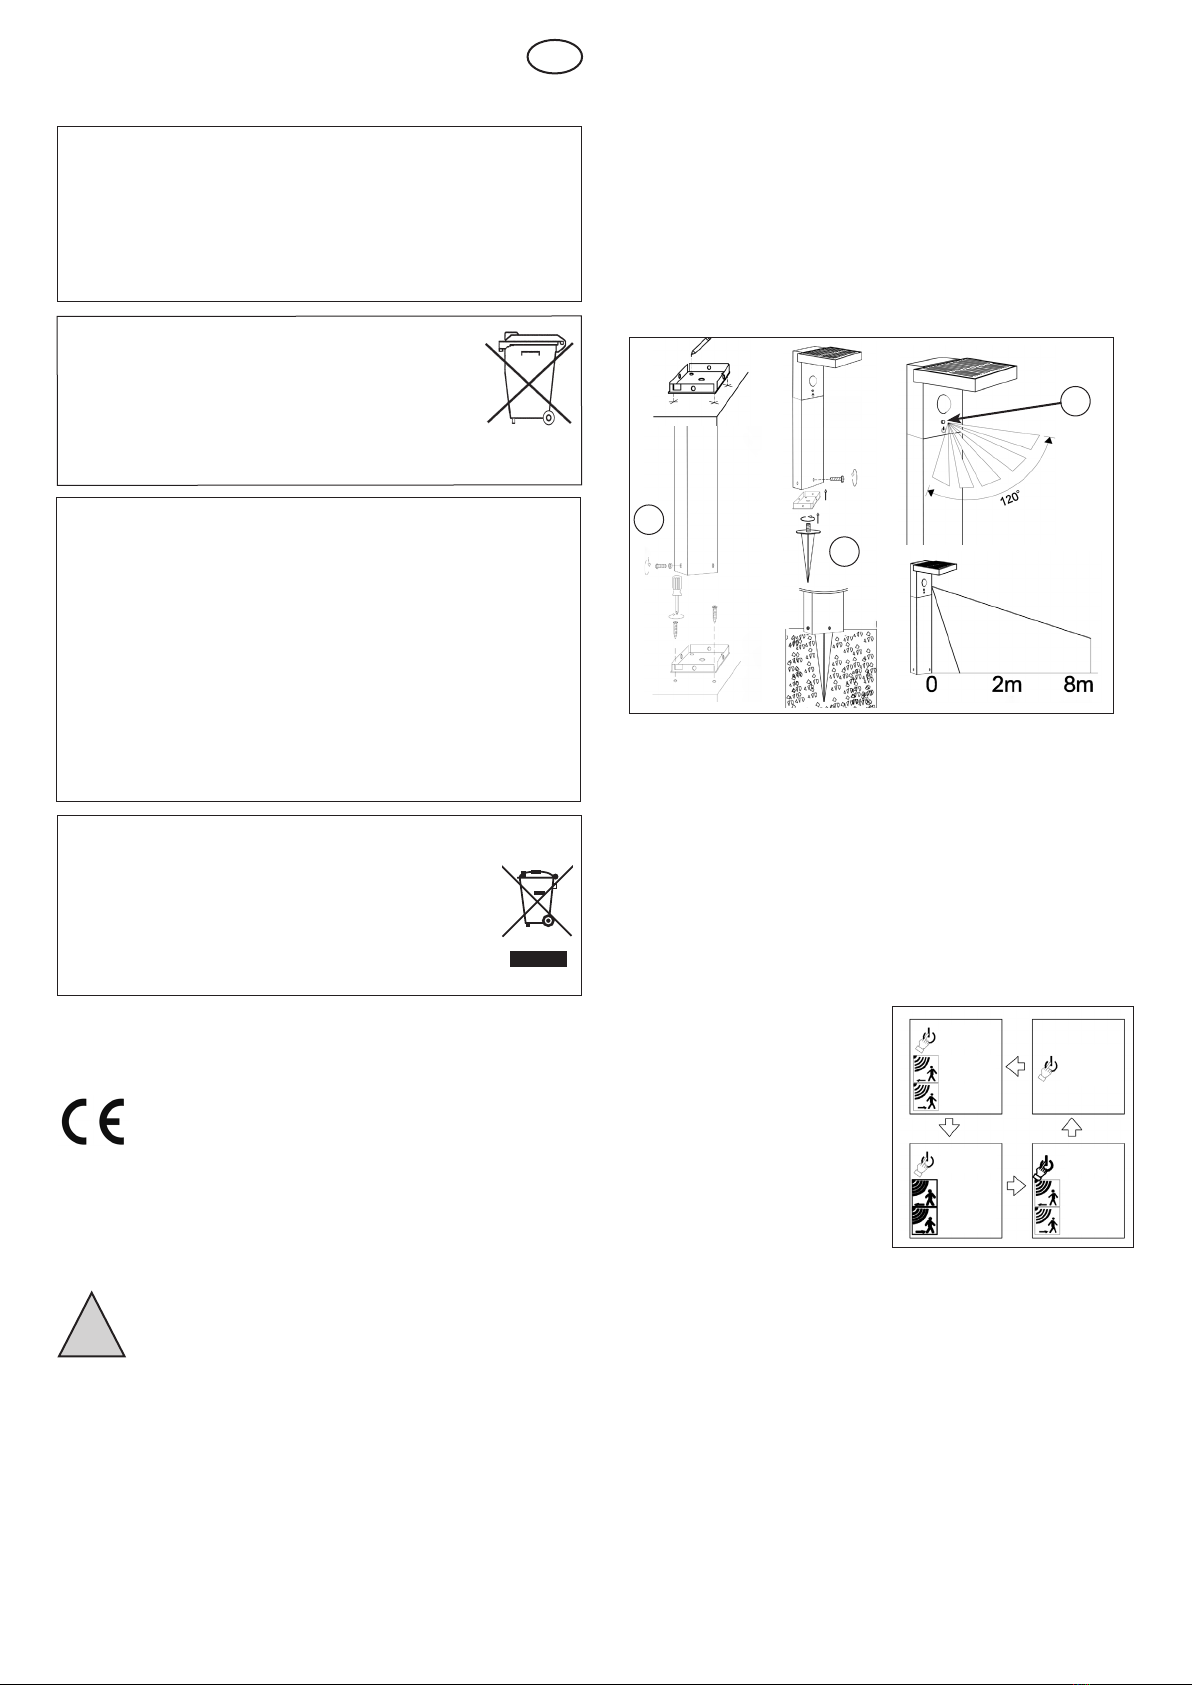
4. Installation
1. Carefully remove the parts from the packaging.
2. Mount the lamp either using the screws and dowels supplied or via the
earth spike included in the scope of delivery (item 1) at the intended loca-
tion.
Note: Please note the detection range of the motion sensor. The
detection angle is 120° and the range is max. 8 m.
3. 3 different operating modes can be selected using the button on the
PIR sensor (point 2). The solar module should be covered. Proceed as
follows:
Note: When switching on and changing the operating modes, the lamp
lights up for a short time until the corresponding mode is activated.
- press button: (Mode A): The lamp
does not light up in the dark, upon
movement the lamp lights up with
600 lm, 10 seconds after the last
movement the light switches off!
- press button: (Mode B): The lamp
shines at a dimmed level with 20
lm in the dark, upon movement the
lamp shines with 400 lm, 10 sec-
onds after the last movement the
lamp goes back to 20 lm.
- press button: (Mode C): The lamp always shines at 100 lm in the dark.
The PIR sensor is switched off.
- press button: Lamp switched off, battery is still being charged!
Note: The duration of the light depends heavily on the intensity and dura-
tion of sunlight during the day. In the winter months, you can generally
expect less lighting time. If the light does not light up on the first evening,
please wait for a sunny day.
1. Introduction
Dear customer, thank you for purchasing this product.
You have acquired a product that has been built according to the current
state of the art.
The product meets the requirements of the applicable
European and national guidelines. The conformity with
these requirements has been proven, and the correspond-
ing declarations and documents are deposited with the
manufacturer.
In order to ensure the product continues to meet these requirements, and
to ensure safe operation, you as the user must observe these operating
instructions.
2. Safety instructions
The guarantee and the warranty expire in the event of
damage to the product caused by failure to observe these
operating instructions. We are not liable for any conse-
quential damage!
The same applies to property damage or personal inju-
ry caused by improper handling or failure to observe the safety
instructions.
- Unauthorised modifications or other changes to the product are not per-
mitted. The guarantee and the CE approval expire in this event.
- Make sure that the light does not get into the hands of children. It is not
a toy!
- Keep plastic film or other packaging material away from children, there is
a risk of suffocation.
- This product is only suitable for private use!
GB
!
Using instructions
Solar PIR lamp „Verla 50“
Customer care:
If you have any problems or questions about this product, just contact us!
esotec GmbH, Industriegebiet Weberschlag 9, D-92729 Weiherhammer
Internet: www.esotec.de
Via phone: +49 9605-92206-0
Internet: www.esotec.de
Manufacturer Part Number: 102760
Warning:
- Batteries do not belong in the hands of children. Never leave batteries
lying around openly, there is a risk of them being swallowed by children
or pets.
- Batteries must never be short-circuited, dismantled or thrown into fire.
There is a risk of explosion!
- Leaking or damaged batteries can cause burns if they come into con-
tact with the skin, so use suitable protective gloves in this case.
- When changing the batteries, only batteries of the same construction
may be used. Under no circumstances should old batteries be used as
they cannot be recharged.
- Make sure the polarity is correct when inserting or connecting the bat-
teries.
- If the device is not used for a longer period of time (e.g. storage),
remove the inserted batteries to avoid damage from leaking batteries.
LiFePO4
Battery disposal
Batteries must not be disposed of with the household
waste. The consumer is legally obliged to return batteries
after use, for example to public collection points or where
such batteries are sold.
Batteries containing pollutants are marked with the sym-
bol “crossed out garbage can” and one of the chemical
symbols.
Disposal:
Dear customer,
Proper disposal of old devices is mandatory!
Should you ever want to part with this article, please keep in
mind that many of its components are made of valuable raw
materials and can be recycled.
Therefore do not dispose of it in the garbage can, but rather
please take it to your collection point for electrical devices.
Thank you for your help!
Mode A
switched ON
press
Mode B
press
Mode C
always
100 lm
PIR
400 lm
20 lm
OFF
PIR
600 lm
OFF
1.
1.
2.


