Espressione PastaMatic 1591 User manual

PastaMatic
AUTO
STOP
manu
mix
manu
EXT
1
4 5
manu
mix
manu
EXT
2
AUTO
STOP
manu
mix
manu
EXT
3
A
D
E
F
H
I
C
V
LMNOP
Q
S
T
U
B
R
G
Z
8 9
6 7
PastaMatic
AUTO
STOP
manu
mix
manu
EXT
10
AUTO
STOP
manu
mix
manu
EXT
AUTO
STOP
11
AUTO
STOP
manu
mix
manu
EXT
12
PastaMatic
AUTO
STOP
manu
mix
manu
EXT
13

EN
-2-
IMPORTANT SAFEGUARDS
READTHESEINSTRUCTIONSBEFOREUSE
The necessary precautions must be taken when using electrical appliances, and
these include the following:
1. Make sure that the voltage on the appliance rating plate corresponds to that of
the mains electricity.
2. Never leave the appliance unattended when connected to the power supply;
unplug it after every use.
3. Never place the appliance on or close to sources of heat.
4. Always place the appliance on a flat, level surface during use.
5. Never leave the appliance exposed to the elements (rain, sun, etc....).
6. Make sure that the power cord does not come into contact with hot surfaces.
7. This appliance can be used by children aged from 8 years and above and
persons with reduced physical, sensory or mental capabilities or lack of experi-
ence and knowledge only if they have been given supervision or instruction
concerning use of the appliance in a safe way and understand the hazards
involved. Do not allow children to play with the appliance. Cleaning and user
maintenance must not be carried out by children unless they are older than 8
and supervised.
8. Children under age 8 should not be allowed to handle appliance and its power
cord which must be kept out of their reach.
9. Never place the appliance body, plug or power cord in water or other liquids;
always wipe clean with a damp cloth.
10. Always unplug the power cord from the electricity mains before fitting or remov-
ing single attachments or before cleaning the appliance.
11. Always make sure that your hands are thoroughly dry before using or adjust-
ing the switches on the appliance, or before touching the power plug or power
connections.
12. To unplug the appliance, grip the plug and remove it directly from the power
socket. Never pull the power cord to unplug the appliance.
13. Do not use the appliance if the power cord or plug are damaged or if the appli-
ance itself is faulty; all repairs, including substitution of power cord, must be
carried out exclusively by an assistance centre or by authorized technicians in
order to avoid all risks.
14. In case of using extension leads, these must be suitable for the appliance power

EN
-3-
to avoid danger to the operator and for the safety of the environment in which
the appliance is being used. Extension leads, if not suitable, can cause operat-
ing anomalies.
15. Never allow the cord to dangle in places where it may be grabbed by a child.
16. Do not threaten the safety of the appliance by using parts that are not original
or which have not been approved by the manufacturer.
17. This appliance is designed for HOME USE ONLY and may not be used for com-
mercial or industrial purposes.
18. This appliance conforms to the directives 2006/95/EC and EMC 2004/108/EC,
and to the regulations (EC) No. 1935/2004 of 27/10/2004 regarding material in
contact with foods.
19. Any changes to this product that have not been expressly authorised by the
manufacturer may lead to the user’s guarantee being rendered null and void.
20. In the event that you decide to dispose of the appliance, we advise you to make
it inoperative by cutting off the power cord. We also recommend that any parts
that could be dangerous be rendered harmless, especially for children, who may
play with the appliance or its parts.
21. Packaging must never be left within the reach of children since it is potentially
dangerous.
22. Do not block or obstruct appliance air vents.
23. Remove all inner accessories, then wash and wipe them thoroughly.
24. Do not move appliance while operating.
25. Do not place anything on the appliance while operating.
26. Never touch the parts when in motion and do not insert your fingers or kitchen-
ware into the bowl while the appliance is operating.
27. Never insert food with hands. Always use the supplied containers.
28. Do not remove dough from die with your fingers while the appliance is running
to avoid the risk of severe injuries.
29. To dispose of product correctly according to European Directive 2012/19/
CE, please refer to and read the provided leaflet enclosed with the product.
DO NOT THROW AWAY THESE INSTRUCTIONS

EN
-4-
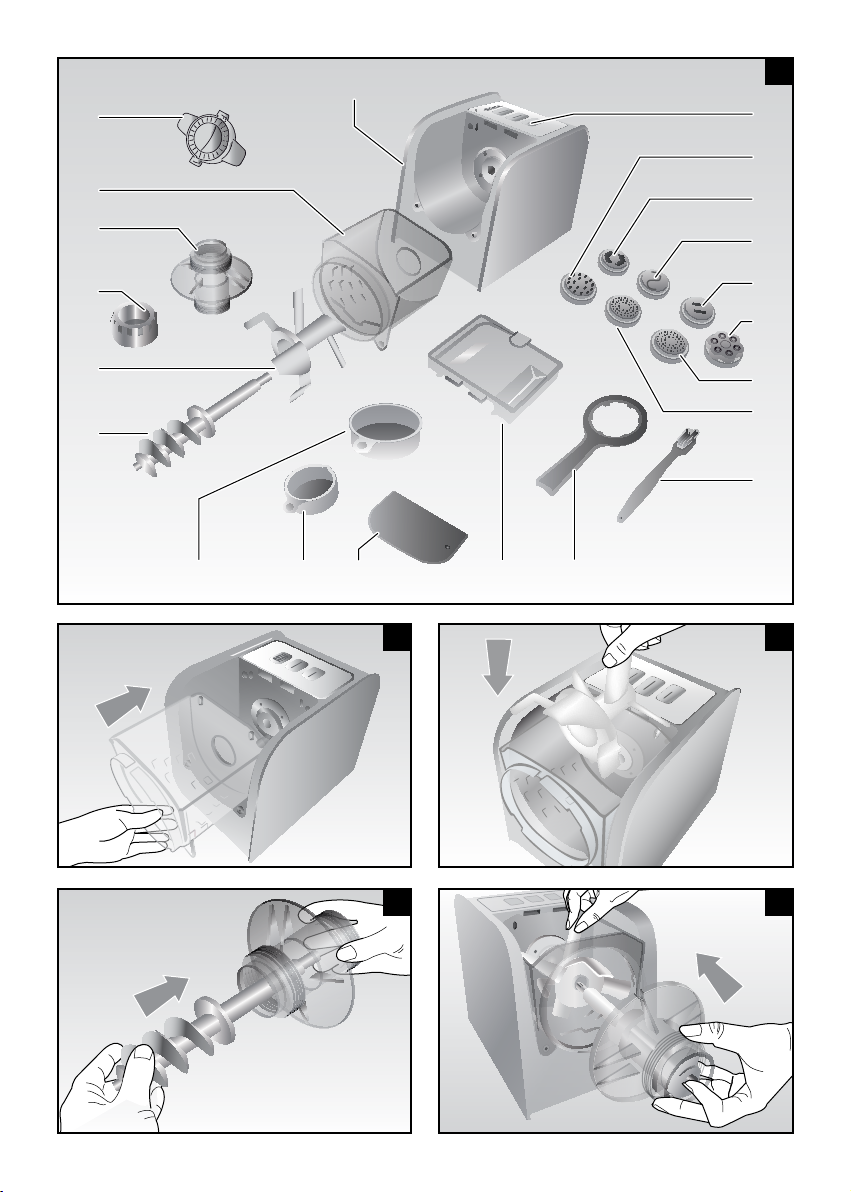
APPLIANCE DESCRIPTION (Fig. 1)
A Motor base
B Control panel
C Tagliatelle die
D Fettuccine die
E Lasagna die
F Biscuit die
G Macaroni die
H Spaghetti die
I Linguine die
L Nut wrench
M Bowl lid
N Pasta cutter
O Liquid measuring cup
P Flour measuring cup
Q Kneading screw
R Mixing blade
S Nut
T Pasta extrusion chamber
U Bowl
V Brush
Z Ravioli attachment
APPLIANCE ASSEMBLY
ATTENTION: Before using the appliance, it is recommended to clean all removable parts that
will be in contact with food using water and common dish detergent.
- Insert the bowl (U) into the motor base (A) by slightly pressing it to lock the rear pins in the cor-
responding holes on the motor base (A) (Fig. 2).
- Place the mixing blade (R) into the bowl (U) by laying it down on the bottom (Fig. 3).
- Assemble the conveying unit by inserting the screw (Q) into the pasta extrusion chamber (T) (Fig.
4).
- By holding the mixing blade (R) with your hand, insert the previously mounted conveying unit into
the bowl (U) from outside, so that the screw (Q) passes through the middle hole on the mixing
blade (R) and the two arrows on the chamber (T) and the bowl (U) are aligned.
Lastly, press the conveying unit forwards so that the screw (Q) perfectly fits with the corresponding
housing on the motor base (A) (Fig. 5).
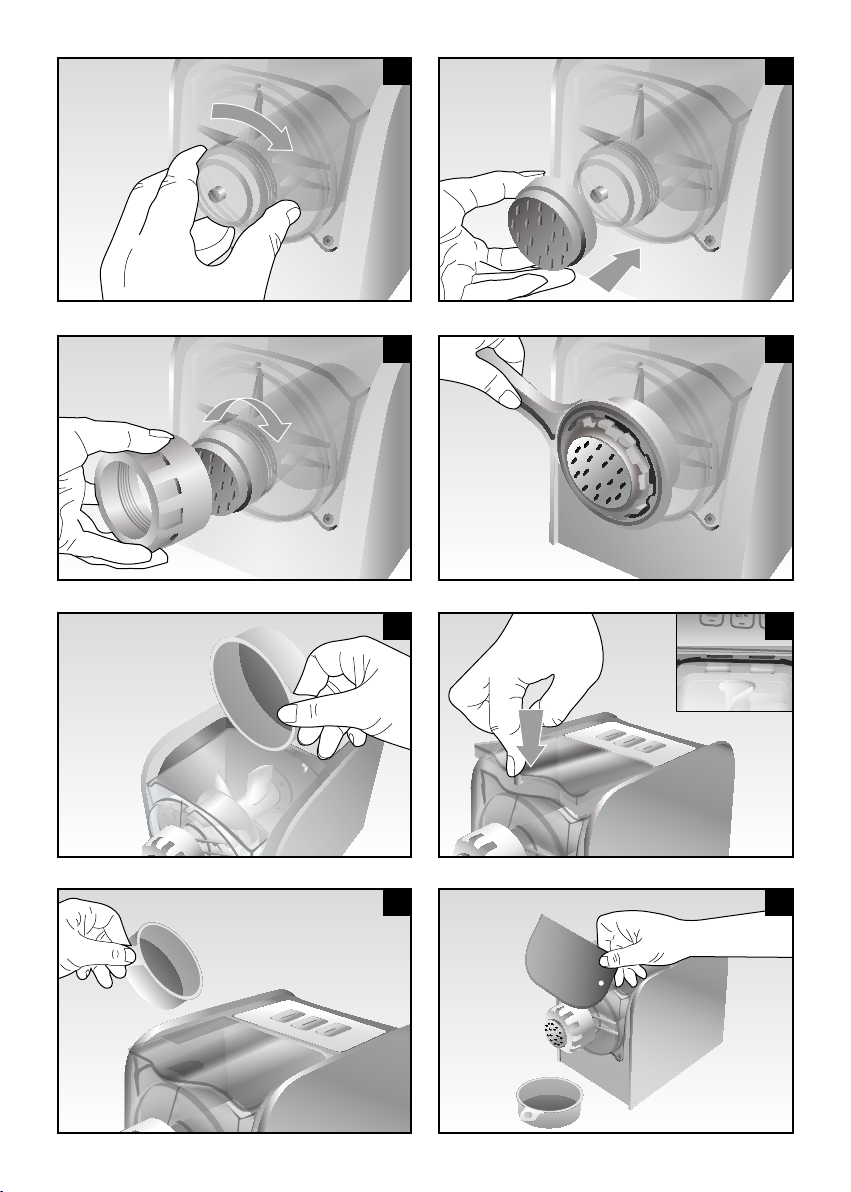
- Rotate the chamber (T) clockwise towards the sign in order to definitively lock the conveying
unit with the bowl (U) (Fig. 6).
- Choose the proper die, according to individual needs, and mount it on the chamber (T) (Fig. 7).
- Screw the nut (S) on the chamber (T) to lock the selected die (Fig. 8). Slightly tighten the nut by
means of the appropriate wrench supplied (L) (Fig. 9).
ATTENTION:
Before use, make sure all components are properly mounted on the appliance. When the lid
(M) is not mounted properly, the appliance does not work.
INSTRUCTIONS FOR USE
- By using the suitable measuring cup (P), pour the necessary amount of flour into the bowl (U), as
indicated on the recipe (Fig. 10), without exceeding the max. level (24 OZ).
- Close the bowl (U) with the suitable lid (M), by inserting the rear tabs in the keyholes of the motor
base (A); press downwards on the lid rear to lock it (Fig. 11).
- Plug the appliance and press the start button situated on the control panel (B) chosen according
to the required operating mode (see following paragraph). The related indicator light close to the

EN
-5-
button itself goes on.
- After having started the appliance, pour the liquids possibly necessary for your recipe (Fig. 12)
through the upper hole of the lid (M) by using the appropriate measuring cup (O).
- Position a suitable container underneath the die and use the supplied pasta cutter (N) to cut the
extruded pasta according to the required length (Fig. 13).
- Eventually keep the prepared pasta in the fridge.
ATTENTION:
During processing, do not add solid ingredients, with the exception of flour. Properly mix
eggs and water.
During processing, do not open the bowl lid and do not touch moving parts in order to avoid
the risk of injury.
Do not use the appliance repeatedly more than 3 times. After three continuous cycles, let the
appliance stand for 30 minutes.
OPERATING MODES
Automatic mode
- By pressing the “AUTO/STOP” button, the appliance starts in automatic mode; it proceeds with the
mixing phase for 3,5 minutes, and then the pasta extrusion phase follows automatically.
- At the end of the process, the appliance stops. The total operating time is approximately 10 min-
utes.
- By pressing the “AUTO /STOP” button during process, the machine stops; press the “MANU/MIX”
button to restart the mixing process or the “MANU/EXT” one for the pasta extrusion phase.
Manual mode
- By pressing the “MANU/MIX” button, the appliance starts the mixing phase.
- Mix water and flour referring to minutes indicated on the recipe, until they are suitably blended.
- By pressing the “AUTO /STOP” button during process, the machine stops. Press the operating
button once more to re-start the process.
- Press the “MANU/EXT” button to proceed with the pasta extrusion phase.
ATTENTION:
DO NOT press the “MANU/EXT” button before the dough is well mixed. When pressing the
“MANU/EXT” mode by mistake, press the “AUTO/STOP” button, unplug the appliance and
clean it. Restart the cycle.
During the extrusion phase, the appliance may jam and proceed with a quick remixing of
ingredients; in this case, the appliance will automatically re-starts. If the appliance does not
start, it might be due to a too hard dough. It is therefore necessary to re-set it according to
the suitable crumb texture.

EN
-6-
USE OF RAVIOLI ATTACHMENT (Z)
The ravioli attachment is useful to prepare stuffed pasta in an easy, quick way. It is used together
with the lasagna die (E): prepare the lasagna first, and then lay the strip to completely cover the
attachment diameter, insert the required stuffing (ricotta cheese and spinach, meat or other accord-
ing to recipe) into pasta and close the latter by folding it on itself. The attachment directly cuts and
seals ravioli. REMAINING pasta cutouts may be subsequently re-processed by inserting them into
the appliance to obtain other lasagna. It is recommended to prepare ravioli when pasta is still fresh;
when it becomes dry, the edges may not adhere properly.
USE TIPS
- Make sure flour and water are suitably mixed together and that there is no dry flour as it might jam
the appliance.
- In case of too dry flour, add 1-3 OZ of water and proceed with mixing for further 2 minutes.
- In case of too wet flour, switch the appliance and unplug it; remove the dough stuck to the mixing
blade (R), add some dry flour, and then mix for further 2 minutes.
APPLIANCE CLEANING
ATTENTION: Make sure the appliance is off and unplugged before disassembling it.
- After use, remove all components from the appliance, by carrying out the procedures described
for assembly in the reverse order.
- Use a clean and soft cloth only for cleaning the motor base (A).
- All components may be cleaned using warm water and any kind of dish detergent. TO remove
pasta residues from the various components, it is recommended to rinse them under running water
by using the brush (V) supplied.
ATTENTION:
In order to make components cleaning easier, after use, let them immersed in warm water with
a little dish detergent for 10 minutes.
Never put the motor base (A) or all components in the dishwasher.
Do not use abrasive tissues or corrosive detergents for cleaning.
After cleaning, let any part completely dry before mounting.
For technical support and service please contact
Espressione Service Center in US
201-439-1700
This manual suits for next models
1
Table of contents
Popular Pasta Maker manuals by other brands


AirPro
AirPro NP-K027-001 user manual

Ernesto
Ernesto 331467 1907 Operation and safety notes

Lincat
Lincat LPB Installation, operating and servicing instructions

Giorik
Giorik 2CPG Instructions for installation, use and maintenance manual

Trebs
Trebs Comfortcook 21126 manual

Philips
Philips HR2332/11 user manual