Estella 348DPC18NH User manual

02/2022
348DPC18NH
18" Round
No Heated Platens
348DPC18P
18" Round
Top Heated Platen
120V • 1200W
348DPC18T
18" Round
Dual Heated Platens
240V • 3300W
348DPC1620T
16" x 20" Rectangular
Dual Heated Platens
240V • 3600W
PIZZA/TORTILLA
DOUGH PRESSES
USER MANUAL

2
Important Safety Information .....................................3
Delivery/Setup.....................................................4
Specifications ......................................................4
Controls............................................................5
Operation .......................................................6-9
Cleaning & Maintenance...........................................9
Troubleshooting ...................................................9
Circuit Diagrams ............................................. 10-11
Limited Warranty ............................................ 12-13
INDEX

3
When using electrical appliances, basic safety precautions should always be followed,
including the following:
1. Keep the work area surrounding the machine clean and organized.
2. Consider environmental conditions surrounding the machine. Do not use the machine in humid,
wet or poorly lit environments. Do not use the machine close to flammable liquids or gas.
3. Keep machine away from children and non-authorized personnel. Do not permit them to go near
the machine or its working area.
4. Do not touch the switch or cable with wet hands.
5. Only utilize the machine with the correct voltage to achieve optimum results.
6. Do not wear low-hanging clothing or items that may get caught in the machine. Wear non-slip
shoes while working with the machine. For hygiene and safety, keep hair tied back and wear
protective gloves.
7. Do not tug on the cable to remove the plug from the outlet. Do not leave the cable near sharp
objects, water or solvents.
8. Remove the plug when the machine is not in use, you are cleaning the machine or need to move
the machine.
9. Check that the machine is not damaged prior to each use. Carefully check that all safety devices
are working, that the removable parts are not blocked, there are no parts damaged, that all the
parts have been set up correctly and that all conditions that could influence the regular function
of the machine are in working order.
10. If the machine is damaged or there are issues during its use, turn off the machine immediately
and contact the manufacturer for assistance or repair. Repairs should only be made by qualified
technicians, using the correct manufacturer parts. Non-compliance with these rules may void
the warranty.
11. This machine's intended use is to press dough. No other use for this machine is authorized
or recommended.
12. This machine is intended for commercial applications where all operators are familiar with the
purpose, limitations, and potential hazards. Operating instructions and warnings must be read
and understood by all users.
NOTE: Save these instructions for future reference.
SAFETY
4
DELIVERY/SETUP
SPECIFICATIONS
• This machine has been comprehensively inspected and tested before the delivery, aiming to provide
the highest quality. Please check for any transportation damages when you received the machine and
contact the carrier if there is any damage.
• Save this manual for the entire operating life of the machine. Store it in a place that is easily
accessible, so that it is always available when its consultation becomes necessary.
• This manual aims to offer the necessary information to those who are authorized to use the machine.
The operators of this machine must read it carefully and apply it strictly.
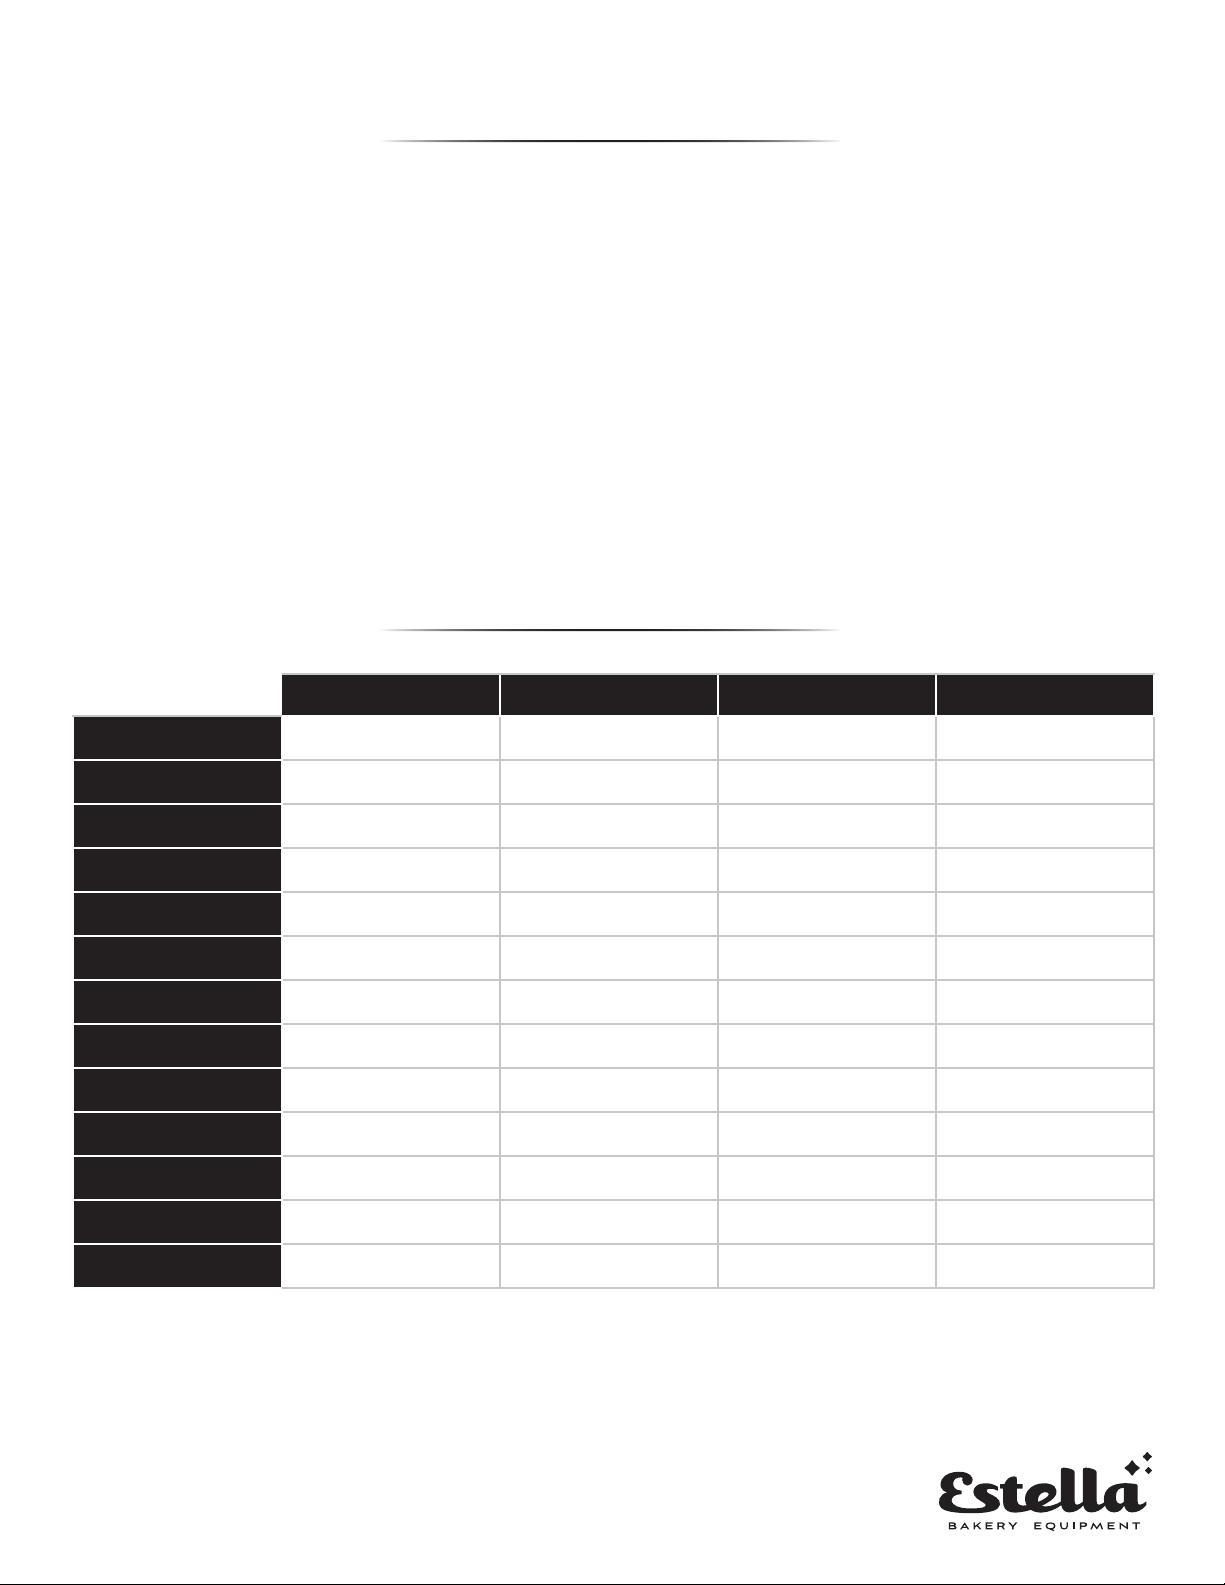
348DPC18NH 348DPC18P 348DPC18T 348DPC1620T
Press Dimensions 18" Round 18" Round 18" Round 16" x 20" Rectangular
Heat Style None Upper Plate Dual Plate Dual Plate
Operation Manual Manual Manual Manual
Design Clamshell Clamshell Clamshell Clamshell
Voltage N/A 120V 240V 240V
Wattage N/A 1200W 3300W 3600W
Temperature Range N/A 95 - 212°F 95 - 446°F 95 - 446°F
Max. Thickness 1/32" - 19/32" 1/32" - 19/32" 1/32" - 7/16" 1/32" - 7/16"
Height (Open) 34" 34" 34" 36"
Height (Closed) 18½" 18½" 18½" 18½"
Depth 30" 30" 30" 32"
Width 18½" 18½" 18½" 18½"
Weight 104 lb. 108 lb. 113 lb. 126 lb.
5
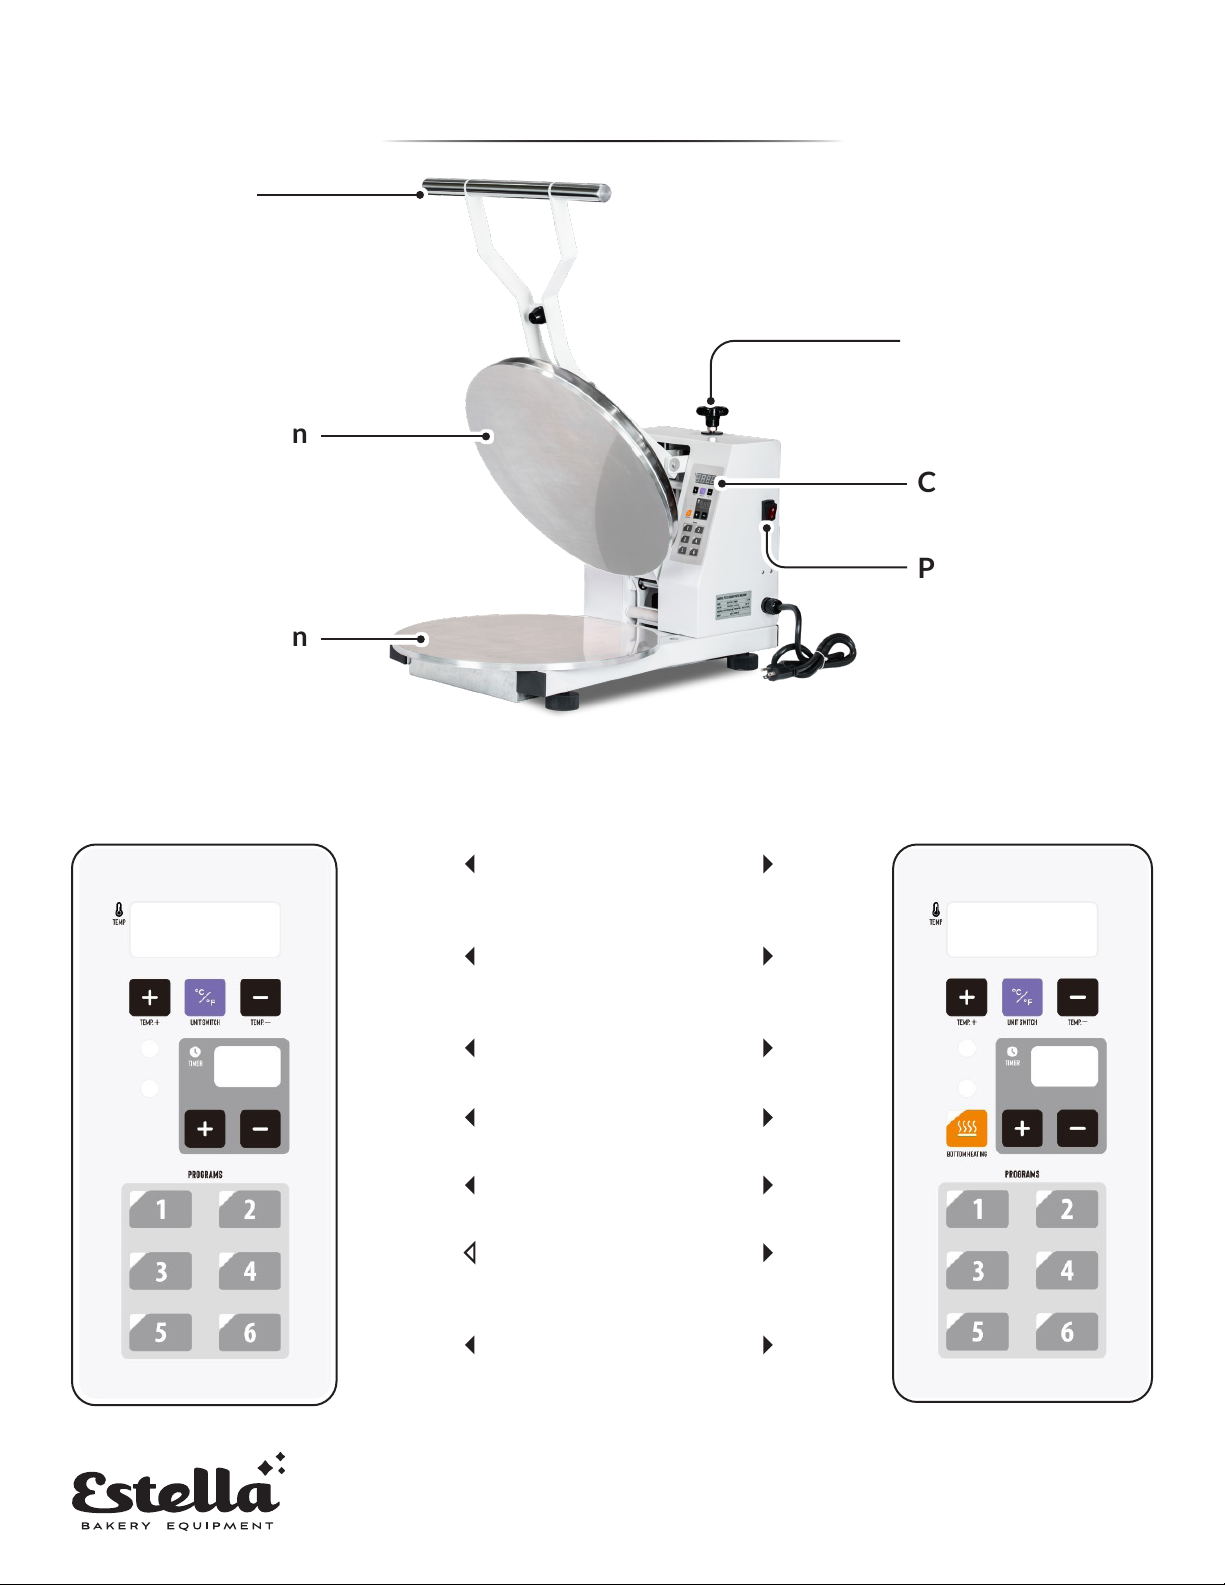
CONTROLS
Handle
Upper Platen
TEMP +
Increases the temperature of upper & lower
(if enabled) platens
TEMP -
Decreases the temperature of upper & lower
(if enabled) platens
UNIT SWITCH
Sets the temperature in Fahrenheit or Celsius
TIMER+
Increases the set time per press
TIMER-
Decreases the set time per press
BOTTOM HEATING
Switches between enabling and disabling
heat to the Lower Platen
PROGRAMS (1-6)
Used to create or select preset programs
Thickness
Adjustment Knob
Control Panel
Power Switch
Lower Platen
348DPC18P
CONTROL PANEL
348DPC18T
348DPC1620T
CONTROL PANEL

6
OPERATION
• Diameter and thickness of the finished product is determined through the dough weight, dough
temperature, press time and thickness setting. It is recommended to use trial and error to determine
the most consistent product.
• Use proofed pizza dough of at least room temperature. Do NOT use frozen dough.
Frozen dough can damage the unit and void the warranty.
• Do not use metal utensils on the unit. Metal utensils can scratch and damage the stainless-steel
platens.
1. Set the desired dough thickness by turning the thickness adjustment knob. For thinner dough, turn
the knob clockwise. For thicker dough, turn the knob counterclockwise.
2. Apply food-safe oil on the upper & lower platens.
3. Place the proofed portioned dough ball in the center of the platen. Add a small amount of food-safe
oil on the top of the dough ball.
NOTE: DO NOT dust the platens or dough ball with flour.
4. Pull down the upper platen all the way by applying pressure to the top handle with both hands.
5. Hold the handle down for desired time. Recommended time is 10-12 seconds. The warmer the
dough, the shorter the required press time.
CAUTION: Please keep hands away from pressing platens when you press down the handle. It can
cause serious injury.
6. Raise the handle all the way up and remove the flattened dough.
7. Since the platens are not heated, this unit will only press dough to about 60% of the finished size.
To reach finished size, stretch or hand toss the dough.
NO HEATED PLATENS (348DPC18NH)

7
OPERATION
• DO NOT touch the heated upper platen. It is hot and can burn the user.
• Diameter and thickness of the finished product is determined through the dough weight, dough
temperature, press time, thickness setting, & temperature. It is recommended to use trial and error
to determine the most consistent product.
• Only use proofed pizza dough of at least refrigerated temperature. Do NOT use frozen dough.
Frozen dough can damage the unit and void the warranty.
• To use no heated platens, unplug the unit and follow the “No Heated Platens” operating instructions.
• Do not use metal utensils on the unit. Metal utensils can scratch and damage the stainless-steel
platens.
1. Plug the cord of the unit into a grounded electrical outlet and turn on the unit by pressing the red on/
off switch on the right side. After the unit is turned on, the upper platen begins to heat automatically. It
usually takes between 15-30 minutes for the unit to heat up to the set temperature.
NOTE: Please close the upper heating platen before turning on the machine.
2. To switch between Fahrenheit and Celsius, press the purple “UNIT SWITCH” button.
3. Set the desired temperature using the “TEMP” controls. A temperature of 150 degrees Fahrenheit
is acceptable for most pizza dough. Generally, colder dough needs a higher press temperature than
warmer dough. However, it is recommended to use trial and error to determine the best temperature
setting.
4. Set the desired press time using the “TIMER” controls. Generally, a press time of 2-8 seconds is
acceptable with less time for warm dough and more time for cold dough. However, it is recommended
to use trial and error to determine the best timer setting.
5. Set the desired dough thickness by turning the thickness adjustment knob. For thinner dough,
turn the knob clockwise. For thicker dough, turn the knob counterclockwise.
6. Apply food safe oil on the upper & lower platens.
7. Place the proofed portioned dough ball in the center of the platen. Add a small amount of food-safe
oil on the top of the dough ball.
NOTE: DO NOT dust the platens or dough ball with flour.
8. Pull down the upper platen all the way by applying pressure to the top handle with both hands.
CAUTION: Please keep hands away from pressing platens when you press down the handle. It can
cause serious injury.
9. Hold the handle down until the timer reaches 0 and the unit beeps.
10. After the unit beeps, raise the handle all the way up and remove the flattened dough. Dough is now
ready for the final finishing touches.
UPPER HEATED PLATEN (348DPC18P)

8
OPERATION
• DO NOT touch the heated upper & lower platens. They are hot and can burn the user.
• Diameter and thickness of the finished product is determined through the dough weight,
dough temperature, press time, thickness setting, & temperature. It is recommended to use
trial and error to determine the most consistent product.
• Only use proofed pizza or flour tortilla dough of at least refrigerated temperature.
DO NOT use frozen dough. Frozen dough can damage the unit and void the warranty.
• To use only the upper heated platen, press the orange “BOTTOM HEATING” button. The indicator
light will then turn off and the lower platen will no longer heat. Then follow the “Upper Heated Platens”
operating instructions.
• To use no heated platens, unplug the unit and follow the “No Heated Platens” operating instructions.
• Do not use metal utensils on the unit. Metal utensils can scratch and damage the stainless-steel platens.
1. Plug the cord of the unit into a grounded electrical outlet and turn on the unit by pressing the red
on/off switch on the right side. After the unit is turned on, the upper & lower platens begin to heat
automatically. It usually takes between 15-30 minutes for the unit to heat up to the set temperature.
NOTE: Please close the upper heating platen before turning on the machine.
2. To switch between Fahrenheit and Celsius, press the purple “UNIT SWITCH” button.
3. Set the desired temperature using the “TEMP” controls. Make sure that the orange “BOTTOM
HEATING” indicator light is on to indicate that the temperature is set for both platens. A temperature
of 325 degrees Fahrenheit is acceptable for most flour tortilla dough & 150 degrees Fahrenheit for
pizza dough. Generally, colder dough needs a higher press temperature than warmer dough. However,
it is recommended to use trial and error to determine the best temperature setting.
4. Set the desired press time using the “TIMER” controls. Generally, a press time of 2-10 seconds
is acceptable with a less time for warm dough and more time for cold dough. However, it is
recommended to use trial and error to determine the best timer setting.
5. Set the desired dough thickness by turning the thickness adjustment knob. For thinner dough,
turn the knob clockwise. For thicker dough, turn the knob counterclockwise.
6. Apply food-safe oil on the upper & lower platens.
7. Place the proofed portioned dough ball in the center of the platen. Add a small amount of food-safe
oil on the top of the dough ball.
NOTE: DO NOT dust the platens or dough ball with flour.
8. Pull down the upper platen all the way by applying pressure to the top handle with both hands.
CAUTION: Please keep hands away from pressing platens when you press down the handle.
It can cause serious injury.
9. Hold the handle down until the timer reaches 0 and the unit beeps.
10. After the unit beeps, raise the handle all the way up and remove the flattened dough.
The dough is now ready for final finishing touches.
DUAL HEATED PLATENS (348DPC18T & 348DPC1620T)

9
• This unit allows users to save up to 6 temperature and timer programs.
• Turn off the machine and unplug it before cleaning and maintenance.
• DO NOT spray the machine with direct jets of water or using high pressure appliances.
1. Select the desired temperature unit in Fahrenheit or Celsius by pressing the purple
“UNIT SWITCH” button.
2. Press the program number button where you want the program to be saved. The temperature
display and time display will flash. Set the desired temperature by using the “TEMP” controls. Set the
desired time by using the “TIMER” controls.
3. After setting the desired temperature and time, the program will be saved automatically.
4. To use a saved program, press the program button number and the time and temperature will
automatically set. Follow the operating instructions for your unit.
NOTE: If a saved program is modified the original program will be replaced by the new program.
NOTE: The program used at the time of shutdown will be the program that starts automatically
when the machine is turned on.
1. Wait for the machine to cool. Opening the upper heating platen cools the machine quicker.
2. Remove the residues and oils from the upper and lower platens with a cloth soaked with
food-grade detergent.
3. Wipe the platens with a dry cloth.
4. Remove residues and oils from the exterior surfaces of the machine using a cloth soaked with
food-grade detergent.
• Allow the machine to cool for 2 minutes and then reset the circuit breaker by pressing the
button back in.
• If the circuit breaker continues to trip, please get an electrician to check the cause of the fault.
PROGRAMMING
CIRCUIT BREAKER TRIP
OPERATION
TROUBLESHOOTING
CLEANING &
MAINTENANCE
10
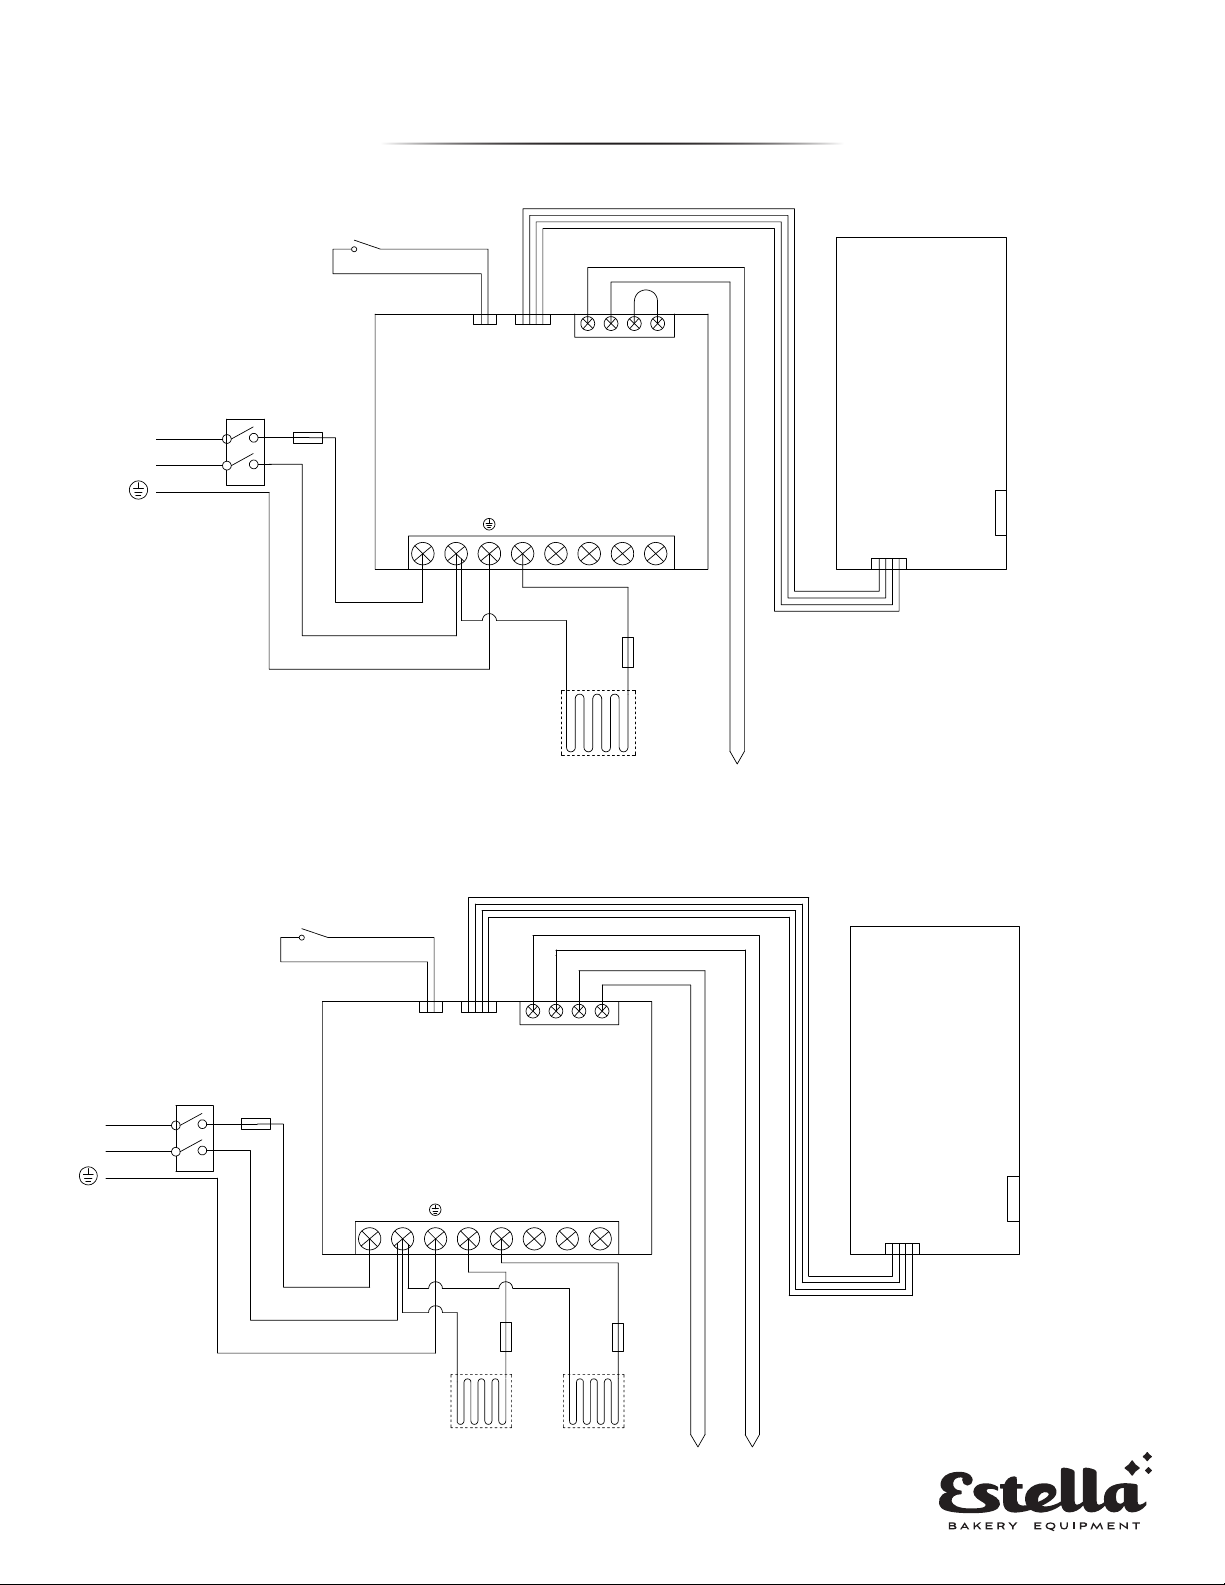
CIRCUIT DIAGRAMS
348DPC18P
348DPC18T
A
A
C
C
L
L
A
A
C
C
N
N
A
A
C
C
L
L
A
A
C
C
N
N
O
O
U
U
T
T
1
1
O
O
U
U
T
T
2
2
TC1 TC2
+
+
-
-
+
+
-
-
KEYIT3IT2IT1
P
P
o
o
w
w
e
e
r
r
d
d
r
r
i
i
v
v
e
e
b
b
o
o
a
a
r
r
d
d
Me Technology
Power drive board
Round Upper and
bottom Heating
T
T
i
i
m
m
e
e
r
r
S
S
w
w
i
i
t
t
c
c
h
h
C
C
o
o
n
n
t
t
r
r
o
o
l
l
P
P
a
a
n
n
e
e
l
l
S
S
w
w
i
i
t
t
c
c
h
h
3
3
0
0
A
A
F
F
u
u
s
s
e
e
2
2
0
0
A
A
O
O
v
v
e
e
r
r
t
t
e
e
m
m
p
p
e
e
r
r
a
a
t
t
u
u
r
r
e
e
p
p
r
r
o
o
t
t
e
e
c
c
t
t
i
i
o
o
n
n
f
f
u
u
s
s
e
e
1
1
0
0
A
A
O
O
v
v
e
e
r
r
t
t
e
e
m
m
p
p
e
e
r
r
a
a
t
t
u
u
r
r
e
e
p
p
r
r
o
o
t
t
e
e
c
c
t
t
i
i
o
o
n
n
f
f
u
u
s
s
e
e
1
1
0
0
A
A
K
K
v
v
a
a
l
l
u
u
e
e
t
t
h
h
e
e
r
r
m
m
o
o
c
c
o
o
u
u
p
p
l
l
e
e
p
p
r
r
o
o
b
b
e
e
K
K
v
v
a
a
l
l
u
u
e
e
t
t
h
h
e
e
r
r
m
m
o
o
c
c
o
o
u
u
p
p
l
l
e
e
p
p
r
r
o
o
b
b
e
e
H
H
e
e
a
a
t
t
i
i
n
n
g
g
t
t
u
u
b
b
e
e
1
1
.
.
6
6
5
5
K
K
W
W
/
/
2
2
4
4
0
0
V
V
H
H
e
e
a
a
t
t
i
i
n
n
g
g
t
t
u
u
b
b
e
e
1
1
.
.
6
6
5
5
K
K
W
W
/
/
2
2
4
4
0
0
V
V
Me Technology
Power drive board
A
A
C
C
L
L
A
A
C
C
N
N
A
A
C
C
L
L
A
A
C
C
N
N
O
O
U
U
T
T
1
1
O
O
U
U
T
T
2
2
TC1 TC2
+
+
-
-
+
+
-
-
KEYIT3IT2IT1
H
H
e
e
a
a
t
t
i
i
n
n
g
g
t
t
u
u
b
b
e
e
1
1
.
.
2
2
K
K
W
W
/
/
1
1
2
2
0
0
V
V
K
K
v
v
a
a
l
l
u
u
e
e
t
t
h
h
e
e
r
r
m
m
o
o
c
c
o
o
u
u
p
p
l
l
e
e
p
p
r
r
o
o
b
b
e
e
P
P
o
o
w
w
e
e
r
r
d
d
r
r
i
i
v
v
e
e
b
b
o
o
a
a
r
r
d
d
T
T
i
i
m
m
e
e
r
r
S
S
w
w
i
i
t
t
c
c
h
h
O
O
v
v
e
e
r
r
t
t
e
e
m
m
p
p
e
e
r
r
a
a
t
t
u
u
r
r
e
e
p
p
r
r
o
o
t
t
e
e
c
c
t
t
i
i
o
o
n
n
f
f
u
u
s
s
e
e
1
1
5
5
A
A
S
S
w
w
i
i
t
t
c
c
h
h
3
3
0
0
A
A
F
F
u
u
s
s
e
e
2
2
0
0
A
A
Round Upper Heating
C
C
o
o
n
n
t
t
r
r
o
o
l
l
P
P
a
a
n
n
e
e
l
l
11
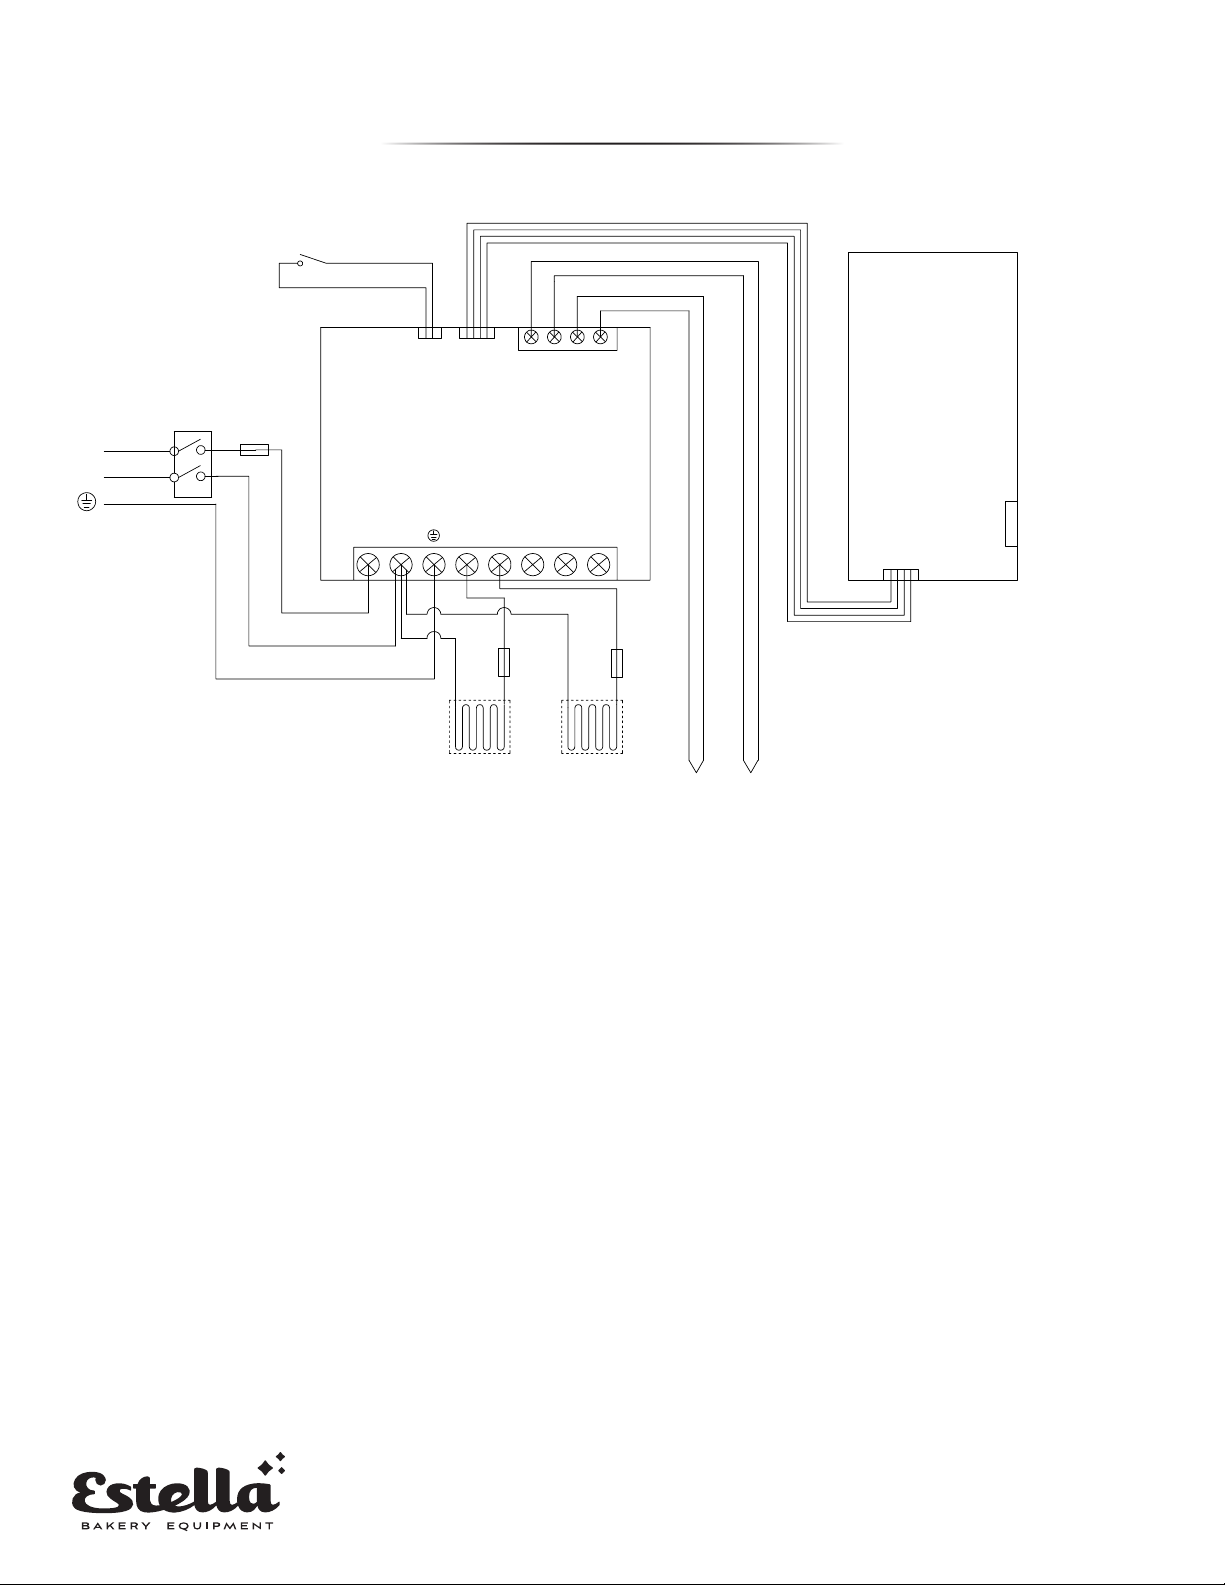
CIRCUIT DIAGRAMS
348DPC1620T
A
A
C
C
L
L
A
A
C
C
N
N
A
A
C
C
L
L
A
A
C
C
N
N
O
O
U
U
T
T
1
1
O
O
U
U
T
T
2
2
TC1 TC2
+
+
-
-
+
+
-
-
KEYIT3IT2IT1
Me Technology
Power drive board
Square Upper and
bottom Heating
T
T
i
i
m
m
e
e
r
r
S
S
w
w
i
i
t
t
c
c
h
h
P
P
o
o
w
w
e
e
r
r
d
d
r
r
i
i
v
v
e
e
b
b
o
o
a
a
r
r
d
d
C
C
o
o
n
n
t
t
r
r
o
o
l
l
P
P
a
a
n
n
e
e
l
l
S
S
w
w
i
i
t
t
c
c
h
h
3
3
0
0
A
A
F
F
u
u
s
s
e
e
2
2
0
0
A
A
O
O
v
v
e
e
r
r
t
t
e
e
m
m
p
p
e
e
r
r
a
a
t
t
u
u
r
r
e
e
p
p
r
r
o
o
t
t
e
e
c
c
t
t
i
i
o
o
n
n
f
f
u
u
s
s
e
e
1
1
0
0
A
A
O
O
v
v
e
e
r
r
t
t
e
e
m
m
p
p
e
e
r
r
a
a
t
t
u
u
r
r
e
e
p
p
r
r
o
o
t
t
e
e
c
c
t
t
i
i
o
o
n
n
f
f
u
u
s
s
e
e
1
1
0
0
A
A
K
K
v
v
a
a
l
l
u
u
e
e
t
t
h
h
e
e
r
r
m
m
o
o
c
c
o
o
u
u
p
p
l
l
e
e
p
p
r
r
o
o
b
b
e
e
K
K
v
v
a
a
l
l
u
u
e
e
t
t
h
h
e
e
r
r
m
m
o
o
c
c
o
o
u
u
p
p
l
l
e
e
p
p
r
r
o
o
b
b
e
e
H
H
e
e
a
a
t
t
i
i
n
n
g
g
t
t
u
u
b
b
e
e
1
1
.
.
8
8
K
K
W
W
/
/
2
2
4
4
0
0
V
V
H
H
e
e
a
a
t
t
i
i
n
n
g
g
t
t
u
u
b
b
e
e
1
1
.
.
8
8
K
K
W
W
/
/
2
2
4
4
0
0
V
V

12/2021
EQUIPMENT LIMITED WARRANTY
1 YEAR PARTS AND LABOR WARRANTY
Select Estella Spiral Mixers, Dough Sheeters, and Bread Slicers are backed by a 1 year parts and labor warranty provided
by Ready Kitchen Warranty. These select Estella products are warranted only to be free from defects in material and
workmanship for a period of 1 year from the date of delivery. Proof of purchase is required to obtain warranty service. This
warranty is only valid to the original purchaser and only to equipment installed in the contiguous United States.
Estella and Ready Kitchen Warranty will only cover regular rate labor (no overtime or holiday hours) and travel up to 100
miles round trip.
COVERED EQUIPMENT:
This warranty is valid on:
Bread Slicer Models: 348BSLICE1, 348BSLICE12, 348BSLICE34, 348BSLICE58
Dough Sheeter Models: 348DSC67, 348DSC78, 348DSF78, 348DSF94, 348EDS12D, 348EDS12S, 348EDS18D, 348EDS18S
Spiral Mixer Models: 348SM40, 348SM50, 348SM60, 348SM80, 348SM100
Dough Press Models: 348DPC18P, 348DPC18T, 348DPC1620T
This warranty does not cover equipment used for residential or other non-commercial purposes.
1 YEAR REPLACEMENT WARRANTY
Select Estella Spiral Mixers are backed by a 1 year replacement warranty provided by Ready Kitchen
Warranty. These select Estella products are warranted only to be free from defects in material and
workmanship for a period of 1 year from the date of delivery. Proof of purchase is required to obtain
warranty service. This warranty is only valid to the original purchaser and only to equipment installed in
the contiguous United States.
COVERED EQUIPMENT:
This warranty is valid on:
Spiral Mixer Models: 348SM20, 348SM30
Cheese Grater Models: 348CG12, 348CG34, 348CG1, 348CG112
Dough Press Models: 348DPC18NH
This warranty does not cover equipment used for residential or other non-commercial purposes.
TO MAKE A WARRANTY CLAIM:
In order to make a claim against this warranty, please contact Ready Kitchen Warranty.
• Phone: 717-381-4844 - Please have your model number, serial number, and proof of purchase ready before calling.
• Email: help@readykitchenwarranty.com - Please include your name, model number, serial number, proof of purchase,
and a brief description of the issue in your email. Including clear pictures of the issue will help expedite the process.
Failure to include one or more of these things will extend processing time.

12/2021
EQUIPMENT LIMITED WARRANTY
This Limited Warranty does not cover:
• Equipment sold or used outside of the contiguous United States.
• Equipment purchased used, or sold by an unauthorized reseller.
• Equipment that has been improperly installed, used, or maintained.
• Equipment that has been subject to abuse, misuse, harsh chemical action, modications made without the approval of
Estella, damage caused by ood, re, or other acts of God.
• Equipment missing a serial number or proof of purchase.
• Equipment that has been serviced outside of the warranty, or by an unauthorized technician, without the approval of
Ready Kitchen Warranty.
• Equipment that was damaged as part of shipping and handling. Please contact your authorized retailer for assistance.
• Equipment that has been changed, modied, or repaired with parts not authorized by Estella.
• Any adjustments, calibrations, leveling, tightening of fasteners, etc.
• Damage caused by unqualied operators. Estella products are designed for use by professionally trained bakers only.
• Any parts determined to be wearable items, such as belts, by Ready Kitchen Warranty or Estella.
This warranty provides the exclusive remedy against Estella relating to Estella products, whether in contract or in tort or
under any other legal theory, and whether arising out of warranties, representations, instructions, installations or defects
from any cause. Estella shall not be liable, under any legal theory, for loss of use, revenue or prot, or for substitute use or
performance, or for incidental, indirect, or special or consequential damages or for any other loss of cost of similar type.
The laws of some jurisdictions limit or do not allow the disclaimer of consequential damages. If the laws of such a jurisdiction
apply to any claim by or against Estella, NO limitations and disclaimers contained here shall be the greatest extent permitted
by law. Estella and Ready Kitchen Warranty shall not be liable for more than the purchase price of the equipment, inclusive of
applicable freight and sales tax.
If required by Estella, customer shall return to Estella for examination any failed product or part to conrm that the part has
failed as a result of material or workmanship.
The warranty is not transferable and cannot be changed for a previously purchased product.
12/2021
This manual suits for next models
3
Table of contents
Other Estella Kitchen Appliance manuals


