ETEKCITY Lasergrip 774 User manual

Lasergrip 774
Infrared Thermometer
ETEKCITY
EN |DE| FR|ES|IT
Questions or Concerns?
supp ort.eu @etekcity.com

EN DE
Safety Information 2 Sicherheitshinweise
Main Functions 4 Hauptfunktionen
Set-Up 5 Inbetriebnahme
Operation 5 Bedienung
Specifications 7 Spezifikationen
Warranty Information 8 Garantie Informationen
ES IT
Informacion de Seguridad 23 Informazione Sicura
Funciones Principales 25 Funzioni Principali
Instalació n 2 6 Setup
0 peració n 2 6 Operazione
Especificaciones 28 Spercificazioni
Informacion de Garantia 29 Garanzia Informazione
FR
Informations de Sécurité
Fonctions Essentielles
Mise en Service
Operation
Specifications
Informations de Garantie
Table of Contents
9
11
12
12
14
15
30
32
33
33
35
36
16
18
19
19
21
22

in s t r ume n t s .
I n t h e vi c i ni t y of u s e , mak e a ny
bystanders aware of the dangers of
looking directly into the laser beam.
DO NOT allow children to operate
th e de vi ce .
Use a 9V battery when replacing the
battery within the device. Make sure
to insert the battery in accordance
with the correct polarities.
ALWAYS remove the battery when
cleaning the device.
DO NOT use leaking batteries or
dispose old batteries in fire.
Remove the battery for storage if
the device is not being used for a
prolonged period of time.
DO NOT disassemble the device or
tamper with internal components.
Doing so will void any warranty.
DO NOT touch the lens or wipe it
using anything other than a soft
cl o t h o r c o t t on sw a b .
Keep the thermometer away from
electromagnetic fields produced
by objects such as arc welders and
IMPORTANT: Please read, understand,
and comply with all of the instructions
provided in this manual before using
the device. Failure to comply with the
instructions given in this manual and/
or using the device in ways other than
the ones mentioned in this manual may
result in serious injury and/or damage
to the product.
· DO NOT point the laser- light at
another person or animal.
· DO NOT attempt to point the laser-
light at an aircraft.
· Avoid direct/indirect eye contact with
the laser-beam. Laser radiation may
cause eye damage.
· DO NOT view the beam with optical
induction heaters.
DO NOT expose the thermometer to
direct sources of heat for extended
periods of time.
T h e t h e r m o m e t e r m e a s u r e s
surface temperature, not internal
temperature. Do not use the
Lasergrip as a reliable source to
measure body temperatures.
Lasergrip 774 Infrared Thermometer
English
Safety
Information
Continued on page 3
2

WARNING: THIS DEVICE PRODUCES
The de vice certificat ion in format ion
The device warning and aperture safety
CLASS 2 LASER RADIATION. USE
is labe led directly on the dev ice. The
infor mation are also l abele d dire ctly on
EXTREME CAUTION AT ALL TIMES
sticker is loc ated on the le ft side of the
the device; the sticker is located on the
WHEN LASER IS IN USE. DO NOT LOOK
Lasergrip.
right side of the La sergrip.
INTO DIRECT OR REFLECTED LASER-
LIGHT BEAM OR VIEW BEAM WITH
OPTICAL INSTRUMENTS. DO NOT AIM
LASER-LIGHT AT ANOTHER PERSON
OR ANIMAL. LASER RADIATION
MAY DAMAGE YOUR EYE. DO NOT
Any updates to the product
infor mation (da te of manu factu ring and
ma nu fa ct ur er ad dress) wil l be adde d a s
adhes ive overla ys.
DI S A S SE M B L E T H E D EV IC E.
CAUTION
LASER RADIATION-
DO NOT STARE INTO BEAM
WAVELENGTH 630-670nm
MAXIMUM OUTPUT<1m霄
This product complies with 21 CFR 1040.10 and 1040.11
WOID EXPO5UE
LASER AADHATION
S EN IT T EO F& OH
3

Function Diagram
1. LCD Display
2. Unit Switch Button (C/°F)
3.Laser Pointer On/Off
4. Display Backlight On/Off
5. Measurement Trigger
6.Battery Compartment
7. Laser Hole
8.IR Sensor
1. Temperature
2.Temperature
3. Result Lock
4. Laser On
5. Low Battery
Display Diagram
Main Functions
Value
Unit
4

Surface Temperature Measurement
NO TE: Th e L as er gr ip c an not mea sure
th e te mpe ra tu re of objec ts beh ind glass.
In ac cu ra cy m ay a ls o oc cu r whe n ex posed
to steam, dust or any other contaminants in
the air.
1. Once the batt ery is properly
insta lled, pre ss the mea suremen t
trigg er to activa te the devi ce.
2. P oint the Lase rgrip towards the
su rf ac e o f m ea su re ment.
3. Pr es s an d h ol d the measurement
trigg er and the l aser will a ctivat e for
aiming guidanc e.
4. Keep holding the tri gger as yo u move
the La sergri p if you wish t o live scan
th e sur fa ce a rea for temperat ure
measurement.
5. Once the laser is pointed to the
desired point of measurement,
1. Open the bat t e ry c o m p artme n t an d
r e m o v e t h e b a t t e r y n o t i c e s t r i p .
2 . T a k e t h e b a t t e r y f r o m t h e
c o m p a r t m e n t a n d r e m o v e t h e p l a s t i c
w r a p p i n g e n c a s i n g t h e b a t t e r y .
3 . C o n n e c t t h e b a t t e r y t o t h e d e v i c e
u n d e r t h e c o r r e c t p o l a r i t y .
4. Plac e th e battery bac k into the
co m p a rtme n t .
5. Re-seal the battery compartment,
making sure the inside wiring does
not get pinched by the compartment
lid.
release the trigger and the LCD
display will lock the calculated
temperature.
6.Press the measurement trigger once
again to make another measurement.
NOTE: The Lase rgrip LCD will display 'H'
wh en t he mea su re d te mp er ature is abo ve
the measurable ra nge, an d wi ll displ ay'LO'
wh en t he me as ur ed te mpe rature is below the
measurable range.
Operation
RELEASE to
temperature
HOLD for
temperature
continuous
reading
Setup
lock the
reading
PAIR
5

Distance-Spot Ratio
The Lasergrip 774 measures surface
t e m p e r a t ur e o n t h e b a s i s o f d i sta n c e
to spot diameter ratio (D:S). As the
distance between the thermometer and
the surface increases, the total surface
area measured will also increase. With a
distance to spot ratio of 12:1 the surface
area measured has a diameter of
roughly 1/12 the distance.
For the most accurate results, make
s u r e t he t a r g e t h as a s u rf a c e ar e a of
twice the corresponding spot diameter.
An insufficient surface area will result
in inaccurate results. The recommended
distance to hold the Lasergrip from the
surface of measurement is 1 4. 17in (36
cm). This creates a spot measurement
area of 1.1 8 inches (3 cm) in diameter.
Battery Replacement
A low battery icon will appear on the
LCD display when the Lasergrip's
battery power is running low.
Immediately replace the battery when
the icon appears.
1. Open the battery compartment and
remove the used battery. Dispose the
used battery properly.
2. C o n n ec t a n e w D C 9 V b a t t e ry ,
making sure it's under the correct
polarity.
3. Ins e r t th e b a tt e ry int o th e
c o m p a r t m e nt a n d c l o se t h e
compartment lid, making sure the
wiring is not being pinched by the
compartment lid.
To actiyate and
deactivate the laser,
press the laser pointer
On/Off button at any
time while the Lasergrip
is on.
To ac t i va t e a n d
deactivate the display
backlight, press the
display backlight On/Off
button at any time while
the Lasergrip is on.
T o s w i t c h b e t w e e n
u n i t s o f t e m p e r a tu r e
measurement, press the
°C/°F button at any time
while the Lasergrip is on.
Display Backlight Operation
Unit Conversion
Laser Activation
PAIR
6

Emissivity
The emissivity of a material is its
efficiency in emitting thermal energy.
Non-reflective surfaces have a higher
emissivity (closer to 1) than reflective
surfaces (closer to O). Inaccurate results
may occur when measuring reflective
surfaces such as glass, polished wood,
and granite.
To take accurate temperature
measurement of reflective surfaces with
· La s er gu i d e d ta r g e ting for a i m i ng
p r e c i s i o n
· N a r r o w d i s t a n c e - s p o t r a t i o f o r
a c c u r a t e r e s u l t s a t g r e a t e r d i s t a n c e s
S a f e l y m e a s u r e h a z a r d o u s o r
i n a c c e s s i b l e o b j e c t s
Standard 9V battery powers up to 12
hours of cumulative use
· Response Time:<500ms
· Fixed Emissivity: 0.95
· Battery: DC 9V
Package Contents
1 x Lasergrip 774
1x9V DC Battery
1 x User Manual
tape o ver th e sur fa ce and allow for it to
a d j u s t t o t h e t e m p e r a t u r e o f t h e s u r f a c e
f o r a p p r o x i m a t e l y 3 0 m i n u t e s . M e a s u r e
t h e s u r f a c e , s c a n n i n g t h e t a p e d s e c t i o n ,
elim i n a ting th e issue of inaccu ra cy.
Specifications
Auto-off after 15 seconds of inactivity
· Measurement Range:-50 ℃~380° ℃
R ° ℃
/
/
F
%
)
0
2
F
y
1
n:
c
7
esolut
Accu
(-58°F
·
·
low emissivity, place a strip of masking
Distance (D) to Spot (S)size D:S=12:1
Distance-Spot Ratio:12:1
7

Terms & Policy
Etekcity warrants all products to be of the highest quality in material,
craftsmanship and service for a minimum of 2 years, effective from the
date of purchase. Warranty lengths may vary between product categories.
Should you encounter any issues or have any questions regarding your
new product, feel free to contact our helpful Customer Support Team. Your
satisfaction is ours!
Email: support.eu@etekcity.com
*Please have your order ID number ready before contacting customer support.
Warranty
Information
8

Laserstrahl. Laserstrahlen konnen
Augenverletzungen zur Folge haben.
Schauen Sie NICHT mithilfe
optischer Gerate auf den Laserstrahl.
Machen Sie bei Gebrauch des Infrarot
Thermometers allen Zuschauern
bewusst, welche Gefahr vom
Laserstrahl ausgeht, wenn man direkt
hineinschaut.
Erlauben Sie Kindern die
Verwendung des Gerates NICHT.
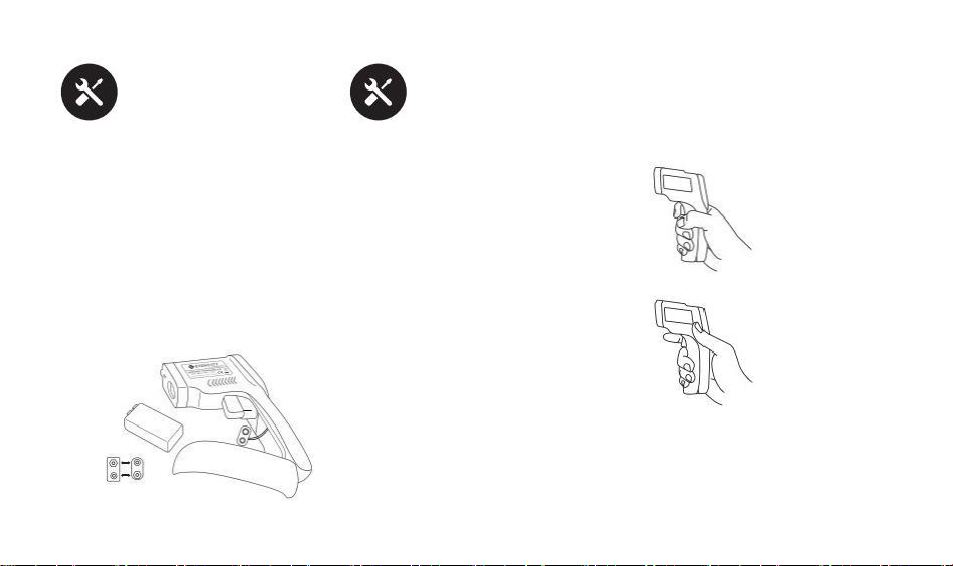
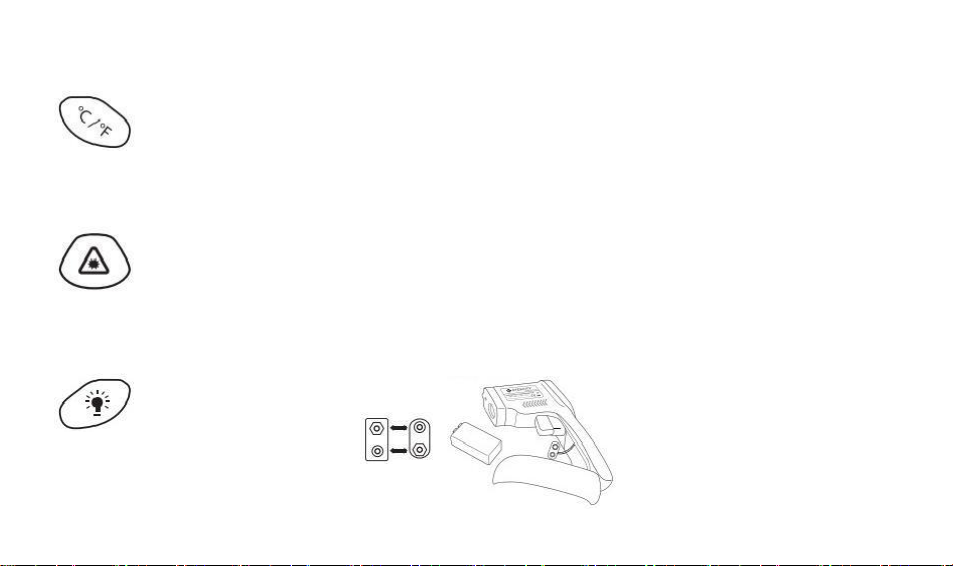
Verwenden Sie eine 9V Batterie
wenn Sie die Batterie des Gerates
austauschen. Stellen Sie sicher,
dass die Batterie entsprechend der
Polaritat eingesetzt wird.
Entfernen Sie IMMER die Batterie,
wenn Sie das Gerat reinigen.
Verwenden Sie KEINE undichte
Batterie und entsorgen Sie die
Batterie nicht im Feuer.
Wenn Sie das Gerat für einen
längeren Zeitraum nicht verwenden,
entfernen Sie die Batterie.
Zerlegen Sie das Gerat NIEMALS
in seine Bestandteile und basteln
Sie NICHT daran herum. Wenn
Sie dies tun verlieren Sie jegliche
Garantieansprüche.
Berühren Sie die Linse NICHT und
verwenden Sie NICHTS anderes
als ein weiches Tuch oder ein
Wattestabchen, um die Linse zu
reinigen.
H a l t e n S i e d e n T h er mo m e te r f er n
von elektromagnetischen Feldern, die
von Objekten wie Schweiβapparaten
oder Induktionsheizgeraten
ausgehen.
Setzen Sie den Thermometer
NIEMALS über einen langeren
Zeitraum direkter Hitze aus.
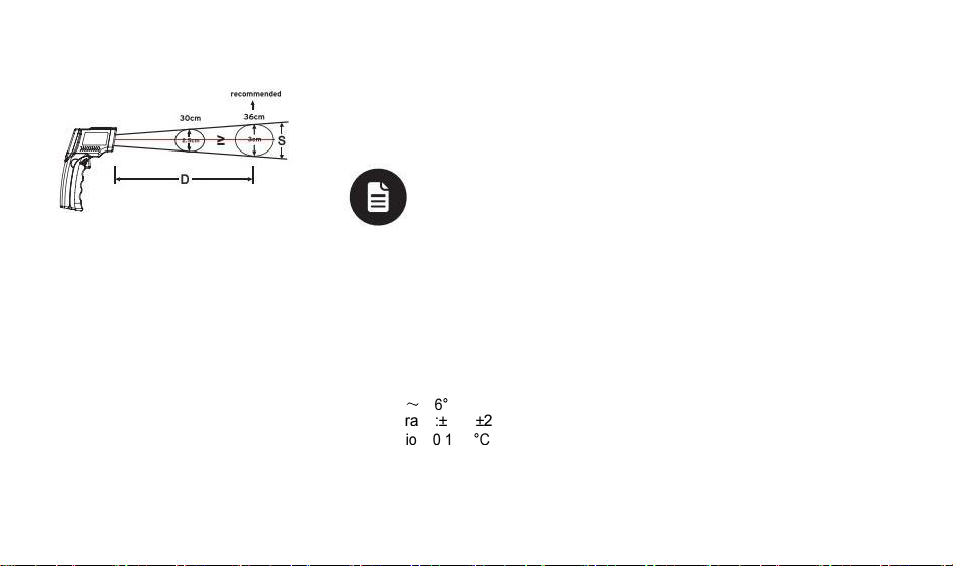
D e r T he rm o me t er mi s s t
O b e r f l a ch en te mp er a t u r e n , k e i n e
Innentemperaturen. Verwenden Sie
den Lasergrip NICHT als verlassliche
Quelle um die Korpertemperatur zu
messen.
Lasergrip 774 Infrarot Thermometer
Deutsch
Sicherheitshinweise
WICHTIG: Lesen, verstehen und
befolgen Sie bitte alle Anweisungen
dieses Handbuches bevor Sie das
Gerat verwenden. Das Missachten der
Anweisungen und Sicherheitshinweise,
die hier enthalten sind, oder die
V e r w e n d u n g f u r e i n en a n d er e n
Z w e c k a l s h i e r b e s c h r i e b en , ka n n z u
ernsthaften Verletzungen und/oder zu
Beschadigungen des Gerates führen.
· Richten Sie den Laserstrahl
NIEMALS auf eine andere Person
oder ein Tier.
· Richten Sie den Laserstrahl
NIEMALS auf ein Luftfahrzeug.
· Vermeiden Sie direkten oder
indirekten Augenkontakt mit dem Fortsetzung auf der nachsten Seite
9

WARNUNG: Das Gerat produziert
Die Information zur Geratezertifizierung
Die Warnungen und die
Laser strahl en der Laserklasse 2.
finde n Sie direkt auf dem Gerat . Der
Si ch er he it sinformation en der
Ve rwen de n Si e d as Gera t stets
Aufkleber befindet sich auf der linken
Laser offnu ng sind auch direkt auf
be hu ts am w an n imme r Sie e s
Seite des Lase rgrips.
de m Ge ra t zu fi nd en. Der Au fkleb er
ve rwenden. Sc hauen Sie nich t i n den
befin det sic h auf der re chten Se ite des
direkten oder reflektierten Laserstrahl,
Laser grips.
auch nicht mithilfe eines optischen
Gerats. Zielen Sie NIEMALS mit dem
Laserstrahl auf eine andere Person
Jegliche Aktualisierungen der
Pr od uk ti nf or mat ionen (Datu m der
Herste llung und He rstell eradre sse)
oder Tiere. Laserst rahle n k onnen Ih ren
Au ge n scha de n. Zerle ge n S ie das Gera t
werden als Aufkleber hinzugefügt.
nicht in seine Best andteile.
ETEKCITY
LASERGRIP⁷ 74
INFRARED THERMOMETER
450c-380*/188'r-n8'
CAUTION
LASER RADIATION —
DO HQT STARE INTO afA
WAVELENGTH 630-670mm
MAXIMUM OUTPUT<1mW
Dieses Produkt entspricht 21 CFR 1040,10 und 1040,11.
EPS
IS EMITTED FROM
THIS APERATLRE.
10

Ubersicht der Funktionen
1. LCD Display
2. Taste fur Anderung der Temperatureinheit (° ℃/°F)
3.Laserpointer AN/AUS
4. Display- Hintergrundbeleuchtung AN/AUS
5. Trigger
6. Batteriefach
7. Laseraustrittsoffnung
8. Infrarot Sensor
Hauptfunktionen
1. Temperaturwert
2. Temperatureinheit
3. Letzten Messwert
halten
4. Laser AN
5. Schwache Batterie
Ubersicht des Displays
11

Oberflachentemperaturmessung
Hi nwei s: D er L as er grip kan n die Temperat ur
von Obj ekten h inter Glas n icht me ssen. Dampf,
Staub oder andere Schmut zstoff e in der Lu ft
hervorrufen.
1. Wenn die Batterie richti g ein gesetzt
wu rd e, d rüc ke n Si e d en Tri gger um
das Gerat einzu schalt en.
2. Zeigen Sie mit d em Laserg rip auf die
Ob er fl ac he , d er en T emper atur Sie
me sse n moc ht en .
3. Beta tigen S ie den T rigger , um den
Zielpunkt des Lasers zu a ktivie ren.
4. Halten Sie den Trigge r beim
Be we ge n de s L aserg rips für ein e
ko nt in ui er li che Temp eraturmes sung
de r O be rf la ch en um ge bu ng ge drückt .
5. We nn der L as er a uf den
ge wün sc ht en Me ss pu nk t geric htet
1. offne n Sie das Batter iefach und
entf ernen Sie den Plast ikfilm
zw isc he n d er Batterie und de m
Kontakt.
2. Nehmen S ie die Ba tterie aus dem
Batteriefa ch und entf ernen Si e de ren
Plast ikverp ackung .
3. Verbi nden S ie die Ba tterie
entsp rechend der Pola ritat mit dem
Gerat.
4. Legen Sie die Batterie zurück in das
Batteriefach.
5. Schliepen Si e d ie Batte rieab deckun g
und st ellen Sie sich er, dass die Kabel
nicht von de r Ba tteri eabde ckung
ei ng ek le mmt we rd en .
ENTGEGENGESETZT Hinweis: Die LCD-Anze ige d es Las ergrip s zeigt
,Hl ' wen n die ge me ssen e T em pe ratu r über der
ma ximal en Me ss te mp er atur de s Gerates liegt
und,LO' wenn die gemessene Temperatur
un te r der min im al en Messte mperat ur des
Gerat es lie gt.
Inbetriebnahme Bedienung
ist, lassen Sie den Trigger los und
das LCD Display halt den letzten
gemessenen Temperaturwert.
6. Betatigen Sie den Trigger erneut, um
eine neue Messung durchzuführen.
LOSLASSEN um
den gemessenen
Temperaturwert zu
haltenreading
DRUCKEN fur eine
kontinuierliche
Temperaturmessung
können auβerdem Messungenauigkeiten
12

Abstand-zu-Punktgroβe-
Verhältnis
Der Lasergrip 774 misst
Oberflachentemperaturen auf Grundlage
des Abstand-zu-Punktgrope-Verhaltnisses
( D : S ) . W e n n d i e D i s t a n z z w i sc he n d e m
T h e r m o m e t er u n d d e r O b e r fl ac he
groper wird, wird die totale gemessene
Oberflache auch groβer. Mit einem
Abstand-zu-Punktgroβe-Verhaltnis von
12:1 hat die gemessene Oberflache einen
Durchmesser von ungefahr 1/12 des
Abstandes.
Fur ein prazises Ergebnis, gehen Sie
sicher, dass das Ziel eine Oberflache
hat, die zwei Mal so groβ wie der
entsprechende Punktdurchmesser ist. Eine
unzureichend grope Oberflache resultiert
in einem ungenauen Messergebnis.
D i e e m p f o h le ne E n tf e r n u n g d e s
L a s e r g r i ps z u d e r g e m e s s e n e n O be rf la ch e
betragt 36cm (1 4,17in). Dies schafft
ein Punktmessgebiet von 3cm(1,18in)
Durchmesser.
Wechsel der Batterie
Wenn die Batterie des Lasergrips nur
noch eine geringe Leistung aufweist,
erscheint auf dem LCD Display
ein solches Symbol. Tauschen Sie
umgehend die Batterie aus, wenn das
Symbol erscheint.
1. o f f n en S i e da s B a tt e r i ef a c h un d
e n t f e r ne n S i e d ie g e br a uch t e
Batterie. Entsorgen Sie die Batterie
sachgemp.
2. V e r b i n d e n S i e e i n e n e u e 9 V
G l e i c h s t ro mb a tt e r i e e n t sp re ch e nd
der P o la r i t at m i t d e m Ge r a t .
3. L e g en S i e d i e B a t t er i e z u rüc k i n
das Batteriefach und schliepen Sie
die Batterieabdeckung. Stellen Sie
sicher, dass die Kabel nicht von der
Batterieabdeckung eingeklemmt
werden.
Um die
Hintergrundbeleuchtung
an- bzw auszuschalten
drücken Sie die
Hintergrundbeleuchtung ON/
OFF Taste zu jeder Zeit wenn
der Lasergrip an ist.
Um den Laserpointer an-bzw.
auszuschalten drücken Sie
die Laserpointer ON/OFF
Taste zu jeder Zeit wahrend
der Lasergrip an ist.
Um zwischen den
Temperatureinheiten zu
wechseln, drücken Sie die
C/⁰F Taste zu jeder Zeit
wahrend der Lasergrip an ist.
Bedienung der Display-
Hintergrundbeleuchtung
Anderung der Temperatureinheit
Einschalten des Lasers
ENTGEGENGESETZT
13

· Standard 9V Batterie versorgt das
Gerat bei durchgangigem Betrieb für
bis zu 12 Stunden mit Energie
Automatische Abschaltfunktion nach
15 Sekunden Inaktivitat
Temperaturmessbereich:-50℃~
380℃(-58°F~716°F)
· Genauigkeit:±2%/±2°C
· Auflosung: 0. 1°C/°F
· Abstand- zu- Punktgroβ e - Verhaltnis:
12:1
· Ansprechzeit:<500ms
· Fixer Emissionsgrad: 0,95
· Batterie:9V Gleichstrombatterie
Emissionsgrad
Der Emissionsgrad eines Korpers gibt
an, wie viel Strahlung er im Vergleich
zu einem idealen Warmestrahler,
einem schwarzen Korper, abgibt. Nicht
reflektierende Oberflachen haben
einen hoheren Emissionsgrad (näher
bei 1) als reflektierende Oberflächen
(naher bei O). Ungenaue Ergebnisse
konnen resultieren, wenn reflektierende
Oberflachen wie Glas, poliertes Holz und
Granit gemessen werden.
Um exakte Temperaturmessergebnisse
v o n r e f l e k t i e re nd en O b e rfl a c h en
mit einem niedrigen Emissionsgrad
zu erhalten, kleben Sie ein Stück
A b d e c k b a n d a u f d i e z u m e s s e nd e
F l ä c h e u n d w a r t e n S i e u n g e f a h r
30 M i n u t e n b is e s d i e T e m p e r a t u r
der Oberflache angenommen hat.
Messen Sie die Oberflache indem
Sie d e n La s e r st r a h l a uf d i e St e l l e
mit dem Abdeckband richten, um so
Ungenauigkeiten auszuschlieβen.
Lasergesteuertes Zielgerat für
prazise Genauigkeit
Kleines Abstand-zu-Punktgroβe-
Verhaltnis fur exakte Ergebnisse bei
groβeren Entfernungen
Sicheres Messen bei gefahrlichen
oder unzugänglichen Objekten
Spezifikationen
Lieferumfang
1x Lasergrip 774
1x 9V Gleichstrombatterie
1x Benutzerhandbuch
Abstand (D) zu Punktgroβe (S) Abmessung
D:S = 12:1
14

Bestimmungen und Richtlinien
Etekcity garantiert bei allen Produkte, dass wir die hochsten Standards
bei den Materialien, der Verarbeitung und beim Service anlegen. Diese
G a r a n t i e i s t g u l t i g f ur z w e i Jahre a b K a u f d a t u m . G a r a n t i e - z e i te n k ö nn e n
zwischen den Produktkategorien variieren. Die konkreten Garantiebedienungen
fur ihr Produkt konnen Sie bei der Website www.etekcity.com nachlesen.
Sollten eine Frage oder Probleme im Bezug auf eines unserer neuen Produkte
auftreten, dann konnen Sie jeder Zeit Kontakt mit unserem Kunden-Support
Team durch eine E-Mail aufnehmen. Ihre Zufrieden- heit ist uns wichtig!
support.eu@etekcity.com
*Beachten Sie bitte, dass Sie ihre Bestellnummer zur Hand haben wenn Sie uns
kontaktieren.
Garantie Informationen
15

· Ne pas fixer le faisceau laser avec
des instruments optiques.
Laisser toute spectateur à proximité
conscients des dangers de fixer
directement le faisceau laser.
Gardez le thermometre hors de la
portée des enfants.
Utiliser l'appareil seulement avec des
batteries du type prescrit.
· Retirer la pile avant le nettoyage.
· Ne pas jeter la batterie dans le feu.
Des piles qui fuient peuvent
endommager 'appareil. Si vous
n'utilisez pas l'appareil pendant une
periode prolongée, retirez les piles du
compartiment a piles.
Ne pas tenter de demonter le produit.
Cela risquerait d'invalider la garantie.
Ne pas toucher la lentille avec les
doigts. Ne jamais utiliser autre chose
qu'un chiffon doux ou un coton-tige
pour nettoyer.
Ne pas exposer le produit à des champs
electromagnetiques intenses (p.ex.
soudage à l'arc et chauffage par
induction).
IMPORTANT: Nous vous remercions de
lire, comprendre et respecter toutes les
instructions fournies dans ce manuel
avant d'utiliser l'appareil. Un mauvais
usage de cet appareil ou le non respect
des consignes de ce manuel peut
entrainer des blessures graves et / ou
endommager le produit.
· Ne pas pointer le faisceau laser vers
une personne ou un animal.
· Ne pas essayer de pointer le faisceau
vers un aeronef.
· Ne pas pointer le faisceau
directement vers les yeux ou
via une surface réflechissante.
Le rayonnement laser risque
d'endommager votre yeux.
· Eviter d'exposer longuement le
thermometre à des temperatures
extremes.
Le thermometre mesure les
temperatures de surfaces d'objets au
lieu des temperatures d'interieurs.
ll n'est pas congu pour mesurer la
temperature du corps.
Informations de
Sécurité
Lasergrip 774 Thermometre Infrarouge
Francais
Suite à lapage 1 7
16

AVERTISSEMENT: Cet appareil est
L'information de certification de
Lavertissement et les informations
un appa reil la ser de Classe II. Faites
Iappareil est marqué directement sur
de sécurité sont également marqués
preuv e d e l a plus gran de prudence
Iappareil. L'étiquette est située sur le
directement sur I'ap pareil . L'étiqu ette
lorsque le faisc eau Lase r e st active.
Ne poin tez pas l e faisceau Las er
cōté gauch e du p roduit .
est sit uée sur le coté droit d u produit.
Tous mise s a jour de I' information
directement ve rs les yeu x ou via une
du pro duit seront ajout ées pa r
surface reflechissante. Ne pointez pas
la lumiere laser vers une personne
re co uv remen t ad hesif .
ou un animal. Le rayonnement laser
risque d'endommager votre yeux.
Ne d esasse mblez pas I'appareil .
CAUTION
LASER RADIATION-
DO NOT STARE INTO BEAM
WAVELENGTH 630-670nm
MAXIMUM OUTPUT<1m霄
Ce produit est conforme a la partie 1040,10 et 1040,11 de 21 CFR
WOID EXPO5UE
ASER RACAATION
_
S EN IT T EO F& OH
17

Schéma des Fonctions
1. Ecran LCD
2. Unite de mesure C/OF
3. Laser On/Off
4. Rétroeclairage On/Off
5. Gachette de mesure
6. Compartiment a pile
7. Pointeur Laser
8. Capteur infrarouge
Fonctions Essentielles
1 . Valeur de
température
2. Unite de
temperature
3. Pointeur Laser
activé
4. Niveau de batterie
faible
Schema d'Affichage
18

Mesure de la Temperature de
Surface
Re marqu e: L e prod uit ne pe ut pa s mesurer
la te mp er at ur e de s ob je ts d errie re une verre .
L ' i m p r e c i s i o n p e u t e g a l e m e n t s e p r o d u i r e
lorsqu'il e st ex pose a de la vapeur, de la
poussiere ou d'autres impuretes dans I'air.
1. Appuyez sur la gachette pour
allumer le thermometre.
2. Pointez I'appareil en direction de la
surface a mesurer.
3. Appuyez sur la gachette et
maintenez-la enfoncée, le faisceau
laser s'allume pour aider le pointage.
4. Continuez a appuyer sur la gachette
en deplacant le thermometre, si vous
voulez balayer la surface à mesurer
et lire les temperatures instantanée.
5. Une fois que le laser est pointé sur le
point de mesure souhaité, relachez la
gachette. HOLD s'affiche, la derniere
Appuyez sur la
gachette pour lire
la temperature en
continu
Relachez la gachette
pour bloquer la
temperature mesure.
Re marqu e: Le th ermom et re a ff ic he 《 Hl 》
lorsque la temperature mesurée est superieure
à la plage de mesure et affiche《LO》 lorsque la
temperature mesuree est inferieure à la plage
de mesure.
1. Ouvrez le compartiment par tirer le
couvercle vers le bas.
2. Retirez la pile et retirez le film de
protection de la pile.
3. Introduisez la pile en respectant la
polarite.
4. Placez la pile dans le compartiment.
5. Refermez le couvercle du
compartiment, assurant que le
cablage ne soit pas coincé par le
couvercle.
mesure reste affichée jusqu'à la
mesure suivante.
6. Appuyez de nouveau sur la gachette
pour la mesure suivante.
Mise en Service 0pération
PAIRE
19
Other manuals for Lasergrip 774
1
Table of contents
Languages:
Other ETEKCITY Thermometer manuals
Popular Thermometer manuals by other brands

Braun
Braun WelchAllyn ThermoScan PRO 4000 owner's manual

Digoo
Digoo DG-TH1180 operating instructions

Nice
Nice SecurityTronix ThermScan ST-THERMSCAN-1 user manual

Big Green Egg
Big Green Egg 128003 manual

VONROC
VONROC IT501DC Original instructions

Endress+Hauser
Endress+Hauser iTHERM TM411 technical information