EUFAB 21014 User manual

1
Art.-Nr.: 21014
Ölabsaugpumpe
Bedienungsanleitung ............... 2
Art. No. 21014
Oil extraction pump
Operating instructions .............. 4
Réf. art. 21014
Pompe d‘aspiration d‘huile
Manuel de l‘opérateur .............. 6
Cod. art. 21014
Pompa di aspirazione olio
Istruzioni per l‘uso .................. 10
Art.nr. 21014
Olieafzuigpomp
Gebruiksaanwijzing ............... 8

2
• Kontrollieren Sie die Ölabsaugpumpe, die Schläuche und Anschlusskabel vor Gebrauch auf einwandfreien
Zustand. Beschädigte, gerissene oder gebrochene Bauteile dürfen ausschließlich durch qualizierte Techniker instand-
gesetzt werden!
• Kinder dürfen nicht mit dem Gerät spielen
• Reinigung und Benutzerwartung dürfen nicht von Kindern ohne Beaufsichtigung durchgeführt werden
• Manipulieren oder zerlegen Sie die Ölabsaugpumpe nicht.
• Stellen Sie sicher, dass Schlauch und Kabel keinen scharfen Kanten oder zu heißen Gegenständen ausgesetzt werden!
• Kein Benzin, Petroleum oder sonstige leicht entzündliche Flüssigkeiten pumpen!
3. SICHERHEITSHINWEISE
2. SPEZIFIKATIONEN
Spannung: 12V DC
Stromaufnahme: ca. 5 A
Max. Benutzungszeit: 30 min
Lautstärke: ca. 70 dB (A)
Temperaturbereich(Umwelt): -10°C – +40°C
Max. Öltemperatur: 60 °C
Max. Dieseltemperatur: 45 °C
Fördergeschwindigkeit: 0,2 – 1,5 l/min abhängig von Flüssigkeit undTemperatur
Max. Förderhöhe: 0,7 m Max. Druck: 3 bar
Abmessungen: 13 x 9 x 9 cm Gewicht: ca. 975 g
1. BESTIMMUNGSGEMÄSSER GEBRAUCH
Die Ölabsaugpumpe ist für einen sauberen Ölwechsel bzw. für das Abpumpen von Motor-, Diesel-, und Heizöl geeignet.
1. Saugschlauch ø 6 mm
2. Ölabsaugpumpe
3. Ablass-Schlauch ø 12 mm
4. Ein – Ausschalter
5. 12V Anschlusskabel mit Batterieklemmen
WARNUNG!
Lesen Sie die Bedienungsanleitung vor Inbetriebnahme sorgfältig durch und beachten Sie
alle Sicherheitshinweise! Nichtbeachtung kann zu Personenschäden, Schäden am Gerät
oder Ihrem Eigentum führen! Bewahren Sie die Originalverpackung, den Kaufbeleg sowie
diese Anleitung zum späteren Nachschlagen auf! Bei derWeitergabe des Produkts geben Sie
auch diese Anleitung weiter. Prüfen Sie vor Inbetriebnahme den Inhalt der Verpackung auf
Unversehrtheit und Vollständigkeit!
INHALT
1. BESTIMMUNGSGEMÄSSER GEBRAUCH 2
2. SPEZIFIKATIONEN 2
3. SICHERHEITSHINWEISE 2
4. WICHTIGER HINWEIS 3
5. BEDIENUNG DER ÖLABSAUGPUMPE 3
6. HINWEISE ZUM UMWELTSCHUTZ 3
7. KONTAKTINFORMATIONEN 3
1
5
3
2
4
Ölabsaugpumpe

3
7. KONTAKTINFORMATIONEN
6. HINWEISE ZUM UMWELTSCHUTZ
5. BEDIENUNG DER ÖLABSAUGPUMPE
1. Vor dem Ölwechsel lassen Sie den Motor warmlaufen, bis die Öltemperatur ca. 40-60° C erreicht hat.
2. Stellen Sie den Motor ab!!
3. Entfernen Sie die Schutzkappen von den Schlauchanschlüssen der Ölabsaugpumpe.
Stecken Sie den Saugschlauch (1) auf den Ansaugstutzen sowie den Ablass-Schlauch (3) auf den Abussstutzen der
Pumpe, beachten Sie dabei die Förderrichtung auf dem Typenschild. Um ein Lösen der Schläuche zu verhindern, werden
diese mit den beigelegten Schlauchklemmen xiert.
4. Absaugschlauch (1) in das Ölmessstabrohr einführen und bis zum tiefsten Punkt der Ölwanne schieben.
5. Ablass-Schlauch (3) in einen geeigneten und ausreichend großen Behälter stecken (die Füllmenge können Sie im Hand-
buch Ihres Fahrzeugs nachschlagen).
6. Schließen Sie nun die Öl-Absaugpumpe an die Batterie an. AUF RICHTIGE POLARITÄT ACHTEN!!!
(schwarze Klemme auf Minus-Pol, rote Klemme auf Plus-Pol der Batterie)
7. Pumpe einschalten (4) und absaugen.
8. Nach Beendigung des Absaugvorganges schalten Sie die Pumpe wieder ab. Lassen Sie die Pumpe niemals
„Trockenlaufen“.
9. FüllenSielt.Kfz-Hersteller neues MotorölinIhrFahrzeugein.DanachkontrollierenSiemitdemÖl-MeßstabdenÖlstand.
4. WICHTIGER HINWEIS
Die Ölabsaugpumpe ist für eine Betriebszeit von ca. 15 Minuten ausgelegt. Danach müssen Sie das Gerät abkühlen lassen.
• Schlagen Sie im Handbuch Ihres Fahrzeugs nach, ob der Hersteller das Absaugen des Motoröls zulässt.
EXPLOSIONSGEFAHR!
• KeinWasser und Getriebeöl absaugen; Pumpe kann dadurch beschädigt werden.
• Beim Anschluss der Batterieklemmen auf richtige Polarität achten!
• Motor beim Absaugen immer abstellen.
• Motoröl vor dem Absaugen immer erwärmen!
• Pumpe niemals„Trockenlaufen“ lassen.Wenn der Öluss abbricht, Pumpe sofort abschalten.
• Altöl in einem ausreichend großen Behälter auangen. Nicht in das Erdreich oder in die Kanalisation
ablassen! Entsorgen Sie das Altöl in der Altölsammelstelle!!!
HINWEIS
Nach Beendigung der Arbeit Pumpe samt Zubehör sorgfältig reinigen und staubgeschützt
lagern.
EAL GmbH
Otto-Hausmann-Ring 107
42115Wuppertal, Deutschland
+49 (0)202 42 92 83 0
+49 (0) 202 42 92 83 – 160
info@eal-vertrieb.com
www.eal-vertrieb.com
Entsorgen Sie Elektrogeräte nicht mit dem Hausmüll! Elektro- und Elektronik-Altgeräte müssen
getrennt gesammelt und einer umweltgerechten Wiederverwertung zugeführt werden. Über
Entsorgungsmöglichkeiten für Elektro- und Elektronik-Altgeräte informieren Sie sich bei Ihrer Gemeinde-
oder Stadtverwaltung. Die Materialien sind recycelbar. Durch Recycling, stoiche Verwertung oder
andere Formen der Wiederverwendung von Altgeräten leisten Sie einen wichtigen Beitrag zum Schutz
unserer Umwelt!

4
• Before use make sure that the pump, the hoses and the cable are in perfect condition.
• Damaged cables or connections should be replaced only by authorized qualied persons
• Children must not play with the appliance. Cleaning and user maintenance tasks must not be carried out by children
unless they are supervised.
• Do not perform any modication or dismount the device by yourself.
• Ensure that the hoses and cables can not be damaged by sharp edges and can not get in contact with hot surfaces.
3. SAFETY WARNINGS
2. SPECIFICATIONS
1. PRODUCT DESCRIPTION
This oil pump is designed for clean replacing of oil and/or draining engine oil, diesel or fuel oil.
1. Pumping hose ø 6 mm
2. Oil pump
3. Outlet hose ø 12 mm
4. ON/OFF switch
5. Power cord with battery clips 12V
WARNING!
Please read the operating instructions carefully prior to use and observe all safety
instructions. Non-compliance can lead to personal injury, damage to the device or to your
property. Keep the original packaging, the purchase receipt as well as these instructions for
future reference. When passing on this product, pass on these instructions as well. Before
operating, check that the contents of the package are intact and complete.
CONTENTS
1. PRODUCT DESCRIPTION 4
2. SPECIFICATIONS 4
3. SAFETYWARNINGS 4
4. CAUTION 5
5. OIL PUMP USE INSTRUCTIONS 5
6. NOTES REGARDING ENVIRONMENTAL PROTECTION 5
7. CONTACT 5
Voltage: 12V DC
Current consumption: approx. 5 A
Max.Time of use: 30 min
Volume: approx. 70 dB (A)
Temperature range (environment): -10°C - +40°C
Max. Oil temperature: 60 °C
Max. Diesel temperature: 45 °C
Conveying speed: 0.2 - 1.5 l/min depending on liquid and temperature
Max. Head: 0.7 m Max. Pressure: 3 bar
Dimensions: 13 x 9 x 9 cm Weight: approx. 975 g
1
5
3
2
4
Oil extraction pump

5
7. CONTACT
• Do not pump gasoline, kerosene or other highly ammable liquids! EXPLOSION HAZARD!
• Do not pump water or gear oil: this may cause damage to the pump.
• When connecting the battery clips, keep correct polarity!
• Always switch the engine o when pumping.
• Always heat engine oil up before pumping!
• Never let the pump ”running idle”When oil pumping is interrupted, switch the pump o immediately.
6. NOTES REGARDING ENVIRONMENTAL PROTECTION
Do not dispose of electrical devices with household waste. Electrical devices and electronic scrap must
be collected separately and disposed of in an environmentally responsible manner for recycling. Please
contact your community or city administration regarding disposal options for electrical and electronic
scrap.The materials are recyclable.You make an important contribution to protecting our environment by
recycling, material utilisation or other forms of reusing waste equipment.
5. OIL PUMP USE INSTRUCTIONS
1. Before replacing oil, heat the engine up until the temperature reaches approx. 40 - 60°C.
2. 2Switch o the engine!!
3. Remove the protection caps from the sockets. Insert the pumping hose (1) in the suction neck and insert the outlet hose
in the outlet neck of the pump. To make sure that the hoses do not let loose, fasten them using the clips supplied.
4. Insert the pumping well (1) into the oil-gauge hole down to the deepest point of the engine sump.
5. Put the outlet hose (2) into a suitable container. (You can look up the ll-up capacity in your car´s manual)
6. Now, connect the oil pump to the battery. KEEP CORRECT POLARITY!!! (black clip to the negative pole, red clip to the
positive pole)
7. Switch the oil pump on (5) and start pumping.
8. When pumping is nished, switch the pump o. Never let the pump ”running idle”
9. Rell the engine with new oil according to the car manufacturer’s instructions. Next, check the oil level using the oil
gauge.
4. CAUTION
The oil pump is designed to run for approx. 15 minutes. After that, let the pump cool down.
CAUTION
After nishing the job, clean the pump and its accessories properly; keep it in a dustproof
place.
EAL GmbH
Otto-Hausmann-Ring 107
42115Wuppertal, Germany
+49 (0)202 42 92 83 0
+49 (0) 202 42 92 83 – 160
info@eal-vertrieb.com
www.eal-vertrieb.com

6
• Ne pas vider de l’essence, du pétrole ou des liquides extrêmement ammables ! RISQUE D’EXPLOSION !
• Ne pas épuiser de l’eau et de l’huile de transmission: cela peut causer l’endommagement de la pompe à huile.
• Réspectez la bonne polarité en connectant les bornes de pile !
• Coupez toujours le moteur lors du vidange.
3. LES AVERTISSMENT DE SÉCURITÉ
2. SPÉCIFICATIONS
1. LA DÉSCRIPTION DE L‘ARTICLE
Cette pompe à huile convient au vidange propre d’huile ou bien à l’épuisement d’huile moteur, de gazole et de mazout.
AVERTISSEMENT!
Lisez attentivement la notice d‘utilisation avant la mise en service et respectez tou-
tes les consignes de sécurité ! Tout non-respect de ces consignes peut entraîner des
dommages corporels, endommager l‘appareil ou vos biens ! Conservez l‘emballage
d‘origine, le justicatif d‘achat et la présente notice pour vous y référer ultérieurement ! Si vous
revendez ou remettez l‘appareil à des tiers, veuillez également leur remettre cette notice d‘uti-
lisation. Avant la mise en service, veuillez contrôler le contenu de l‘emballage quant à l‘absence
de dommages et vérier si toutes les pièces sont présentes !
Tension : 12 V DC
Consommation de courant : env. 5 A
Max.Temps d‘utilisation : 30 min
Volume : env. 70 dB (A)
Plage de température (environnement) : -10°C - +40°C
Max.Température de l‘huile : 60 °C
Max.Température du gazole : 45 °C
Vitesse de transport : 0,2 - 1,5 l/min selon le liquide et la température
Max. Hauteur manométrique : 0,7 m Max. Pression : 3 bar
Dimensions : 13 x 9 x 9 x 9 cm Poids : env. 975 g
1. La sonde aspirante ø 6 mm
2. Pompe d‘aspiration d‘huile
3. Le tuyau aspirant ø 12 mm
4. L‘interrupteur MARCHE/ARRET
5. Câble de raccordement de 12V avec pinces
pour batterie
1
5
3
2
4
Pompe d‘aspiration d‘huile
VUE D‘ENSEMBLE
1. LA DÉSCRIPTION DE L‘ARTICLE 6
2. SPÉCIFICATIONS 6
3. LES AVERTISSMENT DE SÉCURITÉ 6
4. L‘AVERTISSMENT 7
6. REMARQUES RELATIVES À LA PROTECTION DE L‘ENVIRONNEMENT 7
7. RENSEIGNEMENTS DE CONTACT 7

7
• Avant du vidange chauez toujours l’huile moteur !
• Ne laissez jamais la pompe„tourner à vide“. En cas d’interruption du vidage de l’huile: débranchez immédiatement la
pompe.
• Retenez l’huile usagée dans un récipient assez grand. Empêchez l’huile de percer dans la terre ou dans la canalisation !
Récyclez aux endroits destinés à l’huile usagée !!!
7. RENSEIGNEMENTS DE CONTACT
6. REMARQUES RELATIVES À LA PROTECTION DE L‘ENVIRONNEMENT
Ne jetez pas les appareils électriques dans les ordures ménagères ! Les appareils électriques et
électroniques usagés doivent être collectés séparément et être remis aux services de recyclage.
Renseignez-vous quant aux possibilités d‘élimination d‘appareils électriques et électroniques usagés
auprès de votre administration communale ou municipale. Les matériaux sont recyclables. Par le
recyclage, la récupération des matières ou d’autres formes de réutilisation d’appareils usagés, vous
contribuez activement à la protection de notre environnement !
5. OIL PUMP USE INSTRUCTIONS
1. Avant de changer l’huile faites chauer le moteur jusqu’à la température de l’huile 40 - 60°C environ.
2. Coupez le moteur !!
3. Insérez la sonde aspirante (1) avec le tuyau aspirant (2) dans la buse d’aspiration et le tuyau de vidange (4) insérez dans
la buse d’écoulement de la pompe. Pour que les tuyaux ne se desserrent pas, xezles à l’aide des agrafes à tuyaux jointes.
4. Insérez la sonde aspirante (1) dans l’orice de jauge à l’huile et introduisez la sonde le plus bas dans le bac d’huile.
5. Insérez le tuyau de vidange (4) dans le récipient convenable.
6. Maintenant branchez la pompe à l’huile avec la baterie. RÉSPECTEZ LA MEME POLARITÉ !!! ( la borne noire au pôle
noir, la borne rouge au pôle rouge)
7. Allumez la pompe (5) et commencez pomper.
8. Avoir ni le pompage mettez la pompe hors circuit. Ne laissez jamais la pompe„tourner à vide“.
9. Remplisez la nouvelle l’huile moteur selon les instructions de fabricant de véhicule. Ensuite vériez l’huile à l’aide de
jauge à huiel.
4. L‘AVERTISSMENT
La pompe à l’huile est dimensionnée pour la durée de service 15 min environ. Après il faut laissez l’appareil refroidir.
L‘AVERTISSMENT
Après avoir ni le travail nettoyez la pompe y compris les accessoires et entreposez en
étanche aux poussières.
EAL GmbH
Otto-Hausmann-Ring 107
42115Wuppertal, Allemagne
+49 (0)202 42 92 83 0
+49 (0) 202 42 92 83 – 160
info@eal-vertrieb.com
www.eal-vertrieb.com

8
• Controleer de olieafzuigpomp, de slangen en de aansluitkabel vóór gebruik op een correcte toestand. Beschadigde, ge-
scheurde of gebroken componenten mogen uitsluitend door gekwaliceerde technici gerepareerd worden!
• Houd kinderen op een veilige afstand en laat kinderen dit apparaat niet bedienen
• Manipuleer of demonteer de olieafzuigpomp niet.
• Vergewis u ervan dat slang en kabel niet blootgesteld worden aan scherpe kanten of te hete voorwerpen!
3. VEILIGHEIDSINSTRUCTIES
2. SPECIFICATIES
1. GEBRUIKSDOELEINDE
De olieafzuigpomp is geschikt voorhetzuiververversenvanolie resp.voorhetwegpompenvanmotor-, diesel-, en stookolie.
1. Afzuigslang Ø 6 mm
2. Olieafzuigpomp
3. Afvoerslang Ø 12 mm
4. Schakelaar“Aan/uit”
5. 12V aansluitkabel met batterijklemmen
ONDERHOUD!
Lees de handleiding voor ingebruikname aandachtig en neem alle veiligheidsvoorschriften
in acht! Bewaar de oorspronkelijke verpakking, het aankoopbewijs en deze handleiding
voor latere raadpleging! Niet-naleving kan lichamelijke letsels, schade aan het apparaat
of aan uw eigendom veroorzaken! Controleer voor de ingebruikneming de inhoud van de
verpakking op beschadigingen en volledigheid!
Spanning: 12V DC
Stroomopname: ca. 5 A
Max. gebruikstijd: 15 min
Geluidsniveau: ca. 70dB(A)
Temperatuurbereik (milieu): -10°C – +40°C
Max. olietemperatuur: 60°C
Max. dieseltemperatuur: 45°C
Transportsnelheid: 0,2 – 1,5l/min afhankelijk van vloeistof en temperatuur
Max. opvoerhoogte: 0,7 m Max. druk: 3 bar
Afmetingen: ca. 13 x 9 x 9 cm Gewicht: ca. 975g
OVERZICHT
1. GEBRUIKSDOELEINDE 8
2. SPECIFICATIES 8
3. VEILIGHEIDSINSTRUCTIES 8
4. OPMERKING 9
5. BEDIENINGVAN DE OLIEAFZUIGPOMP 9
6. AANWIJZINGENVOOR DE AFVALVERWIJDERING 9
7. CONTACTINFORMATIE 9
1
5
3
2
4
Olieafzuigpomp

9
• Geen benzine, petroleum of andere licht ontvlambare vloeistoen pompen! EXPLOSIEGEVAAR!
• Ga in het handboek van uw voertuig na, of de fabrikant het afzuigen van motorolie toelaat.
• Geen water en transmissieolie afzuigen; pomp kan daardoor beschadigd worden.
• Bij de aansluiting van de batterijklemmen op correcte polariteit letten!
• Motor bij het afzuigen altijd uitzetten.
• Motorolie altijd verwarmen vóór het afzuigen!
• Pomp nooit laten„droog lopen“.Wanneer de oliestroming afbreekt, pomp onmiddellijk uitschakelen
• Verontreinigde olie opvangen in een reservoir dat groot genoeg is. Niet in de bodem of in de riolering laten wegvloeien!
Voer verontreinigde olie af op het voor verontreinigde olie geschikte inzamelpunt!!!
7. CONTACTINFORMATIE
6. AANWIJZINGEN VOOR DE AFVALVERWIJDERING
Gooi elektrische apparaten niet weg met het gewone huishoudelijke afval! Afgedankte elektrische en
elektronische apparaten moeten gescheiden worden ingezameld en op milieuvriendelijke wijze worden
gerecycled. U kunt informatie inwinnen bij uw gemeente- of stadsbestuur over de afvoermogelijkheden
voor afgedankte elektrische- en elektronische apparaten. De materialen kunnen worden gerecycled. Door
recycling of andere vormen van hergebruik van oude producten levert u een belangrijke bijdrage aan de
bescherming van ons milieu!
5. BEDIENING VAN DE OLIEAFZUIGPOMP
1. Vooraleer de olie te verversen, laat u de motor warm draaien tot de olietemperatuur ca. 40-60°C bereikt heeft.
2. Zet de motor uit!!
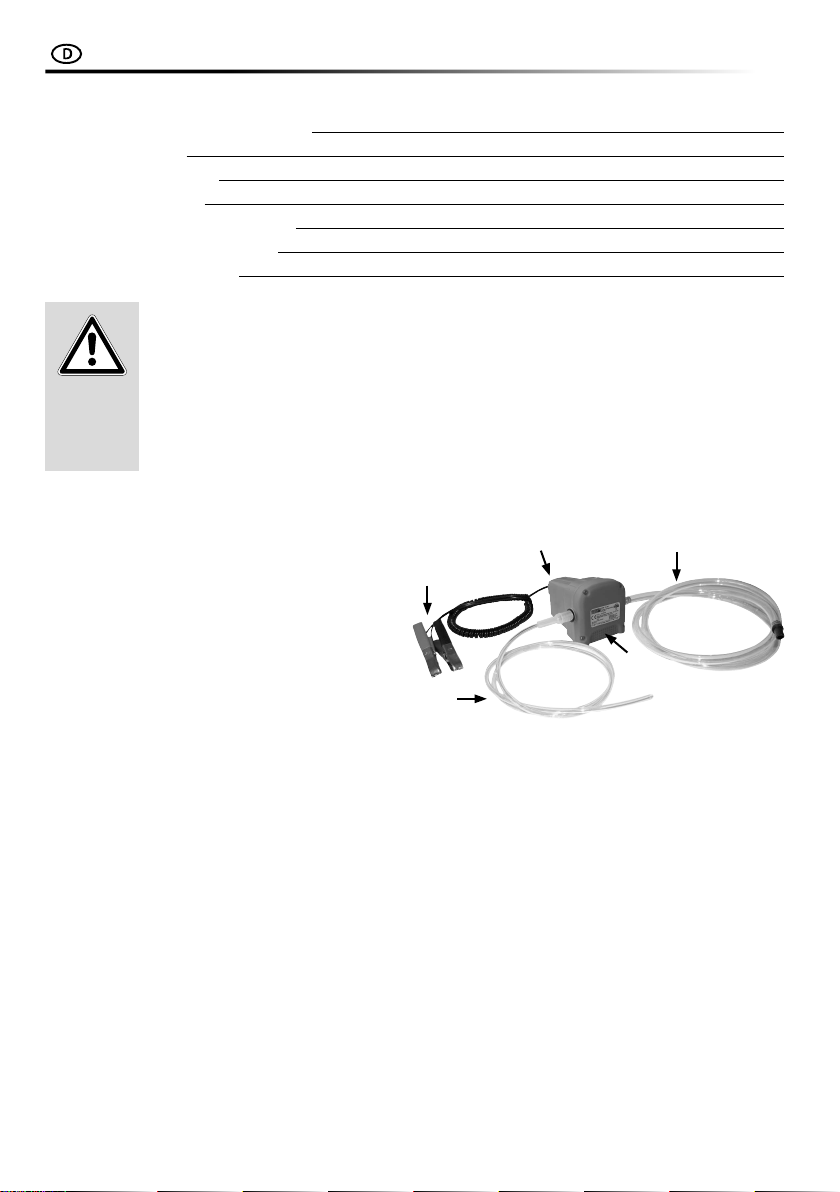
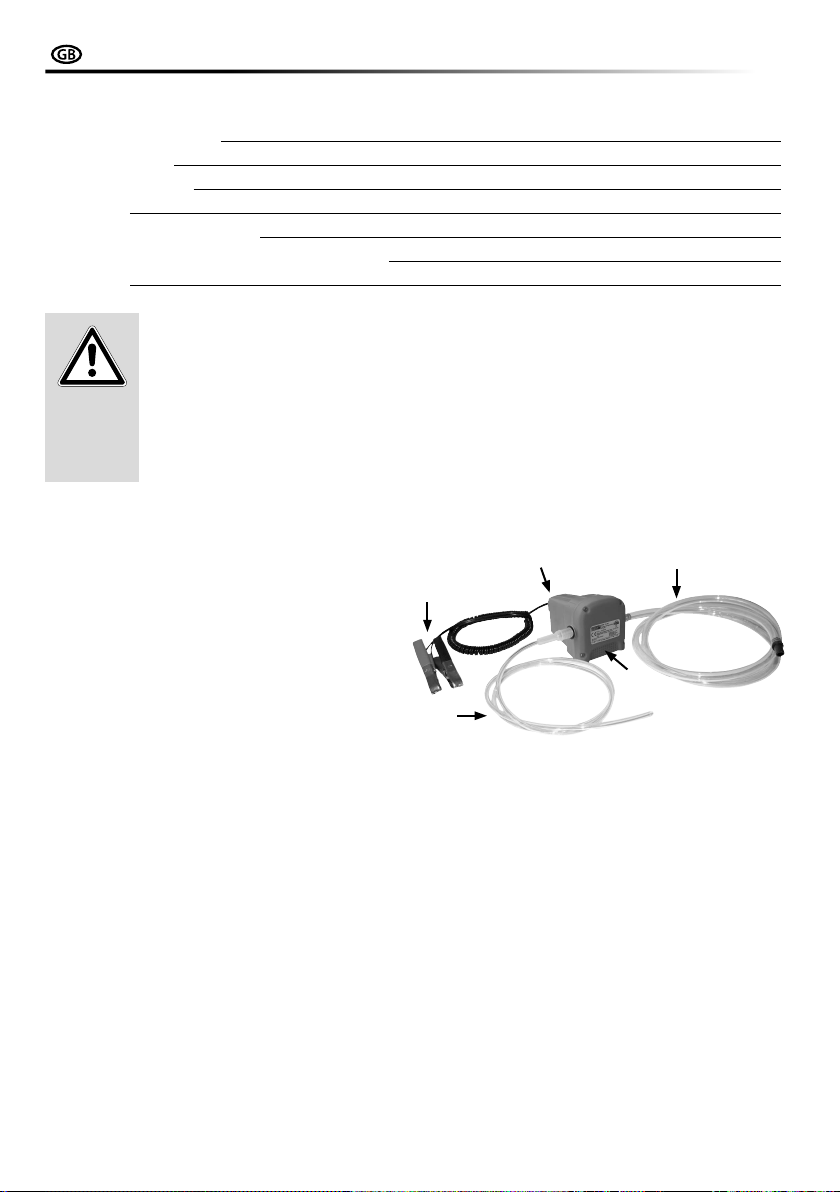
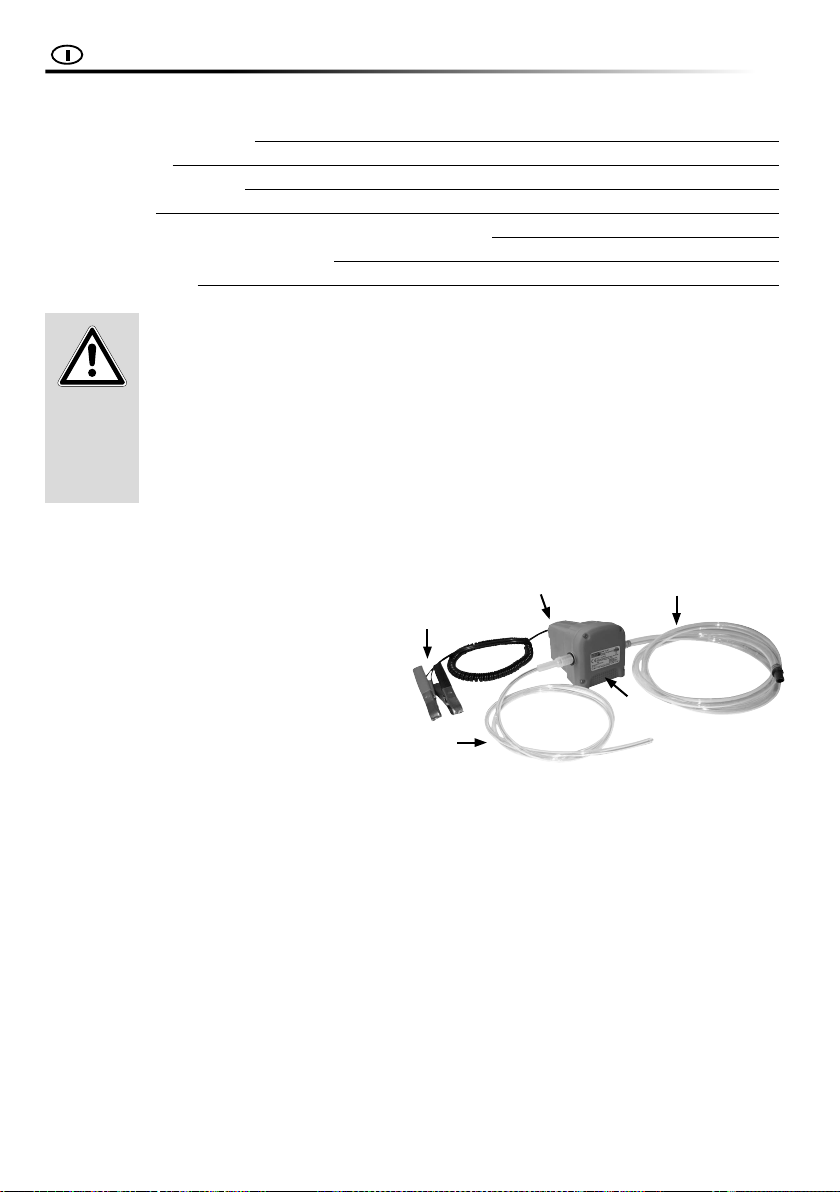
3. Verwijder de beschermdoppen van de slangaansluitingen van de olieafzuigpomp. Speld de zuigslang (1) op de aanzu-
igmof en de afvoerslang (3) op de afvoermof van de pomp. Let daarbij op de transportrichting op het typeplaatje. Om te
verhinderen dat de slangen loskomen, worden deze met de bijgevoegde slangklemmen vastgezet.
4. Afzuigslang (1) in de oliepeilstokbuis inbrengen en tot aan het diepste punt van de oliebak schuiven.
5. Afvoerslang (3) in een reservoir steken dat geschikt en groot genoeg is (de vulhoeveelheid kunt u in het handboek van
uw voertuig achterhalen).
6. Sluit nu de olieafzuigpomp op de batterij aan. LET OP CORRECTE POLARITEIT!!! (Zwarte klem op minpool, rode klem
op pluspool van de batterij).
7. Pomp inschakelen (4) en afzuigen.
8. Na beëindiging van de afzuiging schakelt u de pomp weer uit. Laat de pomp nooit„droog lopen“.
9. Giet in overeenstemming met de fabrikant van het voertuig nieuwe motorolie in uw voertuig. Daarna controleert u met
de oliepeilstok het oliepeil.
4. OPMERKING
De olieafzuigpomp is voorzien voor een inschakelduur van ca. 15 minuten. Daarna moet u het apparaat laten
afkoelen.
OPMERKING
Na beëindiging van het werk pomp samen met toebehoren zorgvuldig reinigen en
beschermd tegen stof opbergen.
EAL GmbH
Otto-Hausmann-Ring 107
42115Wuppertal, Duitsland
+49 (0)202 42 92 83 0
+49 (0) 202 42 92 83 – 160
info@eal-vertrieb.com
www.eal-vertrieb.com

10
• Non aspirate la benzina, petrolio oppure altri liquidi altamente inammabili! PERICOLO DI ESPLOSIONE!
• Non aspirate l’acqua e l’olio cambio di velocità – si potrebbe danneggiare la pompa.
• Osservare la polarità corretta nell’attacco dei morsetti!
• Durante l’aspirazione spegnere sempre il motore.
• Scaldate sempre l’olio da motore prima di aspirazione!
3. AVVERTENZE DI SICUREZZA
2. SPECIFICAZIONI
1. DESCRIZIONE DEL PRODOTTO
La pompa per aspirazione olio è adatta al puro cambio dell’olio, eventualmente all’aspirazione dell’olio da motore, del gas-
olio e dell’olio combustibile.
1. Sonda di aspirazione ø 6 mm
2. POMPA DI ASPIRAZIONE OLIO
3. Tubo di aspirazione in gomma ø 12 mm
4. Interruttore on - o
5. Cavo di collegamento da 12V con morsetti per batteria
AVVERTENZA!
Leggere attentamente le istruzioni per l‘uso prima della messa in funzione e osservare tutte
le avvertenze di sicurezza! La mancata osservanza di queste istruzioni può provocare lesioni
personali, danni al prodotto o alla vostra proprietà! Conservare la confezione originale, la
provad‘acquistoequesteistruzioni come riferimentofuturo!In casodicessione del prodotto,
consegnare anche le presenti istruzioni. Vericare l‘integrità e la completezza del contenuto
della confezione prima di utilizzare il prodotto!
Tensione: 12 V DC
Consumo di corrente: circa 5 A
Max.Tempo di utilizzo: 30 min
Volume: circa 70 dB (A)
Intervallo di temperatura (ambiente): -10°C - +40°C
Max.Temperatura dell‘olio: 60 °C
Max.Temperatura del gasolio: 45 °C
Velocità di trasporto: 0,2 - 1,5 l/min a seconda del liquido e della temperatura
Max.Testa: 0,7 m Max. Pressione: 3 bar
Dimensioni: 13 x 9 x 9 x 9 cm Peso: circa 975 g
INDICE
1. DESCRIZIONE DEL PRODOTTO 10
2. SPECIFICAZIONI 10
3. AVVERTENZE DI SICUREZZA 10
4. AVVERTENZA 11
5. ISTRUZIONI PER IL SERVIZIO DELLA POMPA PER ASPIRAZIONE OLIO 11
6. AVVERTENZE SULLATUTELA AMBIENTALE 11
7. COME CONTATTARCI 11
1
5
3
2
4
Pompa di aspirazione olio

11
• Non lasciate mai la pompa andare a vuoto. Nel caso in cui l’olio viene aspirato, spegnere immediatamente la pompa.
• Raccogliete l’olio usato in un recipiente di grandezza suciente. Evitate che l’olio entri nella terra oppure in canalizza-
zione! Portate l’olio nel punto di raccolta degli oli usati!!!
7. COME CONTATTARCI
6. AVVERTENZE SULLA TUTELA AMBIENTALE
Non smaltire gli apparecchi elettrici insieme ai riuti domestici! I dispositivi elettrici ed elettronici devono
essere separati e destinati al riciclaggio. Per le possibilità di smaltimento delle apparecchiature elettriche
ed elettroniche, informarsi presso il proprio comune I materiali sono riciclabili. Con il riciclo, il recupero del
materiale e altre forme di riutilizzo di prodotti usati si fornisce un contributo importante per la protezione
dell‘ambiente!
5. ISTRUZIONI PER IL SERVIZIO DELLA POMPA PER ASPIRAZIONE OLIO
1. 1. Prima del cambio dell’olio bisogna lasciare scaldare il motore nché la temperatura dell’olio non raggiunge circa
40 - 60°C.
2. Spegnere il motore!!
3. Mettete la sonda di aspirazione (1) con il tubo di aspirazione in gomma (2) nel collo di aspirazione e mettete il tubo di
scaricoingomma (4) nel collo di deusso della pompa.Per evitarela liberazionedei tubi, bisogna ssarli tramite le grae
di tubi in dotazione.
4. Inserite la sonda di aspirazione (1) nel foro per il misuratore di livello d’olio e dopo la inserite nel punto più profondo
della vasca d’olio.
5. Mettere il tubo di scarico (4) nel recipiente adatto.
6. Adesso collegate la pompa per aspirazione olio con la batteria. OSSERVARE LA POLARITÀ CORRETTA!!!
(morsetto nero sul polo negativo, morsetto rosso sul polo positivo della batteria)
7. Accendere la pompa (5) e cominciare ad aspirare.
8. Terminata l’aspirazione, spegnere la pompa. Non lasciate mai andare la pompa a vuoto.
9. Riempire con olio nuovo da motore secondo i dati riportati dal produttore dell’automobile. Dopo controllare tramite il
misuratore di livello d’olio lo stato di olio.
4. AVVERTENZA
La pompa per aspirazione olio è dimensionata per il tempo di servizio di circa 15 min. Dopo è necessario lasciare rareddare
l’apparecchio.
AVVERTENZA
Terminato il lavoro, pulite con cura la pompa inclusi gli accessori e depositate in modo che la
pompa non si impolveri.
EAL GmbH
Otto-Hausmann-Ring 107
42115Wuppertal, Germania
+49 (0)202 42 92 83 0
+49 (0) 202 42 92 83 – 160
info@eal-vertrieb.com
www.eal-vertrieb.com

12 © EAL GmbH, 21014 11.2019
Other manuals for 21014
2
Table of contents
Languages:
Popular Service Equipment manuals by other brands

Osram
Osram TYREseal Kit quick start guide

WABCO
WABCO 971 002 924 2 manual

Philadelphia Scientific
Philadelphia Scientific Stealth Watering System FLT-DC12 manual

Rupes
Rupes MK6000 START-UP, OPERATING AND MAINTENANCE INSTRUCTIONS

Link
Link DD2000 Operation & maintenance manual

Beta
Beta 1759HD/RR Instructions for use