Eureka E46 Series User manual

1
MANUALE ISTRUZIONI
INSTRUCTION MANUAL
MANUEL DE L’EMPLOI
MANUAL DE INSTRUCCIONES
BEDIENUNGSANLEITUNG
E46
_______________________________________________
EUREKA S.r.l.
Via dell’Industria 32, 35013 CITTADELLA (PD) ITALY
Tel. ++39 - 049 - 9481800 Fax. ++39 -049 –9481899
INTERNET:www.eurekasweepers.com E-MAIL: info@eurekasweepers.com

2
MANUALE ISTRUZIONI –ITALIANO ............................................................. 3
INSTRUCTION MANUAL - ENGLISH ............................................................. 3
MANUEL DE L’EMPLOI - FRANÇAIS ............................................................ 21
MANUAL DE INSTRUCCIONES - ESPAÑOL ................................................. 21
BEDIENUNGSANLEITUNG –DEUTSCH ........................................................ 39

3
SOMMARIO
CONTENTS
PAG.
UTILIZZO BATTERIA
BATTERY USE
4
UTILIZZO E CUSTODIA DEL MANUALE
USE OF CARE OF THIS HANDBOOK
5
NORME DI SICUREZZA
SAFETY RULES
7
DISIMBALLO
UNPACKING
7
PREPARAZIONE DELLA MACCHINA
PREPARATION OF THE MACHINE
7
RICARICA DELLE BATTERIE
BATTERY CHARGE
8
SEGNALATORE BATTERIE
CHARGE CONTROLLER
8
SERBATOIO RECUPERO
RECOVERY TANK
8
SERBATOIO SOLUZIONE DETERGENTE
SOLUTION TANK
9
PREPARAZIONE AL LAVORO
PREPARATION FOR WORK
9
DISPOSITIVO TROPPO PIENO
OVERFLOW DEVICE
10
AVANZAMENTO
TRACTION
10
TERMINE LAVORO
END WORK
11
MANUTENZIONE ORDINARIA
PULIZIA SERBATOIO RECUPERO
PULIZIA TERGIPAVIMENTO
SOSTITUZIONE GOMME
SQUEEGEE
PERIODIC MANTEINANCE
RECOVERY TANK
CLEANING
SQUEEGEE CLEANING
SQUEEGEE RUBBERS
REPLACEMENT
11
SOSTITUZIONE SPAZZOLA
PULIZIA SERBATOIO/FILTRO
BRUSH REPLACEMENT
SOLUTION TANK/FILTER
CLEANING
12
SOSTITUZIONE CARICA BATTERIE
CBHD1
CBHD1 BATTERY CHARGER
REPLACEMENT
12
CARICA BATTERIE CBHD1
PRINCIPIO DI FUNZIONAMENTO
CBHD1 BATTERY CHARGER
OPERATION PRINCIPLES
13
MANUTENZIONE STRAORDINARIA
MOTORE SPAZZOLE
MOTORE ASPIRAZIONE
ELETTROVALVOLA SOLUZIONE
DETERGENTE
TRASMISSIONE SPAZZOLE
IMPIANTO ELETTRICO TIMONE
QUADRO COMANDI
EXTRAORDINARY MAINTENANCE
BRUSHES MOTOR
VACUUM MOTOR
DETERGENT SOLUTION
ELECTRO VALVE
BRUSHES TRANSMISSION
STEM ELECTRICAL PLAN
CONTROL PANEL
15
TRASPORTO DELLA MACCHINA
TRANSPORT OF THE MACHINE
15
REGOLAZIONE TERGIPAVIMENTO
SQUEEGEE ADJUSTMENT
16
CARATTERISTICHE TECNICHE
TECHNICAL FEATURES
16
DEMOLIZIONE E SMALTIMENTO DELLA
MACCHINA
DEMOLITION AND DISPOSAL OF
THE MACHINE
16
INCONVENIENTI E COMUNI RIMEDI
TROUBLESHOOTING
17
IMPIANTO ELETTRICO E36 A BATTERIA
ELECTRICAL PLAN E36 BATTERY
VERSION
18
IMPIANTO ELETTRICO E36 A CAVO
ELECTRICAL PLAN E36 CABLE
VERSION
19

4
ATTENZIONE!
ISTRUZIONI PER IL CORRETTO UTILIZZO DELLA BATTERIA.
AL FINE DI PRESERVARE LA LUNGA DURATA DELLA BATTERIA IN DOTAZIONE A QUESTA
MACCHINA E DI ASSICURARSENE UN FUNZIONAMENTO SEMPRE OTTIMALE È
INDISPENSABILE OSSERVARE ALCUNE SEMPLICI PRECAUZIONI:
-LA MACCHINA NON DEVE ESSERE MAI STOCCATA CON LA BATTERIA SCARICA
(SIA PARZIALMENTE SIA COMPLETAMENTE);
-EVITARE OGNI TIPO DI CARICA PARZIALE DELLA BATTERIA; OGNI VOLTA CHE LA
SI METTE IN CARICA SI DEVE ATTENDERE IL COMPLETAMENTO DEL CICLO.
VI PREGHIAMO DI NOTARE CHE L’OSSERVANZA DI QUESTE SEMPLICI PRECAUZIONI E’
INDISPENSABILE PER LA VALIDITA’ DELLA GARANZIA CHE, IN CASO CONTRARIO, SARA’
AUTOMATICAMENTE INVALIDATA.
WARNING!
INSTRUCTIONS FOR THE PROPER USE OF THE BATTERY.
IN ORDER TO PRESERVE THE LONG LIFE OF THE BATTERY PROVIDED WITH THIS
MACHINE AND ENSURE THAT OPERATING WILL BE ALWAYS OPTIMAL, IT IS ESSENTIAL
TO FOLLOW A FEW BASIC PRECAUTIONS:
- NEVER STORE THE MACHINE WITH DISCHARGED BATTERY (WHETHER PARTIALLY
OR COMPLETELY) INSERTED ON.
- AVOID ANY TYPE OF PARTIAL BATTERY RECHARGE: EVERY TIME THAT BATTERY
IS PUT UNDER CHARGE, WAIT UNTIL THE COMPLETION OF THE CYCLE.
PLEASE NOTE THAT FOLLOWING THESE SIMPLE PRECAUTIONS IS ESSENTIAL FOR THE
VALIDITY OF THE GUARANTEE THAT, IF NOT, WILL BE AUTOMATICALLY VOID.

5
USE AND CARE OF THIS HANDBOOK
A copy of this manual has been delivered with the machine to the
operator and to whom is in charge of the maintenance; they undertake
to read it, store it in a safe place and consult it before starting any
operations on the machine.
The information in this manual are intended to illustrate the use of the
machine and of its technical characteristics, to supply instructions on
transportation, displacement, put into operation, assembly, settings,
use, maintenance, spare parts, risks. The manufacturer kindly ask the
Customer to carefully read the manual when he receives the machine
and before starting any operation
This manual wants to give the user all information, indications and
instructions he needs to know the machine, to understand its working
principles and limits and to be properly informed about the use and the
safety. Please follow the instructions written in this manual and
comply with applicable laws.
This operation manual should be considered as part of the machine and
should be kept for future reference until the final dismantling. In case
of damage or loss, it’s always possible to order a new one as a normal
spare part.
The Manufacturer advises that this manual is updated to the
moment of purchase so it cannot be considered as unsuitable when
updates for new information. The manufacturer reserves the right
to update the product and the manual, but this will not oblige the
manufacturer to update the previous production, nor the
handbook, unless extraordinary circumstances relating to the
safety of personal and properties.
The Customer, however, may address to the Manufacturer to ask for
any updating or integration of the Handbook.
If the Customer wishes to obtain more specific information or to
suggest improvements to the manual, he can contact the manufacturer
directly. In case of sale of the machine, the customer is requested to
notify to the manufacturer the address of the new owner to arrange for
shipment of any additions to the manual to the new user.
The manufacturer is not to be held responsible in case of:
improper use of the machine ;
use contrary to existing regulations;
setup errors;
feeding problems;
serious errors in maintenance;
unauthorized replacements or interventions;
use of non-original or non-specific spare parts;
total or partial non-compliance with all instructions;
unusual events.
UTILIZZO E CUSTODIA DEL MANUALE
Una copia di questo manuale spedita insieme alla macchina è destinata
all’operatore e a chi ne controlla la manutenzione, il quale si impegna
a leggerlo, a custodirlo in luogo sicuro e a consultarlo prima di iniziare
qualsiasi operazione sulla macchina stessa.
Le informazioni scritte in questo manuale sono finalizzate alla
descrizione dell’uso della macchina e delle sue caratteristiche tecniche,
a fornire istruzioni su trasporto, spostamento, messa in funzione,
assemblaggio, regolazioni, utilizzo, interventi di manutenzione, parti
di ricambio, rischi. Il Costruttore prega il Cliente di leggere
completamente il manuale al ricevimento della macchina e comunque,
prima di iniziare qualsiasi operazione su di essa. Questo manuale è
fatto ed è mirato a dare tutte le informazioni all’utente, tutte le
indicazioni e le istruzioni di cui ha bisogno per conoscere la
macchina, per capire i suoi principi di funzionamento e i suoi limiti ed
essere informato propriamente dell’uso e della sicurezza. La
preghiamo di seguire le istruzioni scritte in questo manuale ed
accondiscendere con alcune regolamentazioni specifiche in forza.
Questo manuale d’istruzioni di funzionamento dovrebbe essere
considerato come una parte della macchina e dovrebbe essere tenuto
per referenze future fino al finale smantellamento. Nel caso in cui il
manuale dovesse essere danneggiato o perduto, è possibile richiederlo
al fabbricante nell’elenco dei ricambi della macchina.
Il fabbricante rende noto che il manuale riflette la situazione
tecnica nel momento in cui la macchina è stata commercializzata e
non può essere considerato disadatto in caso di aggiornamenti fatti
secondo nuove informazioni. Il fabbricante si riserva il diritto di
aggiornare la produzione ed il manuale, senza essere obbligato ad
aggiornare la produzione precedente ed il manuale, a parte casi
straordinari riguardo all’incolumità e alla salute di persone e
cose. Il cliente, comunque, può fare richiesta al fabbricante per
qualsiasi aggiornamento o integrazione del manuale.
Nel caso in cui il cliente desiderasse ottenere informazioni più
specifiche o suggerire miglioramenti al manuale, può contattare
direttamente il fabbricante. Il cliente è pregato di notificare al
fabbricante l’indirizzo di un eventuale nuovo proprietario in caso di
trasferimento della macchina in ordine per poter provvedere alla
spedizione di qualsiasi integrazione del manuale all’utente nuovo.
Il fabbricante informa il cliente che si considera non-responsabile in
caso di:
uso improprio della macchina;
uso contrario alle regolamentazioni specifiche in forza;
installazione sbagliata;
difetti di alimentazione;
errori gravi di manutenzione;
cambi o interventi non-autorizzati;
uso di parti di ricambio non-originali o non-specifiche;
non-osservanza totale o parziale delle istruzioni;
eventi insoliti.
Via Dell’industri a, 32
35013 –Cittadella( PD )
Tel. (+39) 049 9481800
Fax(+39) 049 9481899
info@eurekasweepers.com
www.eurekasweepers.com
Mod. ABCDEFG
V - AC/DC 09/2008
W
IP
Lt.
Kg.
N° 000000 MADE IN ITALY
(B)
(C)
(D)
(E)
(F)
(A)
(G)
(H)
MATRICOLA E MARCHIO CE
(A) Machine Model
(B) Power Supply
(C) Power of Motors
(D) Protection
(E) Capacity of Tanks
(F) Weight
(G) Serial Number
(H) Date of Manufacture
SERIAL NUMBER AND CE MARK
(A) ModelloMacchina
(B) Alimentazione
(C) PotenzaMotori
(D) Protezione
(E) Capacità Serbatoi
(F) Peso
(G) N° diMatricola
(H) Data di Fabbricazione

6
Fig. (1/A)
Fig. (1)
Fig. (1/B)

7
SAFETY RULES
Prior to working with this machine, carefully read the manual.
The use of the machine is prohibited to untrained or unauthorized
people
Operate with caution on slopes and ramps; avoid U-turning on the
slopes.
WARNING: This machine should only be used on slopes of less
than 2%.
The machine can cause explosions if it works near flammable
materials or vapors (fuels, solvents, etc.).
Do not operate in the presence of harmful dusts.
For maintenance and recharging the batteries, carefully read the
specific instructions of this manual.
Repairs should only be performed by qualified personnel.
Maintenance must be performed after unplugging the power supply;
if in battery operated model, disconnect the batteries
themselves.
When operating, pay attention to cables connected to the mains,
ensuring that they are not damaged.
Never start the machine with damaged cables.
Protect electrical components from water spray, especially when
replacing cables, joints or pins.
When operating pay attention to other people and especially to
children.
For good operation use non- foaming detergents.
CAUTION: make no changes to the machine. Modified machines
require a new CE marking.
NORME DI SICUREZZA
Prima di lavorare con questa macchina, preparatevi ed addestratevi
leggendo con cura questo manuale.
L' uso della macchina è vietato a persone non addestrate e non
autorizzate.
Manovrate la macchina con cautela su pendenze e rampe, non fate
inversioni su pendenze.
ATTENZIONE: questa macchina va usata solo su pendenze
inferiori al 2%.
La macchina può causare esplosioni se funziona nelle vicinanze di
materiali o vapori infiammabili (carburanti, solventi , etc.).
Non operate in presenza di polveri dannose alla salute.
Per la manutenzione e la ricarica delle batterie, leggete con
attenzione le specifiche istruzioni di questo manuale.
Le riparazioni vanno effettuate solo da personale specializzato.
Le operazioni di manutenzione sono da eseguirsi con la macchina
scollegata dalla rete elettrica, togliendo la spina dalla presa,
per il modello a batteria scollegare le batterie stesse.
Durante l'uso fare attenzione ai cavi elettrici di allacciamento alla
rete verificando che non ci siano danni.
Nel caso in cui il cavo sia danneggiato la macchina non può essere
usata.
In caso di sostituzione del cavo o spine o giunti, assicurare. la
protezione da spruzzi d'acqua la resistenza meccanica.
Durante l'uso fare attenzione alle altre persone ed in particolare ai
bambini.
Per un buon funzionamento della macchina utilizzare detergenti non
schiumogeni.
ATTENZIONE: non apportare modifiche alla macchina. La
macchina modificata richiede una nuova marcatura CE.
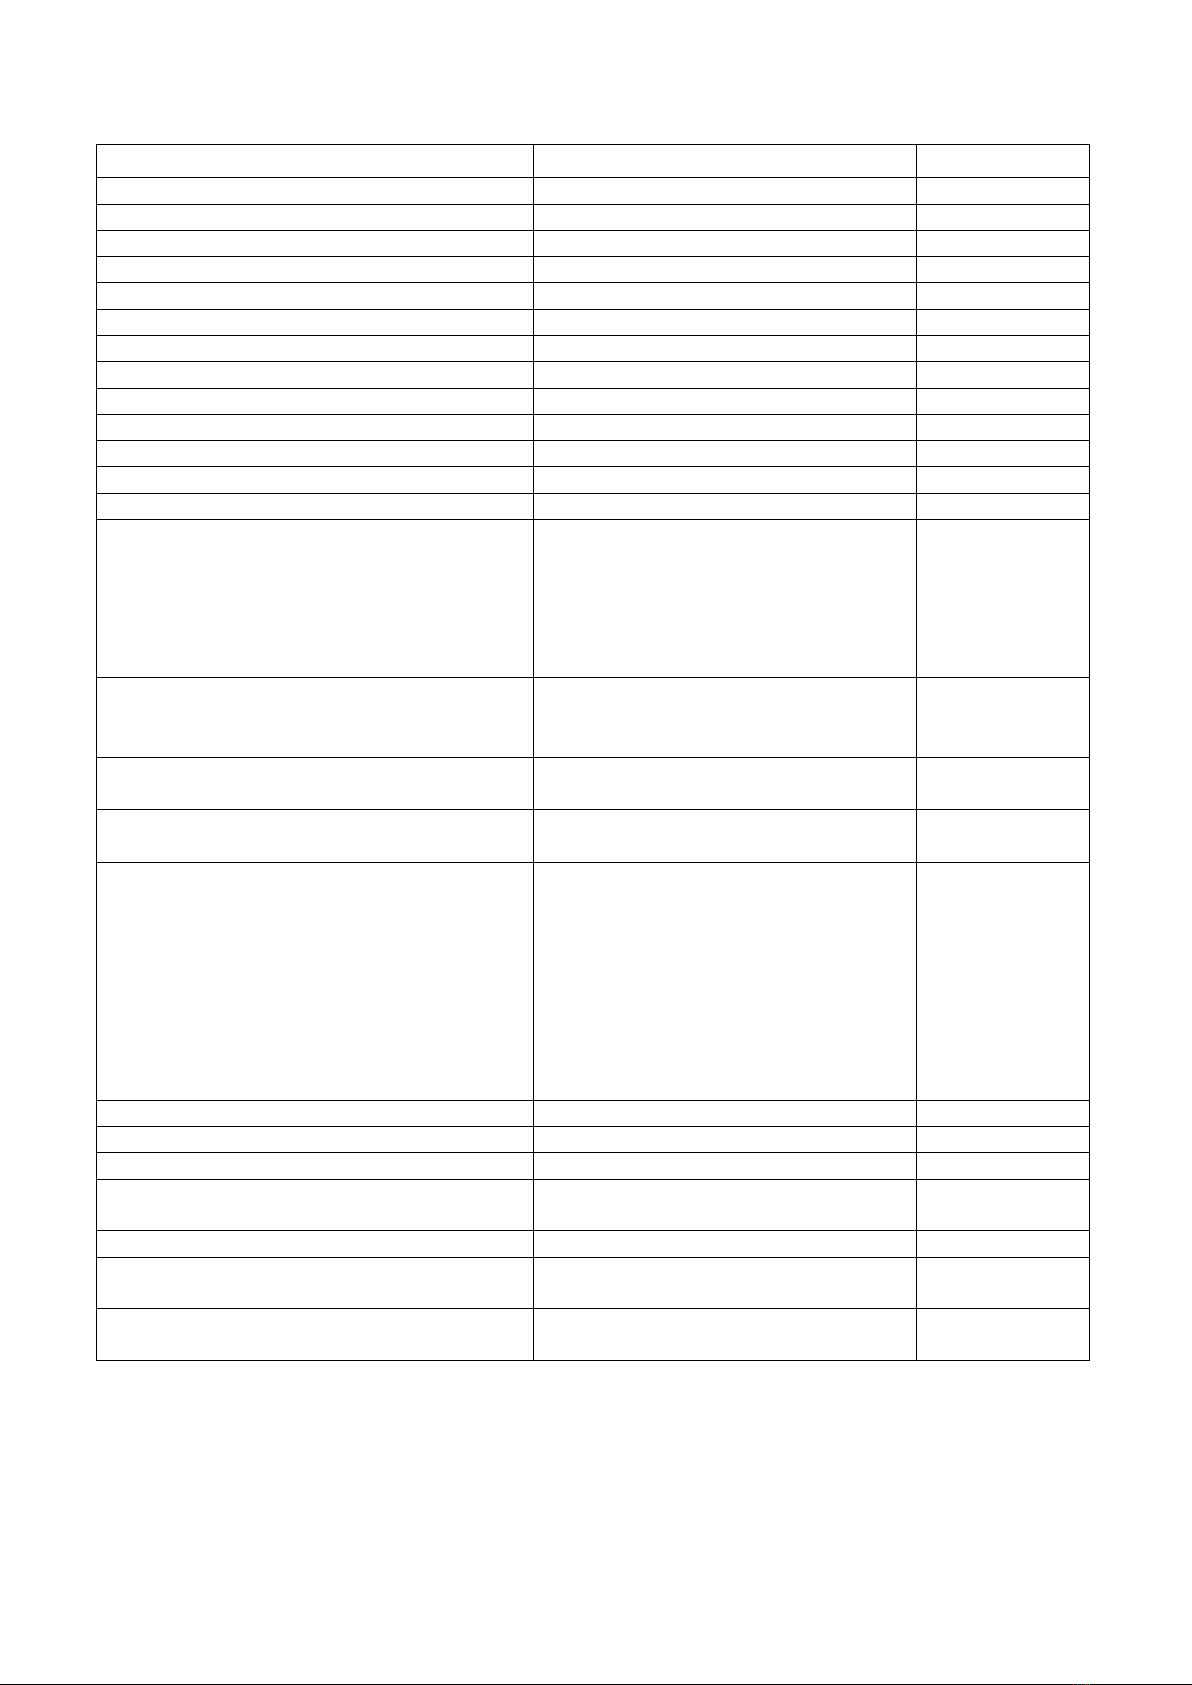
DISIMBALLO
All'arrivo della vostra lavasciuga controllare che l'imballo sia
integro, sballare la macchina, liberarla dal pallet e controllare che non
presenti danni dovuti al trasporto; in caso di danni farlo notare al
trasportatore e immediatamente, per raccomandata, informare il
corriere ed il costruttore. La macchina è contenuta in uno specifico
imballo (Fig1). Non possono essere sovrapposti più di due imballi.
La massa complessiva è di kg 110.
Le dimensioni di ingombro sono:
A : 1050 mm
B : 610 mm
C : 990 mm
COME SBALLARE LA MACCHINA (Fig.1/A-1/B)
1. Rimuovere l’imballo sul lato superiore.
2. Rimuovere l’imballo del serbatoio recupero.
3. Togliere la macchina dal pallet.
UNPACKING
Upon arrival of your scrubber-dryer, check that the package is intact,
unpack the machine, free it from the pallet and check that there are not
damages during the freight. In case of damages, point this out to the
forwarder immediately and contact the manufacturer and the carrier by
registered mail. The machine is contained in specific package (Pic.1);
no more than two packages can be stacked.
Total package mass: kg 110. Overall dimensions:
A: 1050 mm
B: 610 mm
C: 990 mm
UNPACKING THE MACHINE (Pic.1/A –1/B)
1. Unpack it on top
2. Remove the machine from the pallet.
3. Unpack the recovery tank.
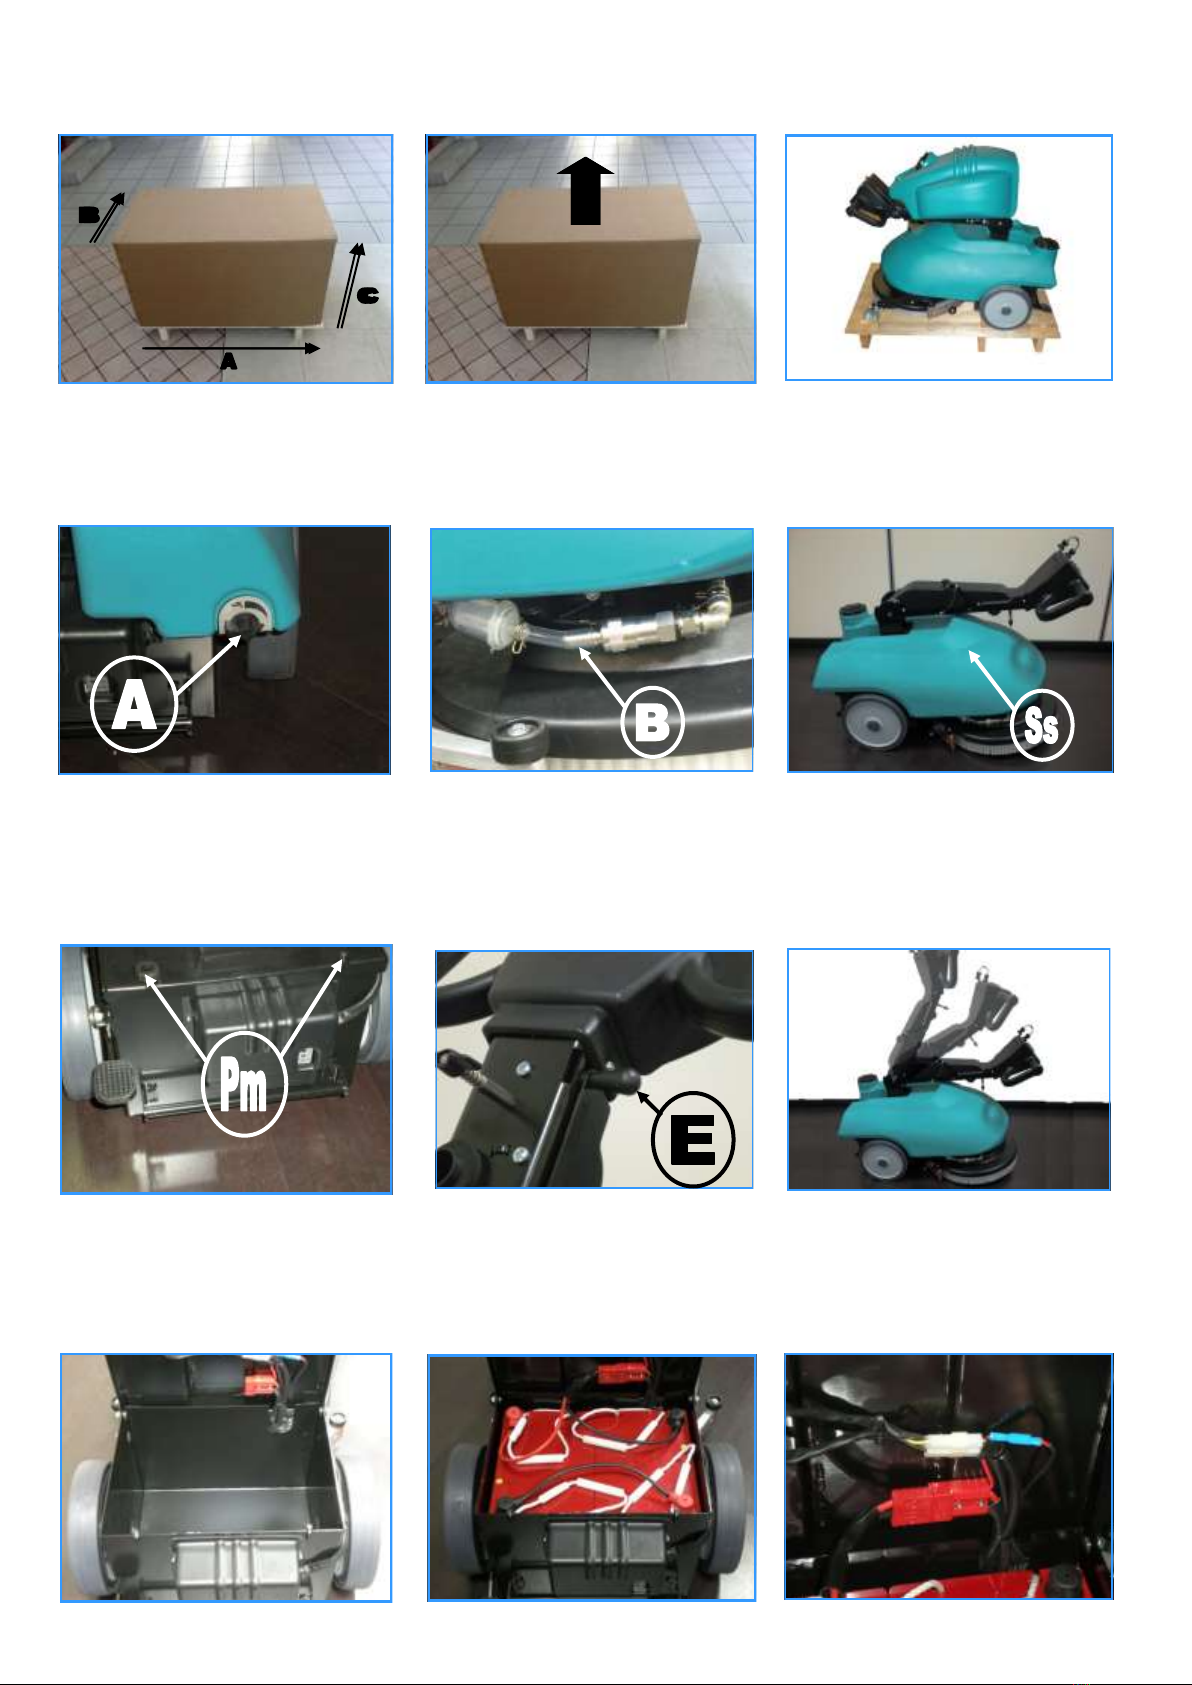
PREPARATION OF BATTERY OPERATED MACHINE
The machine already comes with on-board battery charger and sealed
batteries.
WARNING: You may only use sealed batteries to avoid leakage of
acids.
If you prefer to install different batteries than those supplied with the
machine, use only 12V (80Ah Max) AGM or GEL.
Batteries must be put in the compartment under the solution tank.
To insert the batteries, it is necessary to:
1. Turn off the solution tap (A) under the tank, on the front left part of
the machine.
2. Remove the solution pipe(B).
3. Remove the solution tank (SS).
4. Open the closing hinges of the battery compartment (Pm).
5. Rotate the handlebar by pulling the release lever (E).
6. Place battery inside the compartment.
7. Connect the cables to the battery terminals.
8. Connect the battery plug to the machine connector.
WARNING: This operation must be performed by qualified
personnel only.
A wrong or faulty connection may cause severe injury to people or
property damage.
PREPARAZIONE MACCHINA A BATTERIA
La macchina viene fornita già con caricabatteria incorporato e
batteria ermetica.
ATTENZIONE: Si consiglia esclusivamente l’utilizzo di batterie
ermetiche per evitare fuoriuscita di acidi.
In caso di utilizzo di batterie diverse da quelle fornite con la
macchina, utilizzare solo batterie 12V (Max 80Ah) AGM o GEL.
Le batterie devono essere alloggiate nell’apposito vano previsto sotto
il serbatoio soluzione.
Per l’inserimento delle batterie è necessario:
1. Chiudere il rubinetto soluzione (A) situato nella parte anteriore
sinistra della macchina sotto al serbatoio soluzione.
2. Staccare il tubo della soluzione (B).
3. Togliere il serbatoio soluzione.(Ss)
4. Svitare i pomelli di chiusura del vano batterie (Pm).
5. Ruotare il manubrio sollevando la leva di movimentazione
manubrio (E).
6. Posizionare la batteria all’interno del vano.
7. Collegare i cavi alle batterie.
8. Collegare il connettore batterie al connettore macchina.
ATTENZIONE: Questa operazione deve essere compiuta da
personale qualificato. Un errato o imperfetto collegamento dei cavi e
del connettore può causare gravi danni a persone o cose.

8
RICARICA BATTERIE
Effettuare un ciclo di carica delle batterie prima dell’utilizzo della
macchina. Nel caso di sostituzione della batteria accertarsi di utilizzare
batterie adatte al caricabatteria installato (utilizzare solo batterie 12V
AGM o GEL).Dopo aver spento la macchina inserire la spina del
caricabatteria ( C ) nella presa di rete.
Seguire le istruzioni del libretto allegato per il corretto uso del
caricabatteria.
ATTENZIONE: La macchina è predisposta di un sistema automatico
che toglie la tensione dall’impianto elettrico quando è in fase di
ricarica delle Batterie.
ATTENZIONE: Per non provocare danni permanenti alle batterie, è
indispensabile evitare la scarica completa delle stesse, provvedendo
alla ricarica entro pochi minuti dall’entrata in funzione del segnale
lampeggiante di batterie scariche.
ATTENZIONE: Non lasciare mai le batterie completamente scariche,
anche se la macchina non viene usata.
ATTENZIONE: Per la carica giornaliera delle batterie è necessario
attenersi scrupolosamente alle indicazioni fornite dal costruttore o dal
suo rivenditore. Tutte le operazioni di installazione e manutenzione
devono essere eseguite da personale specializzato.
Pericolo di esalazione di gas e fuoriuscita di liquidi corrosivi.
Pericolo di incendio: non avvicinarsi con fiamme libere.
ATTENZIONE: E’ indispensabile completare il ciclo di ricarica
delle batterie (CR > 8 h). Una interruzione prematura del ciclo
stesso comprometterebbe la durata e l’autonomia delle batterie.
SEGNALATORE BATTERIE
Nella parte posteriore della macchina sul caricabatterie si trova un
segnalatore del livello di carica delle batterie(D) che e' diviso nei
seguenti colori: Verde- batterie cariche.
Giallo- batterie a fine carica. Rosso- batterie da ricaricare. Queste fasi
sono associate alla emissione di segnalazioni luminose intermittenti,
dopodiché il sistema di controllo toglierà corrente al motore delle
spazzole, lasciando invece in funzione il motore di aspirazione per un
minuto, al fine di completare il recupero dei residui sul pavimento
prima di procedere alla ricarica.
BATTERY CHARGE
Do first a complete charge cycle of the battery before using the
machine. When replacing the battery make sure you use suitable
batteries to the charger installed (use only 12V - AGM or GEL Type).
Ensure the machine has been turned off, then insert the charger plug
into the mains socket (C).
Follow the instructions of the attached manual for the correct use of
the charger.
WARNING: The machine is designed with automatic security system
that cuts off power when battery is under charge.
WARNING: To avoid permanent damage to the batteries, it is
essential to avoid complete discharge of the same, even if the machine
is not used. The recharge must begin within a few minutes at the
beginning of the flashing warning light for low battery..
CAUTION: Never leave the battery completely discharged, even if
the machine is not in use
CAUTION: For the battery daily recharge, it is necessary to follow
strictly the instructions provided by the manufacturer or its dealer. All
installations and maintenance must be performed by qualified
personnel.
Danger of leaking of gas, fumes and corrosive liquids.
Risk of fire: do not approach with open flames.
CAUTION: It’s essential to complete the charging cycle UP TO
FULL CHARGE (> 8 h). . A premature termination of the life
cycle itself compromise life and the autonomy of the batteries.
CHARGE CONTROLLER
The charge controller is (D) on the battery charger which is on back of
the machine and it is divided in three colored LEDs, which indicate the
level of power:
Green - full charged battery;
Yellow - low battery
Red - recharge.
These phases are associated to warning flashing lights, after which the
control system will cut power to the brush motor, allowing the vacuum
motor to run for a further minute to complete the recovery of remains
on the floor, before the recharge.
SERBATOIO RECUPERO
Il timone che per motivi di imballaggio viene fornito piegato, dovrà
essere messo in posizione di lavoro. Per fare ciò procedere come
segue:
1. Alzare il timone tirando verso l’alto l’apposita leva (E).
2. Posizionare la macchina in posizione di lavoro.
3. Applicare il serbatoio recupero al timone e fissarlo per mezzo del
gancio (F).
ATTENZIONE : Controllare che il serbatoio recupero sia inserito
correttamente e verificare che il tappo sia chiuso correttamente.
RECOVERY TANK
The rudder comes folded up for reasons of packaging -it must be put in
position before operating.
To do this, follow these steps:
1. Lift the rudder by pulling up the lever (E).
2. Place the machine in working position.
3. Apply the recovery tank at the helm and secure it with the hook (F).
WARNING: Verify the correct positioning of the recovery tank
and check that the cap is closed properly.

9
SERBATOIO SOLUZIONE DETERGENTE
Riempire con acqua pulita, ad una temperatura non superiore a 50°C, il
serbatoio soluzione (Fig.2) ed
aggiungere il detersivo liquido nella concentrazione e con le modalità
previste dal fabbricante. Per
evitare la formazione di un’eccessiva quantità di schiuma che
andrebbe a danneggiare il motore di
Aspirazione, usare la minima percentuale di detersivo.
ATTENZIONE: Usare sempre detersivo a schiuma frenata. Per
evitare con sicurezza la produzione di schiuma, prima di iniziare il
lavoro introdurre nel serbatoio di recupero una minima quantità di
liquido antischiuma. Non utilizzare acidi allo stato puro.
ATTENZIONE: Controllare che il tappo sia correttamente inserito
nella propria sede e che il tubo alimentazione soluzione sia
correttamente innestato.
SOLUTION TANK
Fill the solution tank with clean water at a temperature not exceeding
50°C (Pic. 2); and add the liquid detergent in concentration and
according to the manufacturer’s instructions. To prevent an excessive
amount of foam that would damage the vacuum motor, use the
smallest percentage of detergent.
WARNING: Always use low foam detergent. To safely avoid the
production of foam, before starting the work, add in the recovery tank
a small amount of anti-foaming agent. Do not use acids in pure form.
CAUTION: Make sure that the cap is properly inserted in its seat and
that the feeding solution tube is properly inserted (B).
PREPARAZIONE AL LAVORO
Eseguire le operazioni di preparazione della macchina descritte in
precedenza e poi come segue :
Macchina a BATTERIA :
1. Rilasciare la leva di sollevamento della ruota anteriore (Ls) per
procedere al lavoro.
2. Abbassare la leva di comando tergi (G).
3. Ruotare l’interruttore generale (K) e controllare che la spia verde
(D) sia accesa.
4. Premere l’interruttore spazzole (H).
5. Premere l’interruttore aspirazione (J).
6. Regolare la quantità di soluzione detergente desiderata tramite
l’apposito rubinetto (A).
7. Premere l’interruttore elettrovalvola (L).
Macchina a CAVO :
1. Rilasciare la leva di sollevamento della ruota anteriore (Ls) per
procedere al lavoro.
2. Abbassare la leva di comando tergi (G).
3. Collegare la spina alla presa di corrente e controllare che la spia
verde (V) sia accesa.
4. Premere l’interruttore spazzole (H).
5. Premere l’interruttore aspirazione (J).
6. Regolare la quantità di soluzione detergente desiderata tramite
l’apposito rubinetto (A).
7. Premere l’interruttore elettrovalvola (L).
A questo punto la macchina può lavorare in piena efficienza fino ad
esaurimento della soluzione detergente agendo sulla leva di
funzionamento che aziona tutti i comandi (M).
ATTENZIONE : il limitatore (I), interviene quando il motore delle
spazzole compie uno sforzo maggiore di quello previsto nel progetto.
Per il ripristino attendere un minuto, dopodiché si può spingere il
pulsante. La macchina è di nuovo pronta per l'uso.
PREPARATION FOR WORK
After the preparation procedures of the machine described above,
proceed as follows:
BATTERY OPERATED MACHINE:
1. Release the front wheel lift lever (Ls)
2. Lower the squeegee lever (G).
3. Rotate the main switch (K) and check that the green led (D)
has turned on.
4. Press the brushes switch (H).
5. Press the vacuum switch (J).
6. Adjust the desired amount of cleaning solution by acting
through the appropriate tap (A).
7. Press the electro valve switch (L).
CABLE MACHINE:
1. Release the front wheel lift lever (Ls)
2. Lower the squeegee control lever (G)
3. Turn the main switch (K) on and check the green light (D) is
lit.
4. Press the brush switch (H).
5. Press the inlet power control (J).
6. Adjust the desired amount of cleaning solution by acting
through the appropriate tap (A).
7. Press the electro valve switch (L).
Now the machine can operate at full efficiency - until all the detergent
solution is out - by turning the operating lever that drives all controls
(M).
WARNING: The limiter (I), comes into operation when the brush
motor makes a greater effort than that required in the project. To reset
wait a minute, then push the button again; the machine is ready for re-
use.
Fig. (2)

10
DISPOSITIVO TROPPO PIENO
La macchina è dotata di un filtro a palla (Fig.3) che
interviene quando il serbatoio recupero è pieno,
provocando la chiusura del tubo di aspirazione.
In tal caso è necessario spegnere la macchina e
procedere con lo svuotamento del serbatoio di
recupero.
ATTENZIONE: Questa operazione deve essere
eseguita utilizzando dei guanti per proteggersi dal
contatto con soluzioni pericolose.
AVANZAMENTO
La trazione di queste macchine è ottenuta per mezzo
della spazzola, che lavorando leggermente inclinata,
riesce a trascinare la macchina in avanti.
ATTENZIONE: Nell’effettuare spostamenti anche
brevi in retromarcia, assicurarsi che il tergi
pavimento sia sollevato.
Fig. (3)
OVERFLOW DEVICE
The machine is equipped with a ball filter (Pic.3)
that gets activated when the recovery tank is full,
causing the aspiration pipe closure.
In this case it is necessary to turn off the machine
and empty the recovery tank.
WARNING: This operation must be done wearing
gloves to protect themselves from the contact with
dangerous solutions.
TRACTION
The traction is achieved thanks to the slight angle
at which the brush operates, causing the dragging
of the wheels forward.
CAUTION: doing even short backward shifting
movements, make sure that the squeegee is raised.

11
TERMINE LAVORO
Al termine del lavoro e prima di eseguire qualsiasi tipo di
manutenzione eseguire le seguenti operazioni :
Macchina a BATTERIA :
1. Spegnere l’interruttore elettrovalvola (L).
2. Chiudere il rubinetto di regolazione flusso detergente (A).
3. Alzare la maniglia per sollevare il tergi pavimento (G).
4. Spegnere l’interruttore aspirazione (J).
5. Spegnere l’interruttore spazzola (H).
6. Ruotare l’interruttore generale a chiave (K).
7. Premere la leva di sollevamento della ruota anteriore (Ls).
8. Portare la macchina fino al luogo previsto per lo scarico.
9. Impugnare il tubo (N) sulla parte posteriore della macchina.
10. Aprire il tappo di scarico e svuotare il serbatoio di recupero.
Macchina a CAVO :
1. Spegnere l’interruttore elettrovalvola (L).
2. Chiudere il rubinetto di regolazione flusso detergente (A).
3. Alzare la maniglia per sollevare il tergi pavimento (G).
4. Spegnere l’interruttore aspirazione (J).
5. Spegnere l’interruttore spazzola (H).
6. Staccare la spina dalla presa di corrente.
7. Premere la leva di sollevamento della ruota anteriore (Ls).
8. Portare la macchina nel luogo previsto per lo scarico.
9. Impugnare il tubo (N) sulla parte posteriore della macchina.
10. Aprire il tappo di scarico e svuotare il serbatoio di recupero.
ATTENZIONE: Questa operazione deve essere eseguita utilizzando
dei guanti per proteggersi dal contatto con soluzioni pericolose.
END OF WORK
After work and before performing any maintenance:
BATTERY OPERATED MACHINE:
1. Switch the solenoid valve off (L).
2. Turn the tap of the regulation of the detergent solution off(A).
3. Lift the rear handle to lift the squeegee (G).
4. Switch the vacuum switch off (J).
5. Switch the brush switch off(H).
6. Turn the key switch off (K).
7. Press the lever (Ls) to lift the front wheel.
8. Bring the machine in place provided for draining.
9. Hold the tube (N) on the back of the machine.
10. Open the drain plug and empty the recovery tank.
CABLE MACHINE:
1. Turn the electrical valve switch off (L).
2. Close the tap of the regulation of the detergent solution (A).
3. Lift the back handle to lift the squeegee (G).
4. Turn the vacuum switch off (J).
5. Turn the brushes switch off (H).
6. Disconnect the electrical supply.
7. Press the lever (Ls) to lift the front wheel.
8. Bring the machine in place provided for draining.
9. Hold the tube (N) on the back of the machine.
10. Open the drain plug and empty the recovery tank.
WARNING: This operation must be done wearing protection gloves
to avoid contact with dangerous solutions.
MANUTENZIONE ORDINARIA
PULIZIA SERBATOIO RECUPERO
1. Togliere il serbatoio di recupero dal timone per mezzo del gancio
(F).
2. Impugnare il tubo (N) sulla parte posteriore della macchina.
3. Aprire il tappo di scarico e svuotare il serbatoio di recupero.
4. Rimuovere il tappo per accedere al serbatoio.
5. Sciacquare il serbatoio e pulire con un getto d’acqua.
ATTENZIONE: Questa operazione deve essere eseguita utilizzando
dei guanti per proteggersi dal contatto con soluzioni pericolose.
PULIZIA TERGIPAVIMENTO
Controllare che le gomme del tergi pavimento siano sempre pulite per
avere una miglior asciugatura.
Per la loro pulizia è necessario:
1. Togliere il serbatoio di recupero dal timone per mezzo del gancio
(F).
2. Chiudere il rubinetto regolazione flusso detergente (A).
3. Disconnettere tubo soluzione detergente (B).
4. Togliere il serbatoio soluzione detergente.
5. Svitare le viti di fissaggio del tergi pavimento (O).
6. Smontare il tergipavimento dal supporto.
7. Pulire accuratamente l’interno.
8. Pulire accuratamente le gomme.
9. Rimontare il tutto ripetendo all’inverso le operazioni suddette (dalla
6 alla 1).
SOSTITUZIONE GOMME SQUEEGEE
Controllare lo stato di usura delle gomme tergi pavimento ed
eventualmente cambiarle.
Per la sostituzione è necessario:
1. Ripetere le operazioni per la pulizia del tergi pavimento dalla 1 alla
6.
2. Svitare le viti sul tergi che bloccano le lame premi gomma e sfilarle.
3. Togliere le lame premi gomma.
4. Sostituire le gomme.
5.Rimontare il tutto ripetendo all’inverso le operazioni suddette (dalla
3 alla 1).
PERIODIC MANTEINANCE
RECOVERY TANK CLEANING
1. Remove the recovery tank by the rudder hook (F)
2. Hold the tube (N) on the back of the machine.
3. Open the drain plug and empty the recovery tank.
4. Remove the cap to access the tank.
5. Rinse the tank and clean it with water jet.
WARNING: This operation must be done wearing gloves to protect
themselves from the contact with dangerous solutions.
SQUEEGEE CLEANING
Check that the squeegee wipers are always clean, in order to obtain a
better floor drying.
1. Remove the recovery tank from the handle bar by means of the
fastener (F).
2. Close the detergent flow adjustment tap (A).
3. Disconnect the detergent solution pipe (B).
4. Remove the detergent solution tank.
5. Loosen the squeegee retention screws (O).
6. Remove the squeegee from the support.
7. Carefully clean the inside.
8. Carefully clean the rubbers.
9. Fit everything back together again by repeating the above operations
in the reverse sequence (from 6 to 1).
SQUEEGEE RUBBERS REPLACEMENT
Check the wear of the squeegee blades and in case replace them.
To replace them, it is necessary:
1. Repeat the squeegee cleaning operations from 1 to 6.
2. Loosen the screws on the squeegee which secure the rubber pressing
blades and remove these.
3. Remove the rubber pressing blades.
4. Change the rubbers.
5. Fit everything back on, repeating the above operations in the reverse
sequence (from 3 to 1).

12
SOSTITUZIONE DELLA SPAZZOLA
Inserire nelle apposite cave dei sistema di rotazione (Fig. 5) la
spazzola a disco setolata.
Con lo stesso sistema si può inserire il disco trascinatore (Fig . 6) e,
allo stesso, si possono applicare tutti i pad abrasivi commerciali.
Questa applicazione può essere usata soprattutto nella pulizia a fondo
dei pavimenti in prima posatura.
Per togliere la spazzola a disco ruotare la spazzola stessa in senso
antiorario.
PULIZIA SERBATOIO / FILTRO
1. Togliere il serbatoio di recupero dal timone per mezzo del gancio
(F).
2. Chiudere il rubinetto regolazione flusso soluzione detergente (A).
3. Disconnettere il tubo soluzione (B).
4. Togliere il serbatoio soluzione detergente.
5. Togliere il filtro (P) e pulirlo.
6. Rimontare il filtro.
7. Rimontare il tutto ripetendo all’inverso le operazioni suddette (dalla
4 alla 1).
ATTENZIONE: Questa operazione deve essere eseguita utilizzando
dei guanti per proteggersi dal contatto con soluzioni pericolose.
BRUSH REPLACEMENT
Set in the appropriate slots of the rotation system (Pic. 5) the bristled
brush.
Inserted in the same way the pad holder (Pic. 6), where any
commercial type of abrasive pad holders can also be put.
This can be especially done for the hard cleaning of first laying floors.
To remove the brush rotate the brush in counterclockwise sense.
SOLUTION TANK AND FILTER CLEANING
1. Remove the recovery tank by opening the rudder hook (F).
2. Close the control valve of the cleaning solution (A).
3. Remove the solution pipe (B).
4. Remove the cleaning solution tank.
5. Unscrew the cap on the detergent solution tank.
6. Remove the filter (P) and clean.
7. Replace filter and cap.
8. Remount all the above in reverse order (from 4 to 1).
WARNING: This operation must be done wearing gloves to protect
themselves from the contact with dangerous solutions.
CBHD1 BATTERY CHARGER REPLACEMENT
To replace the battery charger in case of failure or malfunction, please
proceed as follows:
1. Remove both tanks of the machine.
2. Remove the four fixing screws (Fc) of the charger.
3. Open the battery compartment.
4. Disconnect the battery charger connectors (Cr).
5. Remove the battery charger.
6. Replace the battery charger.
7. Tighten the fixing screws of the battery charger.
8. Plug in the battery charger.
9. Close the battery compartment.
10. Replace both tanks on the machine.
10. Reassemble both the reservoirs on the machine.
SOSTITUZIONE CARICA BATTERIE CBHD1
Per procedere alla sostituzione del carica batterie a causa di guasto o
malfunzionamento, operare come segue:
1. Togliere entrambi i serbatoi della macchina.
2. Svitare le quattro viti di fissaggio (Fc) del caricabatteria.
3. Aprire il vano della batteria.
4. Scollegare i connettori (Cr) del carica batterie.
5. Rimuovere il caricabatteria.
6. Sostituire il caricabatterie.
7. Avvitare le viti di fissaggio del carica batterie.
8. Collegare i connettori del carica batterie.
9. Chiudere il vano della batteria.
10. Rimontare entrambi i serbatoi sulla macchina.
Fig. (5)
Fig. (6)

13
SEGNALAZIONE- SIGNAL SIGNIFICATO - MEANING
LED rosso fisso
Red led ON Prima fase di carica Normale
First phase of charge in progress
LED giallo fisso
Yellow led ON Seconda fase di carica Normale
Second phase of charge in progress
LED verde fisso
Green led ON Termine carica o fase di mantenimento
End of charge or maintenance phase
SEGNALAZIONE ANOMALIE- ANOMALIES SIGNAL
LED giallo lampeggiante
Yellow led flashing Batteria errata o non connessa
Unsuitable battery or not connected battery
LED rosso lampeggiante
Red led flashing Timer di sicurezza superato, cortocircuito interno
Safety Timer exceedeed, internal short circuit
LED verde con 2 lampeggi
Green led with 2 flashings Configurato per la ricarica di batterie al Gel o AGM
Configured for recharging Gel or AGM batteries
LED rosso con 2 lampeggi
Red led with 2 flashings Configurato per la ricarica di batterie al Pb-acido
Configured for recharging Lead-acid batteries
TEST INIZIALE- INITIAL TEST
CBHD1 BATTERY CHARGER
The machine is equipped with on-board battery charger model CBHD1
with the following technical specifications:
1. Advanced technology High Frequency System.
2. Charging process entirely under microprocessor control.
3. Universal Input from 100V to 240V.
4. "Soft Start" operating mode.
5. Automatic reset when mounted a new battery and start the
automatic charging cycle.
6. Output relay protection against polarity reverse, short circuits,
overvoltage or any anomaly.
7. Charger Connection without sparks risks at the output terminals,
with obvious advantages in terms of active safety, thanks to the
recognition of the battery tensions by the relay output, normally open.
8. Visual indication of any anomalies by RED/ YELLOW
FLASHING LEDS.
9. Charging parameters independent from voltage changes up to ±10%
10. Efficiency >85%.
11. Output ripple less than 100mV at maximum load.
12. Charge cycle still staring at only 2V battery charge.
CBHD1 OPERATING PRINCIPLES
When turning on the new CBHD1 series, the charger performs a test
on battery voltage to determine whether or not to start charging
routine.
By unconnected battery, the red LED starts flashing.
By successful test, the battery charging starts within one second and
red led will be steady lit.
The output relay closes and the first phase of the current slowly rises
to the set nominal value.
If during the process the battery is disconnected, after a few seconds,
the charger resets and prepares starting a new charging process.
The charging progress is shown by three LED’s : RED, YELLOW and
GREEN, as in the whole range of the battery chargers.
The GREEN led shows the end of the charging or the last phase in
case of deep charging process; in the former case, the relay is opened
to disconnect galvanically the battery from the battery charger.
CARICA BATTERIA CBHD1
La macchina viene fornita di caricabatteria elettronico incorporato
modello CBHD1 avente le seguenti caratteristiche tecniche :
1. Sistema ad alta frequenza con tecnologia avanzata.
2. Processo di carica interamente controllato da microprocessore.
3. Ingresso universale da 100V a 240V.
4. Inizio del processo di carica in modalità “soft start”.
5. Reset automatico all’inserimento di una nuova batteria ed inizio
automatico del ciclo di carica.
6. Protezione con relè in uscita contro l’inversione di polarità, corto
circuiti, sovra tensioni o anomalie.
7. Connessione della batteria al caricatore senza scintille ai morsetti
d’uscita con ovvi vantaggi in termini di sicurezza attiva, grazie
al riconoscimento della tensione di batteria a valle del relè
d’uscita, normalmente aperto.
8. Segnalazione visiva di eventuali anomalie mediante LED ROSSO
LAMPEGGIANTE o LED GIALLO LAMPEGGIANTE.
9. Parametri di carica insensibili alle variazioni di rete ±10%.
10. Rendimento >85%.
11. Ripple di uscita a massimo carico inferiore a 100mV.
12. Inizio del ciclo di carica anche con batterie a 2V.
PRINCIPIO DI FUNZIONAMENTO CBHD1
All’accensione i nuovi caricabatteria della serie CBHD1 eseguono un
test sulla tensione di batteria per decidere se iniziare o meno il
processo di carica.
Se la batteria non è connessa al caricabatteria lampeggerà il led rosso.
Se il test ha dato esito positivo, trascorso 1 secondo avrà inizio la
carica della batteria, con il led rosso acceso.
Il relè di uscita si chiude e lentamente sale la corrente della prima fase
fino al valore nominale programmato.
Se, durante il processo di carica della batteria, l’utente scollega la
batteria stessa dal caricabatteria, dopo pochi secondi, il caricabatteria
si azzera e si prepara ad iniziare un nuovo processo di carica.
Durante il processo di carica l’avanzamento della stessa è segnalato
tramite tre indicatori luminosi a led : ROSSO, GIALLO e VERDE.
Il led VERDE segnala lo stop della carica o l’ultima fase in tampone;
nel primo caso si ha l’apertura del relè a scollegare galvanicamente la
batteria dal caricatore.

14

15
MANUTENZIONE STRAORDINARIA MACCHINA
Per accedere ai dispositivi che controllano le funzioni principali della
macchina, procedere come segue :
MOTORE SPAZZOLE
1. Togliere il serbatoio di recupero dal timone per mezzo del gancio
(F).
2. Chiudere il rubinetto regolazione flusso soluzione detergente (A).
3. Disconnettere il tubo soluzione detergente (B).
4. Togliere il serbatoio soluzione detergente.
5. Operare sul motore delle spazzole (Q).
MOTORE ASPIRAZIONE
1. Togliere il serbatoio di recupero dal timone per mezzo del gancio
(F).
2. Chiudere il rubinetto regolazione flusso soluzione detergente (A).
3. Disconnettere il tubo soluzione detergente (B).
4. Togliere il serbatoio soluzione detergente.
5. Operare sul motore di aspirazione (R).
ELETTROVALVOLA SOLUZIONE DETERGENTE
1. Togliere il serbatoio di recupero dal timone per mezzo del gancio
(F).
2. Chiudere il rubinetto regolazione flusso soluzione detergente (A).
3. Disconnettere il tubo soluzione detergente (B).
4. Togliere il serbatoio soluzione detergente.
5. Operare sull’elettrovalvola soluzione detergente (S).
TRASMISSIONE SPAZZOLE
1. Togliere il serbatoio di recupero dal timone per mezzo del gancio
(F).
2. Chiudere il rubinetto regolazione flusso soluzione detergente (A).
3. Disconnettere il tubo soluzione detergente (B).
4. Togliere il serbatoio soluzione detergente.
5. Togliere il carter di protezione della spazzola.
6. Operare sugli organi di trasmissione.
IMPIANTO ELETTRICO TIMONE
1. Togliere il serbatoio di recupero dal timone per mezzo del gancio
(F).
2. Svitare le viti di fissaggio del carter posteriore sul timone (T).
3. Rimuovere il carter posteriore sul timone.
4. Operare sui componenti elettrici.
QUADRO COMANDI
1. Svitare le viti di fissaggio del quadro comandi (U).
2. Estrarre il quadro comandi prestando attenzione alle connessioni.
3. Operare sui componenti elettrici.
EXTRAORDINARY MAINTENANCE OF THE
MACHINE
For access to the devices controlling the main functions of the
machine, follow these steps:
BRUSHES MOTOR
1. Remove the recovery tank from the stem by the hook (F).
2. Turn the tap of the regulation of the detergent solution off (A).
3. Disconnect the detergent solution pipe (B).
4. Remove the solution tank.
5. Operate on the brush motor (Q).
VACUUM MOTOR
1. Remove the recovery tank from the stem by the hook (F).
2. Turn the tap of the regulation of the detergent solution off (A).
3. Disconnect the detergent solution pipe (B).
4. Remove the detergent solution tank.
5. Operate on the vacuum motor (R).
DETERGENT SOLUTION ELECTRO VALVE
1. Remove the recovery tank from the stem by the hook (F).
2. Turn the tap of the regulation of the detergent solution off (A).
3. Disconnect the detergent solution pipe (B).
4. Remove the detergent solution tank.
5. Operate on the electrical valve (S).
BRUSHES TRANSMISSION
1. Remove the recovery tank from the stem by the hook (F).
2. Turn the tap of the regulation of the detergent solution off (A).
3. Disconnect the detergent solution pipe (B).
4. Remove the detergent solution tank.
5. Remove the brush guard.
6. Operate on the transmission parts.
STEM ELECTRICAL PLAN
1. Remove the recovery tank from the stem by the hook (F).
2. Unscrew the fixing screws from the back stem case (T).
3. Remove the back frame from the stem.
4. Operate on the electrical parts.
CONTROL PANEL
1. Unscrew the fixing screws of the control panel (U).
2. Extract the control panel, paying attention to the connections.
3. Operate on the electrical components.
.
TRASPORTO DELLA MACCHINA
Importanti azioni che consentono di migliorare il trasporto della
lavasciuga.
La macchina è dotata di una ruota piroettante anteriore che ne facilita
il movimento durante la fase di spostamento, sollevando la spazzola
dal pavimento.
Per sollevare o abbassare la suddetta ruota, agire sul pedale ( Ls).
TRANSPORT OF THE MACHINE
Important cautions to allow better transport of the scrubber-dryer.
The machine features a front castor wheel for easier movement during
the movement phase, lifting the brush off the floor.
The above castor wheel can be lifted or lowered by means of the pedal
( Ls).

16
SQUEGEE ADJUSTEMENT
Check that the squeegee is perfectly perpendicular to the floor,
otherwise adjust it by the appropriate screw (Fig. 7).
To access the adjustment screw of the squeegee, follow these steps:
1. Remove the recovery tank from the stem by untying the hook (F).
2 Turn off the tap of the regulation of the detergent solution (A) .
3. Disconnect the detergent solution pipe (B).
4. Remove the solution tank.
5. Adjust the inclination of the blades through the special screw (X).
REGOLAZIONE TERGIPAVIMENTO
Controllare che il tergipavimento stesso sia perfettamente
perpendicolare al pavimento, altrimenti regolarlo mediante l'apposita
vite (Fig. 7).
Per accedere alla vite di regolazione del tergipavimento, procedere
come segue :
1. Togliere il serbatoio di recupero dal timone per mezzo del gancio
(F).
2. Chiudere il rubinetto regolazione flusso soluzione detergente (A).
3. Disconnettere il tubo soluzione detergente (B).
4. Togliere il serbatoio soluzione detergente.
5. Regolare l’inclinazione delle lame asciuganti attraverso l’apposita
vite (X).
CARATTERISTICHE TECNICHE
TECHNICAL FEATURES
U.M. E46 B
Area Pulita Mq/h 1600 Clean area
Motore Aspirazione W 250 Vacuum motor
Motore Spazzole W 350 Brush motor
Diametro Spazzola mm 450 Brush diameter
Rotazione Spazzola RPM 140 Brush rotation
Alimentazione V/Hz 24/DC Power supply
Tergipavimento mm 540 Squeegee
Pressione Spazzola Kg 35 Brush pressure
Serbatoio Soluzione Lt. 28 Solution tank
Serbatoio Recupero Lt. 30 Recovery tank
Depressione Mm/H2O 800 Depression
Peso Kg 50 + 46 (2xB) Weight
Dimensioni mm 830x540x1000 Dimensions
E46 C
1600
300
800
450
140
230/50-60
540
35
28
30
800
50
830x540x1000
DEMOLITION AND DISPOSAL OF THE MACHINE
The demolition and the disposal of the machine requires:
• Cutting the power cord to avoid any inadvertent reuse.
• The removal of the identification plate and its elimination together
with the accompanying documentation.
• The delivery of the machine to a licensed contractor for disposal of
different materials, in compliance with applicable laws and
regulations. The machine was built with non-hazardous materials.
• By battery operated models, bring the exhausted batteries to special
authorized firms.
DEMOLIZIONE E SMALTIMENTO MACCHINA
La demolizione e smaltimento della macchina prevede:
Il taglio dei cavo di alimentazione al fine di garantire l'involontario
riutilizzo.
Il distacco della targhetta di identificazione e la sua eliminazione
assieme alla documentazione a corredo.
La consegna della macchina ad una ditta autorizzata allo
smaltimento differenziato dei materiali, nel rispetto delle
disposizioni legislative vigenti. La macchina è stata costruita
con materie prime non pericolose.
Per il modello a batteria, il conferimento delle batterie esauste a
ditte specializzate per lo smaltimento.

17
INCONVENIENTI COMUNI E RIMEDI
POSSIBILI INCONVENIENTI
CAUSE
RIMEDI
La soluzione di lavaggio non fuoriesce
Ostruzione dei condotti che portano la
soluzione
Filtro intasato
Il serbatoio di soluzione è vuoto
Il rubinetto di regolazione è chiuso
Rimuovere le ostruzioni.
Pulire o sostituire il filtro
Riempire il serbatoio
Aprire il rubinetto di regolazione
Il tergi pavimento non recupera lo
sporco
Tubo di aspirazione ostruito
Tubo di aspirazione perforato
Pulire il tubo
Sostituire il tubo
Il tergi pavimento lascia residui di
sporco
Spigolo delle lame di gomma a contatto con il
pavimento è particolarmente consumato
Tergi pavimento non è perfettamente regolato
nell’inclinazione o nella pressione
Sostituire le lame di gomma
Regolare il tergi pavimento
La macchina non pulisce uniformemente
Le spazzole sono consumate
Sostituire le spazzole
Il motore spazzola non funziona per la
macchina a corrente alternata
Il pulsante RESET è scattato
Il fusibile è bruciato
Premere il pulsante “RESET”
Sostituire il fusibile
Il motore spazzola non funziona per la
macchina a corrente continua a batteria
Le batterie sono scariche o esaurite
Il pulsante RESET è scattato
Il fusibile è bruciato
Ricaricare o sostituire le batterie
Premere il pulsante “RESET”
Sostituire il fusibile
TROUBLESHOOTING
FAULT
CAUSE
SOLUTION
No cleaning solution flowing out
The solution-carrying pipes are clogged
Filters are clogged
Solution tank is empty
Regulation tap has been closed
Remove obstructions.
Clean or replace the filter
Fill the tank
Open the tap
The squeegee does not suck dirt
Vacuum hose clogged
Vacuum hose perforated
Clean the pipe
Change the pipe
The squeegee leaves dirt remains
The edge of the rubber blade scraping the floor
is worn out
The squeegee is not perfectly adjusted in its
inclination or pressure
Replace the rubber blades
Adjust the squeegee
The machine does not clean properly
Brushes worn out
Change the brushes.
Brush motor does not work
(AC-powered machine)
The RESET button went off
The fuse is blown
Press RESET
Replace the fuse
Brush motor does not work
(Battery-powered machine)
Batteries low or exhausted
The RESET button went off
The fuse is blown
Recharge or replace batteries
Press RESET
Replace the fuse
La macchina dispone di una vasta gamma di
accessori quali spazzole, dischi trascinatori con pad
abrasivi e lame asciuganti in gomma e in
poliuretano, per affrontare qualsiasi tipo di sporco
su qualsiasi tipo di superficie.
The machine can be equipped with a wide
range of accessories, including brushes, pad
holders with pads and abrasive blades drying
rubber and polyurethane to face any kind of
dirt on any surfaces.

18
The machine has a vast range of accessories what
brushes, disks pullers with abrasive pad and drying
blades made in rubber and in poliuretano, for
cleaning any type of dirt on any type of surface.
IMPIANTO ELETTRICO E 46 B - E 46 B electrical plant
Descrizioni
Descriptions
MRS
+ / - Morsetto Elettrico
Electric Clamp ILB Segnalatore Batterie
BatteryLevel Indicator MCR1 MicrointerruttoreSicurezza
Safety Micro Switch N 2,5 Cavo Elett. Nero Ø 2,5 mm²
Black electric cable Ø2,5 mm²
PFS Porta Fusibili
Fuse Container MAS Motore Aspirazione
SuctionMotor N 1 Cavo Elett. Nero Ø 1 mm²
Black electric cable Ø1 mm² R 2,5 Cavo Elett. Rosso Ø 2,5 mm²
Red electriccableØ2,5 mm²
TSP Tasto Motore Spazzole
Brush motor switch MSP MotoreSpazzole
Brush Motor Bl 1 Cavo Elett. Blu Ø 1mm²
Blue electric cable Ø1 mm² R 6 Cavo Elett. Rosso Ø 6 mm²
Red electriccableØ6 mm²
TAS Tasto Motore Aspiraz. RAS Relè Motore Aspiraz. R 1 Cavo Elett. Rosso Ø 1 mm² M6 Cavo Elett. Marrone Ø 6mm²
TEL Tasto Elettrovalvola RSP Relè MotoreSpazzole G 1 Cavo Elett. GialloØ 1mm² N 10 Cavo Elett. Nero Ø 10 mm²
RES Tasto RESET40 A
RESET Switch 40 A ELV Elettrovalvola
Solenoid Valve M 1 Cavo Elett. Marrone Ø 1mm²
Brown electric cable Ø1 mm² R 10 Cavo Elett. Rosso Ø 10mm²
Red electriccableØ10 mm²
KEY Interruttore a chiave
Key Switch CBT Caricabatterie
Battery Charger GR1 Cavo Elett. Grigio Ø 1mm²
Grey electriccableØ 1 mm²

19
IMPIANTO ELETTRICO E 46 C - E 46 C electrical plant
Descrizioni
Descriptions
MRS Morsetto Elettrico
Electric Clamp MAS Motore Aspirazione
Suction Motor RS 1 Cavo Elett. Rosa Ø 1mm²
Pink electric cable Ø 1 mm²
TSP Tasto Motore Spazzole
Brush motor switch MSP Motore Spazzole
Brush Motor M 1 Cavo Elett. Marrone Ø 1mm²
Brown electric cable Ø 1 mm²
TAS Tasto Motore Aspiraz.
Suction motor switch ELV Elettrovalvola
Solenoid Valve GR 1 Cavo Elett. Grigio Ø 1mm²
Grey electric cable Ø 1 mm²
TEL Tasto Elettrovalvola
Solenoid Valve switch MCR1 Microinterruttore Sicurezza
Safety Micro Switch Bi 1 Cavo Elett. Bianco Ø 1 mm²
White electric cable Ø 1 mm²
LMP Spia Luminosa
Pilot Light N 1 Cavo Elett. Nero Ø 1 mm²
Black electric cable Ø 1 mm² G/V1 Cavo Elett. Gia/ver Ø 1 mm²
Yel/Greelectric cable Ø1 mm²
RES Tasto RESET5 A
RESET Switch5 A Bl 1 Cavo Elett. Blu Ø 1mm²
Blue electric cable Ø 1 mm² FIL Filtro Antidisturbo
ElectricalNoise filter
CND Condensatore
Condenser R 1 Cavo Elett. Rosso Ø 1 mm²
Red electric cable Ø 1 mm²

20
Other manuals for E46 Series
1
This manual suits for next models
2
Table of contents
Other Eureka Floor Machine manuals

Eureka
Eureka E46 Series User manual

Eureka
Eureka RIDER 1201 SH User manual

Eureka
Eureka KOBRA SH User manual

Eureka
Eureka MAGNUM EB Programming manual

Eureka
Eureka MAGNUM HDK User manual

Eureka
Eureka ESCALATOR EC51 User guide

Eureka
Eureka E51 BASE User manual

Eureka
Eureka E50 User manual

Eureka
Eureka XTREMA EB Programming manual

Eureka
Eureka E51M User manual