Eurolube 1168390 User manual
Eurolube Equipment AB
Box 36 SE-711 21 Lindesberg Sweden Phone + 46 581 83665 Fax 46 581 40975 email: [email protected] website: www.eurolube.com
DIGITAL IN-LINE METERS SERVICE MANUAL
— 1 —
1469000-08/03
General
Thank you for choosing a high quality digital In-Line meter from Eurolube Equipment AB Sweden. All meters to be
installed into the fluid distribution line for the control of dispensed volumes. Fluid compability, see below.
Please refer to the sales Catalogue for details on accessories. Or visit our website: www. eurolube.com
WARNING !
Do NOT use solvents or other explosive fluids. Never point a control valve at any portion of your body or another
person. Accidential discharge of pressure and/or material can result in injury. We decline responsibility for mal-
functions or danger resulting from wrong hose or miss use. Read these instructions carefully before installation,
operation or service.
DO NOT EXCEED MAX. PRESSURE.
Allmänt
Tack för att ni valde en digital inbyggnadsmätare av högsta kvalitet från Eurolube Equipment AB.
Samtliga mätare är avsedda för inbyggnad i rörsystem etc., för kontroll av tappad volym. Val av mätare, se nedan.
För ytterligare information, hänvisar vi till vår kompletta produktkatalog, eller vår hemsida: www. eurolube.com
VARNING !
Får EJ användas för kemikalier eller explosiva vätskor. Rikta aldrig utloppsmunstycke mot någon kroppsdel eller
någon annan person. Vätska kan lätt tränga in i huden och förorsaka skador. Vi frånsäger oss allt ansvar
för felaktigheter och olyckor som inträffar på grund av felaktig montering eller användning.
Läs dessa instruktioner före installation eller vid service.
ÖVERSKRID EJ MaX. ARBETSTRYCK.
Data Part No./Art.nr 1168390 1168094 1168966 1168967
Max. working pressure/ Max. arbetstryck 70 bar 70 bar 70 bar 30 bar
Flow capacity / Flödeskapacitet 1 - 25 l./min. 1 - 25 l./min. 5-50 l./min. 10-100 l./min.
Pressure drop / tryckfall <0,5 bar <0,5 bar <0,5 bar <0,5 bar
Max. temp. 60°C 60°C 60°C 60°C
Accuracy (after calibration)/ Noggrannhet (efter kalibrering) ±0.5% ±0.5% ±0.5% ±0.5%
FLUID / VÄTSKA
Oil up to SAE 240 / olja upp till SAE 240 x x x x
Glycol / glykol x x x x
Diesel x x x x
Water / vatten - x x x
Wind screen fluid / spolarvätska - x - -
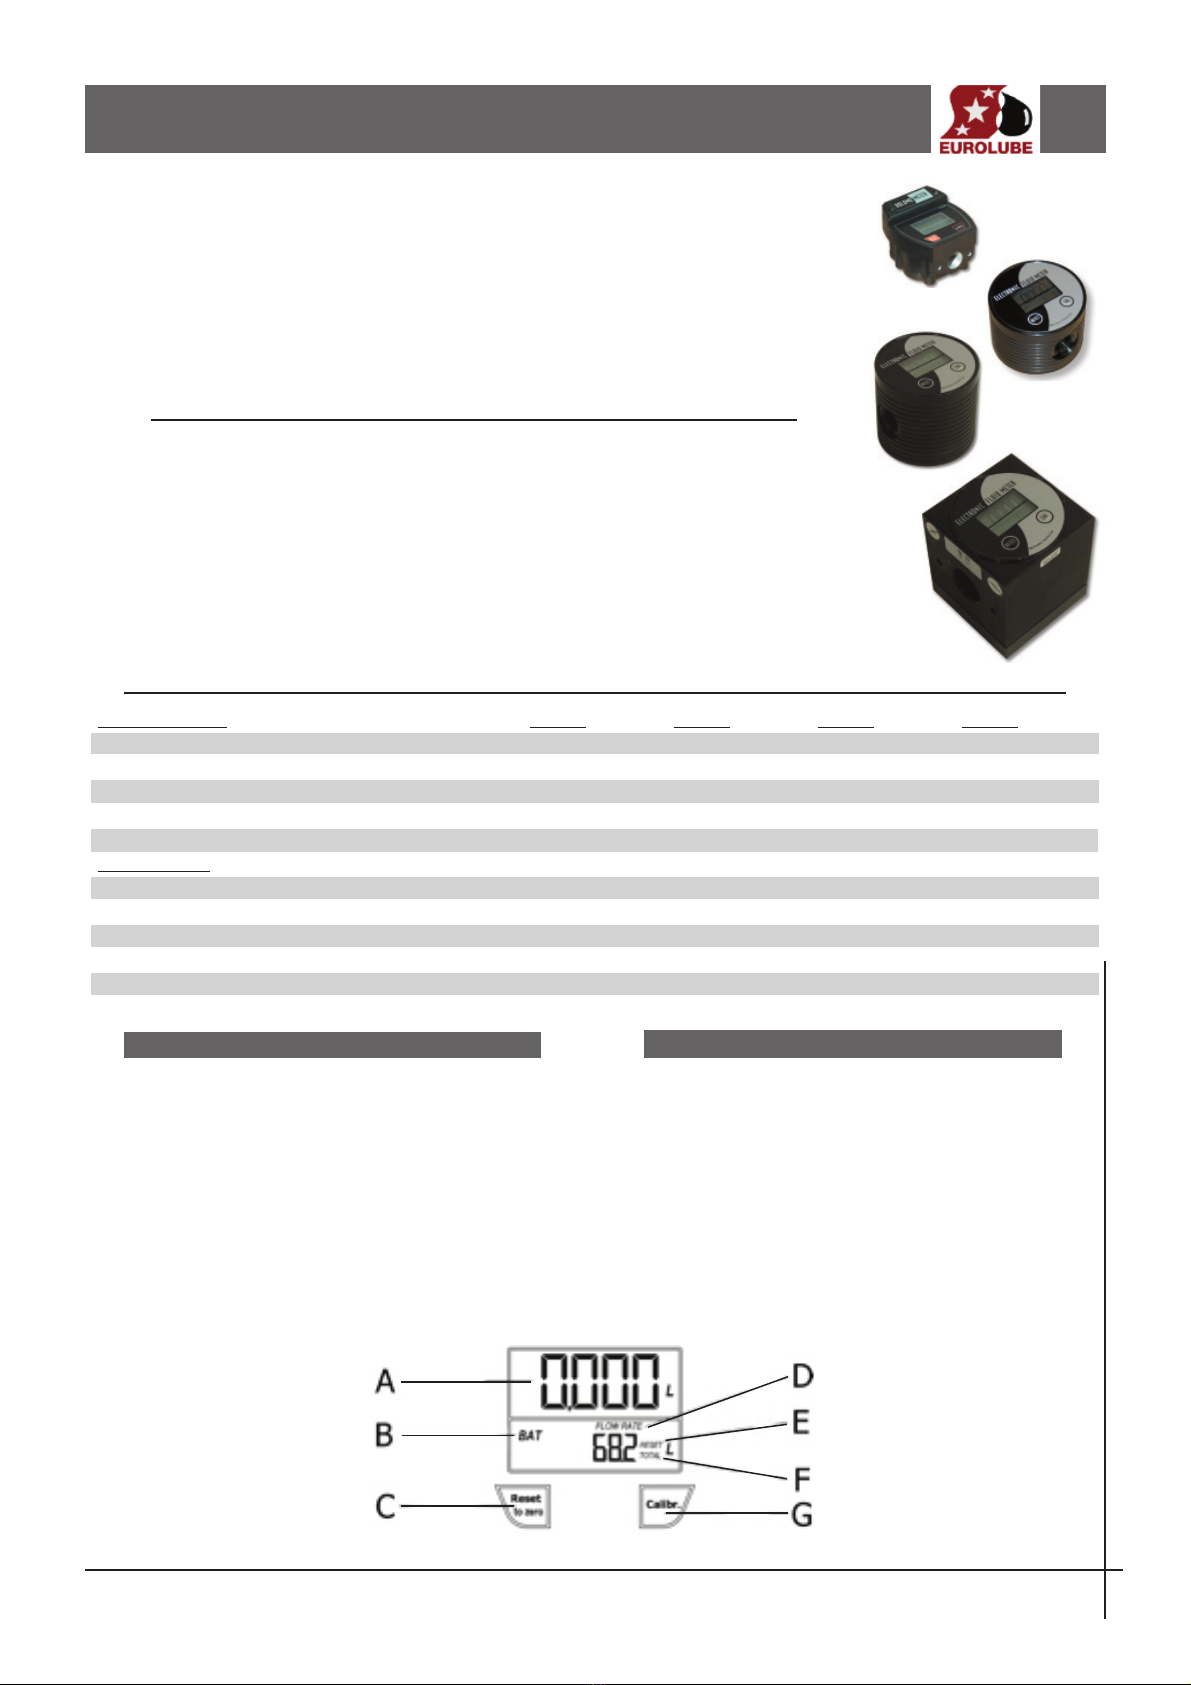
TO GET STARTED
1. The meter is delivered ready for use, even after a long storage period.
If the display is not turned on, or the “BAT” indication (B) is lightened in the
display, see page 2 replacing batteries.
The meter has two totalizer registers incorporated; one resettable (E) and
another non-resettable (F). To bring up the resettable total register, press
the RESET button (C). If the reset button is pressed again (immediately),
the resettable total register is set to zero. If not, after a few seconds the
non-resettable total register will appear.
NOTE: The reset button (C) must be pressed prior each delivery to clear
the partial reading (A). On the models 1168966 and 1168967 it is also pos-
sible to display the flow rate (D). Press the calibration button (G) to switch
between normal mode and flow rate mode.
DRIFTSÄTTNING
1. Mätaren är klar för omeddelbar användning, även efter en längre tid i
lager. Om inga siffror är synliga i display eller om ”BAT” symbol (B) är tänd
i display, gå till sid 2 byte batterier.
Mätaren har två total-räkneverk, en som kan nollställas (E) och en som ej
går att nollställa (F). För att visa den som kan nollställas, tryck på RESET
knappen (C). För att nollställa denna, tryck en gång till(omeddelbart) på
RESET knappen, nu visar den O. Om inte nollställning utföres kommer
totalräknaren att visas efter några sekunder.
VIKTIGT! Innan varje ny påbörjad avläsning måste man trycka på reset-
knappen (C) för att delavläsningsrutan skall nollställas (A). På modell
1168966 och 1168967 kan man läsa av liter/min. (D). Tryck på knappen
(G) för val av normal läge eller liter/minut.
1168390
1168094
1168966
1168967

DIGITAL IN-LINE METERS SERVICE MANUAL
1469000-08/03
— 2 —
Eurolube Equipment AB
Box 36 SE-711 21 Lindesberg Sweden Phone + 46 581 83665 Fax 46 581 40975 email: [email protected] website: www.eurolube.com
METER CALIBRATION
Calibration of the meter can be necessary as different flow ranges, fluid viscosity
and pressure, among other factors, can affect the meters accuracy. Verify that there
is no air in the fluid before beginning the calibration. Bleed the distribution line if
necessary. (The numbers used hereafter are only examples).
1. Press the calibration button (2) until the display appears as described in (A). The
Factory calibration factor (Fact) is pre-set and can not be modified by the user. The
User calibration factor (User) can be modified by the user through the calibration
procedure. To switch from one factor to the other, press the reset button (Reset).
2. Press the reset button (1) until the display appears as shown in (B).
3. Start dispensing fluid continuously into a calibrated measurer (min. 5 litres) until
the volume delivered is within the calibration area. An exact volume in the meter is
not required in order to proceed with the calibration instructions (C).
4. Press the reset button (1) until the arrow appears at the left bottom of the display
as shown in (D). To calibrate the meter, (increase or decrease the volume shown on
the display) to coincide exactly with the delivered volume by pressing the calibration
button (2). The direction ( S- increase and T- decrease) is changed by pres-
sing the reset button (1).
5. Once the amount indicated is the same as the exact delivered volume (E), press
the reset button (1) until the arrow disappears. The meter will first appear as in fig
(F) and then the new calibration factor will be shown for a few seconds. The meter is
now ready to be used.
NOTE: It is always possible to go back to the Factory calibration factor, choosing
(Fact) in step 1.
KALIBRERING MÄTARE
Kalibrering av mätaren kan vara nödvändig beroende på olika flöden, oljans
viskositet och tryck etc., vilket kan påverka mätarens noggrannhet. Kontrollera att
flödesledningen inte har luftfickor innan kalibrering. Lufta av flödesledningen om
nödvändigt. (Siffrorna som visas i följande figurer är bara exempel).
1. Tryck på kalibreringsknappen (2) tills displayen ser ut som i (A). Kalibreringsfaktor
från fabrik (Fact) är förvald och kan inte ändras av en användare. Kalibreringsfaktor
(User) kan justeras av användare genom att följa nedanstående instruktion. Tryck
på (Reset) knapp för att växla mellan kalibreringfaktor.
2. Tryck på reset-knappen (1) tills displayen ser ut som i (B).
3. Dosera oljan kontinuerligt i ett kalibreringskärl tills den exakta volymen är nådd
(minst 5 liter) enligt kärlet. Mätaren behöver inte visa den exakta volymen för att
kalibreringen skall kunna fortsättas (C).
4. Tryck på reset-knappen (1) tills pilen kommer upp i nedre vänstra del av display,
se fig. (D). För att kalibrera mätaren, (öka eller minska visad volym) tills den över-
ensstämmer med den doserade volymen i kalibreringskärlet, tryck på kalibrerings-
knappen (2). Riktningen ( S- öka eller T- minska) ändras genom att trycka på
reset knappen (1).
5. När visad volym överenstämmer med upptappad volym (E), tryck på reset knap-
pen (1) tills pilen försvinner. Mätaren kommer förts att se ut som (F) för att därefter
visa den nya kalibreringsfaktorn i några sekunder. Mätaren är nu klar för använding.
VIKTIGT: Det är alltid möjligt att gå tillbaka till kalibreringsfaktor från fabrik, följ
anvisning i punkt 1.
ABC
DE F
REPLACEMENT OF BATTERIES
1. Remove the screws and the battery cover / threaded plugs.
2. Replace the old batteries with new ones, 2 x AAA alkaline batteries.
NOTE: Always replace both batteries at the same time. Make sure that the
batteries are placed in their correct position.
3. Assamble the battery cover / / threaded plugs.
4. Press the reset key. The meter display must turn on and show 0.000 in
the partial reading display (3). If not, check that the batteries have been
placed in the right position.
BYTE AV BATTERIER
1. Skruva loss skruvarna och tag bort batterilocket eller batteri pluggar.
2. Byt ut de gamla batterierna mot nya, 2 st AAA alkaline batterier.
VIKTIGt: Byt alltid båda batterier samtidigt. Kontrollera att batterier placeras
i rätt position.
3. Sätt tillbaka batterilocket, eller batteri pluggar.
4. Tryck på reset-knappen. Mätarens display ska nu visa 0.000 i delavläs-
ningsrutan (3). Om inte, kontrollera att batterierna är i sin rätta position.
12

Eurolube Equipment AB
Box 36 SE-711 21 Lindesberg Sweden Phone + 46 581 83665 Fax 46 581 40975 email: [email protected] website: www.eurolube.com
DIGITAL IN-LINE METERS SERVICE MANUAL
— 3 —
1469000-08/03
CLEANING THE METER
ATTENTION! Make sure the meter is depressurized before any service is
carried out.
1. Unscrew the screws (1) and remove the cover (2) at the back of the
meter.
2. Remove the oval gears (3).
3. Clean the measuring chamber carefully with a soft brush, making sure
you do not damage the surface of the chamber.
4. Assamble the oval gears (3) and the cover (2).
RENGÖRING MÄTARE
OBS! Kontrollera att det inte finns något tryck i mätaren före ingrepp och
service.
1. Skruva loss skruvarna (1) och tag bort locket (2) på handmätarens
baksida.
2. Tag bort de ovala kugghjulen (3).
3. Gör rent mätkammaren försiktigt med en mjuk borste. Försäkra dig om
att inte skada mätkammarens ytor.
4. Sätt tillbaka de ovala kugghjulen (3) och locket (2).
1
2
3
TROUBLESHOOTING
Symptom Possible reasons Solution
Faided display Weak batteries Replace batteries
No reading in the display Dead batteries Replace batteries
Meter has not been reset Press the reset key
after battery replacement
Meter is not accurate Wrong calibration factor Calibrate the meter
Flow rate is outside the Increase or decrease the flow rate
working flow range
The display is on but the meter does Gears placed incorrectly after Place the gears in the right position
does not work cleaning the measuring chamber
Reduced flow Obstructed inlet filter (14) Clean inlet filter (14)
Obstructed gears Clean measuring chamber
FELSÖKNING
Symtom Trolig orsak Åtgärd
Svag display Svaga batterier Byt ut batterierna
Displayen visar ingenting Batterierna slut Byt ut batterierna
Mätaren har inte blivit nollställd Tryck på reset-knappen
efter batteribyte
Mätaren har dålig precision Fel kalibreringsfaktor Kalibrera handmätaren
Flödet är utanför det flödesområde Öka eller minska flödet
som mätaren kan arbeta på
Displayen är på men mätaren Kugghjul felplacerade efter Sätt kugghjulen i sin rätta position
fungerar inte rengöring av mätkammare
Minskat flöde Smuts i inloppsfilter (14) Rengör inloppsfilter (14)
Smuts i mätkammare Rengör mätkammare
Declaration of Conformity
We hereby declare that the models of digital meters in this manual,
are manufactured in conformity with the EC directive 89/336/CEE
(electromagnetic compatibility) the following European standards: EN
61000-1-6, EN 61000-6-3, EN 55014-1-2000 and EN 55014-2-97.
Deklaration om överensstämmelse
Vi deklarerar härmed att samtliga mätverk som beskrivs i denna
manual är tillverkade i överensstämmelse med EC direktiv 89/336/CEE
(elektromekanisk kompabilitet) enligt följande Europa standard: EN
61000-1-6, EN 61000-6-3, EN 55014-1-2000 and EN 55014-2-97.
This manual suits for next models
3
Other Eurolube Measuring Instrument manuals


