Eurovema Volaris Smart User manual

SMART
User Manual
Important, read before use!
EN

2
Congratulations on your new rollator!
The rollator's brake must always be on when you are sitting down and getting up.
Never walk with somebody sitting on the seat!
Volaris Smart
The Volaris Smart will make your life easier in many ways. We ask you to read carefully through this user infor-
mation in order to familiarise yourself with your new rollator. Correct use and care will give you more benet,
increased safety and a longer service life for your Smart rollator.
The rollator provides good support when moving around and should only be used as a walking aid. There are sev-
eral accessories available for your model to meet your needs, your safety and your comfort.
Made in Sweden
The Smart is developed and manufactured in Sweden, so we can guarantee the functionality and quality, and it is
made from carefully selected materials and component parts. The Smart is 95% recyclable.
The Smart complies with all the standards set for the market: SS-EN 1441, SS-EN 1985, SS-EN 12182 and ISO
11199- 2:2005. The Compact and Kid are approved according to the SS-EN 1441 and ISO 11199-2:2005 standards,
apart from the wheel diameter.
CE marking
This product is CE marked in accordance with Directive 93/42/EEC. The CE mark is on the label. Tested and ap-
proved in accordance with Directive SSEN1335–1,2, 3. Fire tested in accordance with ISO7176-16.
Guarantee
The guarantee period is 2 years and covers materials and manufacturing faults. Wearing parts, such as wheels,
brake components and handles, are 1 year. The guarantee presumes that the product has been used as intended.
We recommend our customers to use the product according to the user manual.

3
List of contents
Safety instructions p. 2
Guarantee p. 2
Made in Sweden p. 2
Contents p. 3
Contact p. 3
Seat adjustment p. 4
Handle adjustment p. 4
Unfolding the S7 SMART p. 5
Folding the S7 SMART, folding catch p. 5
Fixed transport strap p. 5
Braking p. 6
Brake adjustment p. 7
Restriction brake adjustment p. 7
Tips for use – "comfort frame" p. 8
Learn the "scissors technique" p. 9
Maintenance p. 10
Cleaning p. 10
Reconditioning p. 10
Prole clips p. 10
Cable lubrication p. 11
Troubleshooting p. 11
Safety accessories p. 12
Comfort accessories p. 13
Comfort accessories p. 14
Accessories for your needs, safety and comfortp. 15
Sizes and dimensions of the S7 SMART p. 16
Technical facts
Contact (Possibly, local supplier)
If you have any questions, or if you need help with your product, please contact your local supplier rst
(Technical Aid Centre).
To contact the manufacturer, see the info below:
Eurovema Mobility AB, Baldersvägen 38, 332 35 GISLAVED, SWEDEN
Tel: +46 (0) 371 390 100

4
x2
x2
P
Seat height adjustment
Adjust one side at a time. Pull out the knob under
the seat. At the same time, raise or lower the seat
to the position required. Release the knob, ensuring
that it locates properly to secure the seat in place. Do
the same on the other side. Check carefully that the
seat is level before using the rollator. Press down the
centre section of the seat. The seat is not adjustable
on the Kid rollator.
Do not give anyone a ride sitting on
the rollator.
Adjust the handle height
Remove any prole clips (see page 9). Adjust the
height of the handles by pulling out the knob and
adjusting the height; see the setting heights on page
16. Make sure the parking brake lever is up, then
adjust the height and check that the knob clicks back
into place. After adjustment, check the brakes before
using the rollator! Stand upright next to the rollator.
The handles are set at the correct height when your
hands are level with them. Once you have used the
rollator for a while, you will know if you want to make
any further adjustments. You should feel comfortable
when you are walking with your Smart. Mechanical
stop for maximum handle height. Number of visible
holes constitute marked height interval.
Handle height
When you walk using the rollator, you should walk
without bending forwards, keep the rollator close to
your body, keep your back straight and look straight
head.
Adjusting your rollator

5
1
2
3
Comfort Frame
The Smart is built with a Comfort Frame™,
which means that it passes smoothly over une-
ven surfaces. When you need to pass over a larger
obstruction or mount a pavement edge, you can get
help from the tilting peddle by the rear wheels. Press
down one of the peddles at the same time as you lift
using the handles.
When walking over an obstruction, don't
lift the rollator by the seat since this
could cause it to fold!
Learn the "scissors technique"
Approach the obstruction at an angle. Apply the
brake on the wheel closest to the obstruction. Tilt the
rollator slightly backwards, so the front wheels lift
up, swing the front wheels over the obstruction. It is
easy once you have learned how!
For your safety!
Apply the parking brake before sitting on
your Smart!
Never walk with somebody sitting on the
seat!
Tips for use

6
1
3
2
3
2
1
Unfolding and folding your Smart
Unfolding your Smart
1. Hold one of the push handles and tilt the rollator
slightly to that side so the wheels on the opposite
side just lift off the ground.
2. Unfold the rollator using the grey lifting handle on
the opposite side.
A spring helps to unfold the rollator.
3. Press down the centre section of the seat to lock
the rollator.
4. If the rollator is equipped with a folding catch,
pull the strap and press down the centre section
of the seat to lock the rollator.
Folding
If there is a basket tted, remove it.
With installed folding catch, pull out the strap and
then lift.
1. Pull the strap.
2. Lift using the strap.
3. Press the Smart together using the side handles.
Fixed transport strap
If the rollator has a xed transport strap, the rollator
folds up and remains folded by pressing the push
button (see the points above). Release the button
when you want to unfold the rollator.

7
PP
Service brake
The brake is applied by pulling up the lever under the
handle.
Parking brake
The parking brake is applied by pushing the parking
brake lever forward until it is horizontal.
The parking brake must be released when the brake
or the handle height are being adjusted.
The brake must be on when sitting on the seat.
Release the parking brake
The parking brake is released by moving the parking
brake lever to the upright position until a click is
heard.
Safe braking

8
Safe braking
Adjust the brake for the correct
functionality
The braking effect can be set using the cable adjuster
under the frame.
1. Release the parking brake by moving the lever
upright.
2. Release/loosen the nut using a 8mm spanner, and
turn the threaded shaft.
3. Screw in the threaded shaft, if you want to in-
crease the braking effect. Screw out to decrease
the braking effect.
4. Tighten the nut using a spanner.
The brake shoes should be set as close to the wear
path as possible without actually touching it. How-
ever, if the shoes are set too close, the parking brake
will be unnecessarily hard to apply.
Restriction brake
To adjust the restriction brake's effect, turn the knob.
The Kid rollator comes with parking brake as stand-
ard.

9
Maintenance
Cleaning of rollators and acces-
sories
It is worth your while to look after your rollator be-
cause it will last longer.
Wipe dirt off with a wet cloth and a mild cleaning
liquid. Ensure that the gaps between the wheels and
the brake shoes are free of dirt; dirt here can reduce
the braking effect! It can be rinsed using a high-pres-
sure cleaner or garden hose. Dry afterwards, prefera-
bly with compressed air.
Prole clips
Prole clips are used to prevent anything getting
caught. Delivered with the rollator. Should sit in all
visible notches. Both above and below the seat.
Reconditioning
Leave the brakes off when washing the rollator in a
washing facility. The rollator must cool down to room
temperature before it is used and adjusted.

10
1mm
Cable lubrication
After washing the rollator, lubricate the cables under
the frame
by applying a few drops of oil to the cable.
Troubleshooting
If the rollator pulls to one side when you are walking,
check that the wheels rotate equally easily and that
the wheel forks turn easily. Check that the wheels
and the forks are properly secured. Check that there
is no dirt or rubbish caught between wheel and brake
shoe.
If the brake doesn't take, or takes unequally, check
that the play between brake head and wheel is 0-2
mm on both sides. Make sure the brake cables are
rmly attached to the brake shoes under the frame.
Check that the brake shoe springs on the rear wheels
are intact. When braking, check that the brake shoes
press on the wheels with equal force on both sides.
Adjust the wire
Maintenance

11
Safety accessories
Restriction brake
A brake with adjustable, continuous friction.
Back support/Adjustable back
support
Stable support for your back; can help make you feel
more secure. Attached with two bolts to the existing
ttings.
Lights
These are fastened to the upright using Velcro. Red
to the rear, white to the front. Battery powered. Easy
to remove and to replace batteries.
12
Single-handed brake
Locks both of the rear wheels and is applied by either
the service brake or the parking brake.
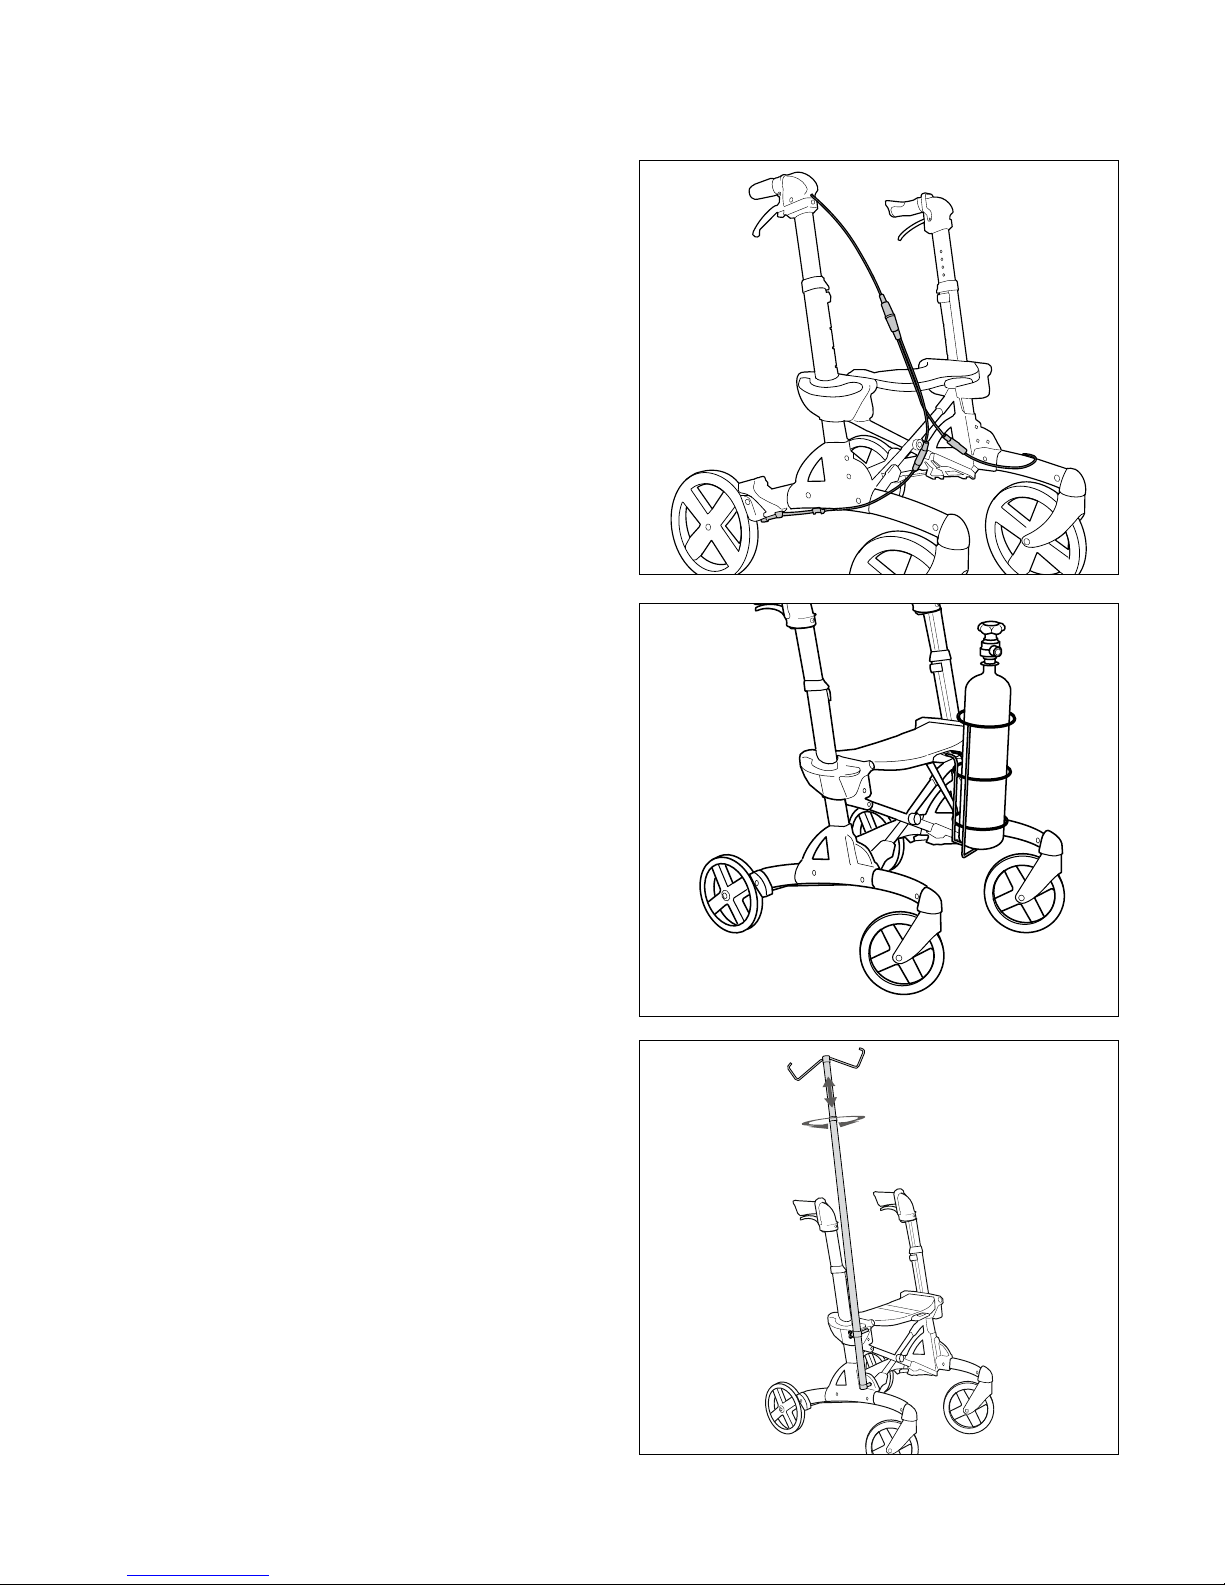
Oxygen bottle holder
Strong steel basket that hooks onto the seat and an
enclosed bracket. Easily removed.
Drip stand
Remember, drip bags may affect the stability of the
rollator. When assembling the Compact and Kid, turn
the bag in, towards the rollator, for extra stability.
Maximum weight 2.2 kg.
Safety accessories

13
Comfort accessories
Walking stick holder
Two pieces that are rmly screwed in place where
indicated. Holds a walking stick, crutch or umbrella
rmly in place.
Umbrella/parasol
Umbrella/parasol including universal holder for all
Volaris models.
Bottle holder
Holder in plastic covered wire for a bottle/can. Holds
a 0.5 litre bottle or 33 cl can. Hangs on the handle.
Maximum load: 0.6 kg.

14
Transport strap
Fasten the strap around the rollator's handle, the
rollator will then stay in the folded position. Easily
attached.
Cloth bag
A soft, woven nylon bag, which can be left in place
when the rollator is folded. Easily removed. Washa-
ble. Maximum load: 5 kg.
Mesh basket
A stable, metal mesh basket. Hooks easily on to the
Smart.
Carrying handle. Maximum load: 5 kg.
Comfort accessories

15
Comfort accessories
Tray
Tray, which ts over the seat.
Soft seat
Three sections that make the seat softer and warmer.
Can be left in place when the rollator is folded.
Fabric basket
Basket with plastic ends and nylon mesh. The basket
can be tted to all Volaris models.
The fabric basket can also be left in place when the
rollator is folded. Easily removed. Maximum load: 5
kg.

Baldersvägen 38 | SE-332 35 Gislaved | Sverige
MILJÖMÄRKT Trycksak 3041 0701
SMART* 150 kg 7,8 kg 59 cm 74 cm 76-102 cm 46-60 cm 41 cm 200x32 mm 27 cm
Shadow line* 150 kg 7,8 kg 59 cm 74 cm 76-102 cm 46-60 cm 41 cm 200x32 mm 27 cm
Discovery* 150 kg 8,1 kg 60 cm 74 cm 76-102 cm 46-60 cm 41 cm 200x42 mm 28 cm
Patrol** 150 kg 8,8 kg 59 cm 84 cm 82-107 cm 52-66 cm 41 cm 260x34 mm 27 cm
Patrol XL** 160 kg +0,5 kg + 6 cm 84 cm 82-107 cm 52-66 cm 47 cm 260x34 mm + 2 cm
Discovery XL* 160 kg +0,5 kg + 6 cm 74 cm 76-102 cm 46-60 cm 48 cm 200x42 mm + 2 cm
*Low -0,3 kg 68-83 cm 46-50 cm
**Patrol Low -0,3 kg 74-88 cm 52-56 cm
Compact 125 kg 6,8 kg 53 cm 62 cm 73-88 cm 43-57 cm 36 cm 150x32 mm 27 cm
Compact
Low 125 kg 6,8 kg 53 cm 62 cm 63-79 cm 43-47 cm 36 cm 150x32 mm 27 cm
Kid 60 kg 6,5 kg 53 cm 62 cm 58-70 cm 42 cm 36 cm 150x32 mm 27 cm
Accessories for your needs, safety and comfort
SMART/
Discovery/
Shadow Line Patrol XL Compact Kid
Restriction brake x x x x x
Lights x x x x x
Back support band x x x x x
Adjustable back
support band x x x
Oxygen bottle holder x x x x x
Walking stick holder x x x x x
Bottle holder x x x x x
Umbrella/parasol x x x
Transport strap x x x x x
Cloth bag x x
Mesh basket x x x
Tray x x x x x
Fabric basket x x x x x
Soft seat x x x x x
Single-handed brake x x x x x
Drip stand x x x x
Part no. BRU-90-410 Rev: 21071106|5
Technical data
Other manuals for Volaris Smart
1
Table of contents
Other Eurovema Mobility Aid manuals

Eurovema
Eurovema Volaris S2 User manual

Eurovema
Eurovema Euroflex User manual

Eurovema
Eurovema ALVEMA Atila Manual

Eurovema
Eurovema Euroflex 224001-4900 User manual

Eurovema
Eurovema Euroflex miniflex ABC User manual

Eurovema
Eurovema Volaris Smart User manual

Eurovema
Eurovema Volaris Discovery User manual

Eurovema
Eurovema Euroflex Miniflex Classic User manual

Eurovema
Eurovema Volaris Compact User manual

Eurovema
Eurovema Euroflex 700 ABC User manual


