Everybot RS500 User manual

Ver 1.3
Before using the product, please read this User Manual carefully, and keep it for future reference.
Depending on your model, some contents of this User Manual may differ from the actual product.
The contents of this User Manual are subject to change without notice.
Copyright © 2017 Everybot Inc. All rights reserved.
RS500
USER
MANUAL

Contests
RS500
03
Before Use
·Features 04
06
12
13
14
15
16
17
19
·Safety Information
10·What’s in the Box
11· Overview
How to Use
·Remote Control
·Charging
·Installing the Battery in the Remote Control
·Installing the Water Supply Mop Kit
·Start Cleaning
·Cleaning Modes
·Handy Cleaning Mode
20
21
22
23
24
25
Maintenance and Customer Support
·Washing Mop and Water Supply Mop Kit Maintenance
·Main Unit Cleaning and Maintenance
·Status Indication
·Troubleshooting
· Specifications
·Product Warranty
Features
RS500
04
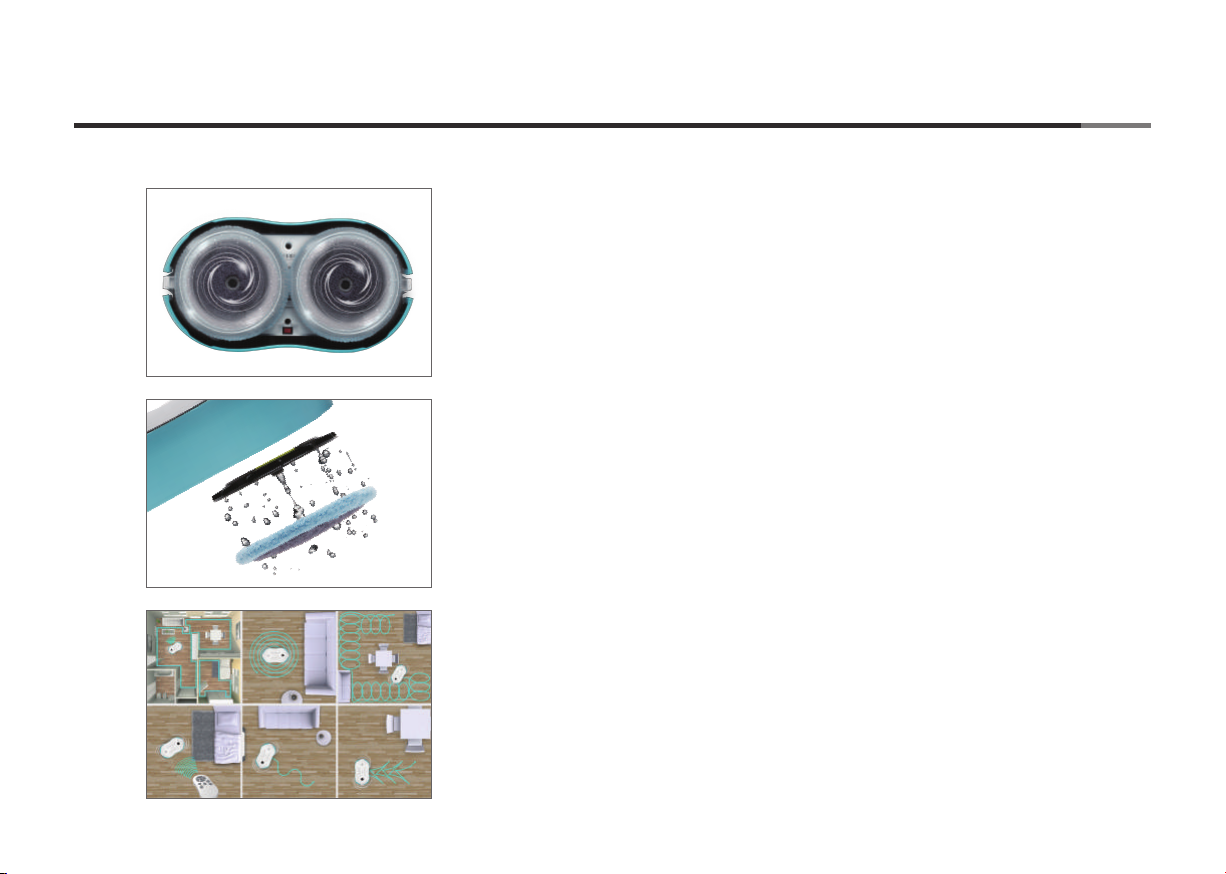
Dual-Spin Floor Mopping Auto Cleaner
As the world's first dual-spin floor mopping auto cleaner,
Everybot RS500 adopted the best wet mop cleaning algorithm to perfectly
eliminate particulates harmful to health.
Water Supply System
Using the Water Supply System, the Mop is continuously moistened to
clean your hard floors during the cleaning cycle.
Various Cleaning Modes
The various cleaning modes provide different cleaning functions and
levels of performance, which are optimized for the user environment.

Features
RS500
05
Smart Sensor System
The cliff sensor detects downward steps such as stairs or a front door
threshold to prevent damage to the Everybot RS500 while the bumper
sensor detects obstacles, providing cleaning efficiency and safety.
* Please still be watchful as in some cases the sensor may fail.
Luminance Sensor
The luminance sensor enables the Everybot RS500 to move to a bright
area after cleaning so that the user can easily find it.
User Convenience
Remote control, one-touch operation, and a handle increase user
convenience so anyone can use the Everybot RS500 easily.
Safety Information RS500
06
Electrical instructions
Do not use damaged power cord or plug.
Do not use an unauthorized power adaptor or multiple plugs in a single socket.
Please use the power source and socket with the correct voltage and current.
Make sure the power cord is not bent or crushed by heavy objects.
When plugging in or removing the power plug, always plug it in or remove it by holding the plug, not the cable.
Do not use a damaged power cord! To repair or replace a damaged power cord, contact a qualified service agent to ensure safety.
Do not touch the plug or wall socket with wet hands.
In this manual, various Warnings, Cautions and Notes are provided to help you to avoid potential
hazards that can hurt you and/or damage your auto cleaner. Please keep the manual easily accessible.
WARNING
You may be killed or
seriously injured if you
do not follow these
instructions.
You may be injured or
your appliance may be
damaged if you do not
follow these instructions.
You should refer to
these notes while using
your device.
CAUTION NOTE

07
Safety Information RS500
When you use
Do not use the auto cleaner in a place where it will be exposed to direct sunlight or where the temperature is too low or too high
(lower than -23° F and higher than 100° F).
Do not use the auto cleaner in a place where only children, seniors, physically or psychologically challenged people,
or pets are The auto cleaner is not intended for use by children, or by persons with reduced physical, sensory or mental capabilities.
Ensure that clothes or any part of the body (hair, finger, foot, etc.) do not get entangled in the rotating plate of the auto cleaner.
Do not use or store the auto cleaner near flammable materials (alcohol, gasoline, kerosene, thinner, etc.) or heating sources
(cigarettes, candles, stove, etc.).
If you notice smoke or a burning smell or an unusual sound from the auto cleaner, immediately turn the system power switch off
and contact your service center.
Do not place shoes or any objects on the floor below the threshold at the front door. This may cause the auto cleaner to go on the shoes
or objects and fall down.
Before using the auto cleaner, remove objects on the floor (fragile objects, valuables, pet litter, cables, long strings, etc.).
Do not soak the auto cleaner in water or spray phlegmatic liquid like oil towards it.
Do not kick the auto cleaner or apply strong impact.
Do not use the auto cleaner on a table or other high places.

If you do not plan to use the auto cleaner for an extended period of time, turn off the system power switch at the bottom of the auto cleaner.
Otherwise, battery discharge may influence cleaning time.
Make sure that children or pets do not step or sit on the auto cleaner while operating.
Do not let the auto cleaner pass over or sweep up liquids, oil, pet droppings, etc.
Do not insert chopsticks or pins in the auto cleaner.
The auto cleaner is made to be used in home environments. Do not use it outdoor or in any other places.
Do not use the auto cleaner on the floor with a slope of more than 10°.
Before cleaning, check that battery is high enough, or recharge the auto cleaner before use.
Make sure to close the doors of rooms that are not to be cleaned.
Remove obstacles (chair s, etc.) for quick and thorough cleaning.
Make sure not to block the cliff sensor installed at the bottom of the auto cleaner when you attach the mop.
If there is dust or foreign substances at the bottom of the auto cleaner, remove it.
After using the mop kit and wet mop, clean them thoroughly.
If you have dropped the auto cleaner, contact your service center.
When you use
Safety Information RS500
08

Maintenance
09
Safety Information RS500
To ensure safety, only a qualified service agent should repair or disassemble the product.
Dispose of your old batteries according to the local laws and regulations of your region.
Please clean the auto cleaner after turning it off.
Clean cliff sensor and mop kit periodically.
• Copyright© 2017 Everybot Inc. All rights reserved.
• Published November 22, 2017.
• This publication is protected by copyright and all rights are reserved. No part of it may be reproduced or transmitted by any means or in any form,
without the prior written consent of Everybot.
• Depending on the model and type of your appliance, some of the contents in this manual may differ from your actual product.
• Everybot Inc. assumes no responsibility for technical or editorial errors or omissions contained herein, nor for any incidental or
consequential damages and failures of the appliance caused by not following the precautions and instructions.
• Everybot Inc. assumes no responsibility for damages resulting from the use of the product that is not approved by the company.
Copyright and Instructions
10
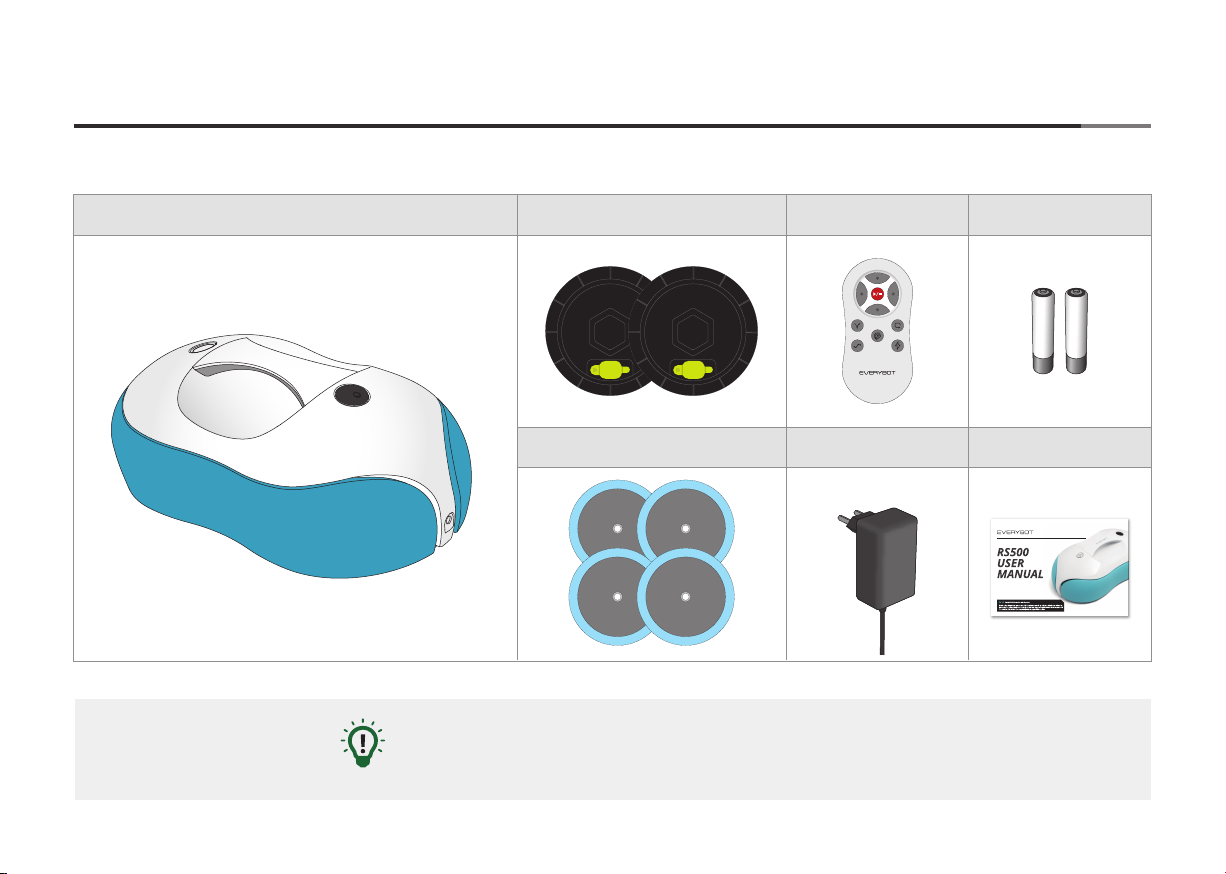
What's in the Box RS500
Main Unit Water Supply Mop Kit
Microfiber Mop Power Adaptor User Manual
Remote Control Battery
• The component pictures and the actual components may differ.
• Make sure that all the components are included.
NOTE
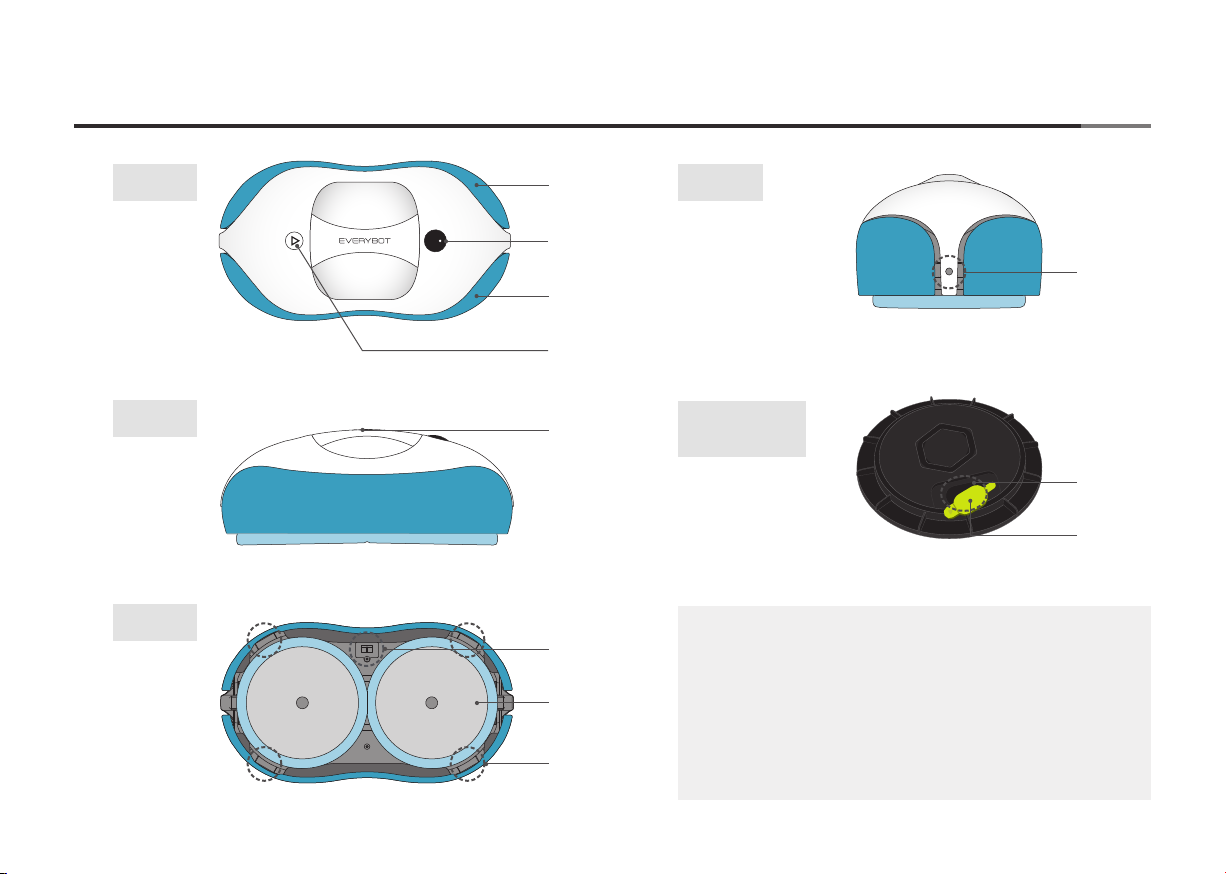
Overview RS500
11
Top Front
Side
①
⑩
⑪
②
③
④
⑤
⑥
⑦
⑧
Water Supply
Mop Kit
① Front Bumper
② Operation Button
③ Luminance Sensor
④ Rear Bumper
⑤ Handle
⑥ Power Switch
⑦ Rotating Plate
⑧ Cliff Sensor
⑨ Power Jack
⑩ Water Inlet
⑪ Rubber Stopper
⑨
Bottom

①
③ ④
②
12
Remote Control RS500
9
① Start/Stop Button
Start or stop cleaning. When you restart the auto cleaner,
it starts cleaning in the previous mode of operation.
② Direction buttons
While the main unit stops, by pressing direction buttons, move the unit
where user wants it to go.
③ Focus Cleaning Button
Intensively cleans the surrounding area relative to the unit’s current location.
④ Corner Cleaning Button
Cleans the corner by repeatedly turning 180° along the walls.
After 20 minutes of corner cleaning, the cleaning mode switches to Auto Cleaning Mode.
⑤ Auto Cleaning Button
The basic cleaning mode, efficiently clean the entire space.
⑥ S Cleaning Button
Clean the entire space using an S pattern.
⑦ Y Cleaning Button
Thoroughly clean with the unit making a Y pattern as if polishing with a wet mop.
• You can conveniently access the various functions of the auto cleaner with your remote control.
•Functions that can be controlled through the remote control : Auto | Focus | Corner | Manual | S-Mode | Y-Mode cleaning
• The distance to which the remote control can be used is up to 16 feet.
NOTE
⑦
⑤
⑥
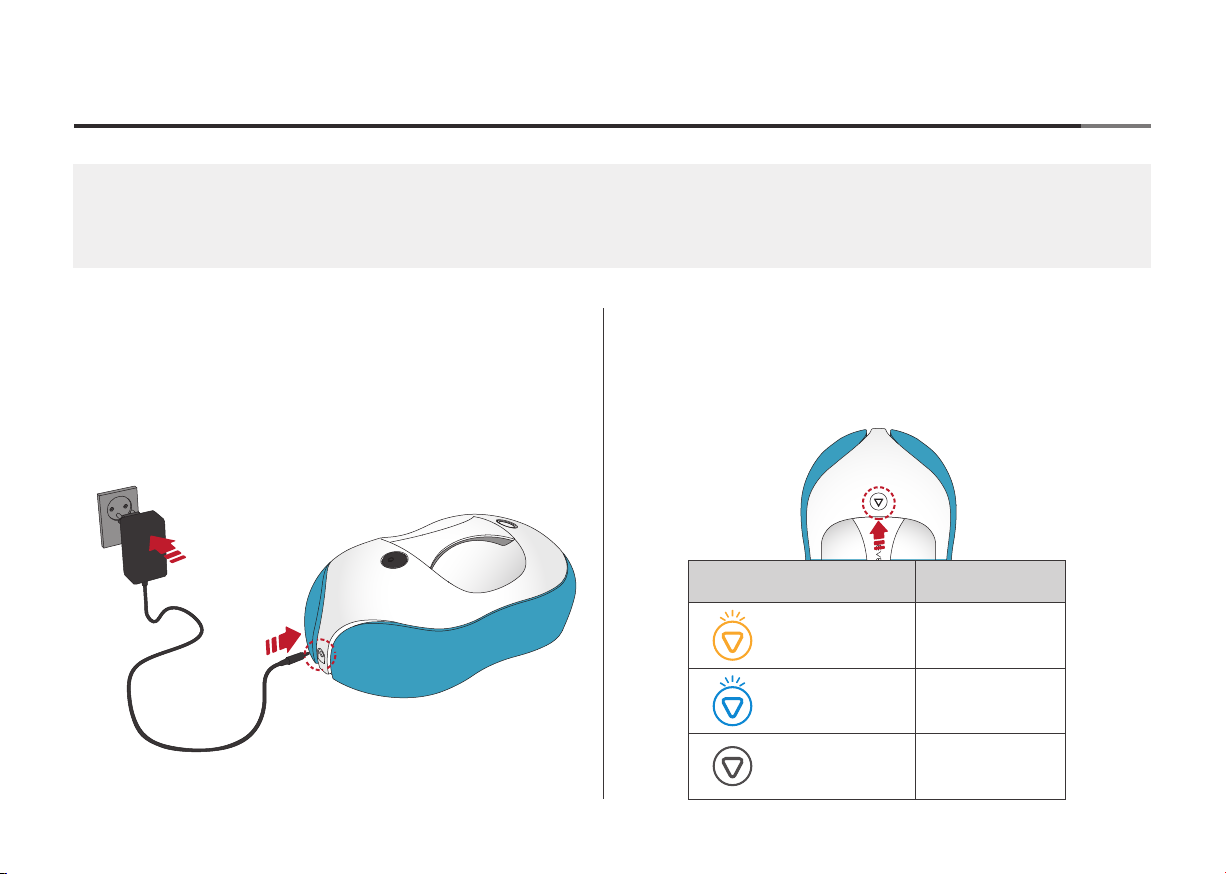
Charging RS500
13
9
Connect the power adaptor to the power jack
on the side of the main unit.
Battery level can be checked using the LED light
on the operation button.
Battery Level IndicationCharging
• Do not use any power adaptor other than authorized power adaptor provided with this product.
•Make sure to use dry cloth when cleaning power adaptor and power jack.
LED Light Battery Level
Low
Medium
Full
Yellow blinking
Blue blinking
LED off
14
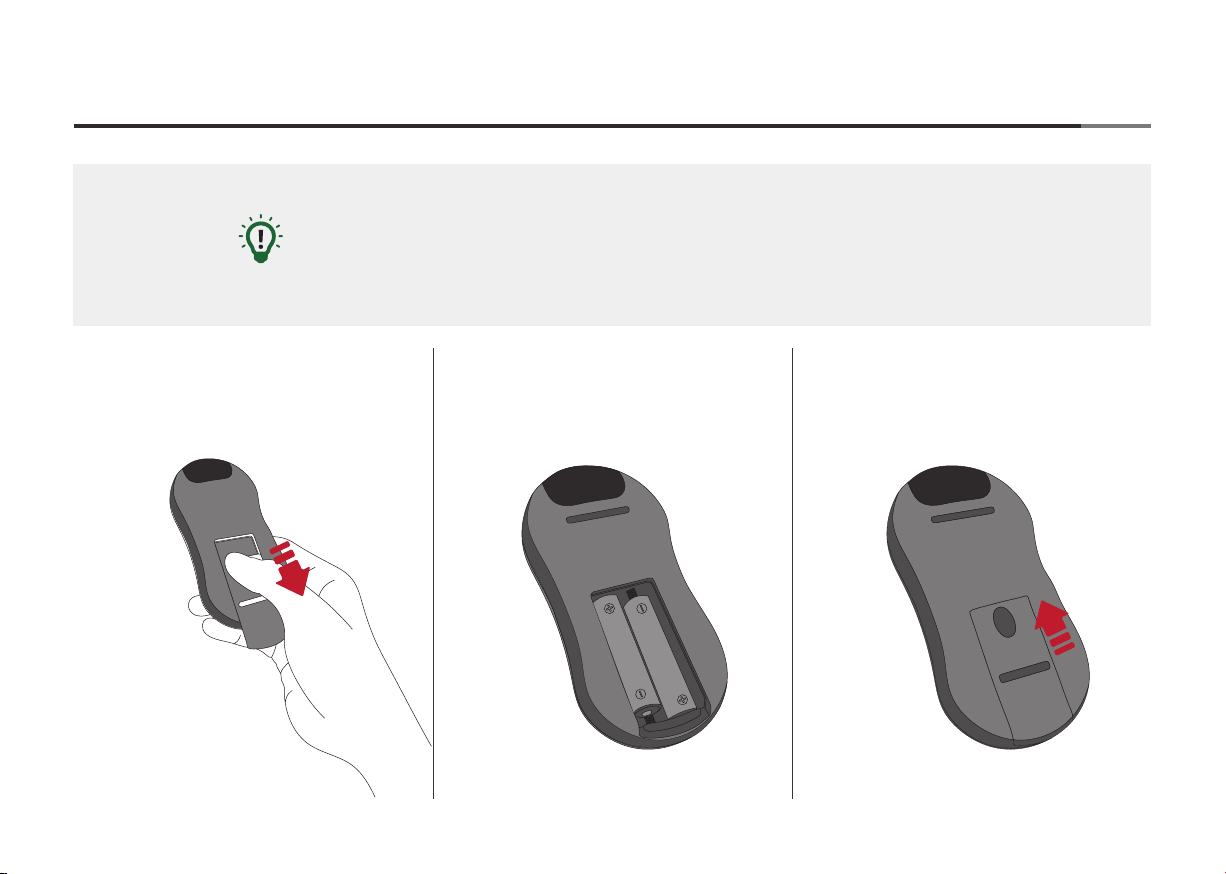
Installing the Battery into the Remote Control RS500
9
① Remove the battery cover. ② Insert the two AAA batteries
that came with the auto cleaner.
③ Replace the battery cover.
• Make sure to properly orient the + and - poles of the batteries when inserting the battery.
• If you insert batteries incorrectly, there is a risk of fire or damage to the remote control.
- Be careful if you use non-standard 1.5V batteries, as this may cause damage to the product and its function.
- If your battery has had a leakage, immediately replace it.
- Dispose of batteries according to the local laws and regulations of your region.
NOTE

Installing the Water Supply Mop Kit RS500
15
9
• Make sure to turn off the System Power Switch when installing or uninstalling the water supply mop kit.
• Attach the microfiber mop to fit properly to the mop kit, lining up the centers
• Before attaching the wet mop, slightly wring out the mop. If the mop is too moist, the main unit may become slow or stop.
CAUTION
① Attach the microfiber mop
to fit properly to the mop kit,
lining up the centers .
(see the Figure below)
② Open the rubber stopper
of the water supply mop
kit.
③ Pour water into the water
tank. (Approx. 60cc)
④ Close the rubber stopper of the Mop Kit
and attach it to the bottom part of the
main unit. (If you press it turning from
side to side, it will install with a click
sound.)
Correct installation
of the mop Incorrect installation
of the mop
Correct installation of
the rubber stopper Incorrect installation of
the rubber stopper
• Attach the mop to the kit correctly (see the right figure); otherwise, the mop can
cover the cliff sensors, leading to the main unit stopping.
• After filling the kit with water, fully close the rubber stopper (see the right figure);
otherwise, the unit may stop or malfunction.
• If too much force is applied while connecting the mop kit, there may be damage.
16
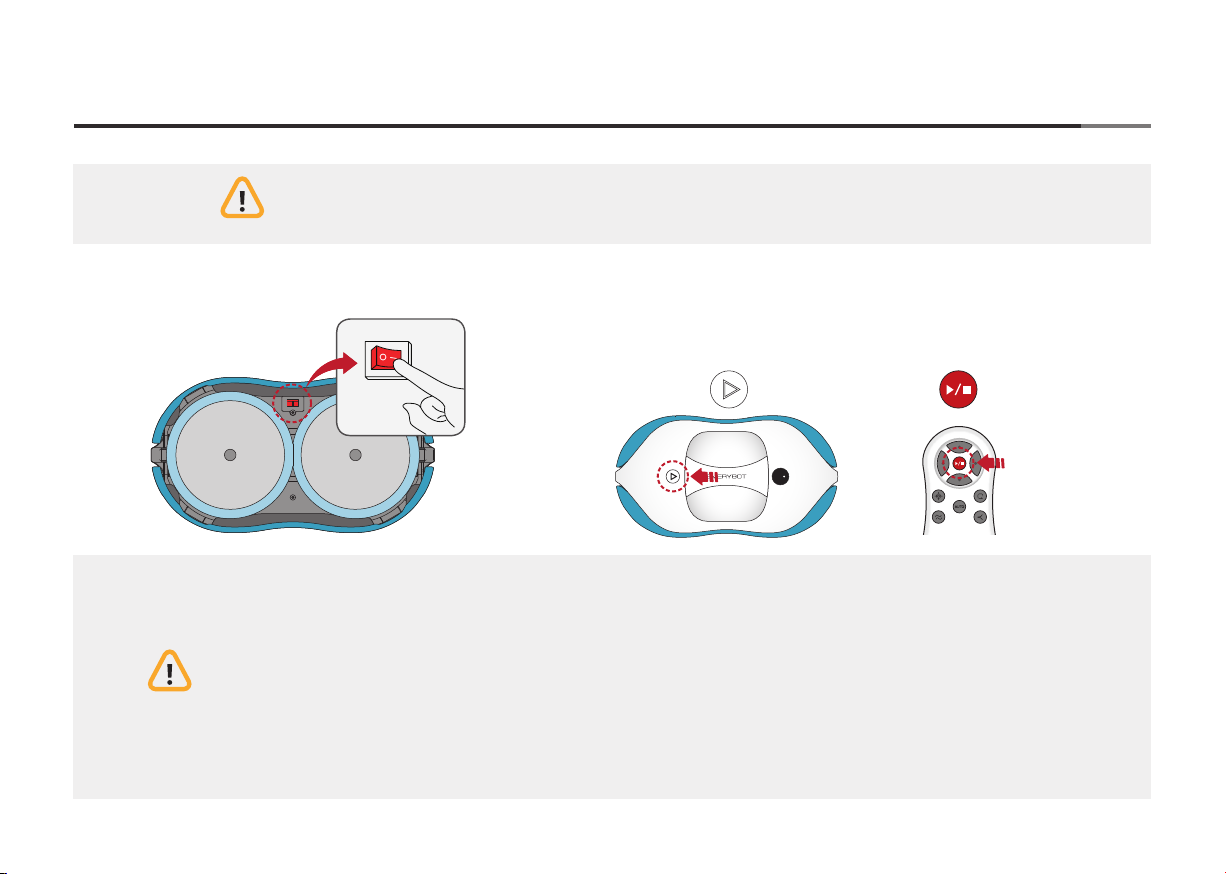
Start Cleaning RS500
9
리모컨을 이용하여 청소할 공간에 알맞은 청소 모드를 선택하여 청소하시기 바랍니다.
3
or
CAUTION
• If you press the Operation button on the main unit or Start/Stop button on the remote control while cleaning,
cleaning stops.
• If the main unit does not operate for 1 minute while the System Power Switch is on, the LED light is turned off
and the main unit will automatically switch to power saving mode.
• If you press the Operation button on the main unit or Start/Stop button on the remote control while in the power
saving mode, the unit will start cleaning.
• If you press the Operation button on the main unit or any button of the remote control while the battery is low,
the main unit will not work and instead it will sound an alarm.
CAUTION
If you start cleaning without installing the water supply mop kit, the main unit may be damaged.
① Turn on the System Power Switch. ② Start cleaning by pressing the Operation button on the main unit or
the Start/Stop button on the remote control .
③ Select a desired cleaning mode using the remote control.
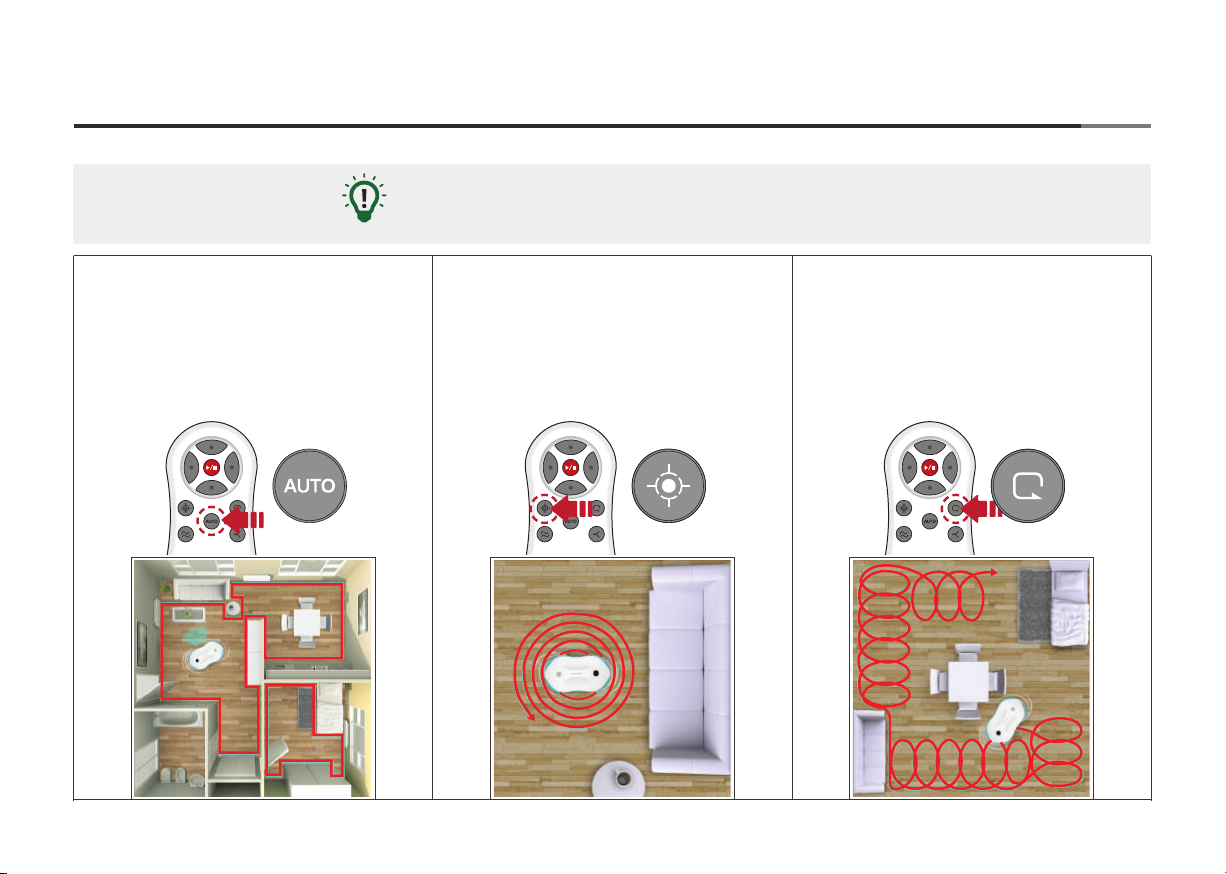
Cleaning Modes RS500
17
9
As a basic cleaning mode,
cleans the entire space efficiently.
Intensively cleans the surrounding
area relative to the main unit’s
current location.
Cleans the corners by turning 180"
along the walls.
* After the 20minutes of corner cleaning
the cleaning mode switches to Auto Cleaning Mode.
Auto Cleaning Focus Cleaning
Select the cleaning mode you want by using the remote control.
NOTE
Corner Cleaning
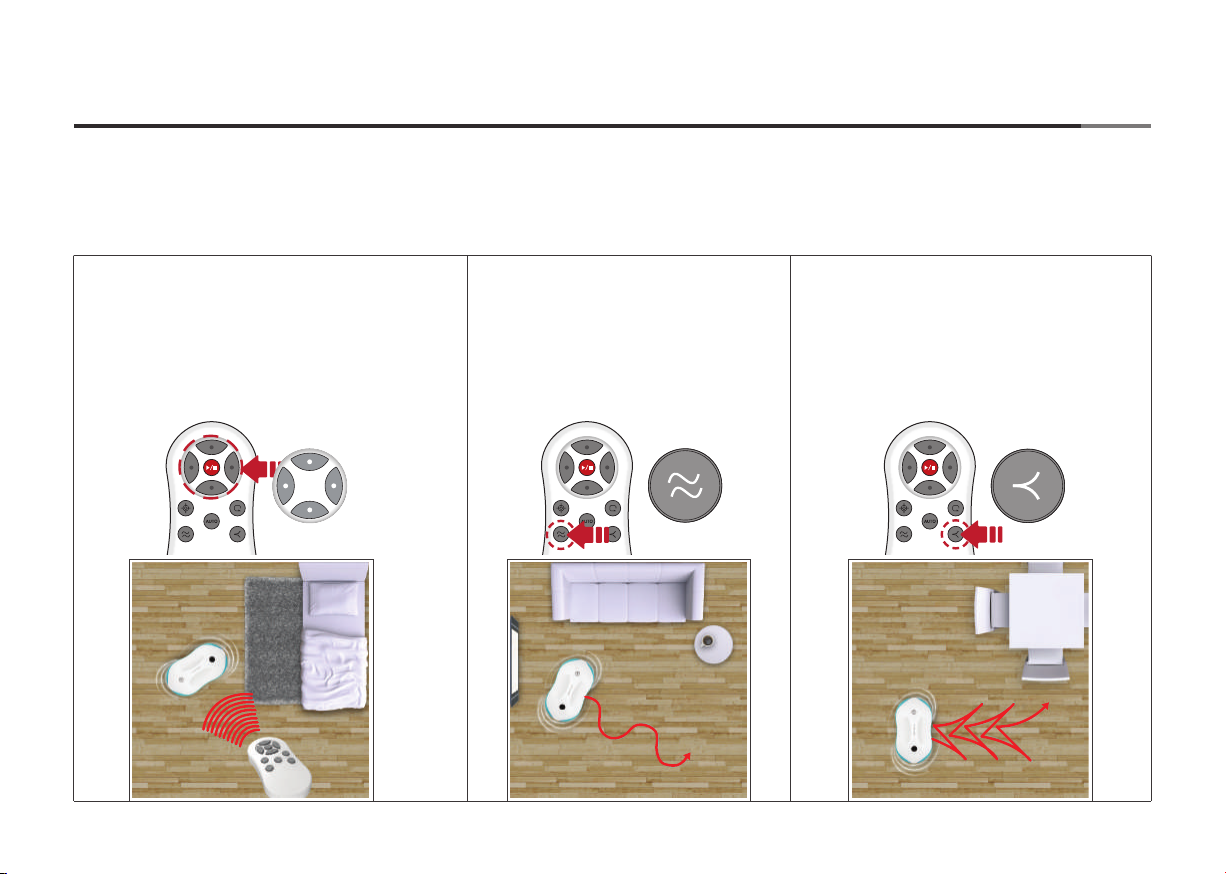
9
While the main unit is stopped, press
the direction buttons to move the main unit
where the user wants it to go.
Cleans the entire space
using an S pattern.
Thoroughly cleans by making Y patterns
as if polishing with a wet mop.
Manual Cleaning S Cleaning Y Cleaning
18
Cleaning Modes RS500

Hand Cleaning Mode RS500
19
9
① Hold the handle of the main unit from the floor and
press and hold the operation button more than 2 seconds.
②Hand cleaning starts with the rotating plate turning.
CAUTION
• In the Hand Cleaning mode, do not place the main unit on the floor.
•If you press the Operation button on the main unit or Start/Stop button on the remote control
in the Hand Cleaning mode, the cleaning mode stops.
• User cleans by directly holding the handle of the main unit.
• This mode is good to clean desks, tables, glass floors, and glass windows.
NOTE
20
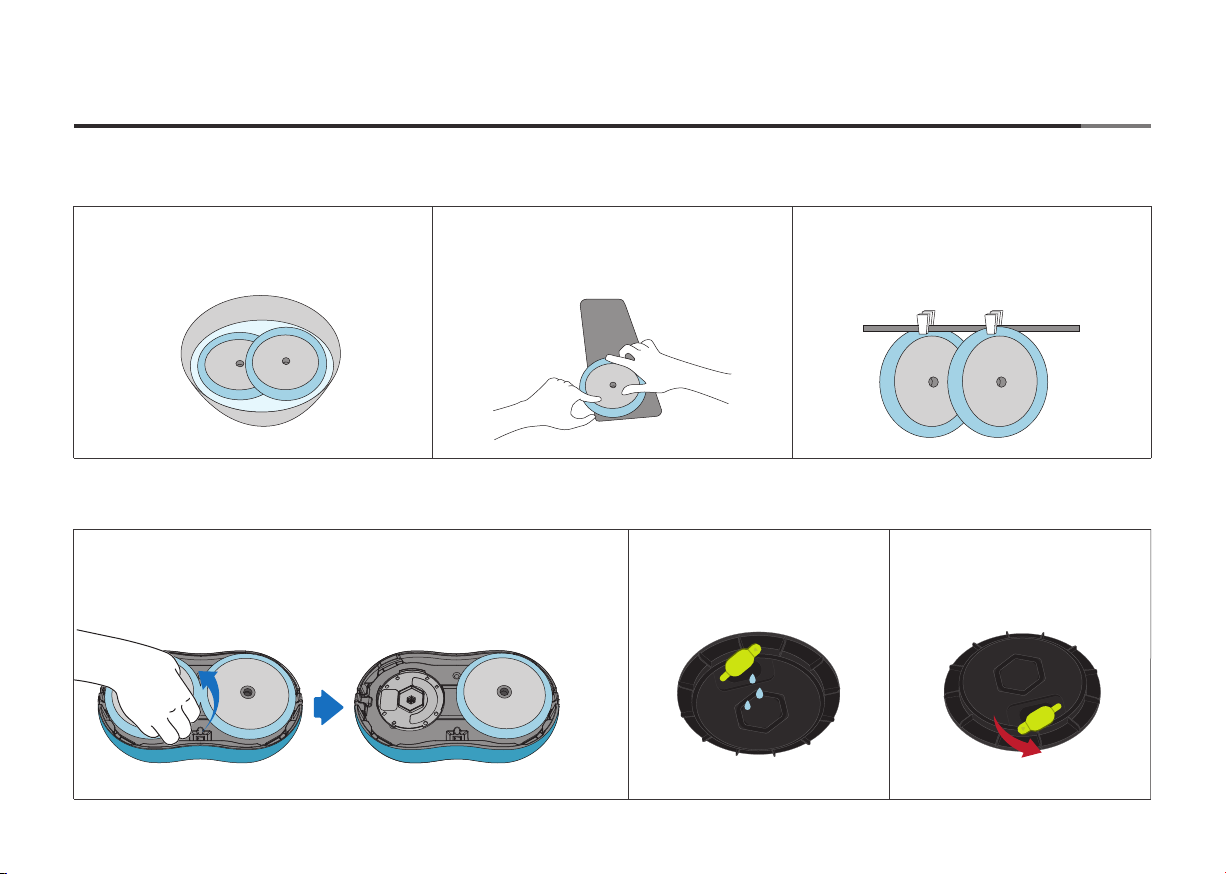
Washing Mop and Water Supply Mop Kit Maintenance RS500
Washing Mop
Water Supply Mop Kit Maintenance
① Dip the mops into the water.
① Alter cleaning, remove the Mop Kit from the main unit.
(The Mop Kit is easily removed if you pull on it while holding
the main unit.)
② Empty the remaining water
from the water tank.
③ Leave the rubber stopper
open to dry the water tank.
② Gently scrub the mop with
a neutral detergent.
③ Wring out the mops and
dry in the sun.
Table of contents
Other Everybot Ultrasonic Jewelry Cleaner manuals


