Evo Affinity 30G Quick start guide
R
OWNER & INSTALLATION MANUAL
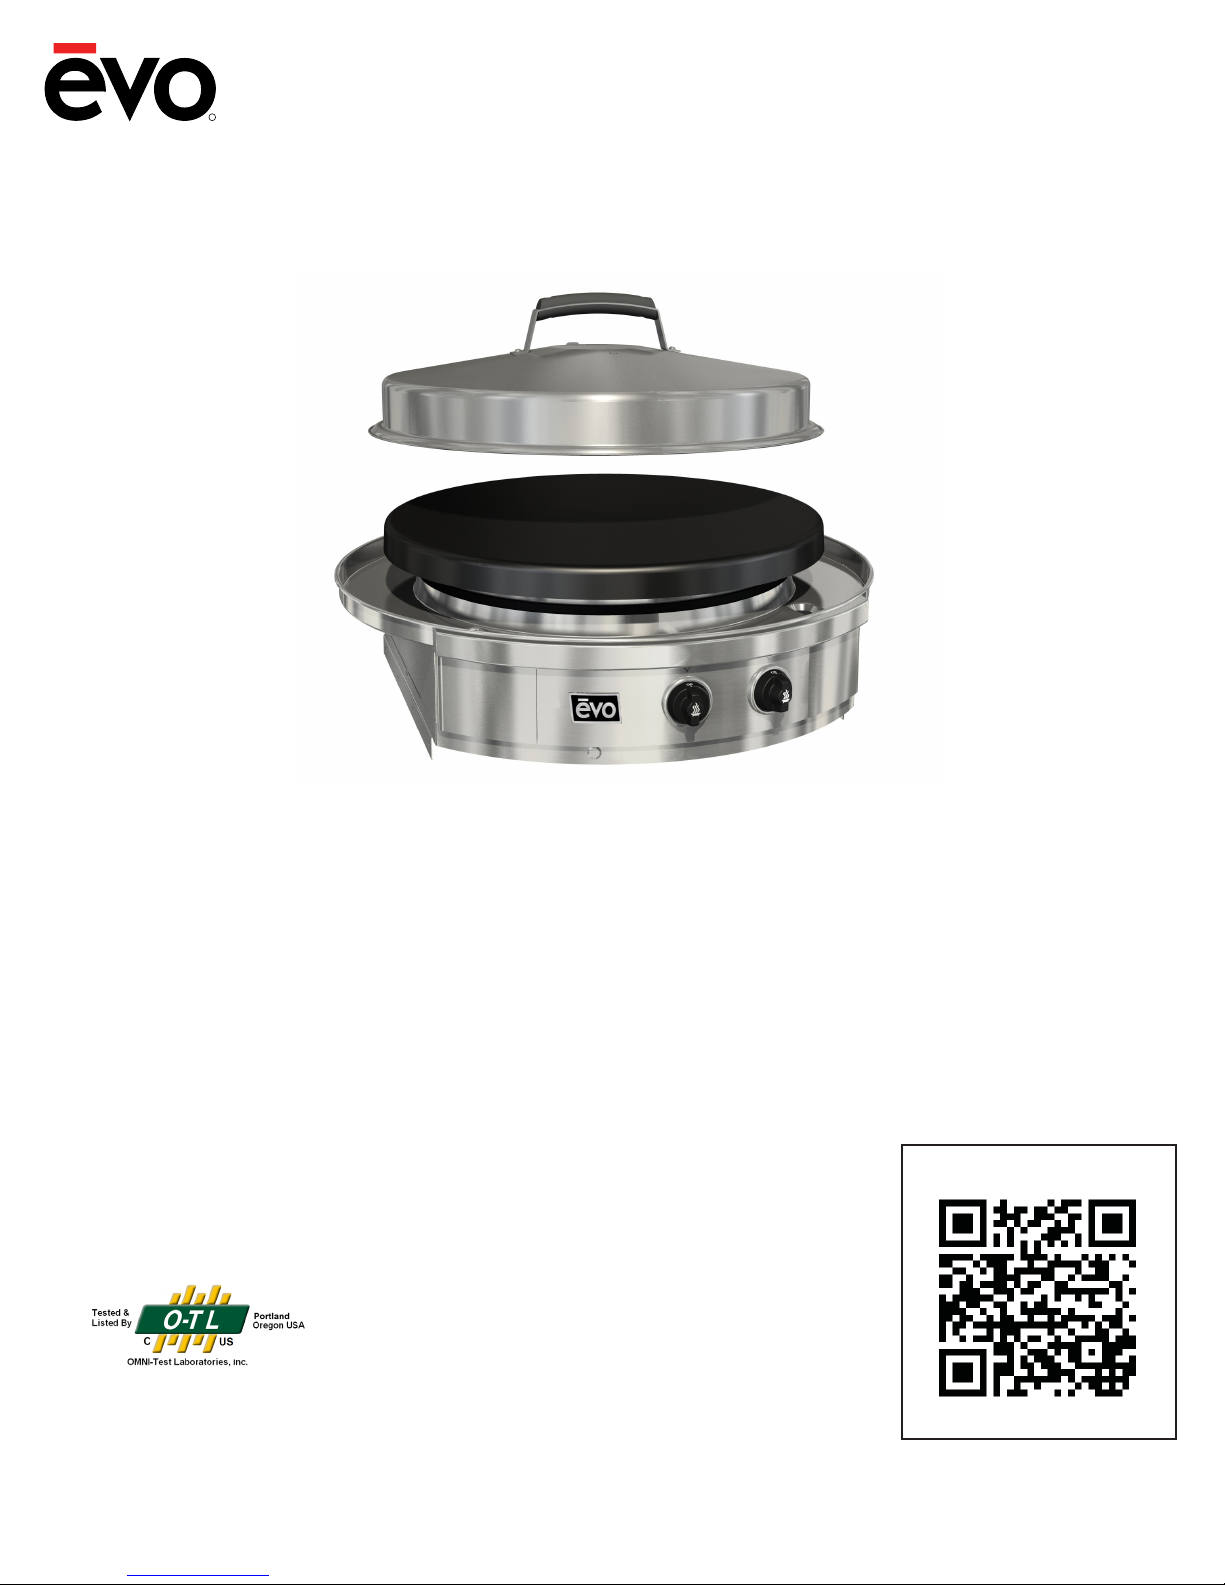
Affinity 30G
Cooktop
Evo, Inc., 20560 SW 115th Ave., Tualatin, OR 97062 USA
Evo Afnity 30G
Outdoor Gas Cooktop
Cleaning Instructions
evoamerica.com
FINAL QR Code for Evo Cleaning.indd 1 11/19/2015 11:43:18 AM
Certication: ANSI Z83.11-2016 / CSA 1.8-2016
OMNI Report # 0141GM003S
Part #: Commercial Models: 10-0054-NG | 10-0054-LP
Residential Models: 10-0055-LP, 10-0055-NG
Doc: 3-2-2018 Copyright © 2018
INSTALLATION INSTRUCTIONS
Affinity 30G
Evo, Inc., 20560 SW 115th Ave., Tualatin, OR 97062 USA
2
THIS MANUAL MUST BE RETAINED FOR FUTURE REFERENCE. READ, UNDERSTAND,
AND FOLLOW THE INSTRUCTIONS AND WARNINGS CONTAINED IN THIS MANUAL.
DANGER POTENTIALLY HAZARDOUS SITUATION WHICH, IF NOT
AVOIDED, COULD RESULT IN DEATH
HIGH
VOLTAGE
CAUTION POTENTIALLY HAZARDOUS SITUATION WHICH, IF NOT AVOIDED,
MAY RESULT IN MINOR OR MODERATE INJURY.
WARNING POTENTIALLY HAZARDOUS SITUATION WHICH, IF NOT AVOIDED,
COULD RESULT IN DEATH OR SERIOUS INJURY
CAUTION Helpful tips and technique instructions are shown.
Notes
Complete Now For Future Reference
Model #_______________________________ Serial # _________________________________
Date Purchased ________________________ Location Purchased _______________________
Date Installed __________________________ Location Installed _________________________
To Installer or Person Uncrating Grill:
Leave these instructions with purchaser.
To Purchaser:
Keep these instructions for future reference.
INSTALLATION INSTRUCTIONS
Affinity 30G
Evo, Inc., 20560 SW 115th Ave., Tualatin, OR 97062 USA
WARNING
This symbol identies the most important
safety messaging in this manual. When you
see this symbol, be alert to the possibility of
serious bodily injury if the instructions are
not followed. Be sure to read and carefully
follow all of the messages.
Grill should only be used outdoors, in a well ventilated space, and should not be used in a
building, garage, or any other enclosed area. Never operate near ammable liquids or vapors.
Do not install or use grill within 36” of combustible ceiling materials, and 12” from back and
sides of grill. Grill shall not be located under unprotected overhead made of combustible
construction within 36” from top of grill. Do not obstruct the ow of combustion and ventilation
air, including ventilation of cylinder enclosures, if applicable.
WARNING
Warnings
FOR YOUR SAFETY
If You Smell Gas:
1. Shut off gas to appliance.
2. Extinguish any open ame.
3. Remove grill cooking surface.
4. If odor continues, immediately call your
gas supplier or your re department.
5. Evacuate all personnel from the area.
FOR YOUR SAFETY
1. Do not store or use gasoline or other
ammable vapors and liquids in the
vicinity of this or any other appliance.
2. An LP Tank not connected for use shall
not be stored in the vicinity of this or
any other appliance.
It is the responsibility of the assembler/owner
to assemble, install and maintain gas grill.
Do not let children operate or play near your
grill. Failure to follow these instructions could
result in serious personal injury and / or
property damage.
WARNING
Improper installation, adjustment, alteration, service or maintenance can cause property
damage, injury or death. Read the installation, operating and maintenance instructions
thoroughly before installing or servicing this equipment.
WARNING
INSTALLATION INSTRUCTIONS
Affinity 30G
Evo, Inc., 20560 SW 115th Ave., Tualatin, OR 97062 USA
4
READ FIRST
IMPORTANT PRODUCT AND SAFETY INFORMATION
WARNING INSTALLATION OF THIS UNIT MUST BE DONE BY A QUALIFIED PLUMBER.
INCORRECT INSTALLATION CAN CAUSE INJURY TO PERSONNEL AND/
OR DAMAGE TO EQUIPMENT. THIS UNIT MUST CONFORM WITH ALL
LOCAL CODES, OR IN THE ABSENCE OF LOCAL CODES, WITH THE
NATIONAL FUEL GAS CODE, ANSI Z223.1/NFPA 54, OR THE NATURAL
GAS AND PROPANE INSTALLATION CODE, CSA B149.1, AS APPLICABLE
INCLUDING:
1. THIS UNIT AND ITS INDIVIDUAL SHUTOFF VALUE MUST BE
DISCONNECTED FROM THE GAS SUPPLY PIPING SYSTEM DURING ANY
PRESSURE TESTING OF THE SYSTEM AT TEST PRESSURES IN EXCESS
OF 1/2 PSI (3.45 kPa).
2. THIS UNIT MUST BE ISOLATED FROM THE GAS SUPPLY PIPING
SYSTEM BY CLOSING ITS INDIVIDUAL MANUAL SHUTOFF VALVE DURING
ANY PRESSURE TESTING OF THE GAS SUPPLY PIPING SYSTEM AT TEST
PRESSURES EQUAL TO OF LESS THAN 1/2 PSI (3.5 kPa).
WARNING DO NOT DIRECTLY INSTALL THIS UNIT TO COMBUSTIBLE SURFACES,
AND DO NOT USE COMBUSTIBLE MATERIALS IN THE CONSTRUCTION
OF ANY COUNTER, STAND, OR OTHER DEVICE WHICH WILL COME INTO
DIRECT CONTACT WITH THE BURNER CHASSIS (SEE PAGE
WARNING IMMEDIATELY AFTER CONNECTING GAS SUPPLY LINE AND BEFORE
FIRST IGNITION, CHECK ALL GAS CONNECTIONS WITH SOAPY WATER
TO TEST FOR LEAKS.
WARNING KEEP WATER AND ALL COOKING SPILL OVERS AWAY FROM FRONT
CONTROL PANEL AND ALL OPEN SERVICE AREAS. NEVER HOSE UNIT,
OR SPRAY UNIT WITH PRESSURIZED CLEANING SOLUTIONS.
CAUTION CAREFULLY FOLLOW ALL INSTALLATION INSTRUCTIONS AND
CONSTRUCT ALL COUNTER SPACE, STANDS, OR OTHER SURFACES TO
THE RECOMMENDED INSTALLATION SPECIFICATIONS AS OUTLINED IN
THIS MANUAL.
CAUTION THIS UNIT IS HEAVY AND SHOULD BE INSTALLED BY TWO PEOPLE.
USE NECESSARY BLOCKING FOR LOCATING AND INSTALLING COOK
SURFACE.
CAUTION ALWAYS KEEP ANY AND ALL FLAMMABLE LIQUIDS AND COMBUSTIBLE
MATERIALS AWAY FROM UNIT. DO NOT STORE TOWELS OR UTENSILS,
OR ANY OTHER ITEMS ON UNIT’S DRIP PAN.
CAUTION DO NOT CLEAN THE COOK SURFACE WITH GRILL BRICKS OR CLEANING
SOLUTIONS. USE ONLY GRILL SCREENS AND GRILL PADS AND FOLLOW
THE PRESCRIBED METHOD OF CLEANING AS OUTLINED IN THIS
MANUAL.
NOTICE THE SERIAL NUMBER AND MODEL INFORMATION LABEL PLATE IS
LOCATED INSIDE THE RIGHT-SIDE SPILLOVER DOOR.
NOTICE INSTALLATION OF ANY VENT HOODS OR FIRE EXTINGUISHER SYSTEMS
MUST CONFORM TO THE NATIONAL, STATE, AND LOCAL BUILDING AND
ALL APPLICABLE UNIFORM CONSTRUCTION CODES.
NOTICE DURING THE FIRST FEW HOURS OF OPERATION IT IS NORMAL FOR OILS
USED IN THE MANUFACTURING PROCESS TO BURN OFF AND GIVE AN
ODOR OR SLIGHT PETROLEUM SMOKE.

INSTALLATION INSTRUCTIONS
Affinity 30G
Evo, Inc., 20560 SW 115th Ave., Tualatin, OR 97062 USA
5
EVO RESIDENTIAL LIMITED WARRANTY TERMS
Evo, Incorporated warrants to the original residential consumer-purchaser that the Evo grill shall be free from rust-through on all
metal surfaces and shall be free from defects in materials and workmanship under normal and reasonable use from the original
date of purchase. Evo promises to replace, at its determination, any product or component that is defective and covered under
this warranty for as long as you, the registered original consumer-purchaser, owns the grill. This is your sole and exclusive
remedy. This warranty is for the benet of the original consumer-purchaser and is non-transferable. This warranty is subject to the
limitations, exclusions and other provisions listed below.
Limitations Involving Materials and Components:
Warranty does not apply to normal wear and tear, which are expected over the course of ownership. The materials and
components listed below are covered according to the following schedule from the original date of purchase:
• One Year – electrical and electronic components [including, but not limited to, electronic displays, overlay and membrane
switches, temperature sensors (RTD and K-Value Thermal Couple), hot surface igniters, computers, transformers,
heater elements, relays, igniters, ignition controllers, wiring, switches, encoders, outlets and plugs]
• One Year – gas components [including, but not limited to, gas regulator, gas hoses, manifold assemblies]
• One Year – accessories and repair parts
The Warranty Registration Card (or online warranty registration form available at www.evoamerica.com/content/
residential-warranty-registration) must be completed and returned/submitted to Evo, Incorporated within 30 days from the
date of purchase. The original purchase invoice or payment record must be retained and produced upon request if claims
are made under this warranty. To receive a replacement Warranty Registration Card, write or call the address listed at the
bottom of this page. Warranties are void if the original serial numbers have been removed, altered, or cannot be readily
determined.
THIS WARRANTY APPLIES ONLY TO PRODUCTS PURCHASED AND LOCATED WITHIN THE UNITED STATES
OR CANADA.
WHAT IS NOT COVERED BY THIS WARRANTY
1. Conditions and damages resulting from any of the following:
a. Improper or inadequate installation, delivery, use, storage or maintenance
b. Any repair not authorized in writing by Evo, Inc., any modications, misapplications, or unreasonable use
c. Improper setting of any control
d. Harsh environmental conditions, including, but not limited to, continual seawater spray, high pressure water, and direct contact
with corrosive chemicals and materials
e. Excessive or inadequate electrical, or gas supply
f. Accidents, natural disasters, acts of God
g. Conditions covered by the purchaser’s insurance
h. Cleaning supplies and lters
2. Products purchased or utilized for commercial use without the express authorization of Evo, Incorporated for such use
3. Labor not pre-authorized by Evo, Incorporated, and labor not performed by an authorized Evo service agency or representative
4. Pre-authorized warranty labor performed outside of normal business hours, and at overtime and premium rates
5. The cost of service or a service call to:
a. Identify or correct installation errors
b. Transport the product or component for service to/from the manufacturer or service center
c. Instruct the user of the proper use of the product
6. The cost for any inconvenience, personal injury or property damage due to failure of the product, and cost of damage arising out
of the transportation of the product which is covered under different terms with the carrier
7. Natural variations in color and nishes that are inherent to the material and unavoidable (and therefore not defects)
ALL IMPLIED WARRANTIES, INCLUDING THE IMPLIED WARRANTIES OF MERCHANTABILITY, SUITABILITY,
QUALITY AND/OR FITNESS FOR A PARTICULAR PURPOSE, ARE LIMITED IN DURATION TO THE EXPRESS
WARRANTY PERIODS SPECIFIED ABOVE FOR THE PARTS DESCRIBED THEREIN. EVO, INCORPORATED
MAKES NO OTHER WARRANTY AND WILL NOT BE LIABLE FOR ANY DIRECT OR INDIRECT, CONSEQUENTIAL
OR INCIDENTAL DAMAGES. Some states do not allow limitations on how long an implied warranty lasts, so the above
limitation may not apply to you. Neither Evo manufacturer representatives and dealers, nor the retail establishment selling this
product has any authority to make any warranties or to promise remedies in addition to or inconsistent with those stated above.
The maximum liability to Evo, Incorporated in any event, shall not exceed the purchase price of the product paid by the original
consumer-purchaser. Some states do not allow the exclusion or limitation of incidental or consequential damages, so the above
limitations or exclusions may not apply to you. This warranty gives you specic legal rights, and you may also have other rights
which vary from state to state.

INSTALLATION INSTRUCTIONS
Affinity 30G
Evo, Inc., 20560 SW 115th Ave., Tualatin, OR 97062 USA
6
Evo, Incorporated warrants to the original commercial foodservice purchaser that the Evo cooking, refrigeration and ventilation
equipment shall be free from rust through on all metal surfaces and shall be free from defects in materials and workmanship under
normal and reasonable use for One Year from the original date of purchase from Evo, Inc. This warranty is for the benet of the
original use purchaser and is non-transferable. Evo promises to replace, at its determination, any product or component that is
defective during this initial one year period. Or as a resolution, Evo may at its option repurchase the product at its original purchase
price. This is your sole and exclusive remedy. This warranty is subject to the limitations, exclusions and other provisions listed
below.
Limitations Involving Materials and Components:
Warranty does not apply to normal wear and tear, which are expected over the course of ownership. The materials and
components listed below are covered according to the following schedule from the original date of purchase
from Evo:
• One Year – electrical and electronic components [including, but not limited to, electronic displays, overlay and membrane
switches, temperature sensors (RTD and K-Value Thermal Couple), hot surface igniters, computers, transformers,
heater elements, relays, igniters, ignition controllers, wiring, switches, encoders, outlets and plugs]
• One Year – gas components [including, but not limited to, gas regulator, gas hoses, manifold assemblies]
• One Year – accessories and repair parts
• Ninety (90) Days - refrigeration components [including, but not limited to, compressor, evaporator, pressure control
units]
The Warranty Registration Card (or online warranty registration form available at www.evoamerica.com/content/
commercial-warranty-registration) must be completed and returned/submitted to Evo, Incorporated within 30 days from
the date of purchase. The original purchase invoice or payment record must be retained and produced upon request if
claims are made under this warranty. To receive a replacement Warranty Registration Card, write or call the address listed
at the bottom of this page. Warranties are void if the original serial numbers have been removed, altered, or cannot be
readily determined.
THIS WARRANTY APPLIES ONLY TO PRODUCTS PURCHASED AND LOCATED WITHIN THE USA OR
CANADA.
WHAT IS NOT COVERED BY THIS WARRANTY:
1. Conditions and damages resulting from any of the following:
a. Improper or inadequate installation, delivery, use, storage or maintenance
b. Any repair not authorized in writing by Evo, Inc., any modications, misapplications, or unreasonable use
c. Improper setting of any control
d. Harsh environmental conditions, including, but not limited to, continual seawater spray, high pressure water, and direct contact
with corrosive chemicals and materials
e. Excessive or inadequate electrical, gas, or refrigeration supply
f. Accidents, natural disasters, acts of God
g. Conditions covered by the purchaser’s insurance
h. Cleaning supplies and lters
2. Labor not pre-authorized by Evo, Incorporated, and labor not performed by an authorized Evo service agency or
representative
3. Pre-authorized warranty labor performed outside of normal business hours, and at overtime and premium rates
4. The cost of service or a service call to:
a. Identify or correct installation errors
b. Transport the product or component for service to/from the manufacturer or service center
c. Instruct the user of the proper use of the product
5. The cost for any inconvenience, personal injury or property damage due to failure of the product, and cost of
damage arising out of the transportation of the product which is covered under different terms with the carrier
6. Natural variations in color and nishes that are inherent to the material and unavoidable (and therefore not defects)
ALL IMPLIED WARRANTIES, INCLUDING THE IMPLIED WARRANTIES OF MERCHANTABILITY, SUITABILITY, QUALITY
AND/OR FITNESS FOR A PARTICULAR PURPOSE, ARE LIMITED IN DURATION TO THE EXPRESS WARRANTY PERIODS
SPECIFIED ABOVE FOR THE PARTS DESCRIBED THEREIN. EVO, INCORPORATED MAKES NO OTHER WARRANTY AND
WILL NOT BE LIABLE FOR ANY DIRECT OR INDIRECT, CONSEQUENTIAL OR INCIDENTAL DAMAGES. Some states do not
allow limitations on how long an implied warranty lasts, so the above limitation may not apply to you. Neither Evo manufacturer
representatives and dealers, nor the commercial establishment selling this product has any authority to make any warranties
or to promise remedies in addition to or inconsistent with those stated above. The maximum liability to Evo, Incorporated in any
event, shall not exceed the purchase price of the product paid by the original commercial-purchaser. Some states do not allow the
exclusion or limitation of incidental or consequential damages, so the above limitations or exclusions may not apply to you. This
warranty gives you specic legal rights, and you may also have other rights which vary from state to state.
EVO COMMERCIAL LIMITED WARRANTY TERMS

INSTALLATION INSTRUCTIONS
Affinity 30G
Evo, Inc., 20560 SW 115th Ave., Tualatin, OR 97062 USA
INSTALLATION AND USE CHECKLIST
UNPACK COOKTOP COMPONENTS 8
Follow unpacking instructions carefully
CLEARANCE TO COMBUSTIBLES DIMENSIONS 9
PREPARE COUNTERTOP FOR INSTALLATION 10-13
INSERT CHASSIS IN COUNTER TOP 14
INSTALL DRIP PAN AND DRIP PAN GASKET 15-16
ASSEMBLING COOK SURFACE RETAINING FASTENERS 17
INSTALL COOK SURFACE AND TIGHTEN FASTENERS 18-20
CONNECT GAS & CHECK FOR LEAKS 21-25
CHECK LIST FOR INSTALLATION PROCEDURES 26
TEMPERATURE CONTROL AND LIGHTING INSTRUCITONS 27-28
RECOGNIZING ABNORMAL GAS OPERATION 29
REPLACING ELECTRONIC IGNITOR BATTERY 30
MAINTAINING SPILLOVER TRAYS 31
AFFINITY 30G DIMENSIONS 32
COOKING SURFACE MAINTENENCE 33
PAGE
INSTALLATION INSTRUCTIONS
Affinity 30G
Evo, Inc., 20560 SW 115th Ave., Tualatin, OR 97062 USA
8
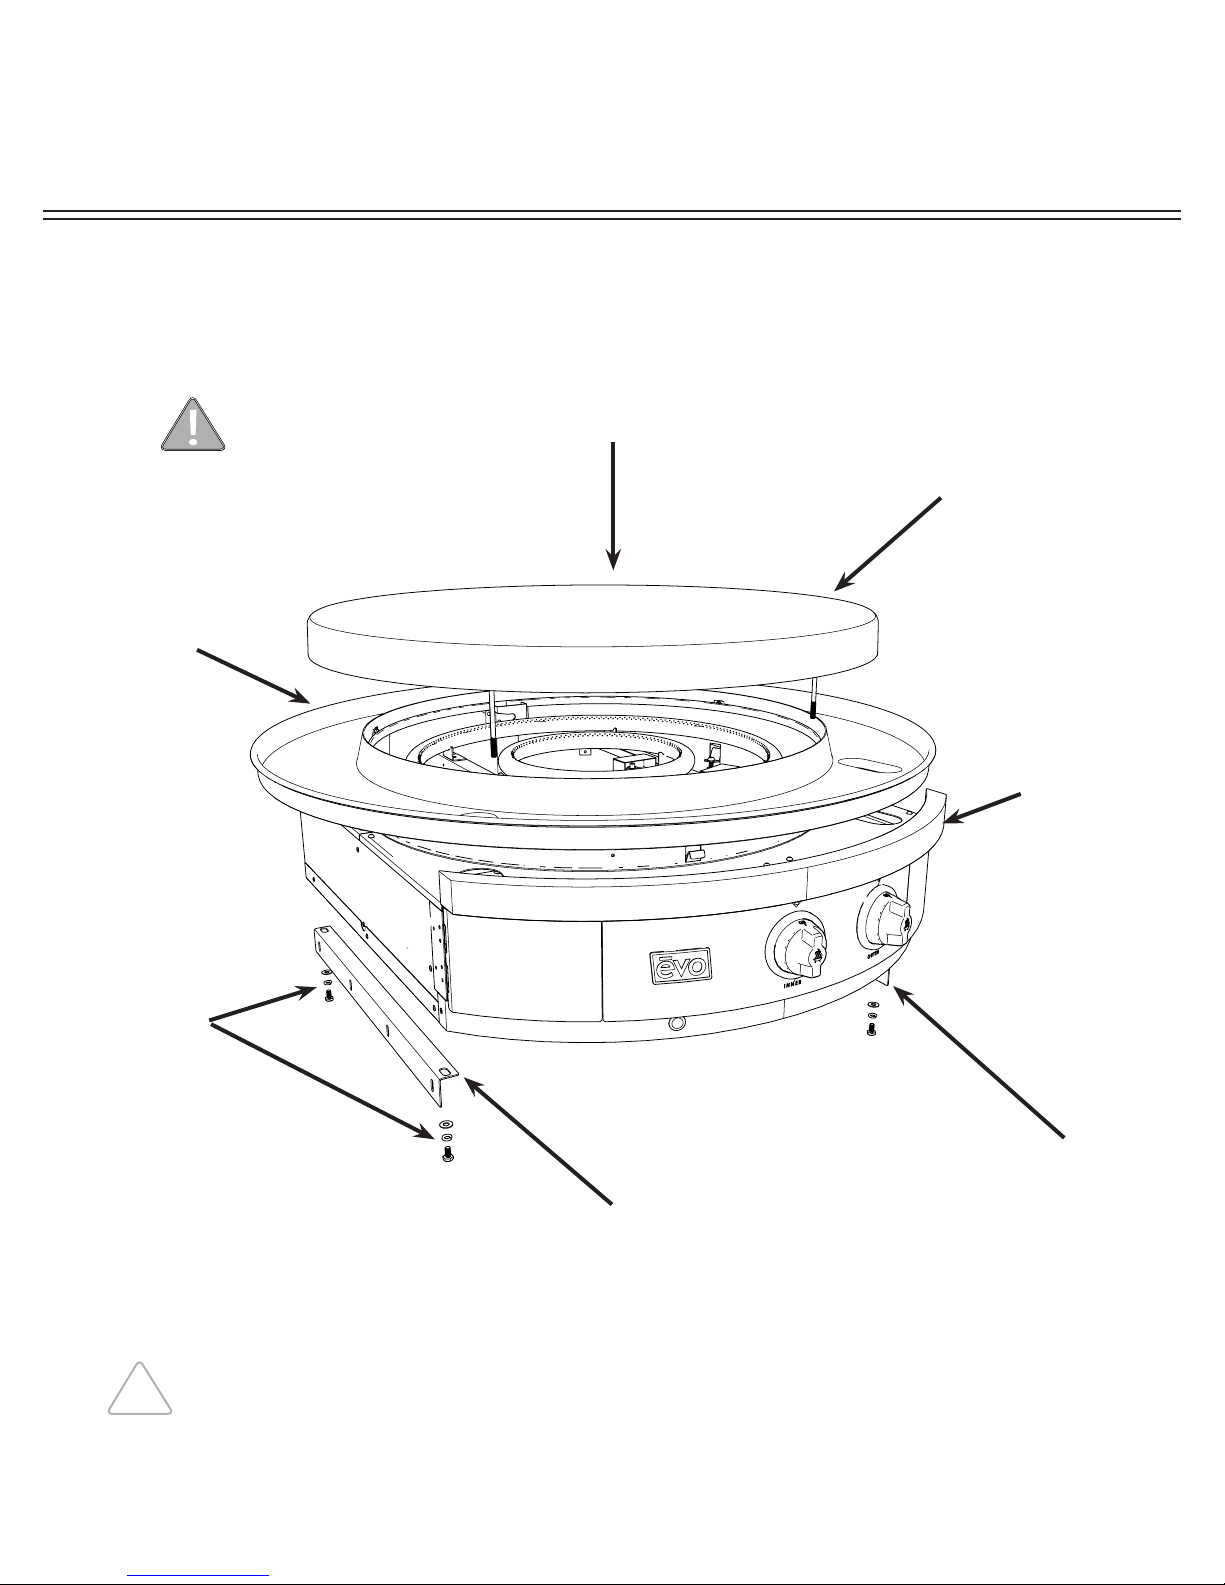
Cook Surface: Lift and separate cook surface from unit and place next to installation area.
Drip Pan Gasket:
Gasket is secured
to top of drip tray.
Remove gasket
from drip tray
and set aside
for reinstallation.
Drip Pan
Unlatch pan
from circular
skirt, then
carefully lift and
separate drip
pan from unit
and place next
to installation
area. Take care
not to scratch
drip pan during
installation.
Chassis:
Lift chassis
from crating box
and place on
its side next to
installation area.
Use caution
since ignition
components
are exposed.
Metal Right Angle Brackets: Unscrew from unit
and keep screws and brackets handy for rst
installation step.
UNPACKING COOKTOP COMPONENTS
STEP 1: As you are unpacking the crate, make sure you locate all components before
installation.
Ignition components are exposed during uncrating and installation.
Use caution and do not alter factory set positions.
The cook surface is heavy. Use caution when lifting.
Remove Tie
Down Bolts
and Tabs
holding chassis
to packing crate
base using 7/16”
wrench.
INSTALLATION INSTRUCTIONS
Affinity 30G
Evo, Inc., 20560 SW 115th Ave., Tualatin, OR 97062 USA
CLEARANCE DIMENSIONS
Read the instructions carefully in this booklet to install the
Evo Afnity 30G Cooktop to a metal, stone or wood countertop surface.
Cabinet layout and construction may vary.
CLEARANCE TO COMBUSTIBLE CONSTRUCTION FROM CHASSIS
Combustibles Non-combustibles
Back * 3/8” 0”
Sides * 3/8” 0”
Bottom 3” 3”
CLEARANCE TO COMBUSTIBLE CONSTRUCTION FROM COOKING SURFACE
Top 36”
Sides 12”
Back 12”
36” CLEARANCE FROM COOKING
SURFACE TO COMBUSTIBLE
CEILING MATERIALS. 12” CLEARANCE
FROM COOKING
SURFACE TO
COMBUSTIBLE
SIDEWALL
MATERIALS.
12” CLEARANCE
FROM COOKING
SURFACE TO
COMBUSTIBLE
BACK WALL
MATERIALS.
The minimum environmental temperature for safe use of the Evo Afnity 30Gp
should not be below 32°F ( 0° C).
IF INSTALLING
ALONGSIDE
ANOTHER 30Gp
UNIT, PROVIDE
2” MINIMUM
CLEARANCE
FROM EDGE
OF DRIP PANS.
Minimum 3” clearance required under unit venting to 22 sq/in of combustible air.
* 3/8” of cement board lined enclosure to chassis.

INSTALLATION INSTRUCTIONS
Affinity 30G
Evo, Inc., 20560 SW 115th Ave., Tualatin, OR 97062 USA
10
2719
32
"
701.04mm
273
4
"
704.85mm
115
32
"
37.16mm
R18
1
8
"
460.38mm
131
8
"
333.38mm
2623
32
"
678.51mm
1313
16
"
350.52mm
STEP 2: Mark the nished position of the Evo Afnity 30G drip pan on the counter top using
the dimensions shown. The circular dimension of 36.25” is the diameter of the drip pan to the
outside material thickness (e.g. to the inside of the rolled bead edge). The drip pan cutout
must be made precisely to these dimensions (or at a maximum +1/16”) so that the half-rolled
top bead on the drip pan edge overhangs the cutout dimension by .25”.
(See following page for more details).
OPENING IN COUNTER TOP FRONT
Counter top
overhang to
cabinet front
TOP VIEW
COUNTER TOP INSTALLATION (1 of 4)
NOTE:
If the dimensions for the
counter top overhang and
counter top depth cutout
are not followed, there will
be a conict with the door
swing which allows access
to the waste containers.
29” 25/32”
[756.61mm]
Other manuals for Affinity 30G
3
Table of contents
Other Evo Cooktop manuals

Evo
Evo Affinity 30G Quick start guide

Evo
Evo Affinity 30Ge User manual

Evo
Evo Affinity 30Ge Quick start guide

Evo
Evo Affinity 30Gp Quick start guide

Evo
Evo EVent 48E User manual

Evo
Evo Centric 20E Electric Owner's manual

Evo
Evo Affinity 30Gp Quick start guide

Evo
Evo Affinity 30G Quick start guide

Evo
Evo affinity 25E Quick start guide

Evo
Evo Affinity 30Ge Quick start guide


