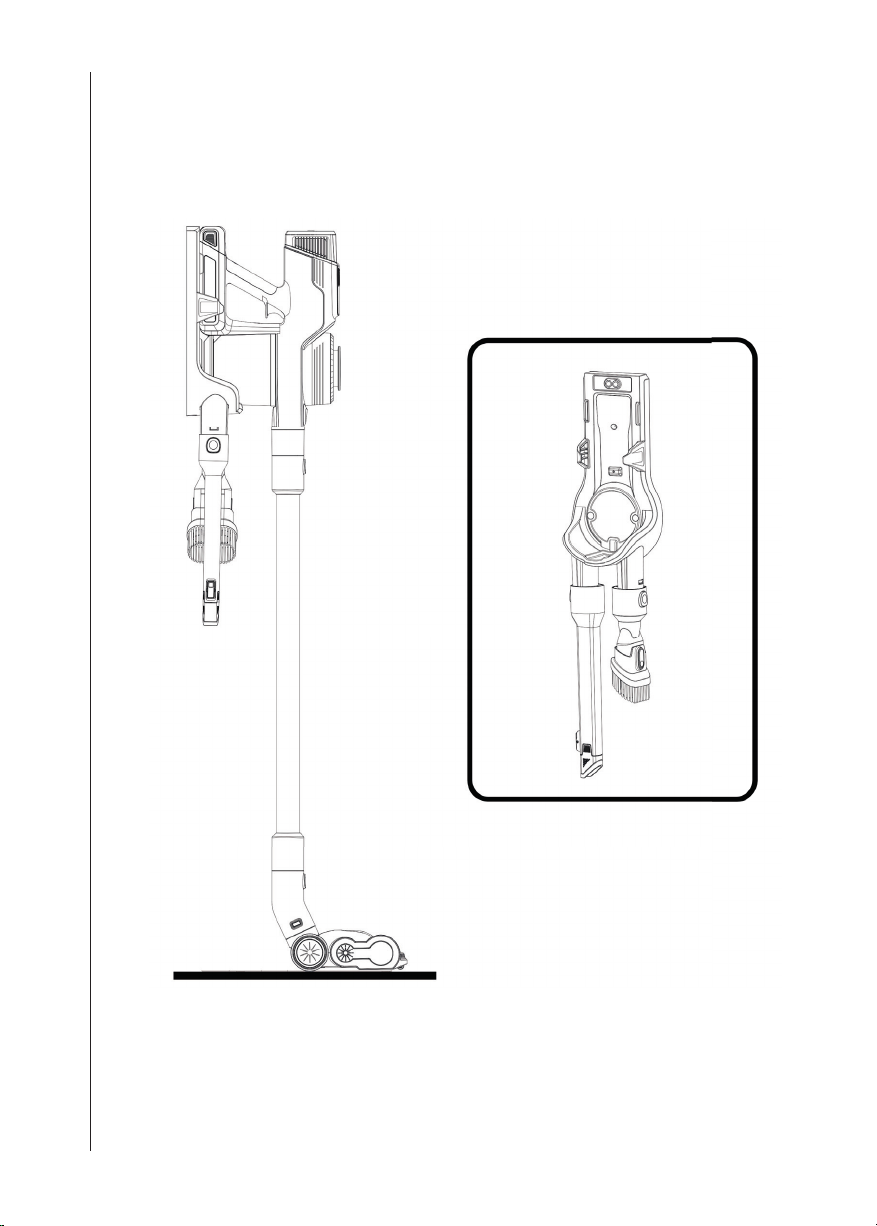
Ewbank AIRSTORM 1 User manual

INSTRUCTION MANUAL
EW3040 2-in-1 Cordless Pet Stick Vacuum Cleaner with Brushless DC Motor
AIRSTORM1
Ewbank has a British heritage to be proud of. It’s a household favourite and much loved brand that has been providing innovative cleaning solutions for over 140 years.

2
CONTENTS
Safety Instructions ........................................................................................... 3 - 5
Appliance Overview....................................................................................... 6 - 8
Product Assembly ......................................................................................... 9 - 11
Operating Instructions.................................................................................. 12 - 13
Cleaning & Maintenance............................................................................. 14 - 16
Troubleshooting.................................................................................................17
Technical Specifications.......................................................................................18
Fuse Replacement..............................................................................................18
Disposal of the Appliance ...................................................................................18
Warranty Terms & Conditions ..............................................................................19

3
Ewbank, 38 Bluestem Road, Ipswich, Suffolk, IP3 9RR Tel. 01473 271 272
SAFETY INSTRUCTIONS
PLEASE READ ALL THE INSTRUCTIONS BEFORE USE
AND WHEN USING THE APPLIANCE, THE FOLLOWING
PRECAUTIONS MUST BE TAKEN:
WARNING! TO REDUCE THE RISK OF FIRE,
ELECTRIC SHOCK, OR INJURY:
1. Do not leave the vacuum cleaner plugged in when not in
use. Unplug from the socket before servicing.
2. To reduce the risk of electric shock, do not use outdoors or
on wet surfaces.
3. Only use as described in this manual, including
attachments. Attachments used should only be that of the
manufacturers.
4. Do not use the charging adapter when the cord or plug are
damaged. If the vacuum cleaner is not working as it should
be or has been dropped, damaged, left outdoors, or fallen
into water, the vacuum cleaner must be serviced by an
engineer.
5. Keep the charging adapter away from heated surfaces.
6. Do not handle the plug or the vacuum cleaner with wet
hands.
7. Do not actively put any objects into any of the vacuum
cleaners openings. Do not use with any of the opening
blocked. Keep free of dust, lint, hair and anything that may
reduce airflow.
8. Keep hair, loose clothing, fingers and all parts of the body
away from any openings and/or moving parts.
9. Take extra care when cleaning the stairs.
10. Do not use to pick up flammable or combustible liquids such
as gasoline. Do not use in areas where this may be present.
11. Do not pick anything up that is burning or smoking such as
cigarettes, matches or hot ashes.
12. Do not use without filter in place.

4
13. If the cord of the charging adapter is damaged, it must be
replaced by the manufacturer, or a service engineer.
14. This appliance is not intended for use by persons (including
children) with reduced physical, sensory or mental
capabilities, or lack of experience and knowledge. Only
when they have been given supervision or instruction to use
the appliance by a person responsible for their safety, can
they then use it.
15. Children should be supervised to ensure that they do not
play with the appliance.
16. The mains power supply should comply with the information
on the appliance’s rating plate. Use the charging adapter
provided ONLY when charging the vacuum cleaner.
17. Do not vacuum water or other liquids.
18. Do not use or store the vacuum cleaner in humid
environments.
19. Do not charge the appliance using an extension cable.
20. When cleaning the stairs, ensure the vacuum cleaner is
located below the user. Keep on the floor when possible.
21. When retaining the packaging, store out of the reach of
children.
22. Do not store outdoors.
23. When vacuum cleaning static electricity may be created. To
prevent shocks, do not access any parts with your hand until
the area is clear.
24. Check the recommended cleaning instructions of your
flooring before vacuum cleaning.
25. Do not use the vacuum cleaner to vacuum powders such as
flour and cement. It can damage, block or break the motor.
26. Do not use or store the vacuum cleaner in excessively high
or low temperatures, outside of 0-40°C. Avoid the vacuum
cleaner being in direct sunshine for a long period.
27. If the vacuum cleaner is broken do not disassemble it. This
must be done by a qualified technician.
SAFETY INSTRUCTIONS

5
Ewbank, 38 Bluestem Road, Ipswich, Suffolk, IP3 9RR Tel. 01473 271 272
SAFETY INSTRUCTIONS
28. Please fully charge the battery before the first use and when
the appliance has not been used for a long time. To avoid
the battery losing performance, please use the vacuum
cleaner at least once every three months.
29. When the vacuum cleaner is fully charged, please unplug
the charger. Do not pull on the power cord directly to
unplug.
30. If the performance of the battery drops, it is advised that a
new battery is purchased.
31. The battery should be disposed of correctly and not
disposed with general waste. Make sure to remove the
battery from the vacuum cleaner before disposing of it,
32. The battery is designed for this vacuum cleaner only. Only
use the charger supplied. Do not disassemble the battery
unit as this can cause serious harm. Do not place the
battery unit close to high temperature objects or fire. Do
not attempt to access the battery unit with sharp objects or
break the battery.
33. Ensure that the battery is not accessible to children.
34. Switch off the appliance and remove the battery before
connecting or disconnecting the motorised brush bar.
READ AND SAVE THESE INSTRUCTIONS
This vacuum cleaner is intended for household use only.
IMPORTANT NOTE:
Read the safety and operating instructions through carefully
before using the vacuum cleaner. This is the only way to ensure
safe and reliable use of the device. If the appliance is sold or
passed on, ensure it is equipped with this instruction manual.
You will also need these operating instructions for ordering
spare parts and accessories. Please keep this booklet in a
safe place.

6
APPLIANCE OVERVIEW
Battery power level indicator light
Speed control and LED display
Soft touch rubber
handle
0.6L dust container
Dust container
release button
Power ON/OFF trigger
One press-and-release only required
to turn the vacuum ON or OFF
Motorised floor brush
Independent motor drive
increases the suction
power and ensures
effective cleaning on both
hard floor and carpet
APPLIANCE OVERVIEW

7
Ewbank, 38 Bluestem Road, Ipswich, Suffolk, IP3 9RR Tel. 01473 271 272
APPLIANCE OVERVIEW
ELECTRIC FLOOR BRUSH
DUST SENSOR
LED floor brush lights
Helps to identify dust and
debris in darker areas
Nylon floor brush
Double layered fine nylon bristles
ensure effective cleaning on both
hard floor and carpet
Floor brush buffer
Wear-resistant rubber trip prevents
damage to furniture during cleaning
Brush blockage indicator
Auto mode switchPower level indicator
Auto mode
indicator
Motor blockage
indicator
Dust sensor level
indicator Manual power control

8
APPLIANCE OVERVIEW
PACKAGE CONTENTS
Main body Floor brush
2-in-1 dusting and upholstery brush Telescopic crevice tool
Charging port and
accessory holder
Turbo pet brush Charger
Long aluminium tube
Due to the continuous improvement of the product, the above configuration will vary according to
the model. We reserve this right. The right to explain is owned by the company.

9
Ewbank, 38 Bluestem Road, Ipswich, Suffolk, IP3 9RR Tel. 01473 271 272
PRODUCT ASSEMBLY
Securing the aluminium tube
• Push the end of the aluminium tube horizontally into the vacuum hole of the main
body. A click noise will indicate that the tube is securely fastened to the main body
(figure 1).
• To remove the aluminium tube, hold the main body with one hand and pull it out with
the other hand by pressing the release button. (Figure 2)
ASSEMBLY INSTRUCTIONS
Figure 1 Figure 2
Securing the floor brush
• Push the aluminium tube into the connecting socket on the floor brush. A click noise
will indicate that the tube is securely fastened to the floor brush (Figure 3).
• If you want to remove the brush, press the release button on the floor brush connecting
socket whilst holding the brush and it can be safely removed. (Figure 4)
NOTE: The floor brush can also connect directly to the main body without the need for the
aluminium tube.
Figure 3 Figure 4

10
PRODUCT ASSEMBLY
ACCESSORIES
Telescopic crevice tool
This tool is designed to access debris in cracks and crevices in furniture and the corners
of rooms, and is especially helpful when using it for such things as cleaning the car. The
crevice tool can be extended to allow the user to access hard to reach areas.
2-in-1 dusting and upholstery brush
This tool comes with bristles to dust and clean hard surfaces, and a lint strip to help pick up
dust and debris from soft furnishings.
Turbo pet brush
This attachment has an additional motorised brush inside that gives a more intense, turbo
clean; great for tackling stubborn material such as pet hair.
Wall mounted charging port and accessory holder
Charge the unit by placing it on the wall mounted charging port as well as storing
accessories
Attaching telescopic crevice tool:
Attaching 2-in-1 dusting and upholstery tool:

11
Ewbank, 38 Bluestem Road, Ipswich, Suffolk, IP3 9RR Tel. 01473 271 272
PRODUCT ASSEMBLY
Attaching turbo pet brush:
BATTERY INSTALLATION
Slot the battery into the main body as per below. A click noise will sound once the battery
is secured correctly in the main body.
IMPORTANT NOTE:
To maintain the life of the battery ensure the appliance is stored in a cool dry place, and
leave the battery in a semi-charged state.

12
OPERATING INSTRUCTIONS
Preparation
Before using the appliance ensure that the battery is securely installed and is fully charged.
If not, recharge the battery (following instructions in ‘Battery charging’ section) before use.
Operating the vacuum cleaner
Start by selecting the appropriate attachment required for cleaning. Once the required
attachment is safely secured to the main body, simply squeeze and release the power
trigger for the power to turn ON. Once cleaning is complete, squeeze and release the
power trigger again for the power to turn OFF.
Adjusting the power level and using AUTO mode
When the AUTO button is pressed the vacuum cleaner uses special infrared sensors that
are able to automatically detect the amount of dust and debris that is travelling through the
vacuum tube.
When dust passes through the appliance it blocks the light emitted by the infrared sensor.
The more light that is blocked the more dust and debris there is being sucked through the
vacuum tube, and therefore the amount of power required is automatically increased or
decreased based on the sensors.
To manually change the power setting manually press the ‘+’ button to increase the power
and the ‘-’ button to decrease the power.
Power trigger Attachment options
Power trigger
Attachment options
AUTO mode
Manual power control

13
Ewbank, 38 Bluestem Road, Ipswich, Suffolk, IP3 9RR Tel. 01473 271 272
OPERATING INSTRUCTIONS
Emptying the dust container
Once the appliance is safely turned OFF, press the dust container release button on the
bottom of the dust container (Figure 5)
Once the dust container release button is pressed the bottom of the container will open and
the contents can be emptied (Figure 6)
IMPORTANT NOTE:
To avoid dust re-emission into the home it is advisable to empty the dust container outside
wherever possible
Figure 5 Figure 6
Figure 9
Battery charging
• Connect the charger lead into the socket located on the back of the battery whilst it
is secured in the main body or charging port and the plug is connect to the power
socket. (Figure 7, Figure 8 and Figure 9)
Figure 7 Figure 8
Battery power level indicator light
Low charge: indicator light will flash
Fully charged: indicator light will be solid
IMPORTANT NOTE:
It is recommended that every 3 months the battery is charged for 3 hours (do not need to
be fully charged).
NEVER charge the battery for longer than the recommended charge time of 5 hours to
prevent the battery from overheating and long term damage.
It is recommended to fully discharge the battery before recharging.

14
CLEANING AND MAINTENANCE
DAILY MAINTENANCE
Product Maintenance
In order to maintain the performance of the vacuum cleaner it is recommended
that you maintain its components on a regular basis. Before cleaning the main body
(handheld part), make sure the machine has been turned OFF and the product is not
recharging.
Scrub with water or a neutral cleaning detergent. Before scrubbing, ensure the cloth is dry.
Do not allow any water into the internal parts of vacuum cleaners (Figure 10)
After cleaning, ensure the appliance is not placed in an area with direct sunlight or in wet
place.
Figure 10
Cleaning dust container
Once the amount of dust reaches the “MAX” line the dust container must be emptied as
soon as possible. In order to make it easier to empty the dust container, it is recommended
that you remove the aluminium tube and/or any other accessories before cleaning. After
the appliance is safely turned OFF, press the dust container release button and empty
the dust. If any stubborn dirt is found in the inner wall of the dust container, please wipe
it carefully with a damp cloth. After cleaning, ensure the cover for the dust container is
securely locked back in place before using the appliance again.
IMPORTANT NOTE:
After cleaning with a damp cloth it is essential that the dust container is fully dry before
the appliance is used again.
Cleaning the outlet sponge
In order to maintain the performance of the appliance it is recommended that you regularly
clean the outlet sponge (roughly every 3-6 months depending on usage). Press and hold
down the dust container release button, remove from the body and turn the cover, remove
the sponge, and dust off the sponge. If a lot of dust has accumulated on the sponge, wash
it thoroughly and dry it before loading it back into the main body.
IMPORTANT NOTE:
When washing, use cold water ONLY and ensure it is completely dry (usually in sunlight
for 24 hours) before putting it back into the main body.

15
Ewbank, 38 Bluestem Road, Ipswich, Suffolk, IP3 9RR Tel. 01473 271 272
CLEANING AND MAINTENANCE
Cleaning brush
It is recommended that the brush be cleaned once after every 4-5 uses.
1. Turn off the power and remove the floor brush
2. Press the PUSH button the top of the floor brush (Figure 13) to release the roller brush
(Figure 14).
3. Use scissors to remove any tangled hairs and debris (Figure 15).
4. When the clean up is complete, push the roller brush back into its original position.
There will be the sound of a click to show it is securely back in place (Figure 16).
Figure 13 Figure 14 Figure 15 Figure 16
Filter disassembly
• Rotate and remove the dust container from the main body and then rotate and remove
the filter (Figure 11)
• Remove the filter element in the direction indicated by the arrow (Figure 12)
Figure 11 Figure 12

16
CLEANING AND MAINTENANCE
STORAGE
The main appliance and accessories can be stored on the wall mounted charging port:

17
Ewbank, 38 Bluestem Road, Ipswich, Suffolk, IP3 9RR Tel. 01473 271 272
TROUBLESHOOTING
If you experience difficulties with the appliance, please check the suggestions below before
contacting customer services on 01473 271272:
PROBLEM SOLUTIONS/TIPS
The vacuum cleaner
does appear to have
any power
The battery is not fitted correctly. See BATTERY INSTALLATION
on page 11.
The battery has no charge. See BATTERY CHARGING page
13.
The motor thermostat may have tripped. Empty the dust
container and check for blockages. Clean the filters and allow
the machine to cool for approximately 1 hour. If you have
washed the filters, wait 24 hours to fully dry before placing
back on the machine. See DAILY MAINTENANCE page 14.
The vacuum cleaner
has poor suction
The dust container may be blocked. Check the dust container
and handheld inlet for blockages. See EMPTYING THE DUST
CONTAINER page 13.
The filters may be clogged. See DAILY MAINTENANCE page
14 - 15.
There maybe a blockage. Ensure all attachments are clear of
blockages.
The floor brush may be blocked. See CLEANING BRUSH page
15.
The motor is making
an abnormal sound
There may be an obstruction. Clear any obstacles inside the
main suction tube.
The brush bar isn’t
turning
The brush bar may be obstructed or blocked. See CLEANING
BRUSH page 15.

18
TECHNICAL SPECIFICATIONS, FUSE REPLACEMENT & DISPOSAL INFORMATION
Working voltage (V) 25.2
Rated motor power (W) 380
Battery capacity (mAh) 2000
Vacuum (KPa) 18
Suction power (W) 140
Dust barrel capacity (L) 0.6
Once charging time (h) 5
Maximum operating time (mins) 35
Noise level (dB) 75
Product dimensions (mm) H:1170 x W:250 x D:230
Net weight (kg) 2.65
Appliance class (main unit) 2
TECHNICAL SPECIFICATIONS
Disposal Information
The European Directive 2012/19/EU on Waste Electrical and Electronic
Equipment (WEEE), requires that old household electrical appliances must not
be disposed of in normal unsorted municipal waste.
Old appliances must be collected separately in order to optimise the recovery and
recycling of the materials they contain and reduce the impact on human health and the
environment.
The crossed out “wheeled bin” symbol on the product reminds you of your obligation, that
when you dispose of the appliance it must be separately collected. Consumers should
contact their local authority or retailer for information concerning the correct disposal of
their old appliance.
Fuse Cover
Fuse Replacement (Class II)
Remove the fuse cover with a small flat head screw driver. Take out
the fuse and replace with a new fuse of the same Amp. Replace the
fuse cover and push back into place.
*The Company reserves the right to make any technical and design changes to the product as a result of
continuous improvement. The explaining title belongs to our company;
*About noise: this data is based on noise testing in our laboratory according to IEC60704-1: 1997
lEC60704-2-12001.According to international standards, noise in actual use varies according to the
environment (room temperature, humidity, atmospheric pressure, original indoor noise, etc.).

19
Ewbank, 38 Bluestem Road, Ipswich, Suffolk, IP3 9RR Tel. 01473 271 272
WARRANTY TERMS & CONDITIONS
Ewbank Warranty Terms & Conditions
This product is guaranteed for a period of 24 months as standard from the date of
purchase against mechanical and electrical defects. Please note that the battery
included with this appliance is only covered for a period of 12 months.
To qualify for the warranty, the product must be used for domestic household use only
and in accordance with the instructions in the user manual. Any misuse of the product
will result in the warranty being void. If after 12 months it is deemed that any damage
or fault with the product is due to the battery then Ewbank reserves the right to refuse
to repair, replace or offer a refund on the appliance.
The warranty does not cover accidental damage, misuse, neglect, tampering or
incorrect adjustment or installation.
The warranty will be rendered invalid if the product is resold, has had its serial
number removed (or has an invalid serial number), or if an unauthorised person has
carried out any repairs or alterations.
The warranty does not cover accessories or consumable parts that require replacement
under normal use. This includes shelving, dials, filters, belts and trays etc.
In the unlikely event of a breakdown please refer to the Troubleshooting guide in your
user manual and check all plugs, fuses and the electricity supply.
If you still require assistance please contact our Customer Service department on
01473 271 272 or write to us at the following address:
Customer Service Department
Ewbank, 38 Bluestem Road,
Ipswich, Suffolk, IP3 9RR
Please quote the Product Code and the PO Number on the rating label and give
details of the exact fault. We will then decide whether to repair or replace the item.
Before we arrange the repair or replacement you will be required to return a copy of
your proof of purchase. Please retain your original.
If an item is replaced within the agreed warranty period, the warranty for the
replacement item will be calculated from the purchase date of the original.
In the event that the product is inspected and no fault is found or the product is not
within the warranty period you will be charged for the repair and any carriage costs.

Disclaimer: Ewbank operate a policy of continual improvement and development.
We therefore reserve the right to change/alter the specification and appearance of our appliances without prior notice.
All diagrams and images shown in this manual are for illustration purposes only.
Your Guarantee
This product is covered by a 2 year guarantee (1 year guarantee on the battery).
This does not cover normal wear and tear or abuse.
For guarantee purposes, please retain your original receipt as proof of purchase.
This guarantee does not affect your statutory rights.
For spares, service and further information please contact;
Ewbank, 38 Bluestem Road, Ipswich, Suffolk, IP3 9RR
Tel: 01473 271 272
This manual suits for next models
1
Table of contents
Other Ewbank Vacuum Cleaner manuals

Ewbank
Ewbank Zest CVZ135 Manual

Ewbank
Ewbank Go-Go HMV600 Manual

Ewbank
Ewbank Chilli HSV1000 Manual

Ewbank
Ewbank SURGEPLUS User manual

Ewbank
Ewbank Cascade 280 Manual

Ewbank
Ewbank EW5015 User manual

Ewbank
Ewbank VC600 Guide

Ewbank
Ewbank Cascade 280 Manual

Ewbank
Ewbank MOTION EW3015 User manual

Ewbank
Ewbank Chilli HSV1000 Manual

Ewbank
Ewbank EW4001 DV6 User manual

Ewbank
Ewbank 280 Manual

Ewbank
Ewbank MOTION EW3001 User manual

Ewbank
Ewbank MOTION+ EW3002 User manual

Ewbank
Ewbank Chilli-3 HSVC3 Manual

Ewbank
Ewbank Chilli 4 Cyclonic HSVC4 Manual

Ewbank
Ewbank HYDROC1 EW3070 User manual

Ewbank
Ewbank EW3021 User manual

Ewbank
Ewbank raycop Manual

Ewbank
Ewbank epv1100 Manual