Ewbank epv1100 Manual

Care and UseInstructions
Ewbank Products Ltd., Ashcombe Court, Woolsack Way, Godalming, GU7 1LQ, UK
www.ewbank.co.uk
,
Floor Cleaner
Scrubber,
Polisher & Vac
Model EPV1100

2
Pack Contents:
1
-
Polishing head & vacuum
2
-
Handle assembly upper &
lower sections
3
-
Scrubbing pads (white) x2 EB0129
4
-
Cleaning/Polishing pads (blue) x2 EB0130
5 - Buffing pads (yellow) x2
6 - Scrubbing brush plates x2
7 - Hook & Loop backing plates x2
8 - Vacuum head x1
Read the Care and Use instructions before
using the Ewbank®4-in-1 Floor Cleaner,
Scrubber Polisher & Vac and
make sure
that:
-The power cord is in perfect condition
-All packaging materials are removed from
the machine
Thank you for purchasing your Ewbank® 4-in-1 Floor Cleaner,
Scrubber Polisher & Vac.We hope you enjoy using it.
Please read the manual carefully to get the most out of
your
product and retain these instructions for future reference.
1
2
5
76
348
EB0589
EB0580
EB0581
EB0674

3
-Do not allow machine to run unattended at
any time.
-Close supervision is necessary when this
machine is used near children. Do not allow
it to be used as a toy.
-The machine is designed for household use
only, do not expose to rain.
-Whilst in use never turn the machine over.
Keep machine level during use.
-To provide continued protection against the
risk of electric shock, connect properly to an
earthed socket-outlet.
-Use only genuine manufacturer's parts.
-It is recommended that a RCD (residual
current device) rated at 30mA is fitted into
the mains supply socket-outlet for added
protection against electric shock.
-Do not immerse power cable, plug or
machine in water or any other liquid.
-Take extra care if operating machine in bare
feet or when wearing open toe shoes or
sandals.
-Do not operate with a damaged power
cable, keep feet and all parts of body away
from the rotating pads.
-Use power cable clip on handle to keep
power cable clear of rotating pads.
-Do not pull or carry by power cable, or use
power cable as a handle, close door on
power cable or pull power cable around
sharp edges or corners. Keep power cable
away from heated surfaces.
-Unplug the polisher when not in use. Turn
all controls off before unplugging from
electrical socket-outlet.
-Do not unplug by pulling on power cable.
Always grasp the plug, not the power cable.
Never handle plug or appliance with wet
hands.
-Store in a dry place. Do not expose
machine to freezing temperatures.
-This appliance is not intended for use by
persons (including children) with reduced
physical, sensory or mental capabilities, or
lack of experience and knowledge, unless
they have been given supervision or
instruction concerning use of the appliance
by a person responsible for their safety.
-Unplug after use and before cleaning.
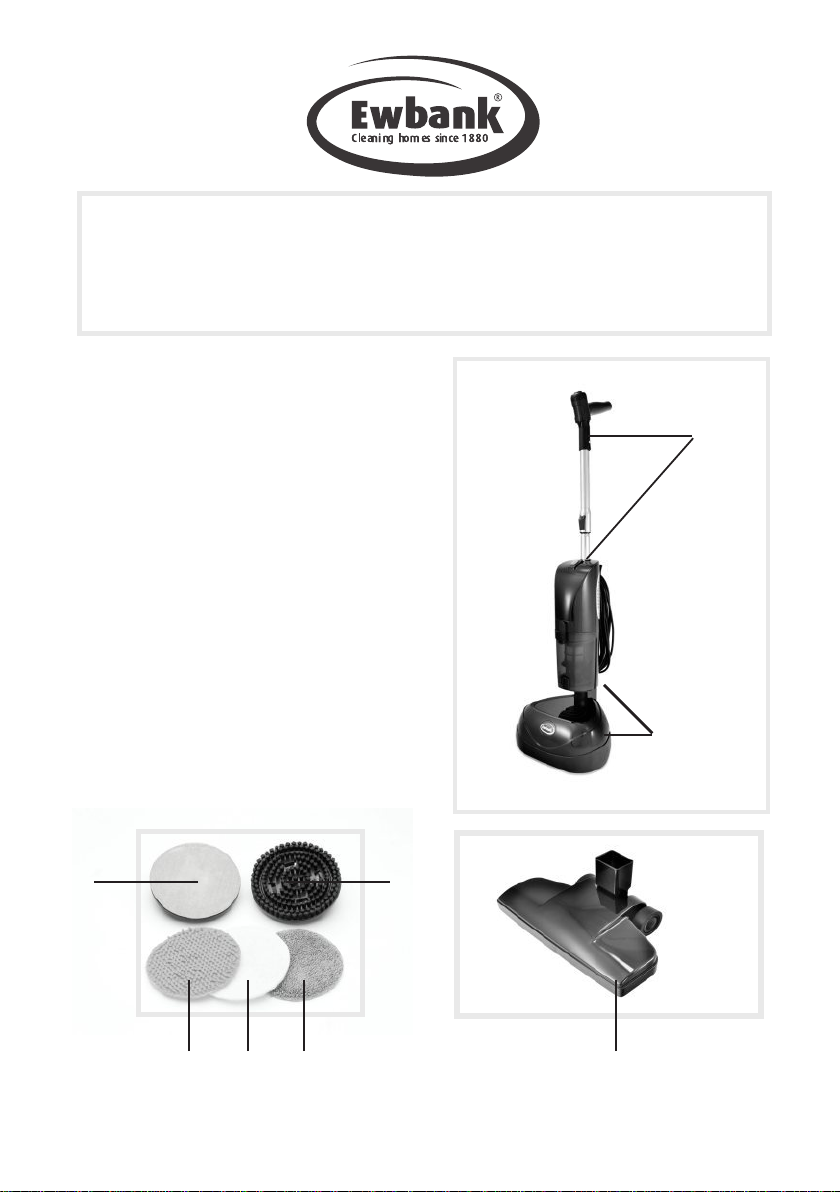
-The Ewbank® 4-in-1 Floor Cleaner,
Scrubber Polisher & Vac is intended for
domestic use and not commercial use.
-Check pads for embedded grit or hard
material before using on floors or scratching
may occur.
-Take care not to transfer polish from
impregnated pads onto carpet when storing
the unit after use.
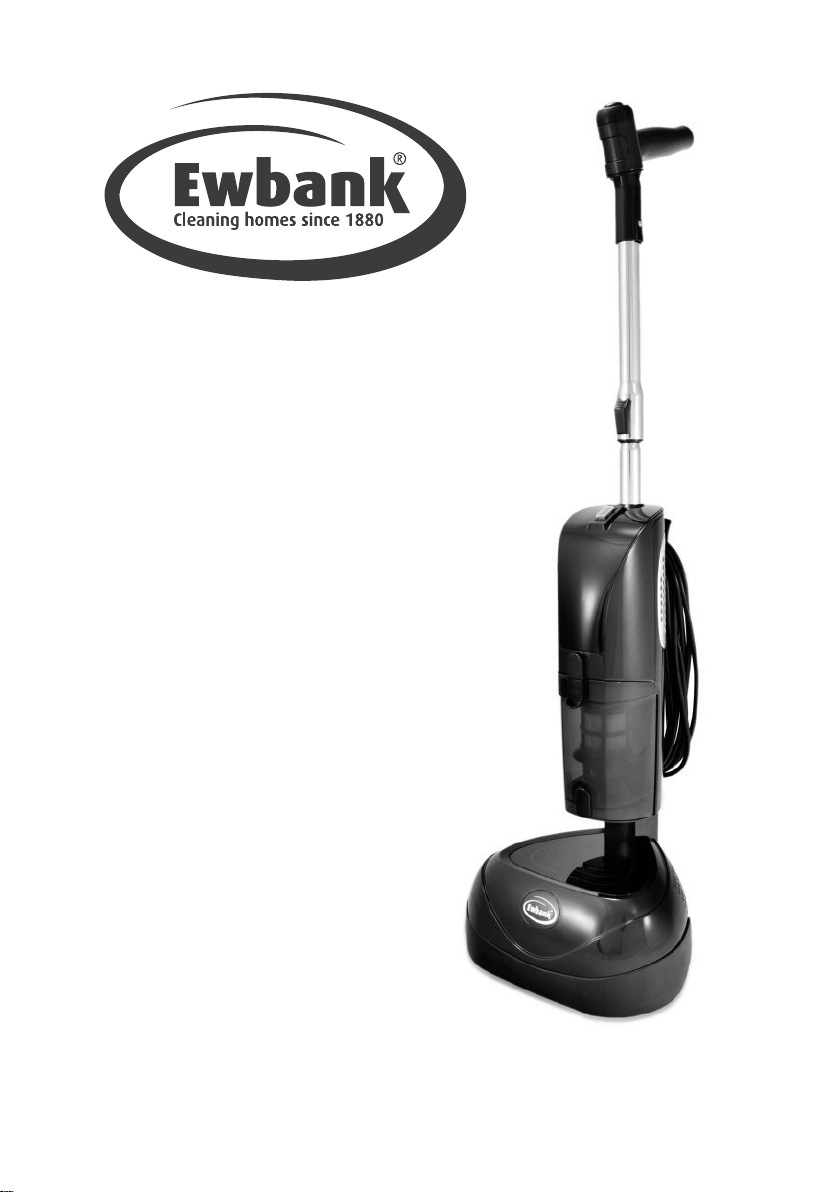
The Ewbank®4 in 1 Floor Cleaner, Scrubber and Polisher with 800W
Cyclonic Vacuum with HEPA filtration delivers a complete floor cleaning
solution. The polisher delivers 2,200rpm on the contra-rotating discs
capable of cleaning, scrubbing and polishing your hard floors to a
beautiful shine with the enclosed microfibre pads. The cyclonic vacuum
detaches from the polishing unit for vacuuming hard floors before or
after polishing.
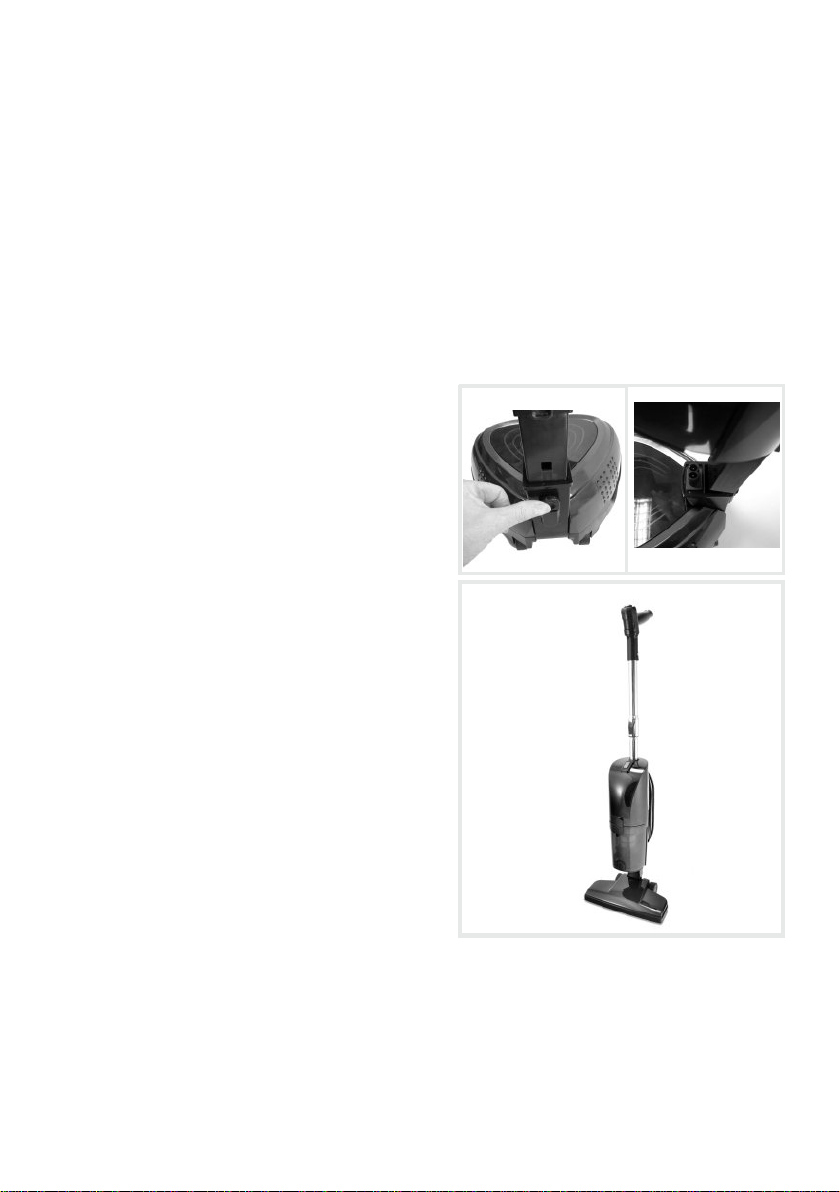
USE AS POLISHER / SCRUBBER, POLISHER / SCRUBBER
WITH VAC OR UPRIGHT VAC
Saftey
In
structions -
CAUTION

4
Assembling the Polisher
-Insert the handle's inner metal tube into the vacuum (Fig.1)
-Push plastic upper handle section onto the handle's outer metal tube,
which will lock into place by way of a metal button (Fig.2)
Changing the pads and plates on your product
-Make sure appliance is not plugged in before fitting or removing the
pads.
-Invert the cleaning head so that the drive hubs are accessible (Fig. 3)
-Place the required hook & loop backing plate (for pads) or brush plate
over the hub, making sure the four connectors are aligned to the holes
in the hub (Fig.4).
-Press the plated down to clip into place.
-Always use two plates of the same type, i.e. not 1 brush and 1 pad
(Fig.5).
-Simply pull the plates/brushes off to remove and change.
-Adjust the height of the handle
White / blue / yellow pads can be applied directly to the
backing plates and peeled off to remove (Fig.6)
For additional stability the pro-grip handle can be opened to
enable two-handed use. Press the button above the grip
(Fig.7) and open the handle (Fig.8)
Using your polishing head - DO NOT USE ON CARPET
-Take care not to slip over when polishing floors, they can become very
slippery in the process.
-Only use dedicated floor products, other inappropriate detergents or
types of polish could leave the floor dangerously slippery.
-Do not leave the product operating in one area for a prolonged period
of time as this may damage your floor surface.
Applying floor treatments
-The recommended floor treatment is Ewbank® Floor Polish, which has
been specifically developed to complement the EPV1100. Ewbank®
Floor Polish is available from Ewbank® retail stockists, from the
Ewbank® website www.ewbank.co.uk or by calling 01483 663050.
-Always read and follow the manufacturer’s instructions.
-Apply the treatment directly to the floor unless instructions indicate
otherwise.
Fig. 1
Fig. 3
Fig. 2
Fig. 4
Fig. 5
Fig. 6
Fig.
7
Fig.
8

Scrubbing / cleaning the floor
-Heavily soiled surfaces may require the brush
attachments are used initially to loosen any debris.
Otherwise ensure that the white scrubbing pads
are attached (see page 4).
-Use the white scrubbing pads with floor cleaner or
Ewbank® Floor Polish to remove stubborn stains
or old treatments from the floor surface.
-Turn the product on at the power socket and
select the correct setting selected on the power
button. The default setting is off. Press down and a
light will show on the front of the unit, this means
the polisher is on and the vacuum is off. Press
down again the polisher and vacuum will be on.
-With your foot securing the head of the polisher on
the floor (1), pull the handle towards you (2) and
the product will start (Fig.9). Returning the handle
to its upright position will stop the product.
-Move at a speed of about 1 minute every 1M2 and
follow the diagram for an even finish (Fig.10)
-Do not sweep the polisher from side to side.
-Do not leave the product operating in one area for
a prolonged period as this may damage your floor
-Once cleaning is complete, turn the unit off by
returning it to its upright position. Polishing / buffing
the floor
-Clean floor thoroughly first before adding your
chosen floor polish / wax
-If you are using an alternative floor polishing wax
or oil to Ewbank® Floor Polish, please refer to the
manufacturer's instructions when using with the
Ewbank® 4-in-1 Floor Cleaner, Scrubber Polisher
& Vac
-Start with the blue cleaning pads initially and buff
to a finish with the yellow pads for a high-sheen
finish
-Keep the polisher moving, do not stop in one place
for a long time or it will spoil the finish
-Once polishing is complete, turn the unit off by
returning it to its upright position
-A glossy finish may not always be possible; this
depends on the polish/wax used and the type of
floor surface. Sometimes several coats of polish
will enable a glossy finish.
5
Fig.9
2.
Pull back
tostart
1.
Placefoot
on base
Power Cable Storage
-The electrical power cable can be stored on the
rear of the product using the convenient power
cable storage hooks
(
a
pp
r
o
x. 1minut
e
p
e
r m
e
tr
e
s
qu
a
r
e
)
Fig.10 1m
1m

Cleaning the floor pads
Assembling the Vacuum
-All pads and floor attachments are washable
Floor vacuum / upright vacuum mode
-The brushes and scouring pads can be washed under
-Leave the metal extension handle in place
the tap with warm soapy water. The blue & yellow
if the EPV1100 is to be used as a floor or
polishing pads can also be machine washed in cool
upright vacuum
water (30°C) and dried naturally. It is recommended to
re-shape the pads whilst drying
-Remove the polis
her head by depressing
the button at the back of the polisher head
-The polishing head unit is not suitable for washing
and lifting the vacuum body clear (Fig. 11)
in water, it must be wiped with a damp cloth
-Please note that the parts do not click
together
Troubleshooting
-The unit is now suitable for use as a floor /
Smear marks are made on floor when polishing
upright vacuum (Fig. 12)
-Has the polish/wax been allowed to dry?
Fig. 11
-Does an existing floor treatment need to be removed?
No gloss sheen is being produced
- Floor polish/wax application level may need to be
increased, try another coat. Allow to dry and re-polish.
- Please note some types of floor do not produce
gloss finish.
Scratches are made on the floor
Fig. 12
- Check for grit or dirt stuck to the pads or on the
rear wheels
- Clean/replace the pads or wipe the wheels free
from debris
Floor is too slippery
- Check the polish/wax is designed to be used on
floors. Good floor polish should always produce a
glossy but grippy finish
Vacuuming
You may use the vacuum while polishing on hard
floors only. Alternatively use the EPV1100 as a
standalone vacuum by changing to the vacuum
head and use on hard floors throughout the home.
Additional Accessories
A pack of accessories for the EPV1100 is also available to enhance your experiences with the unit and
can be purchased by contacting us using the contact information found within the manual.
6

7
Important Care Advice
The
EPV1100
i
s a
lso a
powerful highly efficient
vacuum cleaner.The powerful suction will remove
the smallest particles of dust and dirt. To prevent the unit from overheating and to maintain
efficiency the filter MUST BE cleaned regularly.
The waste chamber is transparent to enable you to see accumulated
dirt and debris.
When this happens the efficiency of the
motor unit is reduced and the waste chamber
must be emptied and
the filter assembly cleaned.
A blocked filter will restrict airflow to the motor
which can start overheating.
This will become
apparent as the noise of the motor will become higher
pitch. If this happens stop the unit and then
clean the filter
.
As a safety precaution the motor is designed to cut out in the event
of overheating.
P
lease allow the unit to cool sufficiently for up to
one hour before restarting.
Emptying the waste chamber and caring for
your filter
Disconnect the E
PV1100
from the
power socket-outlet. Depress the waste chamber
release
button (Fig. 1
3
). While holding the release
button, separate the chamber from the main body
(Fig. 1
4
), and empty the waste from the chamber
by pressing the release button
(Fig. 1
5
).
Filter cleaning – we recommend the filter is
checked and cleaned each time the waste
chamber is emptied.
The filter has 2 separate parts, an outer
pre-filter basket and a pleated filter which fits inside
this
basket. The pre-filter will collect larger particles
and prevent these from becoming lodged in the
grooves of the pleated filter.
To clean the filter separate the two parts, the pleated filter should easily separate from the
pre-filter, then gently shake, tap or brush the pleated filter to remove dust particles and debris
from
the grooves (Fig. 1
6
). The outer pre-filter can be brushed or tapped to remove debris around
the
filter (Fig. 1
7
).
Both parts of the filter assembly are suitable for gentle washing in warm (not hot) water. Do not
use detergent. Allow both the pleated filter, and external pre-filter to dry naturally for 24 hours
before refitting to the EPV1100. Ensure all parts have fully dried before reassembly. Only use the
EPV1100 with both parts of the filter assembly in place.
Fig. 13 Fig. 14 Fig. 15 Fig. 16 Fig. 17

Technical
Data
Power: 160W (Polisher) 800W (Vacuum)
Voltage: 220-240V
Frequency: 50Hz
Rpm: 2,200
INFORMATION
ON
THE
DISPOSAL
OF
WASTE
ELECTRICAL
AND
ELECTRONIC
EQUIPMENT
KNOWN
AS
WEEE
Your
attention
is
brought
to
new
directives
applicable
to
the
disposal
of
this
electrical
equipment
where,
in
accordance
with
legislation,
this
product
must
not
be
disposed
of
in
your
normal
household
waste.
Instead
it
is
your
responsibility
to
dispose
of
this
type
of
waste
by
handing
it
over
to
special
designated
collection
points
for
recovery
and
recycling.
This
product
is
marked
with
a
‘Wheelie
bin’
symbol
with
a
cross
on
it
to
remind
you
of
this
action.
The
objective
of
this
directive
is
to
help
conserve
resources
and
ensure
that
it
is
recycled
in
a
manner
that
protects
human
health
and
the
environment.
For
more
information
about
where
you
can
drop
off
your
waste
please
contact
your
local
authority,
take
back
facilities
are
free
of
charge.
Your
Guarantee
This product is covered by a 12 month guarantee.
This does not cover normal wear and tear or abuse.
For guarantee purposes, please retain your original receipt as proof of purchase.
This guarantee does not affect your statutory rights.
For spares, service and further information please contact;
Ewbank Products Ltd, Ashcombe Court, Woolsack Way, Godalming, GU7 1LQ, UK
Tel: 01483 663050. Opening hours Mon-Thu 8:30am – 5.00pm / Fri 8:30am – 3.30pm
www.ewbank.co.uk
Made in China
EB0587 12/15
8
Other manuals for epv1100
1
Table of contents
Other Ewbank Vacuum Cleaner manuals

Ewbank
Ewbank EW3021 User manual

Ewbank
Ewbank EW4001 DV6 User manual

Ewbank
Ewbank Zest CVZ135 Manual

Ewbank
Ewbank VC600 Guide

Ewbank
Ewbank EW5015 User manual

Ewbank
Ewbank raycop Manual

Ewbank
Ewbank Cascade 280 Manual

Ewbank
Ewbank MOTION EW3015 User manual

Ewbank
Ewbank Chilli HSV1000 Manual

Ewbank
Ewbank Go-Go HMV600 Manual

Ewbank
Ewbank MOTION+ EW3002 User manual

Ewbank
Ewbank Chilli HSV1000 Manual

Ewbank
Ewbank AIRSTORM 1 User manual

Ewbank
Ewbank 280 Manual

Ewbank
Ewbank Chilli-3 HSVC3 Manual

Ewbank
Ewbank UV400 Manual

Ewbank
Ewbank MOTION EW3001 User manual

Ewbank
Ewbank Chilli 4 Cyclonic HSVC4 Manual

Ewbank
Ewbank Cascade 280 Manual

Ewbank
Ewbank SURGEPLUS User manual