Ewbank MOTION+ EW3002 User manual

INSTRUCTION MANUAL
MOTION+ Reach Pet Bagless Upright Vacuum Cleaner
EW3002
Ewbank has a British heritage to be proud of. It’s a household favourite and much loved brand that has been providing innovative cleaning solutions for 140 years.

2
CONTENTS
Safety Instructions................................................................................................................................ 3-5
Appliance Overview ............................................................................................................................... 6
Operating Instructions ....................................................................................................................... 7 - 9
Cleaning & Maintenance.............................................................................................................. 10 - 15
Troubleshooting & Damage Prevention................................................................................................ 16
Fuse Replacement .................................................................................................................................. 17
Disposal of the Appliance..................................................................................................................... 17
Warranty Terms & Conditions............................................................................................................... 18

3
Ewbank, 38 Bluestem Road, Ipswich, Suolk, IP3 9RR Tel. 01473 271 272
SAFETY INSTRUCTIONS
PLEASE READ ALL THE INSTRUCTIONS BEFORE USE
AND WHEN USING THE APPLIANCE, THE FOLLOWING
PRECAUTIONS MUST BE TAKEN:
FOR HOUSEHOLD USE ONLY.
When using the vacuum cleaner,basic safety precautions should
always be observed, including the following:
• Only use the vacuum cleaner indoors on dry surfaces. Do not
handle the plug or vacuum cleaner with wet hands. Do not use
outdoors or on wet surfaces
• Turn off the vacuum cleaner controls before disconnecting or
connecting from the mains supply
• Always unplug the vacuum cleaner before connecting or
disconnecting the vacuum hose and accessories
• Children should be supervised to ensure that they do not play with
the appliance
• This appliance can be used by children aged from 8 years and
above and persons with reduced physical, sensory or mental
capabilities or lack of experience and knowledge if they have
been given supervision or instruction concerning use of the
appliance in a safe way and understand the hazards involved
• Only use as described in this manual. Only use recommended
attachments
• Do not use the vacuum cleaner if it has been dropped, damaged,
left outdoors or dropped into water
• Do not use the vacuum cleaner with a damaged cord or plug. If
the supply cord is damaged, please consult qualified technician
• Do not pull or carry by cord. Do not use the cord as a handle,
close a door on the cord or pull cord around sharp edges or
corners. Do not run the vacuum cleaner over the cord. Keep the
cord away from heated surfaces

4
• Do not put any objects into openings. Do not use with any
openings blocked and do not restrict air-flow. Keep all openings
free of dust, lint, hair or anything that might reduce airflow
• Keep hair, loose clothing, fingers and all parts of the body away
from openings and moving parts
• Do not pick up hot coals, cigarette butts, matches or any hot,
smoking or burning objects
• Do not pick up flammable or combustible materials (lighter fluid,
petrol, kerosene etc.) or use in the presence of explosive liquids or
vapours
• Do not vacuum up harmful or toxic material (chlorine, bleach,
ammonia, drain cleaner etc.)
• Do not vacuum up hard or sharp objects such as glass, nails,
screws, coins, etc
• Do not use without all of the filters in place
• Keep vacuuming area well lit
• Store the vacuum cleaner in a cool, dry area
• Turn off the on/off switch before unplugging the vacuum cleaner
• Only use CE/UKCA-approved 13 amp extension cords
• Non-approved cords may overheat. Care should be taken to
arrange the cord so that the cord cannot be tripped over
• WARNING: Always switch off and unplug the vacuum cleaner
from the electrical outlet before assembling, opening or emptying
the dirt container, connecting/ disconnecting the attachments, or
carrying out maintenance or troubleshooting checks
• CAUTION: The vacuum cleaner is a very powerful unit. Before
plugging the cord into the electrical outlet, make sure the switch is
in the ‘off’ position. Hold the vacuum cleaner firmly when starting
and in use
SAFETY INSTRUCTIONS

5
Ewbank, 38 Bluestem Road, Ipswich, Suolk, IP3 9RR Tel. 01473 271 272
SAFETY INSTRUCTIONS
• IMPORTANT: If the inlet, hose or extension tube is blocked,
switch off the vacuum cleaner and remove the blockage(s) before
re-starting the vacuum cleaner
• IMPORTANT: We recommend that filters should be checked
and cleaned periodically. For washable filters, ensure they are
completely dry before inserting back into the vacuum cleaner. Do
not wash with detergents. Only use warm water, max 40°C

6
APPLIANCE OVERVIEW
Accessories
1. Handle
2. Dust Container Clamp
3. Dust Container
4. Height Adjustment Knob
5. Main Brush
6. Wheel
7. Cleaner Release Button
8. Power On/Off Button
9. Crevice Tool
10. Power Cord Holder
11 . Brush Tool
12. Handle Clamp
13. Upholstery Tool
14. Stretch Hose
15. Power Cord
1
2
3
4
5 6
7
8
9
10
12
11
15
14
13
Vacuum Cleaner Handle Dusting Brush
Crevice Tool
Pet Turbo Brush Upholstery Tool
7
Ewbank, 38 Bluestem Road, Ipswich, Suolk, IP3 9RR Tel. 01473 271 272
Click!
OPERATING INSTRUCTIONS
Getting Started
Remove the appliance from the box and remove the packaging from the appliance. Either store or
dispose of the box and packaging safely and recycle where possible.
Before first use, please wipe all the parts with a soft, damp cloth and dry thoroughly.
Do not immerse the vacuum in any liquid.
Assembly
Click!
Click!
Click!
Click!
Click!
Click!
Click!
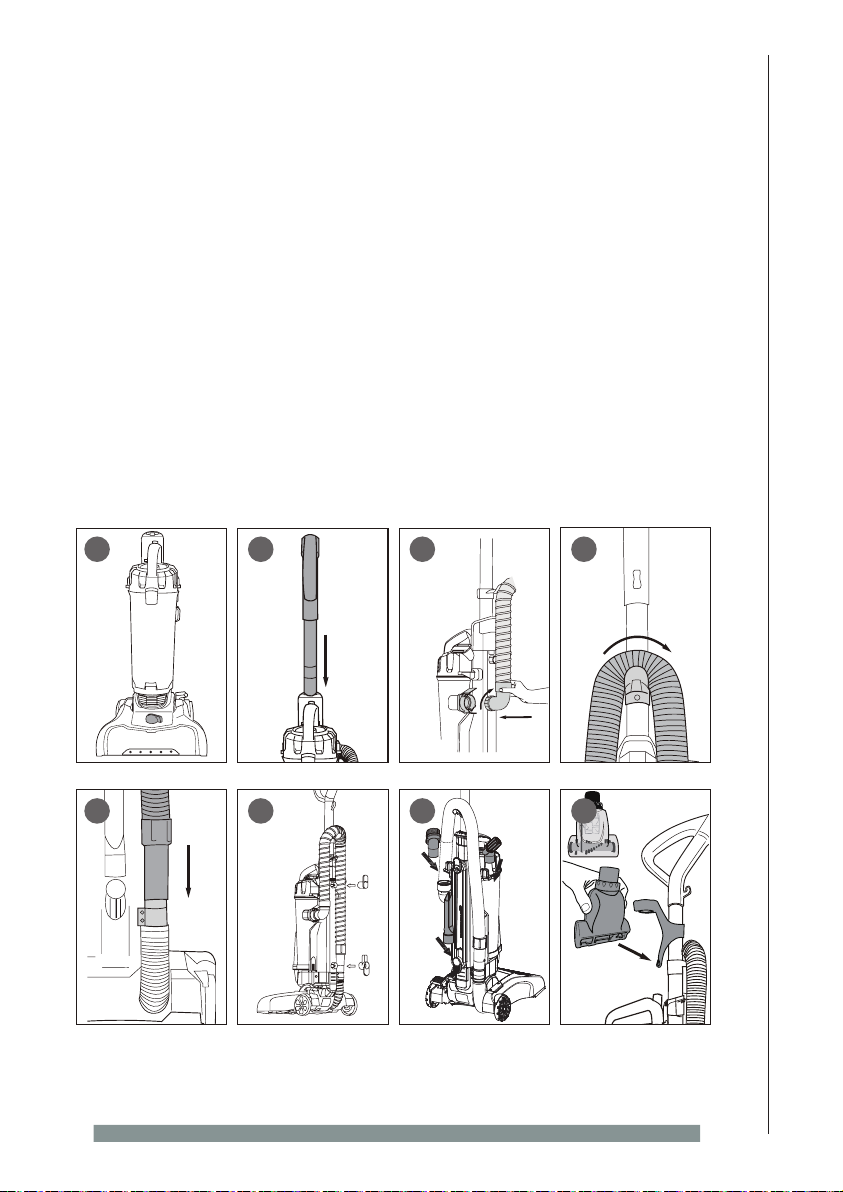
1. Place the dust container onto the machine and push until it clicks into place
2. Slide handle into top of vacuum cleaner. Push down until it clicks
3. Insert bent end of hose into opening at back of dust cup. Twist hose clockwise to lock.
4. Loop hose over hose retainer
5. Push loose end of hose securely onto hose inlet
6. Align upper and lower cord hooks and press to snap in place. Upper cord hook should
rotate freely. Ensure lower clip is correct way around with the hook facing downwards and
the tool holder facing upwards. once snapped into place hard to remove
7. Store accessories on back of vacuum cleaner. Wrap cord onto upper and lower cord hooks
8. Store turbo brush on front of handle. Align brush opening with slot and push to snap tool
into clip
1. 2. 3. 4.
5. 6. 7. 8.
8
OPERATING INSTRUCTIONS
Using the Vacuum
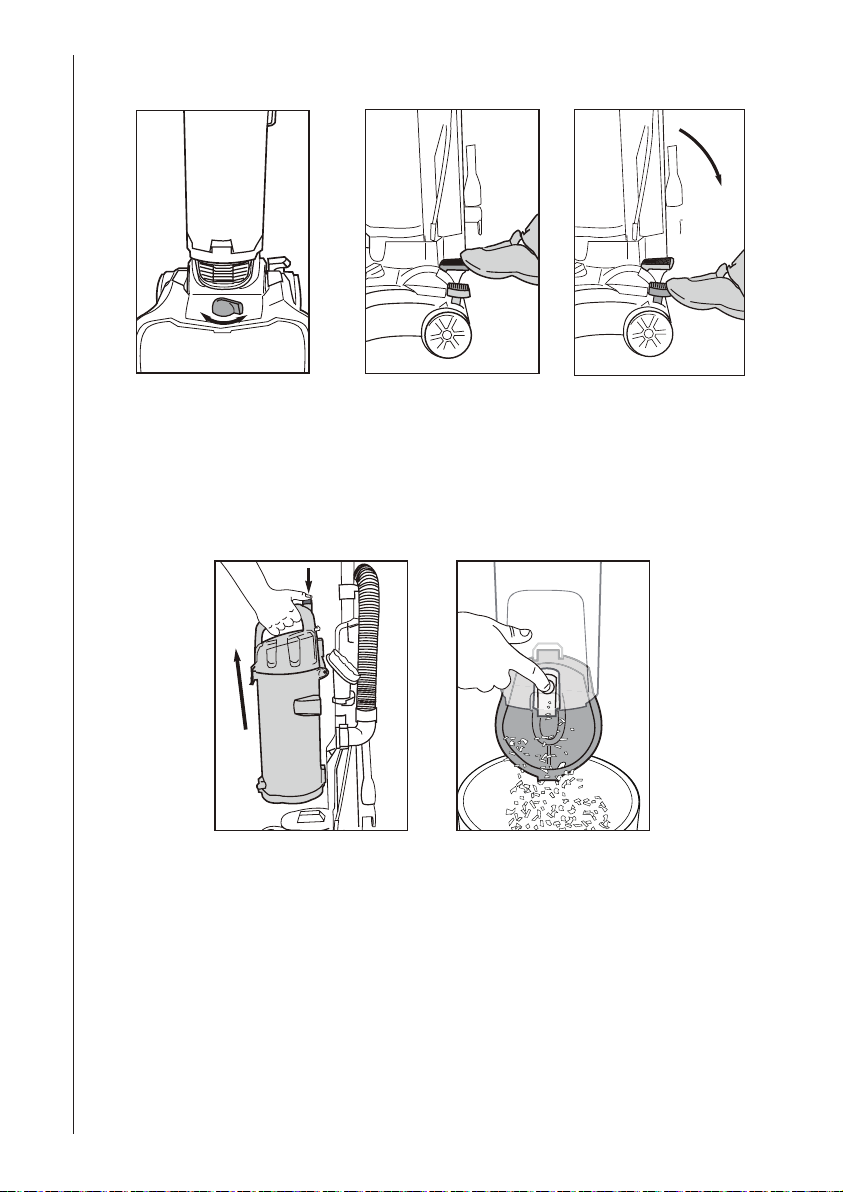
Turn height adjustment knob
to adjust from Low to High
pile carpet or hard floor
setting as appropriate.
Step on power on/off
button to turn vacuum
cleaner on. Step on again
to turn off.
Step on cleaner release
button to lower handle into
position for vacuuming
floors.
Press release button and lift
off dust container
To empty debris, press lever
to release bottom lid.
Emptying the Dust Container
IMPORTANT: We recommend you empty debris from dust container after every use.

9
Ewbank, 38 Bluestem Road, Ipswich, Suolk, IP3 9RR Tel. 01473 271 272
How to Use Accessories
CAUTION: Make sure vacuum cleaner is switched off while attaching and removing tools.
1. Place vacuum in upright position
2. Turn height adjustment knob to highest position (Long pile setting)
3. Pull hose upwards to release end from hose inlet (Fig.1)
4. Check handle opening is clear and nothing has fallen in. Once checked push end of hose
into top of handle, ensuring knot lines up to opening and twist clockwise until it clicks (Fig.2)
5. Press handle release latch and pull out handle (Fig.3)
6. To attach accessories, push desired tool onto end of wand (Fig.4)
7. To use accessories without handle, push desired tool directly onto end of hose (Fig.5)
8. Small Turbo brush is ideal for carpeted stairs, fabric upholstery and small carpeted areas.
Place the tool onto the surface and move forward. Don't apply downward pressure to the
tool. Not suitable for delicate fabrics or surfaces; Do not use the attachment on animals
9. When use of the accessories has finished, twist hose counterclockwise and pull it off from
handle. Slide handle into top of vacuum cleaner and push down until it clicks. Push end of
hose securely onto hose inlet. Store tools on vacuum cleaner back as per set up instructions
on page 7
1. 2. 3. 4.
5.
Recommended Nozzle Use
Nozzle
Cleaning Area
Floor &
Carpets
Furniture
Between
Cushions
Curtains
Stairs
Walls
Skirting
Edges
Radiators
Floor Head P
Brush Tool P P P P
Crevice Tool P P P P P
Upholstery Tool P P P
Pet Turbo Brush P P P
OPERATING INSTRUCTIONS

10
CLEANING AND MAINTENANCE
IMPORTANT: We recommend emptying your dust container and cleaning your filter after every
use.
WARNING! Switch off and disconnect from the mains supply before carrying out cleaning and
maintenance.
To ensure your vacuum cleaner works at optimum efficiency, keep the ventilation holes and
vacuum cleaner surface free from dirt.
Ensure that the dust container is emptied and the air filters are washed regularly.
1. Wipe the outside of the vacuum cleaner and accessories with a damp (not wet) cloth and
then wipe dry. Do not use detergents, solvents or abrasives as these may scratch or damage
the surface
2. Never immerse the vacuum cleaner, cable or plug in water
3. When not in use, store in a cool, dry place
Emptying the Dust Container
1. When the dust container reaches the MAX line marked on the dust container or when the
suction power is reduced, it is time to empty the dust container
2. Switch off and disconnect from the mains supply
3. To keep your vacuum cleaner running efficiently and effectively, it is recommended to empty
the dust container after each use
Click!
Press release button and
lift off dust container.
Hold dust container over
wastebasket and press lever
to release bottom lid.
Once all dirt and debris
has been emptied, close
bottom lid until it clicks
back into place.
11
Ewbank, 38 Bluestem Road, Ipswich, Suolk, IP3 9RR Tel. 01473 271 272
CLEANING AND MAINTENANCE
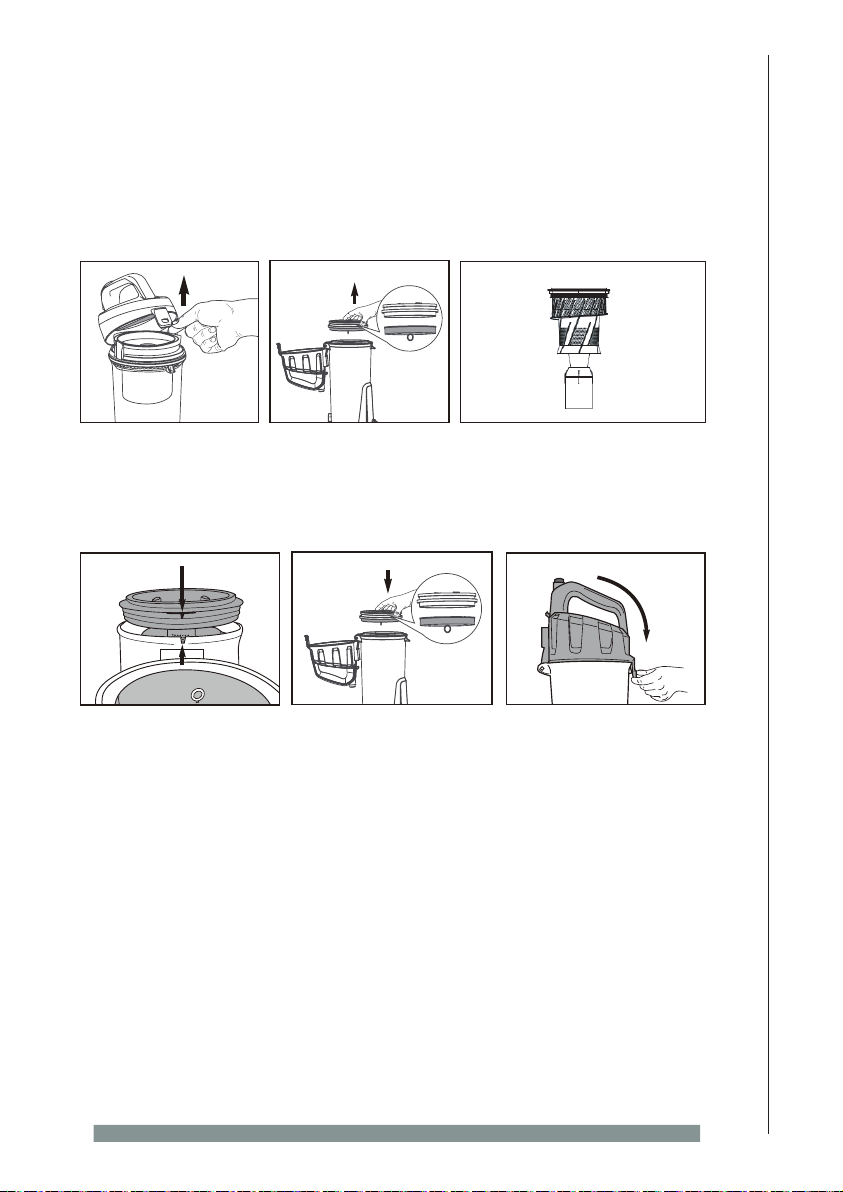
Cleaning the Filters
1. Before starting any cleaning, ensure the appliance is not plugged into the mains supply and
is switched off. The cleaning frequency of filters depend on appliance usage. For maximum
efficiency, the filter at the top of the dust container and dust container should be cleaned
every time, and be washed with water every month, and allow filters at least 24 hours to dry
and make sure it is dry before re-using
2. Washable dust container filters:
Click!
Pull dust container latch to
lift up dust container lid.
Lift out foam filter.
Rinse foam filter and dry
thoroughly.
Grip tabs and lift out. Shake
off dust. Rinse dust cup. Dry all
thoroughly.
Align tab on filter screen
with slot on back of dust
container and drop into
position.
Reinstall foam filter. Close cover till it clicks.
WARNING! Never operate vacuum cleaner without foam filter and filter screen in proper
position and ensure they are dried through.
12
CLEANING AND MAINTENANCE
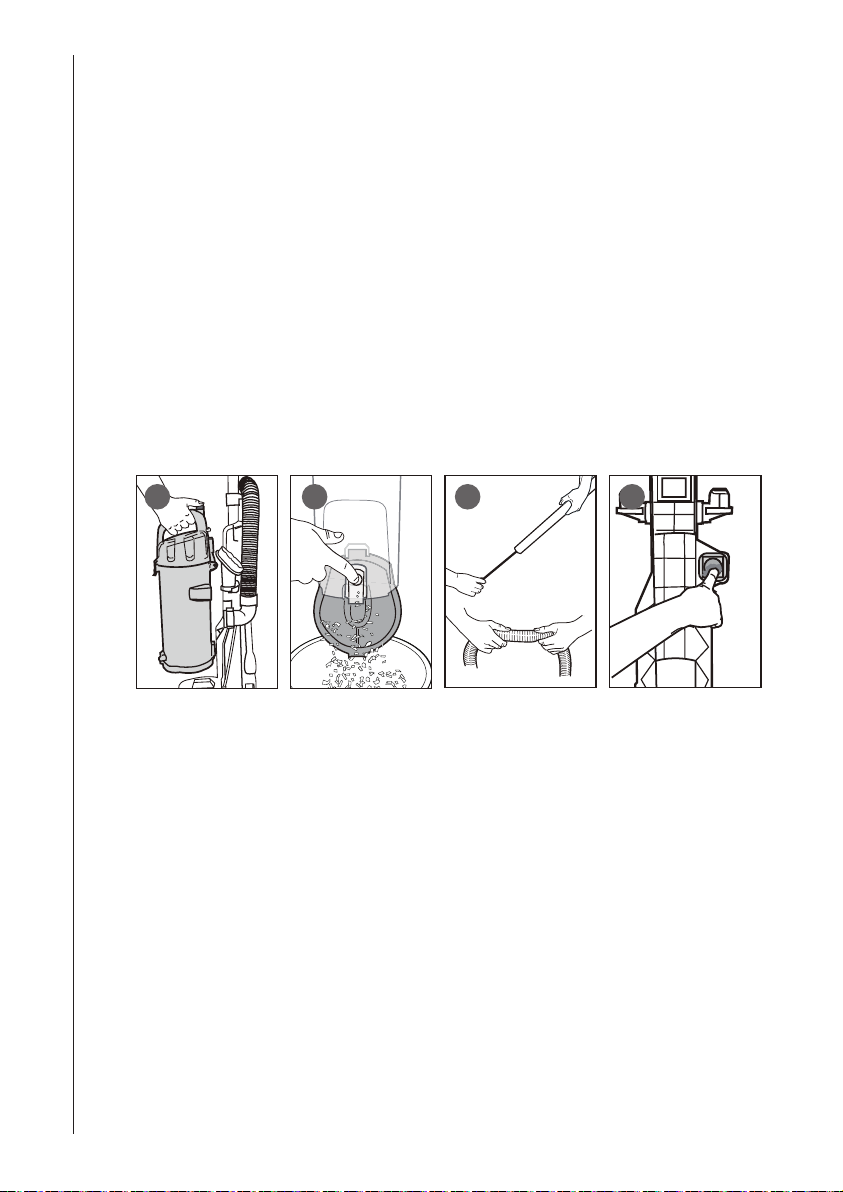
How to Clear a Blockage
Caution: Make sure vacuum is turned off and power cord is unplugged.
If vacuum can’t clean carpet, or if no suction at end of hose, check to be sure air path is not
blocked.
1. Press release button and lift out dust container (Fig. 1)
2. Empty debris. Hold over wastebasket and press bottom lever to release bottom lid (Fig. 2).
3. Check filter screen. Remove any debris and shake off dust (See maintenance instructions on
page 10)
4. Loosen end of hose
5. Use a rod or similar blunt implement to clear a blockage in handle or hose. Stretch hose
to loosen debris. (Fig. 3). Use caution if there is any sharp objects that could have become
imbedded in hose
6. Remove dust container
Caution: Be careful of anything sharp that could have imbedded or got stuck in the unit when
checking!
7. Use finger to check for debris in air path (Fig. 4)
8. Reinstall filters inside dust container and position dust container onto vacuum cleaner
1. 2. 3. 4.
WARNING! Never operate vacuum cleaner without foam filter and filter screen in proper
position.
13
Ewbank, 38 Bluestem Road, Ipswich, Suolk, IP3 9RR Tel. 01473 271 272
CLEANING AND MAINTENANCE
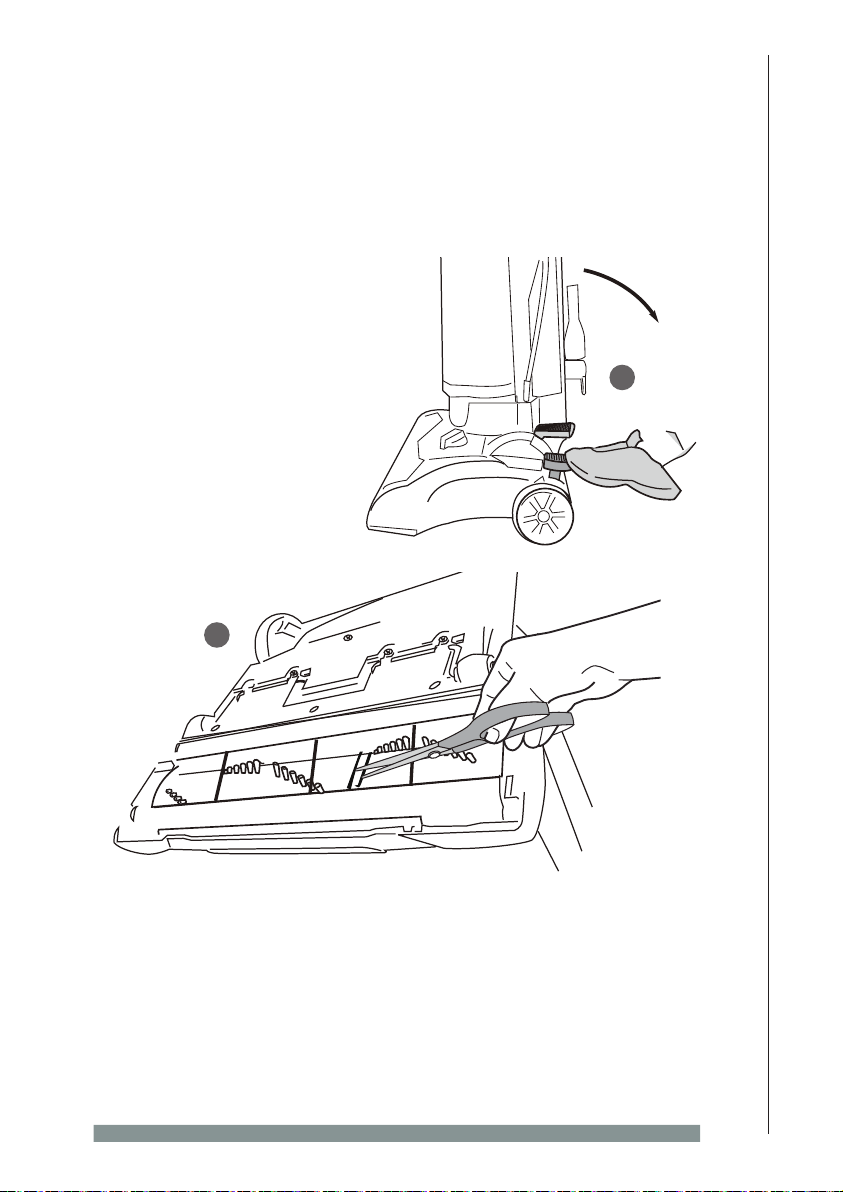
How to Maintain Brush Roll Bar
Caution: Make sure vacuum is turned off and power cord is unplugged.
• Step on handle release to lower handle
• Turn vacuum face down on floor
• To avoid unnecessary service calls, check brush roll bar for debris
• Use scissors to clip heavy threads or strings
• Ensure not to cut any bristles of the bar!
1.
2.
14
1
2
3
4
5
6
1
2
3
4
5
6
CLEANING AND MAINTENANCE
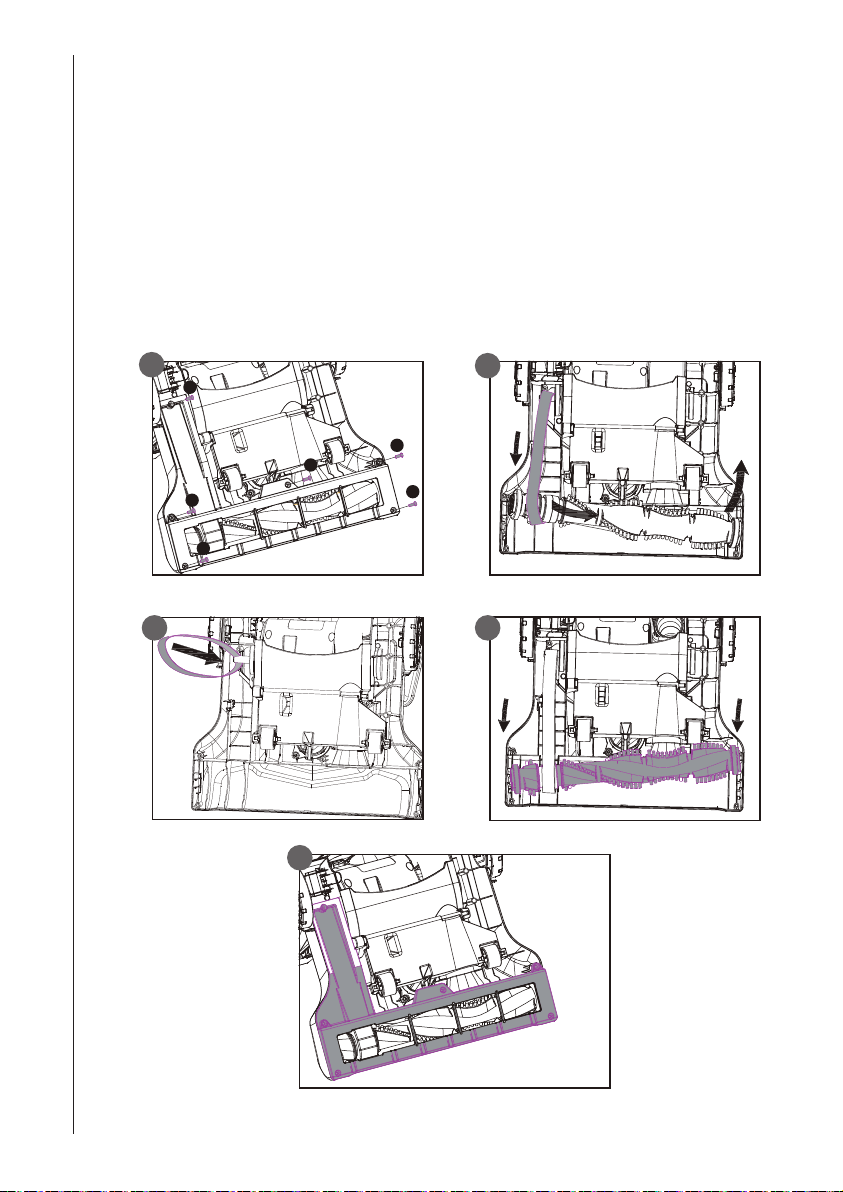
How to Replace Brush Roll Bar or Belt
Caution: Make sure vacuum is turned off and power cord is unplugged.
• Put the product on a flat surface, with wheel facing upwards
• Use a Philips screwdriver to remove 6 screws at the bottom of the base (Fig. 1) lift out brush
cover
• Rotate right end of brush roll bar and lift it out, then lift out left end of brush roll bar. (Fig. 2)
• To replace belt ,position new belt around motor shaft (Fig. 3), loop new belt around brush
roll bar shaft at left end of brush roll bar, then insert left end of brush roll bar first, align brush
roll bar end cap with slot to make it fits into position, press right end of brush roll bar into
position (Fig.4)
• Refit brush roll bar cover and twist 6 screws into base (Fig 5)
1.
3.
1
2
3
4
5
6
1
2
3
4
5
6
2.
4.
5.
15
Ewbank, 38 Bluestem Road, Ipswich, Suolk, IP3 9RR Tel. 01473 271 272
CLEANING AND MAINTENANCE
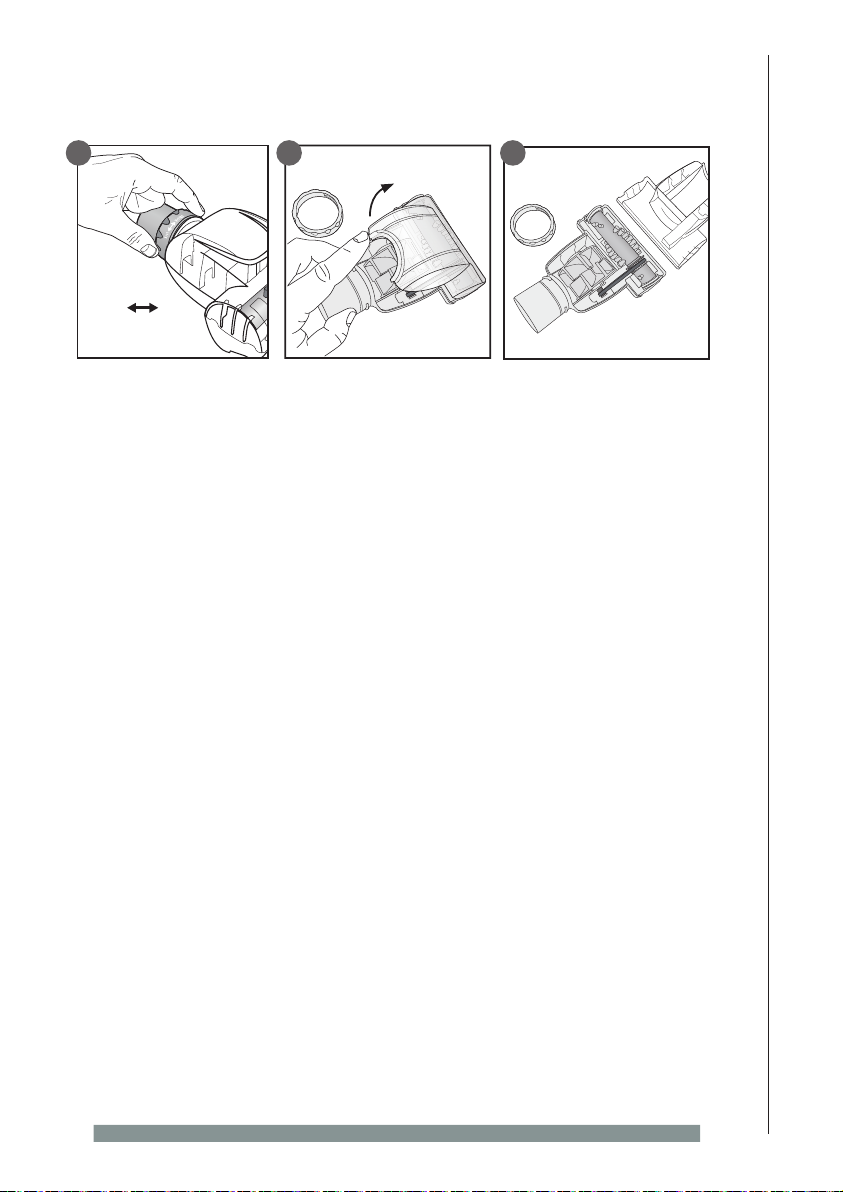
How to Maintain Pet Turbo Brush
Caution: Make sure vacuum is turned off and power cord is unplugged
• Do not clean the vacuum cleaner, components or accessories using petrol or any other
flammable liquid or solvents, etc
• Clean only the outside of the vacuum cleaner
• Use only a moist cloth and mild detergent for cleaning the vacuum cleaner, components and
accessories
• After cleaning, wipe off the moisture on vacuum cleaner, components and accessories with
a dry cloth
• Do not place accessories, tools or components in a dishwasher
LOCKUNLOCK
To release the pet turbo
brush transparent cover
for cleaning, twist the
locking ring to the unlock
position and remove it.
Pull cap up on the
upper part of the pet
turbo brush as shown.
Remove plastic upper cap
and clean, removing pet
hair and debris.
1. 2. 3.
16
TROUBLESHOOTING & DAMAGE PREVENTION
Do not use the appliance if your hands are wet.
Remove all large objects from the floor before use to avoid
any possible damage to the vacuum.
Switch off the vacuum cleaner immediately if the air intake, floor head or the telescopic tube
becomes blocked. Remove any substance which appears to be causing the blockage.
Do not use the vacuum cleaner in the immediate vicinity of hot bodies such as a radiator.
If you experience difficulties with the appliance, please check the suggestions below before
contacting customer services on 01473 271272:
PROBLEM POSSIBLE CAUSES SOLUTIONS/TIPS
The suction is poor. The hose is blocked. Disconnect the attachments
and remove the blockage.
The dust container is almost
full.
Empty the dust container
following the instructions in
the section entitled ‘Emptying
the Dirt Container’.
The sponge and/or dust
filter are blocked.
Clean the filters and/or dust
filter following the instructions
in the section entitled
‘Cleaning the Sponge’.

17
Ewbank, 38 Bluestem Road, Ipswich, Suolk, IP3 9RR Tel. 01473 271 272
MAINS PLUG FUSE REPLACEMENT & DISPOSAL INFORMATION
Disposal Information
The European Directive 2012/19/EU on Waste Electrical and Electronic
Equipment (WEEE), requires that old household electrical appliances must not be
disposed of in normal unsorted municipal waste.
Old appliances must be collected separately in order to optimise the recovery and recycling of
the materials they contain and reduce the impact on human health and the environment.
The crossed out “wheeled bin” symbol on the product reminds you of your obligation, that when
you dispose of the appliance it must be separately collected. Consumers should contact their local
authority or retailer for information concerning the correct disposal of their old appliance.
Fuse Cover
Fuse Replacement (Class II)
Remove the fuse cover with a small flat head screw driver. Take out the fuse
and replace with a new fuse of the same Amp. Replace the fuse cover and
push back into place.

18
WARRANTY TERMS & CONDITIONS
Ewbank Warranty Terms & Conditions
This product is guaranteed for a period of 24 months as standard from the date of purchase
against mechanical and electrical defects.
To qualify for the warranty, the product must be used for domestic household use only and in
accordance with the instructions in the user manual. Any misuse of the product will result in
the warranty being void.
The warranty does not cover accidental damage, misuse, neglect, tampering or incorrect
adjustment or installation.
The warranty will be rendered invalid if the product is resold, has had its serial number
removed (or has an invalid serial number), or if an unauthorised person has carried out any
repairs or alterations.
The warranty does not cover accessories or consumable parts that require replacement
under normal use. This includes shelving, dials, filters, belts and trays etc.
In the unlikely event of a breakdown please refer to the Troubleshooting guide in your user
manual and check all plugs, fuses and the electricity supply.
If you still require assistance please contact our Customer Service department on
01473 271 272 or write to us at the following address:
Customer Service Department
Ewbank, 38 Bluestem Road,
Ipswich, Suffolk, IP3 9RR
Please quote the Product Code and the PO Number on the rating label and give details of
the exact fault. We will then decide whether to repair or replace the item.
Before we arrange the repair or replacement you will be required to return a copy of your
proof of purchase. Please retain your original.
If an item is replaced within the agreed warranty period, the warranty for the replacement
item will be calculated from the purchase date of the original.
In the event that the product is inspected and no fault is found or the product is not within the
warranty period you will be charged for the repair and any carriage costs.

19
Ewbank, 38 Bluestem Road, Ipswich, Suolk, IP3 9RR Tel. 01473 271 272

Disclaimer: Ewbank operate a policy of continual improvement and development.
We therefore reserve the right to change/alter the specification and appearance of our appliances without prior notice.
All diagrams and images shown in this manual are for illustration purposes only.
Your Guarantee
This product is covered by a 2 year guarantee.
This does not cover normal wear and tear or abuse.
For guarantee purposes, please retain your original receipt as proof of purchase.
This guarantee does not affect your statuatory rights.
For spares, service and further information please contact;
Ewbank, 38 Bluestem Road, Ipswich, Suffolk, IP3 9RR
EU: Castle Electrical Factors Ltd., Dundalk, A91 KA9R, IR
Tel: 01473 271 272
Table of contents
Other Ewbank Vacuum Cleaner manuals

Ewbank
Ewbank 280 Manual

Ewbank
Ewbank Chilli HSV1000 Manual

Ewbank
Ewbank AIRSTORM 1 User manual

Ewbank
Ewbank EW5015 User manual

Ewbank
Ewbank HYDROC1 EW3070 User manual

Ewbank
Ewbank epv1100 Manual

Ewbank
Ewbank Cascade 280 Manual

Ewbank
Ewbank Zest CVZ135 Manual

Ewbank
Ewbank MOTION EW3015 User manual

Ewbank
Ewbank EW4001 DV6 User manual

Ewbank
Ewbank VC600 Guide

Ewbank
Ewbank Chilli HSV1000 Manual

Ewbank
Ewbank Chilli HSV1000 Manual

Ewbank
Ewbank Zest CVZ135 Manual

Ewbank
Ewbank Chilli 4 Cyclonic HSVC4 Manual

Ewbank
Ewbank Go-Go HMV600 Manual

Ewbank
Ewbank raycop Manual

Ewbank
Ewbank Cascade 280 Manual

Ewbank
Ewbank UV400 Manual

Ewbank
Ewbank SURGEPLUS User manual


