Appliance location
The temperature of the environment must not be higher than 45 °C and the relative humidity should be less
than 85%.The device should be positioned in a way which ensures good circulation of air.The distance from
any wall of the device should not be less than 10 cm. Keep the device away from hot surfaces. Operate the
device on at, stable, clean, refractory and dry surfaces out of the reach of children and people with mental
disabilities. Install the device making sure that constant access to the main plug is ensured. The power cord
connected to the appliance must be properly grounded and correspond to the technical details. Before
rst use, remove all elements and clean them along with the entire device. Remove all protections (such as
Styrofoam) from the inside of the device.
PRINCIPLE OF OPERATION
TRANSPORTATION AND STORAGE
Shaking, crashing and turning upside down of the device should be prevented when transporting it. Store it
in a properly ventilated location with dry air and without any corrosive gas.
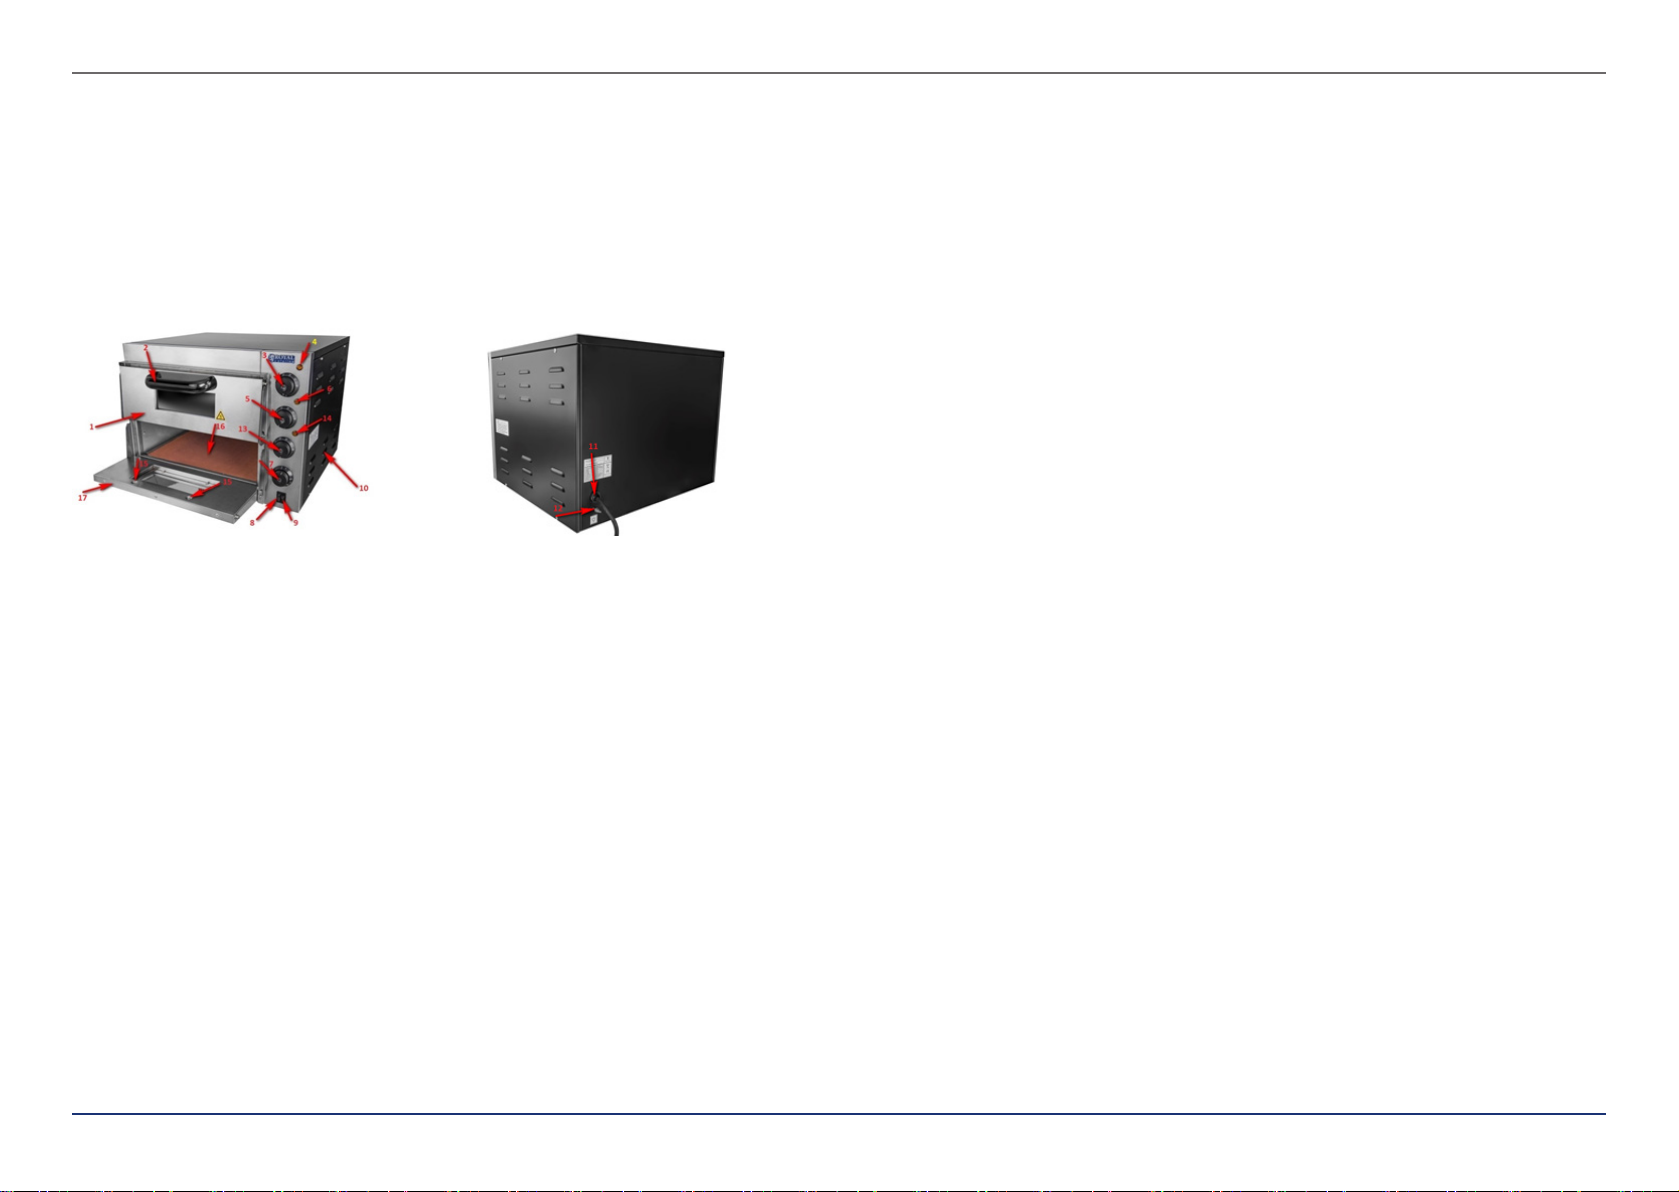
1 – door with sight glass
2 – door handle
3 – thermostat of the rst heater
4 – operation indicator of the rst heater
5 – thermostat of the second heater
6 – operation indicator of the second heater
7 – timer
8 – switch for baking chamber light
9 – heater switch
10 - vents
11 – power supply cord
12 - earthing
5 – thermostat of the third heater
14 – operation indicator of the third heater
15 - door handle mounting location
16 – bread baking stone
17 – door with sight glass of the second baking chamber
Each time before connecting the device to the power supply make sure that the heater switch is set at “0”
position (switched off) and the knobs of all thermostats are set to “0”.
Operation with timer/without timer:
1. Operation without timer:
Set the correct temperature using the thermostat (number of heaters to be used will depend on
preference of the user). Switch the oven on using the heater switches.The operation indicator lights
will switch off when the heaters have reached the pre-set temperature. Open oven door, put your
prepared pizza on the stone inside the baking chamber and close the door. You may observe the baking
process of the pizza through the sight glass in the door. Once the baking is done, remove your pizza
from the oven; use kitchen glove or similar kitchen tools to do this. Attention! Risk of burns!
To observe the baking process, turn on the light of the baking chamber using the baking chamber
lighting switch (8). Remember to switch the light off when you have nished using the oven!
2. Operation with timer:
a. heater switch (9) is off:
Activating the timer will activate the heaters and pre-heat the device to the pre-set temperature as well
as maintain this temperature for the time pre-set on the timer.When the time pre-set on the timer has
elapsed, the device will switch off (heaters will stop heating).
b. heater switch (9) is on:
Activating the timer will start the countdown of the time pre-set on the timer and as soon as it has
elapsed the device will indicate this with a sound.The heaters will still maintain the pre-set temperature
until they are switched off.
If the device is not to be used again, set the thermostat to “0”, switch off the device using the heater
switch (if it was used when pizza was being baked) and nally remove the plug from the socket.
CLEANING AND MAINTENANCE
• Disconnect from electricity when cleaning equipment.
• Use cleaner without corrosive substances to clean surface.
• Dry all parts well after cleaning before the device is used again.
• Store the unit in a dry, cool location, free from moisture and direct exposure to sunlight.
REGULAR CONTROL OF THE DEVICE
Regularly control whether the device is damaged. If it should be damaged, please stop using it immediately
and contact your customer service to solve the problem.
What to do in case of a problem?
Please contact your customer service and prepare the following information:
• Invoice number and serial number (the latter is to be found on the technical plate on the device).
• If relevant, a picture of the damaged, broken or defective part.
• It will be easier for your customer service clerk to determine the source of the problem if you give
a detailed and precise description of the matter. Avoid ambiguous formulations like “the device does
not heat”, which may mean either that it does not heat enough or that it does not heat at all. The
more detailed your information, the better the customer service will be able to solve your problem
rapidly and efciently!
CAUTION: Never open the device without the authorization of your customer service.This can lead to
a loss of warranty!
EN EN
4 5
Rev. 04.03.2021Rev. 04.03.2021