FAFREES F20 User manual

Smart EV/Moped
User Manual
(Model: F20 Light)
EN DE FR IT ES

Congratulations
on your purchase!
Please write down your frame number
in the blank space below in case of
future need.
Bitte notieren Sie Ihre Rahmennummer
in das leere Feld unten, falls Sie dies in
Zukunft benötigen.
Veuillez noter votre numéro de cadre
dans l'espace vide ci-dessous en cas
de besoin futur.
Si prega di annotare il numero di telaio
della bicicletta nello spazio vuoto
sottostante per esigenze future.
Escriba el número de cuadro de su
bicicleta en el espacio en blanco a
continuación en caso de que lo
necesite en el futuro.

3
3
3

1. Note
Before your first ride, it is important for you to know your new e-bike well, so that you can
get the best performance, comfort, enjoyment and safety from it during your ride. To
understand the new bicycle and the correct operation, you should first read the manual
carefully.
Second, it is significant to take your first ride under a safe and controlled circumstance, like
staying away from cars, obstacles and other cyclists.
Third, bicycles are vehicles with certain risks. Please follow the traffic rules during cycling.
It's better to learn the local traffic rules about riding an e-bike on public roads before your
first ride in case you violate the regulations. For your own safety, never forget to put on a
qualified helmet before you get on the e-bike.
Fourth, the electric bike is supplied without basic mandatory equipment, which may vary
from place to place. Therefore, if you intend to use the e-bike on public roads, it's necessary
to equip the bike with the basic mandatory equipment, in accordance with the relevant laws
and regulations.
In addition, this product is designed for your personal use. Do not use it for commercial or
other purposes.
Last, keep this manual safe for reference.
2. Warning
Before each charge, check the charger, cable and plug. If there is any damage, do not use
the charger.
Before riding, check the tire pressure and check whether the wheels and handlebar are
installed correctly and tightly.
Before riding, check whether the headlights are securely fastened in the correct position,
clean and not covered by anything. Damaged reflectors must be replaced.
Besides, if the seat post in the seat tube is not inserted deep enough to reach the minimum
insertion mark, the seat post may break. Check whether it is inserted deeper than the
minimum insertion depth. When braking on a wet road, the braking distance is usually
longer than on a dry road. Therefore, brake earlier for a safer stop.
When you have to brake urgently, please hit the right hand brake first to stop the rear wheel,
and then hit the left hand brake, especially when you brake at a high speed. If the front
wheel stops suddenly while the rear wheel is still cycling at a high speed, you may fall over
and get hurt. So please ride it carefully.
Furthermore, avoid puddles, wet mud, swamps, water, snow or ice. Try not to use the e-bike
on a rainy, stormy or snowy day. If the bicycle's electric parts (control unit, engine and
battery) get damp, wet or soaked, it will cause irreversible damage, or even a battery
explosion.
This product can only be used by one adult at a time. Do not carry any extra passengers.
This vehicle is not a toy. Same as other vehicles, it is possible to fall, crash or encounter
other dangerous situations. Please don't offer your e-bike to anyone that doesn't know how
to use it correctly. If you let anyone else ride your bike, it will be your responsibility to ensure
that all riders understand all warnings, cautions, instructions and safety precautions, and to
ensure that they are able to use this product safely and responsibly and protect themselves
and others from injury.
1
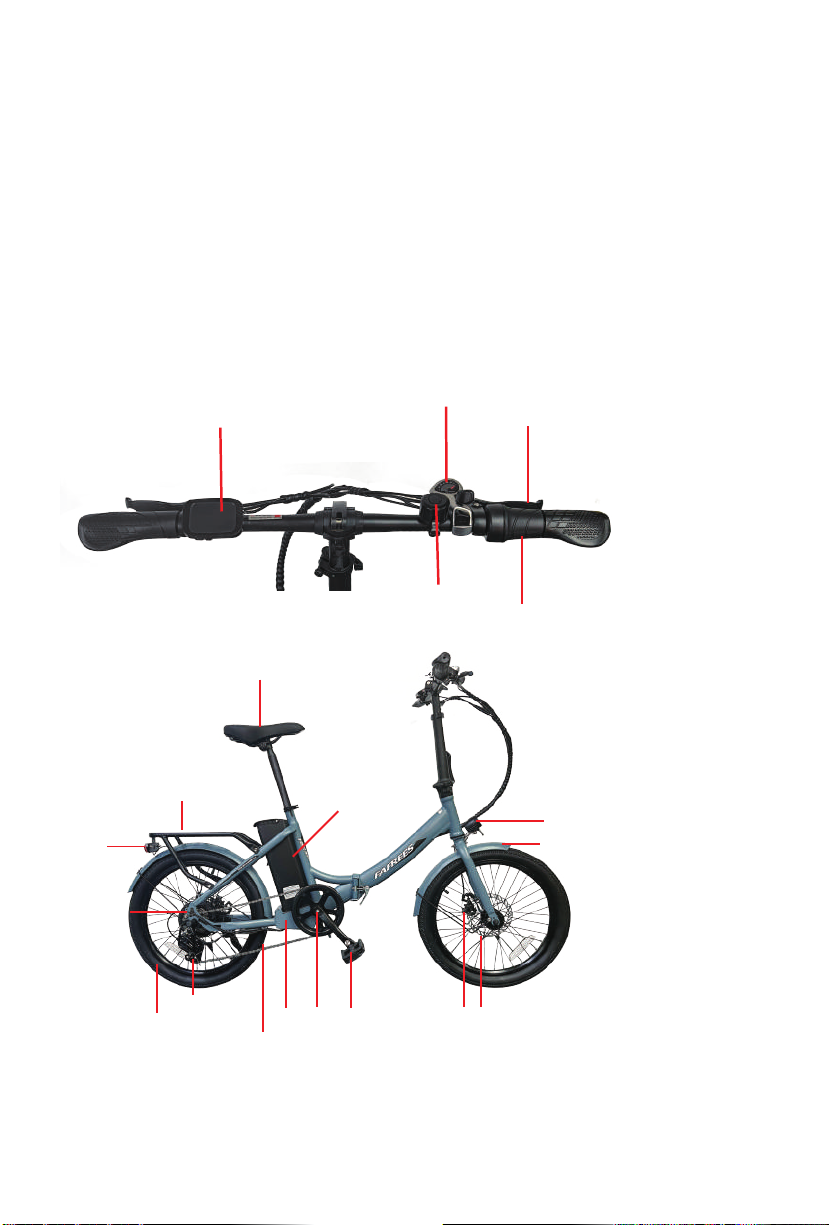
*Before your first operation,
please read the user manual carefully!

1. Note
Before your first ride, it is important for you to know your new e-bike well, so that you can
get the best performance, comfort, enjoyment and safety from it during your ride. To
understand the new bicycle and the correct operation, you should first read the manual
carefully.
Second, it is significant to take your first ride under a safe and controlled circumstance, like
staying away from cars, obstacles and other cyclists.
Third, bicycles are vehicles with certain risks. Please follow the traffic rules during cycling.
It's better to learn the local traffic rules about riding an e-bike on public roads before your
first ride in case you violate the regulations. For your own safety, never forget to put on a
qualified helmet before you get on the e-bike.
Fourth, the electric bike is supplied without basic mandatory equipment, which may vary
from place to place. Therefore, if you intend to use the e-bike on public roads, it's necessary
to equip the bike with the basic mandatory equipment, in accordance with the relevant laws
and regulations.
In addition, this product is designed for your personal use. Do not use it for commercial or
other purposes.
Last, keep this manual safe for reference.
2. Warning
Before each charge, check the charger, cable and plug. If there is any damage, do not use
the charger.
Before riding, check the tire pressure and check whether the wheels and handlebar are
installed correctly and tightly.
Before riding, check whether the headlights are securely fastened in the correct position,
clean and not covered by anything. Damaged reflectors must be replaced.
Besides, if the seat post in the seat tube is not inserted deep enough to reach the minimum
insertion mark, the seat post may break. Check whether it is inserted deeper than the
minimum insertion depth. When braking on a wet road, the braking distance is usually
longer than on a dry road. Therefore, brake earlier for a safer stop.
When you have to brake urgently, please hit the right hand brake first to stop the rear wheel,
and then hit the left hand brake, especially when you brake at a high speed. If the front
wheel stops suddenly while the rear wheel is still cycling at a high speed, you may fall over
and get hurt. So please ride it carefully.
Furthermore, avoid puddles, wet mud, swamps, water, snow or ice. Try not to use the e-bike
on a rainy, stormy or snowy day. If the bicycle's electric parts (control unit, engine and
battery) get damp, wet or soaked, it will cause irreversible damage, or even a battery
explosion.
This product can only be used by one adult at a time. Do not carry any extra passengers.
This vehicle is not a toy. Same as other vehicles, it is possible to fall, crash or encounter
other dangerous situations. Please don't offer your e-bike to anyone that doesn't know how
to use it correctly. If you let anyone else ride your bike, it will be your responsibility to ensure
that all riders understand all warnings, cautions, instructions and safety precautions, and to
ensure that they are able to use this product safely and responsibly and protect themselves
and others from injury.
2
3
2
4
1
5
19
18
17
16
15
14
13
12 11 10 98
7
6
20
1.Break lever
2.Shift lever
3.LCD display
4.Bell
5.Throttle
6.Headlight
7.Fender
8.Brake pad
9.Brake caliper
10.Pedal
11.Crankset
12.Controller
13.Chain
14.Rear derailleur
15.Tire
16.Motor
17.Rear light
18.Cargo rack
19.Saddle
20.Battery
Product function illustration (Model: F20 Light)

1.Charging: Find the charging port on the left side frame of the battery, connect the
charger to charge. When the battery is fully charged, the charger light changes from red to
green.
2.Power On/Off: Long press the power button to turn on/off the display power.
3. Display: After the display is turned on, the display will show the real-time speed (km/h)
and the trip distance(km) by default. By pressing the power button, the information
displayed will be switched between the trip distance (km), ODO (km), maximum speed
(km/h) and average speed (km/h).
4. Headlight: By pressing and holding the plus button, the controller will turn on/off the
headlight.
5. PAS Mode: You must turn on the battery to use the e-bike in pedal-assisted mode.
Power assist is triggered when you pedal forward, and stops when you stop pedaling,
sometime with a delay. If no power is needed, turn off the power of the battery
6. Electric Mode: You do not need to pedal the e-bike if you use the hand throttle. The
throttle can be controlled by twisting it from the resting position, and the farther the throttle
switch is from resting position, the more power is sent to the motor to accelerate the
e-bike.
7. Cruise Control : Cruise control will be triggered when you holding thumb throttle and
riding at the same speed for 8 seconds, and it will be released by braking/pedaling or
throttling.
8. Walk Assist Mode: Long press the "-" button, the electric bicycle will enter the walk
assist mode. The electrical bike runs at a constant speed of 6 km/h. The display will show
level P. Release the "-" button, the electric bicycle will immediately stop power output and
return to the state before walk assist.
3
Function introduction:

3.Install the saddle. Insert the saddle into the seat tube and lock.
4
Product installation:
1. After removing the foam, unfold and secure the frame as shown.
2. Install the handlebar. Insert the handlebar into the tube and lock.

4.Install the pedals. Note the stickers on the pedals. Stamp with "L" is the left pedal,
stamp with "R" is the right pedal, the right pedal is installed on the side of the sprocket.
NOTE: The left pedal is tightened to the left and the right pedal is tightened to the right.
5

Product parameter
1. Product name and model
Intelligent LCD display for e-bike; model: YL81C.
2. Specifications
● 36V/48V power supply
● Rated working current 15mA
● Maximum working current 30mA
● Leakage current at power-off <1uA
● Working current at the supply controller end 50mA
● Working temperature -20~60℃
● Storage temperature -30~70℃
6
Display user instructions
Dimensions
Performance Parameter
Electrical Specifications
Features
Item
Main material
Product size
Pedal-ground distance
Tire size
Package size
Product weight
Package weight
Battery weight
Maximum load
Maximum speed
Maximum range in pure electric mode
Maximum climbing angle
Operating temperature
Waterproof level
Battery type
Battery capacity
Battery rated voltage
Motor rated voltage
Motor rated power
Charging voltage
Input voltage
Undervoltage protection value
Overcurrent protection value
Charging time
Display
Headlight
Braking method
Speed Transmission
Parameter
High-carbon steel
158*64*114CM
11.5CM
20"*1.95
87*37*66CM
24KG
29.3KG
2.1KG
120KG
25KM/H
55-65KM
20°
-20℃~55℃
IPV4
Lithium-ion battery
14.5Ah
36V
36V
250W
42V/3A
220V
30±1V
15A
5-6H
LCD
Yes
Mechanical disc brakes
SHIMANO 7S

Fig. 3-1 Picture of Display 81C
Fig. 3-2 Top View of Display 81C Dimensions
Fig. 3-3 Side View of Display 81C Dimensions
7
3. Appearance and dimensions

8
4. Function overview and functional area layout
4.1 Function overview
Display YL81C provides a variety of functions to meet the riding needs of users,
including:
● Battery level indicator
● Assist level adjustment and indication
● Headlight indicator
● Speed indicator (including real-time speed, maximum speed (MAXS) and
average speed (AVG))
● Distance indicator (including ODO and trip distance (Trip))
● Error code indicator
● Bluetooth connection indicator (reserved)
● Parameter setting function
4.2 Functional area layout
6
7
8
9
10
1
2
3
4
5
Fig. 4-1 Functional Area Layout Interface of Display YL81C
1. Battery level indicator
2. Speed indicator
3. Pedal assist level indicator
4. Maximum speed
5. Trip distance indicator ODO
6. Bluetooth indicator
7. Headlight indicator
8. Speed unit Metric system: km/h Imperial system: MPH
9. Average speed indicator
10. Distance/speed unit Metric system: km, km/h Imperial system: mile, mile/h

4.3 Button definitions
There are three buttons on the operating unit of display YL81C, i.e., the power button ,
plus button and minus button .
5. General operation
5.1 Power on/off
By pressing and holding the power button, the display will start to work and the controller
power will be turned on. In the power-on state, by pressing and holding the power button,
your e-bike will be powered off. In the power-off state, the display will no longer use the
battery power, and its leakage current will be less than 1uA.
If your e-bike is not used for more than 10 minutes, the display will be automatically
powered off.
5.2 Display interface
After the display is turned on, the display will show the real-time speed (km/h) and the trip
distance(km) by default. By pressing the power button, the information displayed will be
switched between the trip distance (km), ODO (km), maximum speed (km/h) and average
speed (km/h).
When the distance reaches 9999.9 km, it will be automatically reset to zero.
Trip distance indicator ODO
Maximum speed indicatorAverage speed indicator
Fig. 5-1 Display Interface Switching
9

10
5.3 Walk assist mode
By pressing and holding the minus button, the walk assist mode will be enabled. Your e-bike
will run at the constant speed of 6km/h. The display will show level P. By releasing the minus
button, your e-bike will immediately stop power output and return to the state before walk
assistance.
Fig. 5-2 Walk Assistance Indicator Interface
5.4 Headlight on/off
By pressing and holding the plus button, the controller will turn on the headlight and the
display backlight will turn dark. By pressing and holding the plus button again, the controller
will turn off the headlight and the display backlight will restore the brightness.
Fig. 5-3 Headlight-on Indicator Interface

5.5 Assist level selection
By pressing the plus/minus button, the e-bike assist level will be switched to change the
motor output power. The assist levels available for the display include: levels 0-3, levels 1-3,
levels 0-5, levels 1-5, levels 0-7, levels 1-7, levels 0-9 and levels 1-9.
Fig. 5-4 Assist Level Switching Interface
5.6 Battery level indicator
The battery level indicator consists of five bars. When the battery is fully charged, the five
bars will be all on. In case of undervoltage, the outline of the battery indicator will flash,
which means the battery must be charged immediately.
Full power
1 bar of power
4 bars of power
2 bars of power3 bars of power
Low battery
Fig. 5-5 Battery Level Indicator Interface
11

12
5.7 Error code indicator
Fig. 5-6 Error Code Indicator Interface
When an error code appears on the display interface, please troubleshoot in time.
Otherwise, your e-bike will not work normally.
6. General setting
●All parameters can only be set when your e-bike is stopped.
The steps for general setting are as follows:
In the power-on state, when the display shows the speed of 0,
6.1 Trip distance reset
Press and hold the power button and minus button at the same time for more than 2
seconds to reset the trip distance.
6.2 Factory reset
dEF refers to factory reset. dEF-n represents not to restore factory settings, and dEF-y
represents to restore factory settings. Press and hold the power button and the plus button
at the same time for more than 2 seconds to enter the factory reset interface, and press the
plus/minus button to select a parameter.
When a fault occurs in the electronic control system of your e-bike, the display will
automatically indicate the error code in the distance area in the format of E0**. Detailed
definitions of error codes are shown in Schedule 1.

Fig. 6-1 Factory Reset Interface
7. Custom setting
●All parameters can only be set when your e-bike is stopped.
The steps for custom setting are as follows:
In the power-on state, when the display shows the speed of 0,
(1) Press and hold the plus and minus buttons at the same time for more than 2 seconds
to enter the custom setting option selection interface;
(2) Press the plus/minus button to switch the selection of custom setting options, and
press the power button to enter the parameter modification interface;
(3) Press the plus/minus button for parameter selection;
(4) Press the power button to save the parameter and return to the selection interface of
custom setting options;
(5) Press and hold the power button to save the parameter and exit the selection interface
of custom setting options.
7.1 Rated voltage setting
P1 refers to the rated voltage setting option. Available values include: 36V and 48V. Press
the power button to enter the parameter modification interface. Press the plus/minus
button for parameter selection. Press the power button to save the parameter and return
to the selection interface of custom setting options.
Fig. 7-1 Rated Voltage Setting Interface
13

7.2 Tire diameter setting
P2 refers to the tire diameter setting option. Available parameters include: 8-32 inches.
Press the power button to enter the parameter modification interface. Press the
plus/minus button for parameter selection. Press the power button to save the parameter
and return to the selection interface of custom setting options.
14
Fig. 7-2 Tire Diameter Setting Interface
7.3 Speed limit setting
P3 represents the speed limit setting option. The adjustable range is 10~40km/h. Press
the power button to enter the parameter modification interface. Press the plus/minus
button for parameter selection. Press the power button to save the parameter and return
to the selection interface of custom setting options.
Fig. 7-3 Speed Limit Setting Interface

7.4 Metric/imperial system setting
P4 refers to the metric/imperial system setting option. 00 represents the metric system,
and 01 represents the imperial system. Press the power button to enter the parameter
modification interface. Press the plus/minus button for parameter selection. Press the
power button to save the parameter and return to the selection interface of custom setting
options.
Metric system indicator interface
15
Imperial system indicator interface
Fig. 7-4 Metric/imperial System Setting Interface

16
7.5 Speed sensor setting
P5 refers to the speed sensor setting option, which can be set according to the number of
magnetic heads installed on the tires of your e-bike. The setting range is 1-63. Press the
power button to enter the parameter modification interface. Press the plus/minus button
for parameter selection. Press the power button to save the parameter and return to the
selection interface of custom setting options.
Fig. 7-5 Speed Sensor Setting Interface
7.6 Current limit setting
P6 refers to current limit setting. The adjustable range is 1-25A. Press the power button to
enter the parameter modification interface. Press the plus/minus button for parameter
selection. Press the power button to save the parameter and return to the selection
interface of custom setting options.
Fig. 7-6 Current Limit Setting Interface

17
7.7 Assistance sensor setting
P7 refers to the assistance sensor setting option, where the number of steel magnets of
the assistance magnetic disk can be set. The adjustable range is 5, 6, 7, 8, 9, 10 and 12.
Press the power button to enter the parameter modification interface. Press the
plus/minus button for parameter selection. Press the power button to save the parameter
and return to the selection interface of custom setting options.
Fig. 7-7 Assistance Sensor Setting Interface
7.8 Power-on password setting
P8 refers to the power-on password setting option. PSd-Y means that a power-on
password is required, and PSd-N means that no power-on passwords are required. The
default value of the display is PSd-N. Press the power button to enter the modification
interface, and press the plus/minus button to enter the selection interface.
If PSd-N is selected, press the power button to return to the selection interface of custom
setting options;
If PSd-Y is selected, press the power button to enter the password setting interface. If you
don’t want to change the password, press and hold the power button to exit the custom
setting interface. If you want to change the password, press the power button for cursor
movement and the plus/minus button for figure selection, and then press the power button
to return to the selection interface of custom setting options.
Fig. 7-8 Power-on Password Setting Interface
Other manuals for F20
3
Table of contents
Languages:
Other FAFREES Bicycle manuals