Fagerhult e-Sense Organic G3 User manual

e-Sense
Organic G3

Subject to change without notice. Version5_20200424
e-Sense Organic G3 – Basic Functions ................................................................................................................................ 3
Relay function ............................................................................................................................................................................. 3
Factory settings........................................................................................................................................................................... 3
e-Sense Organic programming app .....................................................................................................................................4
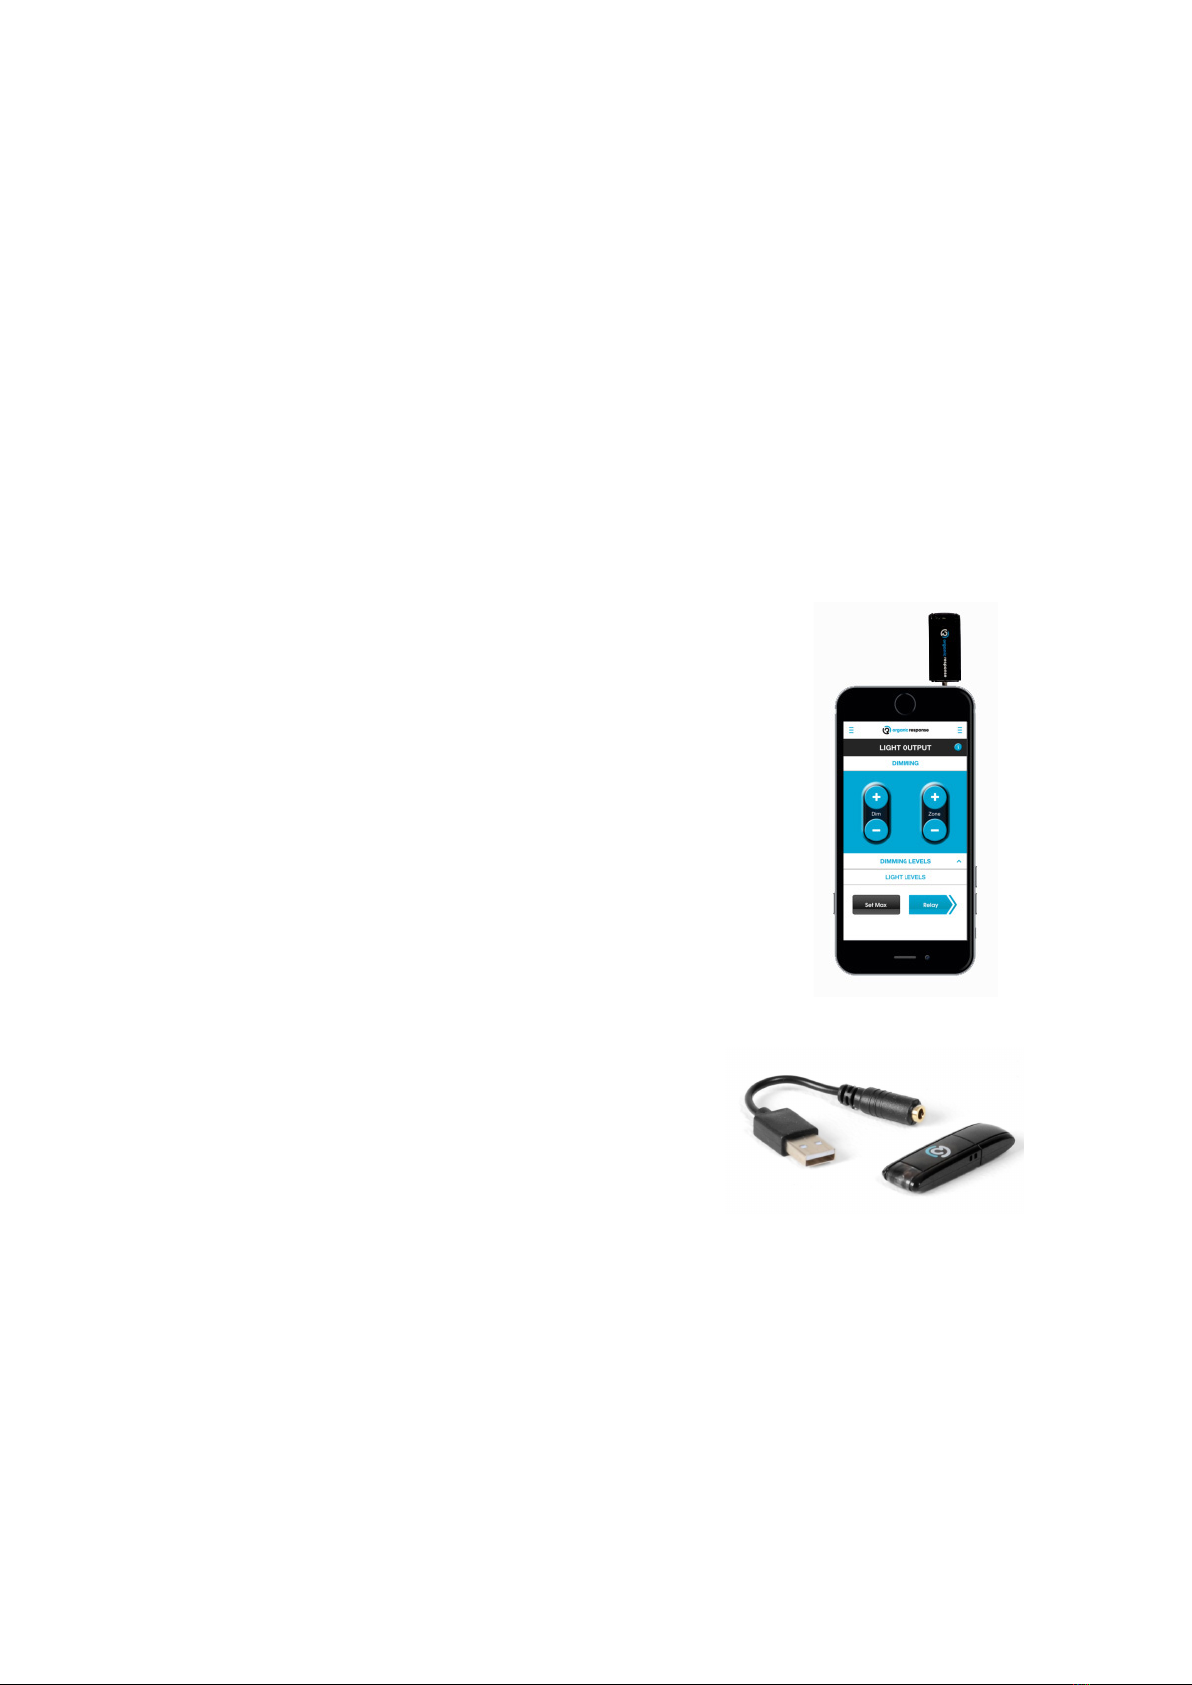
IR interface for smartphones...................................................................................................................................................4
Programmable functions ......................................................................................................................................................... 5
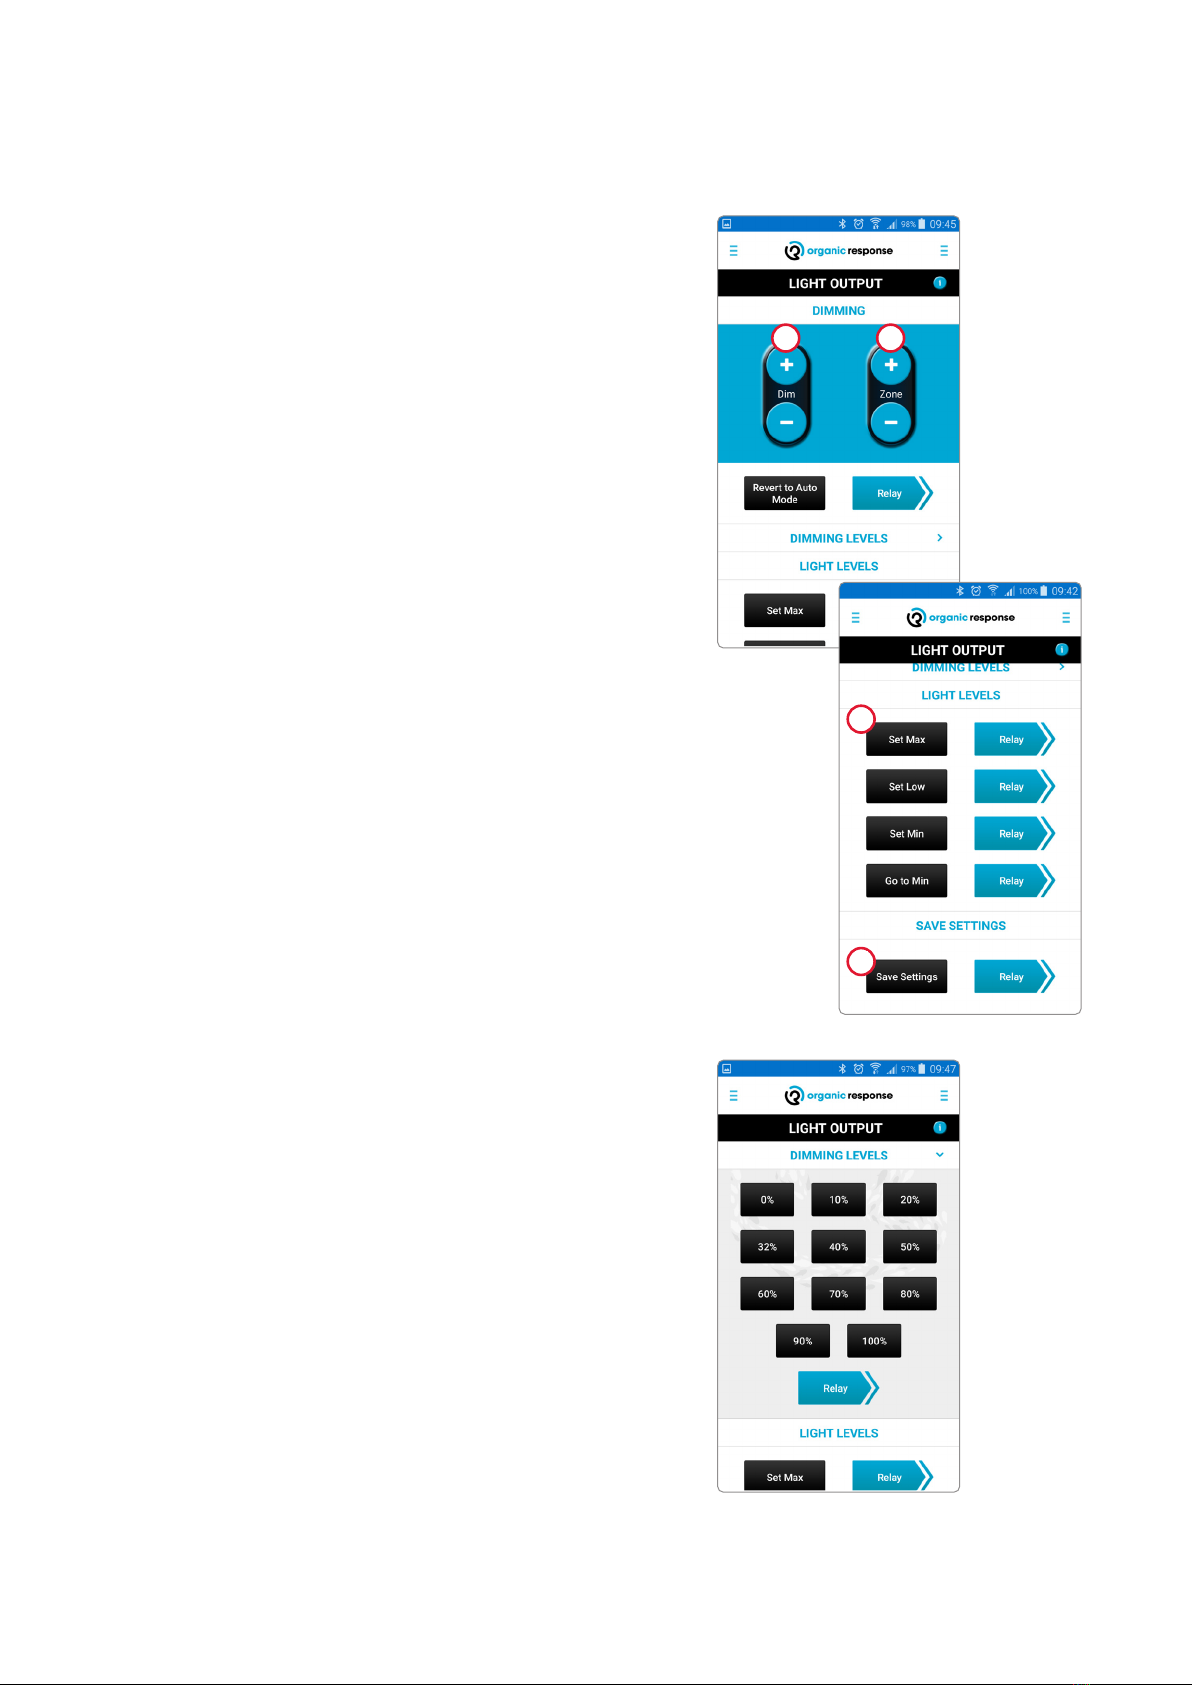
Times and light levels ................................................................................................................................................................6
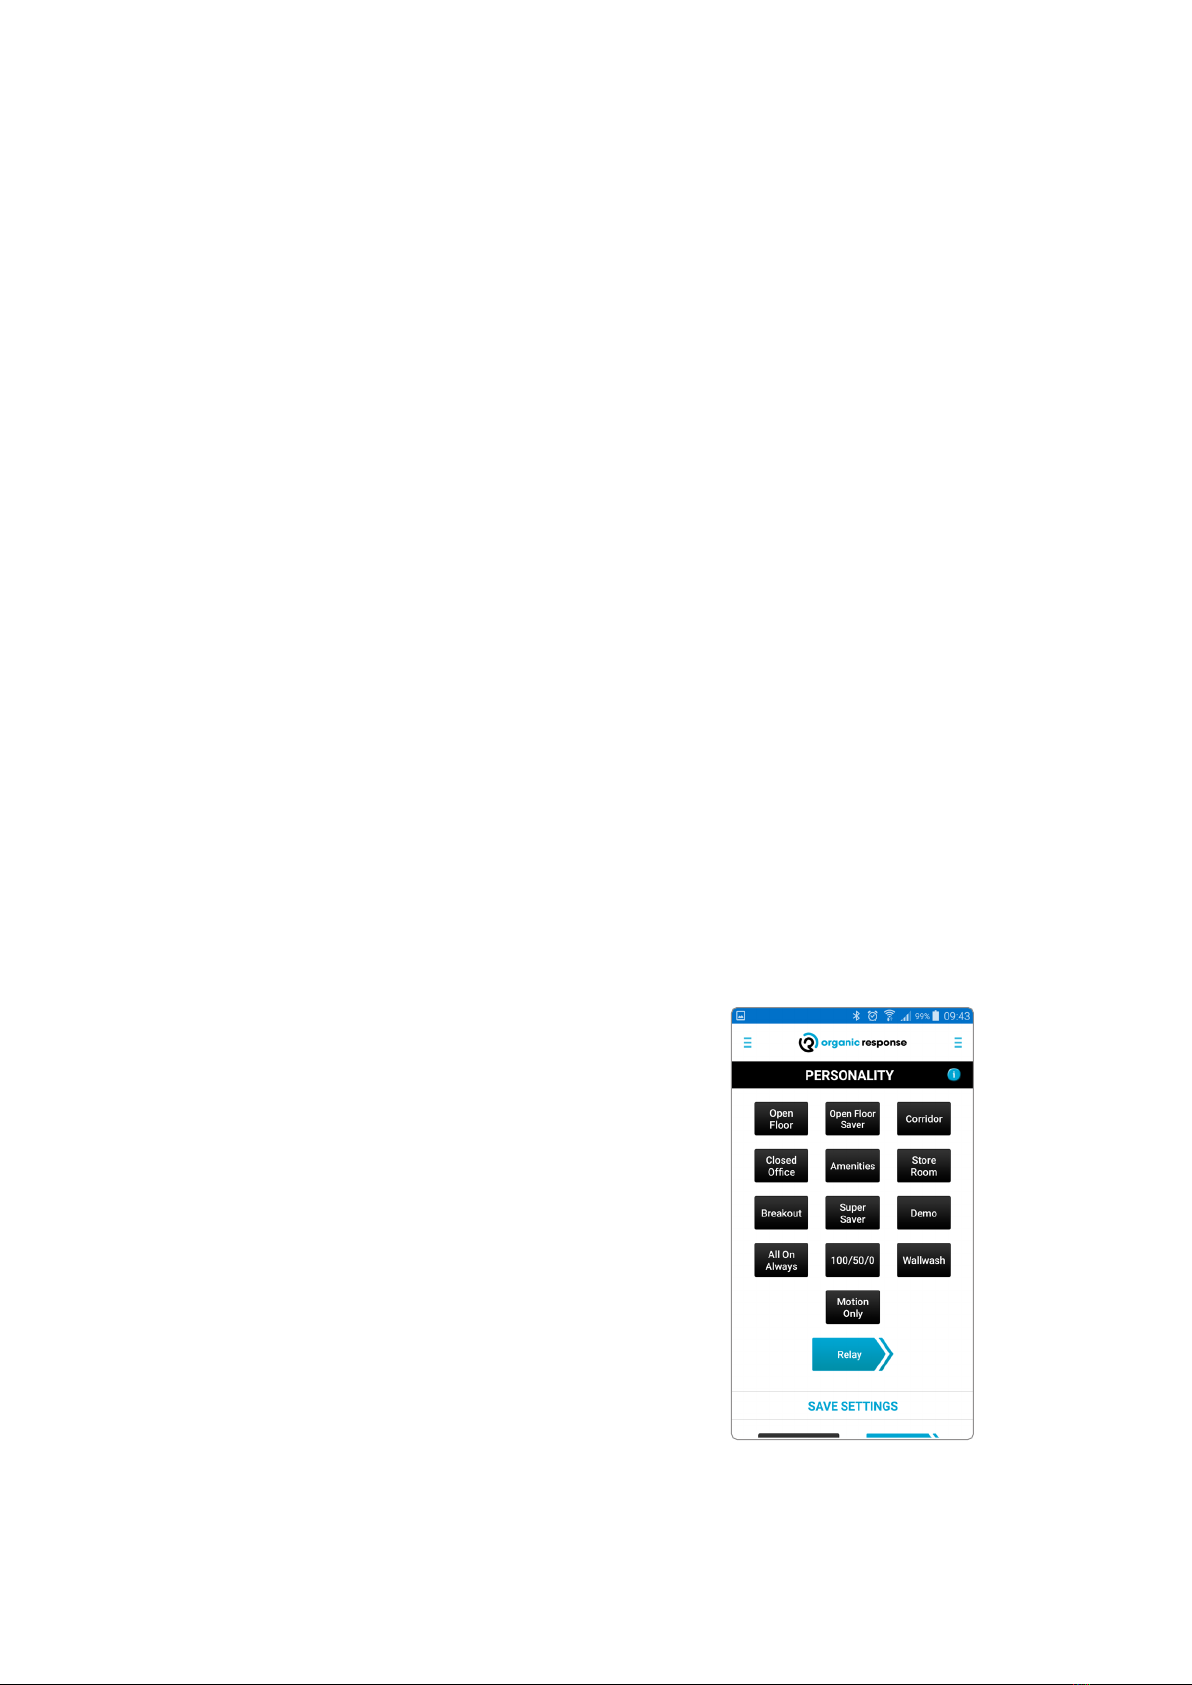
Default settings (personality).................................................................................................................................................6
Explanation of menu................................................................................................................................................................... 7
Factory settings ........................................................................................................................................................................... 7
Explanation of relay function..................................................................................................................................................8
Temporary dimming ..................................................................................................................................................................9
Pre-programmed settings (personality)......................................................................................................................10-11
Setting the time after last presence detected (Dwell time)........................................................................................ 12
Daylight dimming ......................................................................................................................................................................13
Simulating a wall panel ...........................................................................................................................................................13
Zoning ............................................................................................................................................................................................ 14
Relay programming information .........................................................................................................................................15
Zone X............................................................................................................................................................................................. 16
Identifying zones used............................................................................................................................................................. 16
Conguring scenes...............................................................................................................................................................17-18
e-Sense Organic wall panel.................................................................................................................................................... 19
EnOcean Wireless Push button panel ......................................................................................................................... 20-2 4
Read an EnOcean switch................................................................................................................................................................25
Wireless communication between nodes without IR link................................................................................... 26-27
Infrared transmission..............................................................................................................................................................28
Sensor node settings.................................................................................................................................................................28
Other parameters.......................................................................................................................................................................29
Disaster Recovery Mode ..........................................................................................................................................................30
Contents

3
Subject to change without notice. Version5_20200424
e-Sense Organic is an intelligent lighting control system based on distributed information between the sensors. The sys-
tem is optimised for large oces or similar spaces. Communication between the sensors is based on infrared light, similar
to regular remote controls. The signal from one sensor, which detects presence, is distributed via the oor to other sen-
sors nearby. These sensors transmit the information further, but include a change to not adjust up to full light, but rather
a lower level. The distribution continues with the same eect so that the light does not unnecessarily switch on too often.
In order to secure communication between the light ttings below constraints has to be taken into consideration during
installation:
Installation height 2.7–3.7 meters.
Disctance between luminaires 1.0 – 3.0 meters.
e-Sense Organic G3
The system functions immediately after power is supplied to the luminaires. No programming is required during the installation stage.
An important and unique feature in e-Sense Organic is the ability to transfer information between sensors, without phy-
sical interconnection. In daily use, this relates to information about presence, but, when programming the system, such
information can also be “relayed” to other luminaires.
Upon delivery, the factory settings can be used in an oce
environment. The time after last presence, and followed
by low level is 10 + 10 minutes. If presence is detected
again at any time during the intervals, the time is reset.
Max. illumination is 100%.
The sensor is equipped with multiple functions. A PIR
sensor for presence detection, IR transmitter, IR receiver
and a light sensitive diode for measuring brightness. It
also has two LEDs which indicate whether a certain fun-
ction is enabled.
Relay function
Factory settings
IR Transmitter
Light Meter
IR Receiver
PIR Sensor
Green indicator

4Subject to change without notice. Version5_20200424
The device is supplied with a USB charger. A blue LED
indicates charging is in progress. When connecting to a
smartphone or tablet, the volume will raised fully. The
volume will be reset when disconnecting the dongle. If the
volume is adjusted while the dongle is being used, it will
stop transmitting if the volume is below 50%.
The Organic Smartphone app is a simple, intuitive user application for optimising an e-Sense Organic installation.
An entire oce with luminaires can be optimised within minutes by pressing a few buttons. The app can be downloaded
from the App Store or Google Play and includes programming assistance and links to manuals. Immediately after down-
loading the app, you sign in to your LinkedIn or Google account to access programming functions. When this is done, an
application for "Congurator" must be made (this is done via the window in the upper left corner) - go to App Settings,
change from "User" to "Congurator", press apply!
The app contains all the relevant information and contextual help you need to use these simple functions.
The smartphone app communicates with sensor nodes in luminaires via IR communication from an interface connected to
the device’s headphone jack (3.5 mm). Always make sure to point the interface (dongle) at the sensor in the luminaire to
be programmed.
Access to e-Sense Organic programming app
IR Interface for Smartphone – Fagerhult Art. no. 86279

5
Subject to change without notice. Version5_20200424
All features and functions can be changed with an app and connected dongle.
The dongle communicates via infrared light, which is the same as between
luminaires.
You can download the app from Google Play or the App Store.
The dongle can be ordered from Fagerhult (Art. no. 86279).
Access to all the app’s functions is granted upon registration and
log-in via LinkedIn or Google.
Programmable functions
• Temporary dimming in a luminaire
• Temporary dimming in a zone
• Change the maximum light level
• Change the time since last presence
• Change “personality” – default settings for dierent environments.
• Daylight dimming
• Adjust PIR sensor sensitivity
• Change the PIR sensor’s behaviour upon presence detection
(Auto or Manual activation)
• Program Scenes (can be reset on the touch panel)
• Adjust functions on the touch panel
• Behaviour when powered up
• Zoning – certain luminaires are not aected, e.g. dierence between oce and corridor.
It is important to have an understanding of all the sections in the app when programming. You can always bring up more
functions and information by swiping your nger from right to left or left to right. The function used to save settings can
be found at the bottom of the app, together with the relay function (Relay). There is always more information to read
directly in the app by clicking the (i) icon – see red arrow.
Basic programmable functions:
Using the app’s functions
Menu from the right Menu from the left Menu from the bottom
Smartphone with Dongle

6Subject to change without notice. Version5_20200424
Various parameters can be changed to adapt the system to the environment in which it is installed.
• Presence. The light switches on at the set level. This function can also be blocked if you want to switch on the light
manually.
• Time after last presence detected (Dwell Time). The duration the light should remain at the same level after last
presence. Factory setting is 10 minutes.
• Lowlight Level. The level and time for which the light will indicate that it will switch o.
• If the light switches o completely or remains at a low level, each luminaire can be programmed individually
(Minlight Level)
Times and lowlight level are saved in default scenes
(personality). You can select a scene, save, and send on to
other luminaires using the Relay function. This means you
only need to program one luminaire, and then forward the
information further.
Times and light levels
Changing times and light levels
Default settings (personality)

7
Subject to change without notice. Version5_20200424
Various parameters can be changed to adapt the system to the environ-
ment in which it is installed.
• Zones – option for placing luminaires into zones that DO NOT af-
fect one another.
• Light Output – light level settings, max., min. and low level
• Personality – choice of default settings.
• Dwell Time – setting the time after last presence
• Daylight Dimming – setting the daylight dimming
• Scenes – 7 dierent scenes can be set.
• Absence Detection – automatic switch-on when presence is detec-
ted or manual switch-on (touch panel required).
• Wall Switch Setup – settings for touch panel, zoning, and IR
strength.
• Simulated Wall Switch – simulated touch panel.
• Start Up mode – On/Auto or for a certain scene during presence
• Infrared Transmission – increases or decreases the transmission
strength of a sensor.
• Sensor Node Settings – option to save settings in the app for use in
other installations.
• Other Parameters – setting the PIR sensor’s sensitivity, uores-
cent lamp burn-in time, etc.
• Disaster Recovery Mode – all light at full illumination for 90 mi-
nutes. Cannot be cancelled during the 90 minutes.
• Sensor Node Default Setting – refer to the table below.
Explanation of menu
Factory settings
Full light 100 %
Lowlight level 0 %
Basic light level 10 %
Time aer last presence 10 min.
Time at Basic Light Level 10 min.
Basic setting (personality) Open Floor
Daylight dimming Not enabled
PIR Sensor sensitivity High
Fluorescent lamp burn-in time Not enabled
Zoning (zone) 1
Scene 0 light level (on touch panel) 50 %
Scene 1 light level (on touch panel) 10 %
IR transmitting strength 30 %
Function at rst start-up Auto-sequence rst 15 minutes. Test function
Menu from the right

8Subject to change without notice. Version5_20200424
Explanation of relay function
The Relay function facilitates the programming of multiple
luminaires that will have the same setting.
For example, change the dwell time after last presence
from 10 min to 20 min on one luminaire. Save the change
with the app. You can now “relay” the setting to the other
luminaires in the same zone. Press Relay. The program-
med sensor will now ash once per second for 30 seconds.
The other sensors will have a solid red light under the PIR
sensor. This gives you time to ensure that all luminaires
have received the information. After this, all sensors revert
to normal operation, but with a 30-second change across
the entire installation.
One function that cannot be used as above is luminaire
zoning. For this, you will need to point the dongle at each
luminaire that will change zone. If you have multiple
luminaires, you can press the zoning button and hold it in
while moving underneath the luminaires being program-
med. The sensor will ash red.

9
Subject to change without notice. Version5_20200424
1. From the Light Output tab in the menu on the right, you can
dim one luminaire at a time or an entire zone. Try pointing the
dongle at a sensor and dimming the light. The buttons are label-
led “DIM”. Dimming is temporary and resets once the system is
switched o due to absence.
2. Point at the same sensor, but use the “ZONE” buttons to control
light output in order for it to be relayed to other luminaires in
the same zone. This is called relaying information between the
sensors. Dimming is temporary and resets once the system is
switched o due to absence.
Light levels
1. Here you can adjust and save light levels for presence, for
absence prior to switching o, and lowest level. If you have ad-
justed the light to the desired level for presence, you can save it
using the “Set Max” button. After this, you can relay the setting
to other luminaires in the same zone (they will immediately
adjust to the same level as the rst programmed sensor). The
same procedure is used for other levels. With the Minlight Level
function, you can also lock specic luminaires to constantly
remain at a lowlight level. This can be used as a security feature
in stairwells, lifts, or exits.
2. By saving the settings, you can reuse the same settings for other
luminaires, e.g. on another oor or at a later date. You can use
the Recall Settings feature to reuse the settings; refer to the
chapter titled Recall Settings.
Temporary dimming of a luminaire or zone
From the Light Output tab, you can also select a precise value for the
dierent light levels: max., min., and low level. Finish by relaying to
the zone’s other luminaires.
The “Revert to Auto Mode” function is used when programming
scenes. The function enables you to leave programming mode and
revert to normal operation.
Selecting a specic light value (Dimming Levels)
Revert to Auto Mode
1
1
2
2

10 Subject to change without notice. Version5_20200424
From the Personality tab you can choose from a number of default “personalities” or function libraries. Each personality
is selected for one type of environment and installation. The factory setting works for most environments, but especially
for open-plan oce landscapes. By installing the luminaires, then waiting to see how the setting functions, you will be
able to determine which changes need to be made for an optimal installation. Not included is the setting for max. illumi-
nation, this should be done on location.
Point the dongle at a sensor, select the desired
function. Finish with “Save settings”.
If multiple luminaires are to have the same setting,
use the relay function.
An important function in the default settings is how luminaires communicate with each other over distance. “Corridor”
switches on multiple luminaires but at a lower level over distance.
• Open Floor – open-plan oce landscape.
• Open Floor Saver – oce landscape, but with fewer luminaires that switch on fully based in proximity to presence.
• Super Saver – huge saving potential in an oce.
• Corridor – switches on multiple luminaires in order to illuminate the entire length of the corridor.
• Closed Oce – only switches on a few luminaires in proximity to presence; can be supplemented with extended time
after last presence.
• Amenities – suitable for rooms with low presence, such as toilets.
• Store Room – storage rooms, cloakrooms, etc.
• Breakout – suitable for oce meeting spaces.
• Demo – used to demonstrate the system’s functions, short duration between presence and switch-o.
• All On Always – lights always on, never switch o.
• 100/50/0 – only a few luminaires switch on in proximity to presence. Greatest possible savings.
• Ripples – used to visualise how the presence and relay functions work.
• Wall Wash – illumination at 100% regardless of distance to detected presence.
• Motion Only – luminaires only react to presence; no IR information is relayed. For demonstrating the presence function.
Pre-programmed settings (personality)
Saving a personality
Description of personalities

11
Subject to change without notice. Version5_20200424
A large part of “personality” is the relay of information via IR signals between nodes/luminaires. The whole concept of
the e-Sense Organic system is that, when presence is detected, it switches on multiple luminaires or only a few depen-
ding on the setting. The factory setting (Open Plan Oce) switches on a large area, which means the light value in the
luminaires decreases corresponding to presence detection (refer to image and table below).
Description of the dierence between three default settings (personality). Open Floor switches on the most luminaires,
but they decrease in brightness according to distance. Corridor switches on fewer luminaires but at higher brightness.
Description of each “personality” in detail. Level 1 – 6 + correspond to the light level at which a luminaire switches on
when it receives IR signals from sensor nodes as detected presence. It is important to know that the IR signal can be
reected to several luminaires in proximity to the presence, which is why the description in the table may be considered
somewhat extreme.
NOTE! If specic parameters have been programmed, such as Dwell time or Lowlight, will these remain even if you
change "Personality".
Pre-programmed settings (personality)
Light Levels (%)
Personality Dwell Time
(Mins)
Motion
(MaxLight) Level 1 Level 2 Level 3 Level 4 Level 5 Level 6+ 0% from
Level Lowlight Standby Lowlight
Time (Mins)
Open Floor 10 100% 100% 70% 40% 10% 10% 10% 16 10% 0% 10
Open Floor Saver 10 100% 100% 10% 10% 10% 10% 10% 11 10% 0% 10
Corridor 10 100% 90% 80% 80% 70% 70% 70% 11 10% 0% 10
Closed Oice 15 100% 80% 10% 10% 0% 0% 0% 5 10% 0% 15
Amenities 15 100% 50% 10% 10% 10% 10% 10% 11 10% 0% 15
Store Room 10 100% 100% 80% 80% 0% 0% 0% 5 10% 0% 15
Breakout 15 100% 100% 50% 10% 10% 10% 10% 11 10% 0% 15
Super Saver 5 100% 100% 40% 10% 0% 0% 0% 5 10% 0% 2
Demo 10s 100% 60% 40% 10% 10% 10% 10% 11 10% 0% 5
All On Always 10 100% 100% 100% 100% 100% 100% 100% Never o 100% 100% 10
100/50/0 10 100% 50% 0% 0% 0% 0% 0% 2 10% 0% 0
Ripples 10 100% 0% 100% 0% 100% 0% 0% 5 10% 0% 2
Wall Wash 10 100% 100% 100% 100% 100% 100% 100% 20 10% 0% 0
Motion Only 10 100% 0% 0% 0% 0% 0% 0% 1 10% 0% 10

12 Subject to change without notice. Version5_20200424
After last presence is detected, a countdown time will
begin in each node individually. The factory setting of this
time is sucient to not produce annoying phenomena or
cause the luminaires to switch o. This time, and the time
at low level prior to switch-o, can be set in Dwell Time
in the menu. The factory setting is set to 10 minutes for
both of these times (refer to the table for personality as
applicable). Save and relay in Save Settings. A good tip is
to use a default personality and then adjust the functions
in detail.
Setting the time aer last presence detected (Dwell time)

13
Subject to change without notice. Version5_20200424
Use + and - in the Light Output tab to adjust the light level. Adjust all lumin-
aires that use this function. Use + and - to adjust the entire zone in order for
all luminaires to have the same level.
1. Point the dongle at a luminaire and press the Calibrate and Enable but-
ton.
2. Using the Relay button you can now initiate the process to adjust all
nodes and read the desired light level.
3. Finish with Save Settings and Relay.
With Enable and Disable you can start/stop the function.
NOTE! Do not stand underneath a sensor when it is in calibration mode. It
is also advisable to have the right furniture in place, so that the setting does
not apply to the oor, but rather the work area.
You can easily simulate the function of a touch panel from the Simulated
Wall Switch tab. It gives an idea of the functions oered by the panel.
Setting Daylight Dimming
Simulated Wall Switch
Daylight dimming is an eective way to optimise energy saving. For example, luminaires at windows in a large oce can dim
according to incident daylight. Luminaires farther into a room can be optimised by selecting the correct xed light level. If
luminaires that will use daylight dimming are in a separate zone, it is easier and quicker to make adjustments that apply to
all. It’s important that daylight dimming is adjusted when the eect of sunlight is not dominant, preferably below 5% of the
amount of light measured with a lux meter. Adjusting the “Max Light” must be carried out before, since this level is the basis
for the target value which the system will attempt to maintain. If the luminaires are able to provide approx. 700 lux without
being aected by daylight, the level can be adjusted down to just over 500 lux, which is the recommended value for oces
and workspaces.
Daylight Dimming
1 2
3

14 Subject to change without notice. Version5_20200424
You can easily zone luminaires and sensors so that the eect is not limited and optimised. Zoning and the choice of dif-
ferent “personalities” allow for a fast and reliable solution. Large oces and corridors can/should have dierent para-
meters for optimal functionality. Zoning luminaires is the only time that you will be required to point the dongle at each
sensor and change the setting. Zoning cannot be relayed on. By adjusting the zone with + -, you can easily determine
whether the function and zoning are correct. Remember that conguration of a zone is not relayed to other zones.
Zoning (Zone)
All sensors/luminaires are zoneed in Zone 1 upon delivery.
The Zone tab in the app allows you to rezone one luminaire
at a time. To rezone quickly, press and hold a zoning button
while walking underneath all the luminaires (suitable for
corridor). The luminaire to which you point the dongle will
ash red 3 times.
Zoning example
In certain cases, such as in the example below, you will want
presence in the oce section to maintain a light level in the
corridor. This function is suitable when there are fewer people
in the oce.
Choose the zone to be listened to, i.e. the corridor (Zone 2) will
listen to the oce (Zone 1).
Choose the zone to be listened to. See red arrow.
One-way multi-zoning

15
Subject to change without notice. Version5_20200424
If necessary, you are able to forward information via a zone, which is not aected. As shown in the image below, pro-
gramming commands in a corridor (Zone 2) will also aect nodes on the light in the second corridor beyond the oce
(also in Zone 2). The function is located under the “Zone” tab and “Forward message for”. Select the zone to be forwarded
(in this case Zone 2) and program it to correspond to a few luminaires in Zone 1. You do not have to program all the lumin-
aires in Zone 1, just a few to ensure the information is correctly relayed. Finish by saving the change. You can also remove
links with the “Ignore” button.
Note: This is only for programming commands, not presence information.
Relay programming information (Forward Message For)
It is also possible to forward information via multiple zones. Use the same procedure to enable the luminaires to relay
information on. It is important to know which zones are used. The reason is that there may be a touch panel located in the
rst corridor that will aect Zone 4 in the second corridor.
Relay presence information (Forward Message For) via multiple zones

16 Subject to change without notice. Version5_20200424
Zone X
Identifying zones
Zone X is used to send/receive commands from all other zones.
A good example is a large oce in Zones 1-5, with luminaires for wall lighting along walls and pillars. When a person
enters the room, one of the zones starts to switch on, but without Zone X the area farthest away from the presence would
remain dark. By placing the wall-mounted luminaires in Zone X, they will react to commands from all zones, in this case
Zones 1 up to 5. The result is that the wall lighting farthest away will switch on. This means that modern lighting require-
ments for oce environments can be met.
In other words, Zone X reacts to commands from all zones. In this case, the positioning of glass sections between die-
rent oces and other room types is important. The function can also be used for general control from a touch panel, since
if the panel is in Zone X, it aects all other zones.
Open the “Identifying zones” tab. Point the dongle at a sen-
sor and press the selected zone button. If the sensor belongs
to the same zone, it will turn red for 30 seconds, and other
sensors in the same zone will also turn red. If the sensor only
ashes, it is in another zone. Walk from zone to zone until
the correct one is identied.

17
Subject to change without notice. Version5_20200424
Lighting scenes can be used to select a specic light setting at a certain time. Selecting a scene stops active daylight dim-
ming and presence detection. This is suitable for conference rooms and similar spaces. Each sensor can be adjusted sepa-
rately to provide the required lighting. Lighting scenes are most easily recalled using the wall panel.
1. Select the “Scenes” function in the app. Use Congure Scene 0 (for example) to adjust the light from the luminaires.
It is located on the wall panel’s “Scene A”.
2. Adjust the brightness of an luminaire, or for the entire zone.
3. Save the preferred setting.
4. Test the dierent scenes using the “Go to” buttons.
5. Under “Scene Functions” you can choose to revert to normal function (e.g. daylight dimming) with “Revert to Auto
Mode”.
The “Set Scene as Start Up Mode” function is used to de-
termine what should happen after a power failure. When
power is restored, you can check that the light does not
switch on, or switches on in a predetermined mode. It may
be a “hidden” scene that is not located on any touch panel.
If you have prepared a scene to operate at power start up,
you can enable it in this menu. Point the dongle at the
desired sensor, repeat for each luminaire, or use the relay
function (relay).
Conguring Scenes
Start Up Mode
1
4
52
3

18 Subject to change without notice. Version5_20200424
1. In this menu you can select precise % values in order to ensure that levels are equal in a luminaire zone.
2. Scene Exit can be considered a series of complex functions.
3. The “Remain in Scene Until On/Auto” function will remain active for a full year, provided that you do not press On/
Auto on the touch panel, which reverts to normal operation, or use “Revert to Auto Mode” in the app, which also
disables the scene.
4. The “Absence” function exists in order to able to automatically revert to normal operation once presence detection no
longer applies, and the time delay has elapsed. The light adjusts to low level, then switches o – now in normal operation.
5. Exit times are used to automatically exit the scene value and revert to normal operation. This is not contingent on
presence.
6. The “Manual On/Auto O” function is also referred to solely as Manual On. It disables automatic switch-on when a
zone detects presence. The light must be switched on manually at the touch panel, or via the app. The light switches
o as normal after last presence and according to the time setting. NOTE! This function can only be used on nodes run-
ning version 160 or later.
Conguring scenes cont.
Point the dongle at a sensor and press the “Enable” button.
If several luminaires are to have the same function, you can relay the set-
ting.
This also applies to resetting the function.
NOTE! This function can only be used on nodes running version 160 or later.
2
4
5
3
1
6

19
Subject to change without notice. Version5_20200424
e-Sense Organic Wall Panel
e-Sense Organic can be controlled manually with a wall panel (Art. no. 86284). The panel is battery-powered and can
easily be placed on a wall or even glass surfaces. Batteries are supplied with the device. The functions are easy to use. The
panel is supplied to work directly with sensors in Zone 1, but can easily be reprogrammed to another zone.
It is important to remember that the panel is normally in Sleep Mode in order to save battery power. When you press
a function, the panel activates and remains active for 5 seconds to allow the device to be reprogrammed, e.g. changing
zones.
Select “Wall Switch Setup” from the app. Press
any button to wake the panel (the top of the panel
ashes blue when the command is sent).
Point the dongle at the panel and select which zone
it will belong to. The panel ashes again to indicate
that the change has been applied.
Test the panel for luminaires in the same zone.
“Transmission Test” is used to determine how far
the IR signal reaches. Press the test button in the
app and the panel will send 30 IR commands (2 per
second for 15 seconds). All sensors receiving the
command will ash 30 times.
If the signal is weak, the sensor will only ash a
few times.
You can increase/decrease the IR signal strength
using “Infrared Power Transmission”. Press the
On button to wake the panel, select signal strength,
and “Save Settings”.
“Simulated Wall Switch”
This function allows you to
simulate how a wall panel
works without one being
available.

20
EnOcean wireless pushbutton panel
Push Button conguration
e-Sense Organic provides the opportunity to connect an EnOcean wall switch, which are battery-free and communicate
wirelessly, with the Organic installation. The wall switch panels can be congured to control the selected zone, etc., all
parameters are set using the E-Sense Organic app for Android or iOS.
The wall switches are available with two or four button functions. The wall switch can be congured for a selection of fun-
ctions via the app and “EnOcean Wall Switch Setup” in the menu. Refer to the gure below as a reference for the selection
of function and position. The NFC function in the phone or tablet is used to transfer the selected settings in the app. This
requires the phone or tablet to be held with the back against the panel so that the transfer can be performed securely. The
app indicates when the transfer has been completed.
EnOcean Push Button Panel is available with
two or four functions - (the numbers indicate
only the position of the panel).
How to congure an EnOcean Panel:
1 3 1
2 4 2
1. Open the Organic Response app and sign in with a “Congurator”
approved Google- or Linkedin account. See page 4.
2. Open “EnOcean Wall Switch" menu in the OR app.
3. Choose ”Zone Pairing” or “Switch ID Pairing” (there’s more infor-
mation below on which settings are best suited for dierent application
areas.)
4. Select 2 or 4 button panel.
5. Choose “Select function” from the following selection; On/Auto, O,
Dim up, Dim down, Scene 0 to Scene 6.
6. For ”Zone Pairing” choose which zone the push button panel will con-
trol. The default setting on the sensor nodes are Zone 1.
7. For “Switch ID Pairing One to One” functionality, tap the box “One to
One Pair”
8. Press ”Congure” and hold the back of the phone or tablet against the
wall switch. Note that the NFC-chips placement varies between dierent
manufacturers and models.
9. Do not remove the phone or tablet until a message showing “Done”
pops up in the app. If no message pops up, try moving the backside of the
unit around until you’ve located the NFC-chip.
10. After congurating a wall switch a push on any button on the wall
switch is needed before it starts working. This rst push does not aect the
light.
Subject to change without notice. Version5_20200424
Table of contents
Other Fagerhult Control System manuals
Popular Control System manuals by other brands

Zodiac
Zodiac iAqualink IQ904-P quick start guide

King Canada
King Canada RC-110 instructions

TCS
TCS UWT-100 quick start guide

heat-timer
heat-timer SQ-Elite-MV Installation and operation instruction manual

Bosch
Bosch Rexroth NYCe 4000 instructions

Solartron Metrology
Solartron Metrology AMETEK ORBIT ACS SI100 manual

FoxAlien
FoxAlien 4040-XE user manual

SainSmart
SainSmart GENMITSU 3018-PRO user manual

Siemens
Siemens SIMATIC PCS 7 OSx Operator's manual

DYNANAV
DYNANAV Dynaflow 2 Installation and operation guide

Pakedge Device & Software
Pakedge Device & Software NP36 user manual

Nakanishi
Nakanishi E3000 SELECTOR Operation manual