FAL FAL-90-30BG User manual

Cooker Hood
Instruction Manual
Model no.:
FAL-90-30BG / FAL-90-30SS
FAL-60-30BG

Page 1 (Inside)
Please be careful when removing and installing the Island installation Brackets and Stainless Steel chimneys.
The Stainless steel chimneys contains sharp edges and can possibly lead to cuts.
Generally asked Questions and Answers:
1. Q: My extractor fan is not extracting
A: before logging a service call please ensure the installation on your extractor fans was done properly to
avoid a service call out fee charge. Herewith a list of commonly found mistakes on everyday installations:
* Installer did not remove the tape on the butterfly valve. (Q: 13).
*Installer did not secure the power cord inside the chimney. (Q: 13).
*Your ducting hose is exceeding the recommended maximum length. (Q: 13).
*Your unit is not at the recommended height. (Q: 3).
*Your unit is installed above the wrong application. (Q: 2).
A service fee will apply when we log a service call and any of the points above apply.
2. Q: Can I use the extractor fan above my gas braai?
A: NO. Please note that this unit was designed for the intended purpose of domestic kitchens only and cannot
be used as a commercial extractor fan. Commercial usage includes but is not limited to: Restaurants, Coffee
Shops, Soup Kitchens, Tuck shops, Food trailers, Gas braai’s inside or outside your property, any other form
of braai and any kitchen that is used for commercial purposes. Using the extractor you purchased on any
commercial application poses a serious fire risk and will result in immediate void of your warranty. Please
contact our Falco offices for assistance with Gas Braai Extractors.
3. Q: What is the correct installation height?
A: The recommended installation height is 700mm above gas and 650mm above electrical. On either
application it is recommended that your installation height does not exceed 750mm to ensure the best results.
Q: Do I require a recirculation kit?
A: No. The extractor was designed to be used on both applications; External and Re-circulation air operation
and no additional kit are required.
4. Q: What is the difference between External and Re-circulation air operation?
A: Re- circulation; All wall mount units are supplied with aluminium and charcoal filters. For Re-circulation
mode you will simply install the unit. The air will filtrate through both sets of filters, you’re outside aluminium
filters and you’re inside charcoal filters. The air discharged from your extractor is then clean and grease free
and cannot cause any damage. There are two options when using your extractor on Re-circulation. 1 –Let the
filtrated air escape through the vents on top of your top chimney or you can use the extendable ducting house
to vent the air into your ceiling. Activated charcoal in the charcoal filters removes odour and some smoke
particles from the air before releasing the cleaned air back into the kitchen.
•External: The only difference between Re-circulation mode and external mode is that on external mode you
are venting the air to the outside of your property using a ducting hose. This means the clean filtrated air will
not be discharged into your kitchen or ceiling but to the outside. The unit is supplied with an extendable
ducting hose. When venting your air outwards the charcoal filters can be removed to improve the suction rate.
Removing the charcoal filters on re-circulation mode is not recommended.
|
Please note that the wall fitting that fits into your wall when venting your air outwards is not supplied
with the extractor and can be purchased locally.

5. Q: How does an Extractor Fan work?
A: Extractor fans are designed to remove airborne grease, steam, heat smoke and odours from cooking by
extracting and filtration of the air in your kitchen and above your cooking surface.
6. Q: Are my downlights/bulbs covered under the warranty period?
A: NO. Downlights, bulbs, aluminium and Charcoal filters and are not covered under the guarantee period.
For the full list of terms and condition of the warranty period please read the warranty certificate supplied
inside the box or in your manual. You can also download it from www.falco.co.za
7. Q: How often do I have to replace my filters?
A: With daily use we recommend that you replace your charcoal filters every 6 months. Your aluminium filters
can be cleaned in luke warm water and dishwashing liquid. Please do not put your aluminium filters in the
dishwasher as this will discolour the filters and they will become dull. Alternatively you just purchase new
aluminium filters.
8. Q: How long is my warranty and what does it entail?
A: All our extractor fans carry a two year guarantee. Motors, PC Boards, Capacitors, Transformers (for units
with 12volt downlights), 220Volt light sockets(for units with normal 220v light bulbs), Main Control Switches
and motor fan blades are covered by our two year parts and labour guarantee.
9. Q: What is excluded from my warranty?
A: Downlights and bulbs, Glass panels and extractor glass, aluminium and charcoal filters are excluded from
the warranty.
10. Q: How do I clean my Stainless steel extractor?
A: Always ensure your extractor is cleaned with non-abrasive cleaners. Always read the product instructions
and ensure that the product is safe for the use of Stainless steel. Two great products are window cleaner,
which is also a stainless steel cleaner, and spray on wood polish, another certified stainless steel cleaner.
Please note that abrasive cleaners will damage the stainless steel and will cause rust or rust stains.
11. Q: Why is there rust marks on my extractor?
A: Stainless steel can rust if cleaned with abrasive cleaners. The chemicals inside abrasive cleaners react
with the stainless steel and the result will be rust. There are many day to day cleaning products in our kitchens
that are abrasive cleaners and unknown to the consumer. Please make sure you read the instructions and if
Stainless Steel is not mentioned, then do not use the product on Stainless steel.
12. Q: Can I extend my stainless steel chimneys if they are to short?
A: Yes. Please make sure of your measurements before starting your installation process. Additional bottom
chimneys and installation brackets are sold by Lategan & Van Biljoens in Pretoria and they are used to extend
the chimneys on Falco units.
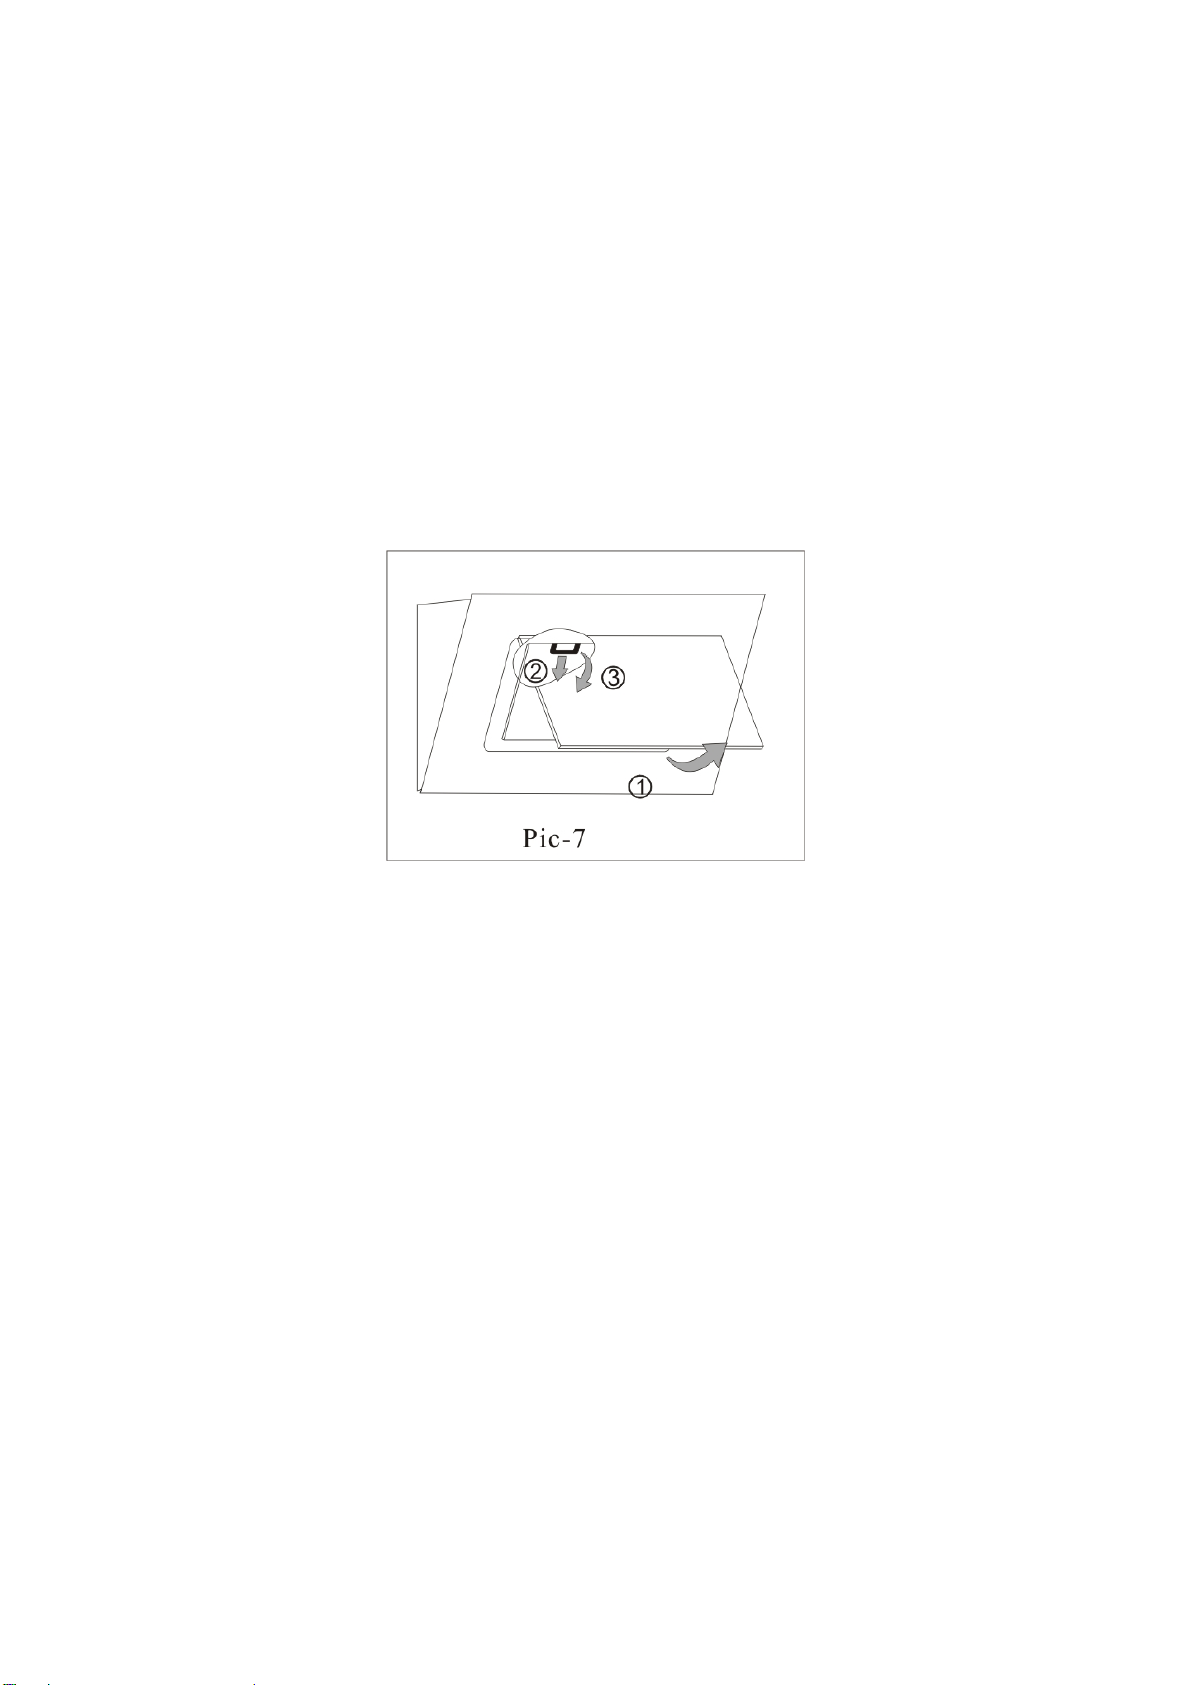
13. Q: My extractor is blowing and not extracting?
A: There are three main reasons that can cause your extractor to blow instead of extracting and most of the
time (98%), this is caused by faulty installations. Please make sure that there is no obstruction on top or inside
your ducting hose. The yellow warning sticker placed over the ducting outlet should be removed after
installation is completed to ensure no debris falls into the cavity, damaging the extractor barrel fan.
Make sure the power cable is neatly secured inside the chimneys and make sure the power cable is not
causing an obstruction on top of your butterfly valve. Poor workmanship and failure to secure the power cable
causes the cable to lie on top of the butterfly valve and this will block and prevent the unit from extracting
properly.

Please ensure that if your butterfly valves are fitted, that the tape stuck over your butterfly valves in the factory
is removed when your unit is installed. Failure to remove the tape on the two butterfly valves will result in
airflow outlet to be restricted and this will cause the air to be returned causing the blowing of air instead of the
extraction of air. Before booking a service call make sure you check this first to avoid being charged.
(a)This is a picture of the butterfly valve closed with the tape on top:
The tape should be removed when installed. Both butterfly valves open when the extractor is switched on:
(b) Ducting hoses exceeding the 2.5meters will also have a negative effect on the extraction rate of your extractor fan.
If you are out-venting the air and the extension of ducting hose exceeds 2.5meter you need to purchase an addition
extraction motor that must be installed in line with the ducting hose to support in the extraction of the air. The longer
your ducting hose the less your extraction rate will be. If your ducting hose is too long and you did not install an
additional extracting motor in line with the ducting hose, your extractor will not extract the air. Please ask your installer
about an additional inline motor when your ducting hose is exceeding 2.5m.
14. Q: Parts Availability
A: Full range of spares is available from Lategan & Van Biljoens in Pretoria. www.appliancesspares.co.za
15. Q: What is the diameter of my ducting hose?
A: 150mm
16. Q: More Queries?
A: Please email any queries to: [email protected], Tel: 011 454 6423/4314.
Spares can be viewed and ordered online: www.appliancespares.co.za

5
Warning
Keep your children from using the cooker hood.
Your cooker hood is for domestic use only, not suitable for barbecue, roast shop and other
commercial use.
Any installation work must be carried out by a qualified electrician or competent person.
The cooker hood and its filter mesh should be cleaned regularly in order to keep in good
working order.
Before cleaning, always ensure that you have switched your cooker hood off.
Clean the cooker hood according to the instruction manual and keep the cooker hood from the
danger of burning.
No fire for drying your cooker hood.
If there is any fault with your cooker hood, please call the service department appointed by
agent for servicing.
Please keep the room draughty when your cooker hood and gas hob are working.
Do not exhaust the gas from cooker hood through the same heated flue which is for the gas
from gas hob and other kitchen appliances.
Before installation and usage, read all the instructions and make sure that the voltage (V) and
the frequency (Hz) indicated on your cooker hood are exactly the same as the voltage (V) and
the frequency (Hz) in your home.
In order to get the most out of your cooker hood, please read the instruction manual before
installing & using, and keep it in a safe place.
Ensure that you could get our guarantee for your cooker hood, please provide the warranty card
and purchase receipt, or the guarantee will not be offered.

6
Function and Feature
The cooker hood is made of high quality materials with streamlined design accordingly to
technical and physical engineering theory, high end and luxury with age aesthetic feeling, also
there are kinds of styles for your option to perfect your kitchen.
Equipped with a large power low noise electric motor and centrifugal leaf, it produces strong
suction, low noise, non stick grease filter and easy to clean.
With the isolated low voltage circuit board control, 12vAC input, the lights are more
concentrative and use is much safer.
The grease filter is easy to remove and clean, and only wipe lightly for the motor and other
interior parts.
Special wind tunnel construction and oil collector design, avoiding redundant grease left in the
flue.
Installation
1. T he cooker ho od sho uld be placed a t a d istance of 65 75cm (26 30inch) fro m the‐‐ co oking
platform for high efficiency. See Image 1.
2. Install the wall brackets at a suitable place oncethe installation height are fixed, and keep it inline,
see Image 2.
3. Install the outlet and exhaust pipe onto the cooker hood by screws. See Image 3.
4. Install the chimney bracket on the chimney. See Image 4.
5. To adjust the cooker hood position, fix the cooker hood with screws (safety screw). See Image 5.
7. Adjust the position of the chimney and fix it by screws. See Image 6.
Note: The two safety vents are positioned on the back casing, with diameter of
6mm.

7
Note:
● Any installation work must be carried out by a qualified electrician or
com petent person.
● Do not connect the ducting system of the hood to any existing ventilation
system which is being used for any other appliance ,such as warmer tube, gas
tu be , hot wind tube.
● The angle of the bend of the ventilation pipe should not be less than 120º;
you must direct the pipe horizontally, or, alternatively, the pipe should go up
from the initial point and should be led to an outer wall.
● After the installation ,make sure that the cooker hood is level to avoid grease
colle ction at on end.See Pic. 5
To use your cooker hood:
LED touch control:

8
LED Touch control have four buttons: (Timer), (Lamp), (Speed) (Power).
See Pic
1. Power on: After you have connected the cooker hood to the main supply, the backlight of button
will turn on. The backlight will turn off after 30s without any operation and the cooker hood will
enter into stand-by mode.
2. Press button once, lights will be on. Press button again; lights will be off.
3. Turn on hood and select the speed, use button “ ”, the motor works at 3 speeds, low, mid
and high, and the LED display will display “1”, “2”, “3”.
Press once, the motor starts to work at low speed and the LED display will display “1”,
Press again base on the low speed, the motor works at mid speed and the LED display
will display “2”,
Press again base on the mid speed, the motor works at high speed and the LED display
will display “3”.
Go on pressing button, the hood works at low speed again and it repeat: “low→mid→
high→low→mid…”
4. Press button once, the hood will work at the speed which it works last time. Press
button again, the hood stop working.
5. The time button works when the motor is working only.
Press , the cooker hood enter into timer setting mode. The max delay time is 9 min, and
the LED display will display “9”.
When t he timer is set, th e LED disp lay will disp lay “ 9”,”8”,”7”…….decreasing by e very
minute, when it display “0”, the motor will start working.
Press once, the cooker hood will enter into timer setting mode, press once again,
the cooker hood will exit the timer setting mode. Press once when the cooker hood is working
at timer setting, the cooker hood will exit the timer setting mode automatically.

9
Touch control:
Touch control have five functions: (Low), (Mid), ( High),
(Light), (Time setting).See Pic.
1. Power on: After you have connected the cooker hood to the mains supply the backlight will turn
on. The backlight will turn off after 5s without any operation and hood will enter stand-by mode.
2. Press button once; lights will be on . Press button again; lights will be off.
3. Push the low button, the indicating light , and the motor runs at low speed. Push it again
and the motor will stop.
4. Push the middle button, the indicating light , and the motor runs at mid speed. Push it
again and the motor will stop
5. Push the high button, the indicating light , and motor runs on high speed. Push it again
and the motor will stop.
6. Whilst the cooker hood is in use, if you press the timer button once the hood will run
for 5 minutes and then cut off.

10
Cleaning and Maintenance:
Changing and cleaning the anti-grease filters
● Tear down your cooker hood as per the approach shown on Pic. 7
● You can clean the filter as below :
1. So ak them for ab out 3 minute i n h ot w ater (4 0-50 degrees) with a gre ase-loosening
detergent th en brus h i t gently w ith a s oft brus h. Pl ease do n ot a pply to o m uch pr essure , avoid to
damage it .
2. It can be put into a dishwasher with detergent, set the temperature at around 60 degrees.
● Please do not use abrasive detergent for it will damage the hood.
Note:Make sure that cooker hood is shut down before cleaning

11
Trouble shooting
Symptom
Solution
The cooker hood does not start. ●Check that the hood is connected to the
electricity supply.
●Check that the fan speed control is set
properly.
The cooker hood is not working
Effectively.
●The fan speed is not set high enough.
●The grease filter is dirty.
●The kitchen is not ventilated well enough.
●If the hood is set for recirculation, check that
the carbon filters have not expired.
●If the hood is set for extraction, check that the
ducting and outlets are not blocked.
The cooker hood has switched off
during operation.
●The safety cut-out device has been tripped.
●Turn off the hob and then wait for the device to
reset.
●Note that if you have installed your cooker
hood too low, this will happen.
●If it happens frequently, it will be damaged.

Warranty and service certificate:
This certificate is issued by Falco Domestic Appliances, supplier of ALL Unbranded Falco Extractor fan models. Hereinafter referred to as ‘The Company’, to the
original purchaser only, of the product/appliances described on the certificate and shall constitute the only warranty given in respect of this product/appliance.
The Company warrants to the original purchaser that for the period of THREE YEAR on ALL extractor fans from date of purchase the appliance should be free
from defect under normal domestic use, both in workmanship and material.
Important Notice:
Please DO NOT remove the warning label on the motor housing until the installation is finished. Debris dropped inside the motor housing during installation
causes the motor fans to break when the unit is turned on resulting in a very loud and noisy extractor. All fans are tested on the assembly line before packaging.
Venting Outward and Ducting: Please ensure your ducting hose (if venting outwards) does not exceed more than 2.5meters. An additional in-line extraction
motor must be fitted in-line with the ducting on all ducting exceeding 2.5 meters. To avoid losing your extraction rate it is very important to keep the length of
your ducting to a distance less than 2.5meter. The longer you’re ducting the less extraction your extractor will have unless you fit an additional in-line motor to
support in the extraction of the air. Failure to comply with this shall void the purchaser’s warranty until such time they correct the installation.
If not, the warranty is subject to the following conditions:
1. Repair or replacement of any part of this product/appliance, found by The Company to be defective, shall be at the cost of The Company. The
Company reserves the right to affect such service through any Service Division authorised by The Company to carry out service on The Company’s
products/appliances. The cost of the service shall be borne by The Company in full, providing that the product/appliance is located no further than
50km from an authorised service agent.
Where the product/appliance is located beyond the 50km radius, the purchaser shall be liable for the standard travelling charges, as determined by
The Company or alternatively, The Company reserves the right to ask the purchaser to deliver any faulty product/appliance to the dealer from which it
was bought or nearest service agent, for repairs. After the said repair has been completed, the original purchaser is again responsible for the
collection and transportation of said product/appliance.
2. Where the purchaser lives in an outlying area (farms/ remote locations) where appointed Service Agents are limited or non-existent, The Company
reserves the right to request such a purchaser to transport the unit to and from the nearest appointed Service Agent for repairs.
3. The Company shall not be held responsible for transportation/other costs other than those incurred within the provisions of Clause 1 and 2 of this
Certificate.
4. All lamps, halogen lamps, globes, LED lights, aluminium filters, charcoal filters and extractor glass panels, are excluded from these
warranties. Abuse, misuse in conflict with the operating instructionsor connection to incorrect voltages (generators, solar panels, wind turbines without
the additional and compulsory addition of pure sine wave invertors), shall release The Company from all its obligations under warranty. It is an
express condition of these warranties that the purchaser takes due care and attention in the installation, use and maintenance of the
product/appliance.
5. Any physical damage to the product/appliance that occurred prior to delivery/receipt of the product/appliance will only be included in this warranty
provided that it is reported, together with the proof of purchase within 48 hours thereof. Any part on any of the abovementioned products/appliances
will be excluded from this warranty, should findings indicate that the parts are damaged or malfunctioning because of any form of physical damage.
6. This warranty shall become void and cease to be valid if the product/appliance is dismantled by, or any repairs to the product/appliance are affected
by any person not authorised by The Company, or if replacement parts not approved by The Company are used in any product/appliance, or if the
serial number of the product/appliance is removed.
7. These warranties shall not apply if the product/appliance is purchased or used beyond the borders of the Republic of South Africa (Swaziland,
Lesotho, Namibia, Botswana and Zimbabwe).
8. The Company shall not be responsible for damages resulting from fire, floods, civil disturbances or any Act of God. The Company shall not, in terms
of these warranties be responsible, nor held liable for any consequential loss or damage of any kind caused by or due to the failure or malfunctioning
of the appliance/product.
9. Where service is requested under warranty and no fault or any defect is found by the Company service agents, all costs incurred will be for the
purchaser’s account.
10. This certificate together with the purchaser’s proof of purchase (Invoice from Dealer) will serve as proof of purchase. For warranty purposes, it will be
essential to produce this Certificate with the Invoice. Failure to do so will render the purchaser liable for service costs.
11. The Company will not exchange any faulty product/appliance still under warranty EXCEPT if the appointed service agent inspects and confirms with
valid proof that the appliance is irrepairable.
12. This warranty shall become void and cease to be valid if the product is installed at the incorrect height. Please refer to your manual.
13. This warranty shall become void and cease to be valid if the incorrect size Extractor Fan is installed above any electrical or gas hob. Example of such
an installation is installing a 600mm Extractor above a 900mm gas or electrical hob.
14. This warranty does not cover rodent or insect infestation.
15. Repairs and parts covered by the Company includes: the motor, the PCB, the power and light switch, the capacitor, the motor fan blade and
transformer.
16. This warranty shall become void and cease to be valid if the extractor fan is used for commercial purposes or on the incorrect application. This may
be subjected but not limited to; outdoors use, use in commercial kitchens, use on motor boats, use above any braai facilities, boarding school
kitchens, restaurant kitchens, coffee shops, tuck shops, commercial cookers and chips fryers. Installing and operating your domestic extractor fan
above the wrong application poses a serious fire hazard.
Appointed call centre:
Lategan & Van Biljoens New Appliances & Spares (LVB)
636 Frederika Street, Gezina, Pretoria, PO Box 23151, Gezina, 0031, Pretoria
Service call centre: Tel: (012) 330-0287 ext 6; Whatsapp:____074-206-5132
E-mail: ad[email protected].za or [email protected]
Alternatively book a service call online using the following link: www.falco.co.za/service.
Any service-related queries should be directed directly to the dealer (store) where the unit was purchased. Alternatively, the purchaser can contact the
appointed call centre on the details provided above. The appointed call centre, Lategan & Van Biljoens New Appliances & spares (LVB), will allocate the
service call under the warranty procedure to one of their closest service agents in the purchaser’s area. No service call will be considered under the warranties
if no proof of purchase can be presented.
This manual suits for next models
2
Table of contents
Other FAL Ventilation Hood manuals