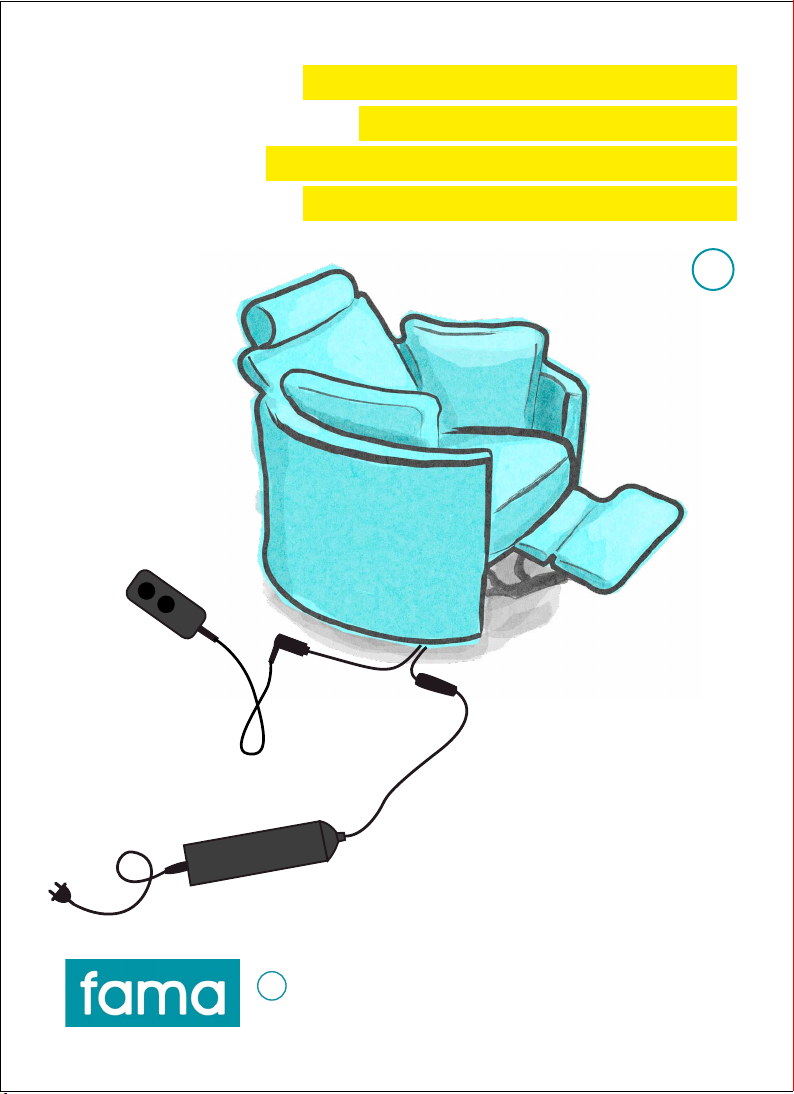
Conectar uno de los cables salientes del motor a la botonera a través de la conexión A.
Connect one of the motor output cables to the buttons panel through connection A.
Connectez l’un des cables sortant du moteur à la Boitier de commande à travers de la connexion A.
Verbinden Sie einen der mit Motor verbundenen Kabeln mit der Knopfplatte durch das Stift A.
Conectar el otro de los cables salientes del motor a la batería a través de de la conexión B.
Connect the other output cable to the battery through connection B.
Connectez l’autre câble sortant du moteur à la batterie à travers de la connexion B.
Verbinden Sie das andere mit Motor verbundenem Kabel mit dem Akku durch das Stift B.
Conectar la batería al cargador de batería a través de la conexión C.
Connect the battery to the charger through connection C.
Connectez la batterie au chargeur de batterie à travers de la connexion C.
Verbinden Sie den Akku mit dem Ladegerät durch das Stift C.
Por último, conectar el cargador de la batería a la toma de corriente.
Finally, connect the battery charger to the power supply.
Pour terminer, branchez le chargeur de la batterie à la prise murale.
Endlich verbinden Sie das Ladegerät mit dem Stromanschluss.
2
1
3
4
5
6
7
*En caso de haber solicitado una batería adicional / In case
that you requested an extra battery / * Dans le cas où vous avez
demandé une batterie supplémentaire / Im Falle wo Sie einen
Zusatzakku bestellt haben.
Si el cargador de batería no llega a la toma de corriente, desconectar la conexión B para poder cargarlo.
If the battery charger is far from the power supply, disconnect it from connection B for charging.
Si le chargeur de la batterie n’arrive pas à la prise de courant, déconnectez la connexion B pour pouvoir le charger.
Wenn das Ladegerät nicht an dem Stromanschluss heranreicht, bitte abschalten Sie das Stift B, um es zu laden.
Motor / motor / moteur / motor
Cable A / cable A / Cable A / Kabel A
Cable B / cable B / Cable B / Kabel B
Conexión A / connection A / connexion
A / Stift A
Botonera / Buttons panel /
Knopfplatte / Boitier de commande
Conexión B / connection B /
connexion B / Stift B
Batería / battery / Batterie / Akku
Conexión C / connection C / connexion
C/ Stift C
Cargador de batería / battery charger
/ chargeur de batterie / Ladegerät
1
3
7
7
4
2
6
5
3
5
5
7
76
4
4
2
COMPONENTES / COMPONENTS /
COMPOSANTS / BESTANDTEILE
MOTOR CONECTADO CON BATERÍA / MOTOR CONNECTED WITH BATTERY / MOTEUR CONNECTÉ
AVEC BATTERIE / MIT AKKU VERBUNDENEM MOTOR
1
2
3
4
5
1A
1A
1B
1B
1A
1B