Far Tools TBS 400B Use and care manual

113251-2-D-20151010 ©FAR GROUP EUROPE
www.fartools.com
Professionnal Machine
TBS 400B
Mini Tour à bois ( Notice originale )
Mini Wood lathe ( Original manual translation )
Holzdrehmaschine ( Originalbetriebsanleitung )
Torno de madera ( Traduccion del manual originale )
Tornio da legno ( Traduzione dell’avvertenza originale )
Torno para madeira ( Tradução do livro de instruções original )
Houtdraaitafel ( Vertaling van de originele instructies )
( Μετάφραση από τις πρωτότυπες οδηγίες )
Tokarka do drewna ( Tłumaczenie z oryginalnej instrukcji )
Sorvi ( Käännös alkuperäisestä ohjeet )
Träsvarv ( Översättning från originalinstruktioner )
cтруг за дърво
( Превод на оригиналната инструкция )
Trædrejebænk ( Oversættelse fra oprindelige brugsanvisning )
Strung lemn ( Traducere din instrucțiunile originale )
Деревообрабатывающий станок (Перевод с оригинальной инструкции)
Ağaç işleme tornası ( Orijinal talimatlar çeviri )
Soustruh na dřevo ( Překlad z originálního návodu )
Sústruh na drevo (Preklad z originálneho návodu)
ץעל הטרחמ (תרגום מהוראות מקוריות)
بشخ ةطرخم (الترجمة من التعليمات الأصلية)
Fatorony ( Fordítás az eredeti utasítások )
Lesna stružnica (Prevod iz izvirnih navodil)
Puidutreipink (Tõlge originaal juhiseid)
Medinės tekinimo staklės (Tulkojumā no instrukcijas oriģinālvalodā)
Koka virpa (Vertimas iš originalių instrukcijas)
FR
EN
DE
ES
IT
PT
NL
EL
PL
FI
SV
BU
DA
RO
RU
TU
CS
SK
HE
AR
HU
SL
ET
LV
LT
www.fartools.com
113251-2-Manual-D.indd 1113251-2-Manual-D.indd 1 03/01/2022 10:3203/01/2022 10:32

Un tour à bois est employé pour créer des objets en bois tels que : vases, bougeoirs,
pieds de table, toupies, jouets...
En fait, un moteur entraine en rotation une pièce de bois solidement fixée entre 2
pointes. Un porte outils ajustable sert à soutenir la lame d’un outil de tournage que
l’utilisateur approchera contre l’ouvrage en rotation.
Le tournage peut aussi s’effectuer sur une seule prise (tournage frontal) afin d’aug-
menter le diamètre de tournage et de réaliser des bols par exemple. Certains tours
proposent un moteur tournant pour dégager le banc du tour.
Een draaibank wordt gebruikt om houten voorwerpen zoals vazen, kandelaars, tafelpo-
ten, tops, speelgoed maken ...
In feite, een motor roteert een houten werkstuk stevig bevestigd tussen twee punten.
Een verstelbare gereedschapshouder wordt gebruikt om het blad van een draaiend
gereedschap tegen de gebruiker het werk roterend benadering.
De opnamen kan worden uitgevoerd op een enkele aansluiting (voorzijde locatie) te-
neinde het draaien diameter en het maken schaaltjes verhogen. Sommige tochten zijn
inclusief een draaiende motor aan de draaibank bed los.
• Les principaux outils de tournage sont des gouges et des ciseaux ( gouges à dégrossir, à profiler, bédane, tronquoir)
• Les outils doivent être tranchants, pour cela il faut disposer d’un touret équipé d’une meule à grain fin afin de les
aiguiser.
• Le variateur de vitesse, si votre machine en est equipée permet d’adapter la vitesse aux matériaux.
• Plus le matériau à travailler est dur , plus le diamètre est important et plus la vitesse de rotation doit être lente.
• S’assurer que la pièce de bois ne comporte pas de partie métallique ( clous, vis...)
• Toujours fixer correctement la pièce à travailler de manière à ce qu’elle ne vibre pas.
• Faire démarrer la machine à son régime maximum avant d’attaquer la pièce à travailler
• Il faut commencer par cylindrer la pièce de bois à l’aide d’une gouge à dégrossir. Ainsi, par passes successives, le «faux rond»
est éliminé.
Ensuite vient le profilage afin de donner les formes désirées au bois.
• Il existe des appareils nommés «copieur» afin de réaliser plusieurs fois le même objet. Balustres d’un escalier par exemple.
• Key draaien tools zijn gutsen en beitels (voorbewerken gutsen, profilering, beitel, tronquoir)
• gereedschap is scherpte, hiervoor is het noodzakelijk om een trommel voorzien van een korrel
molen aan het einde scherpen hebben.
• De aandrijving, als uw machine is uitgerust past de snelheid aan materialen.
• Meer materiaal te werken is moeilijk, hoe kleiner de diameter, hoe groter de snelheid langzaam
verlopen
• Zorg ervoor dat het werkstuk een metalen deel niet heeft (spijkers, schroeven ...)
• Altijd goed beveiligen van het werkstuk, zodat het niet trillen.
• Start de machine op volle snelheid voor de aanval van het werkstuk
• Het begint met cylindrer het stuk hout met een guts te trimmen. Zo succésives passes, de «slinge-
ring» wordt geëlimineerd.
Dan komt profilering om de gewenste vormen te geven in hout.
• Er zijn apparaten genaamd «copier» naar hetzelfde object meerdere keren te bereiken. Balusters van
een trap bijvoorbeeld.
FICHE CONSEIL
TOUR À BOIS
TIP BLAD
WOOD DRAAIBANK
FR
NL
113251-2-Manual-D.indd 2113251-2-Manual-D.indd 2 03/01/2022 10:3203/01/2022 10:32

A lathe is used to create wooden objects such as: vases, candlesticks, table legs, tops,
toys, etc. In fact, a motor rotates a piece of wood secured between two points. An
adjustable tool holder is used to support the blade of a turning tool that the user ap-
proaches to the rotating piece. Turning can also be performed on a single point (frontal
turning) in order to increase the turning diameter and produce bowls for example.
Some lathes provide a turning motor to free the lathe bench.
El torno para madera se utiliza para crear objetos de madera tales como: jarrones, pal-
matorias, patas de mesa, peonzas, juguetes... De hecho, el motor arrastra en rotación
la pieza de madera firmemente fijada entre 2 puntas. El portaherramientas ajustable
sirve para mantener la hoja de la herramienta de torneado que el usuario acerca hacia
la obra en rotación. El torneado también puede efectuarse en un solo punto (torneado
frontal) con el fin de aumentar el diámetro de torneado y de realizar tazones por ejem-
plo. Determinados tornos proponen un motor giratorio para retirar el banco del torno.
• The main turning tools are gouges and chisels (rough-turning, profiling gouges, cross-cut chisel, truncation tool)
• The tools must be sharp; for sharpening purposes, a wheel stand equipped with a fine-grain grinding wheel must be
available.
• The speed control, if your machine has this equipment, enables you to adapt the speed to the material you are working
with.
• Plus le matériau à travailler est dur , plus le diamètre est important et plus la vitesse de rotation doit être lente
• Ensure that the piece of wood does not contain any metal (nails, screws, etc.)
• Always ensure that the piece you are working with is properly fixed so that it does not vibrate.planing.
• Start up the machine at its maximum speed before starting to work on the piece
• It is necessary to start by rolling the wooden piece using a rough-turning gouge. In this way, the curvature defect is eliminated
in several passes. The profiling is then performed to give the wood the desired shape
• So-called «copier» devices are available to produce the same object several times, such as staircase balusters, for example.
• Las principales herramientas de torneado son las gubias y los cinceles (gubias para desbastar, para
perfilar, bedano, formón)
• Las herramientas tienen que cortar, para afilarlas se necesita una esmeriladora equipada con una
muela de grano fino.
• El variador de velocidad, si su máquina está equipada con esta función, permite adaptar la veloci-
dad a los materiales.
• Durante el material de trabajo es difícil, cuanto menor sea el diámetro, mayor es la velocidad
debe ser lenta
• Asegurarse de que no haya ningún objeto metálico en la pieza de madera (clavos, tor-
nillos...)
• Siempre se tiene que fijar correctamente la pieza que se ha de trabajar para que no
vibre.
• Hay que empezar por cilindrar la pieza con la gubia para desbastar. Así, se elimina
por fases sucesivas el «defecto de redondez». Después viene el perfilado para dar las
formas deseadas a la madera.
• Existen máquinas llamadas «copiadoras» que sirven a realizar varias veces el
mismo objeto. Balaustres de una escalera por ejemplo.
TIP SHEET
GRINDER
FICHA DE CONSEJOS
TORNO DE MADERA
EN
ES
113251-2-Manual-D.indd 3113251-2-Manual-D.indd 3 03/01/2022 10:3203/01/2022 10:32

Il tornio per legno viene usato per creare degli oggetti in legno come: vasi, candelabri,
piedi per tavoli, trottole, giocattoli... Infatti, un motore trascina in rotazione un pezzo
di legno fissato saldamente tra 2 punte. Un portautensili regolabile serve a sostenere
la lama di un utensile di tornitura che l’utente deve avvicinare all’opera in rotazione.
La tornitura può anche essere effettuata su una sola presa (tornitura frontale) in modo
tale da aumentare il suo diametro e di realizzare, per esempio, delle ciotole.Alcuni torni
propongono un motore girevole per liberare il banco del tornio.
O torno é empregado para criar objectos de madeira, tais como: vasos, candelabros,
pés de mesa, piões, brinquedos, etc. De facto, um motor acciona em rotação uma peça
de madeira solidamente fixada entre 2 extremidades. Um porta-ferramentas ajustável
serve para sustentar a lâmina de uma ferramenta de torneamento que o operador
aproximará contra a peça em rotação. O torneamento também pode ser efectuado com
um ponto único de fixação (torneamento frontal), de forma a aumentar o diâmetro de
torneamento e para fabricar tigelas, por exemplo. Certos tornos oferecem um motor
rotativo para soltar o banco do torno.
• I principali utensili di tornitura sono le sgorbie e le forbici (sgorbie per sgrossare, per profilare, bedano, troncatore)
• Gli utensili devono essere taglienti, e quindi per affilarli occorre avere una molatrice munita di una mola a grani fini.
• Più materiale da lavoro è duro, minore è il diametro, maggiore è la velocità dovrebbe essere lento
• Assicurarsi che il pezzo non ha una parte metallica (chiodi, viti ...)
• Sempre sicure le pezzo in modo che non vibra.
• Prima di cominciare a lavorare il pezzo, avviare la macchina al massimo di giri
• Bisogna cominciare cilindrando il pezzo di legno con una sgorbia per sgrossare. In questo modo, con passaggi successivi, il
«fuori asse» viene eliminato. Poi si passa alla profilatura per dare al legno le forme desiderate.
• Per realizzare diverse volte lo stesso oggetto, esistono degli apparecchi chiamati «riproduttori». Per esempio per le balaustre
di una scala.
• As principais ferramentas de torneamento são as goivas e tesouras (goivas para desbastar e
perfilar, bedame, buril de corte)
• As ferramentas devem ser cortantes. Para isso, é preciso dispor de um esmeril equipado com
um rebolo de grão fino a fim de afiá-las.
• L’unità, se la macchina è equipaggiata adatta la velocità di materiali.
• Più materiale da lavoro è duro, minore è il diametro, maggiore è la velocità dovrebbe
essere lento
• Certificar-se de que a peça de madeira não apresenta elementos metálicos (pregos,
parafusos, etc.).
• Sempre sicure le pezzo in modo che non vibra.
• Pôr a máquina a funcionar em regime máximo antes de operar a peça a trabal-
har.
• Começar cilindrando a peça de madeira com o auxílio de uma goiva para
desbastar.Após várias passagens sucessivas, isso eliminará a «ovalização». Em
seguida, a perfilagem permite dar as formas desejadas à madeira.
• Os aparelhos denominados «copiadores» permitem realizar várias ve-
zes o mesmo objecto. Balaústres de escadas, por exemplo.
SCHEDA CONSIGLI
TORNIO DI LEGNO
FICHA CONSELHO
MADEIRA TORNO
IT
PT
113251-2-Manual-D.indd 4113251-2-Manual-D.indd 4 03/01/2022 10:3203/01/2022 10:32

FIG. A & B
01
FIG. C
02
03
06
10
07
12
09
13
14
05
Contenu du carton
Inhoud van de doos
Conteúdo da caixa
Contenido de la caja
Contenuto della confezione
Contents of the box
08
09
10
07
07
07
a
b
113251-2-Manual-D.indd 5113251-2-Manual-D.indd 5 03/01/2022 10:3203/01/2022 10:32

FIG. D
A
B
C
02
665 mm
588 mm
52,5 mm
12,5 mm
105 mm
A
C
B
A
B
C
113251-2-Manual-D.indd 6113251-2-Manual-D.indd 6 03/01/2022 10:3203/01/2022 10:32

03
07
07
172 mm 110 mm
172 mm 110 mm
07 a
07 b
113251-2-Manual-D.indd 7113251-2-Manual-D.indd 7 03/01/2022 10:3203/01/2022 10:32

FIG. D
04
05
10
CM1/MT1
113251-2-Manual-D.indd 8113251-2-Manual-D.indd 8 03/01/2022 10:3203/01/2022 10:32

FIG. D
09
CM1/MT1
05
1
08
2
113251-2-Manual-D.indd 9113251-2-Manual-D.indd 9 03/01/2022 10:3203/01/2022 10:32

FIG. E
01
750.min-1 3200.min-1
Laisser refroidir le moteur
Laat de motor afkoelen
Deje que el motor se enfríe
Deixe o motor esfriar
Lasciare raffreddare il motore
Let the engine cooling
Appuyer sur le bouton de
réarmement
Druk op de resetknop
Pulse el botón de reinicio
Pressione o botão de reset
Premere il pulsante di reset
Push the safety switch
Redémarrer la machine
Start de machine opnieuw
Reinicie la máquina
Reinicie a máquina
Riavviare la macchina
Restart your machine
RESET
Protection thermique: en cas de
surchauffe, le moteur s’arrête
Thermische beveiliging: in geval van
oververhitting, de motor stopt
Protección térmica: en caso de
sobrecalentamiento, el motor se para
Protecção térmica: em caso de
superaquecimento, o motor pára
Protezione termica: in caso di
surriscaldamento, il motore si ferma
Thermal protection: in case of overheat, the
motor stops
113251-2-Manual-D.indd 10113251-2-Manual-D.indd 10 03/01/2022 10:3203/01/2022 10:32

FIG. E
02
=
02
10
09
113251-2-Manual-D.indd 11113251-2-Manual-D.indd 11 03/01/2022 10:3203/01/2022 10:32

08
FIG. E
02
113251-2-Manual-D.indd 12113251-2-Manual-D.indd 12 03/01/2022 10:3203/01/2022 10:32

FIG. E
03
+/- 5 mm +/- 10 mm
113251-2-Manual-D.indd 13113251-2-Manual-D.indd 13 03/01/2022 10:3203/01/2022 10:32
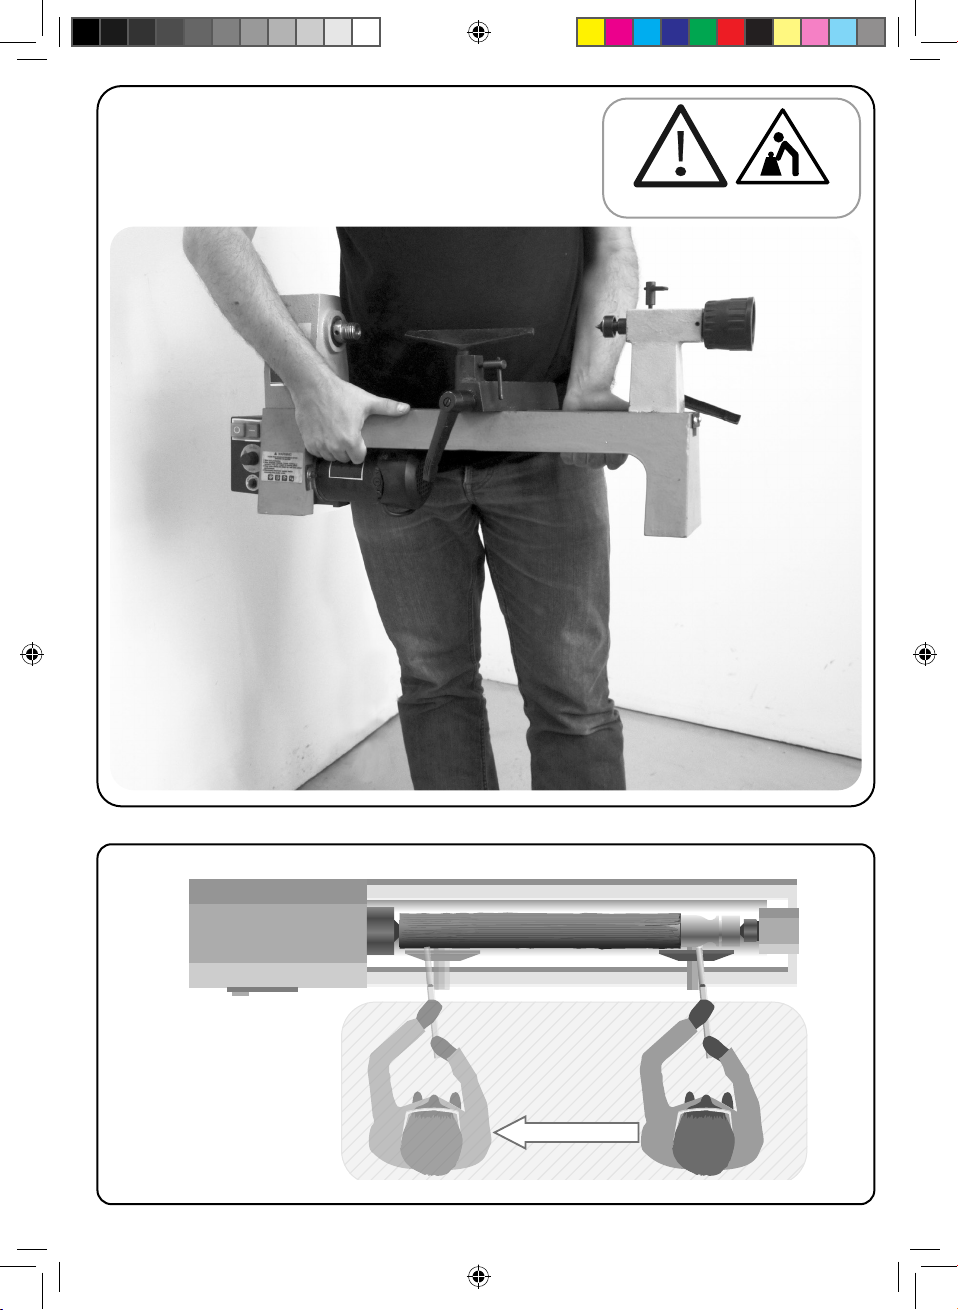
Transport de la machine
Vervoeren Machine
Transporte de la máquina
Máquina de transporte
Il trasporto della macchina
Transportation of the Machine 19 kg
113251-2-Manual-D.indd 14113251-2-Manual-D.indd 14 03/01/2022 10:3203/01/2022 10:32

FIG. H
01
Ref 113800
Ref 113701
Ref 113257
113251-2-Manual-D.indd 15113251-2-Manual-D.indd 15 03/01/2022 10:3203/01/2022 10:32

01 Variateur de vitesse
02 Interrupteur
03 Banc de tournage
04 -
05 Poupée fixe
06 Poupée mobile
07 Porte outils
08 Plateau
09 Pointes
10 Contre pointe
11 -
12 Verrouillage porte outils
13 Avance poupée mobile
14 Verrouillage poupée mobile
15 -
16 -
01 -
02 Fixation du tour
03 Montage du porte outils
04 Montage de la poupée mobile
05 Montage des accessoires
01 -
01 Mise en marche, réglage de la vitesse
02 Fixation de la pièce à travailler
03 Réglage du porte outils
04 -
FR EN
Description et repérage des organes de la machine
Contenu du carton
Assemblage de la machine
Fonctionnalité de la machine
Réglages de la machine
FIG. A & B
FIG. C
FIG. D
FIG. E
FIG. F
01 -
01 L’utilisation d’accessoires adaptés et en bon état
sont garants d’un fonctionnement optimal.
02 -
Remplacement des consommables
FIG. G
FIG. H FIG. H
Entretien, recommandations et conseils
01 Variable speed drive
02 Switch
03 Turning bench
04 -
05 Fixed poppet
06 Mobile poppet
07 Tool-holder
08 Plate
09 Tips
10 Footstock
11 -
12 Tool-holder lock
13 Mobile poppet feed
14 Mobile poppet lock
15 -
16 -
01 -
02 Lathe attachment
03 Tool rest assembly
04 Mobile poppet assembly
05 Accessory assembly
01 Speed start-up, setting
02 Attachment of piece for working
03 Adjusting tool rest
04 -
Description and location of machine parts
Contents of box
Assembling the machine
Functions of the machine
FIG. A & B
FIG. C
FIG. D
FIG. E
01 -
Settings of the machine
FIG. F
01 -
Replacing consumables
FIG. G
Maintenance, recommendations and advice
01 Optimum operation is ensured by the use of
suitable accessories in good condition.
02 -
113251-2-Manual-D.indd 16113251-2-Manual-D.indd 16 03/01/2022 10:3203/01/2022 10:32

DE ES
01 Drehzahlregler
02 Ausschalter
03 Drehbank
04 -
05 Fester Spindelstock
06 Beweglicher Spindelstock
07 Werkzeughalter
08 Teller
09 Spitzen
10 Reitstock
11 -
12 Verriegelung Werkzeughalter
13 Beweglicher Spindelstock
14 Verriegelung beweglicher Spindelstock
15 -
16 -
01 -
02 Drehbankbefestigung
03 Werkzeughalter
04 Beweglicher Spindelstock
05 Zubehörs
01 -
01 Einschalten, Drehzahlregelung
02 Befestigung des Arbeitsstücks
03 Einstellung Werkzeughalter
04 -
Beschreibung & Kennzeichnung der Maschinenteile
Inhalt der Verpackung
Zusammenbau der Maschine
Funktionen der Maschine
Einstellungen der Maschine
FIG. A & B
FIG. C
FIG. D
FIG. E
FIG. F
01 -
01 Der Gebrauch von geeignetem Zubehör in gu-
tem Zustand garantiert eine optimale Funktionswei-
se.
02 -
Auswechseln der Verschleißteile
FIG. G
Reinigung und Wartung
01 Variador de velocidad
02 Interruptor
03 Banco de torno
04 -
05 Cabezal fijo
06 Cabezal móvil
07 Portaherramientas
08 Plato
09 Puntos
10 Contrapunto
11 -
12 Bloqueo portaherramientas
13 avance cabezal móvil
14 Bloqueo cabezal móvil
15 -
16 -
01 -
02 Fijación del torno
03 Montaje del portaherramientas
04 Montaje del cabezal móvil
05 Montaje de los accesorios
01 Puesta en marcha, ajuste de la velocidad
02 Fijación de la pieza que se tiene que trabajar
03 Ajuste del portaherramientas
04 -
Descripción y localización de los elementos de la máquina
Contenido del cartón
Ensamblaje de la máquina
Funcionalidad de la máquina
FIG. A & B
FIG. C
FIG. D
FIG. E
01 -
Ajustes de la máquina
FIG. F
01 -
Cambio de los consumibles
FIG. G
Mantenimiento, recomendaciones y consejos
01 Utilizar accesorios adecuados y en buen estado
es la garantía de un funcionamiento óptimo
02 -
FIG. H FIG. H
113251-2-Manual-D.indd 17113251-2-Manual-D.indd 17 03/01/2022 10:3203/01/2022 10:32

IT PT
01 Variatore di velocità
02 Interruttore
03 Banco di tornitura
04 -
05 Testa fissa
06 Testa mobile
07 Portautensili
08 Piano
09 Punte
10 Contropunta
11 -
12 Chiusura portautensili
13 Avanzamento testa mobile
14 Chiusura testa mobile
15 -
16 -
01 -
02 Fissaggio del tornio
03 Montaggio del portautensili
04 Montaggio della testa mobile
05 Montaggio degli accessori
01 -
01 Avviamento, regolazione della velocità
02 Fissaggio del pezzo da lavorare
03 Regolazione del portautensili
04 -
Descrizione e localizzazione degli organi della macchina
Contenuto della scatola
Assemblaggio della macchina
Funzionalità della macchina
Regolazioni della macchina
FIG. A & B
FIG. C
FIG. D
FIG. E
FIG. F
01 -
01 L’utilizzazione di accessori adatti e in buono
stato garantiscono un funzionamento ottimale.
02 -
Sostituzione dei pezzi di ricambio
FIG. G
Manutenzione, raccomandazioni e consigli
01 Variador de velocidade
02 Interruptor
03 Banco de torneamento
04 -
05 Cabeça porta-árvore fixa
06 Cabeça porta-árvore móvel
07 Porta-ferramentas
08 Prato
09 Pontos
10 Contraponto
11 -
12 Bloqueio do porta-ferramentas
13 Avanço da cabeça porta-árvore móvel
14 Bloqueio da cabeça porta-árvore móvel
15 -
16 -
01 -
02 Fixação do torno
03 Montagem do porta-ferramentas
04 Montagem da cabeça porta-árvore móvel
05 Montagem dos acessórios
01 Accionamento, ajuste da velocidade
02 Fixação da peça a trabalhar
03 Ajuste do porta-ferramentas
04 -
Descrição e identificação dos órgãos da máquina
conteúdo da caixa
Montagem da máquina
Funcionalidade da máquina
FIG. A & B
FIG. C
FIG. D
FIG. E
01 -
Ajustes da máquina
FIG. F
01 -
Substituição de consumíveis
FIG. G
Manutenção preventiva, recomendações e conselhos
01 A utilização de acessórios adaptados e em bom
estado é a garantia de um funcionamento ideal.
02 -
FIG. H FIG. H
113251-2-Manual-D.indd 18113251-2-Manual-D.indd 18 03/01/2022 10:3203/01/2022 10:32

NL EL
01 Snelheidsregelaar
02 Schakelaar
03 Draaibank
04 -
05 Vaste bek
06 Verstelbare bek
07 Gereedschapshouder
08 Blad
09 Pinoles
10 Losse kop
11 -
12 Vergrendeling van de gereedschapshoude
13 Verplaatsing verstelbare bek
14 Vergrendeling verstelbare bek
15 -
16 -
01 -
02 Bevestiging van de draaibank
03 Montage van de gereedschapshouder
04 Montage van de verstelbare bek
05 Montage van de accessoires
01 -
01 Inschakeling, snelheidsregeling
02 Bevestiging van het werkstuk
03 Regeling van de gereedschapshouder
04 -
Beschrijving en plaatsbepaling van de onderdelen van de machine
Inhoud van het karton
Assemblage van de machine
Functionaliteit van de machine
Afstellingen van de machine
FIG. A & B
FIG. C
FIG. D
FIG. E
FIG. F
01 -
01 Het gebruik van gepaste accessoires in goede
staat verzekert u een optimale werking.
02 -
Vervanging van de accessoires
FIG. G
Reiniging en onderhoud
01 Ρυθμιστής ταχύτητας
02 Διακόπτης
03 Βάση τόρνευσης
04 -
05 Σταθερός κεντροφορέας
06 Κινητός κεντροφορέας
07 Εργαλειοφορέας
08 Δίσκος
09 Αιχμές
10 Κεντροφορέας τόρνου
11 -
12 Ασφάλιση εργαλειοφορέα
13 Πρόωση κινητού κεντροφορέα
14 Ασφάλιση κινητού κεντροφορέα
15 -
16 -
01 -
02 Στήριξη τόρνου
03 Συναρμολόγηση εργαλειοφορέα
04 Συναρμολόγηση τoυ κινητού κεντροφορέα
05 Συναρμολόγηση των βοηθητικών
εξαρτημάτων
01 Θέση λειτουργίας, ρύθμιση ταχύτητας
02 Στερέωση κατεργαζόμενου τεμαχίου
03 Χειρισμός εργαλειοφορέα
04 -
Περιγραφή και εντοπισμός των οργάνων της μηχανής
Περιεχόμενου του χάρτινου κουτιού.
Συναρμολόγηση της μηχανής
Λειτουργικότητα της μηχανής
FIG. A & B
FIG. C
FIG. D
FIG. E
01 -
Ρυθμίσεις της μηχανής
FIG. F
01 -
Αντικατάσταση των αναλώσιμων.
FIG. G
Καθαρισμός και συντήρηση
01 Χρήση των προσαρμοσμένων, βοηθητικών
εξαρτημάτων, η καλή κατάσταση των οποίων
εγγυάται την άριστη λειτουργία.
02 -
FIG. H FIG. H
113251-2-Manual-D.indd 19113251-2-Manual-D.indd 19 03/01/2022 10:3203/01/2022 10:32

PL FI
01 Regulator prędkości
02 Przełącznik
03 Stanowisko tokarskie
04 -
05 Wrzeciennik
06 Konik
07 Oprawka narz dziowa
08 Blat
09 Ostrza
10 Kieł
11 -
12 Blokada oprawki narzędziowej
13 Posuw konika
14 Blokada konika
15 -
16 -
01 -
02 Zamocowanie tokarki
03 Montaż oprawki narzędziowej
04 Montaż konika
05 Montaż akcesoriów
01 -
01 Włączenie, regulacja prędkości
02 Zamocowanie obrabianego elementu
03 Regulacja oprawki narzędziowej
04 -
Opis i oznaczenie elementów
Zawartość opakowania
Montaż maszyny
Funkcje maszyny
regulacja maszyny
FIG. A & B
FIG. C
FIG. D
FIG. E
FIG. F
01 -
01 Stosowanie właściwych akcesoriów, będących w
dobrym stanie, gwarantuje optymalne warunki pracy.
02 -
Wymiana elementów zużywających się
FIG. G
Konserwacja i czyszczenie
01 Nopeusvalitsin
02 Katkaisija
03 Sorvipenkki
04 -
05 Kiinteä kara
06 Liikkuva kara
07 Työkalupidike
08 Taso
09 Päät
10 Vastapää
11 -
12 Työkalupidikkeen lukitus
13 liikkuva kara eteen
14 Liikkuvan karan lukitus
15 -
16 -
01 -
02 Sorvin kiinnitys
03 Työkalupidikkeen asennus
04 Liikkuvan karan asennus
05 Lisälaitteiden asennus
01 Käynnistys, nopeudensäätö
02 Työstettävän kappaleen kiinnitys
03 Työkalukiinnikkeen säätö
04 -
Laitteen osien kuvaus ja sijainti
Laatikon sisältö.
Laitteen kokoaminen
Pumpun toiminta
FIG. A & B
FIG. C
FIG. D
FIG. E
01 -
laitteen säädöt
FIG. F
01 -
Kuluvien osien vaihtaminen
FIG. G
Puhdistus ja kunnossapito
01 Sopivien ja hyväkuntoisten lisälaitteiden käyttö
takaa ihanteellisen lopputuloksen.
02 -
FIG. H FIG. H
113251-2-Manual-D.indd 20113251-2-Manual-D.indd 20 03/01/2022 10:3203/01/2022 10:32
Table of contents
Other Far Tools Lathe manuals


Popular Lathe manuals by other brands

Axminster Trade
Axminster Trade AT150PPL Original instructions

Proxxon
Proxxon 24062 manual

Central Machinery
Central Machinery 65044 Set up and operating instructions

Jet
Jet BDB-919 Operating instructions and parts manual

HOLZMANN MASCHINEN
HOLZMANN MASCHINEN PDB3200 user manual

Draper
Draper WTL1100 instructions

Woodstock
Woodstock SHOP FOX W1758 owner's manual

Jet
Jet CL-1640ZX operating instructions

Axminster
Axminster Workshop AW355WL Original instructions

Carbatec
Carbatec WL-B1220H instruction manual

woodmizer
woodmizer DSBA-40 Safety, Setup, Operation & Maintenance Manual

Southbend
Southbend TURN-X SB1039 owner's manual


