Far Tools TB 100 User manual

113250-I-20181030 ©FAR GROUP EUROPE
Simple machine
TB 100
www.fartools.com
FR
EN
DE
ES
IT
PT
NL
EL
PL
FI
SV
BU
DA
RO
RU
TU
CS
SK
HE
AR
HU
SL
ET
LV
LT
Tour à bois (Notice originale)
Wood lathe (Original manual translation)
Holzdrehmaschine ( Übersetzung aus dem Original-Anleitung )
Torno de madera (Traduccion del manual de instrucciones originale)
Tornio da legno (Traduzione dell’avvertenza originale)
Torno para madeira (Tradução do livro de instruções original)
Houtdraaitafel ( Vertaling van de originele instructies )
( Μετάφραση από τις πρωτότυπες οδηγίες )
Tokarka do drewna ( Tłumaczenie z oryginalnej instrukcji )
Sorvi ( Käännös alkuperäisestä ohjeet )
Träsvarv ( Översättning från originalinstruktioner )
cтруг за дърво. ( Превод на оригиналнита инструкция )
Trædrejebænk ( Oversættelse fra oprindelige brugsanvisning )
Strung lemn ( Traducere din instrucțiunile originale )
Деревообрабатывающий станок (Перевод с оригинальной инструкции)
Ağaç işleme tornası ( Orijinal talimatlar çeviri )
Soustruh na dřevo ( Překlad z originálního návodu )
Sústruh na drevo (Preklad z originálneho návodu)
ץעל הטרחמ (תרגום מהוראות מקוריות)
بشخ ةطرخم (الترجمة من التعليمات الأصلية)
Fatorony ( Fordítás az eredeti utasítások )
Lesna stružnica (Prevod iz izvirnih navodil)
Puidutreipink (Tõlge originaal juhiseid)
Medinės tekinimo staklės (Tulkojumā no instrukcijas oriģinālvalodā)
Koka virpa (Vertimas iš originalių instrukcijas)
113250-Manual-I.indd 1113250-Manual-I.indd 1 27/05/2020 11:1027/05/2020 11:10
Een draaibank wordt gebruikt om houten voorwerpen zoals vazen, kandelaars, tafelpo-
ten, tops, speelgoed maken ...
In feite, een motor roteert een houten werkstuk stevig bevestigd tussen twee punten.
Een verstelbare gereedschapshouder wordt gebruikt om het blad van een draaiend
gereedschap tegen de gebruiker het werk roterend benadering.
De opnamen kan worden uitgevoerd op een enkele aansluiting (voorzijde locatie) te-
neinde het draaien diameter en het maken schaaltjes verhogen. Sommige tochten zijn
inclusief een draaiende motor aan de draaibank bed los.
• Key draaien tools zijn gutsen en beitels (voorbewerken gutsen, profilering, beitel, tronquoir)
• gereedschap is scherpte, hiervoor is het noodzakelijk om een trommel voorzien van een korrel
molen aan het einde scherpen hebben.
• De aandrijving, als uw machine is uitgerust past de snelheid aan materialen.
• Meer materiaal te werken is moeilijk, hoe kleiner de diameter, hoe groter de snelheid langzaam
verlopen
• Zorg ervoor dat het werkstuk een metalen deel niet heeft (spijkers, schroeven ...)
• Altijd goed beveiligen van het werkstuk, zodat het niet trillen.
• Start de machine op volle snelheid voor de aanval van het werkstuk
• Het begint met cylindrer het stuk hout met een guts te trimmen. Zo succésives passes, de «slinge-
ring» wordt geëlimineerd.
Dan komt profilering om de gewenste vormen te geven in hout.
• Er zijn apparaten genaamd «copier» naar hetzelfde object meerdere keren te bereiken. Balusters van
een trap bijvoorbeeld.
TIP BLAD
WOOD DRAAIBANK
NL
Un tour à bois est employé pour créer des objets en bois tels que : vases, bougeoirs,
pieds de table, toupies, jouets...
En fait, un moteur entraine en rotation une pièce de bois solidement fixée entre 2
pointes. Un porte outils ajustable sert à soutenir la lame d’un outil de tournage que
l’utilisateur approchera contre l’ouvrage en rotation.
Le tournage peut aussi s’effectuer sur une seule prise (tournage frontal) afin d’aug-
menter le diamètre de tournage et de réaliser des bols par exemple. Certains tours
proposent un moteur tournant pour dégager le banc du tour.
• Les principaux outils de tournage sont des gouges et des ciseaux ( gouges à dégrossir, à profiler, bédane, tronquoir)
• Les outils doivent être tranchants, pour cela il faut disposer d’un touret équipé d’une meule à grain fin afin de les
aiguiser.
• Le variateur de vitesse, si votre machine en est equipée permet d’adapter la vitesse aux matériaux.
• Plus le matériau à travailler est dur , plus le diamètre est important et plus la vitesse de rotation doit être lente.
• S’assurer que la pièce de bois ne comporte pas de partie métallique ( clous, vis...)
• Toujours fixer correctement la pièce à travailler de manière à ce qu’elle ne vibre pas.
• Faire démarrer la machine à son régime maximum avant d’attaquer la pièce à travailler
• Il faut commencer par cylindrer la pièce de bois à l’aide d’une gouge à dégrossir. Ainsi, par passes successives, le «faux rond»
est éliminé.
Ensuite vient le profilage afin de donner les formes désirées au bois.
• Il existe des appareils nommés «copieur» afin de réaliser plusieurs fois le même objet. Balustres d’un escalier par exemple.
FICHE CONSEIL
TOUR À BOIS
FR
113250-Manual-I.indd 2113250-Manual-I.indd 2 27/05/2020 11:1027/05/2020 11:10

A lathe is used to create wooden objects such as: vases, candlesticks, table legs, tops,
toys, etc. In fact, a motor rotates a piece of wood secured between two points. An
adjustable tool holder is used to support the blade of a turning tool that the user ap-
proaches to the rotating piece. Turning can also be performed on a single point (frontal
turning) in order to increase the turning diameter and produce bowls for example.
Some lathes provide a turning motor to free the lathe bench.
El torno para madera se utiliza para crear objetos de madera tales como: jarrones, pal-
matorias, patas de mesa, peonzas, juguetes... De hecho, el motor arrastra en rotación
la pieza de madera firmemente fijada entre 2 puntas. El portaherramientas ajustable
sirve para mantener la hoja de la herramienta de torneado que el usuario acerca hacia
la obra en rotación. El torneado también puede efectuarse en un solo punto (torneado
frontal) con el fin de aumentar el diámetro de torneado y de realizar tazones por ejem-
plo. Determinados tornos proponen un motor giratorio para retirar el banco del torno.
• The main turning tools are gouges and chisels (rough-turning, profiling gouges, cross-cut chisel, truncation tool)
• The tools must be sharp; for sharpening purposes, a wheel stand equipped with a fine-grain grinding wheel must be
available.
• The speed control, if your machine has this equipment, enables you to adapt the speed to the material you are working
with.
• Plus le matériau à travailler est dur , plus le diamètre est important et plus la vitesse de rotation doit être lente
• Ensure that the piece of wood does not contain any metal (nails, screws, etc.)
• Always ensure that the piece you are working with is properly fixed so that it does not vibrate.planing.
• Start up the machine at its maximum speed before starting to work on the piece
• It is necessary to start by rolling the wooden piece using a rough-turning gouge. In this way, the curvature defect is eliminated
in several passes. The profiling is then performed to give the wood the desired shape
• So-called «copier» devices are available to produce the same object several times, such as staircase balusters, for example.
• Las principales herramientas de torneado son las gubias y los cinceles (gubias para desbastar, para
perfilar, bedano, formón)
• Las herramientas tienen que cortar, para afilarlas se necesita una esmeriladora equipada con una
muela de grano fino.
• El variador de velocidad, si su máquina está equipada con esta función, permite adaptar la veloci-
dad a los materiales.
• Durante el material de trabajo es difícil, cuanto menor sea el diámetro, mayor es la velocidad
debe ser lenta
• Asegurarse de que no haya ningún objeto metálico en la pieza de madera (clavos, tor-
nillos...)
• Siempre se tiene que fijar correctamente la pieza que se ha de trabajar para que no
vibre.
• Hay que empezar por cilindrar la pieza con la gubia para desbastar. Así, se elimina
por fases sucesivas el «defecto de redondez». Después viene el perfilado para dar las
formas deseadas a la madera.
• Existen máquinas llamadas «copiadoras» que sirven a realizar varias veces el
mismo objeto. Balaustres de una escalera por ejemplo.
TIP SHEET
GRINDER
FICHA DE CONSEJOS
TORNO DE MADERA
EN
ES
113250-Manual-I.indd 3113250-Manual-I.indd 3 27/05/2020 11:1027/05/2020 11:10
Il tornio per legno viene usato per creare degli oggetti in legno come: vasi, candelabri,
piedi per tavoli, trottole, giocattoli... Infatti, un motore trascina in rotazione un pezzo
di legno fissato saldamente tra 2 punte. Un portautensili regolabile serve a sostenere
la lama di un utensile di tornitura che l’utente deve avvicinare all’opera in rotazione.
La tornitura può anche essere effettuata su una sola presa (tornitura frontale) in modo
tale da aumentare il suo diametro e di realizzare, per esempio, delle ciotole. Alcuni torni
propongono un motore girevole per liberare il banco del tornio.
O torno é empregado para criar objectos de madeira, tais como: vasos, candelabros,
pés de mesa, piões, brinquedos, etc. De facto, um motor acciona em rotação uma peça
de madeira solidamente fixada entre 2 extremidades. Um porta-ferramentas ajustável
serve para sustentar a lâmina de uma ferramenta de torneamento que o operador
aproximará contra a peça em rotação. O torneamento também pode ser efectuado com
um ponto único de fixação (torneamento frontal), de forma a aumentar o diâmetro de
torneamento e para fabricar tigelas, por exemplo. Certos tornos oferecem um motor
rotativo para soltar o banco do torno.
• I principali utensili di tornitura sono le sgorbie e le forbici (sgorbie per sgrossare, per profilare, bedano, troncatore)
• Gli utensili devono essere taglienti, e quindi per affilarli occorre avere una molatrice munita di una mola a grani fini.
• Più materiale da lavoro è duro, minore è il diametro, maggiore è la velocità dovrebbe essere lento
• Assicurarsi che il pezzo non ha una parte metallica (chiodi, viti ...)
• Sempre sicure le pezzo in modo che non vibra.
• Prima di cominciare a lavorare il pezzo, avviare la macchina al massimo di giri
• Bisogna cominciare cilindrando il pezzo di legno con una sgorbia per sgrossare. In questo modo, con passaggi successivi, il
«fuori asse» viene eliminato. Poi si passa alla profilatura per dare al legno le forme desiderate.
• Per realizzare diverse volte lo stesso oggetto, esistono degli apparecchi chiamati «riproduttori». Per esempio per le balaustre
di una scala.
• As principais ferramentas de torneamento são as goivas e tesouras (goivas para desbastar e
perfilar, bedame, buril de corte)
• As ferramentas devem ser cortantes. Para isso, é preciso dispor de um esmeril equipado com
um rebolo de grão fino a fim de afiá-las.
• L’unità, se la macchina è equipaggiata adatta la velocità di materiali.
• Più materiale da lavoro è duro, minore è il diametro, maggiore è la velocità dovrebbe
essere lento
• Certificar-se de que a peça de madeira não apresenta elementos metálicos (pregos,
parafusos, etc.).
• Sempre sicure le pezzo in modo che non vibra.
• Pôr a máquina a funcionar em regime máximo antes de operar a peça a trabal-
har.
• Começar cilindrando a peça de madeira com o auxílio de uma goiva para
desbastar.Após várias passagens sucessivas, isso eliminará a «ovalização». Em
seguida, a perfilagem permite dar as formas desejadas à madeira.
• Os aparelhos denominados «copiadores» permitem realizar várias ve-
zes o mesmo objecto. Balaústres de escadas, por exemplo.
SCHEDA CONSIGLI
TORNIO DI LEGNO
FICHA CONSELHO
MADEIRA TORNO
IT
PT
113250-Manual-I.indd 4113250-Manual-I.indd 4 27/05/2020 11:1027/05/2020 11:10

FIG. A
06
14
12
10
16
05
03
09
02
07
08
113250-Manual-I.indd 5113250-Manual-I.indd 5 27/05/2020 11:1027/05/2020 11:10

x 2
x 2
x 2
AB
C
E
D
H
G
J
F
I
FIG. C
113250-Manual-I.indd 6113250-Manual-I.indd 6 27/05/2020 11:1027/05/2020 11:10

x3
AB
01
02
FIG. D
FR-Transporter la machine à deux mains par la base et non par les parties mobiles. Démonter
les parties mobiles (porte outils, poupée mobile, pointe et contre-pointe) avant transport.
EN-Transporting the machine with both hands by the base and not by the movable parts. Dis-
mantle the moving parts (tool holders, tailstock, leading-edge and against) before transport.
113250-Manual-I.indd 7113250-Manual-I.indd 7 27/05/2020 11:1027/05/2020 11:10
8
8
5
4
11
5
03
113250-Manual-I.indd 8113250-Manual-I.indd 8 27/05/2020 11:1027/05/2020 11:10

04
10
9
8
11
4
113250-Manual-I.indd 9113250-Manual-I.indd 9 27/05/2020 11:1027/05/2020 11:10
01
• Allumer pendant 3min avant l’utilisation
• Turn ON during 3min before the use
3 min
FIG. E
113250-Manual-I.indd 10113250-Manual-I.indd 10 27/05/2020 11:1027/05/2020 11:10
OPTION
02
A
A
B
B
B
=
113250-Manual-I.indd 11113250-Manual-I.indd 11 27/05/2020 11:1027/05/2020 11:10

113701
OI
113250-Manual-I.indd 12113250-Manual-I.indd 12 27/05/2020 11:1027/05/2020 11:10
03
10 mm
5 mm
113250-Manual-I.indd 13113250-Manual-I.indd 13 27/05/2020 11:1027/05/2020 11:10

04
01
<10mm
FIG. F
113250-Manual-I.indd 14113250-Manual-I.indd 14 27/05/2020 11:1027/05/2020 11:10

01
FIG. H
113250-Manual-I.indd 15113250-Manual-I.indd 15 27/05/2020 11:1027/05/2020 11:10

113960
113961
113962
113963
113964
113965
d
d= ø 16 mm
L
L= 25 mm
d
d= ø 13 mm L= 160 mm
d
d= ø 13 mm L= 230 mm
ep1
L
ep2
ep1= 2 mm
ep2= 4 mm L = 20 mm
ep= 5 mm L = 19 mm
L
ep
113250-Manual-I.indd 16113250-Manual-I.indd 16 27/05/2020 11:1027/05/2020 11:10

-
Interrupteur
Banc de tournage
-
Poupée xe
Poupée mobile
Porte outils
Contre pointe
-
Verrouillage porte outils
avance poupée mobile
Verrouillage poupée mobile
-
Courroies
FIG. A & B
Description et repérage des organes de la machine
01
02
03
04
05
06
07
Contenu du carton
Assemblage de la machine
FIG. C
FIG. D
FR
10
11
12
13
14
15
16
Plateau
Pointes
-
-
08
09
17
18
Chassis
Transport - Fixation du tour
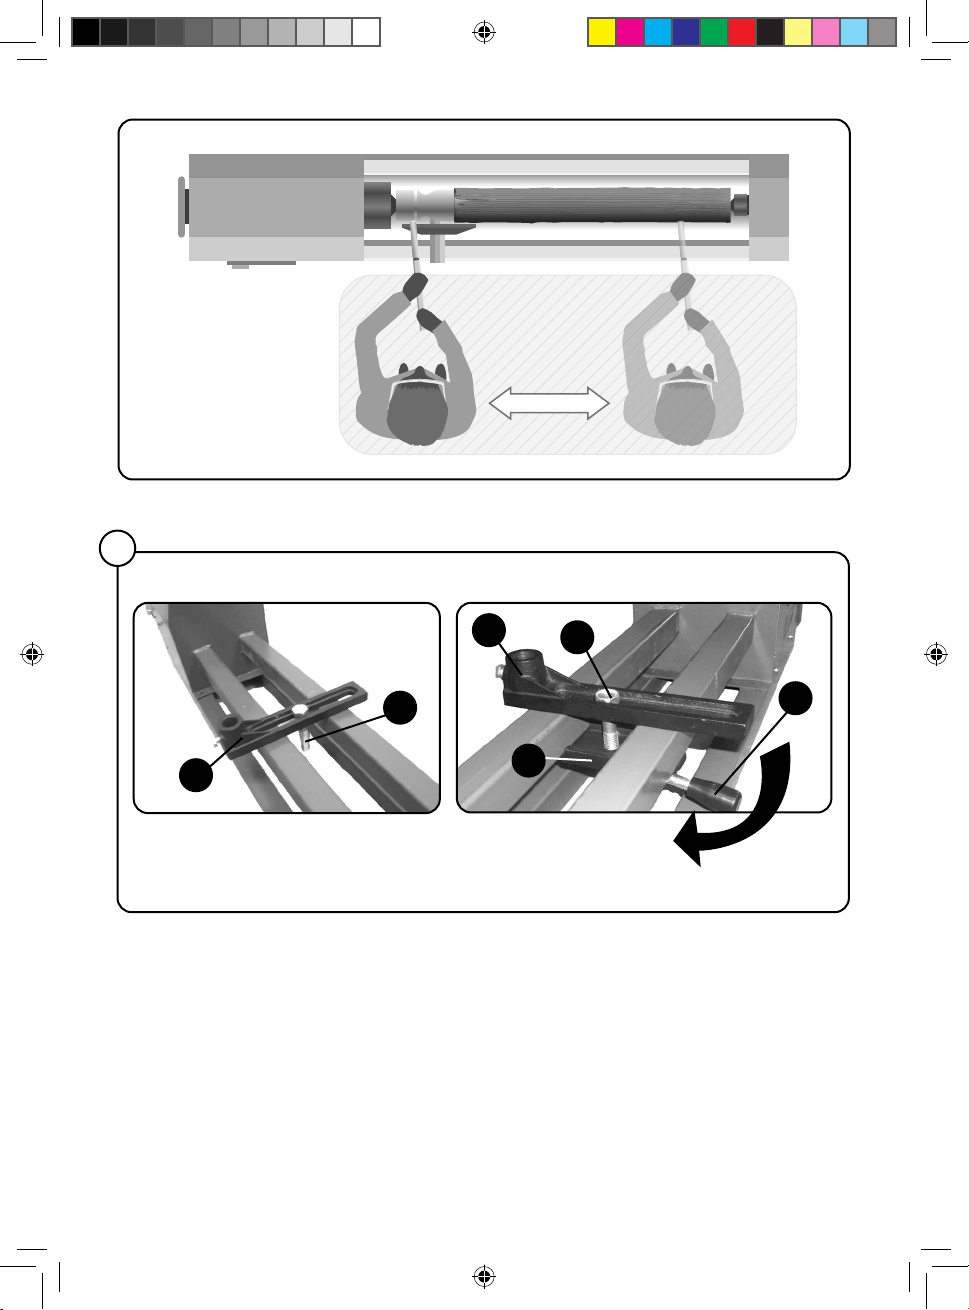
Montage du porte outils
Montage de la poupée mobile
-
-
-
-
01
02
03
04
05
06
07
08
113250-Manual-I.indd 17113250-Manual-I.indd 17 27/05/2020 11:1027/05/2020 11:10

Remplacement des consommables
FIG. G
FIG. H
Changement des courroies
01
Nettoyage et entretien
FR
L’utilisation d’accessoires adaptés et en bon état sont garants d’un fonctionnement optimal.
01
-
Fonctionnalité de la machine
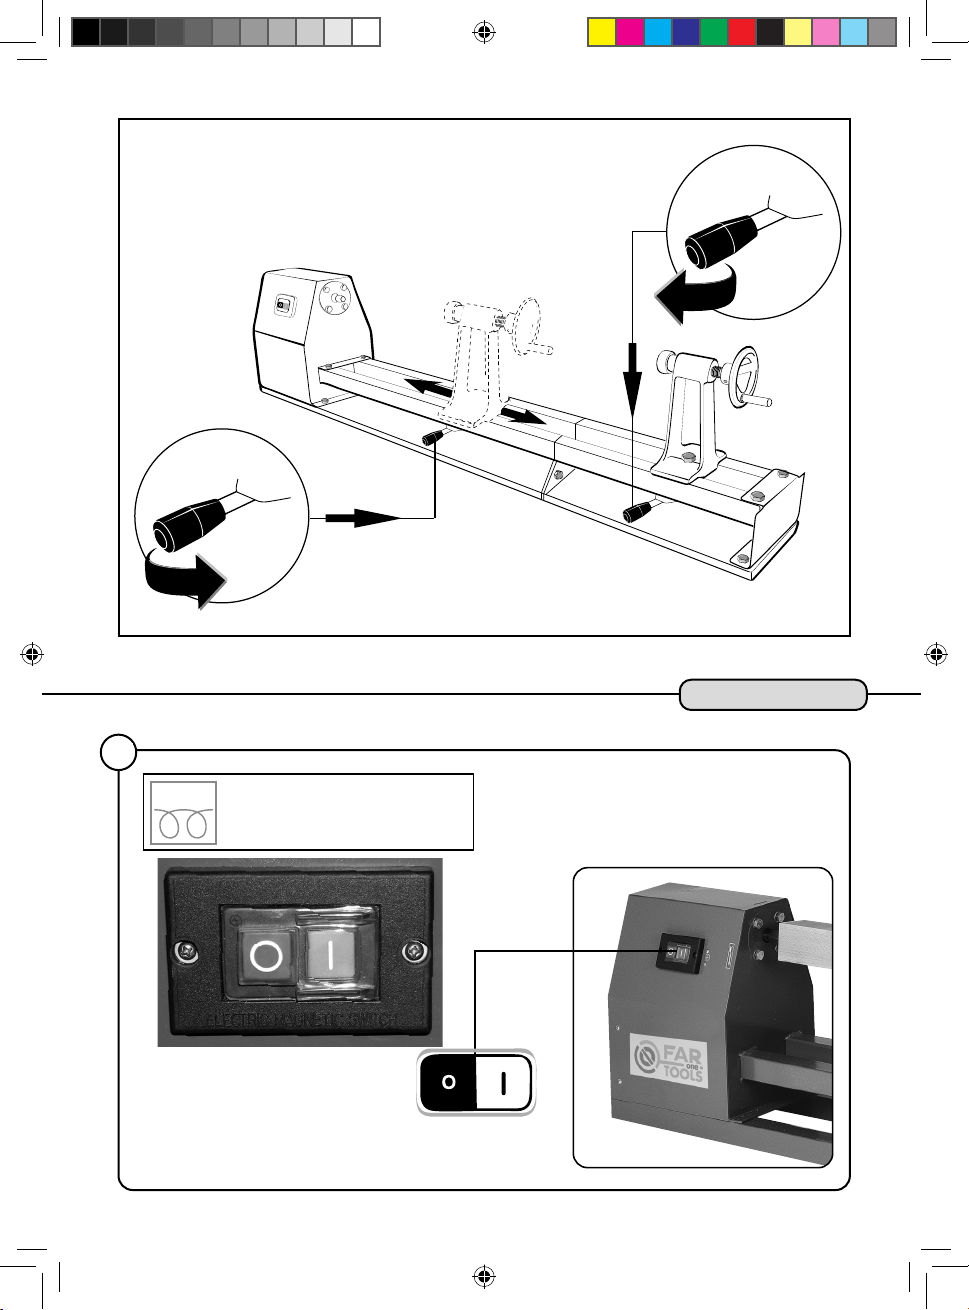
Mise en marche et arrêt
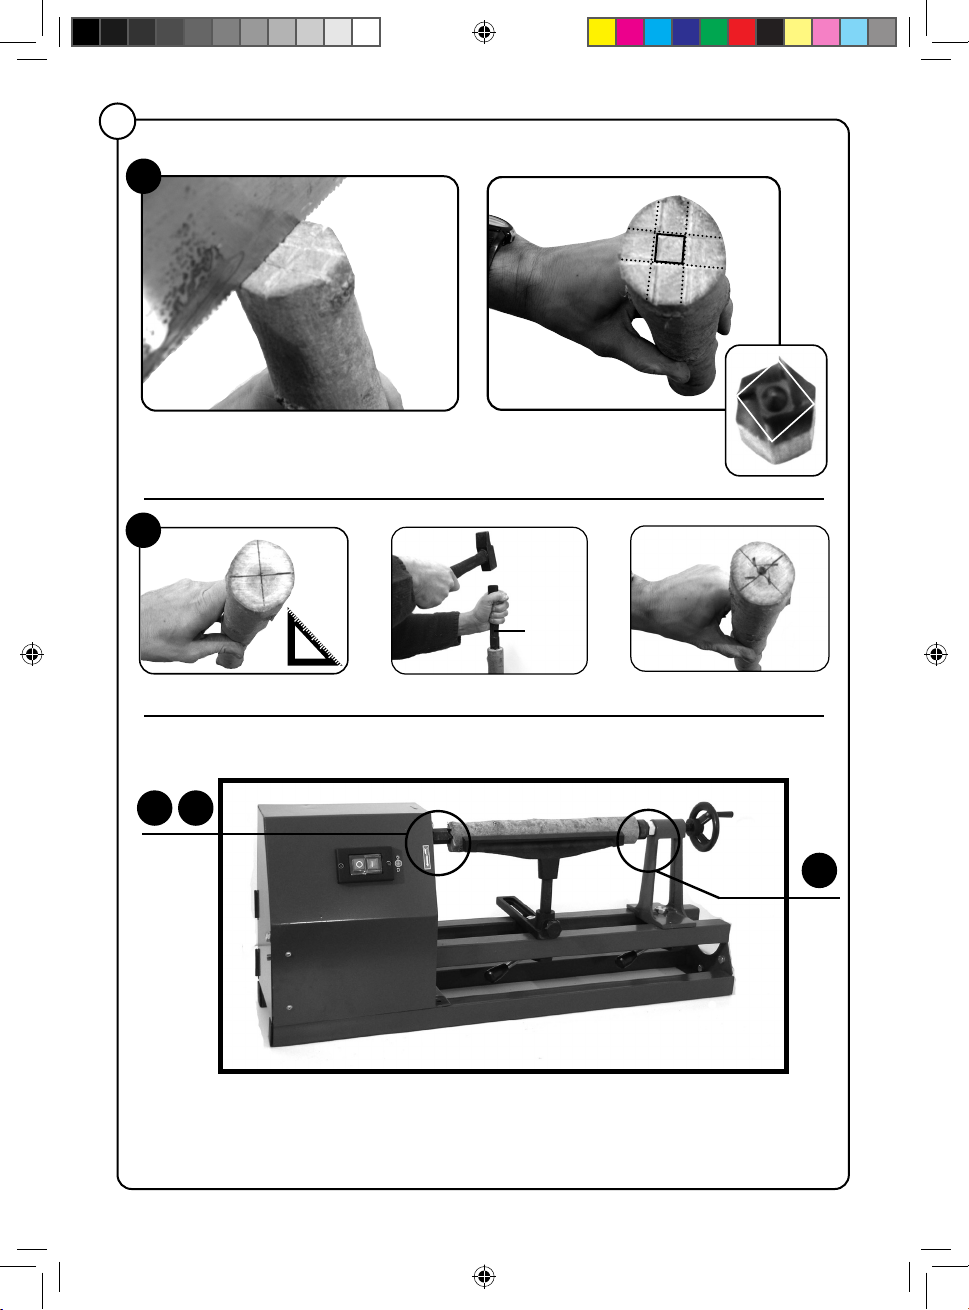
Fixation de la pièce à travailler
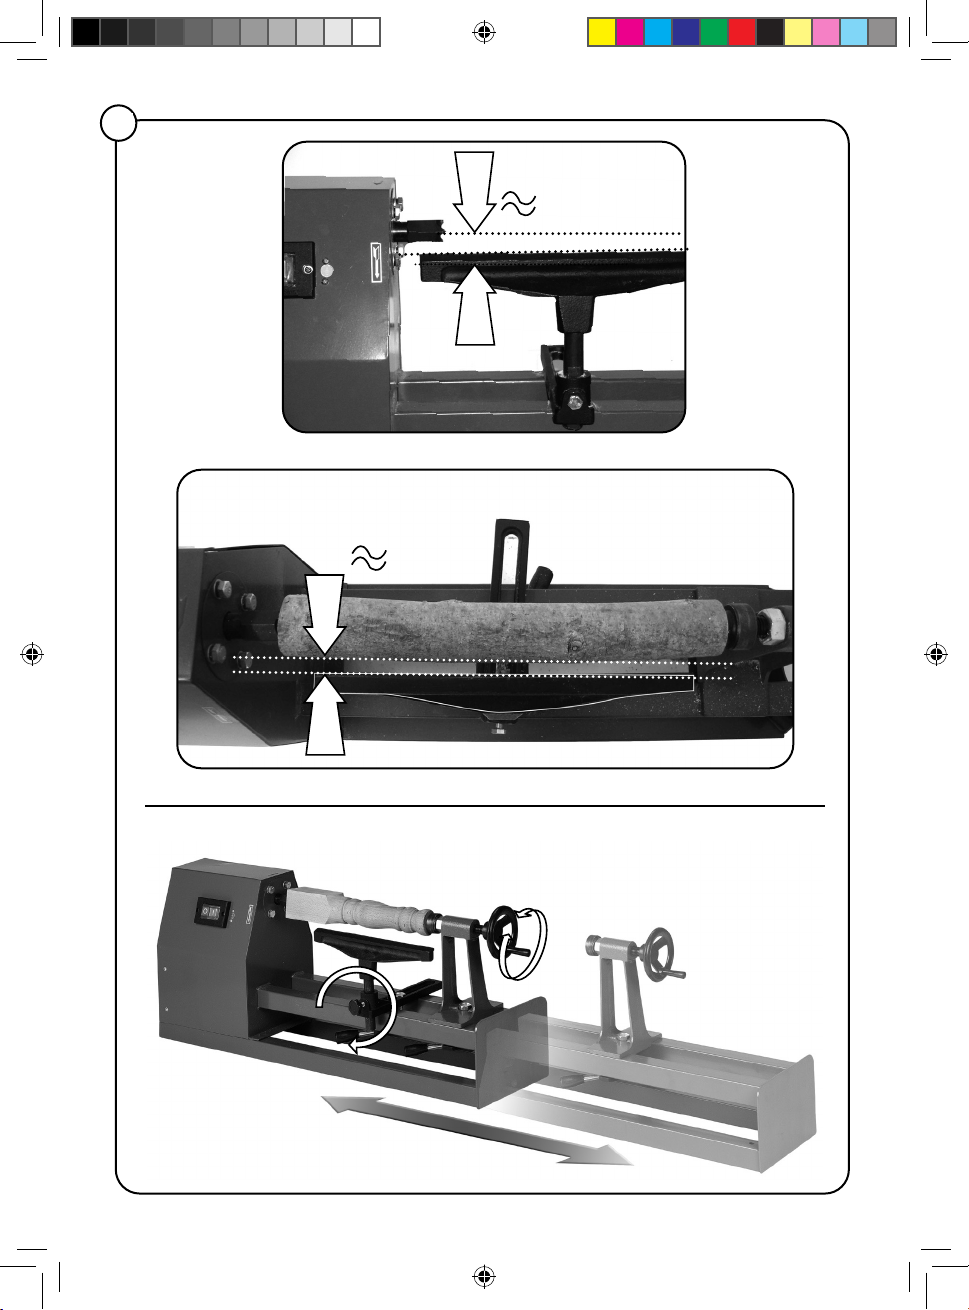
Réglage du porte outils
Changement de vitesse
-
01
02
03
04
05
FIG. E
02
Graissage
02
Réglages de la machine
FIG. F
Tension des courroies
01 -
02
04
FIG. E
113250-Manual-I.indd 18113250-Manual-I.indd 18 27/05/2020 11:1027/05/2020 11:10

-
Switch
Turning bench
-
Fixed poppet
Mobile poppet
Tool-holder
Footstock
-
Tool-holder lock
-
Mobile poppet lock
Four-jaw mandrel
Belts
FIG. A & B
Description and location of machine parts
01
02
03
04
05
06
07
Contents of box
Assembling the machine
FIG. C
FIG. D
EN
10
11
12
13
14
15
16
Plate
Tips
-
-
08
09
17
18
Frame
Transportation - Lathe attachment
Tool-holder assembly
Mobile poppet assembly
-
-
-
-
01
02
03
04
05
06
07
08
113250-Manual-I.indd 19113250-Manual-I.indd 19 27/05/2020 11:1027/05/2020 11:10

Replacing consumables
FIG. G
Belt change
01
Cleaning and maintenance
EN
Optimum operation is ensured by the use of suitable accessories in good condition.
01
-
Functions of the machine
Switch on/off
Attachment of piece for working
Tool-holder setting
Speed change
-
01
02
03
04
05
FIG. E
02
Lubrication
02
Settings of the machine
FIG. F
Belt tension
01 -
02
FIG. H
04
FIG. E
113250-Manual-I.indd 20113250-Manual-I.indd 20 27/05/2020 11:1027/05/2020 11:10
Other Far Tools Lathe manuals


Popular Lathe manuals by other brands


Woodstock
Woodstock SHOP FOX W1752 s Specifications

LEMAN
LEMAN ML392 instruction manual

Jesco
Jesco PRINCE Instruction & parts manual

Holzstar
Holzstar DB 900 operating instructions

Clarke
Clarke Metalworker CL250M operating & maintenance manual

Trak Machine Tools
Trak Machine Tools TMC10 Site preparation guide


