FASAR ELETTRONICA S.r.L.
Strada della Marina, 9/6
60019 Senigallia (AN)
Tel.: 071.6609805 - Fax: 071.6611573
www.fasar.it - www.fasarelettronica.com
Rev. 00 11/2017
Caratteristiche funzionali
Il regolatore può essere controllato/configurato tramite la tastiera o il Radioco-
mando a 5 tasti.
Tastiera:
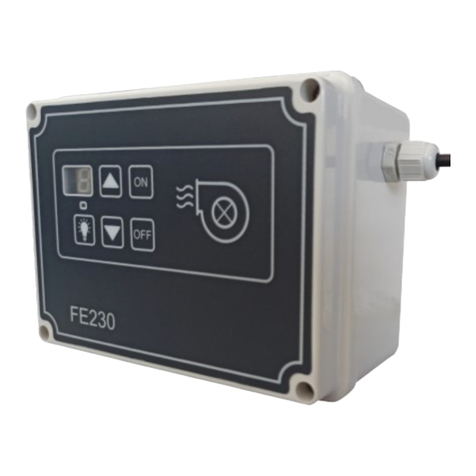
Tasto SW1: avvia il motore, permette l’accesso al Menu di Configurazione
ed è usato come tasto di Conferma nella navigazione nel Menu di Configurazio-
ne.
Tasto SW2: spegne il motore, resetta il contatore di utilizzo filtri e l ’Al-
larme Filtri ed è usato come tasto di “Uscita” nella navigazione all’interno del
Menu di Configurazione.
Tasto SW3: incrementa la velocità del motore, consen-
te la navigazione all’interno del Menu di Configurazione e
permette di abilitare/disabilitare il funzionamento Automati-
co.
Tasto SW4: decrementa la velocità del motore e con-
sente la navigazione all’interno del Menu di Configurazione.
Tasto SW5: accende e spegne la luce.
Radio:
Tasto centrale “O”: accende/spegne il motore, resetta il contatore di utilizzo
filtri e l’Allarme Filtri ed è usato come tasto di “Uscita” nella navigazione all’in-
terno del Menu di Configurazione.
Tasto “MENU” (lettera “F” e Orologio in serigrafia): è usato per
accedere al Menu di Configurazione e come tasto di Conferma nella
navigazione nel Menu di Configurazione.
Tasto “+”: riproduce le funzione del Tasto SW3 della tastiera.
Tasto “-”: riproduce le funzione del Tasto SW4 della tastiera.
Tasto “Luce”: riproduce le funzione del Tasto SW5 della tastiera.
Display a 8 segmenti
Fornisce indicazioni sullo stato operativo del regolatore e in particolare:
velocità attuata dal motore
eventuali allarmi in corso
livello menu e valori di configurazione all’interno del Menu di Configura-
zione.
Il punto del display dà indicazioni aggiuntive:
quando è fisso indica che si è all’interno del Menu di Configurazione e,
nella fase di Startup, indica la finestra di tempo utile per associare un
nuovo radiocomando;
quando è lampeggiante indica una fase di funzionamento transitoria:
spunto, tempo di attesa per apertura Elettrovalvola Gas, tempo di attesa
dello spegnimento del motore.
Led
Lo stato di Elettrovalvola Gas attivata è indicata dal Led acceso.
Gestione del motore di aspirazione, dell’elettrovalvola gas e delle luci
Il motore può funzionare in modalità Manuale secondo 8 velocità preimpostate
comandate da Tastiera o da Radiocomando.
Nel passaggio da una velocità all’altra, nonchè all’accensione e allo spegnimen-
to, il motore segue sempre un’opportuna rampa.
Procedura di avvio motore
Al comando di accensione (tasto SW1 o tasto “O”) il motore si avvia per 3 se-
condi alla velocità di spunto (settabile) e quindi passa automaticamente alla
velocità 1.
Trascorso il tempo settato (vedi relativa modalità di configurazione) è attivata
l’Elettrovalvola Gas con relativa accensione del led DL.
Il Punto del Display lampeggia fino al momento dell’accensione del led DL; in
questo intervallo di tempo è possibile modificare la velocità del motore.
Procedura di spegnimento motore
Al comando di spegnimento motore (tasto SW2 o tasto “O”) è immediatamente
disattivata l’Elettrovalvola Gas e questo evento è segnalato dallo spegnimento
del led DL: il motore inizia ad aspirare alla massima potenza (velocità 8) per il
tempo settato (vedi relativa modalità di configurazione), dopodiché si arresta.
Durante la fase transitoria che porta all’effettivo spegnimento del motore il
Punto del Display lampeggia ed è possibile modificare manualmente la velocità.
Menu “P”: il menu “P” è il punto di ingresso nel Menu di Configurazione e
permette il settaggio della velocità di spunto, minima e massima; con il tasto
UP si passa al menu “T” mentre con il tasto DOWN si passa al menu “n”.
Con il tasto ESC si esce dal Menu di Configurazione.
Con il tasto ENTER si entra nel sottomenu di settaggio della velocità di spunto
“b” (boost). Il motore si porta alla minima velocità che può essere associata
a tale parametro (è bene notare che tale velocità, a seconda del tipo di carico
applicato, potrebbe non essere sufficiente a far partire il motore; in tal caso
premere il tasto UP per incrementarla sino a quando il motore si avvia). La
velocità può essere variata fino al punto desiderato con i tasti UP e DOWN.
Con il tasto ENTER viene acquisita come velocità di spunto quella corrente e
si entra nel sottomenu di settaggio della velocità minima “L” (Low); con i
tasti UP e DOWN si può portare la velocità del motore al livello minimo
desiderato; non è possibile selezionare una velocità maggiore di quella scelta
per lo spunto.
Con il tasto ENTER viene acquisita come velocità minima (1) quella corrente e
si entra nel sottomenu di settaggio della velocità massima “H” (High); il
motore si porta alla velocità massima (8) che può essere variata fino al punto
Desiderato con i tasti UP e DOWN.
Con il tasto ENTER viene acquisita come velocità massima (8) quella corren-
te, vengono calcolate automaticamente le velocità intermedie; le 8 velocità
più quella di spunto vengono memorizzate e si ritorna al menu “P”.
Premendo il tasto ESC nei sottomenu “b”, “L”, e “H” si torna al menu “P”
senza salvare alcuna impostazione di velocità.
Menu “t”: il menu “t” permette di settare il ritardo di effettivo spegnimento
del motore al ricevimento del comando di spegnimento (vedi procedura di
spegnimento motore); con il tasto UP si passa al menu “F” mentre con il
tasto DOWN si passa al menu “P”. Con il tasto ESC si esce dal Menu di
Configurazione.
Con il tasto ENTER si entra nel sottomenu di settaggio del ritardo di
spegnimento; con i tasti UP e DOWN si può scegliere tra 10 possibilità (da 0
a 9) a cui corrispondono le tempistiche come segue:
0: 0 sec. 1: 20 sec. (default) 2: 40sec. 3: 60 sec.
4: 80 sec. 5: 100 sec. 6: 120 sec. 7: 140 sec.
8: 160 sec. 9: 180 sec.
Con il tasto ENTER viene acquisito e memorizzato il ritardo selezionato si ri-
torna al menu “t”.
Premendo il tasto ESC si torna al menu “t” senza salvare l’impostazione in
corso.
Menu “F”: il menu “F” permette di settare le ore di funzionamento del moto-
re prima di generare, per loro saturazione, un Allarme Filtri; con il tasto UP si
passa al menu “E” mentre con il tasto DOWN si passa al menu “t”. Con il ta-
sto ESC si esce dal Menu di Configurazione.
Con il tasto ENTER si entra nel sottomenu di settaggio delle ore di
saturazione; con i tasti UP e DOWN si può scegliere tra 10 possibilità (da 0 a
9) a cui corrispondono le tempistiche come segue:
0:0 ore (Default – allarme OFF) 1: 10 ore 2: 20 ore
3: 30 ore 4: 40 ore 5: 50 ore 6: 60 ore
7: 70 ore 8: 80 ore 9: 90 ore
Con il tasto ENTER sono acquisite e memorizzate le ore di durata dei filtri e si
ritorna al menu “F”.
Premendo il tasto ESC si torna al menu “F” senza salvare l’impostazione in
corso.
Menu “E”: il menu “E” permette di settare il ritardo di attivazione
dell’Elettrovalvola Gas all’accensione del motore (vedi Procedura di avvio
motore); con il tasto UP si passa al menu “A” mentre con il tasto DOWN si
passa al menu “F”. Con il tasto ESC si esce dal Menu di Configurazione.
Con il tasto ENTER si entra nel sottomenu di settaggio del ritardo di
attivazione dell’ elettrovalvola Gas; con i tasti UP e DOWN si può scegliere tra
10 possibilità (da 0 a 9) a cui corrispondono le tempistiche nella tabella
seguente:
0: 1 sec. 1: 10 sec. 2: 20 sec. (default) 3: 30 sec.
4: 40 sec. 5: 50 sec. 6: 60 sec. 7: 70 sec.
8: 80 sec. 9: 90 sec.
Con il tasto ENTER è acquisito e memorizzato il ritardo selezionato e si ritorna
al menu “E”.
Premendo il tasto ESC si torna al menu “E” senza salvare l’impostazione in
corso.
Regolatore digitale di velocità per motori ad induzione
monofase con ricevitore radio per gestione radiocomando
codice FE230/R
Gestione del motore
Con motore acceso è possibile:
- Incrementare in sequenza la velocità del motore (V1 V2 … V7 V8)
tramite il tasto SW3 della tastiera o “+” del Radiocomando;
- Decrementare in sequenza la velocità del motore (V8 V7 … V2 V1)
tramite il tasto SW4 della tastiera o “-” del Radiocomando.
Non è possibile comandare l’accensione del motore con il comando di Incre-
mento velocità come non è possibile spegnere il motore con il comando di De-
cremento velocità.
Gestione Luce
In qualunque momento e in qualunque condizione operativa è possibile accen-
dere o spegnere la luce tramite il tasto SW5 della tastiera o “Luce” del Radioco-
mando.
Reset allarme Filtri
La pressione, in condizione di Motore Spento e non in fase di Setting, per circa
3 secondi del tasto “STOP” (o “START/STOP” del Radiocomando) azzera il con-
tatore delle ore di utilizzo dei Filtri e l’eventuale Allarme Filtri.
Accoppiamento nuovo radiocomando
Togliere alimentazione al Regolatore e rialimentare; premere e tenere premuto
il tasto “+” del radiocomando nella fase di startup indicata dal Punto del display
acceso; ad indicare l’avvenuto accoppiamento sarà visualizzata temporanea-
mente la lettera “r”.
Nota: non è possibile associare più di un radiocomando alla volta; se si
associa un nuovo radiocomando quello precedentemente memorizzato viene
sostituito.
Ripristino settaggi di default
Per effettuare il ripristino della configurazione di Default del regolatore occorre
entrare nel Menu di Configurazione (in condizioni di primo livello di menu) e
tenere premuti contemporaneamente per almeno 3 secondi i tasti SW3 e SW4;
l’uscita dal Menu di Configurazione con contestuale visualizzazione temporanea
della lettera “d” indica l’avvenuto ripristino.
Tale operazione comporta il ripristino delle condizioni di default per:
le 8 velocità del funzionamento non automatico
la velocità di spunto
il ritardo di attivazione della valvola del Gas all’accensione del Motoventila-
tore
il ritardo di spegnimento del motore
le ore di saturazione filtri (Allarme disabilitato)
Attenzione: il ripristino dei parametri di Default non è effettuabile tra-
mite Radiocomando.
Configurazione regolatore
Menu di configurazione
Con Motore spento si accede al Menu di Configurazione tenendo premuto per
almeno 3 secondi il tasto “SW1” o il tasto “MENU” del Radiocomando.
I tasti della tastiera e del Radiocomando permettono la navigazione nel Menu di
Configurazione come di seguito descritto:
- Tasto SW1 o “MENU” (di seguito “ENTER”): Conferma valore settatto o In-
gresso in sottomenu.
- Tasto SW2 o “O” (di seguito “ESC”): Uscita senza salvataggio valore settatto
o risalita nell’albero dei sottomenu.
- Tasto SW3 o “+” (di seguito “UP”): Incremento valore in fase di settaggio o
scorrimento delle voci del sottomenu attivo.
- Tasto SW4 o “-” (di seguito “DOWN”): Decremento valore in fase di settag-
gio o scorrimento delle voci del sottomenu attivo.
