FCA US RAM 2500 User manual

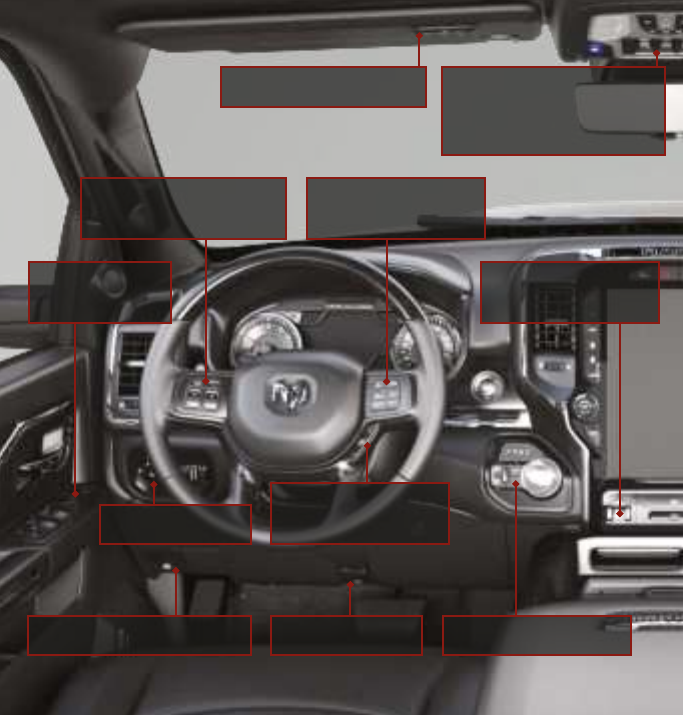
4WD/Shift Controls
Hood Release
Light Controls
Cruise Control
Buttons
Instrument Cluster/
VR Controls
Parking Brake Release
Electronic Range
Selector
Overhead Lights/
Sunroof/Rear Window
Controls (If Equipped)
HomeLink® Buttons
Power Mirror
Controls
Integrated Trailer
Brake Module
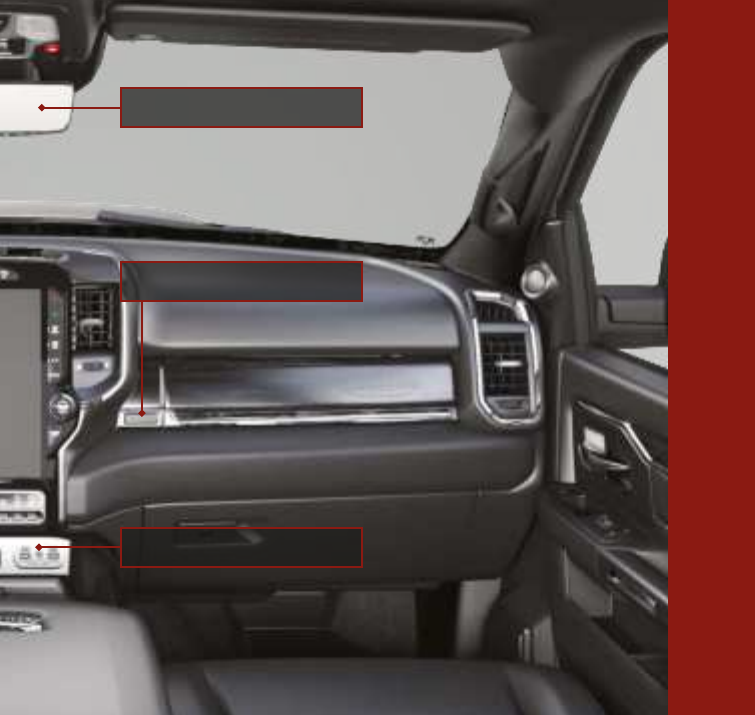
AUX/USB Ports (C/A)
Digital Rearview Mirror
Compartment Release
VEHICLE OVERVIEW
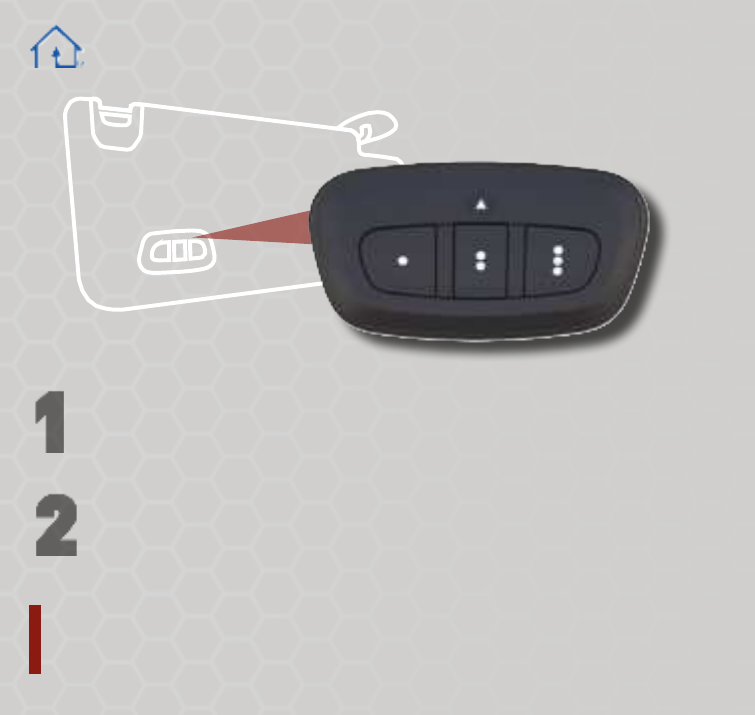
Garage Door Opener
Push and hold the two outside HomeLink® buttons for 20 seconds until the
orange indicator flashes. An individual channel cannot be erased.
TO ERASE ALL SET CHANNELS:
11
22
While the car is ON, hold the handheld garage door transmitter 1-3 inches
from the HomeLink®button you want to program in the vehicle.
Push and hold both the HomeLink® button being programmed and the
button on the garage door transmitter.
PROGRAM YOUR GARAGE DOOR
NEED ASSISTANCE?
1-800-355-3515
33
44
55
ROLLING OR NON-ROLLING?
Check your garage door opener motor in your garage for a
“LEARN” or “TRAIN” button by the hanging antenna. If you have
one of these, you have a Rolling Code garage door opener.
??
For Non-Rolling Code
garage door openers, watch for the indicator light
to go constant
.
For Rolling Code
garage door openers, watch for the indicator light to
go from a slow blink to blinking rapidly.
For Rolling Code garage door openers only, firmly push and release
the “LEARN” or “TRAIN” button on your garage door opener motor in
your garage, then push the HomeLink®button in your vehicle for two
long presses.
If the programming was successful, your garage door should open and
close with your chosen HomeLink®button.
Scan For
HomeLink® Video

Pair a Phone
CONNECT YOUR APPS
Connect your smartphone to the media USB port or pair your smartphone within Device Manager.
The Android AutoTM or Apple CarPlay®icon will replace the phone icon on the touchscreen.
11Make sure Bluetooth®is enabled on your mobile device.
22
With the vehicle in the ACC or ON/RUN position, press the
Phone button in the vehicle’s touchscreen menu bar.
33Press “Device Manager” and then "Add Device". Follow the
prompts on your phone and on the touchscreen.
SCANNING
Ready to remove a phone or audio device?
11Press the Device Manger button on the touchscreen.
33Press "Delete Device". The device should be removed.
22Press the Settings gear icon next to the phone or
device you wish to remove.
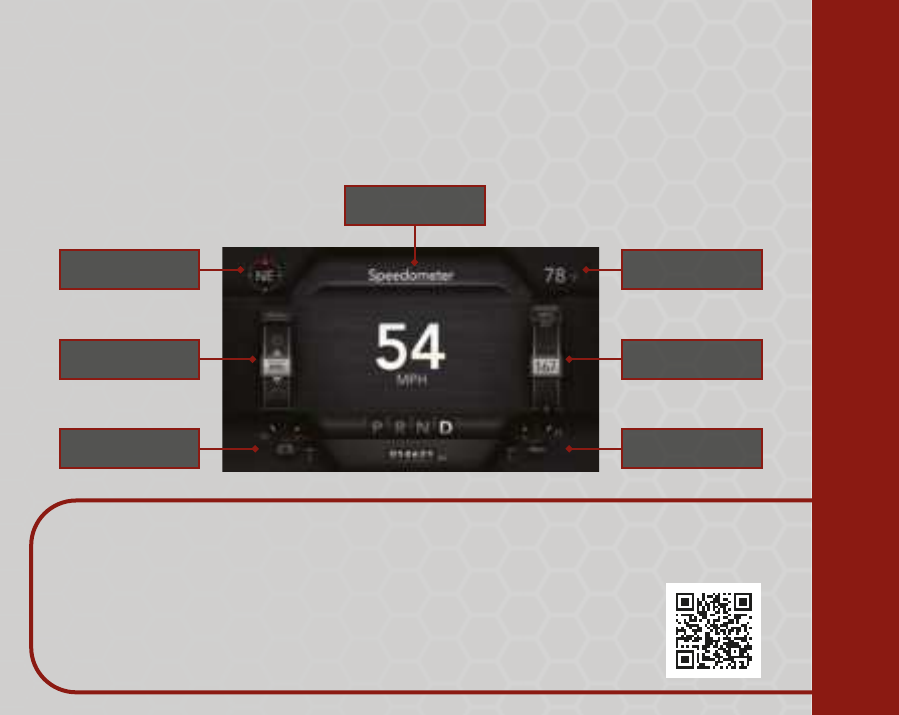
Customize Your Instrument Cluster Display
UNDER THE SCREEN SETUP MENU
Compass, Outside Temp, Time, Range, Fuel Economy, Trip Info, Trailer Trip, Trailer Brake,
Oil Pressure, Coolant Temp, Oil Temp, Battery Voltage, Transmission Temp, Oil Life, and more.
The following may be displayed in different areas of the Instrument Cluster Display:
DEFAULTS:
Upper Left: Compass
Upper Right: Outside TempUpper Center: Speedometer
Left Side: Menu Icon Right Side: Range
Lower Left: Battery Voltage
Lower Right: Oil Pressure (Gas)
Coolant Temp (Diesel)
Upper Center
Upper Right
Right Side
Lower Right
Upper Left
Left Side
Lower Left
Scan For
Instrument Cluster
Display Video
PAIR A PHONE & SET UP CLUSTER DISPLAY

Connected Services
WITH CONNECTED
SERVICES YOU CAN...
Lock Your Vehicle
Unlock Your Vehicle
Remote Start Your Vehicle
Cancel Remote Start
Activate Your Horn
ACTIVATE YOUR
REMOTE SERVICES
Press "Apps" on the touchscreen.
11
22Press "Activate Services".
Press "Activate Now".
33
44There are two ways to activate:
via email or via an agent. On the
next page, you can either enter
your name and email, or press
"Call An Agent" to directly
speak with an agent.
*Canadian residents are
not required to create a
profile, as one is created
when a Uconnect Connected
Services account is activated.
**Requires an active Uconnect Connected Services subscription
Mopar®YOUR Way
CREATE YOUR OWNER'S PROFILE TODAY!
Get 24/7 Access To Everything You Need
Custom vehicle dashboard
Schedule dealer service with ease
View maintenance records**
Mobile vehicle commands**
Access to your vehicle's Owner's Information
Obtain special offers on Mopar® service
Registration is
simple. Scan
the QR code
below and
provide your
email address
to get started.
!!
GET PERSONALIZED BY REGISTERING
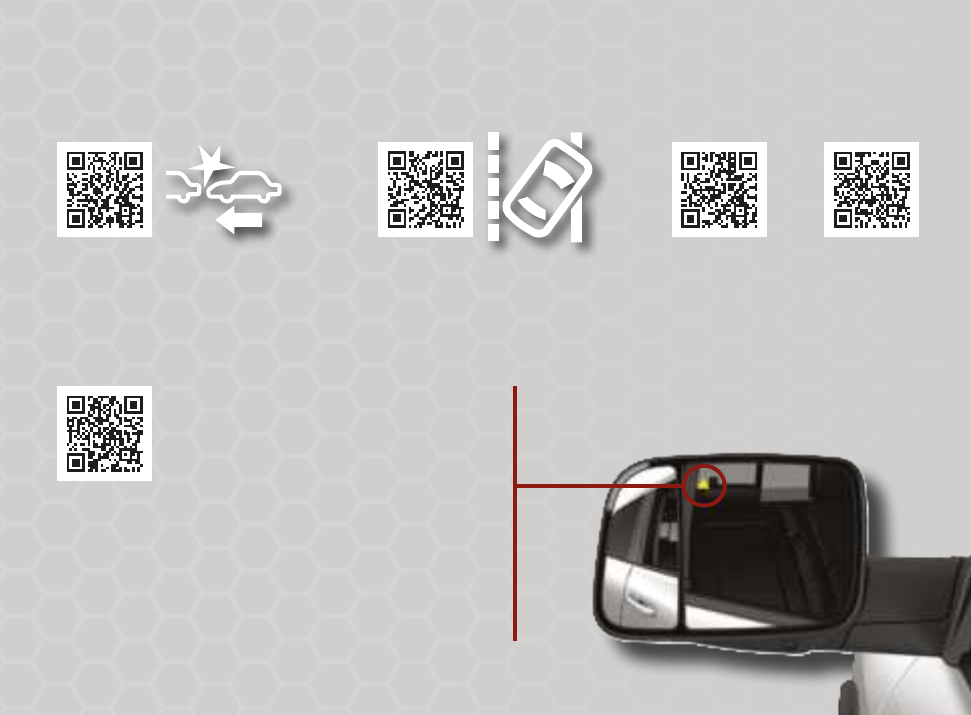
Advanced Driver Assistance Systems
Trailer Merge Assist extends the blind zone when it
senses your vehicle is pulling a trailer. You can select
between Automatic and Maximum modes in your
radio. This feature is NOT available with fifth-wheel
or gooseneck trailers.
Use your radio to choose between three
Blind Spot Monitoring system modes:
• Blind Spot Alert Lights Only
• Blind Spot Alert Lights/Chime
• Blind Spot Alert Off
Turn the Forward Collision
Warning system on or off, and
adjust the sensitivity and active
braking status through your radio.
Adjust your LaneSense system
strength and sensitivity settings
through your radio.
Adaptive
Cruise Control
ParkSense
Scan the QR codes for instructional videos on these Advanced Driver Assistance systems.
Tow Mode
An auxiliary trailer camera can be mounted on the rear of a
trailer. When connected, the display in the Digital Rearview
Mirror automatically switches to the trailer camera.
To return to the rear view camera display, toggle through the
menu options using the control buttons on the mirror.
DRIVING ASSIST SYSTEMS & DIGITAL MIRROR
TO DEACTIVATE:
Push the control on the bottom of the mirror
forward toward the windshield. The mirror will
return to the regular Automatic Dimming Mirror.
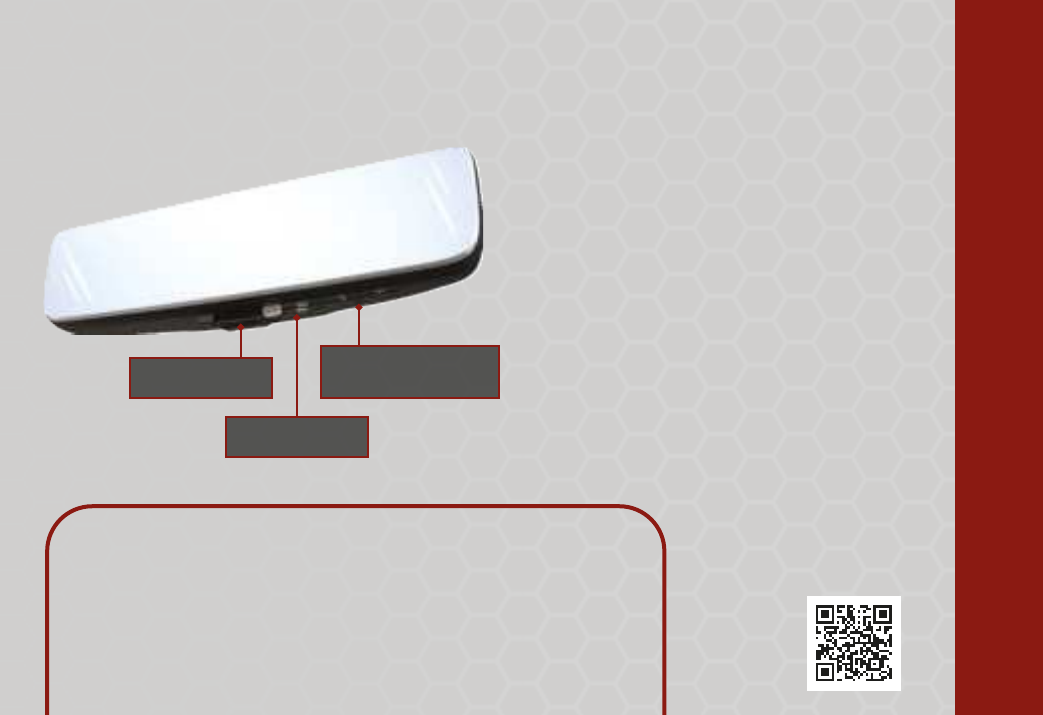
Digital Rearview Mirror
Left/Right Scroll
Buttons
Menu Button
On/Off Control
PROVIDES A HIGH DEFINITION AND UNOBSTRUCTED VIEW OF
THE ROAD BEHIND
TO ACTIVATE:
Pull the control on the bottom of the mirror
rearward toward the driver.
Menu Options
• Brightness
• Tilt
• Tow Mode (If Equipped)
Scan For Digital
Rearview
Mirror Video

Scan For Camera
Systems Video
Trailer Light Check
Available in the instrument cluster display under Trailer Tow. Once activated, the light check
enables all of the exterior lights sequentially for up to two minutes.
The following conditions must be met for activation:
• Vehicle is equipped with the
Trailer Brake Control
• Vehicle is in PARK
• Ignition is in ACC or RUN
• Remote Start is not active
• Brakes are not applied
• Turn signals are not applied
• Hazard lights are not on
Pressing the Trailer Reverse Guidance
button provides a full screen view of
the cargo area and trailer.
Pressing the Left & Right Tow Mirror
Split Screen View button within the
Trailer Reverse Guidance screen
displays a split screen view of both
sides of the trailer.
Camera Systems
Available Camera Features:
• Rear Backup Camera
• Surround View Camera
• Trailer Surround View
• Auxiliary Cameras
Your vehicle is equipped with a Diesel Exhaust Fluid (DEF) injection system and a Selective Catalytic
Reduction (SCR) catalyst to meet emission requirements.
The DEF gauge on the instrument cluster will display the level of DEF remaining in the tank.
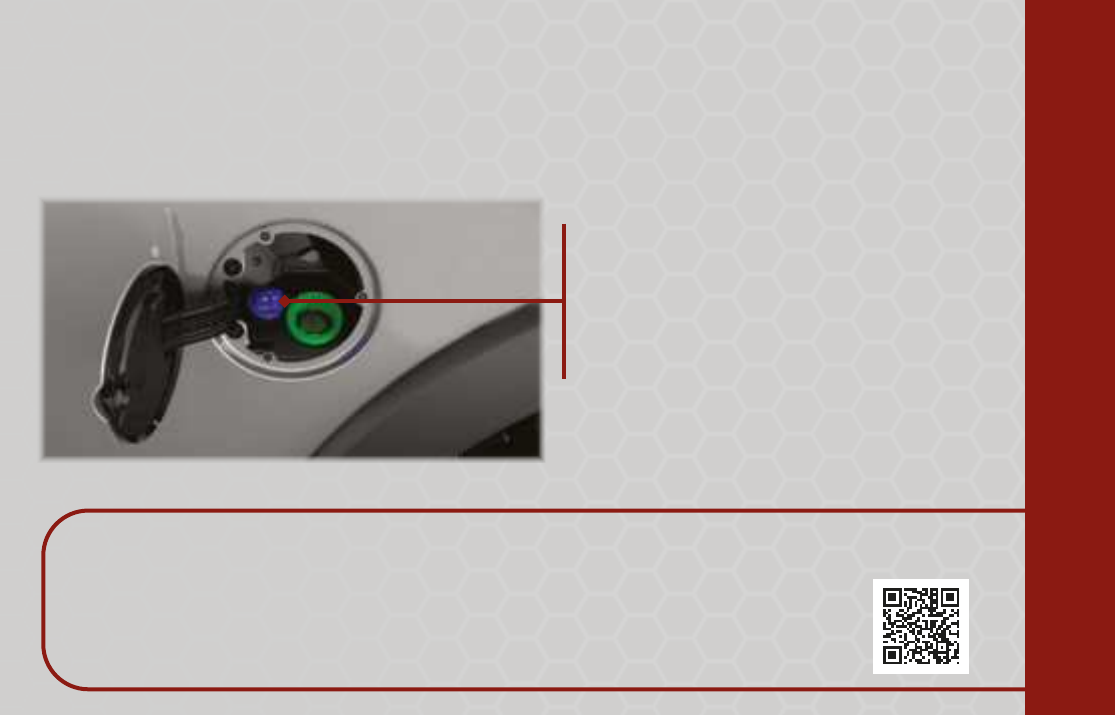
Diesel Exhaust Fluid (DEF)
Any containers or parts that come into contact with DEF must be plastic or stainless steel.
KEEP IN MIND:
If DEF is spilled, it should be wiped up immediately.
Scan for Diesel
Exhaust Fluid Video
DEF FILL LOCATION
REMOVE CAP TO ADD FLUID
During the filling process, there can be a delay
in the cluster gauge indicator showing full.
Do not continue to top off the tank after
it has been filled.
TRAILER LIGHT, CAMERAS, & DIESEL ENGINE

Climate Controls
Rotating the Blower Control knob regulates the amount
of air forced through the system in any mode.
Recirculation Front Defrost
OFF Mode Selection Rear Defrost
AUTOA/C
Head Restraint
Adjustment
Climate
Controls
Light
Controls
Scan the QR Codes for Instructional Videos.
CONTROL YOUR CLIMATE & RADIO
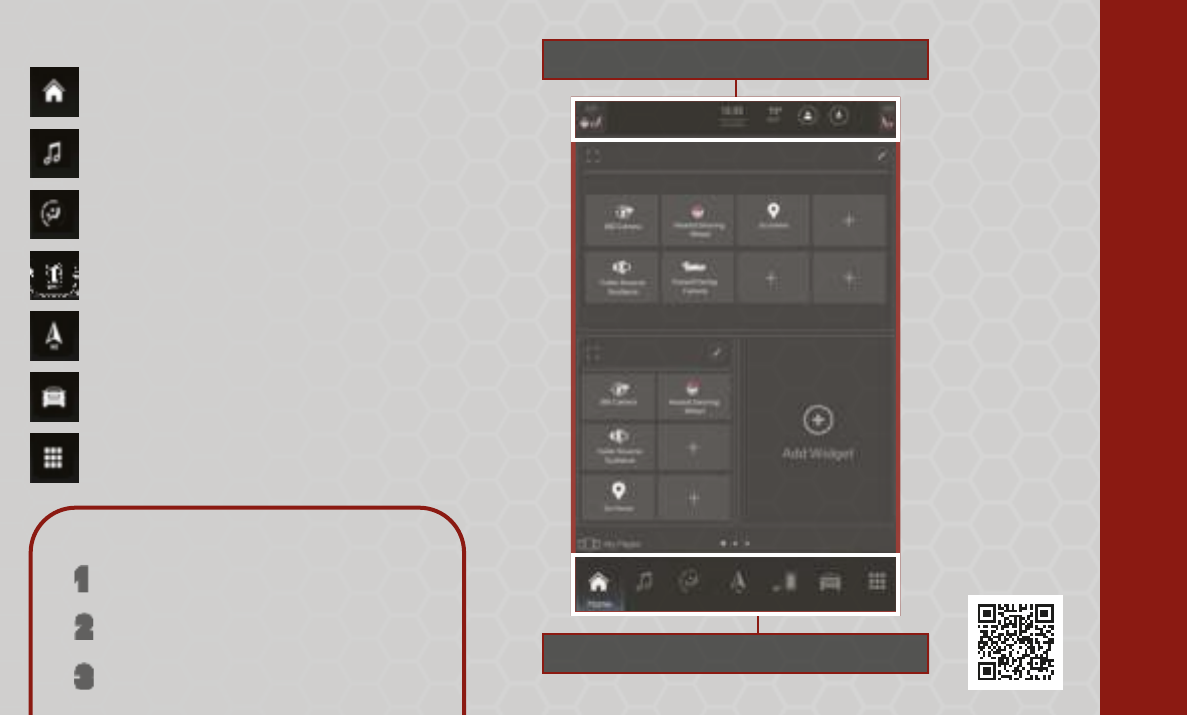
Press and drag an icon to rearrange
Swipe down to customize Profile options
Uconnect 5/5 NAV
HOME:
Customize your Home page.
MEDIA:
Listen to radio stations and play media.
PHONE:
Pair your smartphone and make hands-free calls.
COMFORT:
Adjust the climate control system.
VEHICLE:
Access vehicle settings.
APPS:
Access installed apps.
NAVIGATION:
Navigate to any destination.
Scan For
Radio Video
ACCESS OFF-ROAD PAGES:
Press "Vehicle" on the touchscreen.
11
33Select between the pages on the left
side of the touchscreen.
Press "Off-Road Pages".
22

©2021 FCA US LLC. All Rights Reserved. Tous droits réservés. Ram is a registered trademark of FCA US LLC.
Ram est une marque déposée de FCA US LLC. App Store is a registered trademark of Apple Inc. Google Play Store is a registered trademark of Google.
Warning & Indicator Lights
For additional information on any of the topics in this publication, please refer to your Owner’s Manual.
First Edition
DJD2_QSG_EN_USC_BA
Low Diesel Exhaust
Fluid (DEF)
Engine Check/
Malfunction
Cold Ambient
Derate Mode
Air Suspension Payload
Protection
4WD Low
Trailer Brake
Disconnected
Engine Coolant
Temperature
Air Bag
Rear Axle Lock
Snowplow Mode
Trailer Merge Assist
Battery Charge Brake Door Open Electronic Throttle
Control (ETC)
Hood Open Oil Pressure Oil Temperature
Transmission Temperature 4WD High
Vehicle Security
Air Suspension Fault
Air Suspension Bed
Lowering Mode
Air Suspension Alternate
Trailer Height
Adaptive Cruise
Control (ACC) Fault
Cargo Light
Anti-Lock Brake
System (ABS)
Air Suspension Ride
Height Raising
Air Suspension Ride
Height Lowering
Rear Axle Locker Fault
Low Coolant Level
Forward Collision
Warning (FCW) Off
Cruise Control Fault
TOW/HAUL
Service LaneSense
NEUTRAL
Loose Fuel Filler Cap
Electronic Stability
Control (ESC) OFF
Electronic Stability
Control (ESC) Active
Diesel Exhaust Brake
Wait To Start
Sway Bar
Front And Rear Axle Lock
Service 4WD
Sway Bar Fault
Water In Fuel
Low Fuel
LaneSense
Tire Pressure Monitoring
System (TPMS)
Service Forward
Collision Warning (FCW)
Low Washer Fluid
Seat Belt Reminder
4WD Lock
Automatic Diesel
Exhaust Brake
Parking/Headlights
Cruise Control Set
Turn Signal
ECO Mode
Adaptive Cruise Control
(ACC) Ready
Adaptive Cruise Control
(ACC) Set With Target
Front Fog Lights
Cruise Control Ready
Adaptive Cruise Control
(ACC) Set With No Target
LaneSense
Hill Descent Control (HDC)
LaneSense High Beam
Other manuals for RAM 2500
1
This manual suits for next models
1
Table of contents
Other FCA US Car Video System manuals


