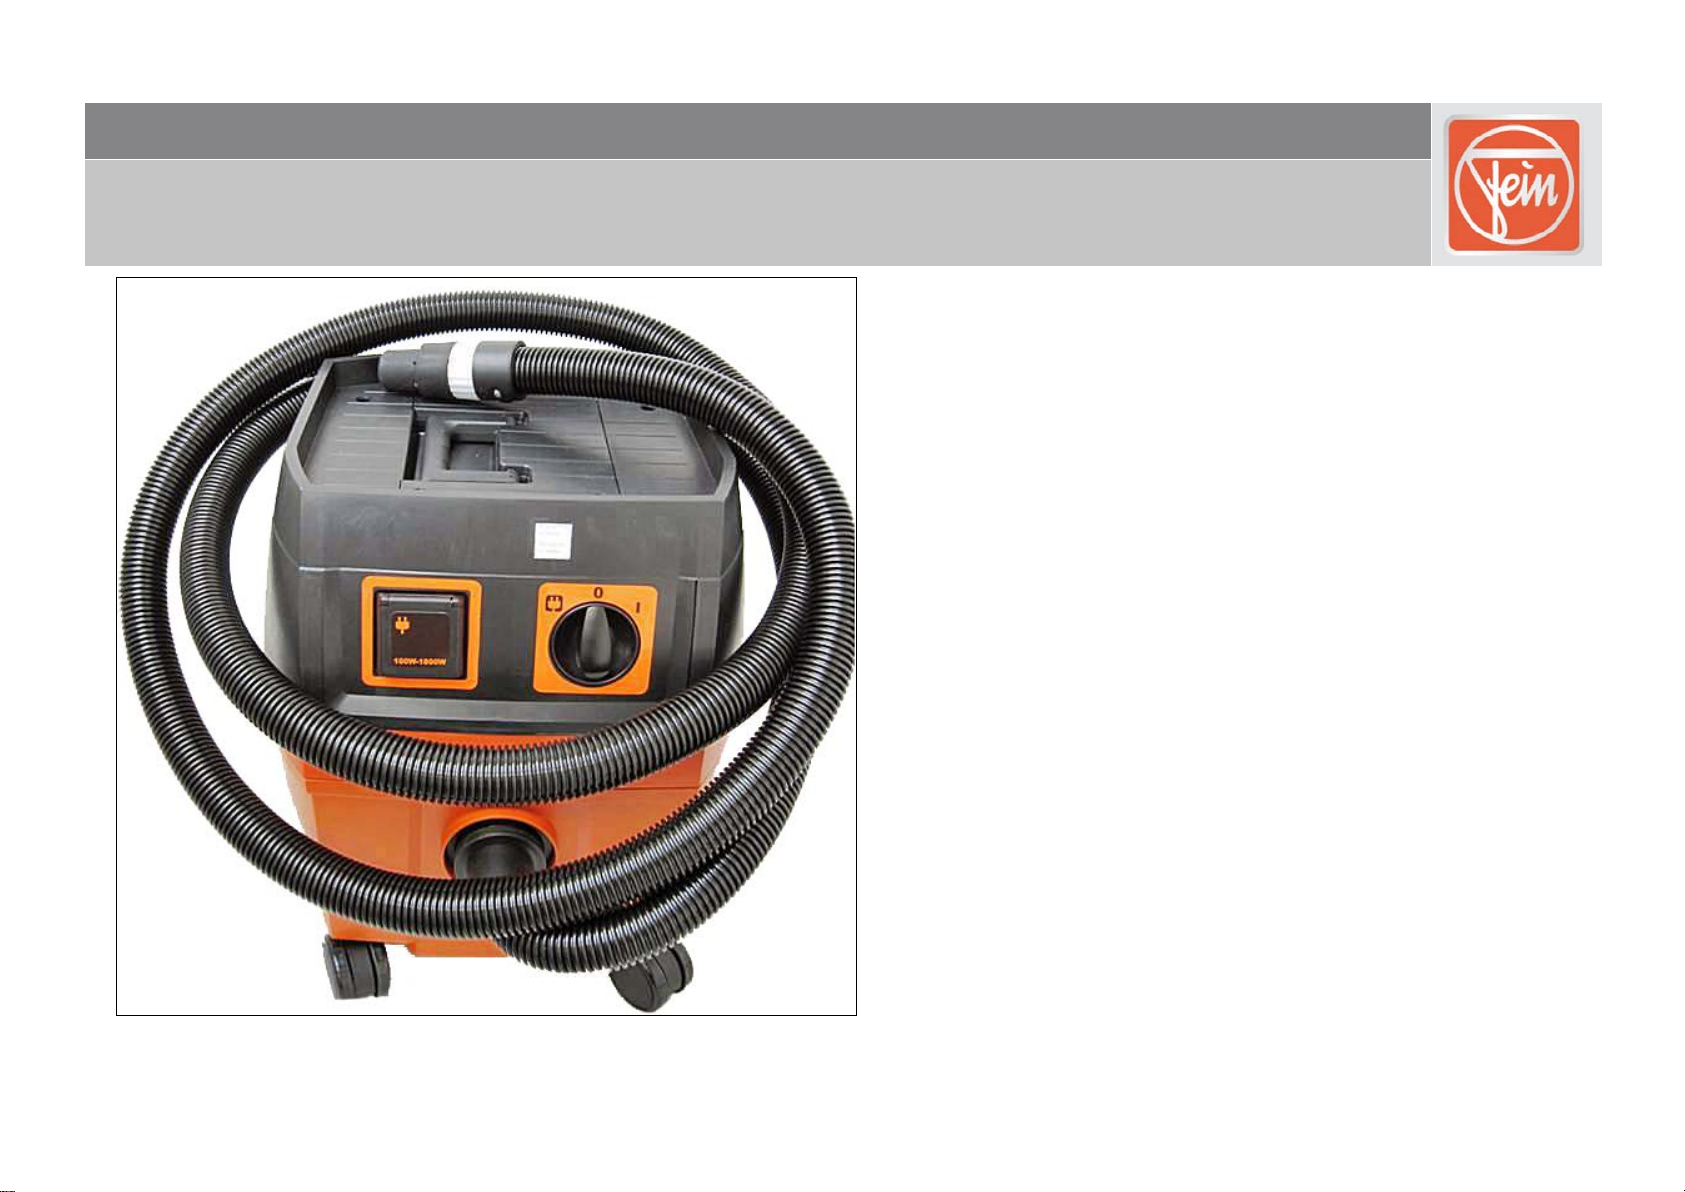
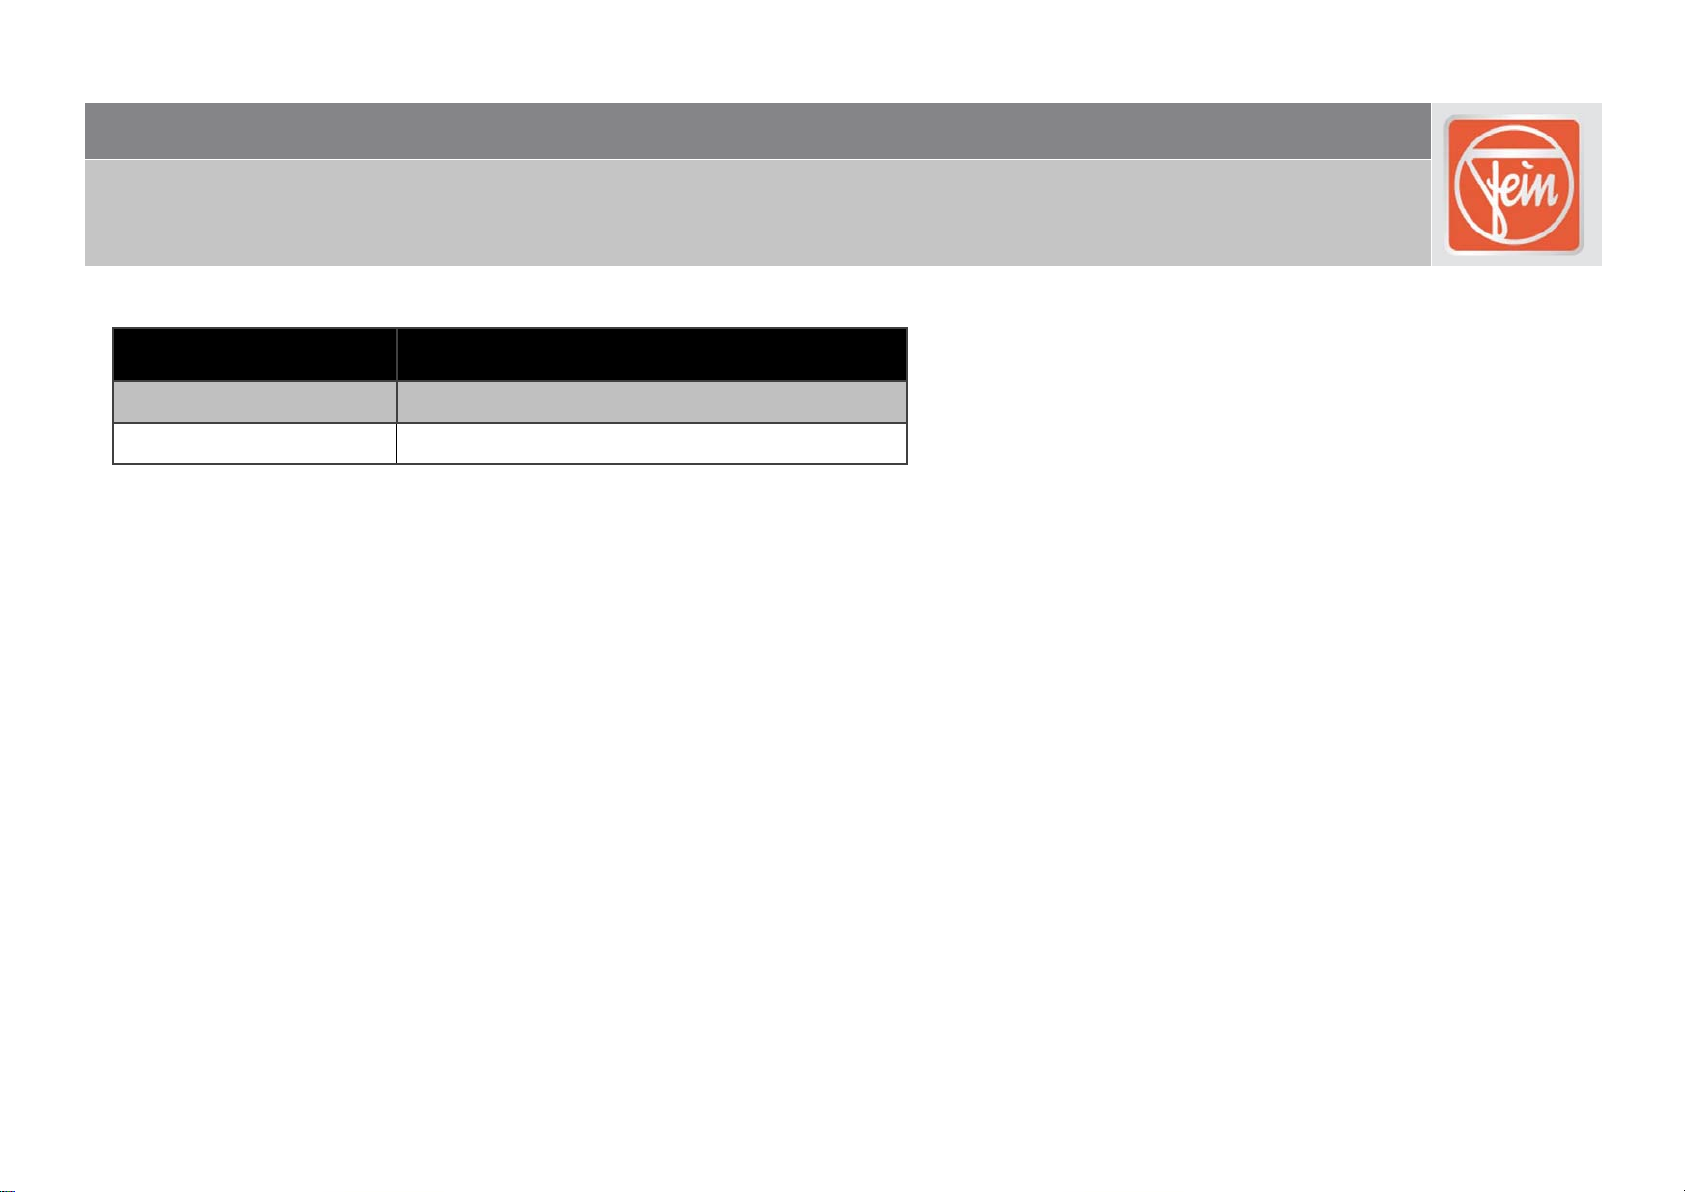
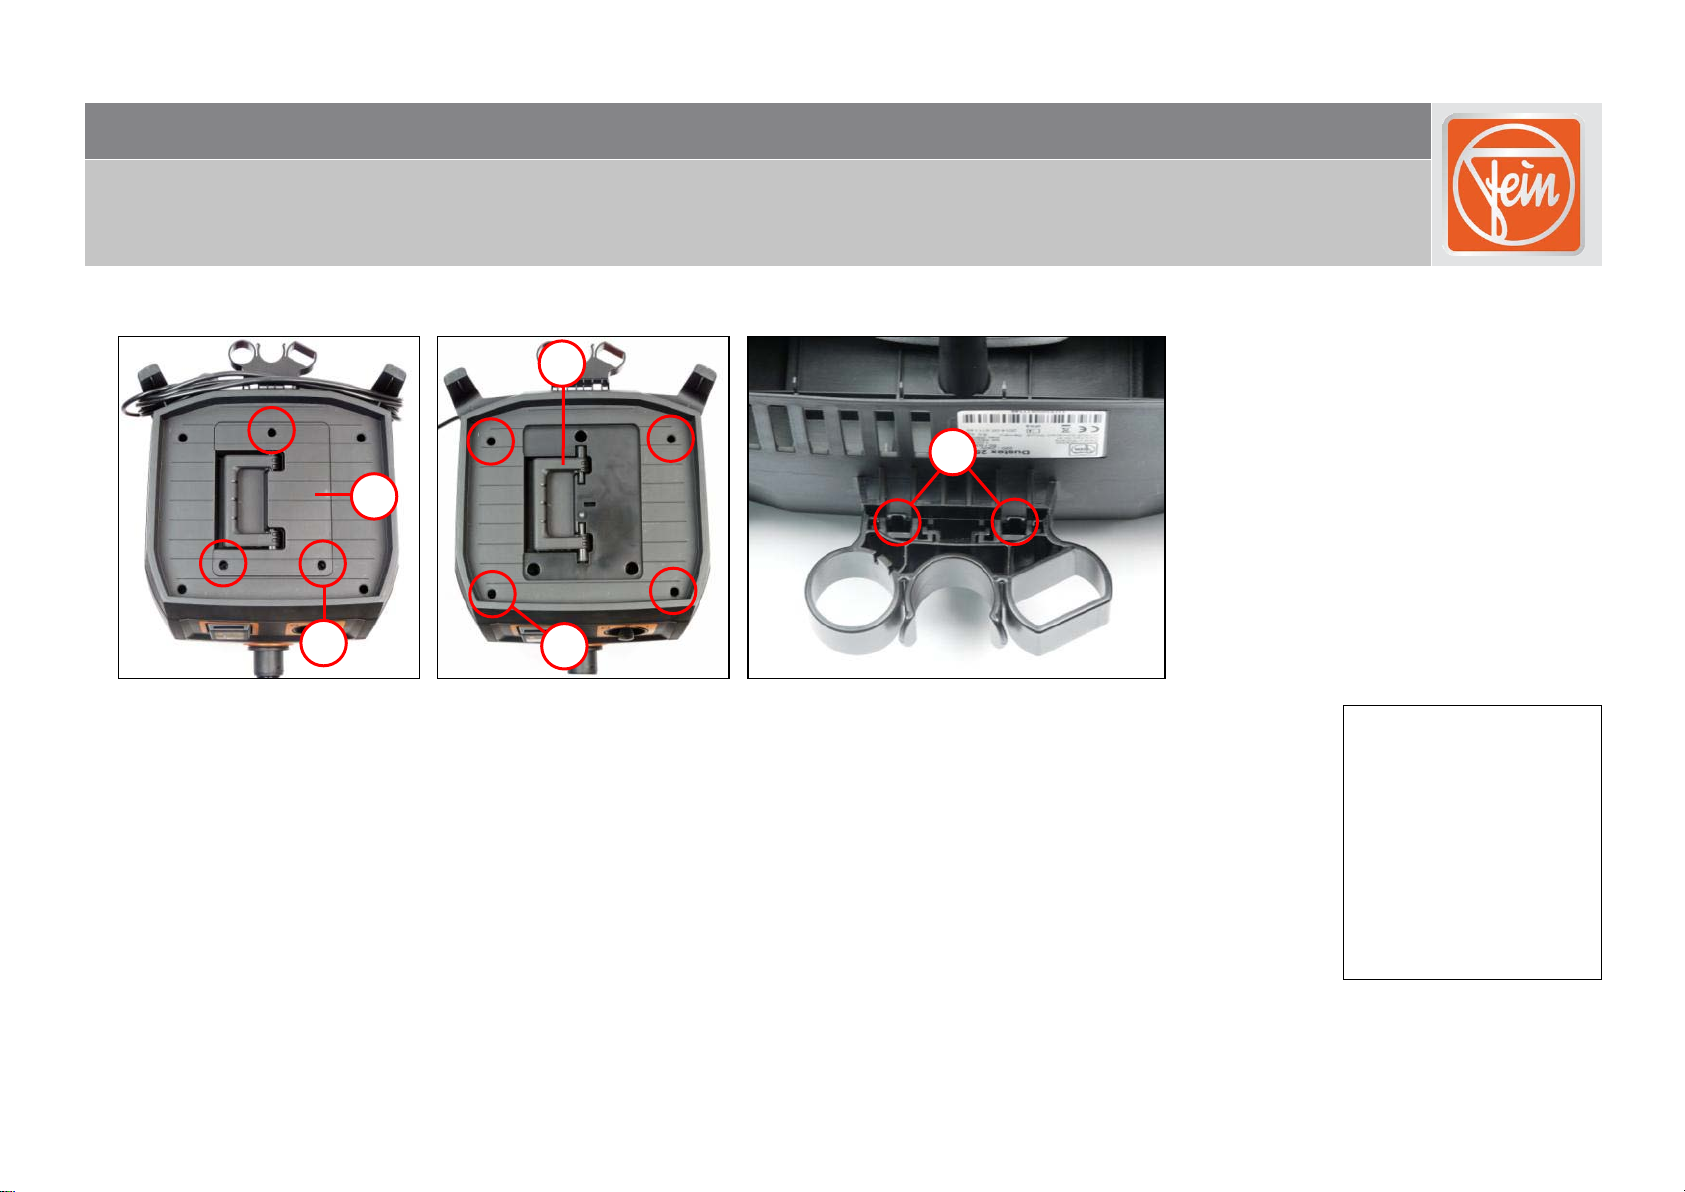
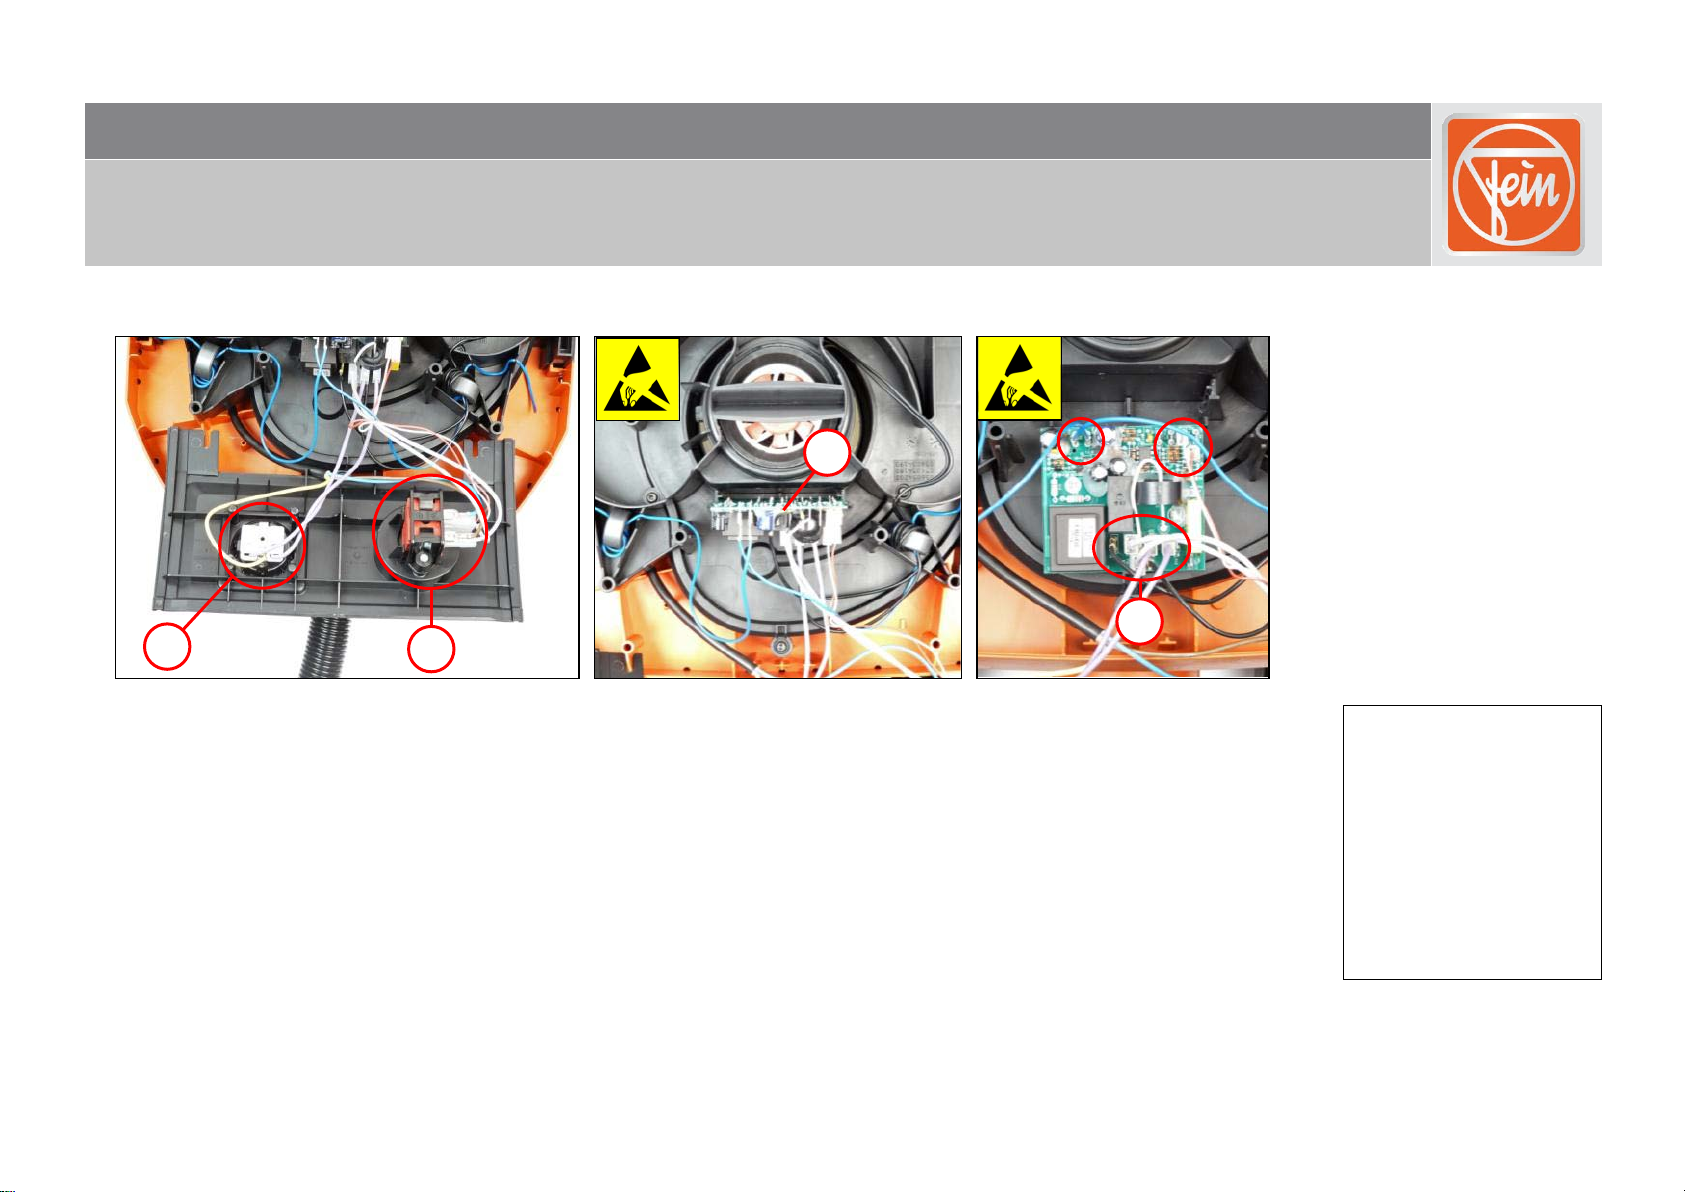
Fein Dustex 25L Turbo I User manual

Dustex 25L; 35L
Repair instructions
C-SC_CSSM
Version 1.0
2015-02-27
All rights reserved by FEIN, especially in case of industrial rights registration.
FEIN retains all rights of disposal, such as copying and circulation.
Page 1of 35

Dustex 25L; 35L
Contents
C-SC_CSSM
Version 1.0
2015-02-27
All rights reserved by FEIN, especially in case of industrial rights registration.
FEIN retains all rights of disposal, such as copying and circulation.
Page 2of 35
1. Models described
2. Technical data
3. Notes and requirements
4. Tools required
5. Lubricants and auxiliary substances required
6. Disassembly
7. Assembly
8. Troubleshooting
9. Connection diagram

Dustex 25L; 35L
1. Models described
C-SC_CSSM
Version 1.0
2015-02-27
All rights reserved by FEIN, especially in case of industrial rights registration.
FEIN retains all rights of disposal, such as copying and circulation.
Page 3of 35
These instructions describe how to repair the following models:
Model Order number
Dustex 25L / Turbo I 9 20 27 223 00 0
Dustex 35L / Turbo II 9 20 28 223 00 0

Dustex 25L; 35L
2. Technical data
C-SC_CSSM
Version 1.0
2015-02-27
All rights reserved by FEIN, especially in case of industrial rights registration.
FEIN retains all rights of disposal, such as copying and circulation.
Page 4of 35
Technical data
The complete technical data can be found in the operating instructions for the model.
Test data
Up-to-date test data for all models can be found on the FEIN Extranet (Customer Service → Repair Guides).
Lubricants
The lubricants and container sizes available from FEIN can be found on the FEIN Extranet (Customer Service → Repair Guides).
Lists of spare parts
Lists of spare parts and exploded views are available online at www.fein.com

Dustex 25L; 35L
3. Notes and requirements
C-SC_CSSM
Version 1.0
2015-02-27
All rights reserved by FEIN, especially in case of industrial rights registration.
FEIN retains all rights of disposal, such as copying and circulation.
Page 5of 35
Note
These instructions are only intended for persons with suitable technical training. It is assumed that the reader has mechanical and
electrical training.
Only use original FEIN spare parts!
Provisions
Please note that power tools may only be repaired, maintained and checked by a trained electrician, as improper repair can result in
serious risks to the user.
The provisions set out in DIN VDE 0701-0702 should be observed after repairs.
The relevant accident prevention regulations of the employers' liability insurance associations are to be observed when
commissioning.
The German Equipment and Product Safety Act applies for correct use.
Outside Germany, the regulations applicable in the relevant country must be observed!

Dustex 25L; 35L
3. Notes and requirements
C-SC_CSSM
Version 1.0
2015-02-27
All rights reserved by FEIN, especially in case of industrial rights registration.
FEIN retains all rights of disposal, such as copying and circulation.
Page 6of 35
WARNING!
Damage from electrostatic charging.
Failure to comply with the safety regulations for ESD protection may cause damage to the electronics.
Only perform assembly/disassembly work on electronics on a workstation with ESD protection.

Dustex 25L; 35L
4. Tools required
C-SC_CSSM
Version 1.0
2015-02-27
All rights reserved by FEIN, especially in case of industrial rights registration.
FEIN retains all rights of disposal, such as copying and circulation.
Page 7of 35
Standard tools Special tools:
Torx T15 (length 89 mm) Pressure gauge 6 41 08 010 01 0
Torx T20 (length: 89 mm, 152 mm)
Side-cutting pliers
Cross-tip screwdriver PH1

Dustex 25L; 35L
5. Lubricants and auxiliary substances required
C-SC_CSSM
Version 1.0
2015-02-27
All rights reserved by FEIN, especially in case of industrial rights registration.
FEIN retains all rights of disposal, such as copying and circulation.
Page 8of 35
Note
No lubricants or auxiliary substances are required for assembly of the Dustex 25L / Turbo I and Dustex 35L / Turbo II tools.

Dustex 25L; 35L
6. Disassembly
C-SC_CSSM
Version 1.0
2015-02-27
All rights reserved by FEIN, especially in case of industrial rights registration.
FEIN retains all rights of disposal, such as copying and circulation.
Page 9of 35
Removing hood
1. Unscrew the three screws (1).
2. Remove cover (2).
3. Remove handle (3).
4. Unscrew the four screws (4) and remove hood.
5. Open clips (5) and remove holder.
Tools:
- Torx T20
(length: 152 mm)
5
4
1
2
3

Dustex 25L; 35L
6. Disassembly
C-SC_CSSM
Version 1.0
2015-02-27
All rights reserved by FEIN, especially in case of industrial rights registration.
FEIN retains all rights of disposal, such as copying and circulation.
Page 10 of 35
Disassembling base plate and electronics
1. Disconnect cables at socket (1).
2. Pull cables off switch (2).
3. Disassemble socket and switch.
4. Pull out the electronics (3).
5. Pull out connected cables (4) from electronics.
Tools:
- Torx T15
(length: 89 mm)
- Cross-tip screwdriver
PH1
1
2
3
4

Dustex 25L; 35L
6. Disassembly
C-SC_CSSM
Version 1.0
2015-02-27
All rights reserved by FEIN, especially in case of industrial rights registration.
FEIN retains all rights of disposal, such as copying and circulation.
Page 11 of 35
Disassembling electronics (applies to: Turbo l; Turbo ll)
1. Remove cover (1).
2. Pull out connected cables (2) from electronics.
3. Take electronics out of housing.
4. Remove housing (3).
1
2
3

Dustex 25L; 35L
6. Disassembly
C-SC_CSSM
Version 1.0
2015-02-27
All rights reserved by FEIN, especially in case of industrial rights registration.
FEIN retains all rights of disposal, such as copying and circulation.
Page 12 of 35
Disassembling base plate
1. Unscrew sensor (1).
2. Unscrew sensor (2).
3. Remove the two filters (3).
4. Remove ferrite sleeve (4) with cable.
5. Unscrew the seven screws (5) and remove housing.
6. Pull cable (6) off motor.
7. Remove motor (7).
8. Remove motor bearing ring (8).
Tools:
- Torx T20
(length: 152 mm)
- Torx T20
(length: 89 mm)
3
2
1
4
7
5
8
6

Dustex 25L; 35L
6. Disassembly
C-SC_CSSM
Version 1.0
2015-02-27
All rights reserved by FEIN, especially in case of industrial rights registration.
FEIN retains all rights of disposal, such as copying and circulation.
Page 13 of 35
Disassembling base plate
1. Remove pressure piece and lug (1) on both sides.
2. Remove two inserts (2).
3. Remove filter (3).
4. Remove cable clamping piece (4).
Tools:
- Torx T15
(length: 89 mm)
3
4
1
2

Dustex 25L; 35L
6. Disassembly
C-SC_CSSM
Version 1.0
2015-02-27
All rights reserved by FEIN, especially in case of industrial rights registration.
FEIN retains all rights of disposal, such as copying and circulation.
Page 14 of 35
Disassembling base plate
1. Remove seal (1).
2. Remove four circlips (2).
3. Remove seal (3).
Tools:
- Side-cutting pliers
2
1
3

Dustex 25L; 35L
6. Disassembly
C-SC_CSSM
Version 1.0
2015-02-27
All rights reserved by FEIN, especially in case of industrial rights registration.
FEIN retains all rights of disposal, such as copying and circulation.
Page 15 of 35
Disassembling motor
1. Remove seal (1).
2. Remove seal (2).
2
1

Dustex 25L; 35L
6. Disassembly
C-SC_CSSM
Version 1.0
2015-02-27
All rights reserved by FEIN, especially in case of industrial rights registration.
FEIN retains all rights of disposal, such as copying and circulation.
Page 16 of 35
Disassembling base plate
1. Open clips (1) and remove housing with filter.
2. Remove two brackets (2).
3. Remove seal (3).
4. Pull out the four rollers (4).
5. Remove holder (5).
3
1
4
2
2
5

Dustex 25L; 35L
7. Assembly
C-SC_CSSM
Version 1.0
2015-02-27
All rights reserved by FEIN, especially in case of industrial rights registration.
FEIN retains all rights of disposal, such as copying and circulation.
Page 17 of 35
Assembling container
1. Fit holder (1).
2. Fit the four rollers (2).
3. Fit seal (3).
4. Insert filter (4) into housing.
5. Attach holder (5).
6. Push the plate in until you hear the holder's clips engage.
3
2
1
5
4

Dustex 25L; 35L
7. Assembly
C-SC_CSSM
Version 1.0
2015-02-27
All rights reserved by FEIN, especially in case of industrial rights registration.
FEIN retains all rights of disposal, such as copying and circulation.
Page 18 of 35
Assembling base plate
1. Fit seal (1).
2. Insert seal (2) into cut-out.
3. Insert the insert (3).
4. Fit the four circlips (4).
1
4
3
2

Dustex 25L; 35L
7. Assembly
C-SC_CSSM
Version 1.0
2015-02-27
All rights reserved by FEIN, especially in case of industrial rights registration.
FEIN retains all rights of disposal, such as copying and circulation.
Page 19 of 35
Assembling motor
1. Place seal (1) on motor.
2. Place seal (2) on motor.
1
2

Dustex 25L; 35L
7. Assembly
C-SC_CSSM
Version 1.0
2015-02-27
All rights reserved by FEIN, especially in case of industrial rights registration.
FEIN retains all rights of disposal, such as copying and circulation.
Page 20 of 35
Assembling base plate
1. Thread cable with plug into opening (1).
2. Position cable clamping piece (2) and screw down.
3. Wind cable of sensor and from motor around ferrite sleeve (3) twice.
4. Wind cable of sensor through ferrite sleeve (4) three times.
Tools:
- Torx T15
(length: 89 mm)
2
1
110/120V GB
3
4
This manual suits for next models
3
Table of contents
Other Fein Vacuum Cleaner manuals

Fein
Fein Dustex 35 LX AC User manual

Fein
Fein 9 20 30 User manual

Fein
Fein Dustex 25L User manual

Fein
Fein 9-55-13 User manual

Fein
Fein 9 20 19 223 01 4 dustex User manual

Fein
Fein 9-77-25 User manual

Fein
Fein Turbo II X User manual

Fein
Fein Dustex II 9 20 20 User manual

Fein
Fein Dustex 35 LX AC User manual

Fein
Fein Turbo I User manual

Fein
Fein Turbo I User manual

Fein
Fein Dustex 25L 9 20 27 User manual

Fein
Fein 9-11-20 User manual

Fein
Fein 9-11-55 Assembly instructions

Fein
Fein Dustex 35 LX AC User manual

Fein
Fein Dustex 25L Setup guide

Fein
Fein ASBS18-10AS User manual

Fein
Fein 9-11-55 User manual

Fein
Fein Dustex25 User manual

Fein
Fein Dustex 25L User manual