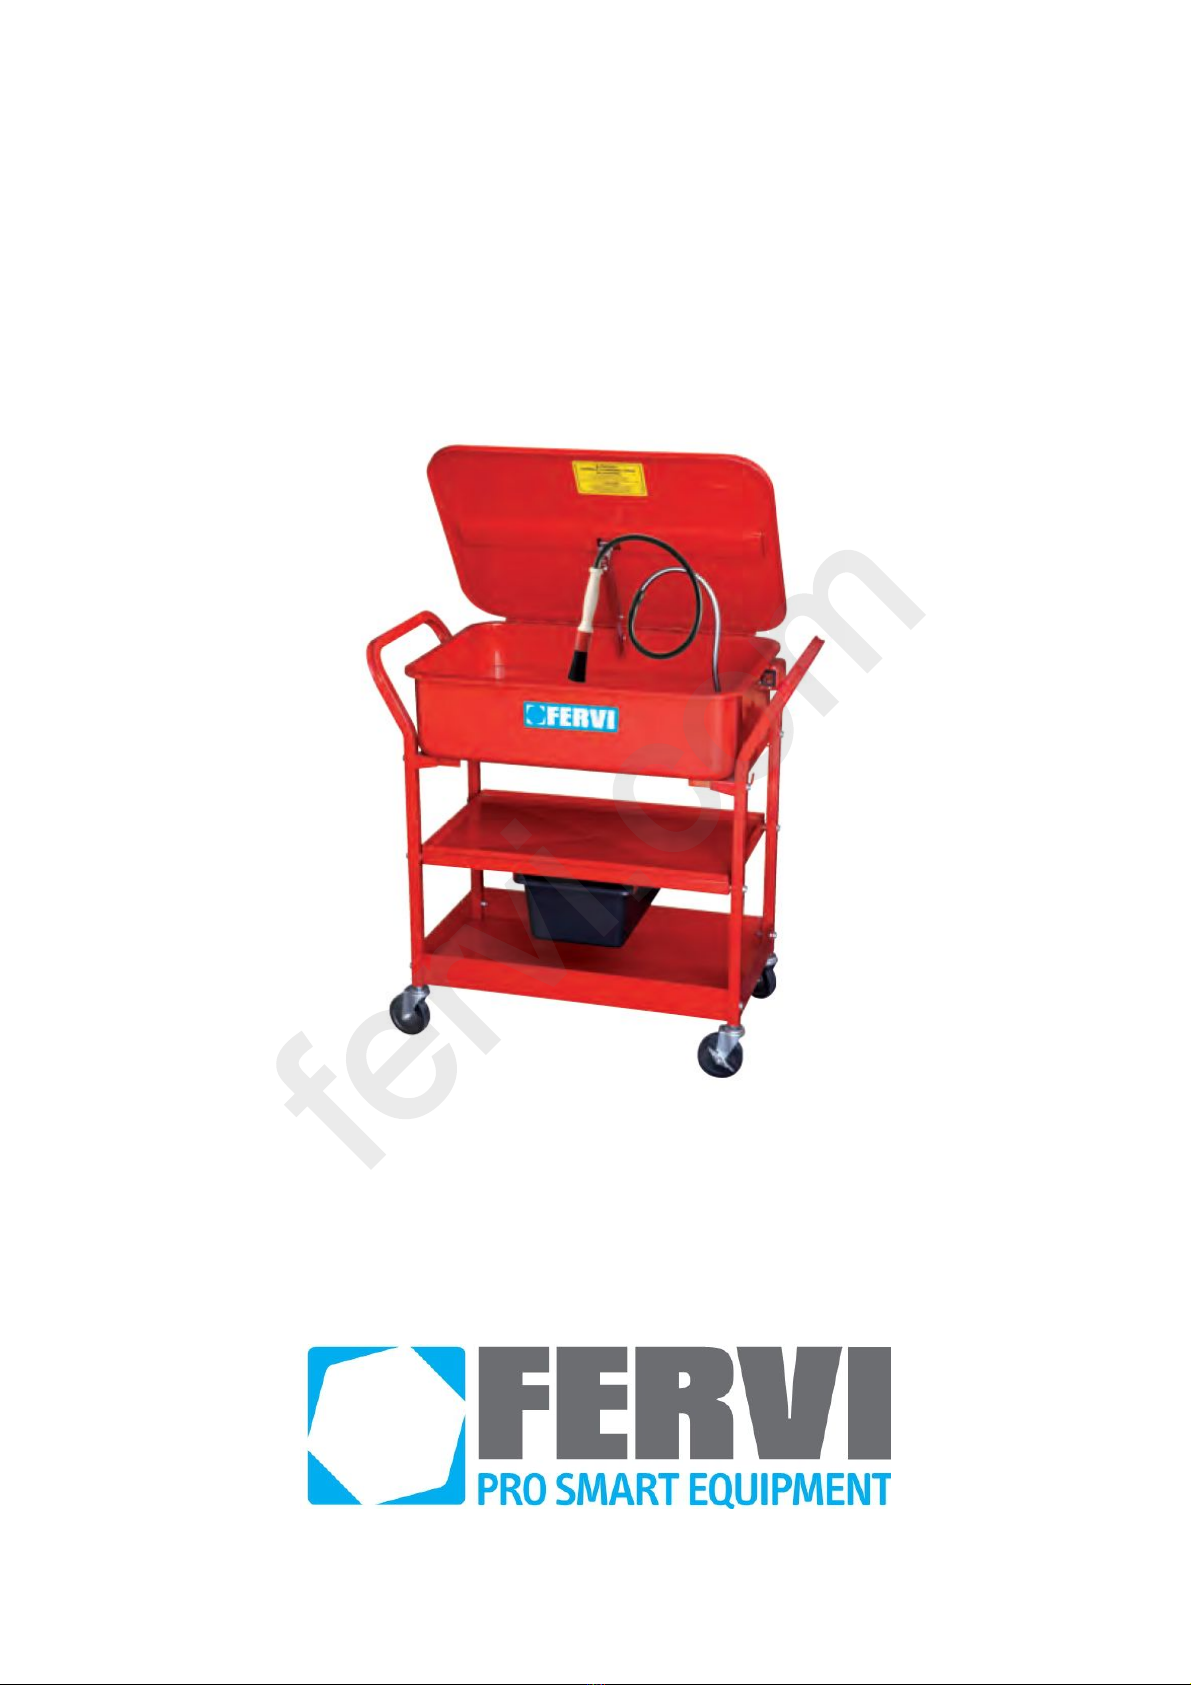
Fervi 0232 User manual

OPERATION AND
MAINTENANCE MANUAL
Degreaser cleaning tank with wheels
Art. 0232
ORIGINAL INSTRUCTIONS
fervi.com

MACHINES AND
ACCESSORIES
Page 2 of 21
FOREWORD
Read this manual before operating any machinery
ORIGINAL INSTRUCTIONS
Before starting any operation it is compulsory to read this instruction manual. The guarantee
of smooth operation and full performance of the equipment is highly dependent on the
application of all the instructions contained in this manual.
Operator Qualification
The workers responsible for the use of this tank must have all the necessary information
and instruction and should be given adequate training in relation to safety regarding:
a) The conditions of use of the equipment;
b) Foreseeable abnormal situations, pursuant to Article 73 of Legislative Decree
81/08.
We guarantee the Tank complies with the specifications and technical instructions
described in the Manual on the date of issuance and listed herein; On the other hand,
the machine may also be subject to important technical changes in the future, without
the Manual being updated.
Therefore, see FERVI for information about modifications that could be implemented.
REV. 2 November 2013
fervi.com

MACHINES AND
ACCESSORIES
Page 3 of 21
CONTENTS
1 INTRODUCTION ........................................................................................ 4
1.1 Preface..........................................................................................................................4
2 SAFETY WARNINGS .................................................................................. 5
2.1 General safety rules for machine tools..........................................................................5
2.2 Safety regulations for the electrical system ..................................................................6
2.3 Technical support..........................................................................................................7
2.4 Other provisions ...........................................................................................................7
3 TECHNICAL SPECIFICATIONS ................................................................... 8
4 DESCRIPTION OF THE EQUIPMENT ........................................................... 9
4.1 Description of the main parts...................................................................................... 10
4.2 Identification plate ..................................................................................................... 11
4.3 Warning / attention pictogram ...................................................................................11
5 EQUIPMENT SAFETY DEVICES ................................................................. 12
5.1 Submersible pump ......................................................................................................12
5.2 Use of PPE................................................................................................................... 12
6 COMMISSIONING OF THE TANK .............................................................. 13
6.1 Assembly .................................................................................................................... 13
6.2 Electrical connection ................................................................................................... 15
7 OPERATION ............................................................................................ 16
7.1 Instructions for Use ....................................................................................................16
7.2 Cleaning ...................................................................................................................... 16
7.3 How to empty the tank................................................................................................ 17
8 MAINTENANCE ........................................................................................ 18
8.1 Routine maintenance .................................................................................................. 18
9 SPARE PARTS.......................................................................................... 19
10 TROUBLESHOOTING ............................................................................. 20
11 DISPOSAL OF MATERIALS .................................................................... 21
fervi.com

MACHINES AND
ACCESSORIES
Page 4 of 21
1 INTRODUCTION
This manual is designed to provide the knowledge required for the use and maintenance of
the Degreaser cleaning tank with wheels Art. 0232 and to provide the operator assigned
to the device with a sense of responsibility and knowledge of its possibilities and limitations.
As the machine is entrusted to experienced and skilled operators, the following equipment
must be perfectly known by the operator if you want it to be used safely and effectively.
Selecting personnel is an important factor for efficiency and safety in the workplace, and the
people considered suitable to perform a specific job must have the sufficient physical and
mental capacity to allow them to follow the instructions that they are given.
GRAPHIC REPRESENTATION OF SAFETY,OPERATIONAL AND RISK WARNINGS
The following boxes are designed to attract the attention of the reader / user for the proper
and safe use of the machine:
Pay attention
This highlights behavioural rules to prevent damage to the machine and/or the occurrence of
dangerous situations.
Residual Risks
This highlights the presence of dangers that cause residual risks to which the operator must
pay attention in order to avoid injury or damage to property.
1.1 Preface
For safe and easy operation of the Degreaser cleaning tank with wheels, this manual
must be read carefully in order to acquire the necessary knowledge. In other words,
durability and performance are strictly dependent on how it is used.
Follow the instructions contained herein, in addition to the general precautions to be observed
while working. Even if the operator is already familiar with the Degreaser cleaning tank
with wheels, it is necessary to:
Acquire full knowledge of the equipment.
Read this manual carefully to understand: operation, safety devices and all necessary
precautions. All this is to allow safe use of the equipment.
Wear appropriate clothing for the job.
The operator must wear appropriate clothing, so as to prevent the occurrence of
unpleasant accidents.
Maintain the equipment with care.
fervi.com

MACHINES AND
ACCESSORIES
Page 5 of 21
2 SAFETY WARNINGS
2.1 General safety rules for machine tools
Risks associated with using the equipment
DO NOT underestimate the risks associated with using the machine and concentrate on the
work in progress.
Risks associated with using the equipment
Despite the implementation of all the safety devices for safe use of the equipment, it is
necessary to take note of all the accident prevention requirements highlighted in various parts
of this manual.
Risks associated with using the equipment
Every person who is responsible for the use and maintenance of the machine should first have
read the instruction manual, particularly the chapter dealing with safety.
It is recommended that the plant safety manager get written confirmation of the above.
Risks associated with using the equipment
During all work phases with the equipment, you should proceed with great caution in
order to avoid damage to persons, to the property or to the device itself.
Please only use the equipment for its envisaged uses.
Don't tamper with the safety devices equipping the machine.
Risks associated with using the equipment
Before starting any type of work on the equipment, the operator must wear appropriate
personal protective equipment (PPE) such as safety gloves, goggles and non-slip shoes.
1. Always check the efficiency and integrity of the equipment.
2. For safety reasons, you should only use solvents on Hazard Table A III of the VdF
Directives with a flash point above 55°C.
3. Do not use corrosive or flammable cleaning liquids that can release toxic and/or
harmful vapours into the atmosphere.
fervi.com

MACHINES AND
ACCESSORIES
Page 6 of 21
4. Use only specific chemical products for cleaning mechanical parts as stated by the
manufacturer and use them according to the indications provided.
5. Used cleaning liquids must be disposed of in accordance with current standards
regarding environmental hygiene.
6. Keep the workplace tidy and free from hindrances; disorder causes accidents.
7. Make sure that the work environment is forbidden to children, non-employees and
animals.
8. Do not make demands of the equipment in excess of its design limits. Only use the
equipment in the manner in which it was intended, as described in this instruction
manual.
9. Disconnect the power supply when:
not using the equipment;
is left unattended;
you are performing maintenance or adjustment because the machine does not
work properly;
in case the machine is being moved to another location;
you are cleaning the machine.
10.Work without disturbances.
11.Work areas must be well lit.
12.Wear appropriate clothing.
13.Replace worn and/or damaged parts, check that the repairs and protections work
properly before operating. If necessary, have the machine checked by the service
support personnel. Use only original spare parts.
14.It is recommended that users of this publication, for maintenance and repair, have a
basic knowledge of mechanical principles and of repair technique procedures.
15.The company safety officer is required to make sure that equipment operators
have read and understood this manual in its entirety.
16.Management is responsible for safety and verification of the company's risk
status according to Legislative Decree 81/08.
2.2 Safety regulations for the electrical system
Modifications to the electrical system
Do not modify the machine's electrical system in any way.
Work carried out in the electrical system of the machine must be carried out only by
authorized personnel.
1. The supply voltage of the equipment must correspond to that stated on the plate and
in the technical specifications (230 V / 50 Hz).
Do not use any other power supply.
2. The use of a life-saving device on the electric power supply for a nominal trip range of
10 to 30 mA is recommended. For more detailed information, contact a trusted
electrician.
fervi.com

MACHINES AND
ACCESSORIES
Page 7 of 21
3. The power cable must be checked regularly, taking care not to come into contact with
hot objects, wet or oiled surfaces, and / or sharp edges.
4. Do not use the power cord to remove the plug from the socket or move the equipment.
2.3 Technical support
For any problems or concerns, please contact, without hesitation the Customer Service
Department of your dealer, who has competent and specialized staff, specific equipment and
spare parts.
2.4 Other provisions
IT IS FORBIDDEN TO TAMPER WITH SAFETY DEVICES
The first thing to do when starting work is to check for the presence and integrity of the
protections and the operation of the safety devices.
If you encounter any defect not use the cleaning tank!
Even more so, it is strictly forbidden to modify or remove guards, safety devices,
labels and indication signs.
fervi.com

MACHINES AND
ACCESSORIES
Page 8 of 21
3 TECHNICAL SPECIFICATIONS
Model Art. 0232
Weight (kg) 36
External dimensions 970 x 540 x 930 h
Tank capacity - liquid level (l) 60
Power supply (V / Hz) 230 / 50
Power (W) 26
Pump flow rate (l/min) 12
Level of IP protection IP X8
fervi.com

MACHINES AND
ACCESSORIES
Page 9 of 21
4 DESCRIPTION OF THE EQUIPMENT
The cleaning tank was constructed for the cleaning of small mechanical parts and
motor components in general, using a liquid detergent.
Type of Detergent
Do not use corrosive or flammable detergents that can release toxic and/or harmful vapours
into the atmosphere.
The cleaning of mechanical parts may require the use of more or less aggressive detergents.
In any case different detergents should not be mixed inside the tank.
Cleaning can be carried out in two ways:
1. By brush: the workpiece is placed above the tank and then cleaned manually using a
brush with a continuous jet of liquid under pressure;
2. Immersion: the piece is placed inside the tank, positioned on the grill, then the upper
cover is closed and the tank is filled with liquid. The liquid can be kept in circulation
using the submersible pump inside the tank.
The cleaning must be used in environments with sufficient lighting (at least 200 lux).
Do not use the equipment in areas with a risk of explosion !
Parts under pressure
Before using the Cleaning tank, check the condition of the outlet nozzle of the pump.
fervi.com

MACHINES AND
ACCESSORIES
Page 10 of 21
4.1 Description of the main parts
Figure 1 – Main parts Art. 0232.
1Tank cover 7Cleaning tank
2Cover locking latch 8Drying shelf
3Pump nozzle 9Collection tank
4Piece-holder grill 10 Support shelf
5Handle for movement 11 Swivel wheel with brake
6Pump
1
2
3
4
5
6
7
8
9
11
10
fervi.com

MACHINES AND
ACCESSORIES
Page 11 of 21
4.2 Identification plate
On the cleaning tank there is an identification plate bearing the CE marking and the following
data:
The name and address of the
manufacturer;
Article code;
Lot number;
Year of construction;
Electrical power supply;
Empty mass;
Capacity.
Figure 2 – CE Plate.
4.3 Warning / attention pictogram
PLATE IN ITALIAN PLATE IN ENGLISH
ATTENTION!
DO NOT USE FLAMMABLE LIQUIDS
SMOKING IS FORBIDDEN
Solvent vapours may be toxic
Use only tap water
Only use in well ventilated areas
Do not use volatile solvents such as petrol,
diesel and kerosene
PRECAUTIONS
Use equipment with caution
Always use safety glasses and rubber gloves
Avoid bringing the solvent in contact with
eyes and/or skin
Check the status of pneumatic tubes
ATTENTION!
DO NOT USE FLAMMABLE LIQUIDS
SMOKING IS FORBIDDEN
Solvent vapours may be toxic
Use only tap water
Only use in well ventilated areas
Do not use volatile solvents such as petrol,
diesel and kerosene
PRECAUTIONS
Use equipment with caution
Always use safety glasses and rubber gloves
Avoid bringing the solvent in contact with eyes
and/or skin
Check the status of pneumatic tubes
Figure 3 – Warning plate.
fervi.com

MACHINES AND
ACCESSORIES
Page 12 of 21
5 EQUIPMENT SAFETY DEVICES
5.1 Submersible pump
The equipment is supplied with a submersible pump with an IP X8 degree of protection, this
means that it can be left immersed in liquid, without danger.
Cleaning liquids
The pump is guaranteed against water infiltration.
If you use different liquids you must make sure that they do not damage the power cord, the
seals and the plastic casing of the pump.
You may not use solvents such as Butanone (methyl ethyl ketone or MEK),
Perchloroethylene, Trichloroethylene, because they will damage the plastic insulation of the
pump.
5.2 Use of PPE
Use of PPE
In any case, ALWAYS use appropriate personal protective equipment such as:
Protective
gloves
Goggles or face shields Overalls or aprons Safety shoes
Figure 4 – Personal Protective Equipment.
fervi.com

MACHINES AND
ACCESSORIES
Page 13 of 21
6 COMMISSIONING OF THE TANK
6.1 Assembly
For the references inside the figures, see section 9.2 of this manual. Proceed as follows to
assemble the equipment:
1. Attach the handle (4) to the left side of the lower
shelf (13), using the bolts (2) and (3) provided.
2. Attach the intermediate shelf (12), joining it to the
left side of the handle, using the bolts (2) and (3)
provided.
3. Attach the support (6) to the left side of the handle.
4. Attach the handle (4) on the other side of the
shelves (12) and (13).
5. Attach the support (6) to the right side of the handle.
Figure 5 – Mounting the handles.
6. Rest the tank (8) on the supports (6) and attach the
brackets below the tank using the bolts supplied.
7. Make sure the drain plug (38) located on the lower
left part of the tank, is properly positioned and
tightened before introducing water into the tank.
Figure 6 - Mounting the tank.
8. Position the box containing the pump and the filter
inside the tank while feeding the power cord and
the button through the special slot located on the
right of the tank itself.
Figure 7 - Mounting the pump.
fervi.com

MACHINES AND
ACCESSORIES
Page 14 of 21
9. Tighten all the bolts.
10.Lie the tank down, resting it on its back and mount
the spring lock washer (39) and the swivel wheel
(1) under the right side of the handle.
Figure 8 – Close-up of the swivel
wheel.
11.Attach the spring lock washer (39) and the swivel
wheel (1) with brake under the left side of the
handle.
Figure 9 – Swivel wheel with brake.
Fitting the wheels
Attach the swivel wheels equipped with brakes on the same side of the tank.
12.Return the tank to a vertical position and place the
cleaning grill inside the tank.
Figure 10 – Close-up of the grill.
fervi.com

MACHINES AND
ACCESSORIES
Page 15 of 21
Pump start-up
Before operating the submersible pump check that the water level in the tank is higher than
the level of the pump feed.
13.Insert the drip tray into the guides on the intermediate
shelf.
Figure 11 – Close-up of the tank.
6.2 Electrical connection
In order to use the Cleaning Tank it is necessary to connect the equipment to the power
supply 230 V / 50 Hz, fitted with a protective conductor and a grounding system.
1. Remove the plug from the mains socket.
2. Press the pump start button.
Figure 12 - Starting the pump.
Pump start-up
Start the pump only after having verified that the water level in the tank is higher than the
level of the pump feed.
fervi.com

MACHINES AND
ACCESSORIES
Page 16 of 21
7 OPERATION
7.1 Instructions for Use
Before starting work perform a control of the Tank, and in particular:
check that the power cord is intact and properly connected;
check that the tank's drain plug is in place and properly tightened;
check that the water level is higher than the level of the pump feed.
Before starting work with the cleaning tank make sure it is resting on a flat, level surface with
adequate strength to support its weight: about 100 kg including the cleaning liquid
7.2 Cleaning
Using the tank
When using the cleaning tank always wear impermeable protective gloves.
1. Place the piece to be cleaned on the grill, inside the tank;
2. Direct the jet of water onto the piece and rub with a brush;
Figure 13 – Open tank.
3. After cleaning, place the piece on the intermediate shelf, make sure the drip container
is properly positioned to avoid dispersing the liquid into the surrounding environment.
fervi.com

MACHINES AND
ACCESSORIES
Page 17 of 21
7.3 How to empty the tank
1. Turn off the pump and disconnect the power
cord from the power outlet.
Figure 14 - close-up of the button.
2. Place a drip container of suitable capacity under
the drain plug located on the left side of the
tank, resting it down on the intermediate shelf.
3. Unscrew the cap, being careful not to lose the
sealing gasket.
Figure 15 – Close-up of the drain
plug.
fervi.com

MACHINES AND
ACCESSORIES
Page 18 of 21
8 MAINTENANCE
8.1 Routine maintenance
Maintenance
Every time maintenance is carried out or the replacement of parts, disconnect the power
supply cable.
To ensure the safe operation of the Cleaning tank it is necessary to regularly perform the
following control and maintenance operations.
a)
Clean the grills and the filter inside the tank;
b) Check the condition of the support rod for the
cover;
c) Check that the fastening screws of the tank are
well-tightened.
Figure 16 – Close-up of the grill
and the pump filter
fervi.com

MACHINES AND
ACCESSORIES
Page 19 of 21
9 SPARE PARTS
Ref. Description Ref. Description
0232/01 Swivel wheel 0232/21 Cable casing
0232/02 Bolt 0232/22 M4 hex nut
0232/03 Flat washer 0232/23 Spring lock washer
0232/04 Handle 0232/24 Wiring flange
0232/05 Grill 0232/25 Right support
0232/06 Left support 0232/26 Metal hose
0232/07 Lock nut 0232/27 Pump box cover
0232/08 Bath 0232/28 Filter cover
0232/09 Cover 0232/29 Filter
0232/10 Support rod 0232/30 Pump
0232/11 Short bolt 0232/31 Pump box
0232/12 Intermediate shelf 0232/32 Gasket
0232/13 Lower shelf 0232/33 Tube holder coupling
0232/14 Container 0232/34 Gasket
0232/15 Electric cable 0232/35 Hex nut M5
0232/16 Cable sleeve 0232/36 Flat washer
0232/17 Switch box. 0232/37 Screw M5x20
0232/18 Screw 0232/38 Drain plug
0232/19 Flat washer Ø 4 0232/39 Spring lock washer
0232/20 Switch 0232/40 Washer
fervi.com

MACHINES AND
ACCESSORIES
Page 20 of 21
10 TROUBLESHOOTING
PROBLEM PROBABLE CAUSE SOLUTION
Liquid does not
comes out of the
tube.
A) Little liquid in the tank
B) Pump filter clogged
C) Nozzle is blocked
A) Add more water
B) Clean the pump filter.
C) Clean the flexible hose and the
pump filter
The liquid does not
come down from the
tank
A) Drain hole is clogged A) Remove sediment from the
drain filter
The pump will not
start.
A) Switch in position 0 or the
cable is not connected
B) The pump is burnt
C) There is no electrical
isolation, the differential has
been triggered
A) Check the cable connection
and/or turn on the pump
B) Contact Technical Support
C) Have Technical Support check
the equipment
fervi.com
Table of contents
Popular Cleaning Equipment manuals by other brands

SkyVac
SkyVac Internal 37 Assembly & user's guide

BioSure
BioSure EOS7161-P quick start guide

Pahlen
Pahlen Auto-UV 75/130 user manual

CREST ULTRASONICS
CREST ULTRASONICS DMS-1218 instruction manual

Rustibus
Rustibus 2000 Electric Low Operation manual

Parkside
Parkside PDRP 6.2 B2 Translation of the original instructions