manuals.online logo
Brands
  1. Home
  2. •
  3. Brands
  4. •
  5. Festool
  6. •
  7. Cutter
  8. •
  9. Festool OFK 500 Q Installation instructions

Festool OFK 500 Q Installation instructions

Originalbetriebsanleitung 6
Original operating manual 9
Notice d’utilisation d’origine 12
Manual de instrucciones original 15
Istruzioni per l’uso originali 18
Originele gebruiksaanwijzing 21
Originalbruksanvisning 24
Alkuperäiset käyttöohjeet 27
Original brugsanvisning 30
Originalbruksanvisning 32
Manual de instruções original 35
Оригинал Руководства по эксплуатации 38
Originál návodu k obsluze 41
Oryginalna instrukcja eksploatacji 44
OFK 500 Q
468042_008
Festool Group GmbH & Co. KG
Wertstraße 20
D-73240 Wendlingen
Tel.: +49 (0)7024/804-0
Telefax: +49 (0)7024/804-20608
www.festool.com
1
1.5 1.71.6
1.1 1.41.2 1.3
1.9 1.8
2.6
2
3
2.1 2.2 2.3 2.52.4
9
Edge router
Technical data OFK 500 Q
Wattage 450 W
Drive shaft rotating speed 28,000 rpm
Max. Diameter of milling tool 27 mm
Weight 1.5 kg
Degree of protection / II
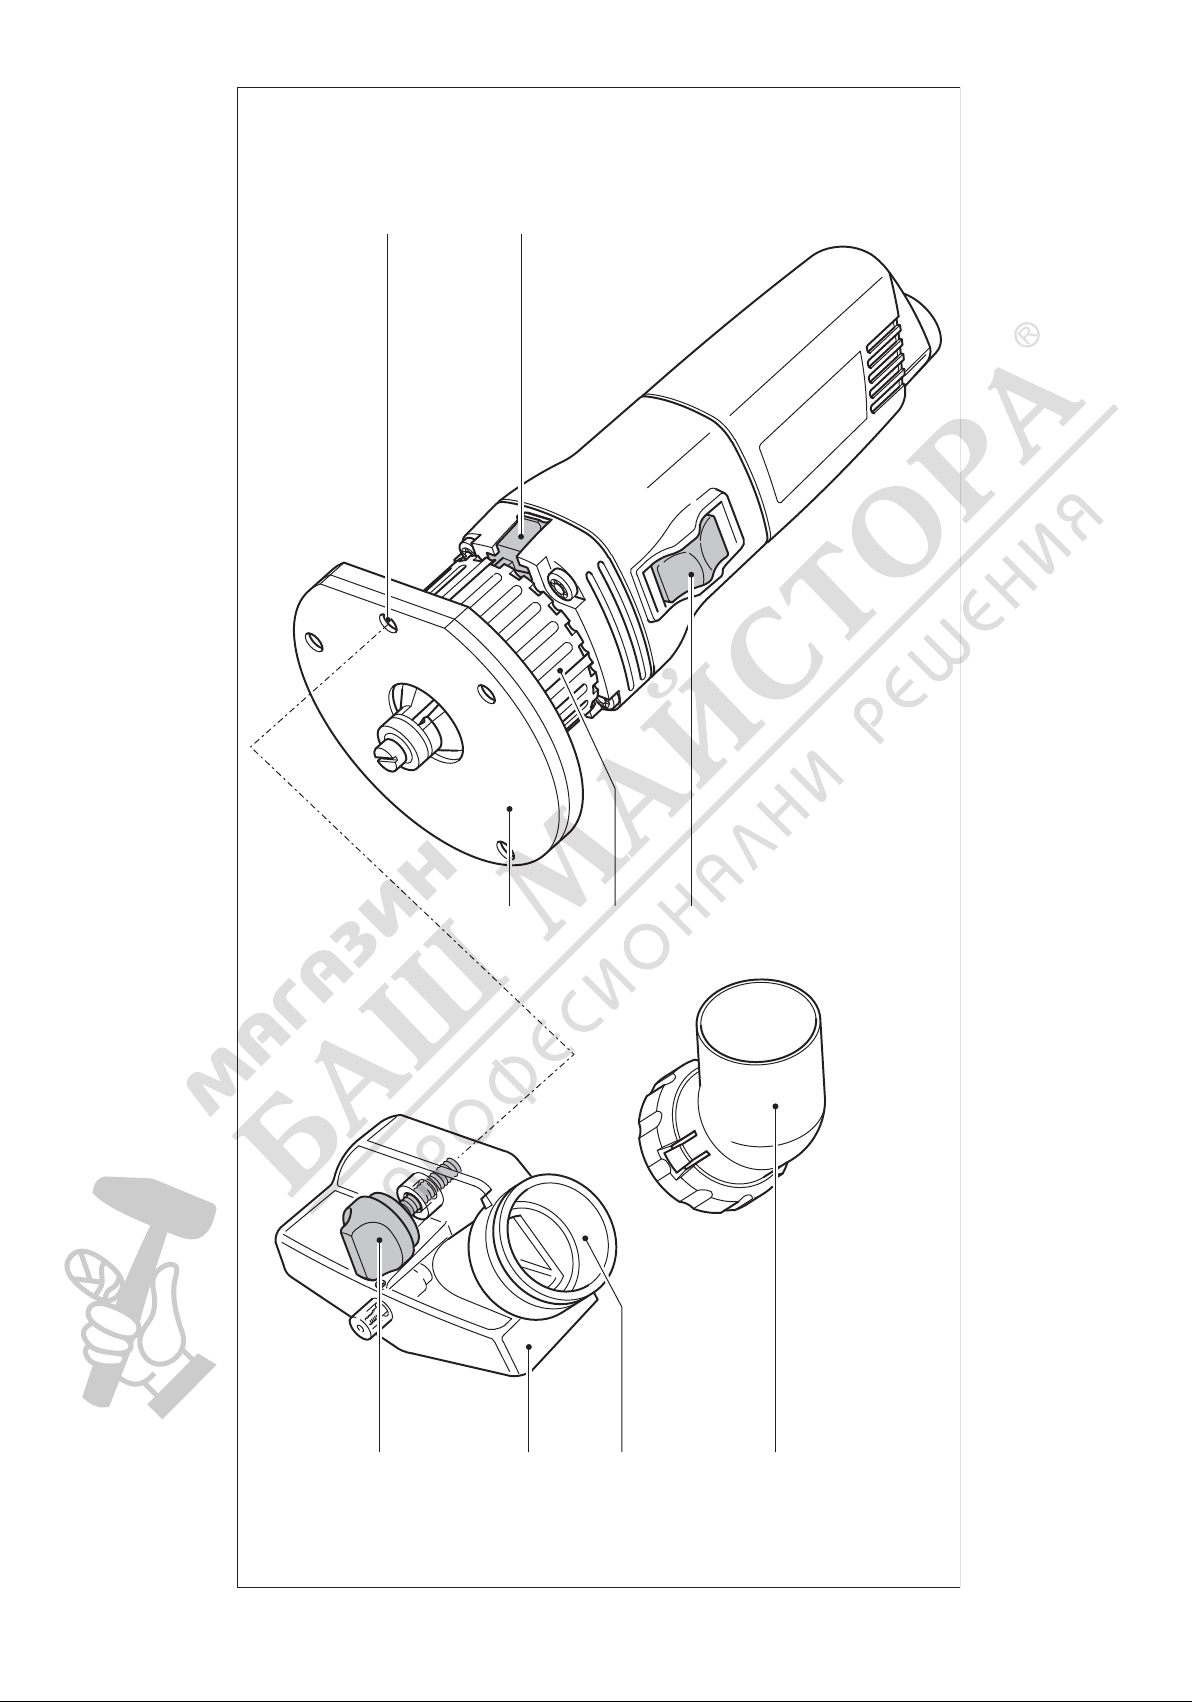
The specifi ed illustrations can be found at the
beginning of the operating instructions.
Symbols
Warning of general danger
Wear ear protection!
Read the Operating Instructions/Notes!
1 Intended use
The OFK 500 Q is intended for fl ush trimming and
profi ling of wood, plastic and similar materials.
The user is liable for damage and injury
resulting from incorrect usage!
2 Safety instructions
2.1 General Safety
WARNING! Read all safety warnings and all
instructions. Failure to follow the warnings
and instructions may result in electric shock, fi re
and/or serious injury.
Save all warnings and instructions for future
reference.
The term „power tool“ in the warnings refers
to your mains-operated (corded) power tool or
battery-operated (cordless) power tool.
2.2 Tool-specifi c safety rules
- Hold the power tool by insulated gripping
surfaces only, because the cutter may contact
its own cord. Cutting a “live” wire may make
exposed metal parts of the power tool “live” and
could give the operator an electric shock.
- Use clamps or another practical way to secure
and support the workpiece to a stable platform.
Holding the work by your hand or against the
body leaves it unstable and may lead to loss of
control.
- Do not operate the machine unless the guiding
table (1.5) and the safety hood (1.2) have been
correctly installed.
- Do not operate the machine unless the setting
ring gauge is locked (see chapter 4.2).
- Only use milling tools that are EN 847 certi-
fi ed for rotating speeds of at least 30.000 rpm.
Tools that are cracked or misshapen must not
be used.
- Ensure that the milling tool is fi rmly seated and
check that it runs smoothly.
- Only use original Festool accessories.
- Only for AS/NZS: The tool shall always be sup-
plied via residual current device with a rated
residual current of 30 mA or less.
2.3 Safety instructions Cutter
a) Technical data
See imprint on tool.
Tool manufactured to comply with EN 847-1.
b) Correct use
Type of feed: MAN (manual feed).
Speed: Do not exceed the maximum speed speci-
fi ed on the tool and/or keep to the speed range.
Materials: Wood, plastic.
Warning: The operator is liable for damages and
accidents caused by incorrect use!
c) Safety instructions
Pay attention to the safety instructions included
with your tool.
Pay attention to the safety regulations applicable
on your country.
Do not use tools with noticeable cracks, blunt or
damaged cutting edges ---> danger to live!
The clamping surfaces must be free of dirt,
grease, oil and water.
Clamp the tool so that it cannot come loose dur-
ing work.
Insert the router into the clamping collet as far
as possible or as far as the mark on the router
shank.
Only mill in the opposite direction of rotation of
the tool (counter-rotation).
c) Maintenance and care
Use only original Festool spare parts.
Repairs and grinding work may only be carried out
by Festool service centres or qualifi ed experts.
Do not alter the construction of the tool.
Clean tool regularly and remove all resin (use
detergents with a pH value between 4.5 and 8).
Blunt cutting edges can be re-ground to a mini-
mum cutting edge thickness of 1 mm on the
face.
10
2.4 Noise and vibration information
The typical values determined in accordance with
EN 60745 are:
Sound-pressure level 79 dB(A)
Sound-power level 90 dB(A)
Measuring uncertainty allowance K = 3 dB
Wear ear protection!
Overall vibration levels (vector sum for three
directions) measured in accordance with EN
60745:
Vibration emission level
(3-axis) ah < 2,5 m/s2
Uncertainty K = 1,5 m/s²
The specifi ed emissions values (vibration, noise)
– are used to compare machines.
– They are also used for making preliminary
estimates regarding vibration and noise loads
during operation.
– They represent the primary applications of the
power tool.
Increase possible for other applications, with
other insertion tools or if not maintained adequat-
ely. Take note of idling and downtimes of machine!
3 Power supply and start-up
The line voltage and frequency must correspond
with the data on the ratings plate!
Always switch the machine off before con-
necting or disconnecting the mains lead!
See Fig. 3 for connection and disconnection of the
power cable.
Switch (1.7) serves as an On/Off switch (I = ON,
0 = OFF).
4 Machine settings
Always remove the power supply plug
from the socket before carrying out any
work on the machine.
4.1 Install safety hood
Attach safety hood (1.2) to threaded hole (1.9) in
guiding table (1.1).
The pin (2.6) must rest on the end face
(not on the circumference!) of the ball
bearing guide.
4.2 Locking/unlocking setting ring gauge
The setting ring gauge (1.6) is locked using the
sliding catch (1.8):
- Push sliding catch to front = lock setting ring
gauge,
- Push sliding catch to back = unlock setting ring
gauge.
Do not operate machine unless setting
ring gauge is locked!
4.3 Adjust milling depth
- Unlock setting ring gauge (1.6).
- Set the required milling depth by adjusting the
setting ring gauge
(turn anticlockwise = decrease milling depth,
turn clockwise = increase milling depth). Turn-
ing the setting ring gauge by 1 notch increases
or decreases the milling depth by 0.1 mm.
- Lock setting ring gauge.
4.4 Replacing the milling tool
- Unlock setting ring gauge (1.6).
- Turn setting ring gauge until the pin (2.4) is op-
posite a notch in the setting ring gauge.
- Press the locking button (2.5) and rotate the
milling tool (2.2), until the locking button en-
gages and therefore locks the spindle (2.3) in
position. Hold down the locking button.
- Undo screw (2.1).
- Remove milling tool (2.2).
- Insert new milling tool.
- Tighten screw (2.1).
- Release locking button and lock setting ring
gauge.
4.5 Dust extraction
Always connect the machine to a dust
extractor.
The machine can be connected to a Festool extrac-
tor using the extraction adapter (1.4).
- Attach extraction adapter (1.4) to extraction
connection piece (1.3) on the safety hood.
- Attach suction hose (Ø 27 mm) to suction adapter.
11
5 Working with the machine
Always secure the workpiece in such a
manner that it cannot move while being
sawed.
Set the required milling depth and steadily guide
the machine along the edge of the workpiece,
ensuring that the guiding table and the milling
tool ball bearing are in contact with the workpiece
at all times.
6 Maintenance and care
Always remove the power supply plug
from the socket before carrying out any
work on the machine.
Always keep the machine and the ventilation slots
clean.
All maintenance and repair work which requires
the motor casing to be opened may only be carried
out by an authorised service centre.
Customer service and repair. Only
through manufacturer or service work-
shops: Please fi nd the nearest address
at: www.festool.com/Service
EKAT
1
235
4
Use only original Festool spare parts!
Order No. at: www.festool.com/Service
7 Accessories, tools
For your own safety, use only original
Festool accessories and spare parts.
Festool offers the appropriate accessories, san-
ding and polishing attachments for every applica-
tion. The accessory and tool order number can be
found in the Festool catalogue or on the Internet
under “www.festool.com”.
8 Disposal
Do not throw the power tool in your household
waste! Dispose of machines, accessories and
packaging at an environmentally-responsible
recycling centre. Observe the valid national regu-
lations.
EU only: European Directive 2002/96/EC stipulate
that used electric power tools must be collected
separately and disposed of at an environmentally
responsible recycling centre.
Information on REACh:
www.festool.com/reach

Other manuals for OFK 500 Q

4

This manual suits for next models

1

Other Festool Cutter manuals

Festool RENOFIX RG 80 E Installation instructions

Festool

Festool RENOFIX RG 80 E Installation instructions

Festool DSC-AG 230 Installation instructions

Festool

Festool DSC-AG 230 Installation instructions

Festool DSC-AGC 18 FH User manual

Festool

Festool DSC-AGC 18 FH User manual

Festool DSC-AG 125 Installation instructions

Festool

Festool DSC-AG 125 Installation instructions

Festool RG 80 E User manual

Festool

Festool RG 80 E User manual

Festool VN-HK85 130X16-25 Installation instructions

Festool

Festool VN-HK85 130X16-25 Installation instructions

Festool DSC-AGC 18 FH User manual

Festool

Festool DSC-AGC 18 FH User manual

Popular Cutter manuals by other brands

Brother 891-Z05 WIRELESS NETWORK SETUP GUIDE

Brother

Brother 891-Z05 WIRELESS NETWORK SETUP GUIDE

Han-Bond H8-120 user manual

Han-Bond

Han-Bond H8-120 user manual

Mejix CMER 200A manual

Mejix

Mejix CMER 200A manual

Victor CUTMASTER operating manual

Victor

Victor CUTMASTER operating manual

Sealey TC100 instructions

Sealey

Sealey TC100 instructions

Roberts 10-60 owner's manual

Roberts

Roberts 10-60 owner's manual

SW-Stahl 40015L instruction manual

SW-Stahl

SW-Stahl 40015L instruction manual

WBT CVABC-G692 instructions

WBT

WBT CVABC-G692 instructions

Foley Belsaw 200 ADJUSTMENT & OPERATION INSTRUCTIONS

Foley Belsaw

Foley Belsaw 200 ADJUSTMENT & OPERATION INSTRUCTIONS

Huskie Tools RCC-MK754ACM Operator's manual

Huskie Tools

Huskie Tools RCC-MK754ACM Operator's manual

Mator SECUNORM MULTISAFE quick start guide

Mator

Mator SECUNORM MULTISAFE quick start guide

Schleuniger CCM 1200 operating instructions

Schleuniger

Schleuniger CCM 1200 operating instructions

ARS KEVLAR EATER instruction manual

ARS

ARS KEVLAR EATER instruction manual

North Star 49157 owner's manual

North Star

North Star 49157 owner's manual

Lukas LC 99 operating instructions

Lukas

Lukas LC 99 operating instructions

KEENCUT SteelTrak 165 installation manual

KEENCUT

KEENCUT SteelTrak 165 installation manual

VERITAS 05J42.01 manual

VERITAS

VERITAS 05J42.01 manual

Sirman Athos Use and maintenance manual

Sirman

Sirman Athos Use and maintenance manual

manuals.online logo
manuals.online logoBrands
  • About & Mission
  • Contact us
  • Privacy Policy
  • Terms and Conditions

Copyright 2025 Manuals.Online. All Rights Reserved.