manuals.online logo
Brands
  1. Home
  2. •
  3. Brands
  4. •
  5. Festool
  6. •
  7. Power Tools
  8. •
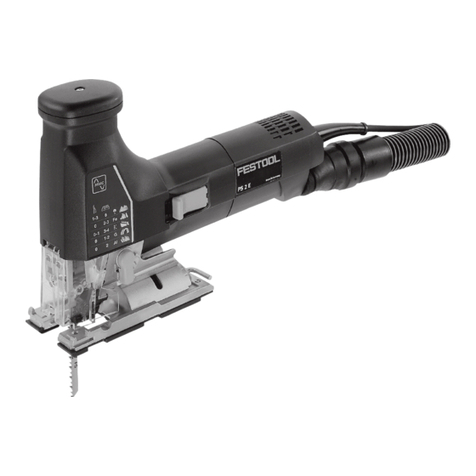
  9. Festool Trion PS-300Q Installation instructions

Festool Trion PS-300Q Installation instructions

1
2a
2
1-1
1-5 1-31-4
2-1 2-32-2
2-8 2-42-52-62-7
1-2
9
3
5
4-1 4-34-2
5-2
3-4
5-15-3
4
3-1 3-33-2
6
8
7-2
8-1
8-2
8-4
8-5
8-3
7-1
7
12
TRION
GB
Original operating manual
The specified illustrations appear at the be-
ginning of the Operating Instructions.
1Symbols
2 Technical data
3 Intended use
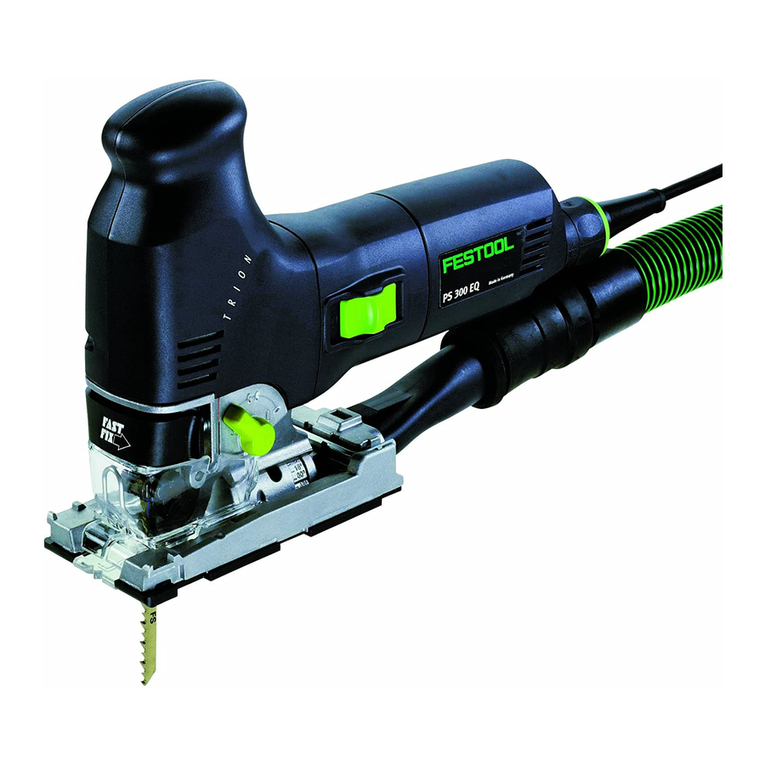
Jigsaws are designed for sawing wood and
similar materials similar to wood. With the
special saw blades offered by Festool, these
machines can also be used for sawing plastic,
steel, aluminium, non-ferrous metal and ce-
ramic plates.
The user bears the responsibility for
damage and accidents caused by im-
proper use.
4 Safety instructions
4.1 General safety instructions
WARNING! Read all safety warn-
ings and all instructions.
Failure to
follow the warnings and instructions may re-
sult in electric shock, fire and/or serious in-
jury.
Save all warnings and instructions for
future reference.
The term "power tool" in the warnings refers
to your mains-operated (corded) power tool
or battery-operated (cordless) power tool.
4.2 Machine-related safety instruc-
tions
–
Hold power tool by insulated gripping
surfaces, when performing an opera-
1 Symbols .................................. 12
2 Technical data .......................... 12
3 Intended use............................ 12
4 Safety instructions .................... 12
5 Emission levels ......................... 13
6 Operation ................................ 14
7 Settings................................... 14
8 Working with the machine.......... 15
9 Service and maintenance ........... 15
10 Accessories .............................. 16
11 Disposal .................................. 16
12 Warranty ................................. 16
13 EU Declaration of Conformity...... 17
Warning of general danger
Risk of electric shock
Read the Operating Instructions/
Notes!
Wear a dust mask.
Wear ear protection.
Wear protective goggles.
Wear protective gloves.
Jigsaws PS 300 Q, PSB 300 Q PS 300 EQ, PSB 300 EQ
Power W550 720
No. of strokes min
-1
3100 1000 - 2900
Stroke length mm 26 26
Pendulum stroke 3 stages 3 stages
max. Inclination 45° to both sides
Cutting depth
(depending on saw
blade)
wood 100 120
aluminium 20 20
steel 10 10
Weight kg 2.4 2.4
Degree of protection / II
TRION
13
GB
tion where the cutting accessory may
contact hidden wiring or its own cord.
Cutting accessory contacting a "live" wire
may make exposed metal parts of the pow-
er tool "live" and could give the operator an
electric shock.
–
Festool electric power tools must only
be installed on work tables provided
by Festool for this purpose.
If the tool is
installed in another, or self-made, work ta-
ble, it can become unstable and result in
serious accidents.
–
Wait until the power tool stops com-
pletely until placing it down.
The tool
can become entangled and lead to a loss of
control of the power tool.
– Deformed or cracked saw blades and saw
blades with blunt or broken cutting edges
must not be used.
– Always place the pendulum jigsaw on the
workpiece with the saw blade running.
– Wear suitable protection such as ear pro-
tection, safety goggles, a dust mask for
work which generates dust, and protective
gloves when working with raw materials
and when changing tools.
– Always secure the workpiece in such a
manner that it cannot move while being
sawed.
– Always connect the machine to a dust ex-
tractor when work involves dust genera-
tion.
– Check the plug and the cable regularly and
should either become damaged, have
them replaced by an authorised after-sales
service workshop.
4.3 Metalworking
The following precautions are to be
taken when processing metals for
safety reasons:
– Pre-connect a residual current circuit-
breaker (FI, PRCD).
– Connect the machine to a suitable dust ex-
tractor.
– Clean tool regularly of dust accumulations
in the motor housing.
5 Emission levels
The typical values determined in accordance
with EN 60745 are:
Vibration emission value a
h
(vector sum for
three directions) and uncertainty K mea-
sured in accordance with EN 60745:
The emission values specified (vibration,
noise) were measured in accordance with the
test conditions stipulated in EN 60745 and
are intended for machine comparisons. They
are also used for making preliminary esti-
mates regarding vibration and noise loads
during operation.
The emission values specified refer to the
main applications for which the power tool is
used. If the electric power tool is used for
other applications, with other tools or is not
maintained sufficiently prior to operation,
however, the vibration and noise load may be
higher when the tool is used. Take into ac-
Wear protective goggles.
PS 300 Q, PSB 300 Q
Sound-pressure leve L
PA
= 86 dB(A)
Sound-power level L
WA
= 97 dB(A)
Measuring uncertainty
allowance K = 3 dB
PS 300 EQ, PSB 300 EQ
Sound-pressure leve L
PA
= 83 dB(A)
Sound-power level L
WA
= 94 dB(A)
Measuring uncertainty
allowance K = 3 dB
CAUTION
Operating noise
Damage to hearing
X
Wear ear protection!
Sawing wood
Handle (PS 300 Q, PSB 300
Q, PS 300 EQ, PSB 300 EQ) a
h
= 4.5 m/s
2
K = 2.0 m/s
2
Gear head (PS 300 Q, PS
300 EQ) a
h
= 7.0 m/s
2
K = 2.0 m/s
2
Sawing metal
Handle (PS 300 Q, PSB 300
Q, PS 300 EQ, PSB 300 EQ) a
h
= 3.0 m/s
2
K = 2.0 m/s
2
Gear head (PS 300 Q, PS
300 EQ) a
h
= 5.0 m/s
2
K = 2.0 m/s
2
14
TRION
GB
count any machine idling times and down-
times to estimate these values more accu-
rately for a specified time period. This may
significantly reduce the load during the ma-
chine operating period.
6 Operation
Connecting and detaching the mains power
cable [1-3] see Fig. [2a].
PS 300 Q, PS 300 EQ
The power tool has a slide switch to switch
the tool on and off (I = ON, 0 = OFF).
PSB 300 Q, PSB 300 EQ
The power tool have a push button switch [2-
2] to switch the tool on and off.
The locking button [2-1] can be engaged to
operate in continuous mode. Press the switch
again to release the knob.
7 Settings
7.1 Changing tools
X
Open chuck lever [3-4] up to the stop,
X
remove fitted saw blade,
X
insert new saw blade up to the stop in the
saw blade holder [3-1],
X
close chuck lever.
7.2 Adjusting three saw blade guide
The pendulum jigsaws have an additional
hard metal guide [3-2] immediately above
the workpiece for a better guidance of the
saw blade.
X
Tighten the screw [3-3] with the Allen
keyl [1-4] until the jaws almost rest
against the saw blade.
The saw blade should still be able to be
moved easily!
7.3 Fitting the splinterguard
The splinterguard allows cuts with splinter-
free edges, even on the exit side of the saw
blade.
X
With the tool switched off, fit the splinter-
guard [4-3] on the guide [4-2] up to the
saw blade,
X
switch the jigsaw on,
X
with the tool running, push the splinter-
guard in until the splinterguard is flush
with the front edge of the base runner.
Thereby the splinterguard is cut in.
L
The splinterguard must lie close to the
saw blade on both sides to ensure its reli-
able operation. Thus, a new splinterguard
should be fitted every time the saw blade
is changed to ensure splinter-free cuts.
7.4 Fitting the chip guard
The chip guard prevents chips from flying off
and improves the efficiency of the chip ex-
tractor.
X
Insert the chip guard [2-8] between the
base runner and chuck lever,
X
push back the chip guard with a slight
pressure until it catches in place.
7.5 Dust extraction
Jigsaws can be connected to a dust extractor
(hose diameter 27 mm) using the extractor
adapter [2-4].
WARNING
Unauthorised voltage or frequency!
Risk of accident
X
The mains voltage and the frequency of
the power source must correspond with
the specifications on the machine's name
plate.
X
In North America, only Festool machines
with the voltage specifications 120 V/60
Hz may be used.
WARNING
Risk of injury, electric shock
X
Always pull the plug out of the socket be-
fore performing any type of work on the
machine!
WARNING
Risk of injury, electric shock
X
Always pull the plug out of the socket be-
fore performing any type of work on the
machine!
WARNING
Dust hazard
X
Dust can be hazardous to health. Always
work with a dust extractor.
X
Always read applicable national regula-
tions before extracting hazardous dust.
TRION
15
GB
L
When working with suction units, always
use a splinterguard in order to prevent the
suction channels becoming blocked.
X
Insert the extractor adapter into the rear
hole of the base runner in so that the hook
[2-6] catches in the notch [2-7].
X
Press the lever [2-5] to remove the ex-
tractor adapter.
7.6 Adjusting the base runner
The base runner can be swivelled to both
sides by up to 45° for bevel cuts.
X
Remove chip guard and splinterguard,
X
release locking screw [4-1] with Allen key
[1-4],
X
push base runner approx. 5 mm forwards,
X
set desired inclination according to the
scale [5-2],
X
tighten locking screw [4-1].
Für randnahes Sägen kann der Sägetisch
nach hinten versetzt werden
X
Remove chip guard and splinterguard,
X
release locking screw [4-1] with Allen key
[1-4],
X
push base runner to rear position so that
the centring pin [5-1] fits in the opening
[5-3],
X
tighten locking screw [4-1].
7.7 Adjusting the pendulum stroke
In order to process different materials with
an optimum feed movement the pendulum
jigsaws have an adjustable pendulum stroke.
Select the desired setting with the pendulum
stroke switch [1-5]:
setting 0 = pendulum stroke off
setting 3 = maximum pendulum stroke
7.8 Adjusting the number of strokes
PS 300 EQ, PSB 300 EQ
You can regulate the number of strokes step-
lessly between 1000 and 2900 min
-1 using the
adjusting wheel
[1-2; 2-3]. This enables you to
optimise the cutting speed to suit the mate-
rial.
8 Working with the machine
8.1 Free hand according to the
scribe mark
The triangular shape of the splinterguard [4-
3] shows the cutting line of the saw blade
and thus facilitates cutting to a scribe mark.
8.2 Plunge cutting without pilot
drilling
The base runner must be in the front position
for plunge cuts in timber materials (basic
setting, see Figure [1]).
X
Place saw on the front edge of the runner,
X
set saw to maximum no. of strokes and
pendulum stroke setting 3 and start the
plunge cut into the workpiece (Figure
[6]).
9 Service and maintenance
Recommended settings of the pendu-
lum stroke
Hard and soft wood,chip board,
wood fibre board 1 - 3
Wood core plywood, plywood, plas-
tics 1 - 2
Ceramic 0
Aluminium, NF metals 0 - 2
Steel 0 - 1
Recommended number of strokes
(adjusting wheel setting)
Hard and soft wood, wood core ply-
wood, plywood, chip board 6
Wood fibre boards 4 - 6
Plastics 3 - 6
Ceramic, aluminium, NF metals 3 - 5
Steel 2 - 4
WARNING
Risk of injury
X
Always secure the workpiece in such a
manner that it cannot move while being
machined.
WARNING
Risk of injury, electric shock
X
Always disconnect the mains plug from the
socket before performing maintenance
work on the machine!
X
All maintenance and repair work which re-
quires the motor housing to be opened
must only be carried out by an authorised
service workshop.
16
TRION
GB
Damaged safety devices and components
must be repaired or replaced in a recognised
specialist workshop, unless otherwise indi-
cated in the operating manual.
To ensure constant air circulation, always
keep the cooling air openings in the motor
housing clean and free of blockages.
10 Accessories
Use only original Festool accessories and
Festool consumable material intended for
this machine because these components are
designed specifically for the machine. Using
accessories and consumable material from
other suppliers will most likely affect the
quality of your working results and limit any
warranty claims. Machine wear or your own
personal workload may increase depending
on the application. Protect yourself and your
machine, and preserve your warranty claims
by always using original Festool accessories
and Festool consumable material!
The order numbers of the accessories and
tools can be found in the Festool catalogue or
on the Internet under "www.festool.com".
10.1 Festool guide system FS
The use of the Festool guide system FS (Fig-
ure [7])facilitates the production of straight
and precise cuts, particularly with material
thicknesses up to 20 mm. The jigsaw is here-
by placed in a guide stop [7-1] order no.
490031) and guided along the guide rail in
this. The guide stop has two adjustable limit
stops [7-2] for a setting free from play. Use
only crossed saw-blades when utilising the
guide stop. We recommend Festool saw
blade S 75/4 FSG.
10.2 Parallel guide
Use the parallel guide (order no. 490119) to
guide the jigsaw parallel to the workpiece
edge. The parallel guide can be fitted on both
sides of the base runner:
X
Slide clamping clip [8-1] onto the base
runner from the front,
X
insert parallel guide [8-2] through the
clamping clip from the side to the desired
position,
X
tighten rotary knob [8-3].
10.3 Circle cutter
The circle cutter (order no. 490118) can be
used to produce circular cuts with a diameter
between 120 and 720 mm. The circle cutter
can be fitted on both sides of the base run-
ner:
X
Slide clamping clip [8-1] onto the base
runner from the front,
X
insert circle cutter [8-4] through the
clamping clip from the side to the desired
position,
X
tighten rotary knob [8-3],
X
insert circle tip [8-5] in the rear bore hole
of the circle cutter.
10.4 Festool CMS
By fitting the jigsaws in the Festool Systems
CMS you end up with a semi-stationary
bench-mounted saw for profile cuts. Further
information can be fond in the CMS brochure.
10.5 Saw blades, other accessories
In order to saw different materials quickly
and cleanly, Festool offers saw blades for all
applications that are specially designed for
your Festool jigsaw.
11 Disposal
Do not throw the power tool in your house-
hold waste! Dispose of machines, accesso-
ries and packaging at an environmentally re-
sponsible recycling centre. Observe the valid
national regulations.
EU only:
European Directive 2002/96/EC
stipulates that used electric power tools must
be collected separately and disposed of at an
environmentally responsible recycling cen-
tre.
12 Warranty
We offer a warranty for material and produc-
tion defects for all our tools in accordance
with the locally applicable legal provisions,
but for a minimum of 12 months. Within the
EU member states, the warranty period is 24
months (verification through invoice or deliv-
ery note). Damage caused by the operator,
natural wear, overloading, incorrect handling
or through the use of the equipment not
specified in the operating manual, or damage
which was known at the time of purchase, is
not covered by the warranty. Furthermore,
damage caused by the use of non-original
accessories and consumable materials (e.g.
sanding pads) is also excluded.
TRION
17
GB
Complaints can only be accepted if the tool is
returned while still assembled to the supplier
or an authorised Festool Customer Service
workshop. Keep the operating manual, safe-
ty instructions, spare parts list and purchase
receipt in a safe place. Otherwise the current
warranty conditions of the manufacturer
shall apply.
Note
Due to continuous research and develop-
ment work, we reserve the right to make
changes to the technical content of this doc-
umentation.
13 EU Declaration of Conformi-
ty
We declare under sole responsibility that this
product complies with the following direc-
tives and standards:
2006/42/EG, 2004/108/EG, 2011/65/EU, EN
60745-1, EN 60745-2-11, EN 55014-1, EN
55014-2, EN 61000-3-2, EN 61000-3-3.
Festool GmbH
Wertstr. 20, D-73240 Wendlingen, Germany
Dr. Johannes Steimel
Head of Research, Development and Techni-
cal Documentation
05.08.2011
REACh for Festool products, its accesso-
ries and consumable materials:
REACh is a European Chemical Directive that
came into effect in 2007. As "downstream
users" and product manufacturers, we are
aware of our duty to provide our customers
with information. We have set up the follow-
ing website to keep you updated with all the
latest news and provide you with information
on all the materials used in our existing prod-
ucts:
www.festool.com/reach
Jigsaw Serial no.
PS 300 Q 489580
PSB 300 Q 489584
PS 300 EQ 488639, 494353
PSB 300 EQ 489274, 491763
Year of CE mark: 2000

Other manuals for Trion PS-300Q

6

This manual suits for next models

1

Other Festool Power Tools manuals

Festool Carvex PSC 400 EB User manual

Festool

Festool Carvex PSC 400 EB User manual

Festool Carvex PS 420 EBQ User manual

Festool

Festool Carvex PS 420 EBQ User manual

Festool LEX 2 150/3 User manual

Festool

Festool LEX 2 150/3 User manual

Festool OF 1400 EQ User manual

Festool

Festool OF 1400 EQ User manual

Festool PF 1200 E Alucobond User manual

Festool

Festool PF 1200 E Alucobond User manual

Festool OF 1010 REBQ User manual

Festool

Festool OF 1010 REBQ User manual

Festool ETS EC 150/3 A EQ Installation instructions

Festool

Festool ETS EC 150/3 A EQ Installation instructions

Festool 1010 EQ User manual

Festool

Festool 1010 EQ User manual

Festool GM 145 Installation instructions

Festool

Festool GM 145 Installation instructions

Festool KA 65 User manual

Festool

Festool KA 65 User manual

Festool OFK 500 Q User manual

Festool

Festool OFK 500 Q User manual

Festool RG 150 E Installation instructions

Festool

Festool RG 150 E Installation instructions

Festool PS 2 E User manual

Festool

Festool PS 2 E User manual

Festool Trion PS-300Q Guide

Festool

Festool Trion PS-300Q Guide

Festool OF 2000 E User manual

Festool

Festool OF 2000 E User manual

Festool TPE-RS 100 Q Installation instructions

Festool

Festool TPE-RS 100 Q Installation instructions

Festool Carvex PSB 420 EBQ User manual

Festool

Festool Carvex PSB 420 EBQ User manual

Festool Compact Saw and Cordless Drill User manual

Festool

Festool Compact Saw and Cordless Drill User manual

Festool PSC 420 EB User manual

Festool

Festool PSC 420 EB User manual

Festool Domino XL DF 700 EQ Installation instructions

Festool

Festool Domino XL DF 700 EQ Installation instructions

Festool Duplex LS 130 EQ Installation instructions

Festool

Festool Duplex LS 130 EQ Installation instructions

Festool Trion PS 300 EQ User manual

Festool

Festool Trion PS 300 EQ User manual

Festool OF 2200 EB Installation instructions

Festool

Festool OF 2200 EB Installation instructions

Festool AH-ES-ETS User manual

Festool

Festool AH-ES-ETS User manual

Popular Power Tools manuals by other brands

Berner BACJS-1 18V Original instructions

Berner

Berner BACJS-1 18V Original instructions

Enerpac W Series instruction sheet

Enerpac

Enerpac W Series instruction sheet

JessEm Tool Mast-R-Fence Operating instructions and parts manual

JessEm Tool

JessEm Tool Mast-R-Fence Operating instructions and parts manual

SCHUNK RST-P 060 Assembly and operating manual

SCHUNK

SCHUNK RST-P 060 Assembly and operating manual

National Flooring Equipment 5625 instruction manual

National Flooring Equipment

National Flooring Equipment 5625 instruction manual

GreenWorks 3500403 Operator's manual

GreenWorks

GreenWorks 3500403 Operator's manual

CP PT450-T3000-S19S manual

CP

CP PT450-T3000-S19S manual

DeWalt DCF899 instruction manual

DeWalt

DeWalt DCF899 instruction manual

Chicago Electric 47937 Assembly and operating instructions

Chicago Electric

Chicago Electric 47937 Assembly and operating instructions

Bort BAB-14x2Li-XDK manual

Bort

Bort BAB-14x2Li-XDK manual

Hilti SJT 6-A22 Original operating instructions

Hilti

Hilti SJT 6-A22 Original operating instructions

EINHELL GE-LM 36/4in1 Li operating instructions

EINHELL

EINHELL GE-LM 36/4in1 Li operating instructions

Milwaukee M12 FMT-0 Original instructions

Milwaukee

Milwaukee M12 FMT-0 Original instructions

Kity 706 Translation from the original instruction manual

Kity

Kity 706 Translation from the original instruction manual

Briteq ALU CLAMP Series Operation manual

Briteq

Briteq ALU CLAMP Series Operation manual

Raider RD-SOG03 user manual

Raider

Raider RD-SOG03 user manual

SATA 98104 manual

SATA

SATA 98104 manual

Sealey YK20F.V5 quick start guide

Sealey

Sealey YK20F.V5 quick start guide

manuals.online logo
manuals.online logoBrands
  • About & Mission
  • Contact us
  • Privacy Policy
  • Terms and Conditions

Copyright 2025 Manuals.Online. All Rights Reserved.