manuals.online logo
Brands
  1. Home
  2. •
  3. Brands
  4. •
  5. Festool
  6. •
  7. Tools
  8. •
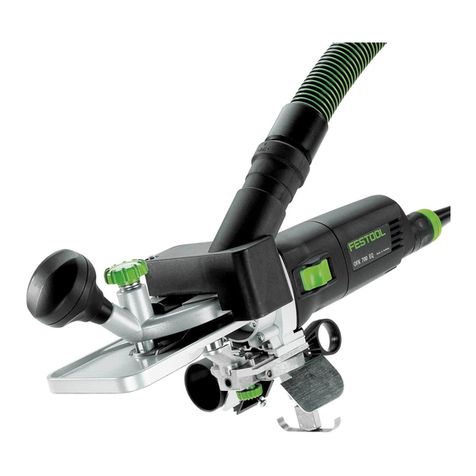
  9. Festool OFK 700 EQ Installation instructions

Festool OFK 700 EQ Installation instructions

Originalbetriebsanleitung - Kantenfräse 7
Original operating manual - Edge router 10
Notice d’utilisation d’origine - Affl eureuse 13
Manual de instrucciones original - Fresadora de cantos 16
Istruzioni per l’uso originali - Rifi latore 19
Originele gebruiksaanwijzing - Kantenfrees 22
Originalbruksanvisning - Kantfräs 25
Alkuperäiset käyttöohjeet - Reunajyrsin 27
Original brugsanvisning - Kantfræser 30
Originalbruksanvisning - Kantfres 32
Manual de instruções original - Fresa para arestas 35
Оригинал Руководства по эксплуатации - Кромочный фрезер 38
Originál návodu k obsluze - Hranová frézka 41
Oryginalna instrukcja eksploatacji - Frezarka do krawędzi 44
OFK 700 EQ
21122_A / 2019-04-03
Festool GmbH
Wertstraße 20
D-73240 Wendlingen
Tel.: +49 (0)7024/804-0
Telefax: +49 (0)7024/804-20608
www.festool.com
2.1
3.2
3.1
3.3
2.2
1
3
2
3A
3B
SW 19
4.24.1 4.3
180°
4
56
7.2
7.1 7.3
7
9
8
1,5°
10
Edge router
Technical data OFK 700 EQ
Wattage 720 W
Speed (idling) 10,000 – 26,000 rpm
Cutter shank Ø 8 mm
Inclination angle of the router table 1.5°
Weight 2.0 kg
The specifi ed illustrations can be found at the be-
ginning of the operating instructions.
Symbols
Warning of general danger
Wear ear protection!
Read the Operating Instructions/Notes!
Wear protective goggles!
Wear a dust mask!
Do not throw in the household waste!
Protection class II
1 Use for intended purpose
The OFK 700 EQ is intended for fl ush trimming and
profi ling of wood, plastic and similar materials.
The user is liable for damage and injury
resulting from incorrect usage!
2 Safety instructions
2.1 Rules
WARNING! Read all safety warnings and all
instructions. Failure to follow the warnings and
instructions may result in electric shock, fi re and/
or serious injury.
Save all warnings and instructions for future
reference.
The term „power tool“ in the warnings refers
to your mains-operated (corded) power tool or
battery-operated (cordless) power tool.
2.2 Tool-specifi c safety rules
- Hold the power tool by insulated gripping sur-
faces, because the cutter may contact its own
cord. Cutting a “live” wire may make exposed
metal parts of the power tool “live” and shock
the operator.
- Use clamps or another practical way to secure
and support the workpiece to a stable platform.
Holding the work by your hand or against the body
leaves it unstable and may lead to loss of control.
- Only operate machine with a guide table and ex-
tractor hood fi tted in accordance with regulations.
- Only use milling tools that are EN 847 certifi ed
for rotating speeds of at least 26,000 rpm. Tools
that are cracked or misshapen must not be used.
- Ensure that the milling tool is fi rmly seated and
check that it runs smoothly.
- Only use original Festool accessories.
Wear suitable protection such as
ear protection, safety goggles, a
dust mask for work which gener-
ates dust, and protective gloves
when working with raw materials
and when changing tools.
- Only for AS/NZS: The tool shall always be sup-
plied via residual current device with a rated
residual current of 30 mA or less.
3 Noise and vibration information
Typical values established in compliance with EN
60745:
Sound-pressure level 80 dB(A)
Sound-power level 91 dB(A)
Measuring uncertainty allowance K = 3 dB
Wear ear protectors!
Overall vibration levels (vector sum for three di-
rections) measured in accordance with EN 60745:
Vibration emission level (3-axis)
Machine housing ah = 6 m/s²
Auxiliary handle ah = 4 m/s²
Uncertainty K = 2 m/s²
The specifi ed emissions values (vibration, noise)
– are used to compare machines.
– They are also used for making preliminary es-
timates regarding vibration and noise loads
during operation.
– They represent the primary applications of the
power tool.
Increase possible for other applications, with oth-
er insertion tools or if not maintained adequately.
Take note of idling and downtimes of machine!
11
4 Electrical connection and operation
The mains voltage must correspond with the volt-
age on the rating plate!
Always switch the machine off before con-
necting or disconnecting the mains lead!
CAUTION
Heating of the Plug it connection if bayo-
net fi tting is not completely locked
Risk of burns
- Before switching on the power tool,
make sure that the bayonet fi tting at the
mains cable is closed fully and locked.
See Fig. 1 for connection and disconnection of the
power cable.
The switch (2.1) acts as an ON/OFF switch (I = ON
/ 0 = OFF).
5 Machine settings
Always pull the mains plug out of the
socket before carrying out any work on
the machine!
5.1 Operating positions
The machine has two operating positions:
- Fig. 3A + 9:
Vertical position, for parallel cutting of surface
coatings and profi ling.
- Fig. 3B + 8:
Horizontal position, for parallel cutting of thin
surface coatings (edging) and profi ling.
To change position, the guide table (3.1), the sensor
(3.2), and the dust extractor (3.3) must be adjusted
– see Fig. 3.
5.2 Suction unit
Always connect the machine to a dust extractor.
An extractor hood (3.3, 4.1) is supplied for
both operating positions; a Festool extrac-
tor (extractor hose with a diameter of 27
mm) can be connected to this extractor
hood.
For reasons of safety, the machine should
only be operated with a correctly fi tted
extractor hood.
The extractor hood (4.1) can be fi xed to the plate
(4.3) with both screws (4.2) in two positions (rotated
180°).
5.3 Exchanging cutting tool
See Fig. 5
5.4 Exchanging the clamping collet
Only tools with a shank diameter of 8 mm can be
clamped with the accompanying clamping collet.
See Fig. 6
6 Electronics
The router features full-wave electronics
with the following properties:
Smooth start-up
The smooth start-up ensures the router starts up
jolt-free.
Speed adjustment
You can regulate the speed steplessly between
10,000 and 26,000 rpm using the adjusting wheel
(2.2).
This enables you to optimise the cutting speed to
suit the material.
Constant speed
The pre-selected speed remains constant whether
the machine is in operation or in neutral position.
7 Working with the machine
Always secure the tool in such a way that
it cannot move during machining.
Ensure that the sensing roller and sensing
spring do not touch the cutting tool.
Set the routing depth
See Fig. 7
 Open the rotary knob.
 Adjust the guide table (7.1) and sensing
roller (7.2) or sensing spring (7.3) to the
required routing depth.
 Close the rotary knob.
Guide the machine along the workpiece at a steady
rate of advance.
Make sure that the guide table and the sensing
roller or sensing springs always rest on the work-
piece (see Fig. 8 + 9).
Use the sensing spring for straight and unma-
chined workpiece edges and the sensing roller for
curved workpiece edges.
Note:
The series standard guide table is tilted 1.5° so that
the surface coating is not damaged during edge
routing. A guide table with 0° inclination angle for
precise cuts is available as an accessory.
12
8 Maintenance and care
Always remove the plug from the mains
supply socket before carrying out any
work on the machine!
Customer service and repair. Only
through manufacturer or service work-
shops: Please fi nd the nearest address
at: www.festool.com/Service
EKAT
1
235
4
Use only original Festool spare parts!
Order No. at: www.festool.com/Service
Always keep the machine and the ventilation slots
clean.
The machines are fi tted with special carbon brush-
es with automatic-switch-off. When the brushes
reach their wear limit the current is interrupted
automatically and the router comes to a standstill.
Any maintenance or repair work requiring the mo-
tor housing to be opened may only be carried out
by an authorised service workshop.
9 Accessories, tools
The accessory and tool order number can be found
in your Festool catalogue or on the Internet under
“www.festool.com”.
10 Disposal
Do not throw the power tool in your household
waste! Dispose of the machine, accessories and
packaging at an environmentally-responsible re-
cycling centre! Observe the valid national regula-
tions.
EU only: In accordance with European Directive on
waste electrical and electronic equipment and im-
plementation in national law, used electric power
tools must be collected separately and handed in
for environmentally friendly recycling.
Information on REACh:
www.festool.com/reach

Other manuals for OFK 700 EQ

4

This manual suits for next models

1

Other Festool Tools manuals

Festool TP 220 Installation instructions

Festool

Festool TP 220 Installation instructions

Festool VB-CMS/CS 50 User manual

Festool

Festool VB-CMS/CS 50 User manual

Festool Basis WRA 500 User manual

Festool

Festool Basis WRA 500 User manual

Festool TP 220 Installation instructions

Festool

Festool TP 220 Installation instructions

Festool OFK 700 EQ User manual

Festool

Festool OFK 700 EQ User manual

Festool HL 850 EB User manual

Festool

Festool HL 850 EB User manual

Festool MFK 700 EQ Installation instructions

Festool

Festool MFK 700 EQ Installation instructions

Festool MFT 800 User manual

Festool

Festool MFT 800 User manual

Festool MX 1000 E EF Installation instructions

Festool

Festool MX 1000 E EF Installation instructions

Festool FSK 250 User manual

Festool

Festool FSK 250 User manual

Festool OF 1000 User manual

Festool

Festool OF 1000 User manual

Festool LA-CS 50/CMS User manual

Festool

Festool LA-CS 50/CMS User manual

Festool OF 1400 EBQ User manual

Festool

Festool OF 1400 EBQ User manual

Festool HL 850 EB User manual

Festool

Festool HL 850 EB User manual

Festool SE-EHL Quick start guide

Festool

Festool SE-EHL Quick start guide

Festool OF 1010 Q Installation instructions

Festool

Festool OF 1010 Q Installation instructions

Festool Conturo MFT/3 User manual

Festool

Festool Conturo MFT/3 User manual

Festool MFT/3-VL Installation instructions

Festool

Festool MFT/3-VL Installation instructions

Festool ROTEX RO 90 DX FEQ User manual

Festool

Festool ROTEX RO 90 DX FEQ User manual

Festool CS 70 KA-ST User manual

Festool

Festool CS 70 KA-ST User manual

Festool SE-HL Installation instructions

Festool

Festool SE-HL Installation instructions

Festool KA 65 User manual

Festool

Festool KA 65 User manual

Festool VAC SYS SE User manual

Festool

Festool VAC SYS SE User manual

Festool CMS OF GE Owner's manual

Festool

Festool CMS OF GE Owner's manual

Popular Tools manuals by other brands

SNOWJOE Aquajoe FIBERJACKET AJFJH50-58-PRO-RM quick guide

SNOWJOE

SNOWJOE Aquajoe FIBERJACKET AJFJH50-58-PRO-RM quick guide

Draper GPAUG52-B manual

Draper

Draper GPAUG52-B manual

ORMA Passeggiando use instructions

ORMA

ORMA Passeggiando use instructions

Sealey AK49 instruction manual

Sealey

Sealey AK49 instruction manual

Albert Roller ROLLER'S King1 1/4 operating instructions

Albert Roller

Albert Roller ROLLER'S King1 1/4 operating instructions

Sealey SJBEX200.V2 manual

Sealey

Sealey SJBEX200.V2 manual

Brownells YAVAPAI 1911 AUTO instructions

Brownells

Brownells YAVAPAI 1911 AUTO instructions

BGS technic 3140 instruction manual

BGS technic

BGS technic 3140 instruction manual

Sealey AK96SET quick start guide

Sealey

Sealey AK96SET quick start guide

BGS technic 3541 instruction manual

BGS technic

BGS technic 3541 instruction manual

RIDGID RE 6 manual

RIDGID

RIDGID RE 6 manual

Universal Tool UT9925 operating instructions

Universal Tool

Universal Tool UT9925 operating instructions

RPM EZ Assembly instructions

RPM

RPM EZ Assembly instructions

Surtek RR612 manual

Surtek

Surtek RR612 manual

Kennedy DCS150 instruction manual

Kennedy

Kennedy DCS150 instruction manual

HIS H6000 user guide

HIS

HIS H6000 user guide

Einpart 3209 instruction manual

Einpart

Einpart 3209 instruction manual

Ryobi JM82K Operator's manual

Ryobi

Ryobi JM82K Operator's manual

manuals.online logo
manuals.online logoBrands
  • About & Mission
  • Contact us
  • Privacy Policy
  • Terms and Conditions

Copyright 2025 Manuals.Online. All Rights Reserved.