Fifine K670 User manual

K670
MADE IN CHINA
CONTACT US
If there is any problem, please contact us by email or phone. We will reply within
24 hours (Mon. to Fri. ).
E-Mail: info@salcar.de
Tel: 0341 25257850
Company: Salcar GmbH
Address: An der Hebemärchte 6 04316 Leipzig, Germany
WHAT'S IN THE BOX
WARRANTY
1 X Microphone with the pivot mount
1 X Adjustable Desk Stand(Included 3 detachable stand tube heighten from 1.97”to 4.65”)
1 X 6.56' length USB cable A-male to B male
1 X 5/8" Male to 3/8" Female Adapter
1 X User’s manual
CONTENTS
USER'S MANUEL ---------------------- 2
BEDIENUNGSANLEITUNG ---------------------- 15
MANUEL FRANÇAIS ---------------------- 28
MANUALE ITALIANO ---------------------- 30
MANUAL ESPAÑOL ---------------------- 32
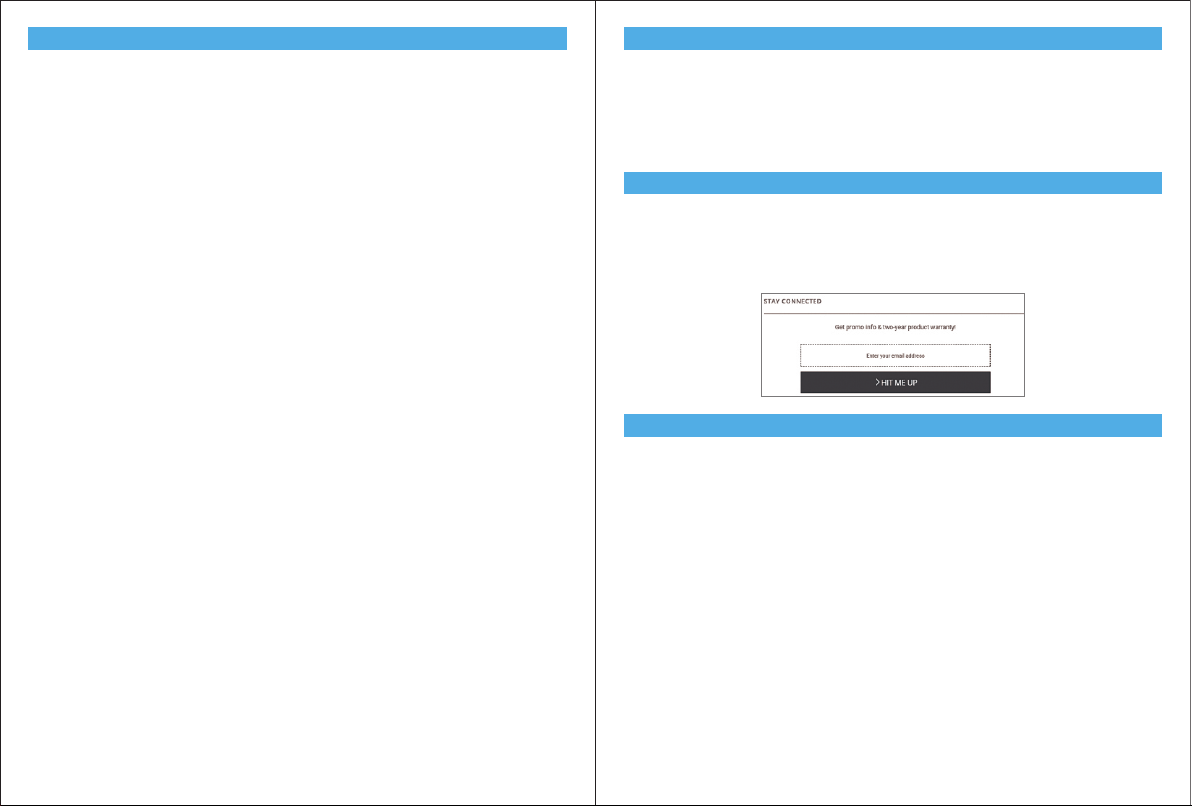
Easily get a 2-year extended warranty with online registration within 90 days of purchase.
1. Input the link : https://nemicrophone.com/
2. Please roll down to the bottom of the page, ll in E-mail address and submit it .
3. Check your inbox or spam to conrm subscription email.
CONTROL PANEL
1. 16mm Capsule—Condenser microphone element with cardioids polar pattern.
2. Blue LED — Blue light shows microphone is receiving USB power.
3. Volume—Volume up: Clockwise(Turn right)/Volume down: Counterclockwise
(Turn left)/Mute: Counterclockwise(Turn maximum left).
4. Headphone Jack — 1/8-inch (3.5 mm) stereo jack for connecting your headphones.
5. Metal Construction — Tough, durable, resilient design.
6. USB Connector — Use the included USB cable to connect 670 to your Mac or PC.
7. USB Cable(6.56')-type A to type B connector
2

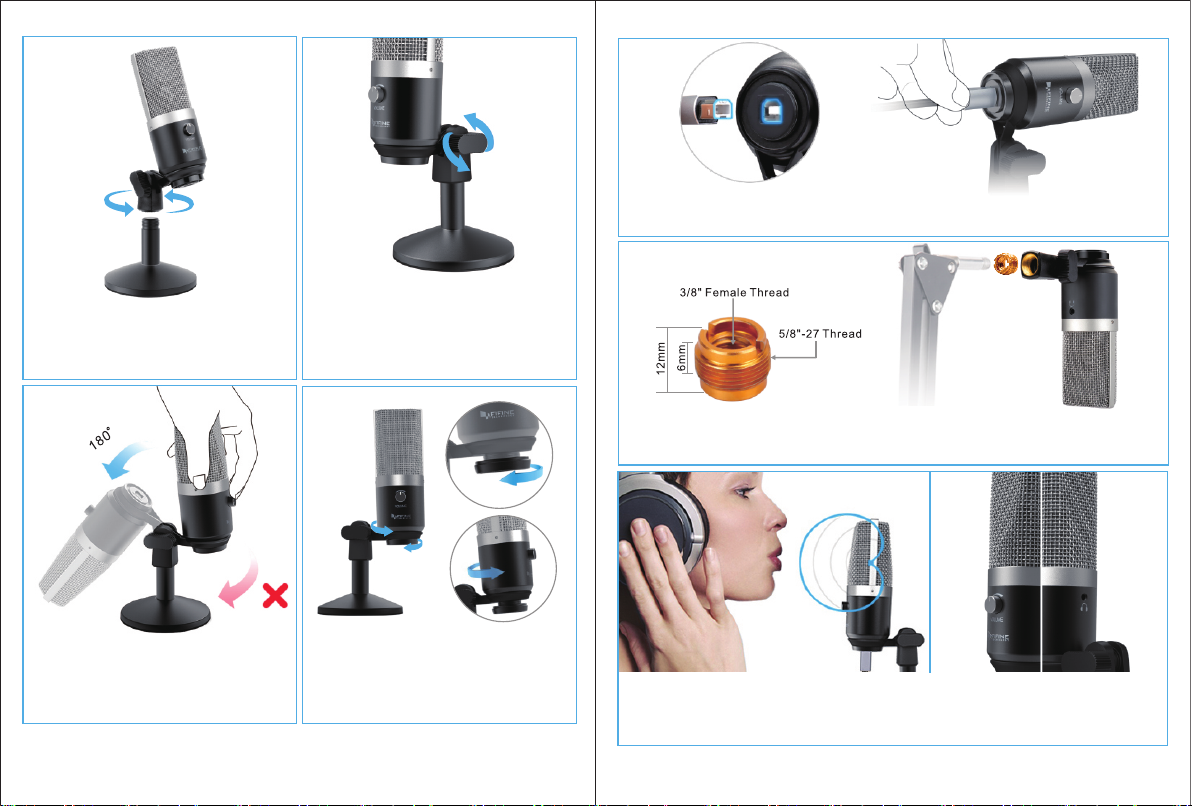
SETTING UP MICROPHONE WITH ADJUSTABLE DESK MICROPHONE STAND
1.Adjustable mounting bracket from 1.97”to 4.65”if you need.
3 4
2.Screw the pivot mount onto the top of the
mental desk stand.
3. If necessary, adjust the microphone’s angle
with the pivot mount’s thumbscrew.(turn left
for tighten ,turn right for loosen)
4. Pls Swing the microphone counterclock-
wise, Swing the microphone clockwise will
cause the bracket broken.
5.Screw the pivot mount to adjust
microphone angle 360° horizontally
1.97" 3.19" 4.65"

HEADPHONE OUTPUT
670 includes a standard 1/8”(3.5mm) headphone jack for monitoring and playback.
When your preliminary setup is completed (Choose “MIC_TEST” as input), and your USB
microphone is connected to your Computer’s USB port (the microphone’s blue LED is
illuminated),Use 670 Headphone output to monitor your microphone recording in real-time
or tracks recordings from your computer.
SPECIFICATION
Power Supply: 5V
Polar Pattern: Unidirectional
Frequency Response: 50Hz-15KHz
Sensitivity: -46±3dB(at 1kHz)
5 6
Note:
* Plug earphone in the mic jack, you can hear your voice at once ,no need to set the output
devices through computer or click ”listen to this device”. But you will need to make this
output setting(choose the output from "Realtek High Denition Audio” option)if you want
to listen the music from the computer.
* No need to log in any recording software or operate on the computer“Listen to this device”
setting, just plug your earphone into the 3.5mm jack on the rear of microphone and you are
good to hear your own voice.
* The sound output from the 3.5mm jack on the rear microphone is louder than which
directly output from 3.5mm jack of computer. Make the test in advance as appropriate
sound level to avoid the sound heard is loud but recorded sound is low.
Front Rear
6. Fully plug the provided USB cable with the right angle into the USB output at the base of
the microphone.
7. One standard screw adapter is also enclosed to ensure you can use the microphone on
current boom arm stand you may have.
8. The front of the microphone should be facing the sound source. (A VOLUME icon and blue
LED indicate the front of the microphone; the earphone jack displayed on the rear of the
microphone.)
Listen music from computer

1. Plug the free end of the provided USB cable into the USB port on your computer. The
microphone’s blue LED will illuminate, indicating the microphone is receiving power. Your
computer will automatically recognize the USB device and install a driver.
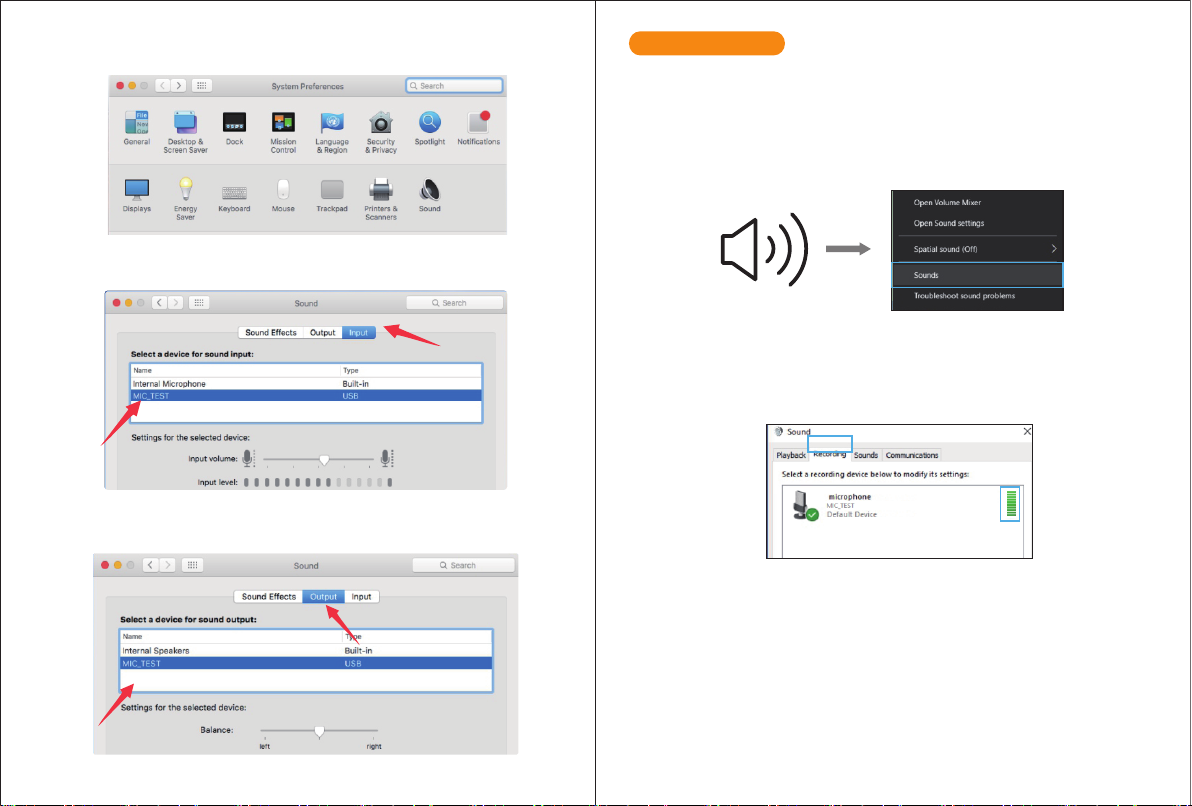
2. To select the 670 as your audio input, rst, open your System Preferences.
3. Next, click Sound to display the Sound preference panel.
Apple MAC OS
Output Impedance: 2200
Equivalent Noise Level: 66dB-A
Max.SPL: 120dB(at 1kHz≤1% T.H.D
S/N Ratio: 66dB
Operating Current: 13mA ± 2mA
Typical Frequency Response Curve
Frequency Response (0dB=1V/pa)
4. Click the Input tab and select the “MIC_TEST” as the device for sound input.
5. Click the output tab and make certain “MIC_TEST” is selected as the default output
device.(This should have happened automatically.)
COMPUTER SETUP
7 8
030
60
90
120
150
180
210
240
270
300
330
+20
+10
0
-10
-20
-30
20 50 100 200 500 1K 2K 5K 10K 20K
Frequency Hz

Please wait for a few seconds when rst time operation ,since driver of microphone takes
time to automatically install.(If plugging receiver in a dierent USB port, driver installs
again).After installation, if mic picks up no sound, please follow procedures below.
1. Right-click the speaker icon at the bottom right of the screen. Click "Sounds".
2. Select the Recording tab, and choose“MIC-TEST”as the default device. When you speak to
mic, bar-type icon will turn green and bounce. If it remains unchanged, please reset
computer and replug in the USB port. If there’s still no “MIC-TEST” , please contact our
customer service.
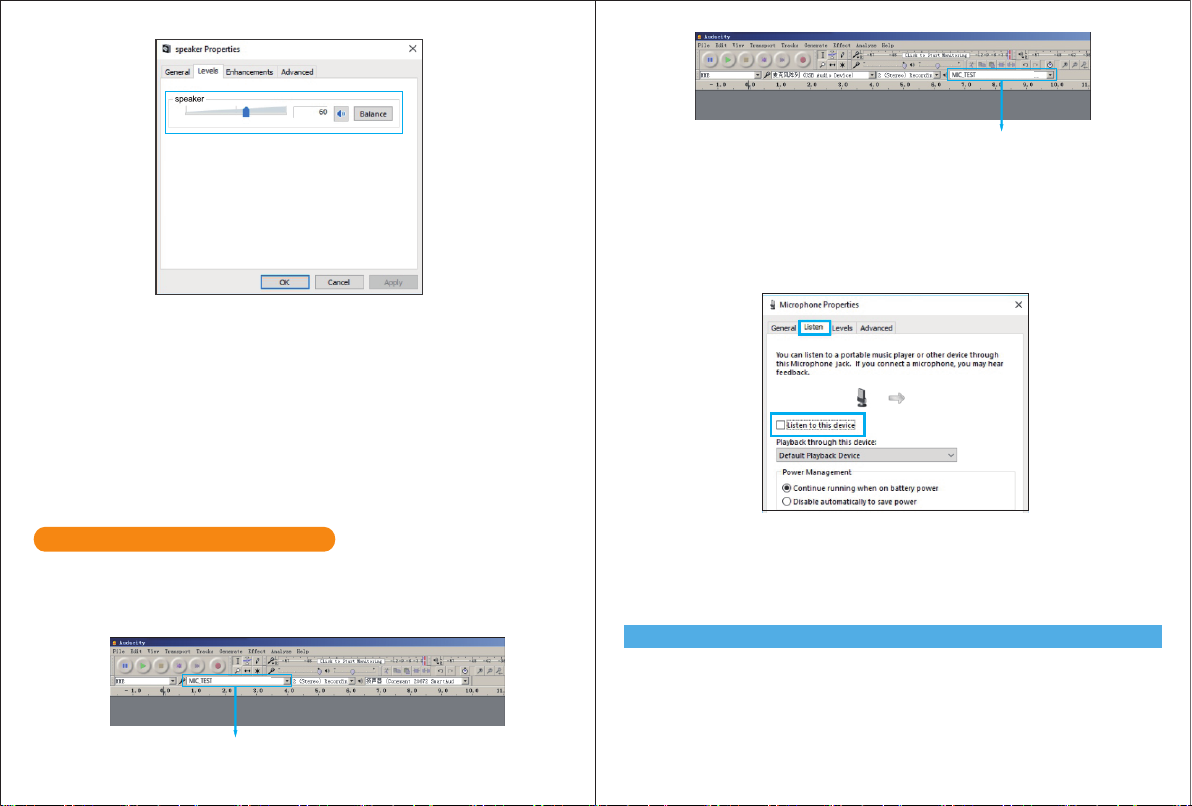
4. Double click on the “MIC_TEST” icon to open the Microphone Properties window. Select
the Levels tab to adjust microphone level (loudness).
5.You will need to make the output setting as below if you want to listen the music from
computer when plugging earphone to 3.5mm jack on the rear of microphone:
“Playback”-click “MIC_TEST”- right click and choose “Enable”, 3.5mm jack can output your
voice only.
3. Two way to monitor your speaking voice:
1) Plug earphone in the headphone jack on the rear of 670, you can hear your voice at once
,no need to set the output devices through computer or click ”listen to this device”. But you
will need to make this output setting (choose the output from "Realtek High Denition
Audio”option)if you want to listen the music from the computer.
2) Plug your earphone into the 3.5mm earphone jack of computer/laptop, manual operate
in your computer: click Microphone“Realtek High Denition Audio”-“Properties”-“Listen”-
click ”Listen to this device”-”Apply”.
NOTE: Your voice out from headphone jack on the rear of the microphone cannot be muted,
choose the computer 3.5mm jack when you are using any chatting software(Skype).
Windows
9
10

If you need output your voice from 3.5mm jack of computer, pls choose the output from
“Realtek High Denition Audio”option. Click into“Playback”-choose “MIC_TEST”- right click
and choose“Disable”. Meanwhile Enable the“Realtek High Denition Audio”. 1. If computer prompts that it’s unable to identify USB devices, please restart computer and
replug the microphone into other USB port.
2. If mic recognized but no sound comes out, please check whether System Sound is mute
and whether you have turned volume control on microphone to minimum.
3. If mic recognized but not sound out, and your computer runs windows 10, please go to
settings>privacy>microphone and click the Allow apps to access the microphone to ON
then restart.
6. Adjust volume of output. Click “MIC-TEST”- “Properties”-“Levels”- drag progress bar to
control volume of output.
11 12
Note:(Applicable for MAC and Windows)
1. Pls select “MIC_TEST” as the input and output device from the setting when using
recording software if monitor the sound output from 1/8" (3.5 mm) headphone jack on
microphone. Choose "Realtek High Denition" when output from 3.5mm of computer.
lnput: MIC-TEST
Recording Software Settings

13 14
Notice: logging out of AUDACITY(or other recording software) if you nd USB microphone
is unavailable. And then plug in mic rst , secondly log in software again.
2. Make sure to click o listen to device in your computer system when you are using any
recording software, or else you would hear duet of yourself just like too much echo.
3. There are several ways to improve the recording by using Audacity. Contact us for other
way if you need.
4. For windows computers, we recommend audacity, and for Apple computers, you can use
Apple's own QuickTime player to test the recording.
IMPORTANT NOTICE
Setting your software levels
Correct adjustment of microphone level is important for optimum performance. Ideally, the
microphone level should be as high as possible without overloading the input of your
computer. If you hear distortion, or if your recording program shows levels that are
consistently overloaded (at peak levels), turn the microphone volume (or level) down, either
through your control panel (or system preferences) settings, or through your recording
software. If your recording program shows insucient level, you can increase the
Selecting software
You have many choices in recording software. Audacity, available for free online at http://au-
dacity.sourceforge.net/, is a widely used software program that provides basic recording
software.
Note: The microphone must be plugged in rst and secondly turning on the recording
software.
Positioning your microphone
It is important to position the microphone directly in line (on axis) with the person
speaking/ singing or instrument (or other sound source) to achieve the best frequency
response of the microphone. For use in speaking/singing applications, the ideal placement
for the microphone
is directly in front of the person speaking/singing. The same placement is optimal when
making an instrument such as an acoustic guitar, drums or piano. Experiment with dierent
mic placements to nd the best sound for your particular setup.
Protecting your microphone
Avoid leaving your microphone in the open sun or in areas where temperatures exceed 110°
F (43° C) for extended periods. Extremely high humidity should also be avoided.
Protecting your microphone
Avoid leaving your microphone in the open sun or in areas where temperatures exceed 110°
F (43° C) for extended periods. Extremely high humidity should also be avoided.
Choose your output setting
When you plug microphone to your pc, it cancels the audio from any other audio le played
or there’s no sound on the playback, you need to make the output setting, from”Realtek
High Denition Audio”option.
microphone gain either from the control panel (or system preferences) settings or through
your recording program.
Output:Pls choose correct output

15 16
WAS IST IN DER VERPACKUNG
GARANTIE
1 X Mikrofon mit Schwenkhalterung
1 x verstellbarer Tischständer (3 abnehmbare Standrohrerhöhungen von 1,97"auf 4,65")
1 x 6,56'' langes USB-Kabel A-Stecker an B-Stecker
1 x 5/8"männlich auf 3/8" weiblich Adapter
1 X Benutzerhandbuch
Bei Online-Registrierung erhalten Sie innerhalb von 90 Tagen nach dem Kauf eine erweiter-
te Garantie von 2 Jahren.
1. Folgen Sie dem Link: https://nemicrophone.com/
2. Am Ende Der Seite geben Sie Ihre E-Mail-Adresse ein und bestätigen.
3. Überprüfen Sie Ihren Posteingang, um die Abonnement-E-Mail zu bestätigen.
SYSTEMSTEUERUNG
EINRICHTEN EINES MIKROFONS MIT VERSTELLBAREM TISCHMIKROFONSTÄNDER
1. 16-mm-Kapsel - Kondensatormikrofonelement mit nierenförmiger Richtcharakteristik.
2. Blaue LED - Blaues Licht zeigt an, dass das Mikrofon USB-Strom erhält.
3. Lautstärke — Lautstärke erhöhen: Im Uhrzeigersinn (rechts drehen) / Lautstärke
verringern: Gegen den Uhrzeigersinn (links drehen) / Stummschaltung: Gegen den
Uhrzeigersinn (maximales links drehen).
4. Kopfhörerbuchse - 3,5 mm Stereo-Klinkenbuchse zum Anschließen Ihrer Kopfhörer.
5. Metallkonstruktion - robustes und widerstandsfähiges Design.
6. USB-Anschluss - Verwenden Sie das mitgelieferte USB-Kabel, um den 670 an Ihren Mac
oder PC anzuschließen.
7. USB-Kabel (6,56') - Typ A an Typ B-Stecker.
1.Verstellbare Halterung von 1,97”bis 4,65”, falls erforderlich.
1.97" 3.19" 4.65"
17
18
2.Schrauben Sie die Schwenkhalterung oben
auf den Tischständer.
3.Passen Sie bei Bedarf den Winkel des
Mikrofons mit der Rändelschraube der
Schwenkhalterung an (zum Drehen nach
links drehen, zum Lösen nach rechts drehen).
5.Schrauben Sie die Schwenkhalterung, um
den Mikrofonwinkel um 360 ° horizontal
einzustellen.
Front Rear
6. Stecken Sie das mitgelieferte USB-Kabel im rechten Winkel in den USB-Ausgang an der
Unterseite des Mikrofons.
7. Ein Standard-Schraubenadapter ist ebenfalls im Lieferumfang enthalten, um sicherzustel-
len, dass Sie das Mikrofon an Ihrem aktuellen Mikrofonarm verwenden können.
8. Die Vorderseite des Mikrofons sollte zur Schallquelle zeigen. (Ein VOLUME-Symbol und
eine blaue LED zeigen die Vorderseite des Mikrofons an; die Kopfhörerbuchse wird auf der
Rückseite des Mikrofons angezeigt).
Bitte schwenken Sie das Mikrofon gegen den
Uhrzeigersinn. Wenn Sie das Mikrofon im
Uhrzeigersinn schwenken, wird die
Halterung beschädigt.

19 20
KOPFHÖRERAUSGANG
1. Stecken Sie das freie Ende des mitgelieferten USB-Kabels in den USB-Anschluss Ihres
Computers. Die blaue LED des Mikrofons leuchtet, um anzuzeigen, dass das Mikrofon mit
Strom versorgt wird. Ihr Computer erkennt das USB-Gerät automatisch und installiert einen
Treiber.
2. Um das 670er Modell als Audioeingang auszuwählen, önen Sie zuerst Ihre Systemein-
stellungen.
Apple MAC OS
Stromversorgung: 5V
Polarmuster: Unidirektional
Frequenz: 50Hz-15KHz
Empndlichkeit: -46 ± 3 dB (bei 1 kHz)
Ausgangsimpedanz: 2200
Äquivalenter Geräuschpegel: 66dB-A
Max.SPL: 120 dB (bei 1 kHz ≤ 1% T.H.D)
S/N-Verhältnis: 66 dB
Betriebsstrom: 13 mA ± 2 mA
Typische Frequenzgangkurve
Frequenzgang (0dB=1V/pa)
Das 670er Modell verfügt über eine standardmäßige 3,5-mm-Kopfhörerbuchse für Überwa-
chung und Wiedergabe.
Wenn Ihre vorbereitenden Einstellungen abgeschlossen sind (wählen Sie „MIC_TEST“ als
Eingang) und Ihr USB-Mikrofon an den USB-Port Ihres Computers angeschlossen ist (die
blaue LED des Mikrofons leuchtet), verwenden Sie den 670-Kopfhörerausgang, um die
Mikrofonaufnahme in Echtzeit zu überwachen oder Aufnahmen von Ihrem Computer zu
verfolgen.
SPEZIFIKATION
COMPUTER-SETUP
Hinweis:
* Schließen Sie den Kopfhörer an die Mikrofonbuchse an. Sie können Ihre Stimme
gleichzeitig hören. Sie müssen die Ausgabegeräte nicht über den Computer einstellen oder
auf "Dieses Gerät hören" klicken. Sie müssen diese Ausgabeeinstellung vornehmen (wählen
Sie die Ausgabe mit der Option "Realtek High Denition Audio"), wenn Sie die Musik vom
Computer hören möchten.
* Sie müssen sich nicht in einer Aufnahmesoftware anmelden oder auf dem Computer die
Einstellung "Hören Sie dieses Gerät" verwenden. Stecken Sie einfach Ihren Kopfhörer in die
3,5-mm-Buchse an der Rückseite des Mikrofons, und Sie können Ihre eigene Stimme gut
hören.
* Die Tonausgabe von der 3,5-mm-Buchse am hinteren Mikrofon ist lauter als die von der
3,5-mm-Buchse des Computers. Machen Sie einen Test im Voraus, wenn die Lautstärke
angemessen ist, um zu verhindern, dass der Ton laut ist, aber der aufgenommene Ton zu
niedrig ist.
Hören Sie Musik vom Computer
030
60
90
120
150
180
210
240
270
300
330
+20
+10
0
-10
-20
-30
20 50 100 200 500 1K 2K 5K 10K 20K
Frequency Hz
21 22
4. Klicken Sie auf die Registerkarte Input und wählen Sie "MIC_TEST" als Gerät für die
Toneingabe.
3. Klicken Sie als nächstes auf "Sound", um das Fenster mit den Soundeinstellungen anzuzei-
gen.
5. Klicken Sie auf die Registerkarte "Ausgabe" und stellen Sie sicher, dass "MIC_TEST" als
Standardausgabegerät ausgewählt ist. (Dies sollte automatisch geschehen.)
Warten Sie beim ersten Betrieb einige Sekunden, da der Treiber des Mikrofons eine automa-
tische Installation benötigt. (Falls Sie den Empfänger an einen anderen USB-Anschluss
anschließen, wird der Treiber erneut installiert.)
1. Klicken Sie mit der rechten Maustaste auf das Lautsprechersymbol unten rechts auf dem
Bildschirm. Klicken Sie auf "Sounds".
2. Wählen Sie die Registerkarte Aufnahme und wählen Sie als Standardgerät „MIC_TEST“.
Wenn Sie mit dem Mikrofon sprechen, wird das Balkensymbol grün und springt ab. Bleibt es
unverändert, setzen Sie den Computer zurück und stecken Sie den USB-Port erneut ein.
Wenn es immer noch keinen„MIC_TEST“ gibt, wenden Sie sich bitte an unseren Kundend-
ienst.
3. Zwei Möglichkeiten, Ihre Sprechstimme zu überwachen:
1) Schließen Sie den Kopfhörer an der Kopfhörerbuchse an der Rückseite des 670er Modells
an. Sie können Ihre Stimme sofort hören. Sie müssen die Ausgabegeräte nicht über den
Computer einstellen oder auf "Dieses Gerät hören" klicken. Sie müssen diese Ausgabeein-
stellung vornehmen (wählen Sie die Ausgabe mit der Option "Realtek High Denition
Audio"), wenn Sie die Musik vom Computer hören möchten.
2) Schließen Sie Ihren Kopfhörer an die 3,5-mm-Kopfhörerbuchse des Computers/Laptops
an und betätigen Sie die manuelle Bedienung in Ihrem Computer: Klicken Sie auf Mikrofon
"Realtek High Denition Audio" - "Eigenschaften" - "Anhören" - Klicken Sie auf "Auf dieses
Gerät hören" - "Übernehmen".
Windows

23 24
4. Doppelklick Sie auf das Symbol „MIC_TEST“, um das Fenster mit den Mikrofoneigen-
schaften zu önen. Wählen Sie die Registerkarte Pegel, um den Mikrofonpegel
(Lautstärke)einzustellen.
HINWEIS: Ihre Stimme aus der Kopfhörerbuchse an der Rückseite des Mikrofons kann nicht
stummgeschaltet werden. Wählen Sie die 3,5-mm-Buchse des Computers, wenn Sie eine
Chatsoftware (Skype) verwenden.
5. Wenn Sie Musik vom Computer hören möchten, bzw. wenn Sie Kopfhörer an die
3,5-mm-Buchse an der Rückseite des Mikrofons anschließen, müssen Sie folgende Ausgang-
seinstellung vornehmen: „Wiedergabe“ - klicken Sie auf „MIC_TEST“ - klicken Sie mit der
rechten Maustaste und wählen Sie „Aktivieren“. 3,5 mm-Buchse kann nur Ihre Stimme
ausgeben.
Wenn Sie Ihre Stimme über die 3,5-mm-Buchse des Computers ausgeben möchten, wählen
Sie die Ausgabe mit der Option „Realtek High Denition Audio“. Klicken Sie auf "Wieder-
gabe" - wählen Sie "MIC_TEST" - klicken Sie mit der rechten Maustaste und wählen Sie
"Deaktivieren". Aktivieren Sie in der Zwischenzeit das "Realtek High Denition Audio".
6. Passen Sie die Lautstärke an. Klicken Sie auf "MIC_TEST" - "Eigenschaften" - "Pegel" -
ziehen Sie den Fortschrittsbalken, um die Lautstärke der Ausgabe zu steuern.
25 26
1. Wenn der Computer das USB-Gerät nicht identiziert, starten Sie den Computer neu und
stecken Sie das Mikrofon an einen anderen USB-Anschluss.
2. Wenn das Mikrofon erkannt, aber kein Ton ausgegeben wird, prüfen Sie, ob System Sound
stummgeschaltet ist und ob Sie den Lautstärkeregler am Mikrofon auf ein Minimum
eingestellt haben.
3. Wenn das Mikrofon erkannt, aber kein Ton ausgegeben wird und auf Ihrem Computer
Windows 10 ausgeführt wird, gehen Sie zu Einstellungen> Datenschutz> Mikrofon und
klicken Sie auf Apps zulassen, damit das Mikrofon eingeschaltet ist - starten Sie es dann
erneut.
Hinweis: Wenn Sie feststellen, dass das USB-Mikrofon nicht verfügbar ist, melden Sie sich
bei AUDACITY (oder einer anderen Aufzeichnungssoftware) ab. Danach das Mikrofon
einstecken und die Software erneut starten.
2. Stellen Sie sicher, dass Sie in Ihrem Computersystem nicht auf Gerät hören klicken, wenn
Sie eine Aufnahmesoftware verwenden. Andernfalls hören Sie ein Duett, wie ein zu starkes
Echo.
3. Es gibt mehrere Möglichkeiten, die Aufnahme mit Audacity zu verbessern. Kontaktieren
Sie uns für Alternativen.
4. Für Windows-Computer empfehlen wir Audacity. Bei Apple-Computern können Sie den
eigenen QuickTime-Player von Apple verwenden, um die Aufnahme zu testen.
WICHTIGER HINWEIS
Einstellen der Softwareversionen
Die korrekte Einstellung des Mikrofonpegels ist wichtig für eine optimale Leistung.
Idealerweise sollte der Mikrofonpegel so hoch wie möglich sein, ohne die Eingabe Ihres
Computers zu überlasten. Wenn Sie Verzerrungen hören oder wenn Ihr Aufnahmepro-
gramm Pegel aufweist, die ständig überlastet sind (bei Spitzenpegeln), verringern Sie die
Hinweis: (gültig für MAC und Windows)
1. Bitte wählen Sie "MIC_TEST" als Eingabe- und Ausgabegerät in der Einstellung, wenn Sie
die Aufnahmesoftware verwenden, bzw. wenn Sie die Tonausgabe von der 3,5 mm-Kopf-
hörerbuchse des Mikrofons überwachen von Computer.
Eingabe: MIC_TEST
Ausgabe: Bitte wählen Sie die korrekte Ausgabe
Einstellungen der Aufnahmesoftware

MANUEL FRANÇAIS
PRESENTATION
1 X Microphone avec montage à pivot
1 X Support de bureau ajustable (inclus 3 tubes de support détachables d’une hauteur de
1,97" à 4,65")
1 X Câble USB A-mâle à B-mâle
1 X Adaptateur 5/8" mâle à 3/8" femelle
1 X Manuel d’utilisation
DÉMARRAGE RAPIDE
1. Support de microphone réglable de bureau de 1,97'' à 4,65'' si vous en avez besoin.
2. Vissez le support de pivot sur le dessus du socle de bureau en métal.
3. Si nécessaire, ajustez l'angle du microphone (180°) avec la vis de serrage du pivot.
4. Desserrez le collier du support pivotant pour ajuster le microphone à 360° horizontale-
ment.
5. Branchez le câble USB fourni avec le bon angle sur la sortie numérique USB à la base du
microphone.
6. Branchez votre casque dans la prise casque à l'arrière du microphone. En parlant dans le
microphone, vous devriez vous entendre dans le casque.
CONFIGURATION DE L'ORDINATEUR
Apple MAC OS
1. Branchez l'extrémité libre du câble USB fourni dans le port USB sur votre ordinateur. La
LED bleue du microphone s'allume, indiquant que le microphone est sous tension. Votre
ordinateur
reconnaîtra automatiquement le périphérique USB et installera un pilote.
2. Pour sélectionner le 670 comme entrée audio, ouvrez d'abord Préférences Système.
3. Ensuite, cliquez sur Son pour acher le volet de préférence Son.
4. Cliquez sur l'onglet Entrée et sélectionnez le « Périphérique audio USB PnP » comme
périphérique d'entrée audio
5. Cliquez sur l'onglet Sortie et assurez-vous que « Périphérique audio USB PnP » est
sélectionné
comme périphérique de sortie par défaut. (Cela aurait dû se produire automatiquement.)
Windows
1. Cliquez droit sur l'icône du haut-parleur dans le coin droit de l'écran. Choisissez
27 28
Software auswählen
Mit der Aufnahmesoftware haben Sie viele Einsatz-Möglichkeiten. Audacity ist unter
http://audacity.sourceforge.net/ kostenlos verfügbar und ist ein weit verbreitetes Software-
programm, das eine grundlegende Aufnahmesoftware bereitstellt.
Hinweis: Das Mikrofon muss zuerst angeschlossen sein um anschließend die Aufnahmesoft-
ware zu verwenden.
Positionieren Sie Ihr Mikrofon
Es ist wichtig, das Mikrofon direkt in einer Linie (auf der Achse) mit der sprechenden /
singenden Person oder dem Instrument (oder einer anderen Schallquelle) zu positionieren,
um den besten Frequenzgang des Mikrofons zu erzielen. Die ideale Platzierung für das
Mikrofon für den Einsatz bei Sprech- / Gesangsanwendungen ist direkt vor der Person, die
spricht / singt. Die gleiche Platzierung ist optimal, wenn Sie beispielsweise ein Instrument,
wie eine akustische Gitarre, ein Schlagzeug oder ein Klavier platzieren wollen. Experimentie-
ren Sie mit verschiedenen Platzierungen, um den besten Klang für Ihr spezielles Setup zu
nden.
Schützen Sie Ihr Mikrofon
Lassen Sie das Mikrofon nicht über längere Zeit in der freien Sonne oder in Bereichen liegen,
in denen die Temperaturen 43°C übersteigen. Extrem hohe Luftfeuchtigkeit sollte ebenfalls
vermieden werden.
Wählen Sie Ihre Ausgabeeinstellung
Wenn Sie ein Mikrofon an Ihren PC anschließen, wird der Ton von allen anderen wiederge-
gebenen Audiodateien abgebrochen, oder es ist kein Ton bei der Wiedergabe zu hören. Sie
müssen die Ausgabeeinstellung über die Option „Realtek High Denition Audio“
vornehmen.
Mikrofonlautstärke (oder den Pegel) entweder über die Einstellungen Ihres Bedienfelds
(oder der Systemeinstellungen) oder über Ihre Aufnahmesoftware.
Wenn Ihr Aufnahmeprogramm einen unzureichenden Pegel anzeigt, können Sie die
Mikrofonverstärkung entweder über die Einstellungen des Bedienfelds (oder der
Systemeinstellungen) oder über Ihr Aufnahmeprogramm erhöhen.

« Périphériques d'enregistrement ».
2. Sélectionnez l'onglet Enregistrement et choisissez « Périphérique audio USB PnP » comme
périphérique par défaut. Lorsque vous parlez au micro, l'icône de type barre devient verte et
rebondit. Si elle reste inchangée, réinitialisez l'ordinateur et rebranchez le micro sur le port
USB. S'il n'y a toujours pas de « Périphérique audio USB PnP », veuillez contacter le service
après-vente Si vous voulez surveiller directement votre enregistrement. Cliquez sur «
Périphérique audio USB PnP » - « Propriétés » - « Écouter » - cliquez sur « Écouter cet appareil
» - « Appliquer ». Aucun son ne peut être entendu à travers les écouteurs, si vous ne suivez
pas cette procédure. Sans le délai qui se produit si vous branchez votre casque dans la prise
casque à l'arrière du microphone. 3. Double-cliquez sur l'icône « Périphérique audio USB
PnP » pour ouvrir la fenêtre Propriétés du microphone. Sélectionnez l'onglet Niveaux pour
régler le niveau du microphone (intensité). Vous devrez peut-être revenir à cette fenêtre
pour lire le niveau après avoir commencé l'enregistrement
4. Si vous voulez sortir de la prise casque à l'arrière du microphone. Cliquez sur « Lecture » -
choisissez « Périphérique audio USB PnP » - faites un clic droit et choisissez « Activer ».
5. Régler le volume de sortie Cliquez sur « Périphérique audio USB PnP » - « Propriétés » - «
Niveaux » - faites glisser la barre de progression pour contrôler le volume de sortie.
MANUALE ITALIANO
INTRODUZIONE
1X Microfono con Pivot mount
1X Supporto da tavolo regolabile (inclusi 3 tubi da supporto separabili estendibili da 1.97" a
4.65")
1X Cavo USB A maschio - B maschio
1X Adattatore 5/8" Maschio a 3/8" Femmina
1X Manuale dell'utente
Windows
1. Clicca con il pulsante destro del mouse sull'icona dell'altoparlante all'angolo destro dello
schermo. Seleziona "dispositivi di registrazione".
GUIDA RAPIDA
1.Se necessario, regola il supporto da tavolo del microfono da 1.97”to 4.65”.
2.Avvita il pivot mount sopra il supporto da tavolo.
3.Se necessario, regola l'angolo del microfono (180°) con la vite a testa zigrinata del pivot
mount.
4.Allenta il collare del pivot mount per regolare il microfono orizzontalmente di 360°.
5.Collega ad angolo retto il cavo USB in dotazione all'uscita digitale USB posta alla base del
microfono.
6.Collega i tuoi auricolari nel jack per cue sulla parte posteriore del microfono. Parlando al
microfono dovresti sentire la tua voce negli auricolari.
CONFIGURAZIONE DEL COMPUTER
Apple MAC OS
1. Collega l'estremità libera del cavo USB in dotazione nella porta USB del tuo computer. Il
LED blu del microfono si illuminerà, indicando che il microfono è in funzione. Il tuo comput-
er riconoscerà automaticamente il dispositivo USB e istallerà un driver.
2.Per selezionare il 670 come il tuo ingresso audio, apri prima la scheda Preferenze di
Sistema.
3. Successivamente, clicca su Suoni per mostrare il pannello delle preferenze suoni.
4.Clicca sulla scheda Ingresso e seleziona "USB PnP Audio Device" (Dispositivo Audio USB
PnP) come dispositivo per il suono in ingresso.
5. Clicca sulla scheda Uscita e accertati che il Dispositivo Audio USB PnP sia selezionato
come dispositivo di uscita predenito. (Ciò dovrebbe vericarsi automaticamente.)
29 30

2. Seleziona la scheda Registrazione e scegli il "Dispositivo Audio USB PnP" come dispositivo
predenito. Quando parli al microfono,l'icona a barra diventerà verde e lampeggerà. Se non
si verica lcun cambiamento, resetta il computer e ricollega alla porta USB. e ancora non
visualizzi il "Dispositivo Audio USB PnP", la reghiamo di contattare il servizio assistenza. Se
desideri monitorare direttamente la tua registrazione, clicca su "Dispositivo Audio USB
PnP"-"Proprietà"-"Ascolta"-clic su "Ascolta questo dispositivo"-"Richiedi/Conferma". Se non
segui
questa procedura, non potrai sentire alcun suono attraverso le cue. Senza il ritardo che si
verica se inserisci le cue nel jack delle cue sul retro del microfono.
3. Doppio clic sull'icona del "Dispositivo Audio USB PnP" per aprire la nestra delle Proprietà
del Microfono. Seleziona la scheda Livelli per regolare il livello del microfono (il volume).
Potresti
aver bisogno di tornare su questa nestra per leggere il livello dopo che hai iniziato a
registrare.
4. Se vuoi uscire dal jack cue sul retro del microfono, clicca su "Riproduzione"-seleziona
"Dispositivo Audio USB PnP"-clic con il pulsante destro e seleziona "Abilita"
5. Regola il volume in uscita. Clicca su "Dispositivo Audio USB PnP" -"Proprietà"-"Livelli";
trascina la barra di avanzamento per regolare il volume in uscita.
MANUALE ITALIANO
INTRODUCCIÓN
1X Micrófono con soporte de eje
1X Soporte Ajustable de Escritorio (Incluídos 3 columnas de pie desmontables de alturas de
1.97”a 4.65”)
1X Cable USB A-macho a B macho
1X Adaptador de Macho de 5/8" a Hembra de 3/8"
1X Manual de Usuario
Windows
1.Pulsar boton derecho en el icono del altavoz en la esquina superior derecha de la pantalla.
Elegir“Dispositivos de grabación”.
INICIO RÁPIDO
1. Soporte Ajustable de Micrófono de Escritorio de 1.97” hasta 4.65” si lo necesita.
2. Atornille el soporte del eje sobre el soporte de escritorio mental.
3. Si es necesario, ajuste el ángulo del micrófono (180°) con la empulguera del soporte del
eje.
4. Desatornille el aro del soporte del eje para ajustar el micrófono 360° horizontalmente.
5. Enchufe el cable USB suministrado en el ángulo correcto en la salida USB digital en la base
del micrófono.
6. Enchufe sus auriculares en la entrada para auriculares en la parte trasera del micrófono.
Mientras habla al micrófono, debe oirse por medio de los auriculares.
AJUSTES DEL ORDENADOR
Apple MAC OS
1. Enchufe el extremo ibre del cable USB suministrado en el puerto USB de su ordenador. El
LED azul del micrófono se iluminará, indicando que el micrófono esá recibiendo energía. Su
ordenador reconocerá automáticamente el dispositivo USB e instale el driver.
2. Para seleccionar 670 como entrada de audio, primero abra Preferencias de Sistemas.
3. Siguiente, pulse Sonido para mostrar el panel de preferencias de Sonido.
4. Pulsar la pestaña de Entrada y seleccione“Dispositivo de Audio USB PnP” como dispositi-
vo de entrada de sonido.
5. Pulse la pestaña de salida y asegúrese de que “Dispositivo de Audio USB PnP” está
seleccionado como dispositivo de salida predeterminado. (Esto debió ocurrir automática-
mente.)
31 32

2. Seleccionar la pestaña de Grabación, y elegir “Dispositivo de Audio USB PnP” como
dispositivo predeterminado. Cuano le hable al micrófono, el icono tipo barra se vuelve verde
y rebota.
Si permanece sin cambiar, por favor reinicie el ordenador y vuelva a insertar en el puerto
USB. Si aún no aparece “Dispositivo de Audio USB PnP” , por favor contacte con. Si quiere
monitorizar directamentetu grabación, pulse “Dispositivo de Audio USB PnP”-
“Propiedades”-“Escuchar”-
pulsar“Escuchar este dispositivo”-“Aplicar”. No se oirá nada por los auriculares si no sigue
este procedimiento. Sin el retardo que ocurre al enchufar los auriculares en la entrada de
auriculares
en la parte trasera del micrófono.
3. Doble clic en el icono“Dispositivo de Audio USB PnP”para abrir la ventana de Propiedades
del Micrófono. Seleccione la pestaña de Niveles para ajustar el nivel (de sonido) del micrófo-
no. Puede que necesite volver a esta pestaña para leer el nivel justo después de comenzar a
grabar.
4.Si quiere que se produzca de la entrada de auriculares en la parte trasera de micródono,
pulsar“Playback”-elegir “Dispositivo de Audio USB PnP”- botón derecho y elegir“Habilitar”.
5. Ajustar el volumen de salida. Pulsar“Dispositivo de Audio USB PnP”-“Propiedades”-”Nive-
les”-arrastrar la barra de progreso para controlar el volumen de salida.
33
Table of contents
Languages:
Other Fifine Microphone manuals

Fifine
Fifine AMPLIGAME A8 PLUS User manual

Fifine
Fifine K669 User manual

Fifine
Fifine K651 User manual

Fifine
Fifine K726 User manual

Fifine
Fifine T683 User manual

Fifine
Fifine K720 User manual

Fifine
Fifine K669B User manual

Fifine
Fifine K669B User manual

Fifine
Fifine K658 User manual

Fifine
Fifine K025 User manual


