Fifine K669B User manual

K669B
User Manual • Uživatelský manuál • Užívateľský manuál •
Használati utasítás • Benutzerhandbuch

2
Content • Obsah • Tartalom • Inhalt
English
3 – 12
Čeština
13 – 22
Slovenčina
23 – 32
Magyar
33 – 42
Deutsch
43 – 52
Importer • Dovozce • Dovozca • Importőr • Importeur
Alza.cz a.s.
Jankovcova 1522/53
Prague 7
www.alza.cz

3
Dear customer,
Thank you for purchasing our product. Please read the following instructions carefully
before first use and keep this user manual for future reference. Pay particular attention
to the safety instructions. If you have any questions or comments about the device,
please contact the customer line.
✉www.alza.co.uk/kontakt
✆+44 (0)203 514 4411
What’s in the Box?
1× USB Microphone with 180cm USB cable
1× Metal Tripod Stand
1× User Manual
Specifications
Power Supply
5V
Polar Pattern
Uni-directional
Frequency Response
20 Hz – 20 kHz
Sensitivity
-34 dB ± 30 % (at 1 kHz)
Load Impedance
1000 Ω
Equivalent Noise Level
16 dB-A
Max. SPL
130 dB (at 1 kHz ≤1 % T.H.D)
S/N Ratio
78 dB
Electrical Current
3 mA

4
Introduction
Keep the volume all the way down when plugging the mic into the USB port and
gradually turn volume up for the perfect effect during the use.
Volume Control
Volume up
Clockwise (turn right)
Volume down
Counter clockwise (turn left)
Mute
Counter clockwise (turn maximum left)
The front of the microphone should be facing the sound source (a VOLUME icon
indicates the front of the microphone). No matter how you adjust the angle or position
of the mic, make sure the front of the mic is pointing at your mouth in order to achieve
the best pick-up effect.

5
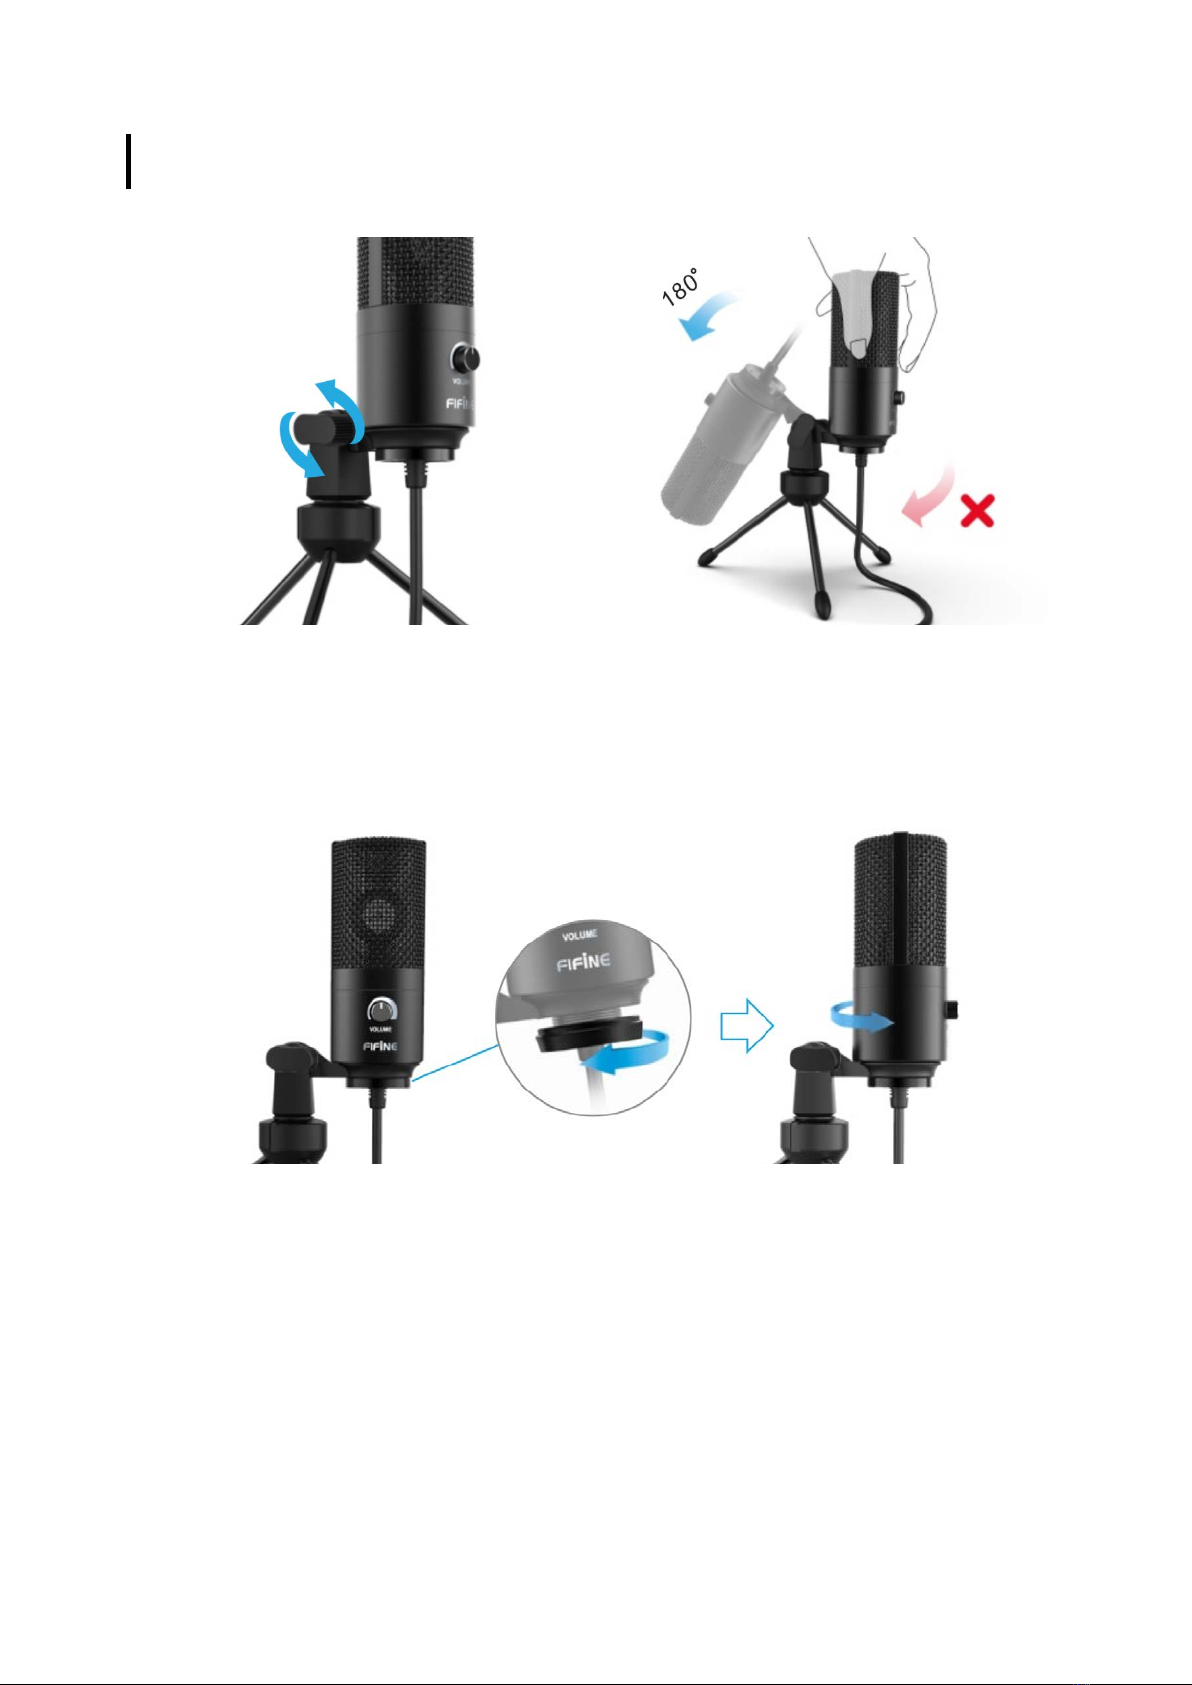
Stand Installation and Adjustment
1. If necessary, adjust the microphone’s
angle with the pivot mount’s thumbscrew.
Turn left for loosening, turn right for
tightening.
2. Swing the microphone counter
clockwise. Swinging the microphone
clockwise will break the bracket.
3. Screw the pivot to adjust microphone angle 360° horizontally.

6
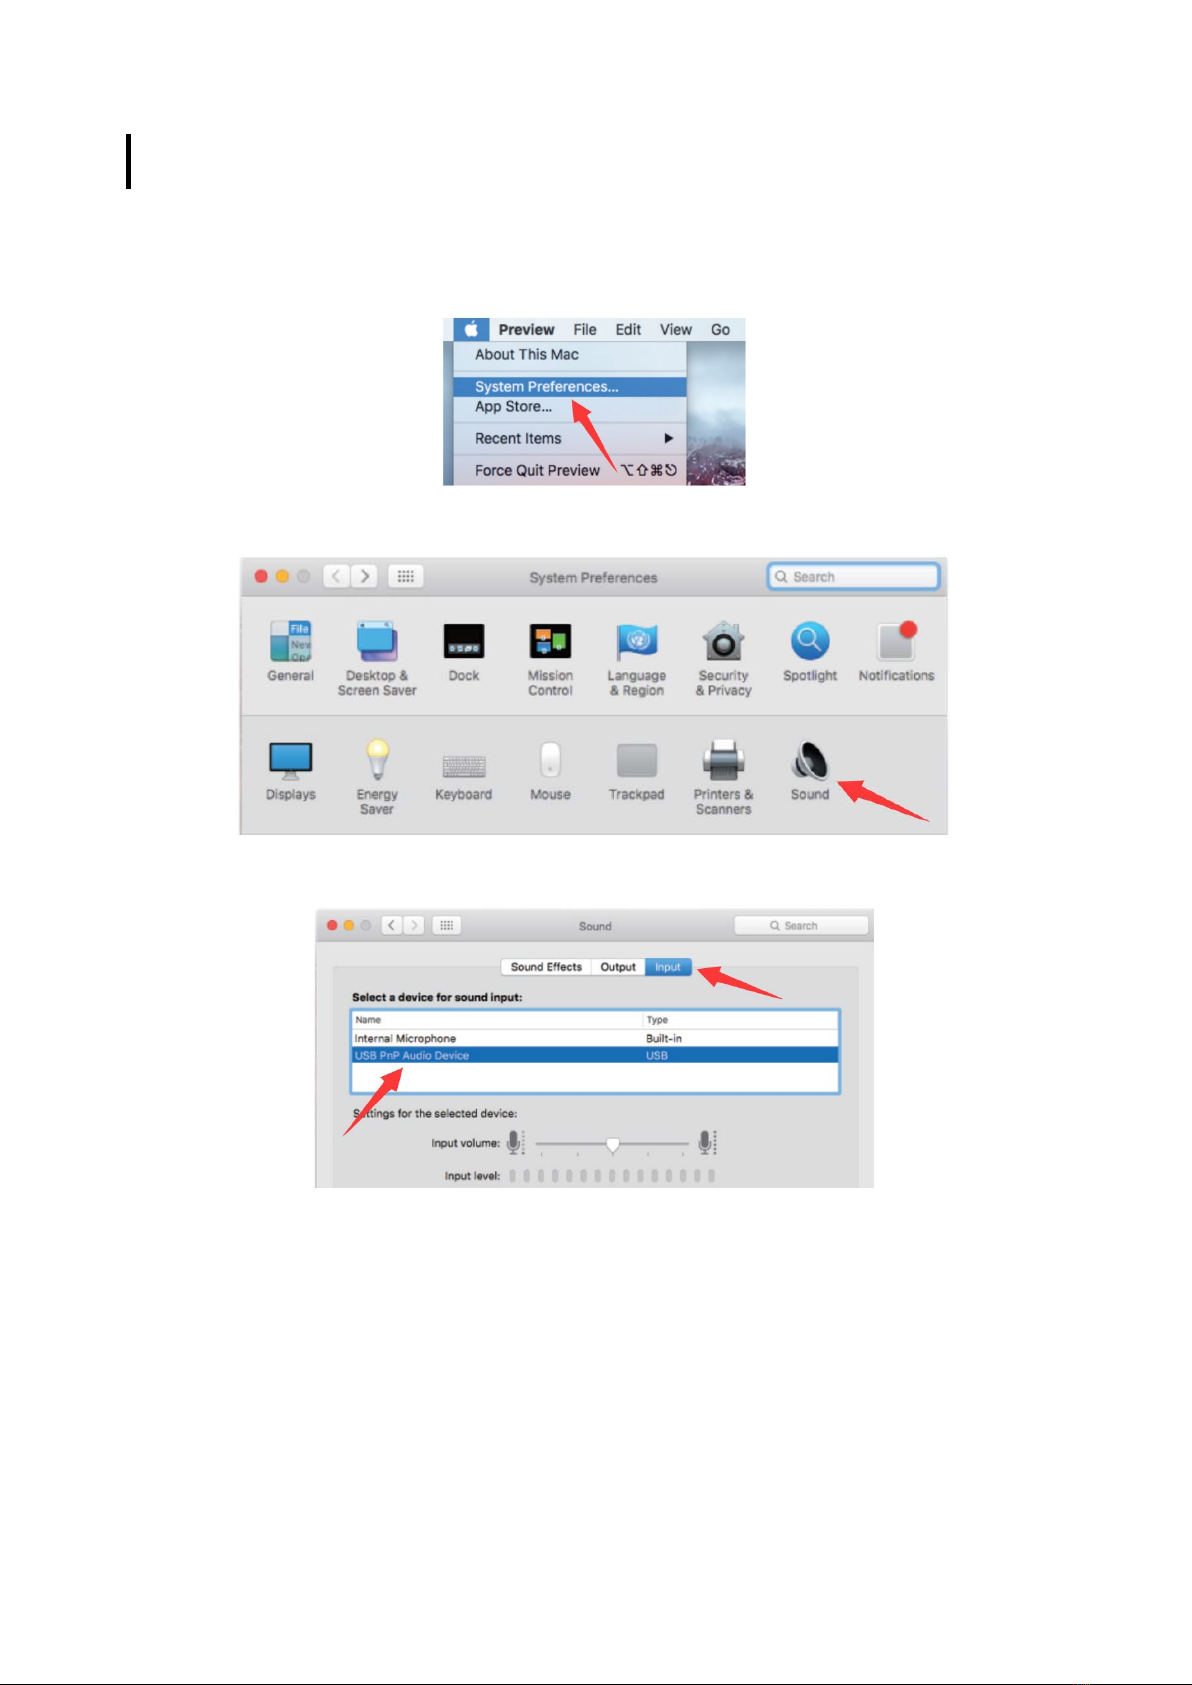
MacOS Setup
1. Plug the free end of the provided USB cable into the USB port of your computer.
Your computer will automatically recognize the USB device and install a driver.
2. To select the K669 as your audio input, first open your System Preferences.
3. Next, click Sound to display the Sound preference panel.
4. Click the Input tab and select the “USB PnP Audio Device” as the device for sound
input.
Note: If you want to monitor your voice when using MacBook, you must turn on any
recording software first (e.g. Audacity). Make sure to click “Software Playthrough (ON)”,
then click the Record button to begin, otherwise you cannot hear any sound when you
speak to the mic.
If the computer is not able to identify this USB device, please restart computer and
re-plug the mic into another USB port.

7
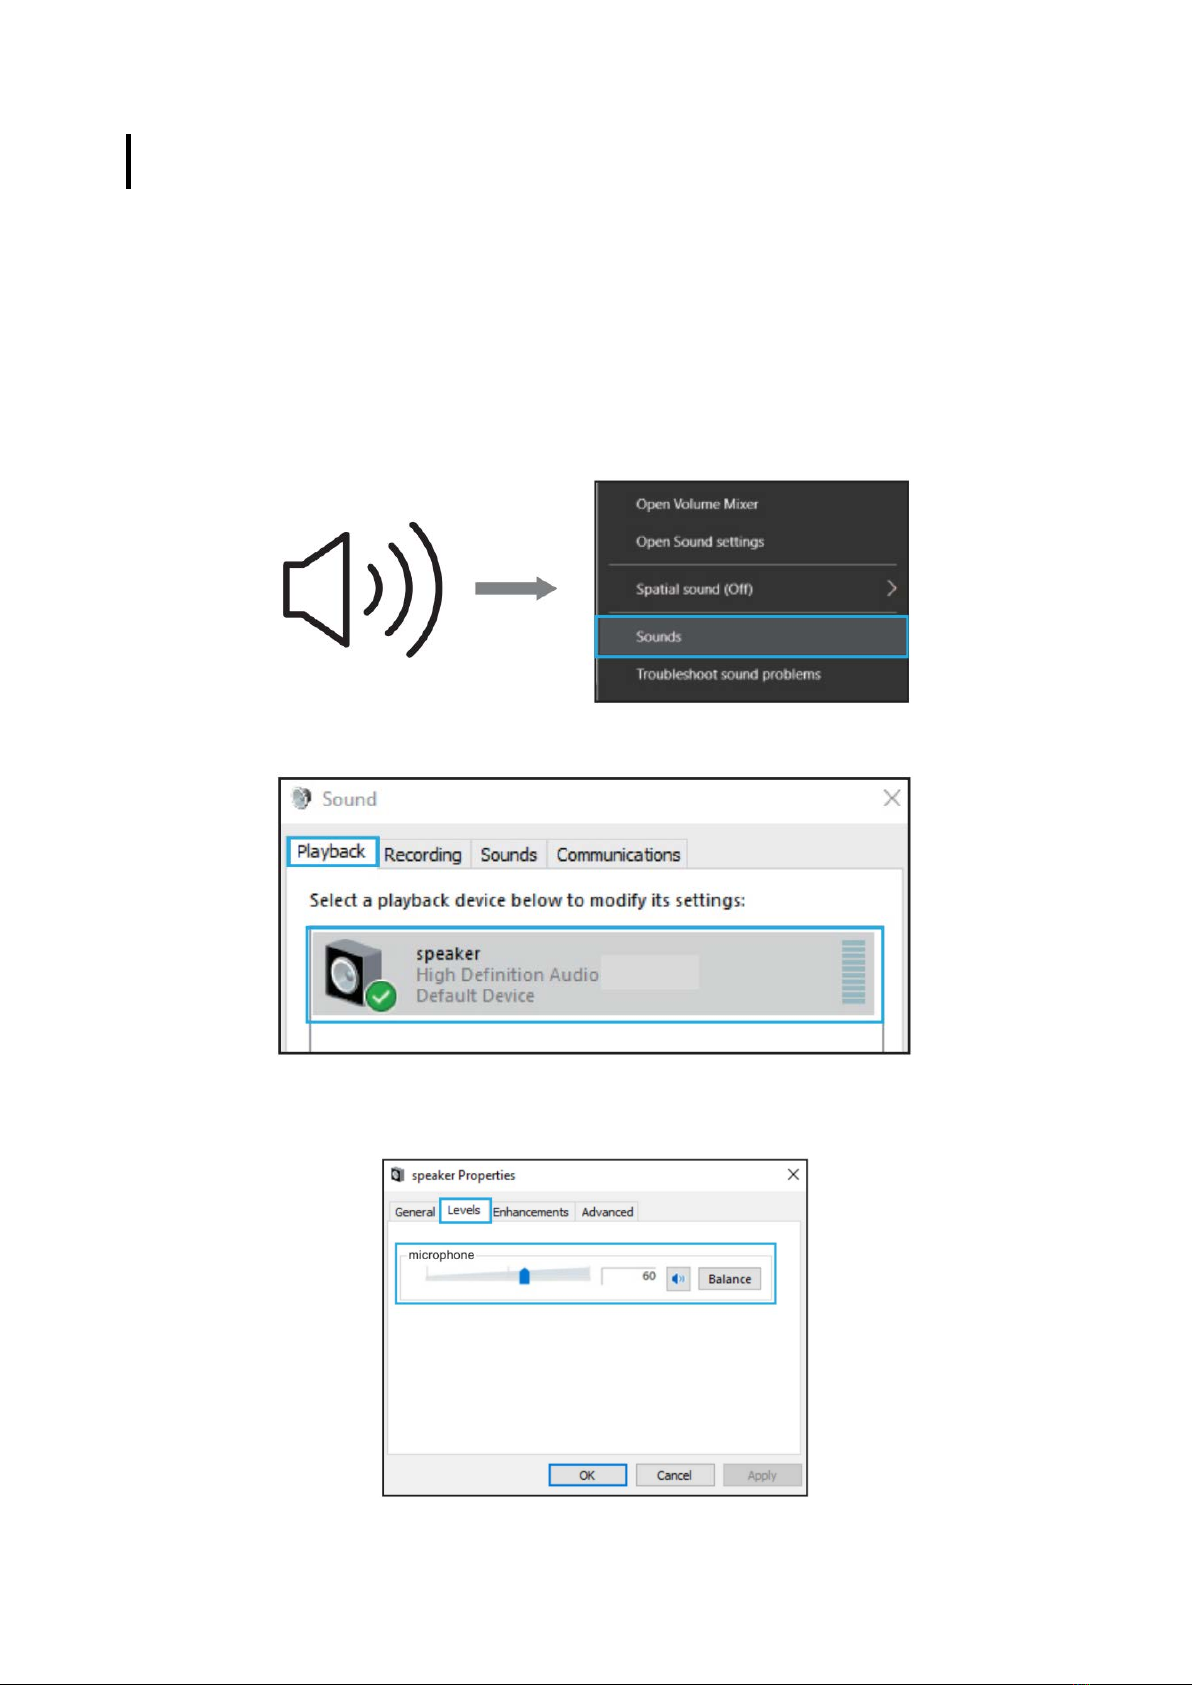
Windows Setup
Please wait for a few seconds when you use the device for the first time, since driver of
the microphone takes time to automatically install. There may be no pop-up window or
message though. If you plug the microphone in a different USB port, the driver installs
again.
1. Right-click the speaker icon at the bottom right of the screen. Click “Sounds”.
2. Confirm the loudspeaker is open.
Click the loudspeaker that is being used, then navigate through
“Properties” →“Levels”, drag progress bar to adjust volume of output.

8
3. Select the Recording tab and choose “USB PnP Audio Device” as the default
device. When you speak to mic, bar-type icon will turn green and bounce. If it
remains unchanged, please restart the computer and re-plug the device. If there’s
still no “USB PnP Audio Device”, please contact our customer service.
If you want to monitor your recording, click Microphone
“Realtek High Definition Audio” →“Properties” →“Listen”,
check “Listen to this device” and hit “Apply”. No sound can be heard through
earphone or speaker if you don’t follow this procedure.
Note: Uncheck “Listen to this device” when you’re using any recording software
or chatting software (e.g. Skype).
4. Double-click on the “USB PnP Audio Device” icon to open the Microphone
Properties window. Select the Levels tab to adjust microphone level (loudness).

9
Troubleshooting
Applicable both for Mac and Windows systems.
1. If computer prompts that it’s unable to identify USB devices, please restart
computer and re-plug the microphone into other USB port.
2. If the microphone is recognized but no sound comes out, please check whether
System Sound is mute and whether you have turned volume control on
microphone to minimum.
3. If the microphone is recognized but no sound comes out and your computer runs
Windows 10, please go to “Settings” “Privacy” “Microphone” and check the “Allow
apps to access the microphone”. Then restart your computer.
Recording Software Settings
Make sure you have the correct input/output selected. Also make sure to uncheck
“Listen to this device” in your computer system when you are using any recording
software, or else you would hear a duet of yourself.
Note: Quit Audacity (or other recording software) if you find USB microphone
unavailable and then plug in the microphone first, secondly start the software again.
Input: USB PnP Audio Device
Output
: Choose whatever device you need

10
Important Notice
Setting Your Software Levels
Correct adjustment of microphone level is important for the optimal performance.
Ideally the microphone level should be as high as possible without overloading the input
of your computer.
If you hear distortion or if your recording program shows levels that are consistently
overloaded (at peak levels), turn the microphone volume (or level) down, either through
your control panel (or system preferences) settings, or through your recording software.
If your recording program shows insufficient level, you can increase the microphone
gain either from the control panel (or system preferences) settings or through your
recording program.
Selecting Software
You have many choices in recording software. Audacity (available for free online at
www.audacity.sourceforge.net) is a widely used software program that provides basic
recording software.
Note: The microphone must be plugged in first and then the recording software is to be
opened.
Positioning Your Microphone
It is important to position the microphone directly in line (or axis) with the person
speaking/singing or other source of sound in order to achieve the best frequency
response of the microphone. For use in speaking/singing applications, the ideal
placement for the microphone is directly in front of the person speaking/singing.
Protecting Your Microphone
Avoid leaving your microphone in the open air or in areas where temperatures exceed
43 °C for extended periods. Extremely high humidity should also be avoided.

11
Caring for Your Microphone
•Store the product in a dry, clean and dust-free environment.
•Keep corrosive chemicals, liquids, and heat sources away from the product to
prevent damage to the mechanical parts.
•Use only a soft, dry cloth to clean the product.
•The fault may be caused by a fall or the impact of an external force.
•Do not attempt to disassemble the product. Otherwise, the warranty expires.
•If a malfunction occurs, have the product inspected or repaired by an authorized
technician.
•Failure to follow all instructions may result in damage to the drive.
•The warranty does not cover the fault of the buyer.
Warranty Conditions
A new product purchased in the Alza.cz sales network is guaranteed for 2 years. If you
need repair or other services during the warranty period, contact the product seller
directly, you must provide the original proof of purchase with the date of purchase.
The following are considered to be a conflict with the warranty conditions, for
which the claimed claim may not be recognized:
•Using the product for any purpose other than that for which the product is intended
or failing to follow the instructions for maintenance, operation and service of the
product.
•Damage to the product by a natural disaster, the intervention of an unauthorized
person or mechanically through the fault of the buyer (e.g. during transport, cleaning
by inappropriate means, etc.).
•Natural wear and aging of consumables or components during use (such as
batteries, etc.).
•Exposure to adverse external influences, such as sunlight and other radiation or
electromagnetic fields, fluid intrusion, object intrusion, mains overvoltage,
electrostatic discharge voltage (including lightning), faulty supply or input voltage and
inappropriate polarity of this voltage, chemical processes such as used power
supplies, etc.
•If anyone has made modifications, modifications, alterations to the design or
adaptation to change or extend the functions of the product compared to the
purchased design or use of non-original components.

12
EU Declaration of Conformity
Identification data of the manufacturer's / importer's authorized representative:
Importer: Alza.cz a.s.
Registered office: Jankovcova 1522/53, Holešovice, 170 00 Prague 7
IČO: 27082440
Subject of the declaration:
Title: USB Microphone
Model / Type: Fifine K669B
The above product has been tested in accordance with the standard (s) used to
demonstrate compliance with the essential requirements laid down in the
Directive (s):
Directive No. (EU) 2014/30/EU
Directive No. 2011/65/EU as amended 2015/863/EU
Prague, 23.7.2020
WEEE
This product must not be disposed of as normal household waste in accordance with
the EU Directive on Waste Electrical and Electronic Equipment (WEEE - 2012/19 / EU).
Instead it shall be returned to the place of purchase or handed over to a public
collection point for the recyclable waste. By ensuring this product is disposed of
correctly, you will help prevent potential negative consequences for the environment
and human health, which could otherwise be caused by inappropriate waste handling of
this product. Contact your local authority or the nearest collection point for further
details. Improper disposal of this type of waste may result in fines in accordance with
national regulations.

13
Vážený zákazníku,
děkujeme Vám za zakoupení našeho produktu. Prosíme, pečlivě si přečtěte následující
instrukce před prvním použitím a uživatelskou příručku si uschovejte pro pozdější užití.
Zejména dbejte na bezpečnostní pokyny. Pokud máte jakékoliv dotazy či připomínky
ohledně přístroje, prosíme, obraťte se na zákaznickou linku.
✉www.alza.cz/kontakt
✆+ 420 255 340 111
Obsah balení
1× USB Mikrofon s USB kabelem 180cm
1× Kovový stativ
1× Uživatelská příručka
Technické specifikace
Zdroj napájení
5V
Polární vzor
Jednosměrný
Frekvenční odezva
20 Hz – 20 kHz
Citlivost
-34 dB ± 30 % (při 1 kHz)
Impedance zátěže
1000 Ω
Ekvivalentní hladina hluku
16 dB-A
Max. SPL
130 dB (při 1 kHz ≤ 1 % T.H.D)
Poměr S / N
78 dB
Elektrický proud
3 mA

14
Úvod
Při připojování mikrofonu k USB portu hlasitost snižte na minimum a postupně hlasitost
zvyšte, abyste během používání dosáhli co nejlepšího efektu.
Ovládání hlasitosti
Zvýšit hlasitost
Ve směru hodinových ručiček (otočte
doprava)
Snížit hlasitost
Proti směru hodinových ručiček (otočte
doleva)
Ztlumit Proti směru hodinových ručiček (otočte
maximálně doleva)
Přední část mikrofonu by měla směřovat ke zdroji zvuku (ikona HLASITOSTI označuje
přední část mikrofonu). Bez ohledu na to, jaký nastavíte úhel nebo polohu mikrofonu,
mikrofon zajistěte tak, aby jeho přední část směřovala k vašim ústům, a abyste dosáhli
co nejlepšího efektu snímání.
15
Instalace a seřízení stativu
1. V případě potřeby upravte úhel
mikrofonu pomocí šroubku otočného
držáku. Otočením doleva uvolněte,
otočením doprava utáhněte.
2. Otočte mikrofon proti směru
hodinových ručiček. Otočením mikrofonu
ve směru hodinových ručiček se stativ
zlomí.
3. Zašroubováním otočného čepu upravte úhel mikrofonu vodorovně o 360 °.
16
MacOS Nastavení
1. Připojte volný konec dodaného USB kabelu do USB portu v počítači. Váš počítač
automaticky rozpozná USB zařízení a nainstaluje ovladač.
2. Chcete-li jako zvukový vstup vybrat K669, nejprve otevřete systémové předvolby.
3. Dále kliknutím na “Sound” (Zvuk) zobrazte panel Předvolby zvuku.
4. Klikněte na kartu “Input“ (Vstup) a jako zařízení pro zvukový vstup vyberte “USB
PnP Audio Device“.
Poznámka: Pokud chcete při používání MacBooku sledovat svůj hlas, musíte nejprve
zapnout jakýkoli nahrávací software (např. Audacity). Nezapomeňte kliknout na
“Software Playthrough (ON)“ a poté začít kliknutím na tlačítko “Record“ (Nahrávání), jinak
neuslyšíte žádný zvuk.
Pokud počítač nedokáže toto USB zařízení identifikovat, restartujte počítač a znovu
zapojte mikrofon do jiného USB portu.
17
Windows Nastavení
Při prvním použití zařízení počkejte několik sekund, protože automatická instalace
ovladače mikrofonu vyžaduje čas. Nemusí se zobrazit žádné vyskakovací okno ani
zpráva. Pokud připojíte mikrofon k jinému USB portu, ovladač se nainstaluje znovu.
1. Klikněte pravým tlačítkem na ikonu reproduktoru v pravé dolní části obrazovky.
Klikněte na “Sounds” (Zvuky).
2. Zkontrolujte, zda je reproduktor otevřený.
Klikněte na používaný reproduktor a poté procházejte “Properties” (Vlastnosti) →
“Levels”(Úrovně), ukazatelem hlasitosti upravte hlasitost výstupu.

18
3. Vyberte kartu “Nahrávání“ (Recording) a jako výchozí zařízení zvolte “USB PnP
Audio Device“. Když mluvíte do mikrofonu, ikona pruhu zezelená a odrazí se.
Pokud se nezmění, restartujte počítač a znovu zařízení připojte. Pokud “USB PnP
audio zařízení“ stále neexistuje, obraťte se na náš zákaznický servis.
Chcete-li sledovat záznam, klikněte na Mikrofon “Realtek High Definition Audio“
→“Properties“(Vlastnosti) →“Listen“(Poslouchat), zaškrtněte “Listen to this
device“ (Poslouchat toto zařízení) a stiskněte “Apply“ (Použít). Pokud tento postup
nedodržíte, neuslyšíte žádný zvuk ze sluchátka ani reproduktoru.
Poznámka: Pokud používáte jakýkoli nahrávací software nebo chatovací software
(např. Skype), zrušte zaškrtnutí políčka “Listen to this device“ (Poslouchat toto
zařízení).
4. Poklepáním na ikonu “USB PnP Audio Device“ otevřete okno “Properties“
(Vlastnosti mikrofonu). Vyberte kartu “Levels“ (Úrovně) a upravte úroveň
mikrofonu (hlasitost).

19
Odstranění problémů
Platí pro systémy Mac i Windows.
1. Pokud vás počítač vyzve, že nedokáže identifikovat USB zařízení, restartujte
počítač a znovu připojte mikrofon k jinému USB portu.
2. Pokud je mikrofon rozpoznán, ale nevychází z něj žádný zvuk, zkontrolujte, zda
není vypnutý systém zvuku a zda jste nenastavili ovládání hlasitosti na mikrofonu
na minimum.
3. Pokud je mikrofon rozpoznán, ale nevychází z něj žádný zvuk a na vašem počítači
běží Windows 10, přejděte do části “Settings” (Nastavení) “Privacy” (Soukromí)
“Microphone” (Mikrofon) a zaškrtněte políčko “Allow apps to access the
microphone” (Povolit aplikacím přístup k mikrofonu) “, poté restartujte počítač.
Nastavení nahrávacího softwaru
Ujistěte se, že jste vybrali správný vstup / výstup. Pokud používáte jakýkoli nahrávací
software, nezapomeňte ve svém počítačovém systému zrušit zaškrtnutí “Listen to this
device” (Poslouchat toto zařízení), jinak uslyšíte sebe sama.
Poznámka: Ukončete Audacity (nebo jiný nahrávací software), pokud zjistíte, že USB
mikrofon není k dispozici, nejprve připojte mikrofon, a poté software znovu spusťte.
Vstup: USB PnP audio
Výstup: Vyberte si jakékoli zařízení, které potřebujete.

20
Důležité oznámení
Nastavení úrovní softwaru
Správné nastavení úrovně mikrofonu je důležité pro optimální výkon. V ideálním případě
by úroveň mikrofonu měla být co nejvyšší, aniž by došlo k přetížení vstupu vašeho
počítače.
Pokud uslyšíte zkreslení nebo pokud váš záznamový program zobrazuje úrovně, které
jsou trvale přetížené (na špičkových úrovních), snižte hlasitost mikrofonu (nebo úroveň)
dolů, a to buď pomocí nastavení ovládacího panelu (nebo systémových předvoleb), nebo
prostřednictvím nahrávacího softwaru. Pokud váš záznamový program vykazuje
nedostatečnou úroveň, můžete zvýšit zesílení mikrofonu buď z nastavení ovládacího
panelu (nebo systémových předvoleb) nebo prostřednictvím vašeho záznamového
programu.
Výběr softwaru
V nahrávacím softwaru máte mnoho možností. Audacity (k dispozici zdarma online na
www.audacity.sourceforge.net) je široce používaný softwarový program, který poskytuje
základní nahrávací software.
Poznámka: Nejprve musí být zapojen mikrofon a poté se musí otevřít záznamový
software.
Umístění mikrofonu
Pro dosažení nejlepší frekvenční odezvy mikrofonu je důležité umístit mikrofon přímo do
linie (nebo osy) s mluvícím / zpívajícím nebo jiným zdrojem zvuku. Pro použití při
mluvení / zpěvu je ideální umístění mikrofonu přímo před mluvící / zpívající osobou.
Ochrana mikrofonu
Nenechávejte mikrofon na volném prostranství nebo v oblastech, kde teploty přesahují
43 ° C po delší dobu. Rovněž je třeba se vyvarovat extrémně vysoké vlhkosti.
Other manuals for K669B
1
Table of contents
Languages:
Other Fifine Microphone manuals

Fifine
Fifine K670 User manual

Fifine
Fifine K726 User manual

Fifine
Fifine K720 User manual

Fifine
Fifine T683 User manual

Fifine
Fifine AMPLIGAME A8 PLUS User manual

Fifine
Fifine K651 User manual

Fifine
Fifine K669B User manual

Fifine
Fifine K025 User manual

Fifine
Fifine K669 User manual

Fifine
Fifine K658 User manual


