Fire Pro FP500V User manual

Smoke Alarm User Manual
Model number: FP500V
Thank you for purchasing our smoke alarm. Please take a few
minutes to read the user’s manual thoroughly and familiarise
yourself and your family with its operation and save it for
future reference.
Product Specications:
POWER: DC9V Battery
OPERATION CURRENT: <10uA (standby), <30mA
(alarm)
ALARM VOLUME: >85dB(A) at 3 meters.
ALARM SENSITIVITY: 0.090-0.150dB/m.
SMOKE ALARM DEVICE SOUND PATTERN:
ISO8201 (BI 0.5s - pause 0.5s - BI 0.5s - pause 0.5s - BI 0.5s
- pause 1.5s, with the red LED ash, repeat this alarm pattern)
COMPLY WITH: AS3786:2014
Description:
The unit is a photoelectric 9V DC smoke alarm. With the
photoelectric technology. It is more sensitive to detecting slow
smoulder res which generally have thick, black smoke, little
heat and may smoulder for hours before bursting into ames.
The smoke alarm does not contain the radioactive material
which is harmless to the environment. Smoke alarms should
be installed in every room and area of the home (except the
bathroom), to ensure the everyone in the home will be able to
hear and respond to the alarm sound. For minimum protection
you should t an alarm in the hallway between the living
areas and sleeping areas. Place the unit as near to the living
areas as possible and ensure the alarm is audible when the
bedrooms are occupied.
Typical single storey dwelling recommended protection:
Install a smoke alarm on the ceiling inside each bedroom
and in the hallway outside each separate sleeping area. If a
bedroom area hallway is more than 9.1m long, install a smoke
alarm at each end. If there is a basement: install a smoke
alarm on the basement ceiling at the bottom of the stairwell.
Typical multi-storey dwelling recommended protection.
Install a smoke alarm on the ceiling of wall inside each
bedroom and in the hallway outside each separate sleeping
area. If a bedroom area hallway is more than 9.1m long,
install a smoke alarm at each end. Install a smoke alarm at the
top of a rst–to-second oor stairwell.
Important Safety Information:
1: The test button accurately tests smoke alarm functions. Do
not use any other test method. Test smoke alarm weekly to
ensure proper operation.
2: Do not remove or disconnect battery. This will negate your
protection. Open windows or fan the air around smoke
alarm to silence it.
3: Observe and follow all local and national electrical and
building codes for installation.
4: This smoke alarm is designed to be used inside a single
family residence only. In multi-family buildings, each
individual living unit should have its own smoke alarms.
Do not install in non-residential buildings. This smoke
alarm is not a substitute for a complete alarm system.
5: Install a smoke alarm in every room and on every level of
the home. Smoke may not reach the smoke alarm for many
reasons. For example, if a re starts in a remote part of the
home, on another level, in a chimney, wall, roof, or on the
other side of a closed door, smoke may not reach the smoke
alarm in time to alert household members. A smoke alarm
will not promptly detect a re except in the area or room in
which it is installed.
6: Smoke alarm may not alert every household member every
time. The alarm horn is loud in order to alert individuals
to a potential danger. However, there may be some
circumstances where a household member may not hear the
alarm (i.e. outdoor or indoor noise, sound sleepers, drug or
alcohol usage, the hard of hearing, etc.). If you suspect that
this smoke alarm may not alert a household member, install
and maintain specialty smoke alarms. Household members
must be able to hear the alarm’s warning sound and quickly
respond to it to reduce the risk of damage, injury, or death
that may result from re. If a household member is hard
of hearing, install special smoke alarms with lights or
vibrating devices to alert occupants.
7: Smoke alarms can only sound their alarms when they
detect smoke or detect combustion particles in the air.
They do not sense heat, ame, or gas. This smoke alarm
is designed to give audible warning of a developing
re. However, many res are fast-burning, explosive, or
intentional, and others are caused by carelessness or safety
AS 3786-2014
Lic.SMK40627
SAI Global
- 1 -

hazards. In these circumstances, smoke may not reach the
unit alarm QUICKLY ENOUGH to ensure safe escape.
8: Smoke alarms have limitations. This smoke alarm is not
foolproof and is not warranted to protect lives or property
from re. Smoke alarms are not a substitute for insurance.
Homeowners and renters should insure their lives and
property. In addition, it is possible for the smoke alarm to
fail at any time. For this reason, you must test the smoke
alarm weekly and replace unit every 10 years.
Battery Connections:
Battery Specication:
Rating voltage: DC9V (Carbon Zinc, Alkaline, Lithium
Battery
Carbon Zinc Battery
Gold Peak: GP1604S by GPI International (Shenzhen). LTD
Alkaline Battery
Raymax: 6LR61 by Zhejiang Mustang Battery Co., Ltd;
Duracell: 6LR61 or MN1604 by Duracell/P&G company;
Gold Peak: GP1604A by GPI International (Shenzhen). LTD
Lithium Battery
EVE: CR9V/P by EVE Energy Co., Ltd.
Replace Battery:
1: Turn the alarm body counterclockwise and take out the
alarm body from the bracket (see Diagram 5).
2: Take out the old battery, connect the new battery to power
connector, according to Diagram 1.
3: Fix the battery into battery box, t alarm body on bracket
and turn the alarm body clockwise (see Diagram 2).
4: Test smoke alarm using test button. The sound pattern is
3 short beeps - pause 1.5 seconds, repeat it. If there’s no
sound output, it means that the smoke alarm is faulty or the
installing operation is wrong, see “troubleshooting” section
for more information.
Do Not Install Smoke Alarms in the
Following Places:
1: Near appliances or areas where normal combustion
regularly occurs (kitchens, near furnaces, hotwater heaters).
Use specialised smoke alarms with unwanted alarm control
for these areas.
2: In areas with high humidity, like bathrooms or areas near
dishwashers or washing machines. Install at least 3m away
from these areas.
3: Near air returns or heating and cooling supply vents. Install
at least 1m away from these areas. The air could blow
smoke away from the detector, interrupting its alarm.
4: In rooms where temperatures may fall below 5°C or
rise above 45°C, or in humidity higher than 85%. These
conditions will reduce battery life or cause a fault with the
alarm.
5: In extremely dusty, dirty, or insect-infested areas particles
may interfere with smoke alarm operation.
Operation:
Testing
Test the unit to ensure proper operation by pressing the Test
button for at least 5 seconds, this will sound the alarm if the
electronic circuitry, horn and battery are working. If no alarm
sounds, the unit has a defective battery or other failure. DO
NOT use an open ame to test your alarm, you could damage
the alarm or ignite combustible materials and start a re.
Diagram 1
Diagram 2
- 2 -

CAUTION: Due to the loudness (85 decibels) of the alarm,
always stand an arms-length always from the unit when
testing
Test the alarm weekly to ensure proper operation. Erratic or
low sound coming from your alarm may indicate a defective
alarm
NOTE: WEEKLY TESTING IS REQUIRED.
LED indicators
This alarm is equipped with a red LED indicator, with two
modes of operation.
Red LED-Flashing every 32 seconds: indicates that the smoke
alarm is operating properly.
RED LED-Flashing: when the Test button is pressed, or when
the smoke alarm sense particles of combustion and goes into
alarm (constant pulsating sound), the red LED will ash
once per second. The ashing LED and pulsating alarm will
continue until the air is cleared
Fault indication - The unit will generate a “chirp” between
two ashes every 32 seconds when the unit goes into fault
mode.
NOTE: WEEKLY TESTING IS REQUIRED.
DANGER: If the alarm sounds, and it is not being tested, it
means the unit is sensing smoke, THE SOUND OF THE
ALARM REQUIRES YOUR IMMEDIATE ATTENTION
AND ACTION.
Maintenance and Cleaning:
In addition to weekly testing, the alarm requires yearly battery
replacement and periodic cleaning to remove dust, dirt, and
debris.
Clean the alarm at least once a month to remove dust, dirt, or
debris. Always turn off power before cleaning.
Use a vacuum cleaner with the soft brush, vacuum all sides
and covers of smoke alarm. Be sure all the vents are free of
debris. Use a damp cloth to clean the alarm’s cover.
This smoke alarm uses a 9 volt battery. A fresh battery should
last for one year under normal operating conditions.
This alarm has a low battery monitor which will cause the
alarm to “chirp” and at the same time as the red LED ash
approx every 32 seconds for a minimum of seven days when
the battery gets low. Replace the battery when this condition
occurs. Please refer to “REPLACE BATTERY”.
IMPORTANT: Do not attempt to remove the cover to clean
inside. This will affect warranty.
Repair:
Caution: Do not attempt to repair the alarm. It will affect your
warranty.
If the alarm is not operating properly, and is still under
warranty, return it to the original place you purchased it from.
Pack it in a well-padded carton, and ship to the original place
of purchase.
If the alarm is out of warranty, replace it immediately with a
comparable alarm.
Practice Fire Safety:
If the alarm sounds, and you have not pushed the test button,
it is warning of a dangerous situation, your immediate
response is necessary. To prepare for such occurrences,
develop family escape plans, discuss them with all household
members, and practice them regularly.
1: Expose everyone to the sound of a smoke alarm and
explain what the sound means.
2: Determine two exits from each room and an escape route to
the outside from each exit.
3: Teach all household members to touch the door and use
an alternate exit when the door is hot, instruct them not to
open the door if the door is hot.
4: Teach household members to crawl along the oor to stay
below dangerous smoke, fumes and gases.
5: Determine a safe meeting place for all members outside the
building.
What to Do in Case of Fire:
1: Do not be panic; stay calm.
2: Leave the building as quickly as possible. Touch doors to
feel if they were hot before opening them. Use an alternate
exit if necessary. Crawl along the oor, and don’t stop to
collect anything.
3: Meet at a pre-arranged meeting place outside the building.
4: Call the re department form outside the building.
5: Do not go back inside a burning building. Wait for the re
department to arrive.
Note: These guidelines will assist you in the event of a re,
however, to reduce the chance that res will start, practice re
safety rules and prevent hazardous situations.
- 3 -
Trouble shooting:
DO NOT disconnect battery to quieten an unwanted alarm.
This will remove your protection. Fan the air or open a
window to remove smoke or dust.
Problem Trouble shooting
Smoke alarm does not sound
when tested. NOTE: Push
test button for at least ve
seconds while testing!
1. Remove smoke alarm
from bracket. Then check
the battery is properly
connect to battery
connector.
2. Clean smoke alarm.
The alarm chirp occurs every
about approx 32 seconds,
at the same time as the red
LED ash once
The battery is in low battery
status, please replace battery,
and refer to “replace battery”
section.
Smoke alarm chirp occurs
every approx 32 seconds,
alarm goes into fault mode.
1. Clean smoke alarm. Please
refer to the “maintenance
and cleaning” section.
2. Purchase and change
another smoke alarm if the
problem still exist
Smoke alarm sounds
unwanted alarms
intermittently or when
residents are cooking, taking
showers, etc.
1. Clean smoke alarm. Please
refer to the “maintenance
and cleaning” section.
2. Move smoke alarm to a
new location.
The alarm sounds different
from it is used to. It starts
and stops.
1: This alarm is operating
correctly.
2: Clean smoke alarm.
Please refer to the
“maintenance and
cleaning” section.
Warranty Information:
3-year limited smoke alarm warranty
Company warrants to the original consumer that each
new smoke alarm to be free from defects in material and
workmanship under normal use and service for a period of 3
years from the date of purchase. This warranty does not cover
damage resulting from accident, misuse or abuse or lack of
reasonable care of the product.
In no case shall company be liable for any incidental or
consequential damages for breach of this or any other
warranty express or implied, whatsoever. The defective
product can be mailed to the address on page 6 with details
explaining the problem.
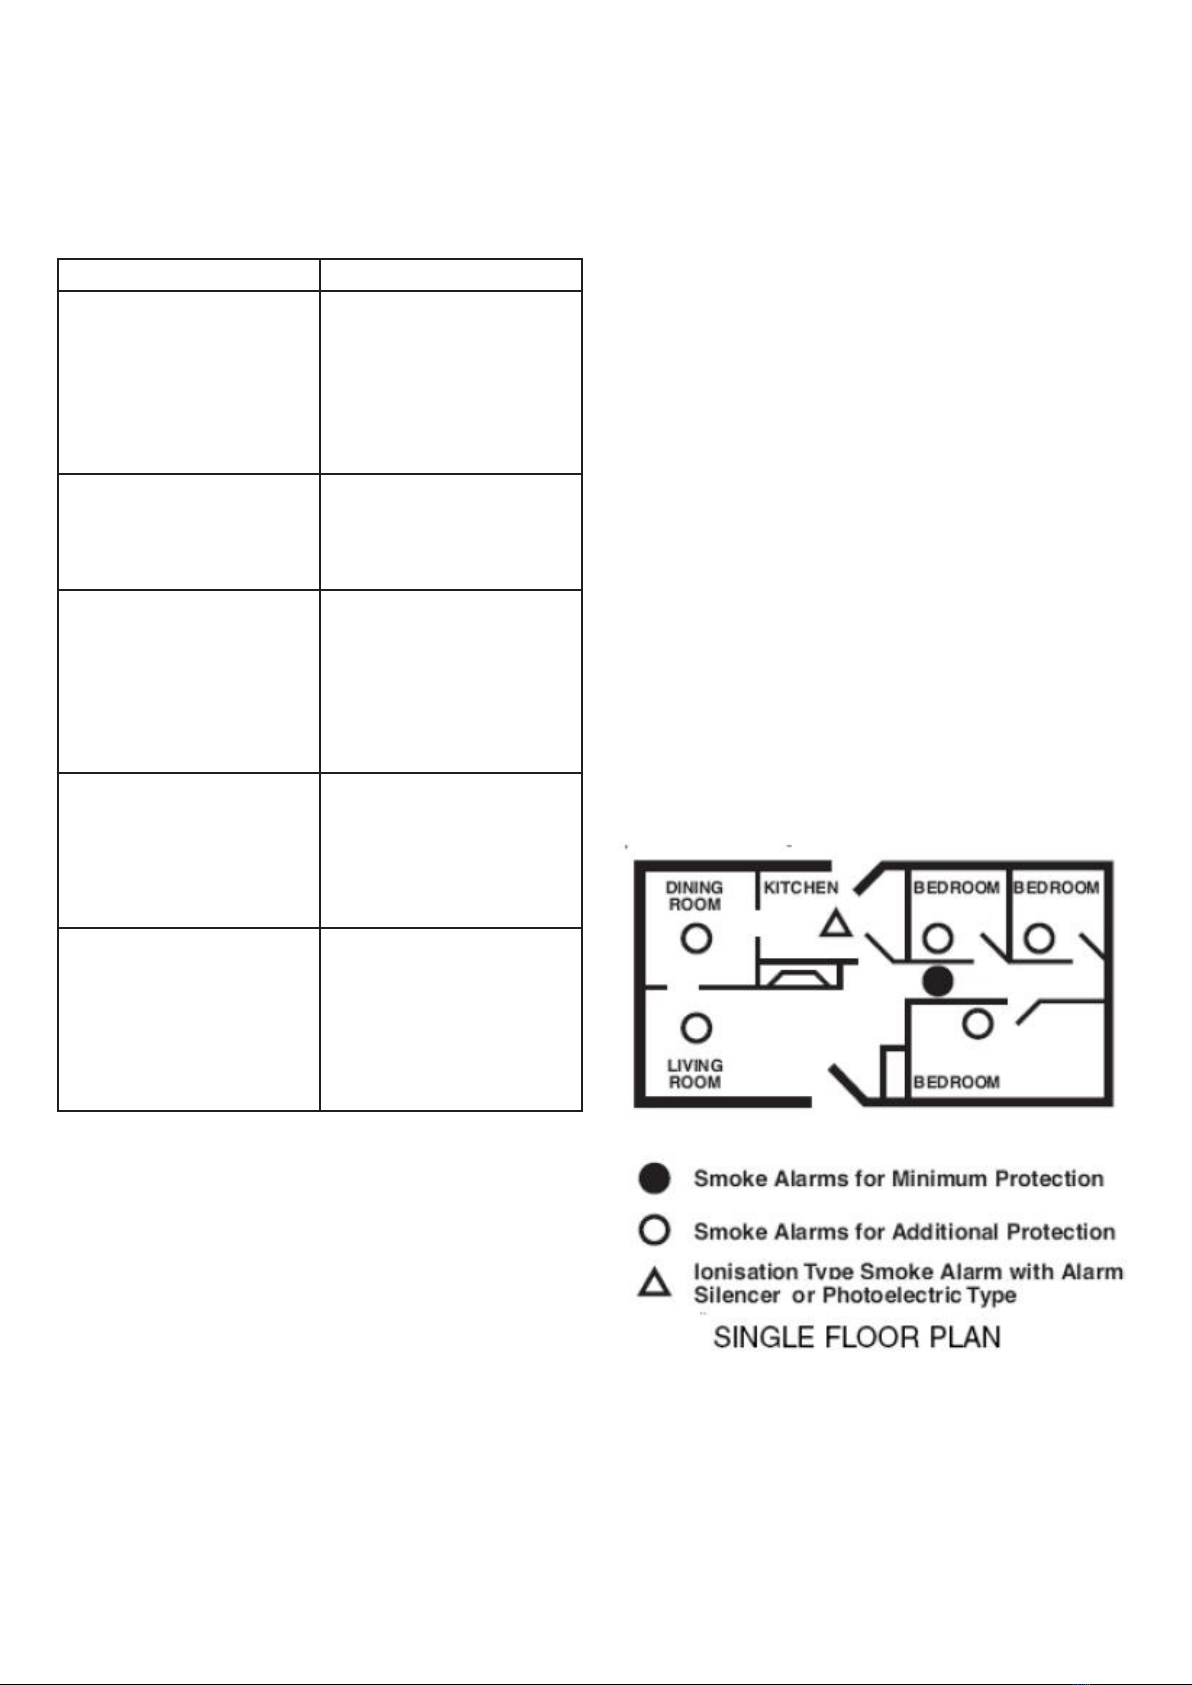
Where is the best place to install alarm:
• At rst you need install one unit in each bedroom and
hallway. (see Diagram 3).
• Install it in the stairway and on every oor. (see Diagram 4)
• Smoke, heat and burning things will spread horizontally
after rising to the ceiling, so install the alarm in the middle
of the ceiling of an ordinary structure house let the alarm
induce every corner.
• Install an alarm in every bedroom.
• Install an alarm in every room where large electrical
appliances are operated (for example portable heaters ).
• If the alarm cannot be installed in the middle of the ceiling
for any reason, position the alarm at least 30cm away from
the wall and corner of the room (see Diagram 5).
• Put smoke alarm at both ends of a bedroom hallway or large
room if the hallway or room is more than 9.1 m (30 ft) long.
• Install smoke alarms on slopped, peaked or cathedral
ceilings between 500 and 1500mm from the highest point
of the ceiling. Smoke alarms in rooms with ceiling slopes
greater than 1m in 8 m horizontally shall be located on the
high side of the room (See Diagram 6)
Diagram 3
- 4 -

Installation:
• Turn the alarm body counterclockwise and take off the
bracket.
• Press the bracket on the installation position, mark
installation hole of the bracket with pencil.
• Drill two installation holes with electric drill. Make diameter
of holes 5mm. Strike the two plastic plugs into holes with
hammer.
• Attach the bracket to the plastic plugs and x the screws
tightly into the plastic plugs. (refer to Diagram 7).
• Connect the battery to power connector.
• Fix the battery into battery box.
• Fit the alarm on the bracket and turn the alarm body
clockwise until matching well on the bracket.
• Test smoke alarm using test button. The alarm will sound 3
short beeps – 1.5 seconds pause, then repeat it until release
the button.
Diagram 4
- 5 -

WARNING:
To prevent injury, this unit must be securely attached to the
wall or ceiling in accordance with the installation instructions.
FirePro
138 – 140 Bayeld Rd East,
Bayswater North, VIC, 3153.
Australia.
P (03) 9720 4333
F (03) 9720 4344
MODEL NUMBER: FP500V
Diagram 7
- 6 -
Table of contents
Other Fire Pro Smoke Alarm manuals


