Cavius 2203-002 User manual

All alarms to be connected in the house should be put
into ‘Learn Mode’ by sliding the switch on the back of
the alarm to the ‘Learn Mode’ position.
As the other alarms receive the specific house code,
they will also flash the LED light.
When all alarms flash the red LED, they are connected
and can be switched out of ‘Learn Mode’ and installed.
The distance between interlinked alarms depends on
the house layout and they should always be tested after
installation. It is not advised to install alarms with a
separation of more than 10m.
Diameter: 97mm. Height: 41mm (without mounting
base) 52mm (with mounting base).
Interlinked by RF: 926.365 MHz
Complies to standards: AS3786:2014
Mains powered smoke alarm device
Model number: 2203-002
Developed by CAVIUS™
This smoke alarm is designed for private homes.
TECHNICAL INFORMATION
The smoke alarm is powered by mains power (110-
230V AC), with a lithium CR2 back-up battery.
It can be Radio Frequency (RF) interlinked with other
2203 alarms and with other CAVIUS™ Wireless Family
alarms. The maximum number of alarms that can be
interlinked within a house group are 32.
Please note: These must be alarms from the CAVIUS™
Wireless Family range.
CHAMBER
FILTER
OPTIONAL HOLE
FOR LAMP WIRE
TEST BUTTON
SIREN RED & GREEN LED
1. HOW TO SET UP AND CONNECT ALARMS:
Start by pulling out the battery isolation strip in the
battery compartment as shown.
Please note: RF connection is done with the device
powered with battery only. You do not have to connect
the power supply unit. The product label must not be
removed as it contains important information regarding
the product.
MAINS
POWERED
SMOKE ALARM
ISOLATION
STRIP
1NORMAL MODE
2LEARN MODE
1
2
PLEASE READ THE USER GUIDE
CAREFULLY BEFORE INSTALLATION AND
RETAIN FOR FUTURE USE.
Please note: The learn switch placed on the back of
the alarm can only be in learn position when the alarm
is disassembled from the power supply unit. The learn
switch will automatically switch to normal position
when the alarm head is fitted to the power supply unit.
The red LED will light up to indicate that ‘Learn Mode’
has been selected.
Do not remove the battery during ‘Learn Mode’ as
this will interrupt the learn process. Press and hold the
test button on one alarm only, until it beeps and the
LED flashes. This alarm will become the master and will
start sending out a specific house code to the
other alarms.
2. THE BEST AREAS TO INSTALL THE SMOKE ALARM:
• Note the local country regulations regarding installation
and compliance.
• Note the local regulations and information for insurance
company policy regarding installed smoke alarms.
• Install an alarm between possible fire sources and
bedrooms as a minimum.
• Install alarms on each floor of the house, in hallways and
stairways.
• Alarms in each room such as bedrooms and living rooms.
Additional alarms increase the security.
3. AREAS WHERE NOT TO INSTALL SMOKE ALARMS:
• In dusty rooms
• At the top of a high pointed ceiling, in ceiling corners,
and within 50cm of a wall.
• In rooms where temperature goes outside the range
+4° to 38°C or above 90% relative humidity not
condensing.
• In kitchens, garages, laundries, or too close to
fireplaces; areas where either dampness, gases or
smoke could occur.
Place the alarm where it is reachable in order to test the
alarm and for maintenance.
Smoke Heat
Minimum 50cm from wall
Wall
Ceiling
Minimum 50cm
from peak.
Ceiling
1

N
L1 L2
N
L1 L2
N
L1 L2
N
L1 L2
N
L1 L2
N
L1 L2
N
L1 L2
N
L1 L2
N
L1 L2
N
L1 L2
N
L1 L2
N
L1 L2
MARK UP
4 SCREW HOLES
WITH A PEN
4. PLACEMENT:
The smoke alarm is designed to be installed on a ceiling.
With a minimum of one smoke alarm per floor and
a maximum distance between smoke alarms of 10
meters.
For ceiling installation:
The smoke alarm should be a minimum of 50cm from
the wall.
Minimum 50cm
from wall
Wall
Ceiling
Minimum 50cm
from peak
For cathedral or peak ceiling:
5. INSTALLING THE SMOKE ALARM:
NOTE: THIS ALARM NEEDS TO BE INSTALLED BY A
PROFESSIONAL.
MAKE SURE ELECTRICITY IS SWITCHED OFF BEFORE
STARTING THE INSTALLATION.
CAUTION: LIVE, NEUTRAL AND EARTH MUST BE
CORRECTLY INSTALLED AND NOT MIXED UP.
NOTE: The alarm is delivered in the packaging with a
dust cover, installed to protect the alarm for exposure
to excessive dust which could potentially damage or
reduce the function of the alarm while the building is
under construction. The dust cover must be removed
after the building is fully cleaned.
OPTION 1: ALARM MOUNTED ON MOUNTING BASE ON
THE CEILING:
Use the mounting base ring to mark the screw holes on
the ceiling.
For surface wiring pass the feed wire through
the mounting base cable holder and screw after
termination.
Connect the 3 wires to the power supply unit: Live feed
(L1), neutral (N), Ground ( ).
Screw the mounting base on the ceiling. Screw the power supply unit on the mounting base. Once the mounting base with power supply unit is
installed, attach the alarm by twisting clockwise until
it clicks. If the battery is either missing or inserted
incorrectly, the smoke alarm will not be able to click
into the mounting base.
OPTION 2: ALARM MOUNTED ON TOP OF CONDUIT
BOX:
Connect the 3 wires from the conduit box on the alarm
power supply unit:
Live feed (L1), neutral (N), Ground ( ).
Screw the power supply unit on conduit box. NOTE: Mounting base is not used when the alarm is
installed on conduit box.
USE THE
ENCLOSED
SCREWS AND
PLUGS
MARK UP
SCREW
HOLES WITH
A PENCIL
2

Connect the 4 wires to the power supply unit: Live feed
(L1), neutral (N), Ground ( ), lamp feed wire (L2).
The CAVIUS™ Wireless Family have two different alarm
signals:
Alarm signal 1 (--- --- ---) is life threatening alarms,
like a smoke alarm.
Alarm signal 2 (- - -) is a non life threatening alarm, like
a flooding alarm:
Smoke alarm signal: --- --- ---
Heat alarm signal: --- --- ---
Flood alarm signal: - - -
CO alarm low level signal: - - -
CO alarm high level signal: --- --- ---
Please note that only the originating alarm’s red LED
will flash, so it can be identified.
9. PAUSE/HUSH FUNCTION:
If the smoke alarms are set into a false alarm by
cooking, fireplace, etc. they can be hushed for 10
minutes by pressing the test button on the originating
smoke alarm only (indicated by the flashing LED).
The reason for this is that it is necessary to locate the
source of the alarm before using the hush function. This
is to make sure that it is not a life-threatening situation.
OPTION 3: ALARM MOUNTED WITH LAMP SOCKET:
Drill through the middle of the alarm (Diam. 8mm)
Minimum 10cm
Install the power supply unit into the mounting base
ring or use the conduit box as shown in option 1 & 2.
NOTE: Alarm supply must be different from the lamp
supply which can be switched ON and OFF.
Remove the plastic cover to access to the power supply
unit connector.
Pass the lamp wire through the smoke alarm.
Install the cableholder and replace the cover.
NOTE: After putting the wires through the alarm, check
if the test button can move freely. If the hole is too
small the test button cannot move and will not function
correctly.
Light bulb: maximum 75W
Lamp: maximum 2 kgs weight
6. TEST FUNCTION:
After installation, and at least once per quarter, test all
of your alarms to ensure they are operating correctly
and are within range of each other.
It is recommended to check visually every week if the
LED flashes correctly (every 48sec.).
Press the test button on any alarm for at least 10
seconds.This will send out a test signal from the alarm;
all other connected alarms should receive the signal
within a short time. The alarms will emit a short beep
and the LED will flash every 8 seconds for 2 minutes.
NOTE: Test function also transmits a weaker RF signal
to ensure an optimal operation in normal conditions.
When the test signal is sent out, the alarms will respond
in two ways:
1. A single beep every 8 seconds indicates that the
alarms are connected and functioning.
2. Three short beeps every 8 seconds indicates a
smoke sensor fault. The alarm should be cleaned by
running the vacuum (on a low setting) around the
smoke alarm chamber and in the provided vacuum slot,
then tested again.
If required this indication can be stopped early on each
alarm by a short press of the test button.
TIP: It is safe to cover the sound output holes with
your finger or a cloth during the testing to minimize the
sound level emitted.
If the problem continues, please visit
www.cavius. co.nz or www.cavius.com.au
for any trouble shooting.
7. NORMAL MODE:
In normal mode the LED will flash every 48 seconds to
show correct operation.
The green LED is on when the alarm is connected to
mains power. It may take up to 1 minute to indicate that
mains power has been connected.
8. ALARM MODE:
When the smoke is detected, the smoke alarm will go
into ‘Alarm Mode’. It will sound the alarm signal and
the red LED will flash.
The smoke alarm will also transmit the alarm signal to
the other connected alarms, which will also sound the
alarm signal after a short delay.
Install the wires as shown.
3
L1
NL2
L2
N
N
L1 L2
N
L1 L2

The mains powered smoke alarm can be used together
with alarms in the CAVIUS™ Wireless Family range:
Smoke, Heat, Flood, CO & mains power alarms. All
CAVIUS™ interconnected alarms within the Wireless
Family run on the same frequency and use the same
data protocol. This means that the wireless system can
consist of a combination of smoke, heat, flood etc.
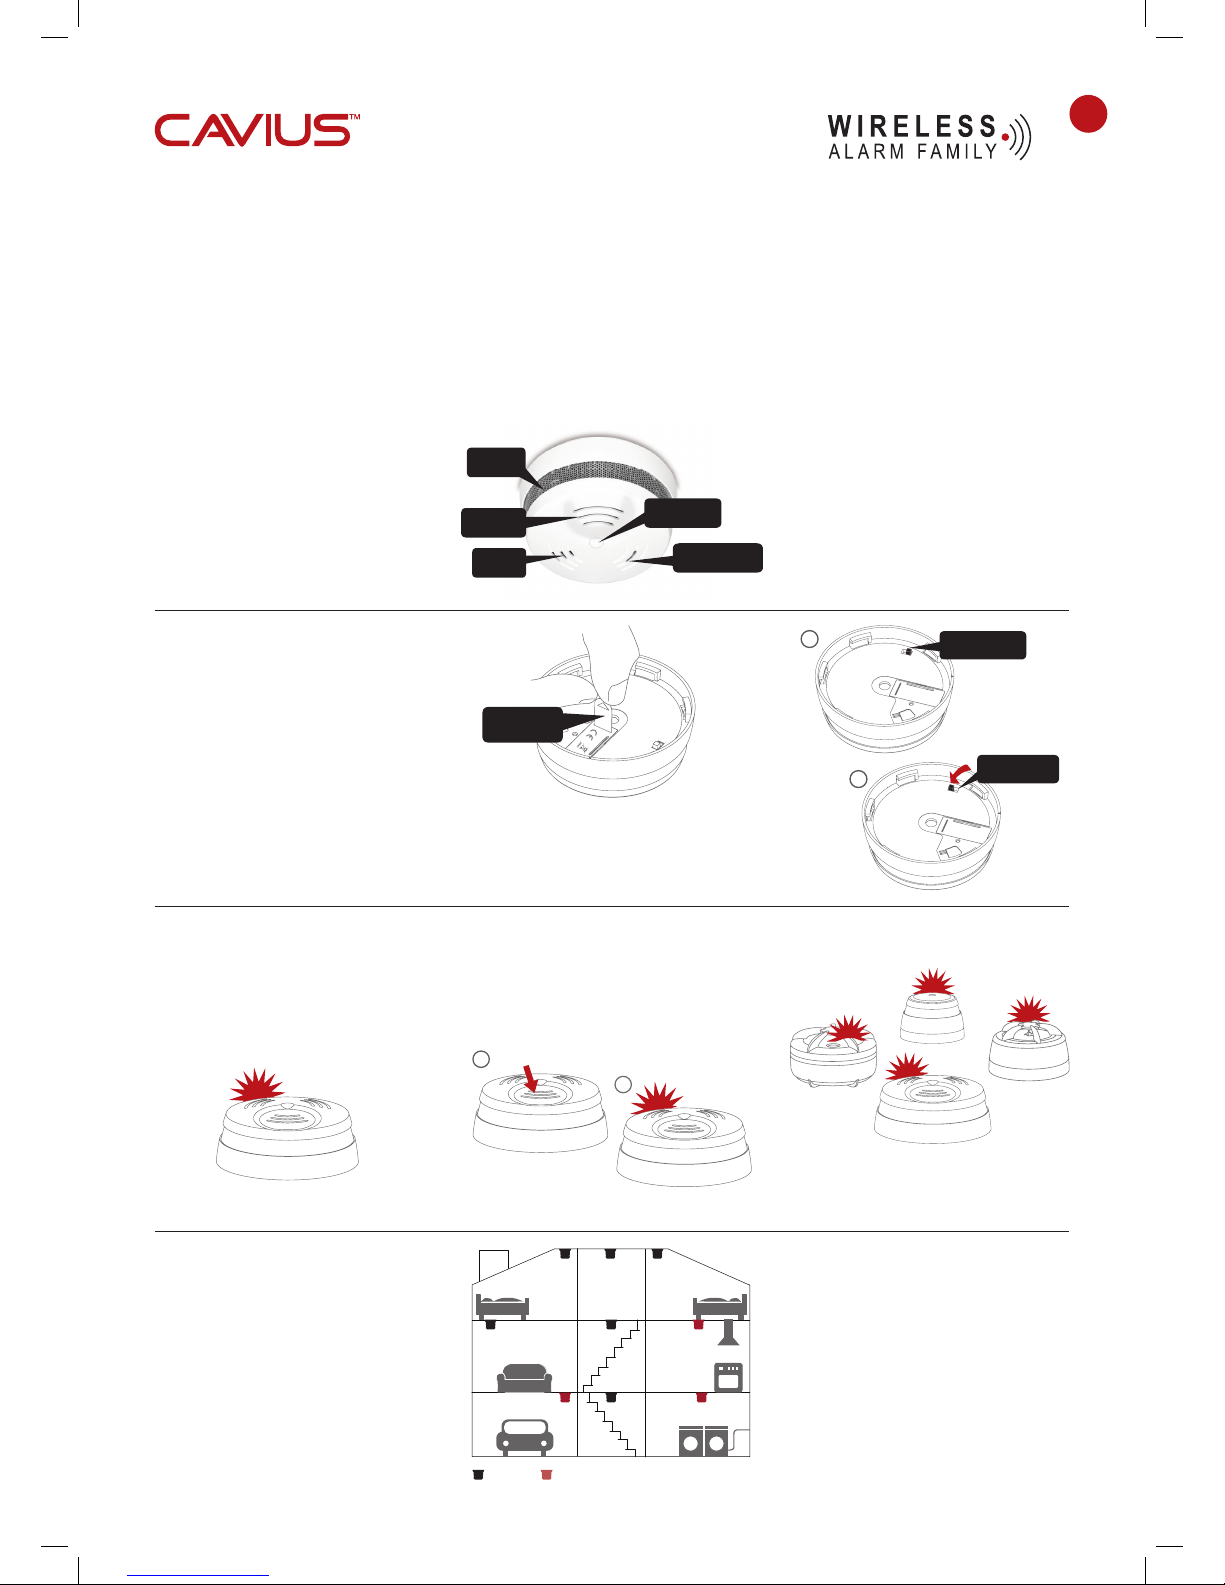
Place all alarms into ‘Learn Mode’ and repeat
section 1.
Always test connection to all devices by repeating test
function section 6 after adding devices.
10. ADD EXTRA DEVICE:
HEAT ALARM
SMAR T REMOT E
FLOOD ALARM
SMOKE ALAR M
MAINS POWERE D
SMOKE ALAR M
11. LOW BATTERY SIGNAL:
Your product has a battery back-up with a 1 year life in
battery mode without mains power, and up to 10 years
normal life with mains. However, we recommend to
replace the battery every 5 years.
When the battery is starting its end of life, a short beep
will sound out every 48 seconds for 30 days.
Only the alarm with the low battery will sound, no
other connected alarms will sound. It is safe to change
batteries in the alarms without going through the learn
process again – they will not forget the codes during
the battery change process.
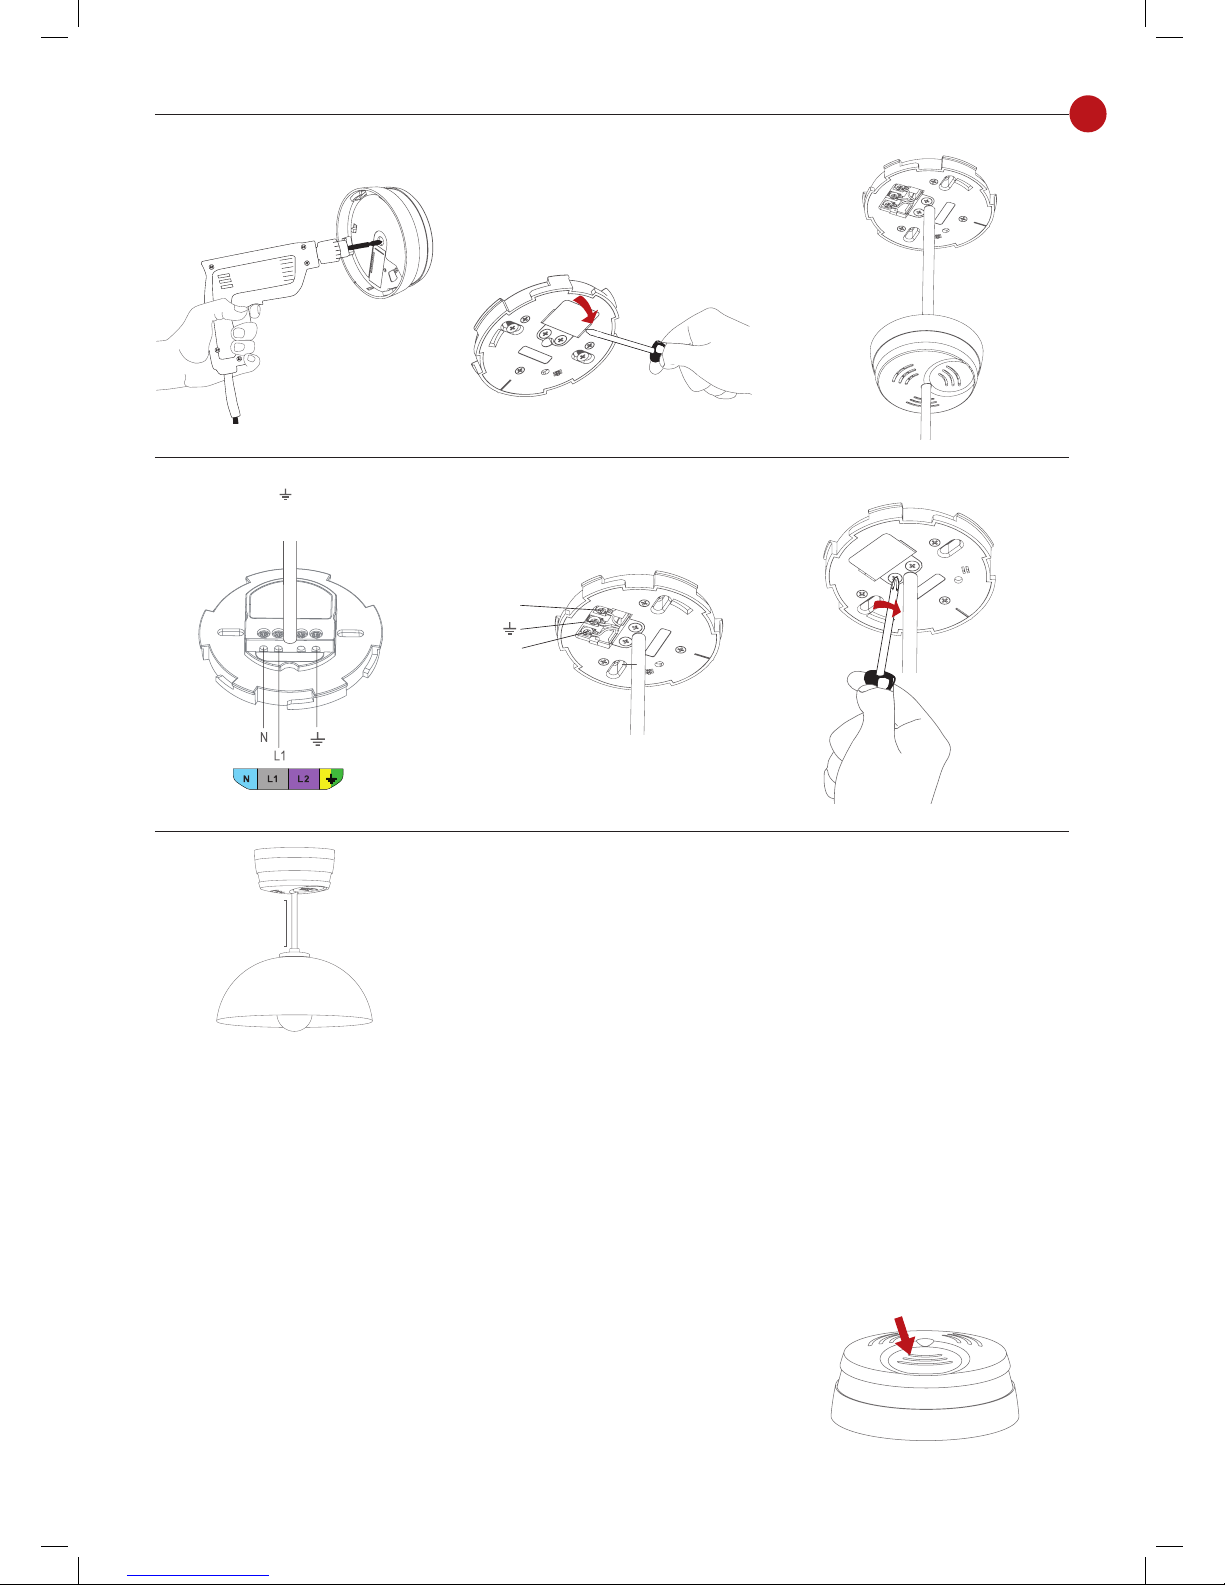
12. BATTERY REPLACEMENT:
To replace the battery, detach the smoke alarm from the
power supply unit by twisting counterclockwise.
Remove the plastic cover to access the battery.
Replace the battery respecting the polarities. Attach the
alarm on power supply unit by twisting clockwise until it
clicks, and test the alarm.
13. MAINTENANCE & TROUBLE SHOOTING:
The smoke alarm should be vacuum cleaned once per
quarter, to remove dust particles, and it can be wiped
with a damp cloth. (Do not open the alarm).
NOTE: You can easily vacuum clean the smoke chamber
through the dedicated slot in the top cover, and it’s
possible to test the alarms by pressing the cover at the
same time.
High humidity condensing which can be resolved by
drying the smoke alarm.
If the smoke alarm does not work when the test button
is pushed, the probable cause is a power failure. Always
test the alarm after replacement of battery.
If the problem continues, please visit
www.cavius.co.nz or www.cavius.com.au
for any trouble shooting.
14. OTHER INFORMATION:
Do not paint the alarm.
Disposal: For battery and product, please dispose
properly at the end of life. This is electronic waste which
should be recycled at an authorised e-waste facility.
WARNING: Please remove dust cover after installation.
Smoke will not be able to reach the chamber while the
dust cover is in place.
All Rights reserved: CAVIUS™ Aps assumes no
responsibility for any errors, which may appear in this
manual. Furthermore, CAVIUS™ Aps reserves the right
to alter the hardware, software, and/or specifications
detailed herein at any time without notice, and
CAVIUS™ Aps does not make any commitment to
update the information contained herein. All the
trademarks listed herein are owned by their respective
owners. Copyright © CAVIUS™ Aps.
127126 rev 1
MANUFACTURED BY:
Aps
Julsøvej 16 - DK8600 Silkeborg
Manufactured in P.R.C.
DISTRIBUTOR INFORMATION:
New Zealand:
CAVIUS NANO LTD. 8 King Street, Te Puke. 3119,
Bay Of Plenty 3118. P.O Box 11241, Palm Beach Plaza,
Papamoa, Bay Of Plenty 3151, New Zealand.
www.cavius.co.nz
PH: 0800 766533 or 07 542 219
Australia:
REPELEC (AUST)
Locked Bag 45, Plumpton, NSW 2761, Australia.
www.cavius.com.au
PH: 1300 555 586
WARRANTY:
Your CAVIUS™ smoke alarm has a 5 year warranty
from the date of purchase against defect in material
and workmanship (excludes the battery). Faulty units
during this period can be returned to the place of
purchase. You must provide the proof of purchase date
and such defects will be repaired, or replaced at the
distributors option, without charge. This Warranty only
covers defects in materials or workmanship in normal
residential use and does not cover damage resulting
from negligent handling, misuse or lack of reasonable
care. This warranty is in lieu of any other warranty
either expressed or implied.
Alarm condition aural signal pattern according to
ISO 8201.
4
Other Cavius Smoke Alarm manuals

Cavius
Cavius 2201-003 User manual

Cavius
Cavius RAUCHWARN MELDER User manual

Cavius
Cavius 2007-003 User manual

Cavius
Cavius 3103-002 User manual

Cavius
Cavius LUMI-PLUGIN LP120 User manual

Cavius
Cavius 3104-001 User manual

Cavius
Cavius 3002-TK001 User manual

Cavius
Cavius 2001-030 User manual

Cavius
Cavius 4002-001 User manual

Cavius
Cavius 2008-001 User manual

Cavius
Cavius 2107-001 User manual

Cavius
Cavius 2104-001 User manual

Cavius
Cavius 2103-002 User manual

Cavius
Cavius 2103 User manual

Cavius
Cavius 4002-001 User manual

Cavius
Cavius 2107-001 User manual

Cavius
Cavius 2008-002 User manual

Cavius
Cavius 2208 User manual

Cavius
Cavius 2203-002 User manual

Cavius
Cavius 2106-003 User manual