manuals.online logo
Brands
  1. Home
  2. •
  3. Brands
  4. •
  5. Firetide
  6. •
  7. Wireless Access Point
  8. •
  9. Firetide HotPoint 5100 User manual

Firetide HotPoint 5100 User manual

HotPointTM 5100 Access Point
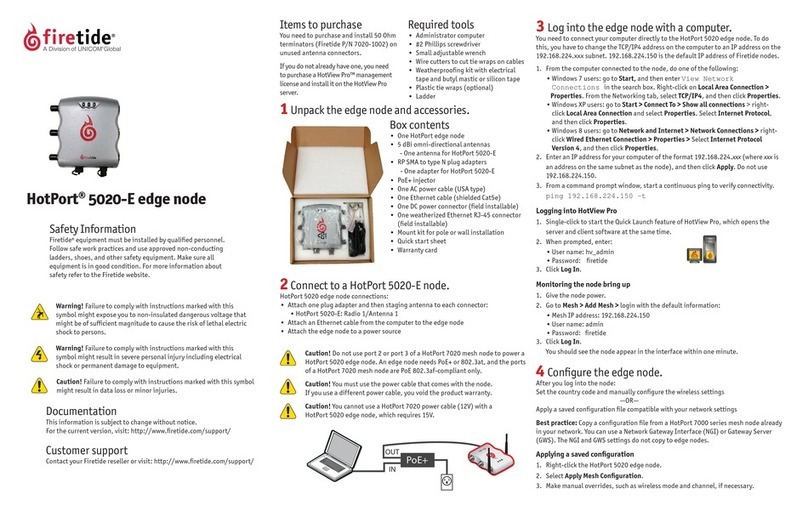
What’s in the box?
• HotPoint 5100 access point
• 6 staging antennas
• DC power supply and cable
• Ethernet cable
• Quick start sheet
Not included
• Plastic tie wraps (optional)
3 Log into the access point
Connecting your computer to the access point
You need to change the TCP/IP4 settings on your computer so you can communicate
with the access point. 192.168.224.160 is the default IP address of the access point.
1. Power on the access point.
The access point boots in 1.5 to 2 minutes. The power LED glows steady and the
2.4G LED blinks.
2. From the computer connected to the access point, do one of the following:
• Windows 7 users: go to Start, and then enter View Network
Connections in the search box. Right-click on Local Area Connection >
Properties. From the Networking tab, select TCP/IP4,and then click Properties.
• Windows XP users: go to Start > Connect To > Show all connections > right-click
Local Area Connection and select Properties. Select Internet Protocol, and
then click Properties.
• Windows 8 users: go to Network and Internet > Network Connections > right-
click Wired Ethernet Connection > Properties > Select Internet Protocol
Version 4, and then click Properties.
3. Enter an IP address/subnet mask for your computer of the format 192.168.224.xxx
(where xxx is an address on the same subnet as the access point), and then click
Apply.
Caution! Do not use 192.168.224.160. It is the default address of the access point.
4. From a command prompt window, ping the access point to verify connectivity.
ping 192.168.224.160
Logging into the web interface
1. In a browser, enter: 192.168.224.160.
2. When prompted, enter this information:
User Name: admin
Password: firetide
3. Click Login.
4 Configure the access point
After you log in, set the country code, and then do the other configuration tasks.
Setting the country code
Caution! Make sure you configure the access point for the correct country. If
you select any country outside the United States, you can return the access
point to the factory default settings with the reset button or a software reset.
1. Go to Configuration > System > Basic > Country Code
2. Select the country.
3. Click Apply.
Installation
1Unpack the device and accessories
2 Attach the Ethernet cable, power cable and
staging antennas to the access point
Warning! Do not open the cover of the access point or power unit.
• Dangerous voltages inside.
• No serviceable parts inside.
• Refer to your Firetide reseller for repair or service.
• If you open the cover, you void the product warranty.
Safety Information
Firetide equipment must be installed by qualified personnel.
Follow safe work practices and use approved non-conducting
ladders, shoes, and other safety equipment. Make sure all
equipment is in good condition. For more information about safety
refer to the Firetide website.
Warning! Failure to comply with instructions marked with
this symbol might expose you to non-insulated dangerous
voltage that might be of sufficient magnitude to cause the
risk of lethal electric shock to persons.
Warning! Failure to comply with instructions marked
with this symbol might result in severe personal injury
including electrical shock or permanent damage to
equipment.
Caution! Failure to comply with instructions marked with
this symbol might result in data loss or minor injuries.
Documentation
This information is subject to change without notice. Visit
http://www.firetide.com/downloads.aspx for the current version.
Technical support
Contact http://www.firetide.com/support.aspx or your Firetide
reseller for technical support.
Tighten the antennas to the
connectors, and then bend them up.
Attach the Ethernet cable to the
access point and your computer.
Attach the DC power
supply to the access
point and a power source.
Firetide, Inc
2105 S. Bascom Ave
Suite 220
Campbell, CA 95008
QSAP5100-012316
©2016Firetide, Inc. All rights reserved.
Changing the default password
To prevent others from easily logging into this access point, change the password
to something secure. You must have the current password to be able to change the
password.
1. From the main window of the Maintenance tab enter the information.
2. Click Apply.
The system logs you out.
3. Log in with the new password to verify that the new password works.
Setting the IP adress of the access point manually (optional task)
By default, DHCP is enabled. The access point automatically gets an unused IP address
from the network. Optionally, you can disable DHCP and set the IP address manually.
1. Go to Configuration > IP
2. Select disable DHCP client.
3. Click Apply.
4. Enter an appropriate IPv4 address and subnet mask.
5. Click Apply.
Configuring a virtual access point
One access point can have multiple virtual access points (VAP). A VAP is a logical
subgroup within an access point that lets you assign different permissions or quality
settings to different wireless users, such as guest users and trusted users.
For more information, refer to the HotPoint 5100/5200 User Guide.
1. Go to Configuration > VAP > Basic
2. Enter the settings.
Note: In the SSID text field, change the name “firetide” to a descriptive name.
3. Click Apply.
Configuring the radios
By default, Radio 1 is 11ng, and Radio 2 is 11na.
1. Go to Configuration > Wireless
2. Change the radio settings for your application.
3. Click Apply.
Resetting the access point to the factory default
settings
Caution! When an access point is reset, all configuration information is
erased.
You can reset the access point with the reset button or with software in the web
interface.
The back panel of the access point has a recessed reset button. To reset the device to
the factory defaults, with a paperclip or stiff wire, press and hold the reset button for
20 seconds. When you release the button, the access point resets.
To reset the access point with the web interface:
1. Go to Maintenance > Reboot/Reset
2. Select reset.
3. Click Apply.
Upgrading the firmware
You can view the firmware version from the Upgrade window. If necessary you can
download different firmware from http://www.firetide.com/downloads.aspx.
1. Go to Maintenance > Upgrade
2. Download different firmware from http://www.firetide.com/downloads.aspx.
3. Click Browse and navigate to where you save firmware.
4. Click Apply.
The access point automatically reboots.
End User License Agreement
Visit the Firetide website to download a copy of the End User License Agreement
(EULA).

Other manuals for HotPoint 5100

1

Other Firetide Wireless Access Point manuals

Firetide HotPort 5020-E User manual

Firetide

Firetide HotPort 5020-E User manual

Firetide FWB-100 User manual

Firetide

Firetide FWB-100 User manual

Firetide HotPoint 5100 Manual

Firetide

Firetide HotPoint 5100 Manual

Firetide HotPoint 4100 User manual

Firetide

Firetide HotPoint 4100 User manual

Firetide HotPoint 5200 User manual

Firetide

Firetide HotPoint 5200 User manual

Firetide HotPort 8020 User manual

Firetide

Firetide HotPort 8020 User manual

Firetide HotPort 3203 Manual

Firetide

Firetide HotPort 3203 Manual

Firetide HotPort 6101 Manual

Firetide

Firetide HotPort 6101 Manual

Firetide HotPort 6100 Series Manual

Firetide

Firetide HotPort 6100 Series Manual

Firetide HotPoint 4500 User manual

Firetide

Firetide HotPoint 4500 User manual

Popular Wireless Access Point manuals by other brands

Honeywell Field Device Access Point user guide

Honeywell

Honeywell Field Device Access Point user guide

HP E-MSM466 Product End-of-Life Disassembly Instructions

HP

HP E-MSM466 Product End-of-Life Disassembly Instructions

LG TWFB-R101D manual

LG

LG TWFB-R101D manual

SMC Networks EZ Connect SMC2682W user guide

SMC Networks

SMC Networks EZ Connect SMC2682W user guide

Browan BW1253S user guide

Browan

Browan BW1253S user guide

Casa Systems Apex Lifestyle Triangle quick start guide

Casa Systems

Casa Systems Apex Lifestyle Triangle quick start guide

Aruba AP-105-MNT-C2 installation guide

Aruba

Aruba AP-105-MNT-C2 installation guide

MikroTik RouterBOARD Groove 5Hn Quick setup guide and warranty information

MikroTik

MikroTik RouterBOARD Groove 5Hn Quick setup guide and warranty information

NETGEAR WAX204 user manual

NETGEAR

NETGEAR WAX204 user manual

MikroTik hAP ac2 quick start guide

MikroTik

MikroTik hAP ac2 quick start guide

EnGenius M2000 quick start guide

EnGenius

EnGenius M2000 quick start guide

Intermec MobileLAN access WA2X Upgrade guide

Intermec

Intermec MobileLAN access WA2X Upgrade guide

Trapeze Mobility Point MP-620 quick start guide

Trapeze

Trapeze Mobility Point MP-620 quick start guide

Linksys LAPAC1200C user guide

Linksys

Linksys LAPAC1200C user guide

Communication Machinery Corporation EmulationEngine 11a/b/g user guide

Communication Machinery Corporation

Communication Machinery Corporation EmulationEngine 11a/b/g user guide

Pakedge Device & Software wap-c3n Installation quick guide

Pakedge Device & Software

Pakedge Device & Software wap-c3n Installation quick guide

Aruba AWS-100 user manual

Aruba

Aruba AWS-100 user manual

NETGEAR HE102 - Wireless Access Point Specifications

NETGEAR

NETGEAR HE102 - Wireless Access Point Specifications

manuals.online logo
manuals.online logoBrands
  • About & Mission
  • Contact us
  • Privacy Policy
  • Terms and Conditions

Copyright 2025 Manuals.Online. All Rights Reserved.