Fisheye FIX NEO Mini 800SS User manual

NEO Mini 800SS
user manual

-2-
取扱説明書について
・本書の内容は、予告なく変更することがあります。
・本書の内容について、誤り、記載漏れ、印刷ミス、不明な点がありましたら、弊社もしくはお近くの販売
店までご連絡をお願いいたします。
・本説明書の一部もしくは全ての転載、コピーなどは個人でご使用になるもの以外一切認められません。
目次
<はじめに>
●安全にお使いいただくために
●仕様
●各部名称
<使用方法>
●付属アダプターの取付
●バッテリー装填手順
●充電方法
●操作方法
●高温時保護モード
●セーフティモード
<メンテナンス>
●Oリングの確認
●ご使用後のお手入れと保管方法
<保証規定>
<保証書>
・・・・・・・・・・・・・・・・・・・・・・・・・・・・ 3
・・・・・・・・・・・・・・・・・・・・・・・・・・・・ 4
・・・・・・・・・・・・・・・・・・・・・・・・・・・・ 5
・・・・・・・・・・・・・・・・・・・・・・・・・・・・ 6
・・・・・・・・・・・・・・・・・・・・・・・・・・・・ 6
・・・・・・・・・・・・・・・・・・・・・・・・・・・・ 7
・・・・・・・・・・・・・・・・・・・・・・・・・・・・ 8
・・・・・・・・・・・・・・・・・・・・・・・・・・・・ 8
・・・・・・・・・・・・・・・・・・・・・・・・・・・・ 8
・・・・・・・・・・・・・・・・・・・・・・・・・・・・ 9
・・・・・・・・・・・・・・・・・・・・・・・・・・・・ 1 0
・・・・・・・・・・・・・・・・・・・・・・・・・・・・ 1 1
・・・・・・・・・・・・・・・・・・・・・・・・・・・・ 2 4
-3-
はじめに
●この説明書を必ずお読みの上、正しくお使いください。
●誤った使い方は故障や水没の原因となり、修理不能になる場合があります。
●ご使用の際にはこの説明書に従い、必ず点検・テストを行ってください。
●分解、改造、修理に伴う事故などに関し、当社では一切責任を負いかねますので、ご了承ください。ま
た、使用時の人身、物損事故に関しての保証は致しかねます。
●バッテリー接点部同士を、金属板や針金などで接続しないでください。感電や発火の原因になります。
●本製品を改造・分解しないでください。発熱や発火の原因になります。
●ナイトダイビングや洞窟など暗い水中でのメインライトとして使用しないでください。
ここに表示した注意事項は、状況によっては重大な結果に結びつくおそれがあります。 いずれも安全
に関する重要な内容を記載していますので、必ず守ってください。
危険
●本製品を乳児、幼児、小さなお子様など、本製品の取扱いの注意事項などについて理解できない人の手の届く場所に
保管しないでください。
●ライト本体にバッテリーを入れたまま保管しないでください。ガスや液の発生によって、人体に影響を及ぼすおそれ
があります。
●本製品をご自分の目や他の人の目に向けて照射しないでください。失明や視力障害など重大な障害を引き起こすお
それがあります。
●本製品の発光部を床やテーブルに伏せた状態で点灯させないでください。また、燃えやすいものの近くで点灯させな
いでください。火災の原因となるおそれがあります。
●必ず専用のバッテリーとチャージャーをご使用ください。他の製品を使用すると本製品を破損させたり、ガスが発生し
て危険な状態になる場合があります。
●濡れた手でバッテリーやチャージャーを触ると感電する危険性があります。バッテリーは十分に乾いた手で取り扱っ
てください。
警告
安全にお使いいただくために
取扱いを誤った場合に、死亡または重傷を負う差し迫った危険の発生が想定される内容。
取扱いを誤った場合に、死亡または重傷を負う可能性が想定される内容。
取扱いを誤った場合に、傷害を負う可能性及び物的損害のみの発生が想定される内容。
危険
警告
注意

*CR123x2 本でも使用可能です。ただし点灯時間はバッテリー容量に準じます。
-4-
仕様
●本製品は100mの水深まで耐えられるように設計されています。それ以上深い場所で使用されたり、また、浅い深度に
おいても衝撃や圧迫を加えますと、破損したり浸水したりするおそれがあります。
●浸水や故障などの事故を防ぐためにこの説明書をよくお読みになり、ご使用前後に必ず点検とメンテナンスを実施し
てください。
●本製品には誤点灯を防止するスイッチのロック機構がありません。持ち運びの際は必ずライト本体よりバッテリーを
取り外してください。不用意にライトが点灯したままになると発熱・発火の原因となります。
●気温が異常に高くなる、あるいは低くなる場所、極端に大きな温度変化がある場所などに本製品を置いたり、保管した
りしないでください。部品が劣化し、破損したり防水機能を損なったりするおそれがあります。
●砂や塵、ほこりなどが多い場所でライト本体を開閉すると、防水部分に異物が付着し、防水性能が損なわれることがあ
ります。
●飛行機で移動する場合は、本体のOリングを外しておくことをおすすめします。気圧の影響で取り外しができなくなっ
たり、またその状態で無理に取り外そうとすることで製品を破損してしまうおそれがあります。
●本製品より異音や異臭がする場合や煙が出たりする場合は、バッテリーを取り外し、お求めになった販売店にて修理
をご依頼ください。
●万一、浸水が発生した場合、速やかに電源を切り、バッテリーを取り外してください。濡れているバッテリーに直接触れ
ると感電の危険性がありますので取り扱いには十分ご注意ください。
●アルコールやベンジン、シンナーなどの有機系溶剤は、変形などの原因になりますので絶対に使用しないでください。
●万一、浸水が発生した場合、すぐに使用を中止してください。また、浸水している場合、本製品内部の圧力が高くなって
いることがあります。ライト本体を開ける際、水が噴き出したり、ライト本体が跳ねたりすることがありますので、十分ご
注意ください。
注意
最大光量
色温度
最大光量時連続点灯時間
水中照射角
陸上点灯可否
充電時間
バッテリー種類
付属バッテリー容量
耐圧水深
サイズ
陸上重量
水中重量
付属品
製品名 FIXNEOMini800SS
800 ルーメン
6,000〜6,500K
約 120 分
約10度
不可
最大 4 時間
Li-ion*
3,100mAh
100m
W38xH40xL155mm
185g
65g
Li-ion バッテリー、充電器、USB ケーブル (A- マイクロ B)、
YS ベース、リストランヤード、スペア O リング、O リング
グリス、O リングリムーバー、六角レンチx2、固定ネジ

-5-
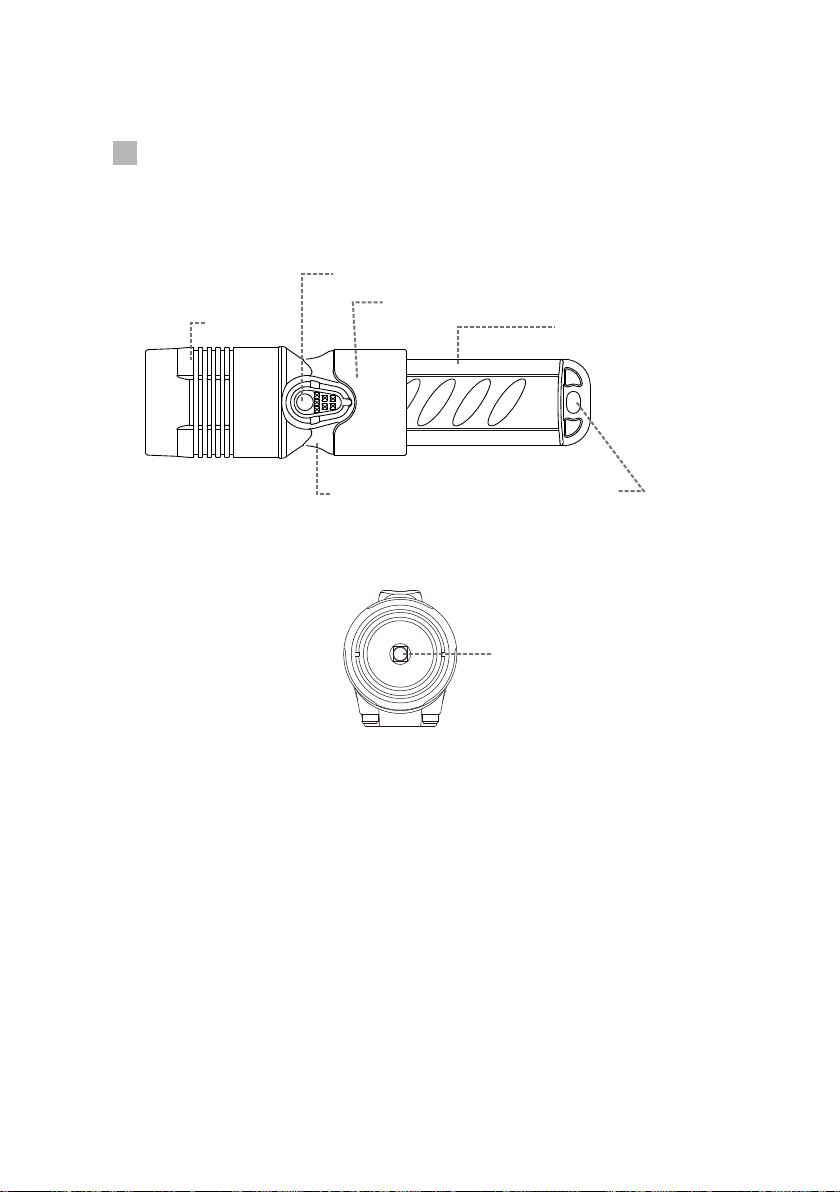
ライトヘッド
ランヤード取付穴
アダプターホルダー
本体ケース
LED
各部名称
電源/調光ボタン
内蔵LED
①②
③
④
-6-
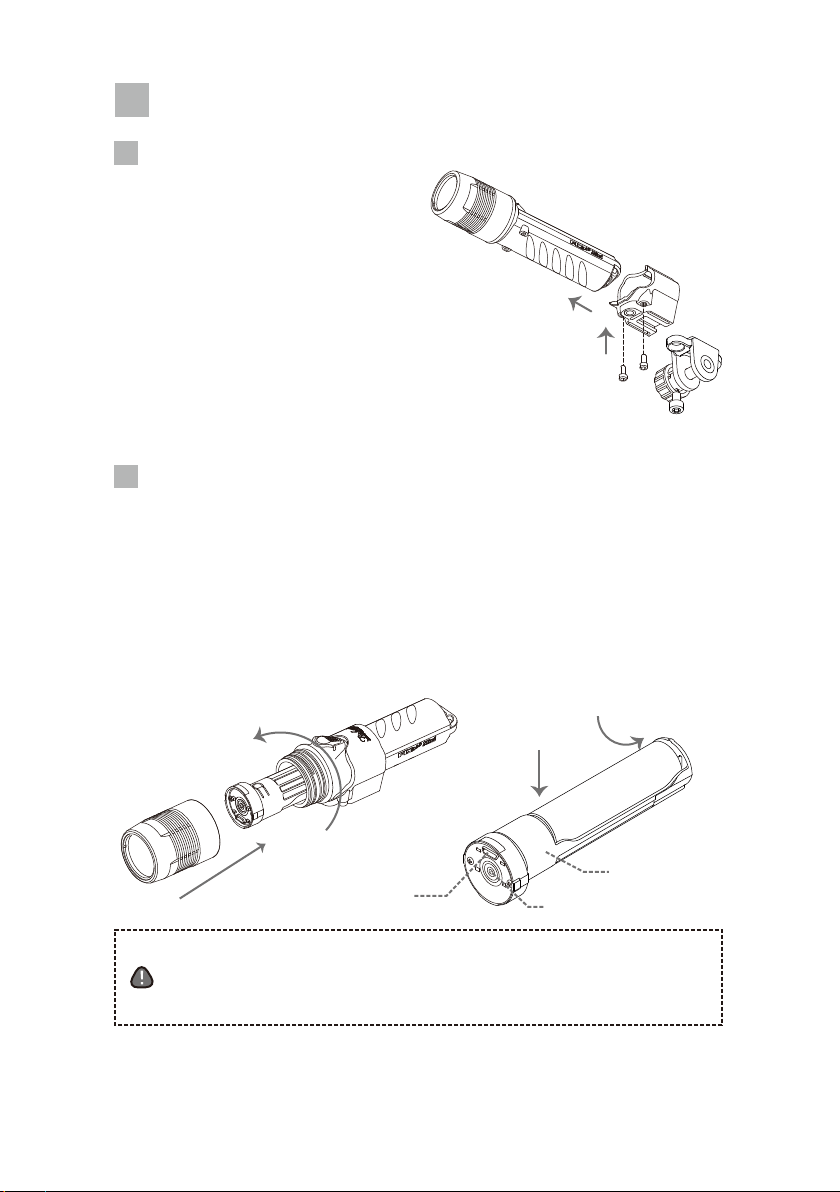
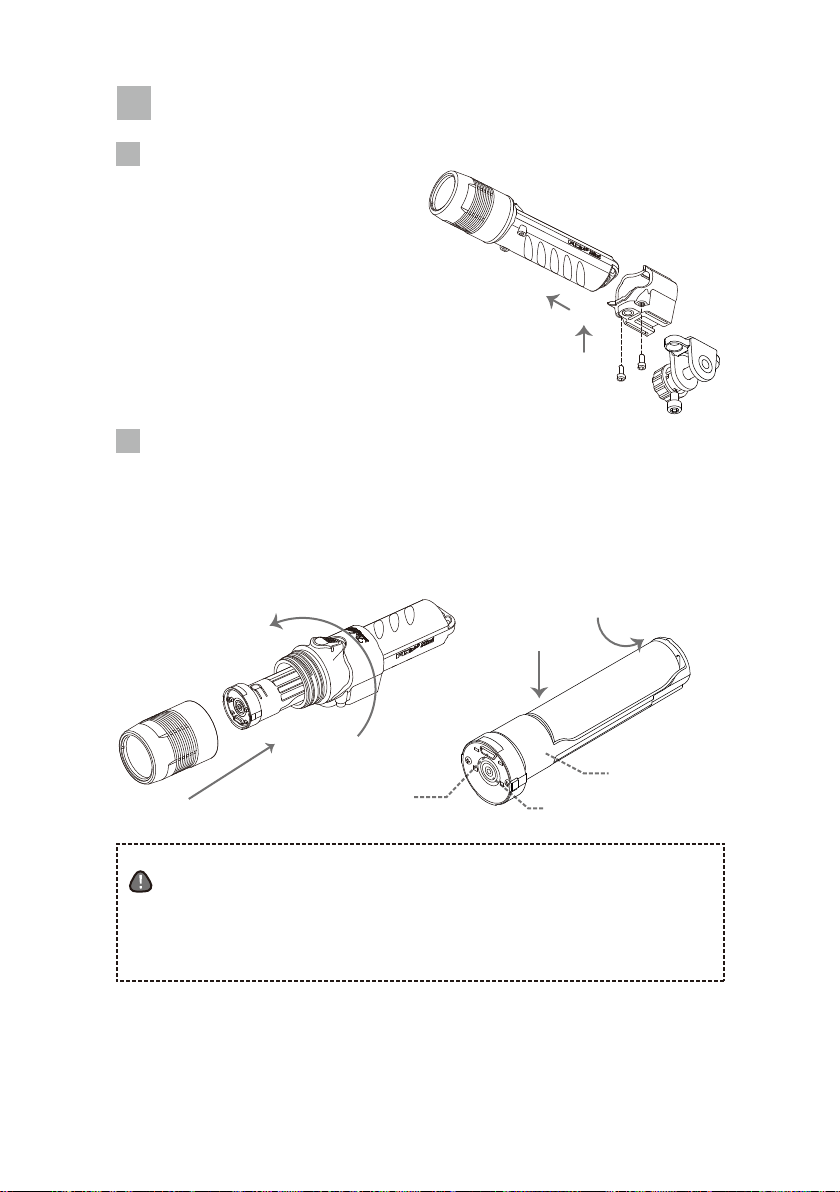
1.アダプターホルダーをライト本体後方より
奥まで差し込み、六角レンチ(小)で2カ所の
ネジを締めて取り付けます。
2. YSベースを、正円の穴を前方に、楕円の穴
を後方にして、アダプターホルダーに差し込
みます。
3. 六角レンチ(大)で固定ネジを締め込み、固定
します。
4.YSタイプの各種アームの展開が可能です。
※ 同様に、FIX NEOオプションのウルトラアダプ
ター、GoProアダプター、Loc-Lineアダプターを取り付けることができます。
使用方法
アダプターホルダーとYSベースの取り付け
アダプター
ホルダー
YSベース
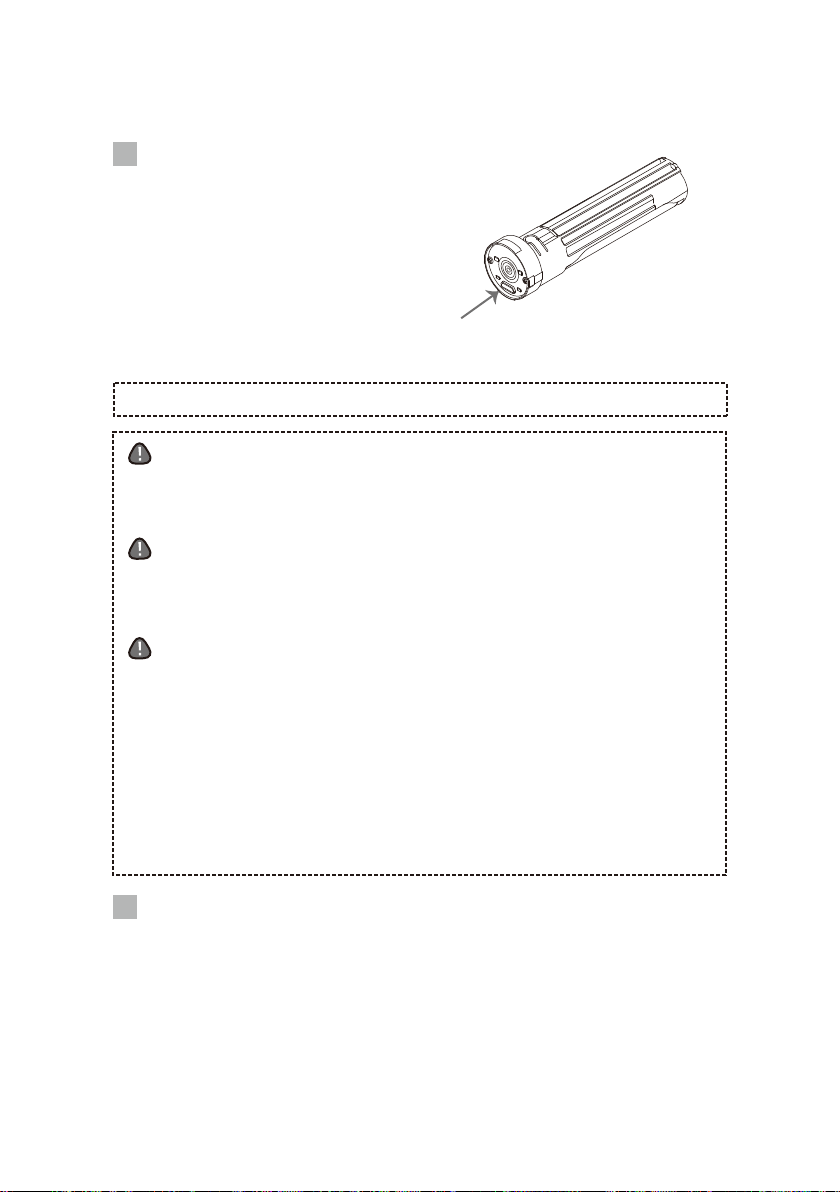
バッテリーホルダー
マイナス側
プラス側
Li-ionバッテリー
金属端子
マイクロUSBソケット
バッテリーホルダーへのLi-ionバッテリーの装填は、必ずマイナス側から行ってください。マイナ
ス側をあとから押し込むと接点スプリングを破損されてしまうおそれがあります。また、取り外し
の際は必ずプラス側から行ってください。マイナス側を先に引き出すと同じく接点スプリングを
破損されてしまうおそれがあります。
1.本体ケースをしっかりと持ち、ライトヘッドを反時計回りに回し取り外します。(1)
2. バッテリーホルダーのプラス/マイナスを確認し、Li-ionバッテリーの極性を合わせ、マ
イナス側より押し込んで装填します。(2)(3)
3. ライトヘッドのバッテリー接点ならびにバッテリーホルダーの金属端子部に汚れ、水滴
などが付着していないか確認します。
4. マイクロUSBソケット側が下になる向きで、バッテリーホルダーをスライドさせて本体
ケースに装填します。(向きが正しくないと奥まで挿入できません)(4)
5.本体ケースをしっかりと持ち、ライトヘッドを時計回りに回して取り付けます。
バッテリー装填手順
-
+
注意
-7-
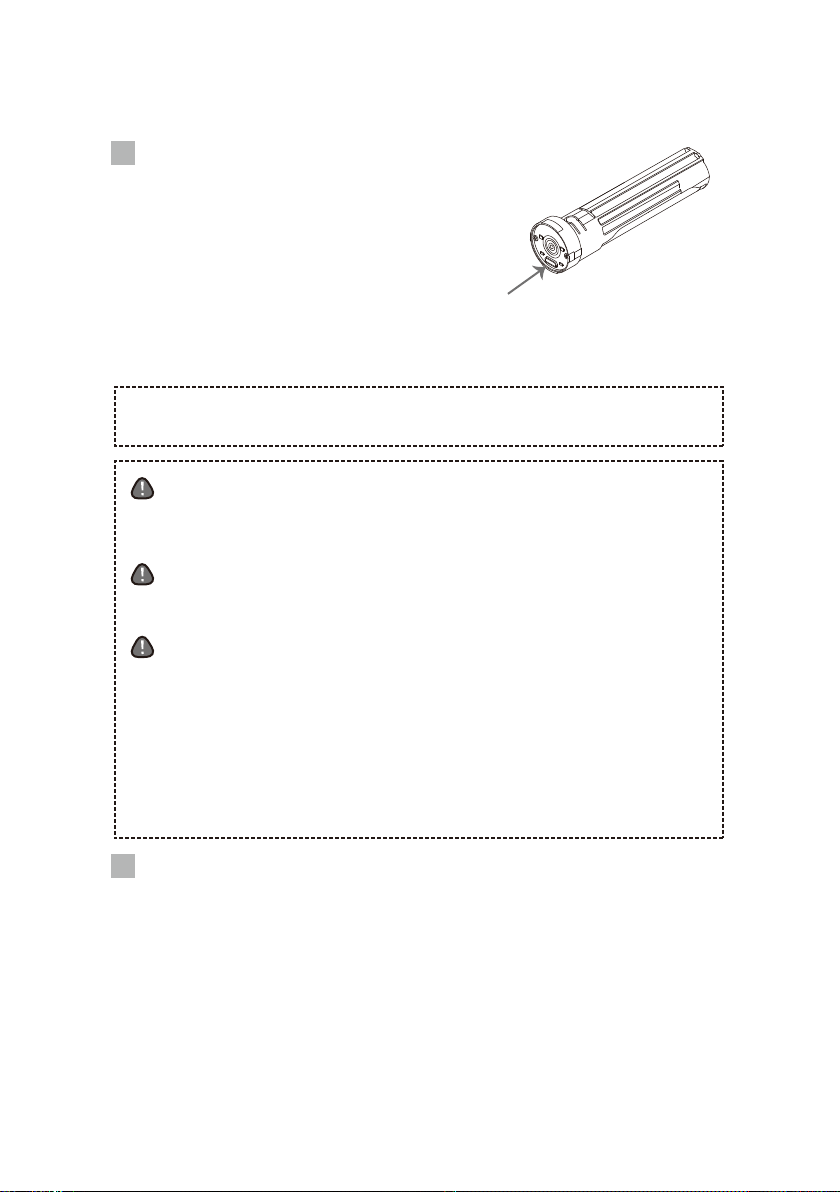
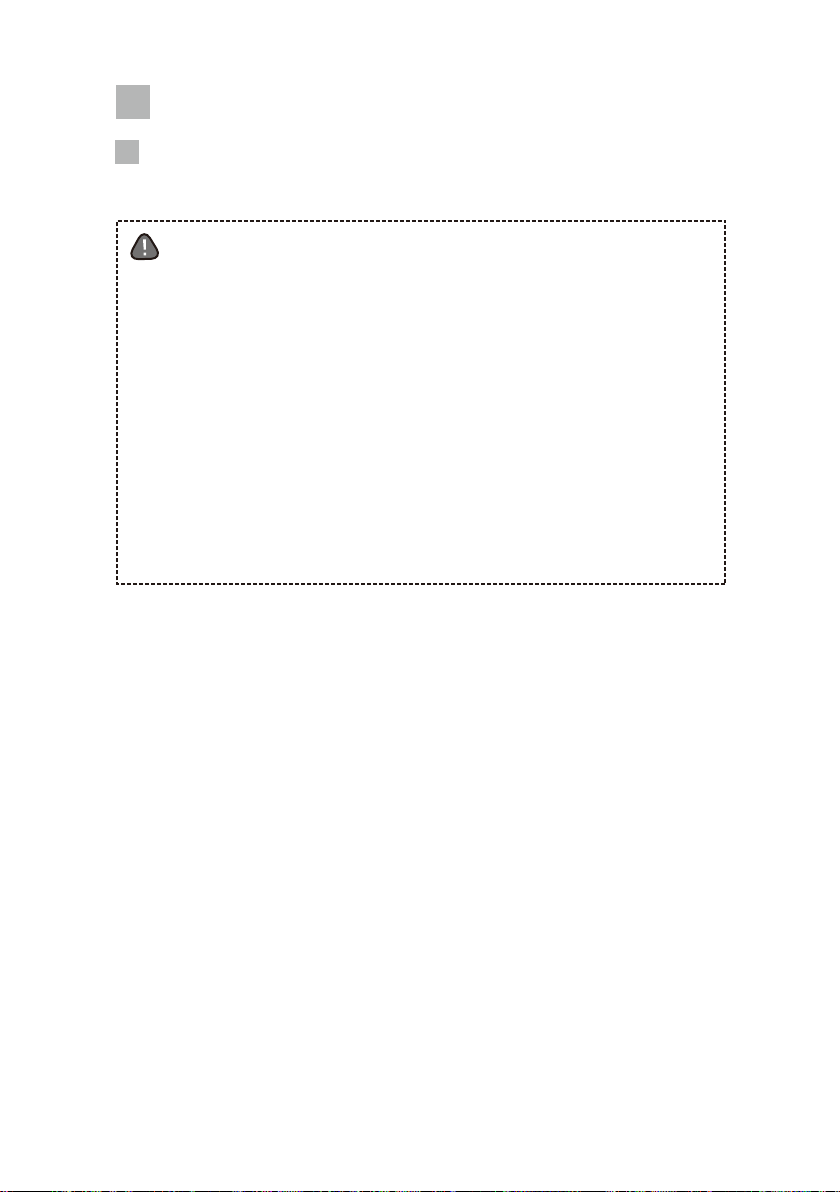
充電方法
ライトヘッドにつ いて
バッテリーが満充電の場合、充電器を接続してもLED点灯は緑色のままです。
バッテリーホルダーをライト本体に装填したまま充電することも可能です。
1.バッテリーホルダーをライト本体から取り出します。
2.充電器の AC プラグを電源コンセントに差し込みます。
3.USB ケーブルの A 端子を充電器のポートに差し込みます。
4.USB ケーブルのマイクロ B 端子をバッテリーホルダーの
マイクロ USB ソケットに差し込みます。
5.バッテリーホルダーの LED が赤色に点灯します。
6.充電が完了すると LED 点灯は緑色に切り替わります。( 充電時間は最大 4 時間 )
7.充電完了後、USB ケーブルをバッテリーホルダーから取り外します。
8.USB ケーブルを充電器から取り外し、充電器を電源コンセントから取り外します。
●充電中はバッテリーや充電器が熱を持つことがありますので、絶対に紙や絨毯 など燃えやす
い物の上で充電しないでください。
●ケーブルを束ねた状態で充電すると、発熱による発火の原因となるおそれがありますので絶
対におやめください。
●濡れた手、濡れた環境での充電は感電するおそれがありますので絶対におやめください。
●充電を開始する前に、必ずコネクター端子部に汚れや水滴が付着していないか確認してくだ
さい。もし汚れや水滴が付着していた場合は十分に清掃してください。本製品の故障だけでは
なく、感電の危険性があります。
●水没した、あるいは水没しているおそれのあるバッテリーを絶対に充電しないでください。
●ライトヘッドを閉める前には、必ずOリングやOリング溝、Oリング当たり面にゴミや砂などの付
着がないことを確認し、Oリングのグリスアップを行ってください。
●バッテリー/バッテリーホルダーを取り出す際、落下にご注意ください。バッテリーの破損だけ
でなく、ケガなどにつながるおそれがあります。
●充電器は、マルチボルト(100〜240V)対応になっていますが、自家発電のリゾートやクルーズ
船などでご使用の場合は、電圧が非常に不安定なため、異常な高電圧により充電器を破損さ
せてしまうおそれがあります。安全回路内蔵の変圧器を併用されることをおすすめします。
●30°C以上の高温になる所や直射日光の当たる所に放置しないでください。
●振動や衝撃、落下などで充電器からUSBケーブルがはずれたりしないよう安定した場所で充電
してください。
警告
危険
注意
本製品のライトヘッドは、FIX NEO Mini FSシリーズに搭載されている「ストロボ自動消灯
モード」には対応していません。
NOTE

-8-
操作方法
点灯
電源/調光ボタン 内蔵LED
電源オフの状態で、電源/調光ボタンを1回(1秒以内)押すと点灯します。
内蔵LED:緑色点灯、バッテリー残量半分で赤色点灯
高温時保護モード
注意
●ご使用の環境によってはライトヘッドが高温になり、やけどをするおそれがあります。取り扱い
には十分ご注意ください。
注意
●残点灯時間はバッテリーのコンディションや周囲の水温などの使用環境により異なります。
本製品には電源OFF時の光量設定を記憶する機能はありません。電源ON時は100%からのスタートと
なります。
NOTE
使用中にライトヘッドが55°C以上になると、自動的に光量を20%まで落とします。高温時
保護モードに切り替わった場合は、電源/調光ボタンを約4秒間長押しして消灯し、ライト
ヘッドを冷却することをおすすめします。温度が下がると再び通常モードへ復帰します。
光量調節
電源/調光ボタンを押すごとに、[100%]⇒[75%]⇒[50%]⇒[25%]の順で光量が切り替わり
ます。
消灯
点灯時に電源/調光ボタンを長押しすると消灯します。
セーフティモード
バッテリー残量が残りわずかになると自動的に20%まで光量を落とし、内蔵LEDが赤色点
滅します。セーフティモードに移行後、約10分で自動消灯します。
-9-
Oリングの取扱いについて、下記の点に注意してください。
●本体ケースのOリングを外す際は、絶対に金属製の鋭利なもの(はさみの先端、釘、ナイフな
ど)を使わず、付属のOリングリムーバーをご使用ください。
●外したOリングを紛失しないようご注意ください。
●Oリングの摩擦や劣化を防ぐために、外したOリングの表面に付属のOリンググリスを薄く塗
布(グリスアップ)します。その際、砂や小さなゴミ、髪の毛などが付着していないか必ず確認して
ください。もし、砂やゴミなどが付着していた場合は、水で洗い流してからグリスを塗ってくださ
い。また、Oリンググリスが多すぎると、かえってゴミやホコリが付きやすくなり、浸水の原因とな
ることがありますのでご注意ください。
●Oリング面に小さな傷やひび割れなどがある場合は、絶対に使用せず、すぐにスペアのOリン
グに交換してください。
●Oリング溝、またはOリングが当たる防水面にも砂や小さなゴミ、髪の毛などが付着していな
いか必ず確認してください。綿棒などを利用すると、きれいに清掃できます。また、傷やひびなど
がないかもしっかり確認してください。
●上記の確認ができましたら、再び溝にOリングを装着してください。その際、Oリングがねじれ
たり、はみだしたりしないようにご注意ください。
●OリングやOリング溝のチェック、グリスアップなどは、ボディ開閉時に毎回行ってください。
注意
本製品はOリングを使用して防水しています。お客様ご自身でメンテナンスや交換が可能
なOリングは1ヶ所(2本)です。
メンテナンス
Oリング の 確 認

-10-
1. 使用後はライト本体をおよそ10~20分程度、真水に浸けておいてください。また真水の中で、
電源/調光ボタンを数回動かして、周囲についた塩分を洗い流してください。
2. 真水から上げたら、弱い流水で洗ってください。強い水流を一定方向から当てると浸水
の原因となりますので、絶対におやめください。
3. 水洗い後は、乾いた柔らかい布などで水気をよく拭き取ってください。炎天下での直射
日光による乾燥や、ドライヤーやストーブによる乾燥は、故障や変形、破損の原因となり
ますので絶対におやめください。
4. ご使用後はOリングにシリコングリスを薄く塗ってから保管してください。Oリングは1年
毎に交換されることをおすすめします。
5. 長時間ご使用にならない場合は、高温多湿な場所や直射日光の当たる場所、極端に気
温が下がる場所をさけて保管してください。
6. アルコールやシンナー、ベンジンなどの有機系溶剤や中性洗剤は変形や破損の原因と
なりますので絶対に使用しないでください。
ご使用後のお手入れと保管方法
海水でご使用後、そのまま放置すると細かいすき間などに塩分が残り、乾燥するとその塩分が結晶と
なり水に溶けなくなってしまいます。結晶化した塩分は時にOリングを押し上げ、浸水の原因になりま
すので、必ず真水に浸けて塩分を洗い流してください。
注意
もしも浸 水したときは
本製品のご使用回数に関わらず、1年から2年に一度の定期的なオーバーホールをおすす
めいたします。 製品内部に、お客様には交換いただけない防水Oリングを使用しておりま
す。これらを定期的に交換・メンテナンスすることで、事故を防止し、製品寿命を延ばすこと
になりますので、一定期間が経過いたしましたら、弊社カスタマーサービスまで、オーバー
ホールをご依頼ください。
オーバーホールのおすすめ
別売の『FIXメンテナンスキット』に含まれる、塩害防止剤『ソルトアウェイ』をご使用いただくと一層
効果的です。
NOTE
浸水が発生した場合は、速やかに本製品の使用を中止し、ライト内部およびバッテリーに付
着した水分を取り除いてください。そしてバッテリーはライト本体には戻さず別途保管してく
ださい。もし内部に水分が残っていると感電や基板破損の危険性がありますので、浸水後は
絶対にご使用にならず、弊社カスタマーサービス(Tel:03-5988-0191)まで点検に出してくだ
さい。

-11-
保証規定
他の機材などに損害が生じた場合、いかなる理由でも、本製品以外の機材に対する補償はございませ
ん。ご使用になる機材などには「保険」をおかけいただくなど、ご使用者ご自身での対処をお願いいた
します。また、本製品の故障に起因する付随的損害(ダイビングや撮影に要した旅行費用などの諸費用、
及び撮影により得られる利益の喪失など)につ いては保証いたしかねます。また、保証期間の内外によ
らず修理時の運賃、諸掛かりはお客様においてご負担をお願いいたします。
保証期間内でも次のような場合には有料修理になります。
1.使用上の誤り(取扱説明書の取扱上の注意事項以外の誤操作など)により生じた故障。
2.弊社以外で行われた修理、改造、分解などによる故障。
3.お買い上げ後の輸送、落下、衝撃などによる故障及び損傷。
4.火災・地震・水害・落雷その他の天災地変、公害による故障及び損傷。
5.保管上の不備(高温多湿の場所、有害薬品のある場所での保管)や手入れの不備などによる故障。
6.砂・泥・水かぶりなどが原因で発生した故障。
7.保証書のご提示がない場合、または保証書の記載事項を訂正された場合。
8.保証書にご購入年月日や必要事項の記載がない場合。
製品の改良などにより仕様・デザイン・価格など、予告なしに変更をすることがあります。

Contents
..............................................................13
..............................................................15
..............................................................16
..............................................................17
..............................................................17
.............................................................18
..............................................................19
..............................................................19
..............................................................19
..............................................................20
..............................................................21
..............................................................21
..............................................................21
..............................................................22
..............................................................24
- Contents of this manual are subject to change without prior notification.
- If you find errors, omissions, misprints or any unclear parts in the contents of this manual, please
contact Fisheye or your local supplier.
- This manual may not be reproduced or copied in whole or part for any reason except personal use.
<Introduction>
- Safety
- Specifications
- Name of Parts
<How to Use>
- Attaching the included adapter
- Battery Loading
- How to Charge
- How to Operate
- High Temperature Protection Mode
- Safety Mode
<Maintenance>
- O-ring Check
- Care and Storage
- In case of internal water contact
- Recommended Service
<Warranty Conditions>
<Warranty>
-12-

-13-
- Please read this entire manual before use.
- Improper use may result in a permanent unrepairable damage.
- Perform O-ring and component checks in accordance with this manual.
- Fisheye is not responsible for any accidents resulting from the use, disassembly,
modification, or repairs of this product. Fisheye assumes no responsibility for any
physical, material, or consequential damage from the use of this product neither
specified or implied.
Where the following icons appear, they indicate a particular situational hazard. Pay
particularly close attention to the instructions given where these icons appear.
Mishandling the product can likely lead to the imminent danger of death or severe injury.
Mishandlingproductmaypossiblyleadtodeathorsevereinjury.
Mishandling product may lead to the possibility of injury or material damage.
DANGER
DANGER
- Do not store this product in a location where children or untrained people may mishandle it.
- Do not store the product with the battery installed to prevent battery off gassing or leaking.
- Do not shine the light directly into your eyes or another person’s eyes. Doing so may cause
permanent eye damage.
- Do not turn on the light with the light head in direct contact with a surface such as a table or floor.
The heat emanating from the light head when turned on could cause material damage.
- Do not operate the light near any flammable material to avoid initiating a fire.
- Use only the manufacture’s battery and charger with this system. Alternate or third party battery and
charging solutions can create dangerous conditions such as inadvertent off gassing.
- Do not touch the battery or charger with wet hands. Failure to do so can cause an electrical shock.
Handle light components only with dry hands.
- Do not attempt to charge the battery with any other device than the manufacture’s charger. Use of
an alternate charging device can cause electric shock or fire.
- Do not modify or disassemble this product. Doing so can create a thermal hazard or fire.
- Always carry a back up light source during night dives or over-head environments in the event a
battery exhausts unexpectedly.
WARNING
WARNING
CAUTION
Safety
Introduction

-14-
CAUTION
- This product is designed to be used to a depth of 100 meters (330 ft.). Use of this product at greater
depths may cause damage or a flood.
- Read this manual thoroughly to prevent accidental misuse, water intrusion or damage. Perform
inspections and maintenance before and after each use of this product.
- This product does not have a lock switch. Always remove the battery from the light when traveling
or packing. If the light accidentally turns on it will create a thermal or fire hazard.
- Do not place or store this product in extreme high or low temperatures or where the temperature
can drastically change. Extreme heat or temperature changes can warp the sealing surfaces and
cause the light to flood or prematurely deteriorate O-rings.
- Do no open or attempt to seal the light in environments where an excess of sand, dirt, lint, dust, or
animal hair are present. These elements and other free floating bodies can breach O-ring sealing
surfaces and cause the light to flood or other components to fail to function properly.
- Remove the main O-ring when flying. Due to altitude pressure differential, if the O-ring is not
removed, the light will be become difficult to open.
- If this product produces a particular noise or emits any odor or smoke, remove the battery and
contact your local dealer immediately.
- In the event of a flood, turn off the power immediately and remove the battery. Use caution when
handling the battery to avoid electrical shock. Use caution when opening a flooded light. Pressure
could be built up inside the light causing the light head to eject from the light body once the light
head is loosened.
- Never use any organic solvents such as alcohol, benzene or thinner as they may deform the
sealing surfaces of the light.

-15-
Specifications
Brightness
Color Temperature
Burn Time
Beam Angle
Usability in Air
Charge Time
Battery Type
Battery Capacity
Depth Rating
Size
Weight (In air)
Weight (In water)
Set Includes
FIX NEO Mini 800SS
800 lumens
6,000-6,500K
approx.120min.
approx.10 degrees
Not available
4 hours max.
Li-Ion*
3,100mAh
100m
W38 x H40 x L155mm
185g
65g
Product Name
Li-ion Battery, Battery Charger, USB cable (A-micro B), YS Base, Wrist
Lanyard, Spare O-ring, O-ring Grease, O-ring Remover, Allen Wrench x2,
Lock Screw
* Even two CR123 batteries are available, but the burn time is up to the
capacity of the battery to use.
-16-
Names of Parts
Light Head
Body Case
Power Button
Body Case
Wrist lanyard installation hole
Adaptor Holder
LED
①
①
②
②
③
③
④
④
-17-
1. Insert the included adaptor holder by sliding
from the back of the light body and secure by
two screws.
2. Insert the included YS base by sliding from the
back of the adaptor holder. YS base has 2
holes: install the round shaped side to the
front and oval shaped side to the back.
3. Secure the included lock screw in the round hole by tightening
clockwise.
4. Other adaptors than the YS mount can be used. Alternate adaptors
include a 1” ball mount, GoPro mount, and Loc-Line mount.
Alternate mounts must be purchased separately.
How to Use
Attaching adaptor holder and YS base
Loading the Li-ion battery into the battery holder: insert the negative end of the battery
first. Inserting the positive end first might damage the battery holder’s contact spring.
Removing the Li-ion battery from the battery holder: push the positive end of the battery
first into the contact spring first, then pull the positive end up slightly, then release
pressure on the positive end allowing the contact spring to push the battery out of the
holder. Removing the battery from the negative end may damage the contact spring.
1. Hold the body case firmly and remove the light head by rotating counter-clockwise.
2. Confirm polarity and install Li-ion battery to the battery holder.
3. Make sure that there is no dirt or water drops on the metal terminal of the battery holder.
4. Tilt the body case and load the battery holder.
5. Hold the body case firmly and attach the Light Head by rotating clockwise. Battery removal is
the opposite procedure.
Battery Loading
CAUTION
-
+
Battery Holder
Metalic Terminal
Li-ion Battery
Micro USB Socket
Lock Screw
Adaptor Holder
YS Base
-18-
1. Take the battery holder out of the light.
2. Insert the AC plug of the charger into the power outlet.
3. Insert the A terminal of USB cable into the port of the
charger.
4. Insert the micro B terminal of USB cable into the
socket of the battery holder.
5. Make sure that the LED on the battery holder turns
red at this point.
6. The LED color switches to green when charging is complete. (Charging time is 4 hours maximum)
7. Remove a USB cable from the battery holder.
The Light Head of this product does NOT support "Automatic shut-off mode" equipped with for the
FIX NEO Mini FS series.
About "Automatic shut-off mode"
DANGER
- Do not charge on paper, carpet or anything potentially flammable as battery and
charger may become hot during charging.
- Do not charge with coiled cables as heat build-up may result in fire.
- Do not handle charging work with wet hands or charge under wet circumstances to
avoid electric shock.
- Make sure that there is no debris or water drops on the charging connector terminal
before starting charge. If there is any dirt or water drops, clean it thoroughly. It may
cause not only damage to this product but also the riskof electric shock.
- Do not charge batteries that have been flooded, or are suspected of having water
intrusion.
- Make sure that there is no dust, sand etc. on the O-ring, O-ring groove or O-ring
contact surface and grease the O-ring before closing the Light Head.
- Take care not to drop when removing the battery. It may cause not only damage to the
battery but also injury.
- Charger is multi-volt compatible (100‒240V), but using at a resort or on a cruise ship
with in-house power generation may cause highly unstable voltage output and result in
damage to the charger. It is recommended to use a converter with a built-in safety
circuit.
- Do not leave in temperatures above 30°C (86°F) or in direct sunlight.
- Charge in a stable position to avoid the USB cable being disconnected from vibration,
impact shock or dropping.
WARNING
CAUTION
How to charge
LED light remains green if the battery is fully charged when connecting the charger.
NOTE

-19-
Use caution when handling the light head as it may get extremely hot and you may get
burned depending on the environments.
CAUTION
Please note that the remaining light time may differ from the actual light time due to the
battery condition or the usage circumstances such as the surrounding water temperature.
CAUTION
How to Operate
Turning on
Light output adjustment
High Temperature Protection Mode
Power Button Built-in LED
Safety Mode
When the battery is almost exhausted, the light output drops automatically to 20%, and the Built-in
LED blinks red. The light turns off after enters Safety Mode in approximately 10 minutes.
When initially powered ON, the NEO Mini will always start with 100%. This product is NOT designed to
memorize the light output setting when the power is turned OFF.
NOTE
The light output is cycles in order of [100%] > [75%] > [50%] > [25%] each time the Power Button
is pushed.
Turning off
Hold the Power Button for a few seconds.
Press the Power Button.
[ Built-in LED ]: The LED lights in green normally, and when the battery power becomes half, the
LED turns red.
Protection mode automatically engages when the light head becomes over 55°C (131°F) during
use and decreases the light volume to 20% of maximum. When the High Temperature Protection
Mode engages, hold the Power Button for four seconds to turn off the light. Cooling down the light
head is recommended. The functions will go back to normal mode when the temperature drops
below 45°C (113°F).
-20-
Maintenance
Be aware of the following points regarding handling O-ring.
- Use the included O-ring remover when removing the O-ring of the body case and never use
sharp metal tools such as the edge of scissors, nail or knife.
- Be careful not to lose the removed O-ring.
- Lightly coat it with a thin film of the included O-ring grease to prevent friction or deterioration of
the O-ring. Make sure that there is no sand, small lint or hair. If there is any sand or lint on it,
wash off first then grease it. Be careful not to put too much O-ring grease as it may attract
more lint or dust and cause water intrusion.
- Never use and immediately exchange with a spare O-ring if there are any small cuts or cracks
on the O-ring surface.
- Make sure that there is no sand, small lint or hair on the O-ring groove and the waterproof
side that the O-ring contacts. It can be wiped clean with a cotton tipped swab etc. Also make
sure that there are no scratches or cracks.
- Once above points have been checked, install the O-ring back on the groove. Make sure
O-ring is uniform with no twists or bulges.
- Always perform checks of O-ring or O-ring groove and O-ring grease-up every time you
open/close the body.
The FIX NEO Mini is sealed using a double O-ring seal design. The two O-rings are user
serviceable for maintenance and replacement.
O-ring Check
CAUTION
Table of contents
Other Fisheye Underwater Lighting manuals


Popular Underwater Lighting manuals by other brands


Shadow-Caster
Shadow-Caster SCM-CC installation instructions

SCALEO
SCALEO infinity operating manual

lumishore
lumishore SMX-53 Series Installation and operation instructions for

AL’S GARDEN ART
AL’S GARDEN ART AG-80 quick start guide

Jandy
Jandy Infinite WaterColors IWCP50W100 Installation and operation manual

Gardena
Gardena UL 20 operating instructions

Jandy
Jandy Infinite WaterColors IWC15W100 owner's manual

Hugo Lahme
Hugo Lahme VitaLight POWER LED 4 x 3 W user manual

Astral Pool
Astral Pool 00346 Installation and maintenance manual

Astral Pool
Astral Pool PAR56 Installation and maintenance manual

Sea & Sea
Sea & Sea YS-1 instruction manual

Astral Pool
Astral Pool SLX Light Engine installation manual