Fit4Home TF-7001 User manual
1
F4H-HG-TF7001
Please Keep For Future Reference
IMPORTANT - Please Read Instructions Fully Before Assembly Or Use
These instructions contain important information which will help you get the best
from your equipment and ensure safe and correct assembly, use and maintenance.
If you need help or have damaged or missing parts,
call the Customer Helpline: 0330 124 0718 (Opening hours: Mon-Fri 9:00am-3:00pm)
or Email: customerservices@fit4home.co.uk
USER MANUAL
TF-7001 HOME GYM

2
CONTENTS
Safety Information
Parts List
Exploded Diagram
Parts Chart
Assembly Instructions
Step 1
Step 2
Step 3
Step 4
Step 5
Step 6
Step 7
Step 6
Step 8
Step 9
Step 10
Step 11
Warm Up and Cool Down
Fit4Home
Declaration
03
04
05
06,07
08
08
09
10
11
12
13
14
15
16
17
18
19
20,21
22
23

3
IMPORTANT SAFETY INFORMATION
IMPORTANT SAFETY INFORMATION
BE SURE TO READ THE ENTIRE MANUAL BEFORE YOU ASSEMBLE OR
OPERATE YOUR MACHINE. IN PARTICULAR, NOTE THE FOLLOWING SAFETY
PRECAUTIONS:
1. Read all instructions and follow it carefully before using this equipment. Make sure the equipment is
properly assembled and tightened before use.
2. Before exercise, in order to avoid injuring the muscle, warm-up exercises are recommended.
3. Please make sure all parts are not damaged and xed well before use. This equipment should
be placed on a at surface when using. Using a mat or other covering material on the ground is
recommended.
4. Please wear proper clothes and shoes when using this equipment; do not wear clothes that might
catch any part of the equipment.
5. Do not attempt any maintenance or adjustments other than those described in this manual. Should
any problems arise, discontinue use and consult your local dealer.
6. Do not use the equipment outdoors. It is not a commercial model.
7. This equipment is for household use only.
8. Only one person at a time should use this equipment.
9. If you feel any chest pains, nausea, dizziness, or short of breath, you should stop exercising
immediately and consult your physician before continuing.
10. Care should be taken in mounting or dismounting the equipment.
11. Do not allow children to use or play on the equipment. Keep children and pets away from the
equipment while in use. This machine is designed for adults use only. The minimum free space
required for safe operation is not less than two meters.
12. The maximum weight capacity for this product is 120kgs.
WARNING: Before beginning any exercise program consult your physician. This
is especially important for the people who are over 35 years old or who have
pre-existing health problems. Read all instructions before using any tness
equipment.
CAUTION: Read all instructions carefully before operating this product. Retain
this Owner’s Manual for future reference.

4
PARTS LIST

5
EXPLODED DIAGRAM

6
PARTS TABLE

7
PARTS TABLE
8
ASSEMBLY INSTRUCTIONS
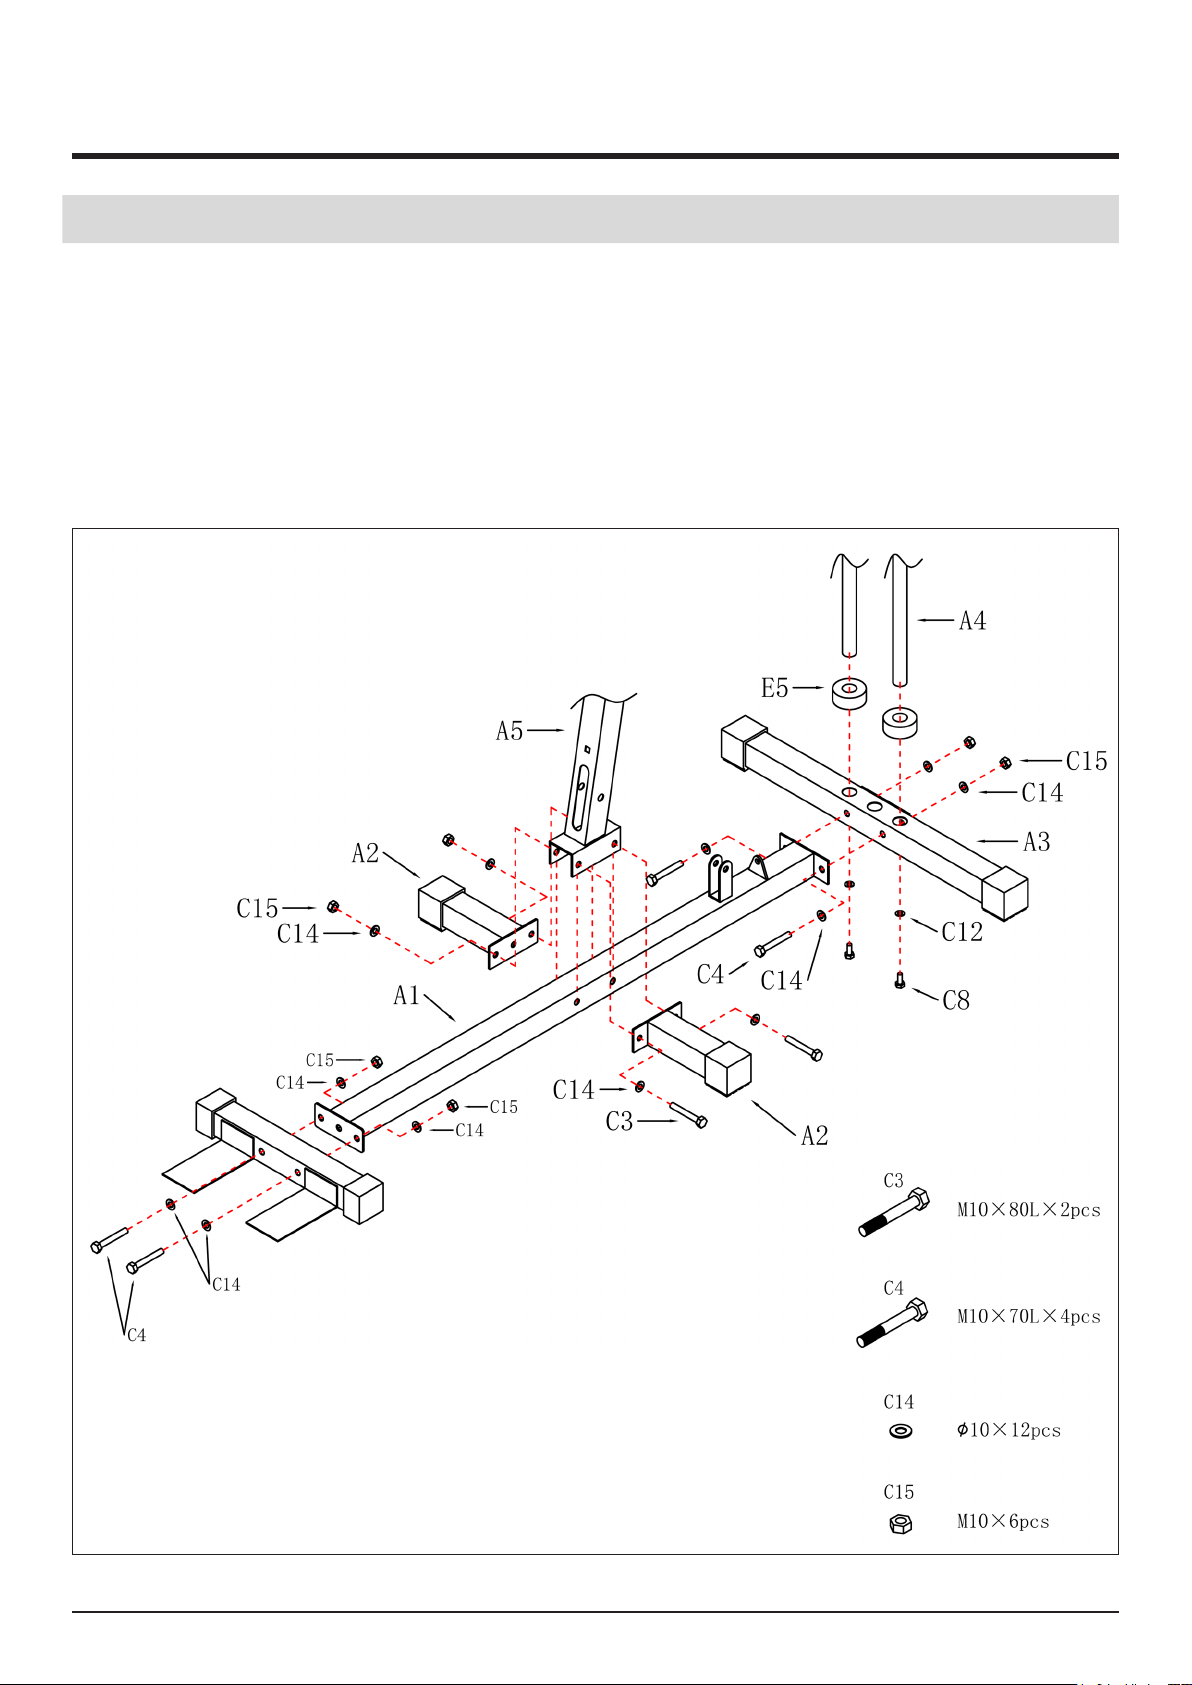
STEP 1
1. Assemble main support tube(A5) & side base tube(A2) at both side of main base tube(A1).t
them in the property hole with bolt(C3) & washer(C14) & nut(C15).
2. Put middle base tube(A3) by main base tube(A1).then x if by bolf(C4).washer(C14) and
nut(C15).
3. Attach rubber ring(E5).weight slide tube(A4) and x if by bolt(C8) & washer(C12).
4. Install the front bottom pipe (A19) to the front end of the straight bottom pipe (A1) using the
bolt (C4) washer (C14) and nut (C15)
9
ASSEMBLY INSTRUCTIONS
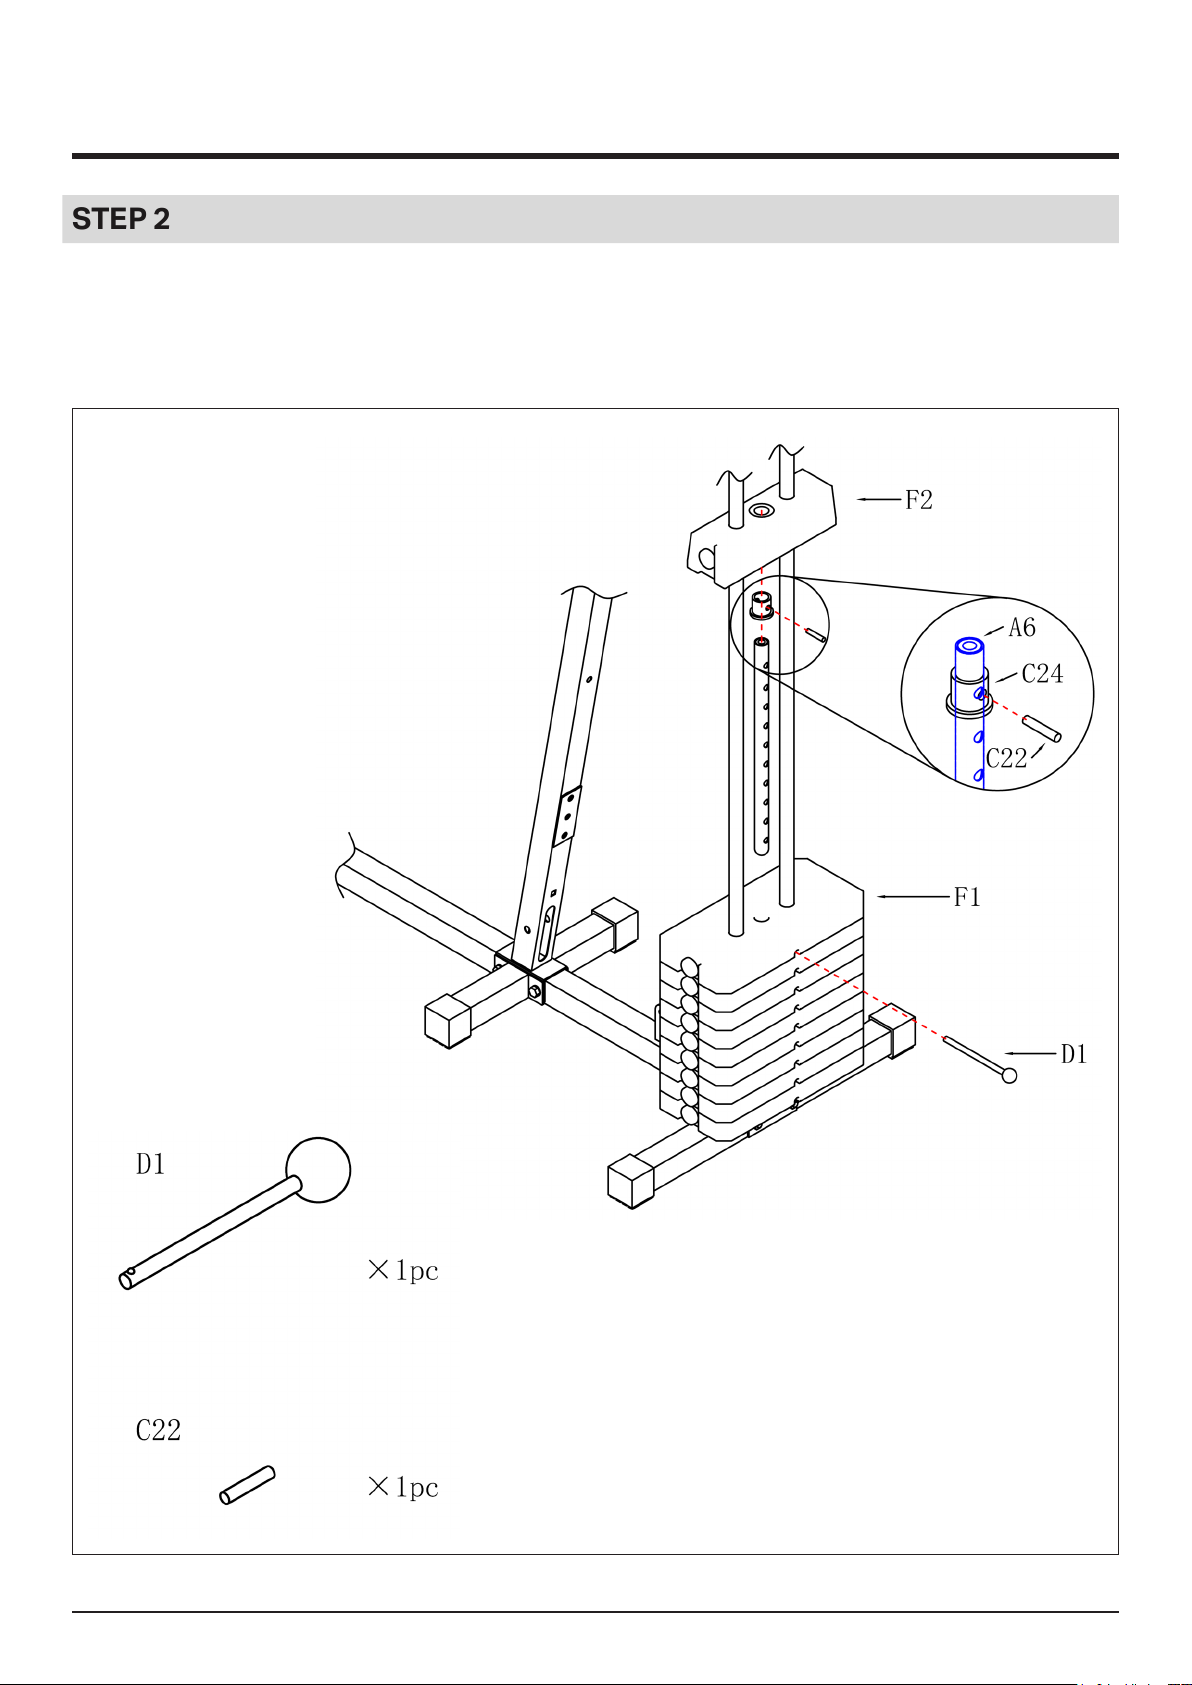
STEP 2
1. Slide weight plate(F1) over weight slider tube(A4). Equip weight pick up pole(A6) with tube
housing(C24), then equip pin(C22) into the holes.Insert weight pick up pole(A6) into weight
plate(F1),then slide weight stack top plate(F2) on top.

10
ASSEMBLY INSTRUCTIONS
STEP 3
1. Equip top brace tube(A7) on weight slider tube(A4) & main support tube(A5),x
bolt(C4),washer(C14) & nut(C15),x bolt(C8) & washer(C12).
2. Equip pulley housing(D2) with main support tube(A5) and x it by bolt(C9),washer(C14) &
nut(C15).
3. Put screw(D5) at middle of U plate,then equip it by bolt(C10),washer(C12) & nut(C13).Fix
washer(C21) & knob(D4) after.

11
ASSEMBLY INSTRUCTIONS
STEP 4
1. Equip seat tube(A8) with main support tube(A5),then x if by bolt(C4),washer(C14) & nut(C15.)
2. Equip roller pad tube(A9) with seat tube(A8),then insert sponge(F5) from both sides.
3. Assemble backrest pad(F3) onto main support tube(A5)with bolt(C5) & washer(C14)

12
ASSEMBLY INSTRUCTIONS
STEP 5
1. Assemble leg developer(A10) at the middle of seat tube(A8) with bolt(C2),washer(C16) &
nut(C17).
2. Assemble roll pad tube(A9) info leg developer (A10) then insert sponge(F5).
3. Install the T-connection plate (D10) on the cushion (F4) with the bolt (C11) and washer (C12)
4. Install the seat cushion (F4) to the seat cushion support (A16) and lock with nut (C15) and
washer (C14)
5. Then insert the cushion support (a16) into the cushion tube (A8) and lock it with the adjusting
knob (C23)

13
ASSEMBLY INSTRUCTIONS
STEP 6
1. Connect the elbow pad (F7) to the elbow pad support pipe (A18) and x it with bolts (C25) and
washers (C14).
2. Put the elbow pad support tube (A18) into the kicking tube (A10) and x it with a knob (D12).

14
ASSEMBLY INSTRUCTIONS
STEP 7
1. Insert bushing(C19) into support tube for buttery arm(A11),t top brace tube(A7) at middle
position. Insert bolt(C1) into top brace tube(A7) & (A11) and x it by washer(C16) & nut(C17).
2. Insert metal bushing(C20) into buttery arm(A11). Equip buttery arm(A12) with support tube
for buttery arm(A11),x with washer(C16) & nut(C17). The same way to assemble buttery
arm(A13).
3. Assemble sponge(F6) onto both buttery arms(A12,A13), then insert sponge(D6) into
buttery arm(A12) &(A13) washer(C12). Square end inside cap(E8).Insert sponge(E9).
15
ASSEMBLY INSTRUCTIONS
16
ASSEMBLY INSTRUCTIONS
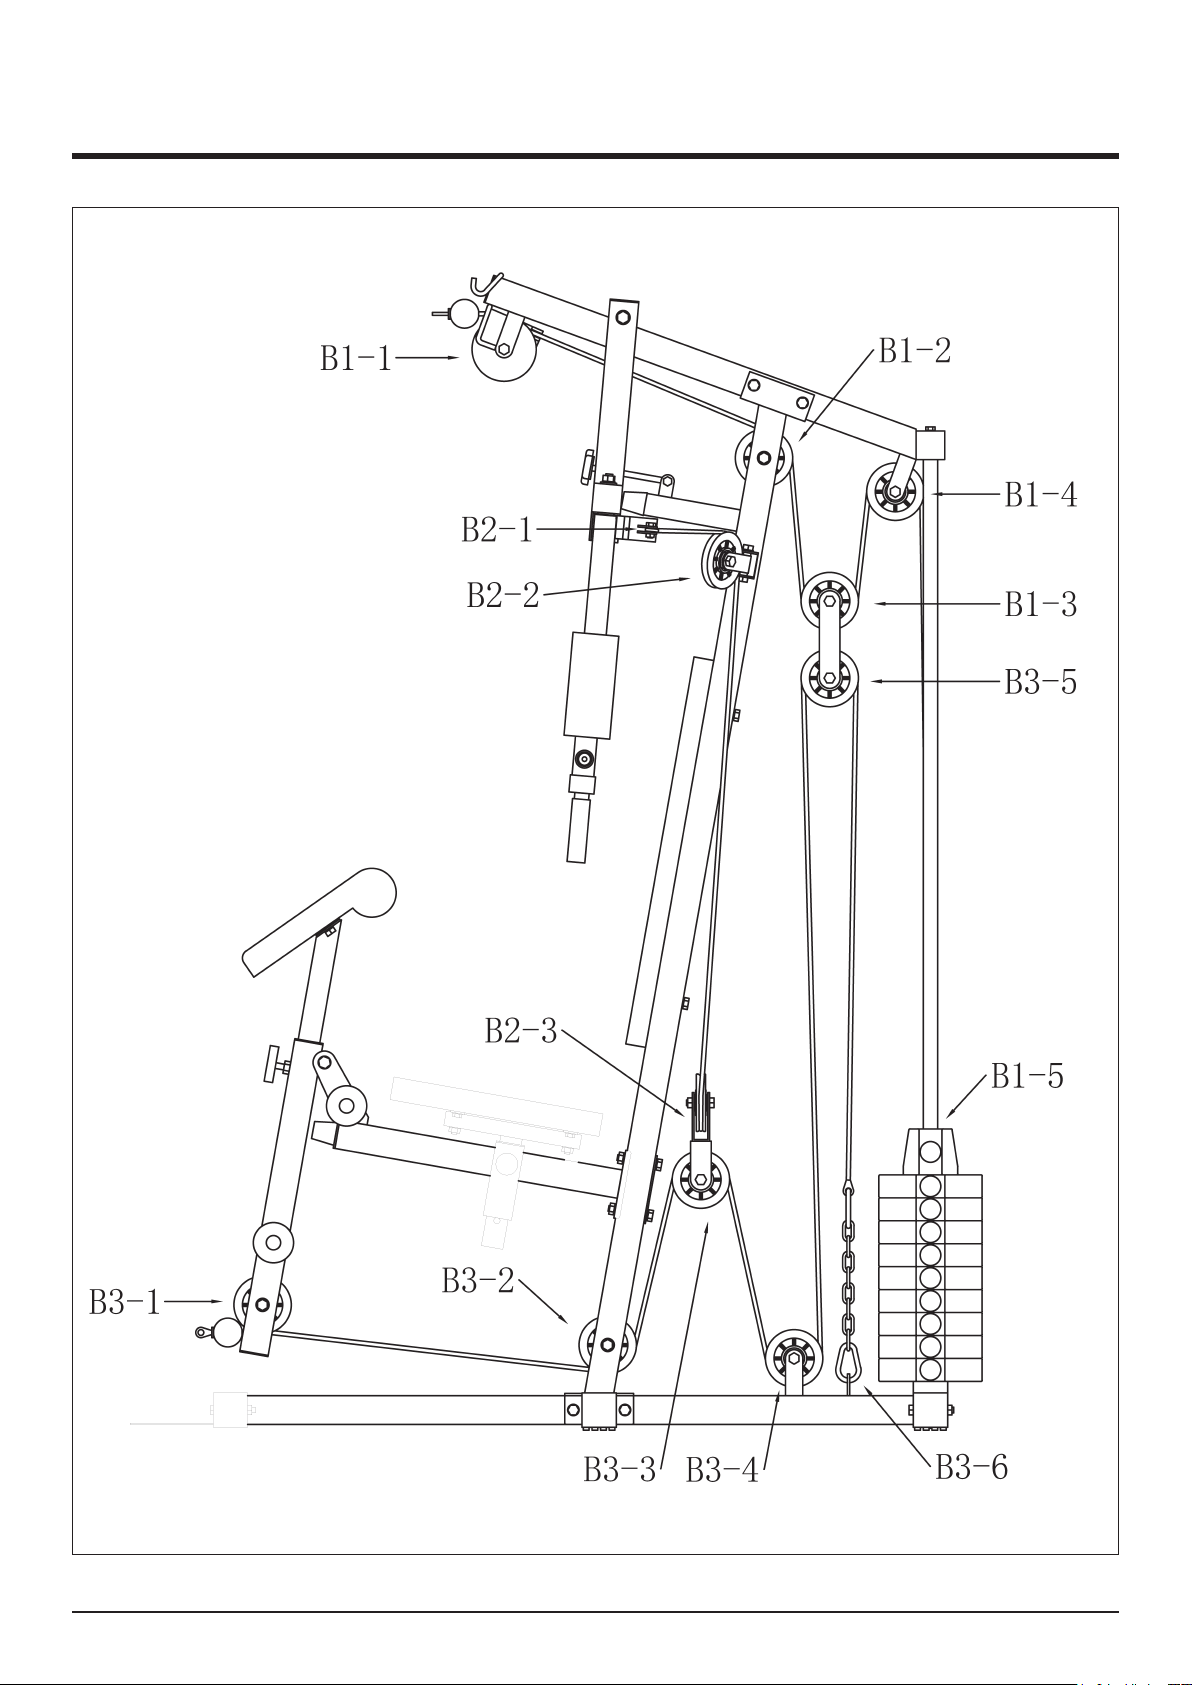
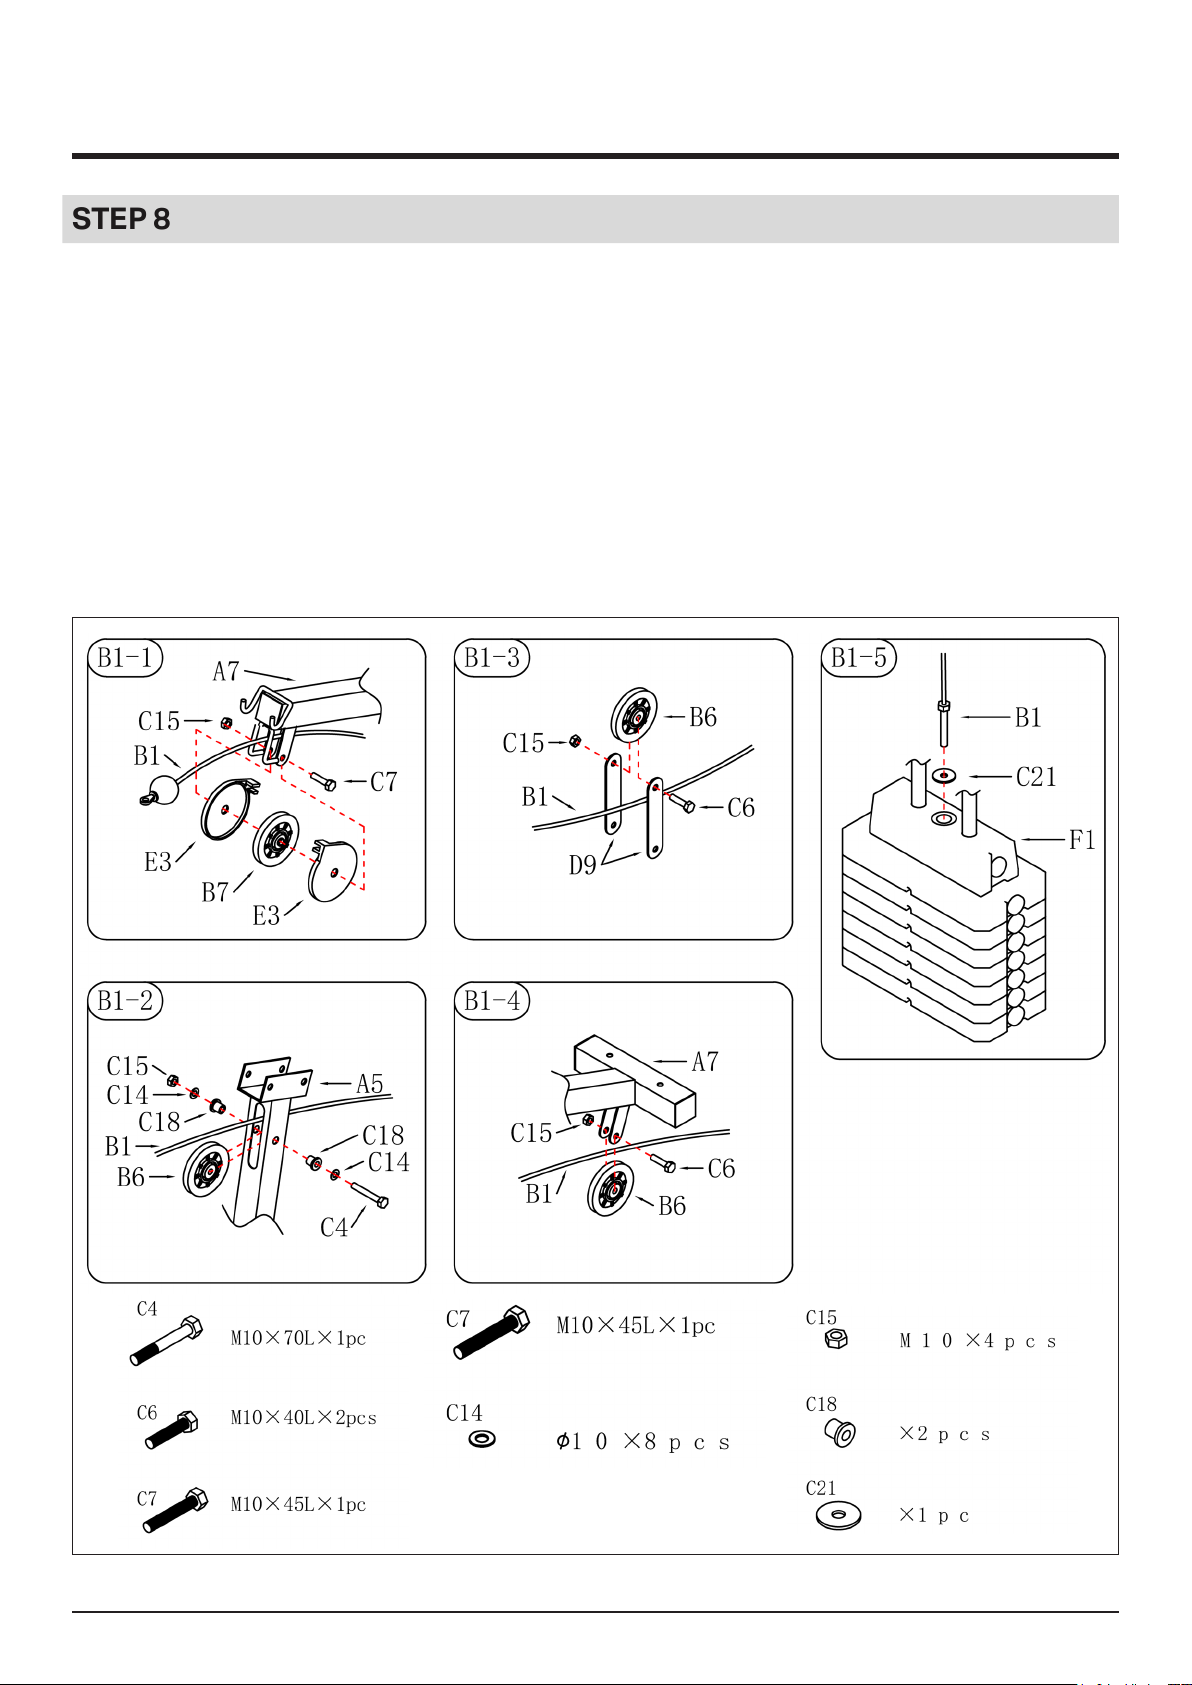
STEP 8
1. Equip weight cable(B1) onto top brace tube(A7) & pulley (B6),then x it by bolt(C7) & pulley
housing(E3),through (A7)/(B7),x it by(E3)/nut(C15).
2. Insert weight cable(B1) into main support tube(A5),then equip pulley(B6).Put metal
bushing(C18) at both side of main support tube(A5),then x by bolt(C4) & washer(C14),
through(C18)/(A5)/(B6)/(C18),x it by(C14)/nut(C15).
3. Equip weight cable(B1) into pulley bracket(D9),then equip it under pulley(B6).Then x it by
bolt(C6),through(D9)/ (B6),x it by nut(C15).
4. Equip weight cable(B1) into top brace tube(A7),then equip it on pulley(B6).Then x it by
bolt(C6),through(A7)/(B6), x it by nut(C15).
5. Equip washer(C21) onto weight cable(B1),then x it into weight pick up pole(F1).
17
ASSEMBLY INSTRUCTIONS
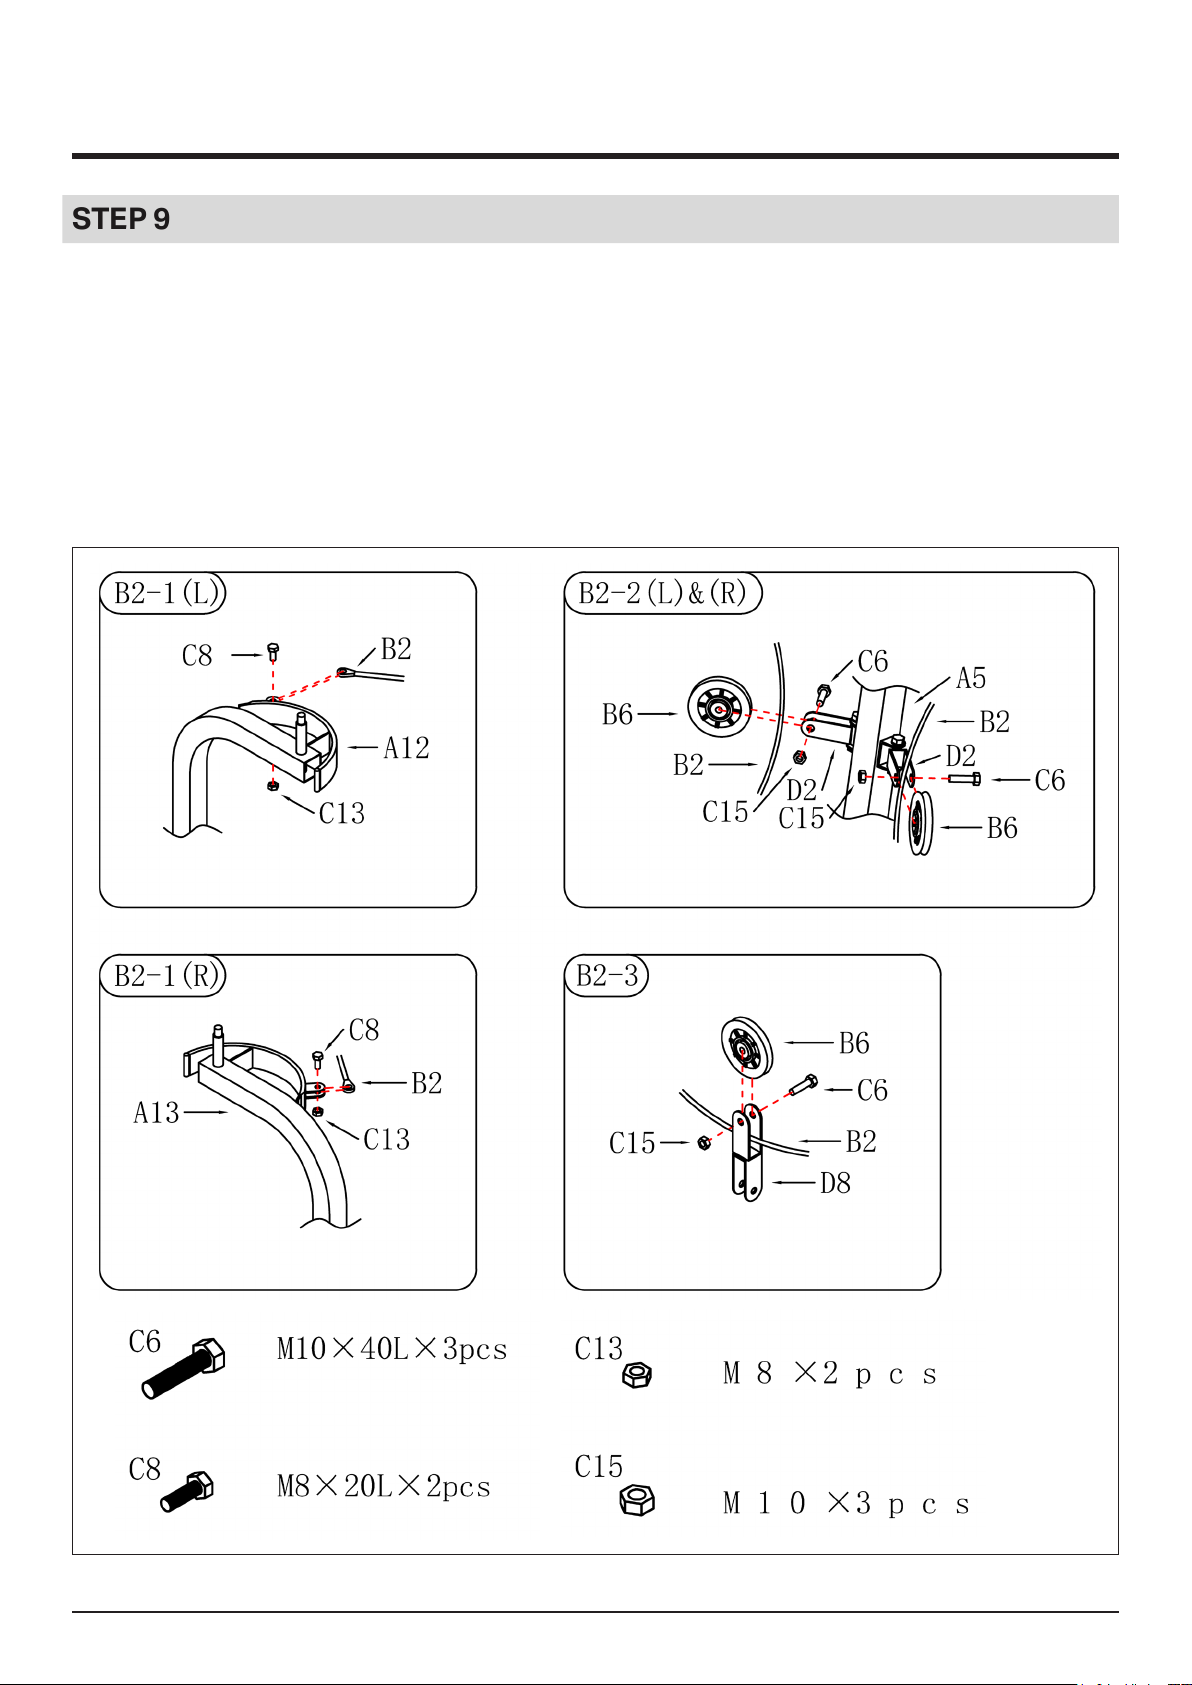
STEP 9
1. Insert the screw of buttery cable(B2) through buttery arm(A12) and x it by bolt(C8) nut
(C13).
2. Put buttery cable(B2) into pulley housing(D2). Then equip pulley(B6),then x it by nut(C15) &
bolt(C6).
3. Equip buttery cable(B2) into pulley bracket(D8). Insert it into pulley(B6) & pulley
bracket(D8),then x it by bolt(C6) and nut(C15).
4. Same as B2-1(L)
5. Same as B2-2(L)

18
ASSEMBLY INSTRUCTIONS
STEP 10
1. Equip main cabe(B3) into leg developer(A10).Insert it into pulley(B6) & leg developer(A10).Put
metal bushing (C18) at both side of leg developer(A10),then x it by bolt(C4),washer(C14) &
nut(C15).
2. Equip main cable(B3) into main support tube(A5).Insert it into pulley(B6) & main support
tube(A5).Put metal bushing(C18) at both side of main support tube(A5),then x it by
bolt(C4),washer(C14) & nut(C15).
3. Equip main cable(B3) into pulley bracket(D8),then equip it on pulley(B6).Then x it by bolt(C6)
& washer(C14), through(D8)/(B6),x it by(C14)/nut(C15).
4. Equip main cable(B3) into main base tube(A1),then equip it under pulley(B6).Then x it by
bolt(C6) & washer(C14) through(A1)/(B6),x it by(C14)/nut(C15).
5. Equip main cable(B3) into pulley bracket(D9),then equip it on pulley(B6).Then x it by bolt(C6)
& washer(C14), through(D9)/(B6),c it by(C14)/nut(C15).
6. Equip chain(B5) into main base tube(A1),then x it by hook(D7).Adjust main cable(B3) and
connect it with chain by hook(D7).

19
ASSEMBLY INSTRUCTIONS
STEP 11
1. Connect hook(D7) on both side between weight cable (B1) & lat pull bar(A14).
2. Connect chain(B5) with hook(D7) on both side between main cable(B3) & lat pull T-Bar(A15).

20
FIT4HOME LTD
Fit4Home is essentially an online business which aims to provide high quality
Exercise and Fitness products to ensure all customers maintain a healthy lifestyle.
At Fit4Home we stock various dierent types of tness and exercise equipment
such as Treadmills, Cross Trainers, Weights, Exercise Bikes etc and aim to provide
an excellent service to each and every one of our valued customers. We try to cater
for every type of individual, so if you are someone who is very serious about health
and tness we can provide you with professional heavy duty products, but if you are
someone who is busy and short on space we can provide you with equipment that is
compact and aesthetically pleasing.
Fit4Home employs a dedicated customer service team to ensure the consumer is
provided with the best service and experience. For any queries or issues feel free to
contact us via e-mail or phone.
As an online business we sell our products independently via our website, and we
also trade from established markets such as Amazon and EBay. As an established
business we endeavour to earn the condence of the customer, it is for this reason
that we try our utmost best to dispatch products the same day using a next working
day delivery service to all UK mainland areas.
Along with the customer service department, Fit4Home consists of hard-working
and reliable technicians and designers who aim to meet the needs of our customers.
Fit4Home© Ltd
Hours of Business: 9am - 5pm
Website: www.t4home.co.uk
E-mail: customerservices@t4home.co.uk
This manual suits for next models
1
Table of contents
Other Fit4Home Home Gym manuals

Fit4Home
Fit4Home POWER TOWER TF-1007 User manual

Fit4Home
Fit4Home TF-7005A User manual

Fit4Home
Fit4Home KPR91100 User manual

Fit4Home
Fit4Home TF-1001A-1 User manual

Fit4Home
Fit4Home TF-7002 MULTIGYM User manual

Fit4Home
Fit4Home ELITE GAIN TF-7005 User manual

Fit4Home
Fit4Home TF-7080A User manual

Fit4Home
Fit4Home TF-3001C-1 User manual

Fit4Home
Fit4Home TF-7509 User manual


