Fit4Home ELITE GAIN TF-7005 User manual

1
HJ-8TCD-IXQ6Please Keep For Future Reference
IMPORTANT - Please Read Instructions Fully Before Assembly Or Use
These instructions contain important information which will help you get the best
from your equipment and ensure safe and correct assembly, use and maintenance.
If you need help or have damaged or missing parts,
call the Customer Helpline: 0330 124 0718 (Opening hours: Mon-Fri 9:00am-3:00pm)
or Email: customerservices@fit4home.co.uk
ELITE GAIN TF-7005
USER MANUAL

2
CONTENTS
Safety Information
Parts List
Exploded Diagram
Assembly Instructions
Step 1
Step 2
Step 3
Step 4
Step 5
Step 6
Step 7
Step 8
Step 9
Step 10
Step 11
Step 12
Step 13
Exercises
Declaration
03
04-05
06
07-18
07
07
08
09
10
11
12
13
14
15
16
17
18
19-20
21

3
IMPORTANT SAFETY INFORMATION
PLEASE KEEP THIS MANUAL IN A SAFE PLACE FOR REFERENCE
1. It is important to read this entire manual before assembling and using the equipment. Safe
and ecient use can only be achieved if the equipment is assembled, maintained and used
properly. It is your responsibility to ensure that all users of the equipment are informed of all
warnings and precautions.
2. Before starting any exercise program you should consult your doctor to determine if you
have any physical or health conditions that could create a risk to your health and safety, or
prevent you from using the equipment properly. Your doctor’s advice is essential if you are
taking medication that aects your heart rate, blood pressure or cholesterol level.
3. Be aware of your body’s signals. Incorrect or excessive exercise can damage your health.
Stop exercising if you experience any of the following symptoms: Pain, tightness in your
chest, irregular heartbeat, extreme shortness of breath, feeling light headed, dizzy or
nauseous. If you do experience any of these conditions you should consult your doctor
before continuing with your exercise program.
4. Keep children and pets away from the equipment. The equipment is designed for adult use
only.
5. Use the equipment on a solid, at level surface with a protective cover for your oor or
carpet. For safety the equipment should have at least 0.5 meters of free space all around it.
6. Before using the equipment, check the nuts and bolts are securely tightened.
7. The safety level of the equipment can only be maintained if it is regularly examined for
damage and/or wear and tear.
8. Always use the equipment as indicated. If you nd any defective components whilst
assembling or checking the equipment, or if you hear any unusual noise coming from the
equipment during use, stop. Do not use the equipment until the problem has been rectied.
9. Wear suitable clothing whilst using the equipment. Avoid wearing loose clothing which may
get caught in the equipment or that may restrict or prevent movement.
10. The equipment is not suitable for therapeutic use.
11. Care must be taken when lifting or moving the equipment so as not to injure your back.
Always use proper lifting techniques and/or use assistance

4
PARTS LIST
No. Description Quantity No. Description Quantity
1 Main Base Tube 1 2 Front Bottom Tube 1
3 Middle Bottom Tube 1 4 Rear Base Tube 1
5 Weight Slider Rod 2 6 Locating Tube 2
7 Weight Pick Up Pole 1 8 Left Support Tube 1
9 Rear Beam Tube 1 10 Right Side Support
Tube(Up)
1
11 Right Side Support
Tube(Down)
1 12 Main Support Tube 1
13 Top Brace Tube 1 14 Small Supporting
Tube
1
15 Support Tube For
Buttery Arm
1 16 Buttery Arm (L) 1
17 Buttery Arm ( R ) 1 18 Handle Bar 4
19 Seat Tube 1 20 Supporting Tube 1
21 Leg Developer 1 22 Pad Supporting
Tube
1
23 Roll Pad Tube 4 24 Support Arm(L) 1
25 Support Arm(R) 1 26 Situp Main Frame 1
27 Long Foam Tube 1 28 Bolt M10x70l 25
29 Bolt M10x65l 8 30 Bolt M10x60l 6
31 Bolt M10x45l 1 32 Bolt M10x40l 8
33 Ф10 Washer 77 34 Anti-Slip Bolt M10 45
35 Bolt M12x80l 3 36 Bolt M12x130l 1
37 Ф12 Washer 8 38 Anti-Slip Bolt M12 4
39 Bolt M8x40l 1 40 Bolt M8x20l 4
41 Bolt M8x15l 10 42 Ф8 Washer 10
43 Anti-Slip Bolt M8 3 44 Bolt M6x55l 2
45 Ф6 Washer 4 46 Anti-Slip Bolt M6 2
47 Single Pulley Group 2 48 Pulley Connecting
Plate
2
49 Double Pulley
Bracket
1 50 Pin 1

5
PARTS LIST
51 Selector Pin 1 52 Locating Pin 1
53 Press Pin 1 54 Ф12 Washer 2
55 M10 Knob 1 56 Small Bearing 8
57 Boxing Bag 1 58 Dumbbell Hook 4
59 M8x20 Knob 1 60 M12x35 Knob 1
61 Cover Holder 2 62 Protecion Cover 4
63 Hook 6 64 Chain 2
65 Carriage Bolt
M10x60l
3 66 T Type Supporting
Plate
2
67 Weight Plate 14 68 Weight Stack Top
Plate
1
69 Rubber Washer 2 70 50x50mm Tube
Cap
6
71 Ø25 Tube Cap 10 72 Ø25 Tube Cap 1
73 50x50 Flst Foot
Jacket
6 74 T Type Nylon
Bearing Sleeve
6
75 Pulley A 11 76 Pulley B 1
77 Pulley Housing 2 78 25x50 Tube Cap 2
79 Hand Grip 12 80 Inside Cap 4
81 Tube Housing 1 82 Outer Foot Sleeve
Ø38
2
83 38*38 Tube Cap 1 84 Big Sponge 2
85 Small Sponge 4 86 Arm Cushion 1
87 Seat Cushion 1 88 Back Cushion 1
89 Vkr Back Cushion 1 90 Elbow Cushion 2
91 Low Pull Bar 1 92 Lat Pull Bar 1
93 Upper Cable 1 94 Lower Cable 1
95 Buttery Cable A) 1 96 Dumbbell 2
97 Supine Plate Pad 1 98 Sandbag Fixed
Rope
1
99 Rubber Cone Pad 1 100 Rubber Pad 2
101 Arc Foam 6 102 Bolt M10x15l 2
6
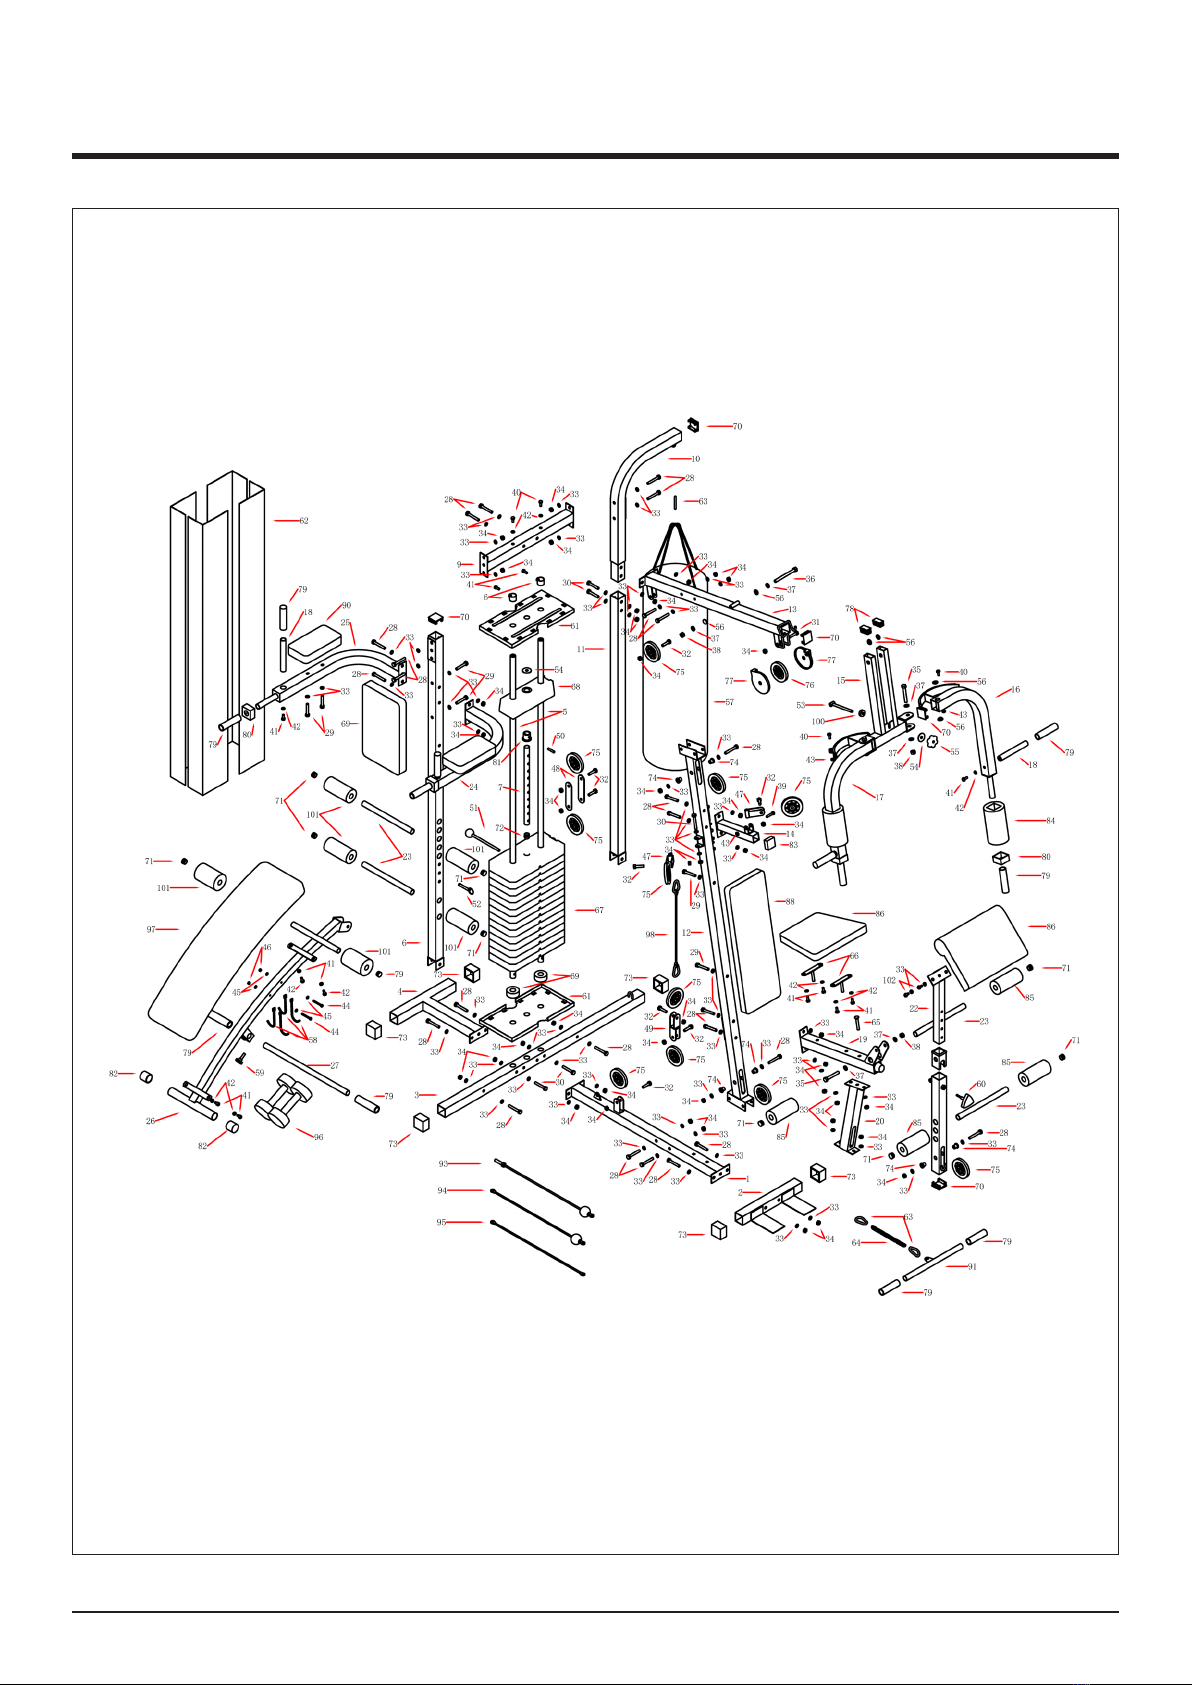
EXPLODED DRAWING

7
ASSEMBLY INSTRUCTIONS
NEEDS DIAGRAM IMAGE
STEP 1
1. Place the Main base tube (1) at on the oor, connecting the bottom of the tube (3) and the
back end of the tube (4) with 2*M10*70 bolt (28).2*bolt M10*70(28), 4 x Ø10 washer(33) and
2x M10 nut (34
STEP 2
1. Insert the weight slider rod (5) to the
rear base tube(4) throug rubber ring
(69) & net cover plate (61).Tighten
2*M10*60 bolt (30)4* Ø10 washer
(33)2*M10 nut (34).
2. Put down weight plate (67) through
weight slider rod (5).
3. Assemble tube housing(81) and
weight pick up pole ((7) with pin(50)
insert inside of weight plate and put
down the weight stack top plate(68)
on top.
4. Install the net cover plate (61) on the
weight slider rod (5).And xed (6) the
2*M8*15 bolt (41).
5. Insert the pin (51) into weight stack
8
ASSEMBLY INSTRUCTIONS
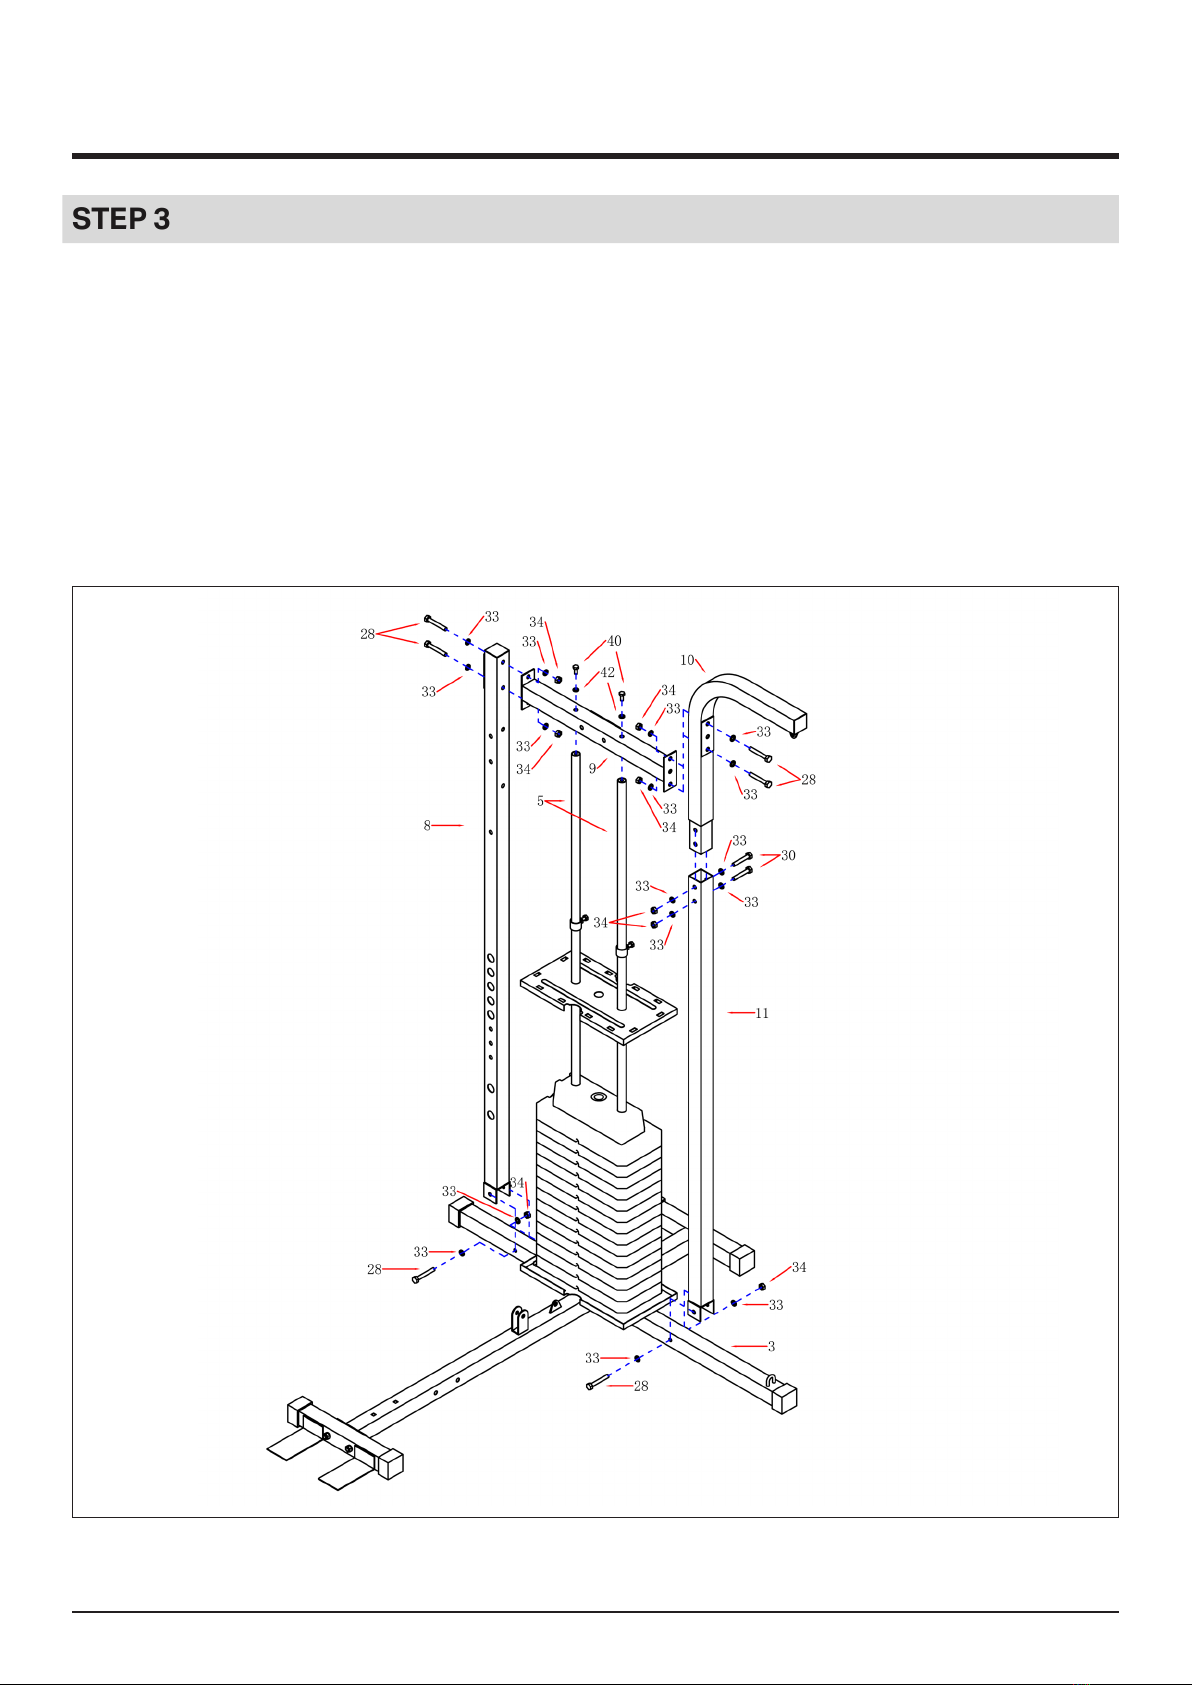
NEEDS DIAGRAM IMAGE
STEP 3
1. The left support tube (8) and the right support tube (down) (11) are installed on the middle
bottom tube (3). Tighten 2*M10*70 bolt (28)4* Ø10 washer (33)2*M10 nut (34).
2. Insert the right support tube (up) (10) to the right support tube (down)(11). Tighten 2*M10*60
bolt (30)4* Ø10 washer (33)2*M10 nut (34).
3. Insert the rear cross member (9) into the guide rod (5). Tighten 2*M8*20 bolt (40)2* Ø8
washer (40).
4. Install rear beam tube(9) to the right support tube (upper) (10) and the left support tube (8).
Tighten 4*M10*70 bolt (28)8* Ø10 washer (33)4*M10 nut (34).

9
ASSEMBLY INSTRUCTIONS
NEEDS DIAGRAM IMAGE
STEP 4
1. Install the main support tube (12) to the main base tube (1).Tighten 2*M10*70 bolt (28)4*
Ø10 washer (33)2*M10 nut (34).
2. Connecting the upper beam (13) and the main support tube (12) Tighten 2*M10*70 bolt
(28)4* Ø10 washer (33)2*M10 nut (34).
3. Then the upper beam (13) is mounted on the rear cross member (9).Tighten 2*M10*70 bolt
(28)4* Ø10 washer (33)2*M10 nut (34).
4. The small support pipe (14) is mounted on the main support tube (12).Tighten 2*M10*70 bolt
(28)4* Ø10 washer (33)2*M10 nut (34).
10
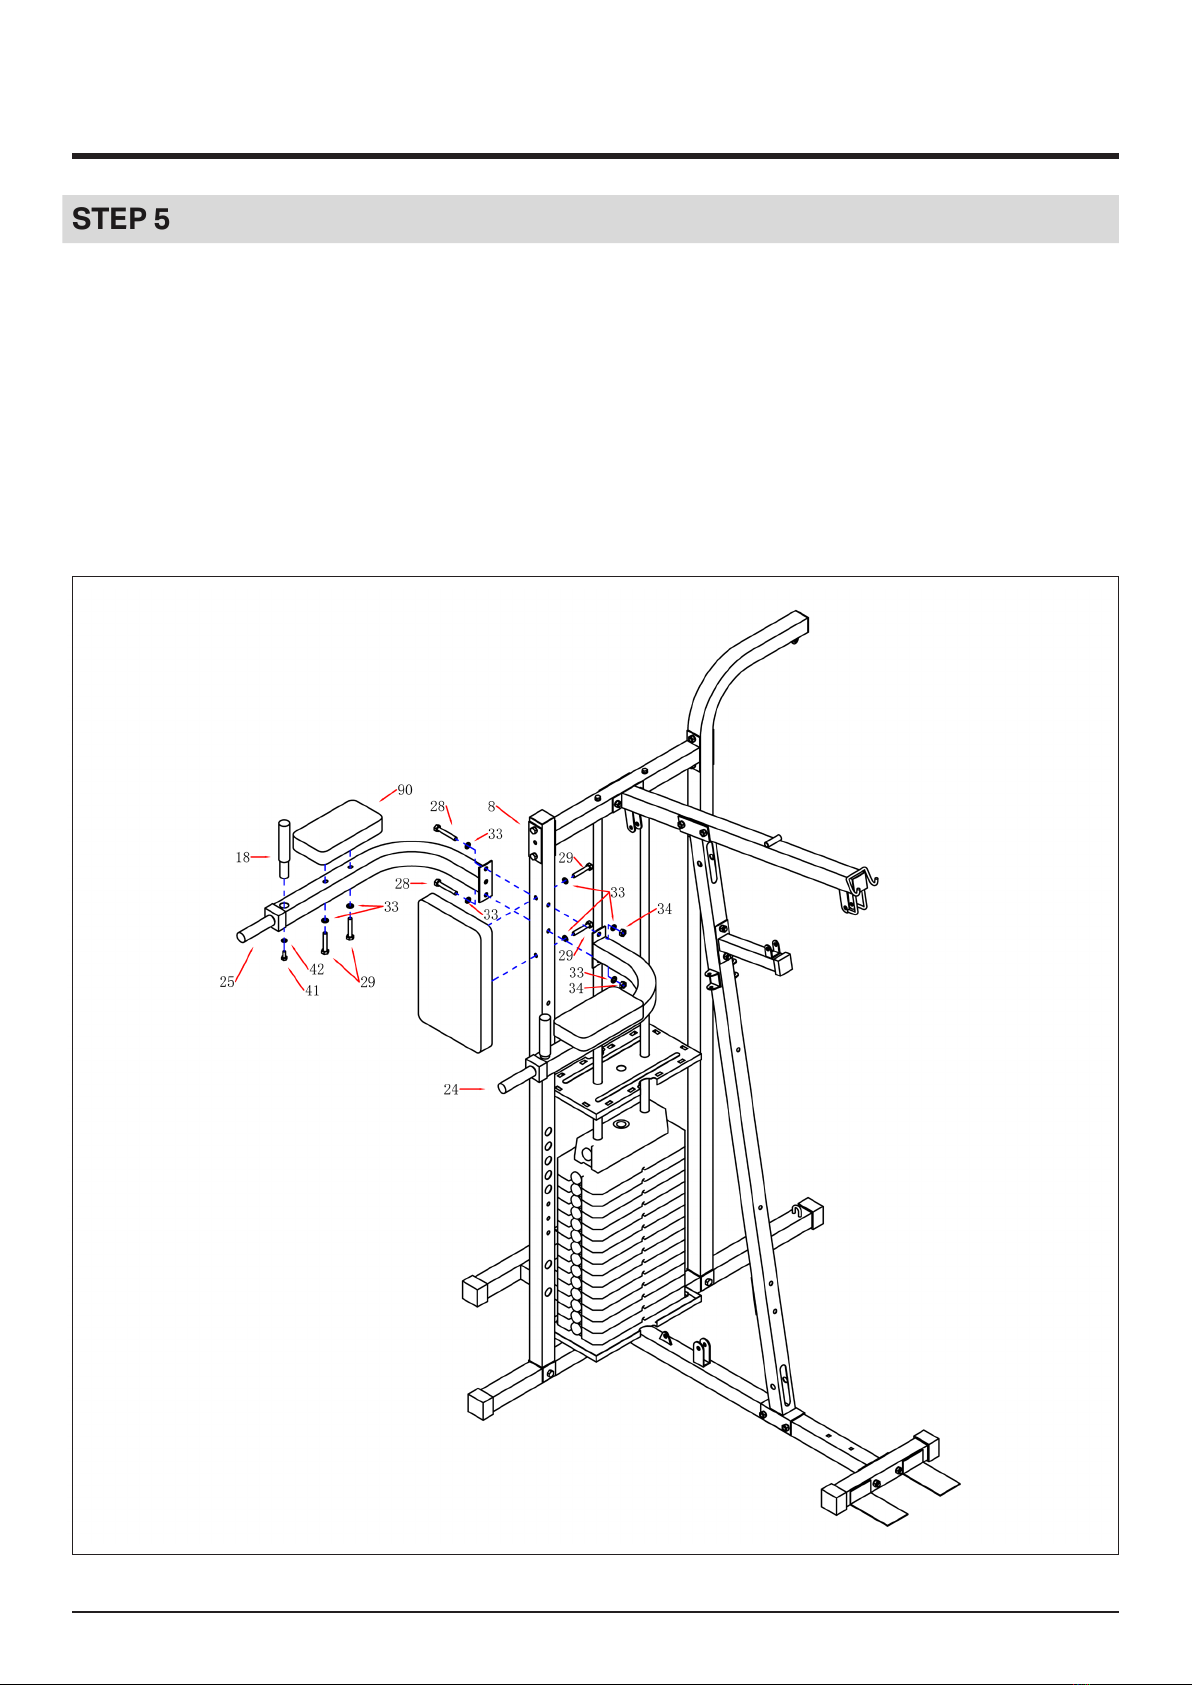
ASSEMBLY INSTRUCTIONS
STEP 5
1. The support arm (left) (24) and a supporting arm (right) (25) is connected with the left
support tube (8)Tighten 2*M10*70 bolt (28) 4* Ø10 washer (33)2*M10 nut (34).
2. Fixed the samll back cushion(89) and left support tube(up)(8)with 2pcs M10*65 bolt(29) and
2pcs Ø10 washer (33).
3. The elbow pad (90) is mounted on the support arm (24, 25).Tighten 2*M10*65 bolt (29)4*
Ø10 washer (33).
4. The straight handle (18) is inserted into the left and right support arm tube (24, 25) Tighten
2*M8*15 bolt (41)4* Ø8 washer (42).

11
ASSEMBLY INSTRUCTIONS
STEP 6
1. The inclined support pipe (20) is mounted on the main base tube (1).Tighten 2*M10*60
carriage bolt (65)2* Ø10 washer (33)2*M10 nut (34).
2. The seat tube (19) is assembled on the main support tube (12) Tighten 2*M10*70 bolt (28)4*
Ø10 washer (33)2*M10 nut (34) Then the seat tube (19) connected with the oblique support
tube (20) Tighten 2*M10*60 carriage bolt (65)2* Ø10 washer (33)2*M10 nut (34).
3. Assemble leg developer(21) and seat tube(19) with M12*80 bolt(35)2*Ø12 washer(37( and
M12 nut, tighten.(38)
4. Insert the preacher pad support tube(22) into the leg developer(21) xed with knob (60)
5. Fixed the “T” type supporting plate(66) and seat cushion(87) with 4pcs M8*15 bolt(41)
and 4pcs Ø8 washer(42) rst. assemble the seat cushion (87) and seat tube (19) with
2*M10bolt(34) & 2*Ø10washer (33).
6. Assemble the back cushion (88) and main support tube (12) with 2*M10*65 bolt (29) and
2*Ø10 washer (33).
7. Fixed Preacher pad(86) and supporting tube(22) with 2*M10*15bolt (102) &2*Ø10washer(
33)
12
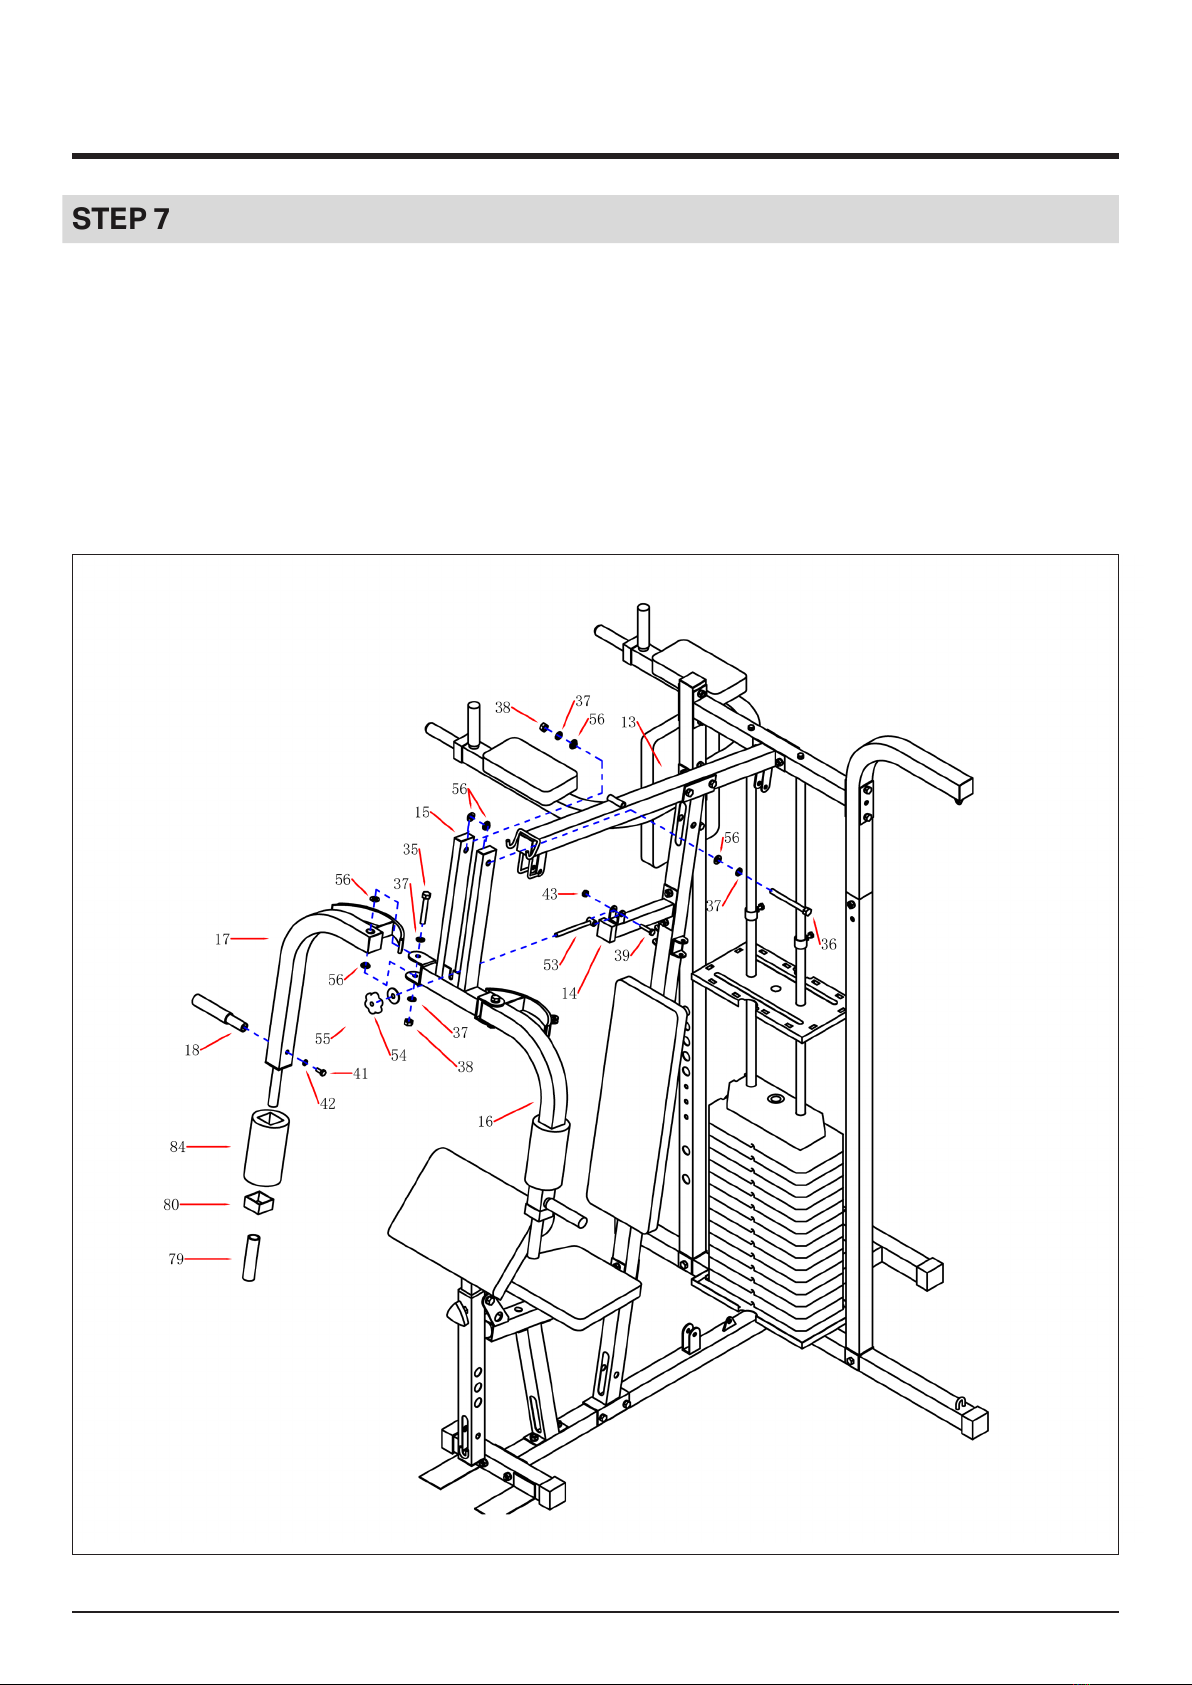
ASSEMBLY INSTRUCTIONS
STEP 7
1. 1. The buttery arm bracket (15) is mounted on the upper beam (13). Insert M12*130 bolt
(36) 4*bearing (56) and 2xØ12washer(37)tighten with M12 nut(38).
2. Install buttery arm (16, 17) to the buttery arm bracket (15) xed by 2*bearing(56) and
Ø12washer(37)tighten with M12 nut(38).
3. Assemble the big sponge(84) to the buttery arm(16,17) and the square end iside
cap(80);handle cap(79).
4. Insert the handle bar(18) to the buttery arm(15,16) xed with M8*20 bolt(41)and Ø8
washer(42).
13
ASSEMBLY INSTRUCTIONS
STEP 8
1. Let cable A goes through pulley B (76) rst, then xed the pulley housing (77) pulley B (76)
and top brace tube (12) with M10*45 bolt and M10 nut.Let cable A goes through the pulley
of main support tube (12),over pulley connecting plate (48) ,goes up through the pulley (75)
on the top brace tube(12) And then through the net cover plate (61)Ф12 washer (54)Fixed in
the selector lever (7) tighten all pulleys with M10*45 bolt(31) and M10 nut(33).

14
ASSEMBLY INSTRUCTIONS
STEP 9
1. Fixed the single pulley bracket (47) and main support tube(12) with M10*60 bolt(30)4* Ø10
washer (33)2*M10 nut (34).
2. Fixed one end of cable C and buttery arm L (16) with M8*20 bolt(40) M8 nut(43). Let cable
C goes through single pullley bracket(47),then double pulley bracket (49) ,xed them with
M10*40 bolt; M10 nut. Finally go up through single pulley bracket (47) and xed the cable
end and buttery arm R (17) with M8*20 bolt(40) M8 nut(43).
15
ASSEMBLY INSTRUCTIONS
STEP 10
1. Let cable B goes through pulley of leg developer rst and the pulley of main support tube.
Then goes through as shown as the drawing connected with Hook and chain.
16
ASSEMBLY INSTRUCTIONS
STEP 11
1. The 4 pieces of net cover sheet (62) arranged in the net cover plate frame (61) and xed by a
positioning tube (6) 2*M8*15 (41) and tighten the bolts.
17
ASSEMBLY INSTRUCTIONS
STEP 12
1. Put on the back board (26)With the Locating pin(52)Fixed on the left support tube (8) Insert
the foam tube (23) through the left support tube (8) Put on the foam (101) both ends of the
foam tube (23).
2. Put on the dumbbell (96) to the main frame supine hook (26)Insert the long foam tube (27)
through the main frame (26) supine Put on the handle cover (79) from the two ends of long
foam tube (27).
3. Insert the roll pad tube through Leg Developer(21). Put on the small sponge(85)

18
ASSEMBLY INSTRUCTIONS
STEP 13
1. The boxing bag (57) is mounted on the right side of the tube (upper)(10) and is connected
with an annular hook (63) and a pull rope (98).
2. Connected lat pull bar(92) and cable A(93) with hook(63)
3. Connected T-bar(91) and cable B(94) with 2 hooks(63)and chain(64).

19
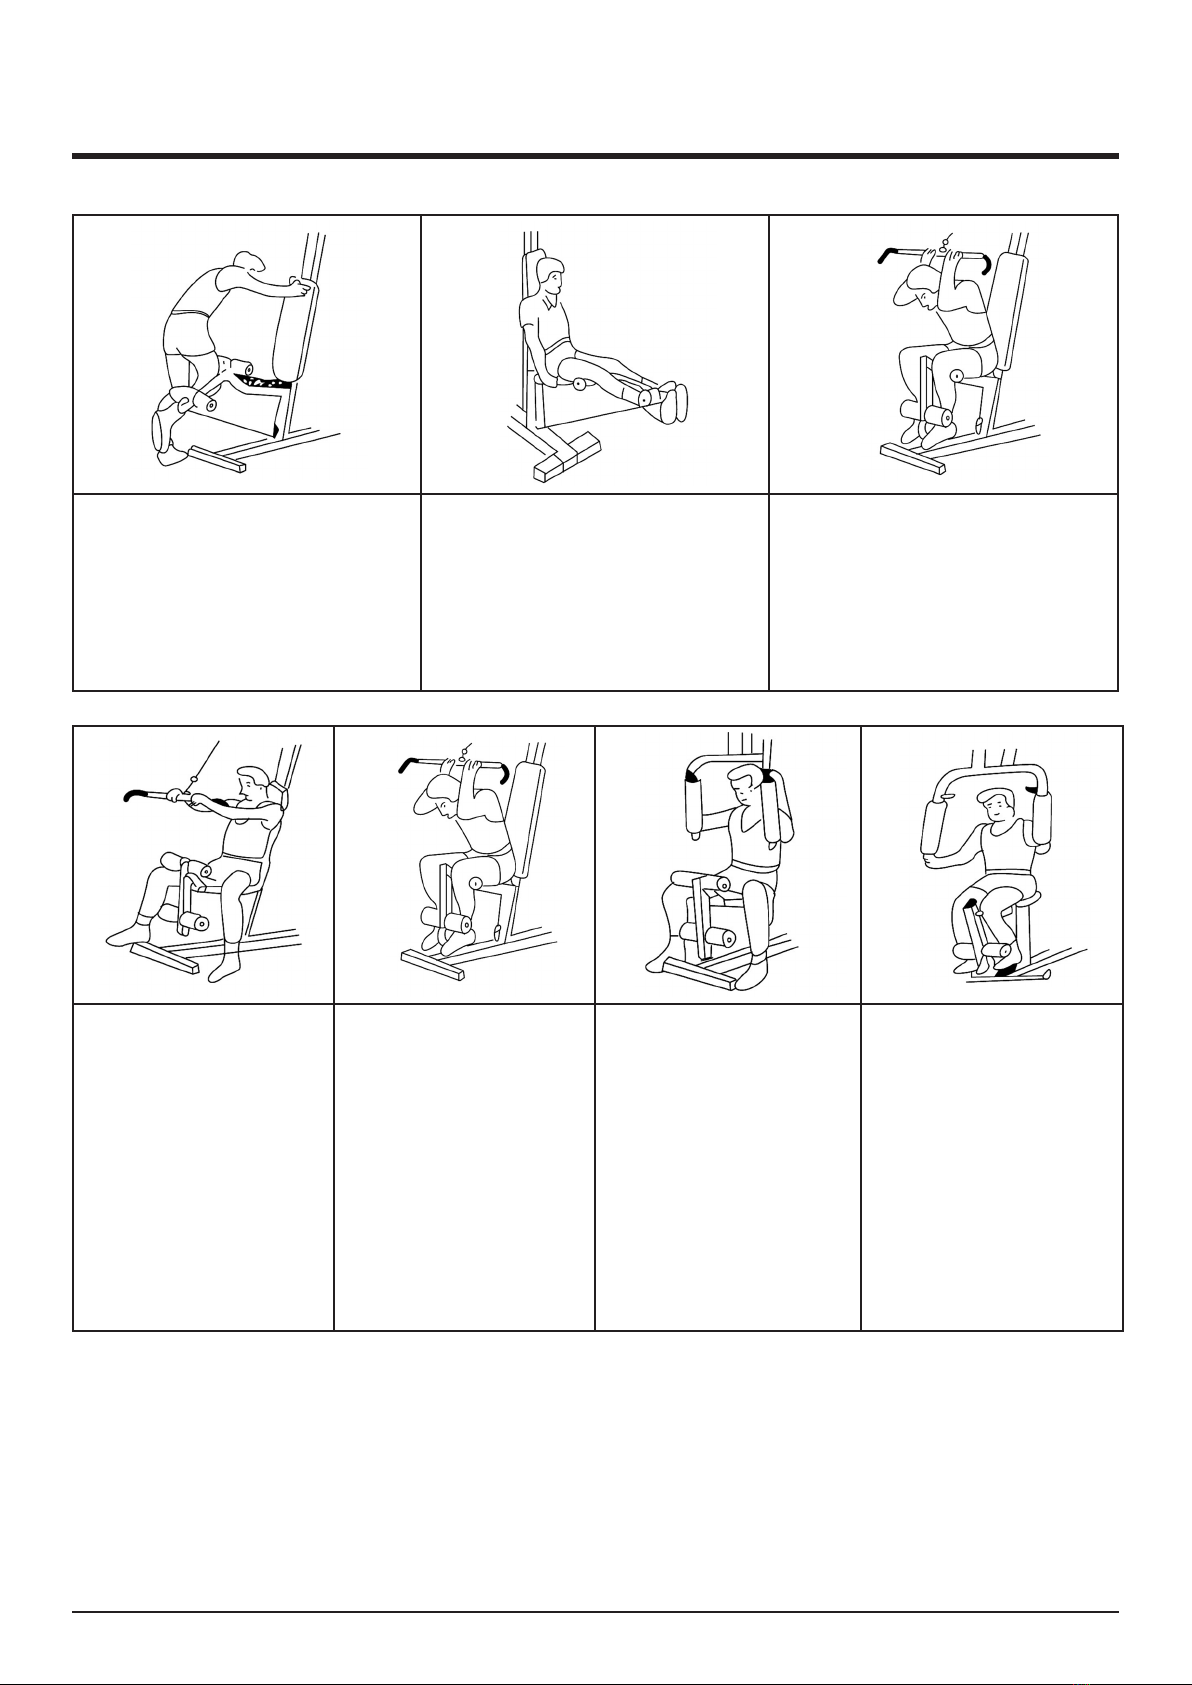
4. 5. 6.
Preacher Curls
(Biceps-Forearm Flexors)
Fit “T”-Bar To Low Pulley And Roll
Pads. To Top Hole Sit On Seat And
Lean, Forward Grip The Bar And Place
Elbows Against Roll Pads, Curl Bar In
An Arc Upwards As Far As Possible
Preacher Curls-Reverse Grip
(Biceps-With Very Strong Emphasis
On Forearm Muscles) Same As For
Preacher Curls But With, A Reverse
Grip. You May Find That Your Forearm
Grip Is The Limitation With This
Exercise And Not Your Bicep Strength.
Wrist Curl
(Forearm Flexors)
Fit “T” Bar To Low Pulley And
Roll Pad To Top Hole. Rest
Forearms On Roll Pads While
Gripping Bar. “Curl” Your Wrists With
As Much Range As Possible, Reverse
Grip Works T
1. 2. 3.
Low Pulley Row
(Trapezius-Latissimus
Dorsierectorspinaf)
Fit “T”-Bar To Low Pulley Sit With
Feet Against Cross-Brace. Legs
Slightly Bent Stretch Forward Sit-Up,
Arch Your Back And Pull To Your Waist
Knee Raise
(Hit Flexors-Rectus Abdominis)Fit
“T”-Bar To Low Pulley Lie On Your
Back With Legs Almost Straight Curl
Toes Upwards And Place “T”-Bar
Between Your Feet. “Raise” Knees As
Far As Possible Towards Chest.
Bicep Curls
(Biceps-Forearm Flexors)
Fit “T”-Bar To Low Pulley Grip
The Bar And Stand With Your
Arms Straight And Your Flbows Locked
Into Your Body. Curl The Bar Upwards
As Far As Possible
EXERCISE INSTRUCTION
20
7. 8. 9.
Leg Curl
(Hamstring Group)
This Exercise Is Preformed With One
Leg At A Time. Fit The Roll Pads To The
Top Hole. Hook Your Leg Around With
Your Knee Against The Top Pad Curl
As Far As Possible.
Leg Extensions
(Quadriceps)
Fit The Roll Pads To The Bottom Hole.
Hook Your Legs Around The Roll Pads
And Grip The Bottom Of The Seat.
Slowly Straighten Your
Crunches
(Rectus Abdominis-Serratus-Lower
Latissi-Mus Dorsi) Fit “T” Bar To High
Pulley And Roll Pads To Bottom Hole.
Hook Your Legs Around The Roll Pads
And Grip The Bar Bend At The Waist
And Curl Forward And Down As Far As
Possible.
EXERCISE INSTRUCTION
10. 11. 12. 13.
Straight Arm Pullover
(Latissimus
Dorsi-Serratus Pectorals)
Fit “T” Bar To High Pulley, Sit
Back And Grip Handles With
Arms Straight. Pull The Bar
Downwards In An Arc As
Far As Possible, Lean
Forward To Increase Range
Of Arc.
Lat Pull Front
(Latissimus Dorsi-Posterior
Deltoid biceps Brachialis)
Fit Lat Bar To High Pulley
And Roll Pads To Top Poiton.
Grip Handles And Sit With
Thighs Under Roll Pads.
Arch Your Back And Pull The
Bar To Your Chest
Buttery
(Pec-Dec Flyes)
(Pectroals, Almost
Completely Isolated)
Set Pre-Stretch, Upper
Arm Parallel With Floor And
Your Forearms Against The
Roll Pads. Push With Your
Elbows. Not Your Hands.
Vertical Bench Press
1) Adjust The Seat Height
So That The Handles Of The
Pressing Armare At Mid-
Chest Level
2) Using Either Set Of Grips,
Push Against The Pressin5
Arm To FullExtension. Vary
Your Grip From Horizontal
To Vertical To Wory The
Muscles From Dierent
Angles Of Isolation.
3) Repeat For The Desired
Number Of Repetitions.
WARNING
PRIOR TO UNDERTAKING ANY PROGRAM OF EXERCISE THAT REQUIRES A MAJOR INCREASE IN PHYSICAL
ACTIVITY, CONSULTATION WITH A COMPETENT MEDICAL AUTHORITY IS STRONGLY RECOMMENDED. IN
ADDITION, ANYONE WHO HAS A PHYSICAL HANDICAP, SUFFERS FROM A PROLONGED ILLNESS, OR WHO HAS
INCREASED RISK FACTORS SUCH AS OBESITY, HYPERTENSION, CARDIO-CIRCULATORY PROBLEMS, ETC.,
SHOULD CONSULT A COMPETENT MEDICAL AUTHORITY BEFORE UNDERTAKING ANY EXERCISE OR ENGAGING
IN A CONTINUING PROGRAM OF EXERCISING. PLEASE READ THROUGH INSTRUCTIONS CAREFULLY BEFORE
STARTING TO ASSEMBLE.
This manual suits for next models
1
Table of contents
Other Fit4Home Home Gym manuals

Fit4Home
Fit4Home KPR91100 User manual

Fit4Home
Fit4Home TF-7005A User manual

Fit4Home
Fit4Home POWER TOWER TF-1007 User manual

Fit4Home
Fit4Home TF-7002 MULTIGYM User manual

Fit4Home
Fit4Home TF-7080A User manual

Fit4Home
Fit4Home TF-7001 User manual

Fit4Home
Fit4Home TF-1001A-1 User manual

Fit4Home
Fit4Home TF-3001C-1 User manual

Fit4Home
Fit4Home TF-7509 User manual


