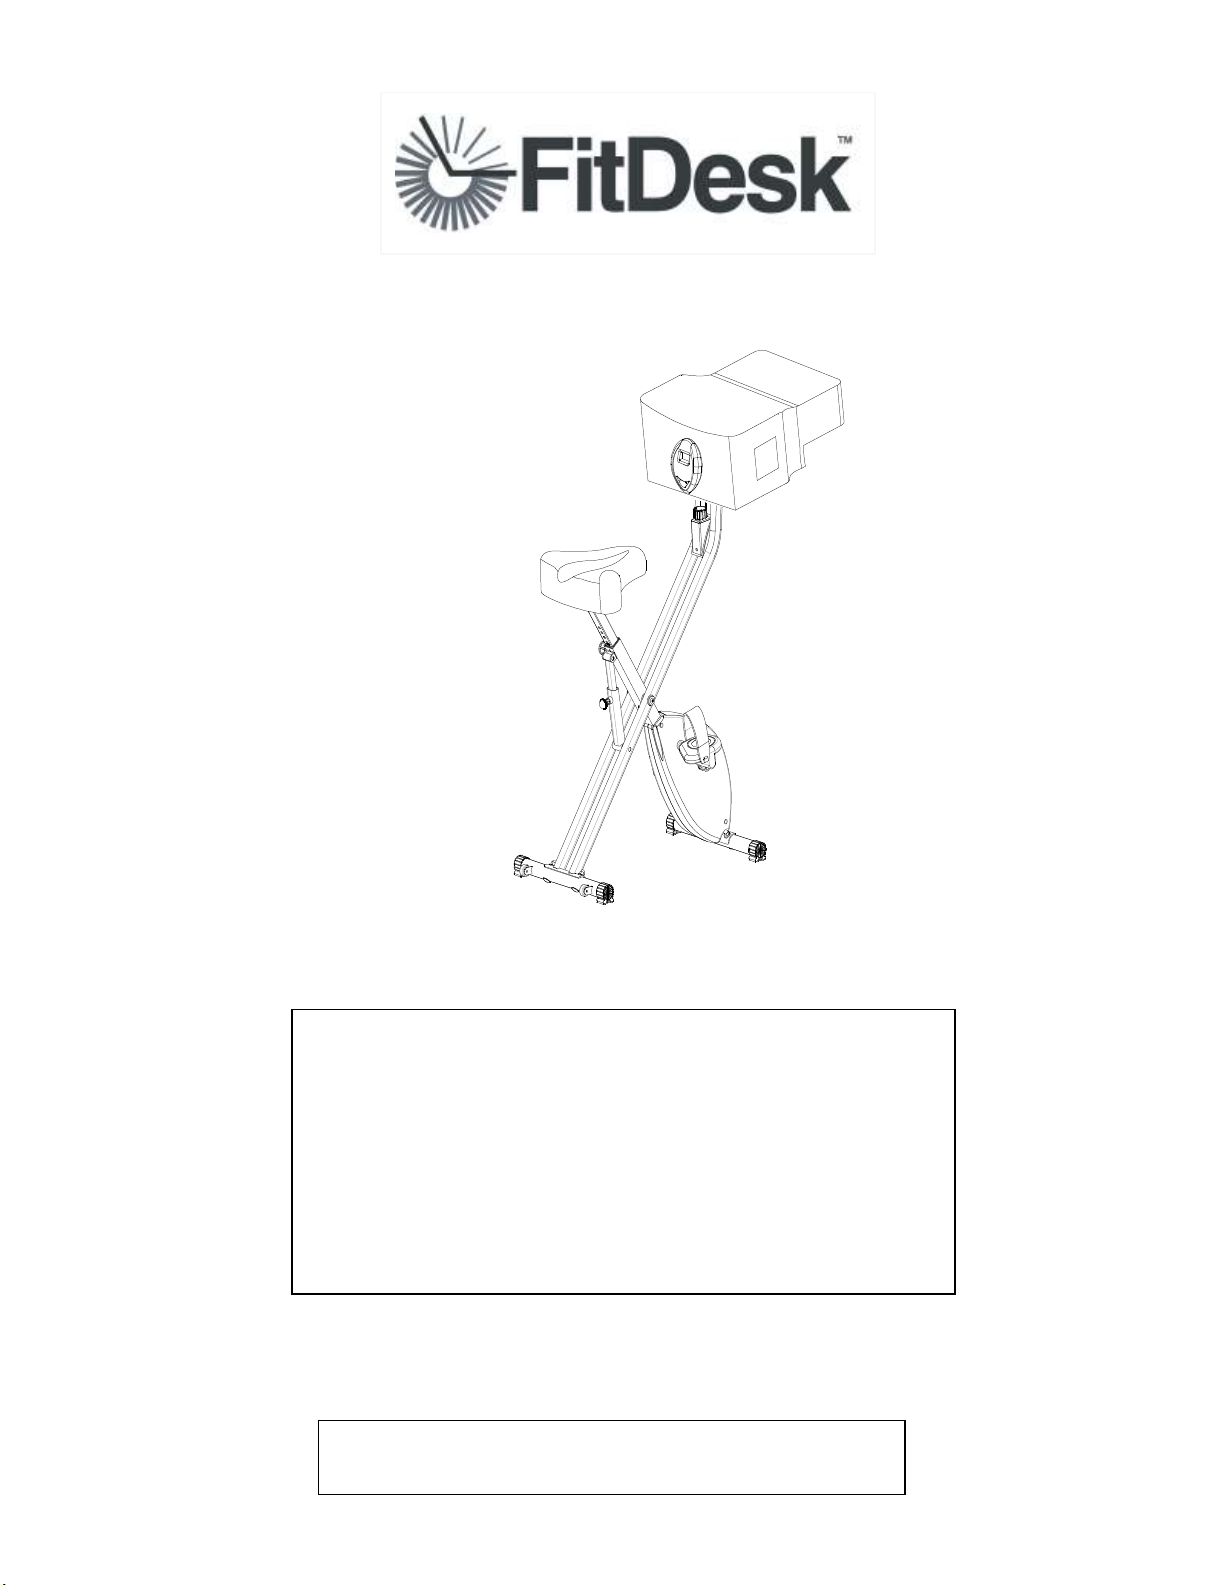
FitDesk FD-X-003 User manual
Where Health and Productivity Converge
Patent Pending
o
Model # FD-X-003
Thank you for trying our product. Our goal is to help people improve their
health and productivity.
We hope you enjoy your FitDesk and use it daily.
This product can help you improve your health.
Please tell us what you think of our product, write a review or tell a friend.
Take a moment and join us on our Face ook page for updates and new releases.
Also, see our we site for our continued addition of new accessories to help
make your FitDesk even etter.
Re
Owner’s Manual
Owner’s ManualOwner’s Manual
Owner’s Manual

.
Important Safety Information:
:
::
:
Please keep this manual in a safe place for reference.
1. Read the entire manual before assembling and using the equipment. Safe use
can only be achieved if the equipment is assembled, maintained and used properly.
All users of the equipment must be informed of all warnings and precautions.
2. Before starting any exercise program you should consult your doctor to
determine if you have any health conditions that could create a risk to your health
and safety, or prevent you from using the equipment properly. our doctor's advice
is essential if you are taking medication that affects your heart rate, blood pressure
or cholesterol level.
3. Be aware of your body's signals. Incorrect or excessive exercise can damage
your health. Stop exercising if you experience any of the following symptoms: Pain,
tightness in your chest, irregular heartbeat, extreme shortness of breath, feeling
light headed, dizzy or nauseous. If you do experience any of these conditions you
should consult your doctor before continuing with your exercise program.
4. Fingers can get pinched when picking up the bike. Lift by seat and handlebar
only.
5. Always CLOSE frame and LOCK with FRAME LOCK PIN before transport
6. Read and heed the warning stickers on the FitDesk.
7. Warm-up stretching is recommended before exercise. ALWA S USE GOOD
POSTURE
8. Make sure your laptop, kindle or other devices are tightly secured to the desk top
by the strap provided. eep wires from getting tangled while pedaling.
9. Mount and dismount carefully.
- Extreme movements CAN TIP MACHINE
- INJUR AND EQUIPMENT DAMAGE CAN OCCUR
10. Keep pets and young children away from the equipment.
11. Use the equipment on a solid, level surface with a protective cover for your floor
or carpet. The equipment should have at least one yard of free space all around it.
12. Inspect and tighten all parts often. Replace any worn parts immediately. The
safety level of the equipment can only be maintained if it is regularly examined for
damage and/or wear and tear. (E.g. handle bar, pedals, and seat..)

13. Always use the equipment as indicated. If you find any defective components
while assembling or checking the equipment, or if you hear any unusual noises
coming from the equipment during use, stop immediately. Do not use the
equipment until the problem has been rectified.
14. Wear suitable clothing while using the equipment. Avoid wearing loose clothing
that may get caught in the equipment or clothing that may restrict or prevent
movement.
15. Do not exceed maximum weight of user: 250 lbs, 113 kg
16. The equipment is suitable for home and office use only. Do not use in
commercial or rental settings.
17. Keep wires from getting tangled in pedals
Thank you for trying our product FitDesk !
100% SATISFACTION GUARANTEED!
We hope you love your FitDesk. And if you have any questions, comments or any pro lems whatsoever,
please call us at 615-669-9004 or email us customerservic[email protected].
However, if for any reason you are not satisfied with your FitDesk we offer a 100% satisfaction
money- ack guarantee. Simply return your FitDesk product in 30 days and we will refund your entire
purchase price (please note that expedited shipping fees from UPS Ground and UPS 2nd Day cannot e
refunded). Prior approval IS required for refund.
IMPORTANT: Please make sure to save the original carton to return ALL the components of the
FitDesk:
Also, please include a short note telling us why you are returning the FitDesk as this information is very
important in helping us to improve our future products.
Your satisfaction is our #1 priority! Send returns to:
REVO Innovations
FitDesk
14601 Old Hickory Blvd.
Antioch, TN 37013

EXERCISE MONITOR INSTRUCTION MANUAL
SPECIFICATIONS:
TIME 00:00-99:59
SPEED(SPD)..........0-99.MPH
DISTANCE(DIST)...0-999 Miles
CALORIE(CAL)0-9999KCAL
ODOMETER(ODO).....0-999.9zmi
EYFUNCTIONS:
MODE(SELECT/RESET:This key lets you select and lock onto a particular function.
SET: This key toggles the data for “TIME” “DISTANCE” “CALORIES”.
CLEAR(RESET):The key resets values to zero.
OPERATION PROCEDURES:
1. AUTO ON/OFF
◆ The system turns on when any key is pressed or when it senses input from the
speed sensor.
◆ The system turns off and RESETS automatically when there is no signal input
for approximately 4 minutes.
2. RESET
The unit can be reset by pressing the RESET key for 3 seconds.
3. MODE
To choose a function, press the MODE key when the pointer is on the function you
want. It will begin blinking.
FUNCTIONS:
1. TIME: Press the MODE key until the pointer is on TIME. The time of the workout will
be displayed.
2. SPEED: Press the MODE key until the pointer advances to SPEED. The current
speed will be shown.
3. DISTANCE: Press the MODE key until the pointer advances to DISTANCE. The
distance of each workout will be displayed.
4. CALORIE: Press the MODE key until the pointer advances to CALORIE. The
calories burned will be displayed.
5. ODOMETER Press the MODE key until the pointer advances to ODOMETER. The
total accumulated distance will be displayed.
SCAN: Automatically display changes every 4 seconds.
TroubleShooting:
BATTER : If there are problems with the display try reinstalling the battery.
Connection: If no reading when pedaling disconnect, clean and reconnect link.
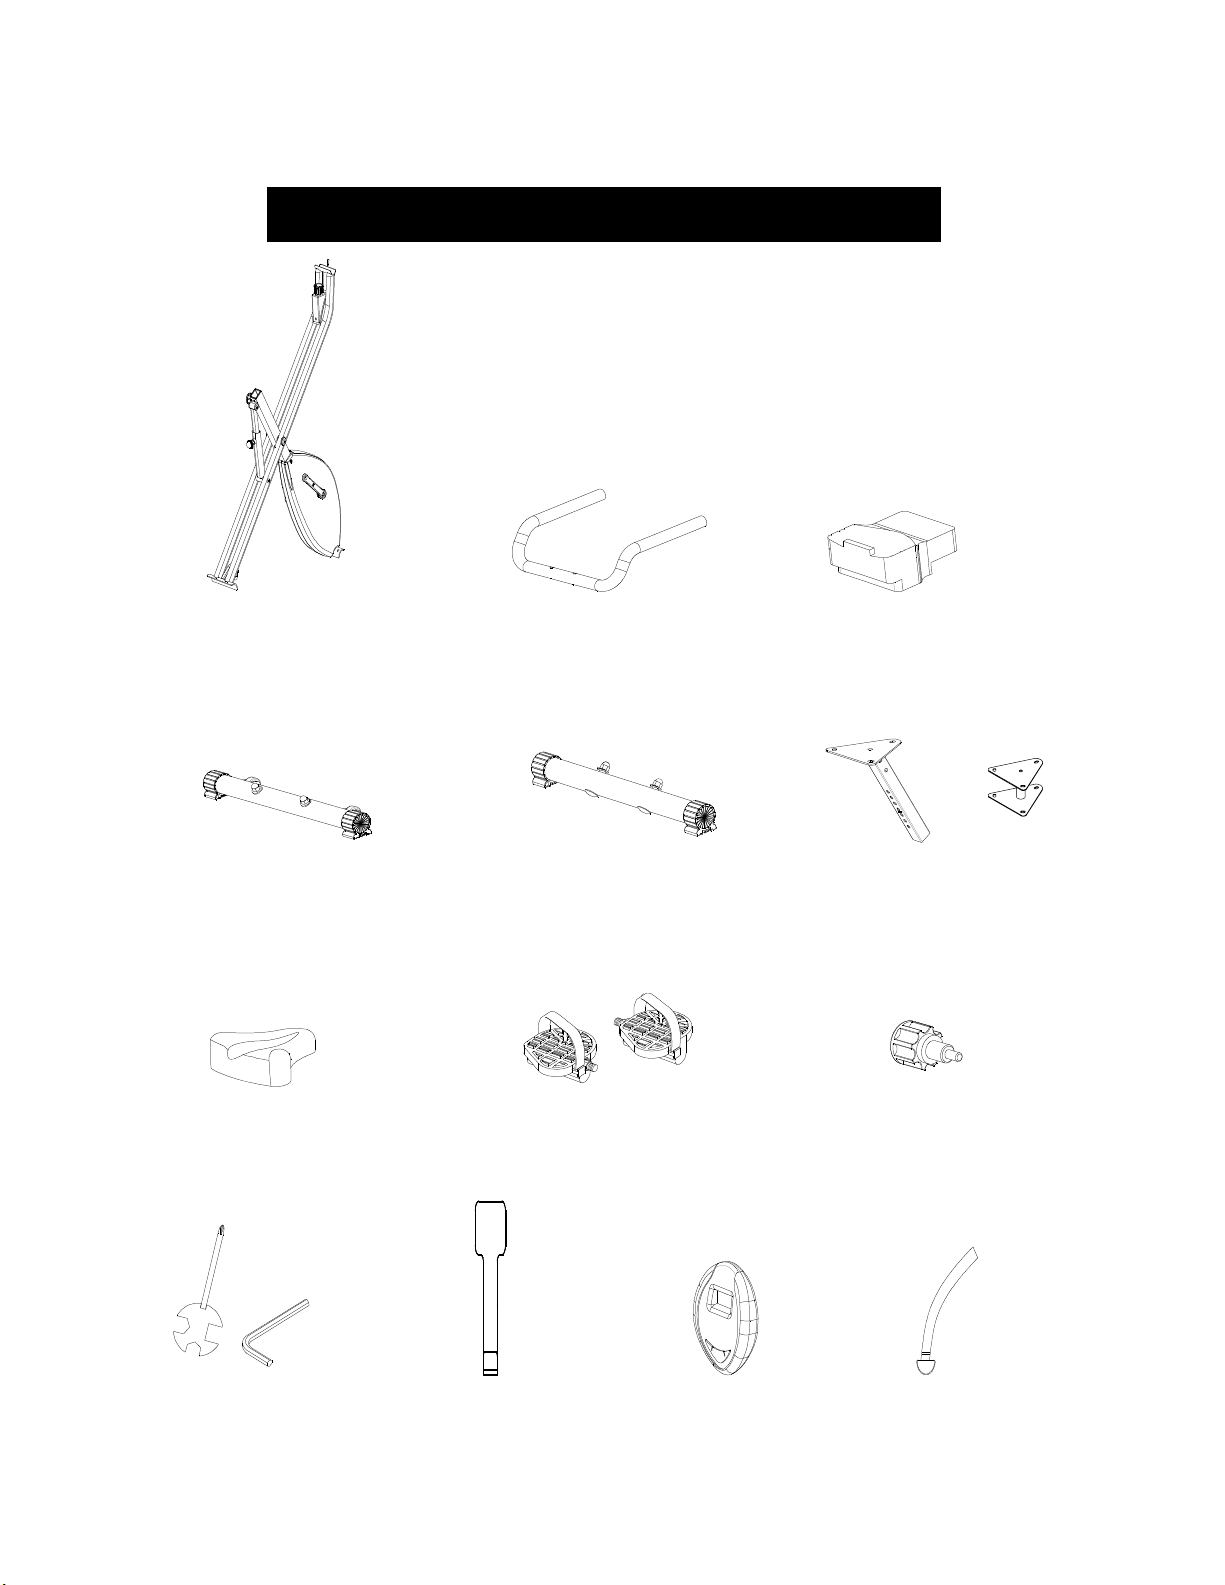
. PART LIST .
Main frame
Foam Desk +
Cover
Seat Tube + extender
Handle bar
Front Stablizer Rear stabilizer
Seat Tube Lock
Pedal L/R
Saddle
Meter Holder
In cover
Spanner and
Hex wrench
Desk
Strap
Meter
. COMPLETE EXPLOSION DRAWING
67
29
68
01
02
8
09 10
11
14
15
21
21
25
24
27
44
35
43
42
54
55
55
58
60
64
64
64
66
70/
L
20
69
61
7
64
23
42
35
17
81
63
36
37
56
19

PART NO. DESCRIPTION QTY PART NO. DESCRIPTION QTY PART NO. DESCRIPTION QTY
1 Main frame 1 25 M6*12 1 49 Bearing6000 2
2 Support rack 1 26 ST4.2*20 2 50 Left crank 1
3 Seat-adjusting metal 1 27 M4*10 1 51 Right crank 1
4 Handle bar 1 28 M8*40 2 52 Saddle 1
5 Front Stablizer 1 29 ST4.2*19 2 53 Idle wheel 1
6 Desk 1 30 ST4.2*20 3 54 Bearing pedestal 2
7
N
ylon cable ties 2 31 Gasket φ
φφ
φ8.2*φ
φφ
φ20*1.6 9 55 Turn stem bushing 6
8 Rear stabilizer 1 32 gasketφ
φφ
φ17.2*φ
φφ
φ21* 5 56 Lower support bar 1
9 Spindle 1 30 Gasket φ
φφ
φ5.2*φ
φφ
φ20*1.0 1 57 Nylon NutM5 2
10 Main belt wheel 1 34 Arc gasketφ
φφ
φ8.2*φ
φφ
φ
20*1.5 2 58 Cap 4
11 Flywheel 1 35 Arc gasketφ
φφ
φ8.2*φ
φφ
φ
20*1.5 4 59 Round tube plug 2
12 driven shaft 1 36 Bush 2 60 Inner tube bushing 1
13 Idler shaft 1 37 Bush 1 61 Nylon gasketφ
φφ
φ9*φ
φφ
φ
20*1 1
14 Roller bearing end cap
2 38 Outer hex nutM10*1*8 2 62 Meter 1
15 Magnetic plate 1 39 Steps hex nuts M10*1 1 63 Upper support bar 1
16 hexagon flange nuts
M10*P1.25 2 40 Nylon nut M8 6 64 Wire protector 3
17 Driven shaft
spacer bushing 1 41 Nylon nut M10 1 65 plum flower pull pin
M16 1
18 Wire protector 1 42 Acorn nut M8 4 66 Crank cap 2
19 Frame lock pin 1 43 circlips for axisφ
φφ
φ17 7 67 Left chain cover 1
20 Fine turning 1 44 M6*14 6 68 Right chain cover 1
21 M8*15 2 45 Roller bearing end cap
reinforce panel 2 69 Front cover 1
22 M5*15 2 46 Pull
block
bolt M6 2 70 Pedal L/R 1
23 M5*20 1 47 Pressure spring 1 71 Extender 1
24 M6*10 1 48 Bearing 6003 5 72 M8*16 3
PARTS LIST

. EXPLOSION DRAWING

. ASSEMBLY INSTRUCTION ..
1. Install Sta ilizers
Remove Main Frame (1) and all components
and place on a clean dura le surface. Note: all
mounting hardware is pre-installed for easy
matching during assem ly. Tools are provided
• Unlock Main Frame (1) to “Open” position
y pulling Frame Lock Pin (19).
• Install front and rear sta ilizers (5) , (8) to
Main Frame (1). Tighten hex nuts securely.
Rear Sta ilizer has transport wheels.
2. Install Pedals
• Note: Left Pedal installs counter
clockwise. Install y rotating to
LEFT. Use care that Pedal Shaft is
Perpendicular to Crank Shaft. Use
supplied wrench to tighten. Check
pedals often for tightness when new.
• Note: Crank arms should e checked
for tightness using 14mm socket after
first couple hours of use.
3. Install Seat Tu e and Saddle
• Saddle (52) is mounted to Seat Tu e (3)
using Nut (40) and Washer (31).
• Height is adjusted using Kno (65).
• Note: FitDesk is supplied with saddle
height extender for more comforta le leg
Tip: Lower saddle to allow for frame lock
pin (19) to lock in closed position
-
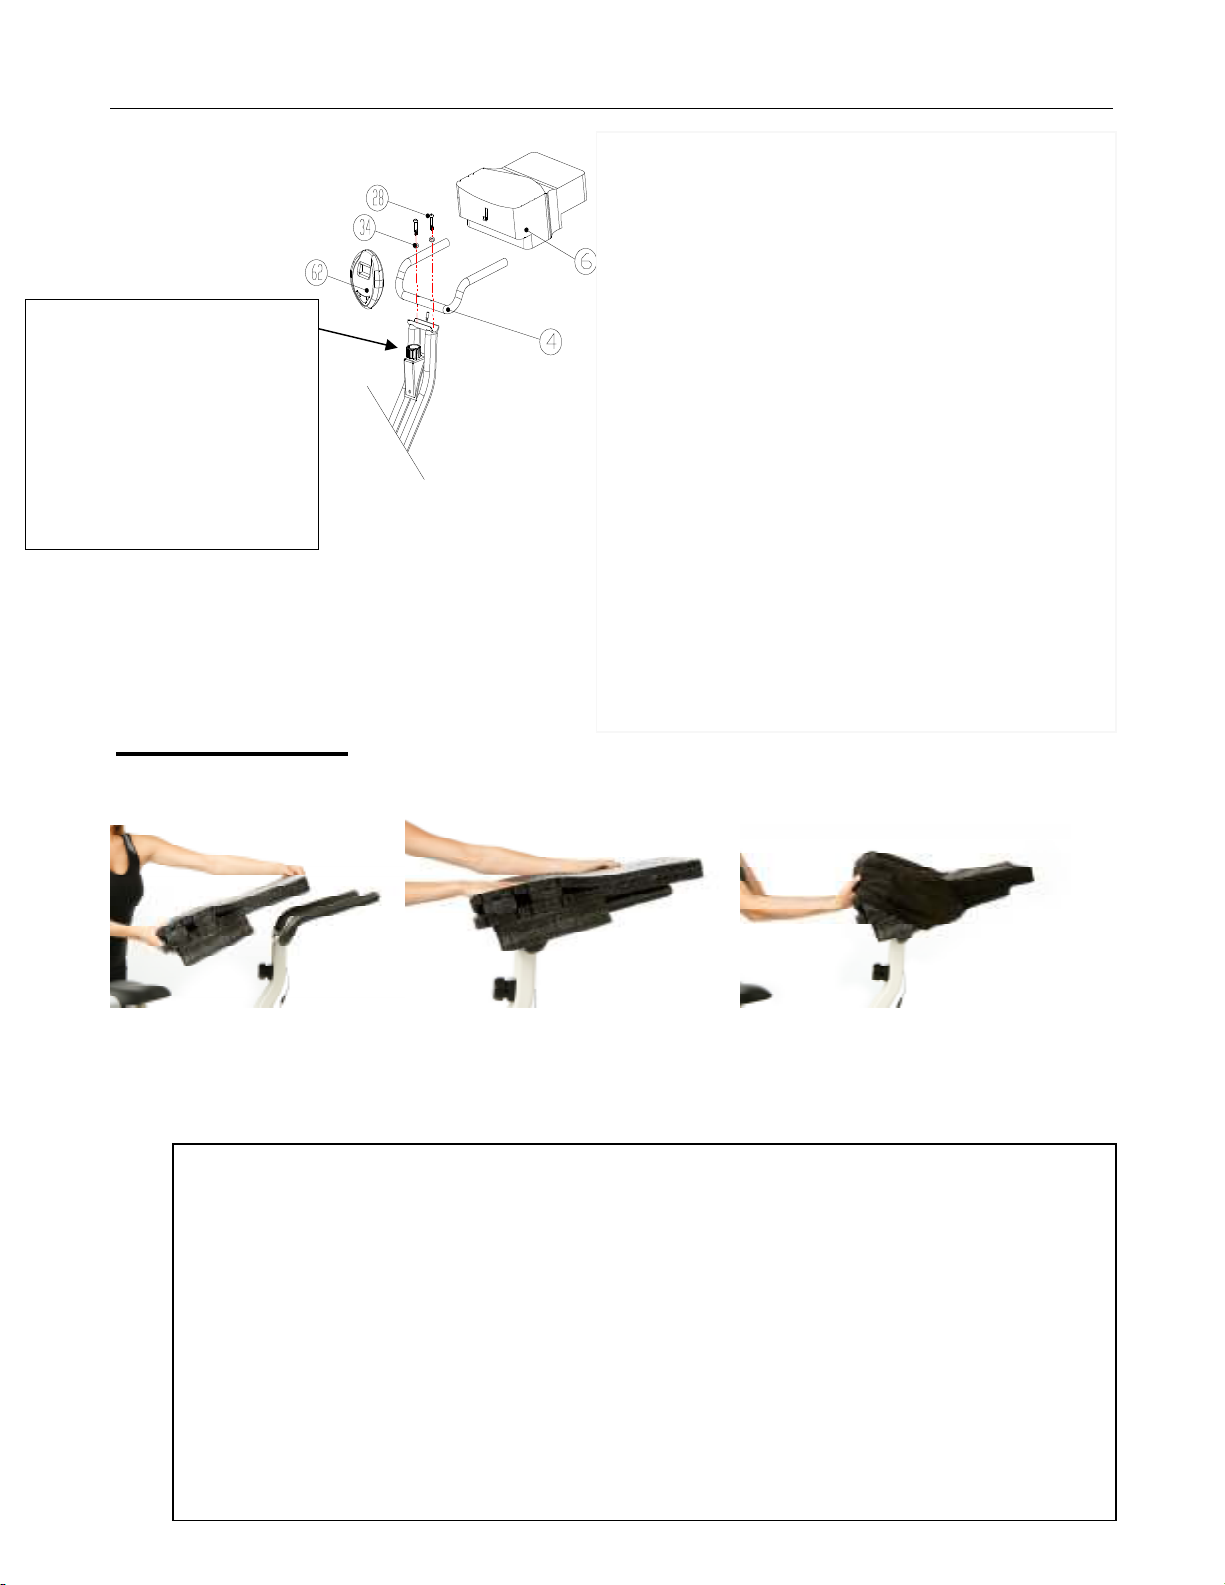
INSTALL DESK
1. Line up slots on ottom of Desk 2. Press Desk down and forward direction 3. Slip cover over
front and pull down over rear
.
Tip: Resistance kno is a
micro adjusta le system
and should e set to “0”
then count num er of turns
as you increase resistance
for recording resistance
level
Step 4:
Install Handle ar + Desk + Meter
• Install Handle ar (4) using Bolt (28)
and Washer (34). Tighten securely
using 5mm hex wrench.
• Install Desk (6) y spreading at ase
and firmly pressing down and forward
on handle ar.
• Install cover over front of Desk first
then pulling over rear. Note:
o Cover should e placed over
handle ar
o Cover can e removed for easy
washing.
• Slide meter on hook.
• Wrap wire over ack of handle ar &
plug in to Main Frame End Wire.
See all our accessories at www.fitdesk.net
- Seat ack
- Exercise ands
- Stress grips
Our goal is to provide products that can improve your health and productivity. Let us know
how we are doing y leaving a review. Thank you!
Have an assem ly question? email: customerservi[email protected] with a picture showing
what is challenge.
RevoInnovatiaons LLC
Table of contents
Other FitDesk Exercise Bike manuals


