FitNord OCEANS 300 User manual

FITNORD
OCEANS 300
AIR-MAGNETIC ROWING MACHINE
OWNER’S MANUAL

IMPORTANT !
Please read all instructions carefully before using this product.
Retain this manual for future reference.
The specifications of this product may vary slightly from the illustrations and are subject to
change without notice.
IMPORTANT SAFETY NOTICE
Note the following precaution before assembling or operating the machine
1、Assemble the machine exactly as the descriptions in the instruction manual.
2、Check all the screws, nuts and other connections before using the machine for the
first time and ensure that the trainer is in the safe condition.
3、Set up the machine in a dry level place and leave it away from moisture and water.
4、Place a suitable base (e.g. rubber mat, wooden board etc.) beneath the machine in the
area of assembly to avoid dirt and etc.
5、Before beginning training, remove all objects within a radius of 2 meters from the
machine.
6、Do not use aggressive cleaning articles to clean the machine, only use the supplied
tools or suitable tools of your own to assemble the machine or repair any parts of
machine. Remove drops of sweat from the machine immediately after finishing
training.
7、Your health can be affected by incorrect or excessive training. Consult a doctor
before beginning the training program. He can define the maximum setting (Pulse.
Watts. Duration of training etc) to which you may train yourself and can get precise
information during training. This machine is not suitable for therapeutic purpose.
8、Only do training on the machine when it is in correct working way. Use only original
spare parts for any necessary repairs.
9、This machine can be used for only one person’s training at a time.
10、Wear training clothes and shoes that are suitable for fitness training with the machine.
Your training shoes should be appropriate for the trainer.
11、If you have a feeling of dizziness, sickness or other abnormal symptoms, please stop
training and consult a doctor immediately.
12、People such as children and handicapped persons should only use the machine in
the presence of another person who can give aid and advice.
13、The power of the machine increases with increasing the speed, and the reverse. The
machine is equipped with adjustable knob that can adjust the resistance.
14、The maximum user’s weight is 120kg.

EXPLODED DIAGRAM

NOTE:
Most of the listed assembly hardware has been packaged separately, but some hardware items have
been preinstalled in the identified assembly parts. In these instances, simply remove and reinstall the
hardware as assembly is required.
Please reference the individual assembly steps and make note of all preinstalled hardware.
PARTS LIST
No.
Description
Q’ty
No.
Description
Q’ty
1
Main Frame
1
33
Adjustable U-shaped washer
2
2
Front bottom tube
1
34
Nylon nut
2
3
Rear support tube
1
35
Roller wheel spacer
6
4L/R
L/R Pedal
1 pr
36
Bearing
6
5
Rear bottom tube end cap
2
37
Railway roller wheel
3
6L/R
L/R front end cap
1 pr
38
Nylon nut M8
6
7
Console bracket
1
39
Roller wheel
2
8
Railway support tube
1
40
Nylon nut M8
2
9L/R
L/R support board
1 pr
41 L/R
L/R pedal
1 pr
10
U-shaped board
2
42
Outter hex bolt M12X160
4
11
Cross screw ST4.2X18
10
43
Cross pan screw M5X15
12
12
Handlebar
1
44
Inner hex screw M8X20
2
13
Belt
1
45
Flat washer D8X1.5
2
14
Cross screw ST4.2X16
4
46
Nylon nut M5
12
15L/R
L/R rear protective cover
1 pr
47
Pedal strap
2
16
Square end cap
1
48
Inner hex screw M8X55
2
17
Flat washer D8X1.5
19
49
Flat washer D12XФ24X2
1
18
Spring washer D8
8
50
Pop-pin knob
1
19
Inner hex screw M8X20
8
51
Pulse wire
1
20
Inner hex scre M8X20
2
52
Connection wire
1
21
Rubber cushion
2
53
Sensor wire
2
22
Railway
1
54
Foam grip
2
23
Cross pan screw M5X15
3
55
Carriage bolt M8X74
1
24
Locating column
1
56
Rubber cushion
2
25
Railway isolating bar
2
57
Alloy bushing
2
26
Strength column
1
58
Fixed seat
1
27
Flat washer D10XФ20X2
2
59
Cross pan screw
4
28
Outter hex bolt M10X112
1
60
i-pad holder bracket
1
29
Nylon nut M10
1
61
Console
1
30
Seat
1
62
End cap 1
2
31
Outer hex bolt M8X125
3
63
End cap 2
2
32
Adjustable chain bolt
2

ASSEMBLY INSTRUCTION
Attention:
Please follow these assembly instructions step by step to assemble this programmable
magnetic rowing machine.
Step 1:
A: Attach the left / right front cover (64L / R) to the main body (1) with the cross head screws (11).
B: Fix the front bottom tube (2) on the main frame (1) with the inner hex screw (48) and flat washer
(17).

Step 2:
A: Fix the rear support tube (3)to railway (22)with inner hex screw (19),spring washer
(18)and flat washer (17).
B: Lock L/R rear protective cover(15L/R)to the rear support tube(3)with cross screw (11).
C: Attach the rubber cushion (21) to the slide rail (22) with the Allen screw (20).
Step 3:
A: Firstly, connect pulse wire (51)and connection wire (52), then lock railway (22)to
main frame (1)with outter hex bolt (28),flat washer (27)and nylon nut (29).
B: Finally,lock the railway (22) to the main frame (1) with pop-pin knob (50) and flat washer
(49).

Step 4:
A: Lock the L/R Pedal (4L/R)to main frame (1)with outter hex bolt(42).
B:Pull the connection wire (52)and sensor wire (53)through i-pad holder bracket (60)
and connect with console (61).Then lock console (61),i-pad holder bracket (60)to the
fixed seat (58)with cross pan screw (59).
INSTRUCTION MANUAL
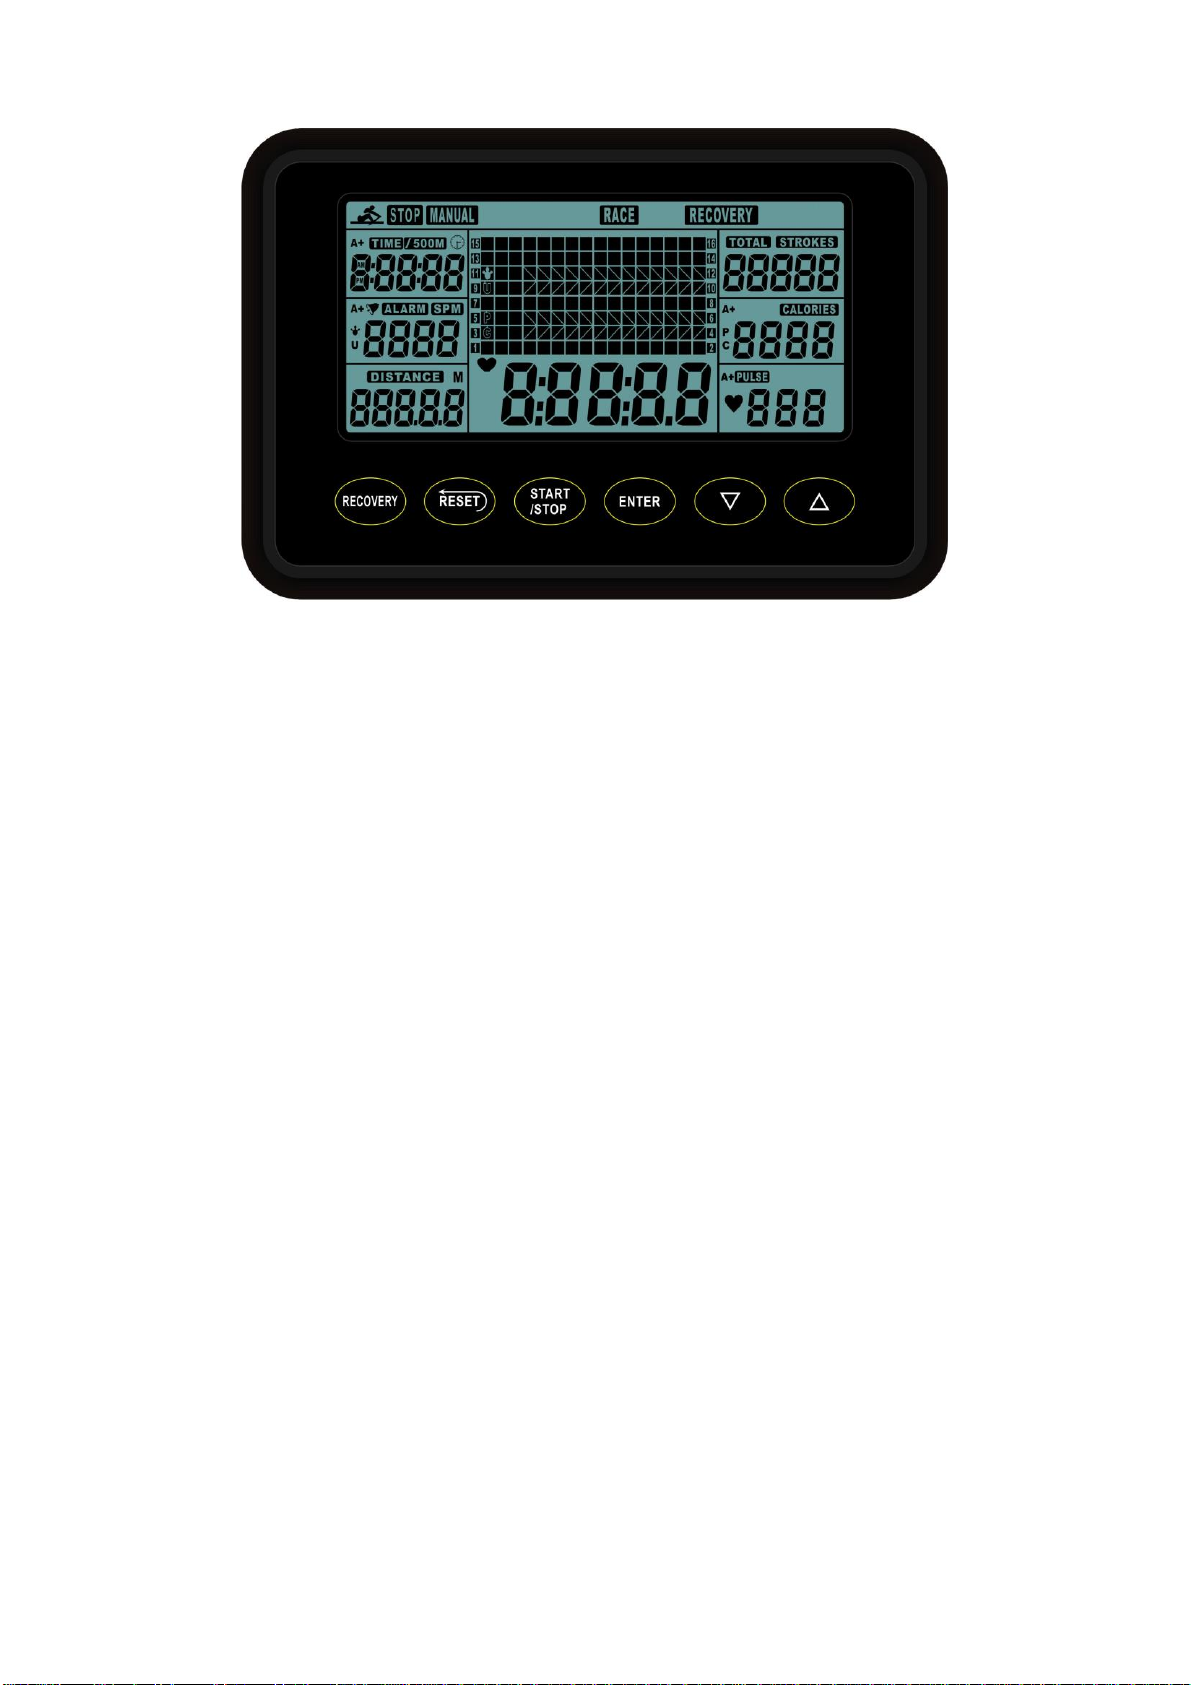
【FUNCTION BUTTONS】
UP▲/ DOWN▼:To press these two buttons through available selection.
To adjust the function value upward and downward.
ENTER:To confirm your selection.
During training, press the button to scan each display function.
START / STOP:To start and stop your selected workout program.
RESET:To reset the computer back to the main menu.
RECOVERY:To activate the RECOVERYPROGRAM that will automatically evaluate your fitness immediately after
your work out.
【DISPLAY FUNCTIONS】
TIME:Preset target time by pressing UP and DOWN buttons (1min ~ 99 min),
increase or decrease setting is 1 minute.
TIME/500M:Your average 500 meter time will automatically be displayed and continuously updated.
SPM:Strokes per minute.
DISTANCE:Preset target value by pressing UP and DOWN buttons ( 0 ~ 99900meters),
increase or decrease setting is 100 meters.
STROKES:Preset target value by pressing UP and DOWN buttons (0~9990 strokes).
increase or decrease setting is 10.
TOTAL STROKES:Accumulates total strokes from 0 up to 9999.
CALORIES:Preset target CALORIES by pressing UP or DOWN buttons (5Cal ~9990Cal),
increase or decrease setting is 5Cal.
PULSE:To preset target value by pressing up/down/mode from 30 to 240, each increase/decrease setting
is 1. The monitor will display user’s heart rate during training. The pulse measurement function is
only used by chest belt system;
CALENDAR:The monitor will display year, month, and day when monitor is in sleep mode.
TEMPERATURE:The monitor will display current room temperature when the monitor is in sleep mode.
CLOCK:The monitor will display current clock when the monitor is in sleep mode.

【OPERATION】
1. Install 2PCS AA batteries→one long beep for 2 seconds →in the meanwhile, segment test for 2 seconds (Fig.1).
Then, the monitor enters into the CLOCK & CALENDAR MODE.(Fig.2).
2. Firstly, you may enter into the CLOCK field to set YEAR (in the area of STROKES); MONTH (in the area of
CALORIES); DAY (in the area of PULSE). After you confirm it, the ALARM will blink. Press UP KEY to set the
ON/OFF which is the sign of the ALARM. If the sign don’t display, you can press ENTER button to jump to the next
one .When the sign of ALARM display “ON”, you can press the ENTER button to set the time of the ALARM (the
same way of the CLOCK setting). After the setting, you can slip into the picture of the SPORT (Fig.3).
Fig.1 Fig.2
Fig.3 Fig.4
3. When you enter into the picture of the SPORT, the MANUAL & RACE will blink to be selected.
Press UP or DOWN to select it, then press ENTER and confirm all you have selected.
(1) MANUAL(Fig.4):
A. Enter into the MANUAL mode, press UP to set the flickering figure of the TIME .Press ENTER to confirm it.
Then, you can press UP to set DISTANCE→STROKES→CALORIES→PULSE→TIME immediately.(If
you have set the target value for Time then DISTANCE can’t be set, vice versa.)
B. Press START KEY to START, the STOP icon will disappear. Press UP or DOWN to select functions.
C. When the function you have selected count backwards to ZERO or you have pressed the STOP KEY, the
monitor will STOP and display the average figure.
(2) RACE (Fig.5):
A. Enter into the RACE mode and L1 will glitter, the TIME/500M may display with 8:00.Then, you can press
UP or DOWN to set L1 ~ L15 immediately, press ENTER to confirm. Where after, you can set the distance
of the race(500M~10000M)while the figure of the DISTANCE is blinking.
Press ENTER and the picture of the race will display clearly on the screen.
The figure of the TIME/500M are as follows:
L1
L2
L3
L4
L5
L6
L7
L8
L9
L10
L11
L12
L13
L14
L15
8:00
7:30
7:00
6:30
6:00
5:30
5:00
4:30
4:00
3:30
3:00
2:30
2:00
1:30
1:00
Fig.5 Fig.6
B. Press START KEY to START and STOP will disappear. The USER & PC will display in the
matrix.(Fig.6).the monitor will STOP when one have reached the distance of race which has been set
before, then the matrix displays “PC WIN or USER WIN”(Fig.7) and may display the state of the energy
after 6 seconds.

Fig.7
C. When the race is over, you can press the START to have a race once again. Press RESET to leave the
picture of the race.
(3) RECOVERY:
After exercising for a period of time, keep wearing chest strap and press “RECOVERY”
button. All function display will stop except “TIME” starts counting down from 00:60 to 00:00.
Screen will display your heart rate recovery status with the F1,F2….to F6. F1 is the best, F6 is the
worst. User may keep exercising to improve the heart rate recovery status.
(Press the RECOVERY button again to return the main display.)
Table of contents
Other FitNord Elliptical Trainer manuals


