FJC 45115 User manual

1
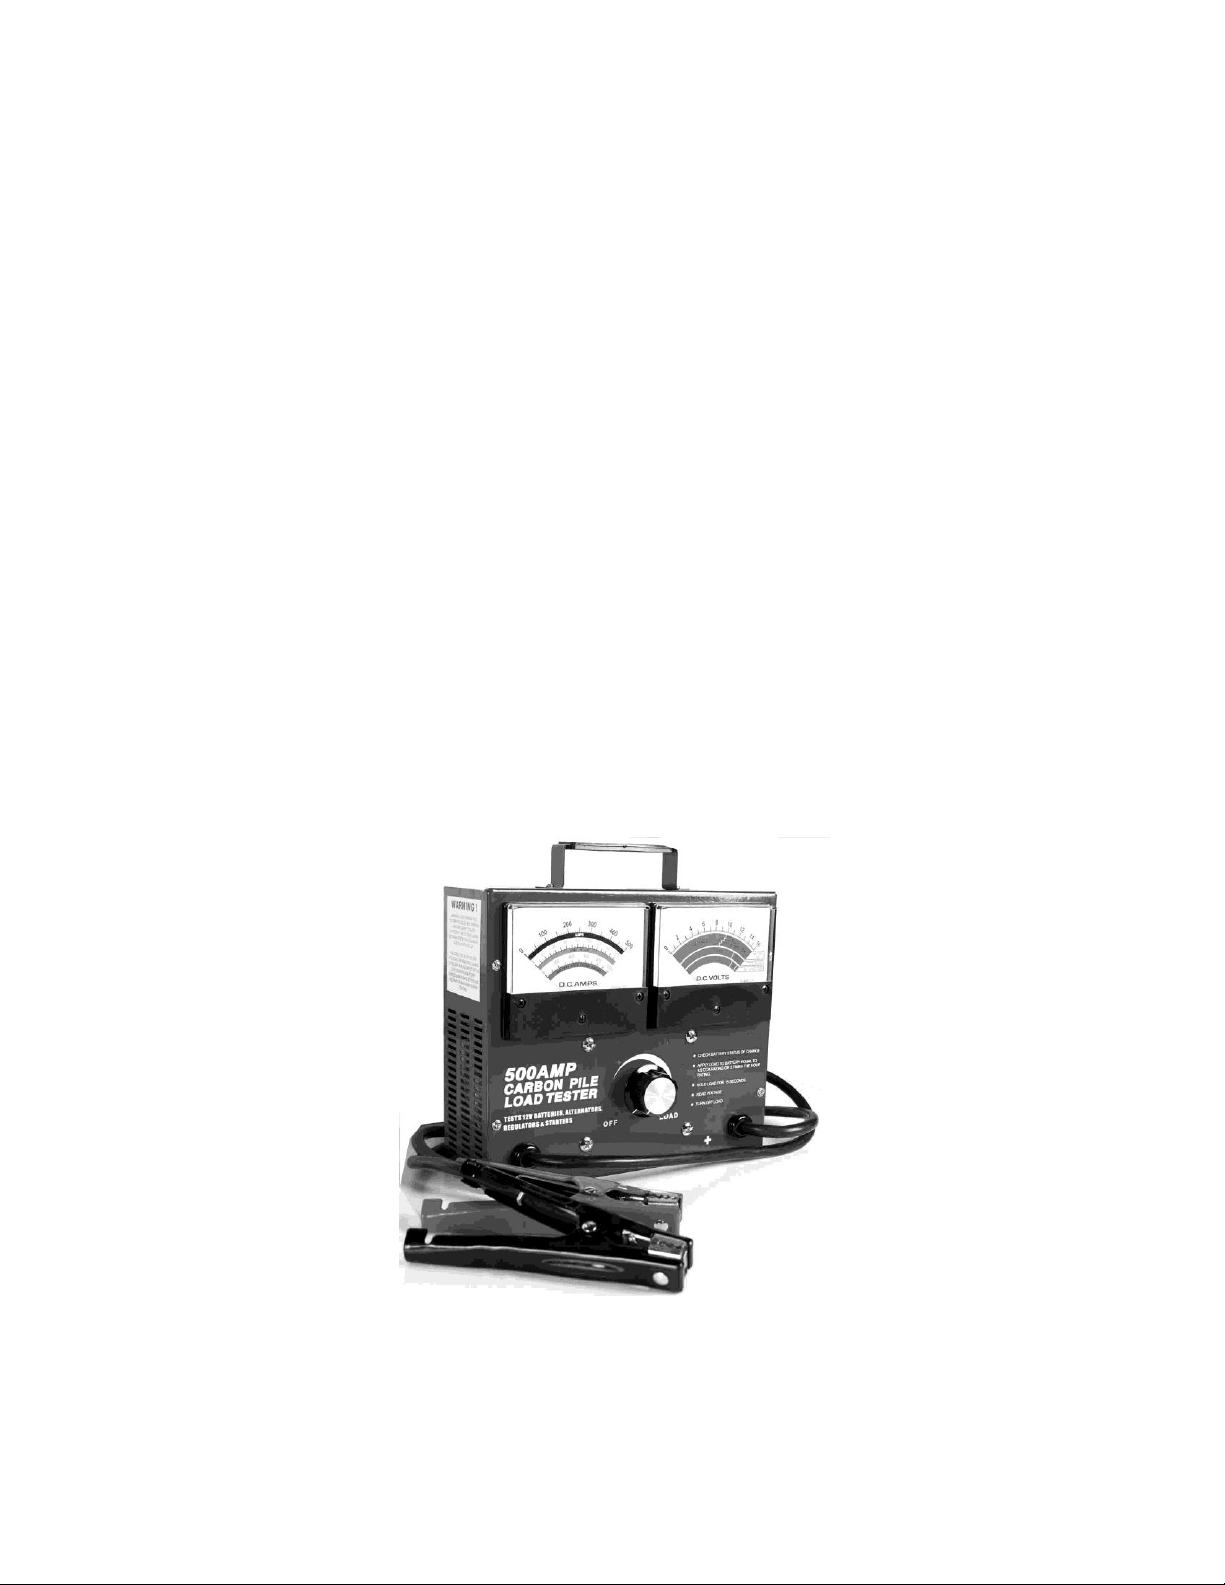
CARBON PILE BATTERY TESTER
Part # 45115
OPERATOR’S MANUAL
READ SAFETY INSTRUCTIONS
CAUTION: ALWAYS WEAR EYE PROTECTION
WARNING
A RISK OF EXPLOSIVE GASES is always present when in the presents of a battery. Lead Acid batteries generate explosive gases during
normal operation, charging or testing. Always follow these instructions when operating the battery tester.
TO HELP PREVENT EXPLOSIONS:
1. Only charge or test batteries in a well ventilated area.
2. Use distilled water to add to each cell until battery acid reaches battery manufacture’s specified level. Do not over-fill the battery. Do not charge or
test a battery without cell caps. Carefully follow manufacturer’s instructions.
3. Do not smoke or allow sparks or open flames near any battery which is being charged or tested. It is good practice not to smoke or allow sparks or
open flames around any battery.
4. Always follow battery manufacturer’s instructions.
5. Always turn off battery tester before connecting or disconnecting the tester to or from the battery.
CAUTION: Automotive batteries contain sulfuric acid, which can cause severe damage to skin, eyes, and clothing. When skin, eyes or clothing comes
in contact with battery acid, perform the following:
1. If acid comes in contact with eyes: Force eyes open and flood with cool running water at least for 10 minutes, then contact a doctor. Do Not Use
eye drops or other medication before contacting a doctor.
2. If acid comes in contact with skin: Remove contaminated clothing and run cool water over skin for at least 10 minutes.
During the battery charging or testing process, an explosive gas forms inside each of the batteries cells. This gas may escapethrough vent holes inthe caps
and create an explosive condition. If sparks or a flame ignites this gas it can burn back into the battery and cause the battery to explode. An explosion
such as this is very dangerous and can cause the battery acid to be sprayed in to the surrounding area.
PERSONAL PRECAUTIONS:
1. When working near or testing a battery always wear complete protection: Approved Eye Protection, Approved Gloves and Protective Apron.
2. When working near or handling a battery always thoroughly wash hands before touching skin or eyes.
3. If acid contacts skin or clothing; remove clothing and wash skin immediately with soap and water.
4. If acid comes in contact with eye; flood eye with running cold water for at least 10 minutes and contact a doctor immediately. Do Not Use eye
drops or other medication before contacting a doctor.
5. Do not smoke or allow sparks or open flames near any battery which is being charged or tested. It is good practice not to smoke or allowsparks or
open flames around any battery.
6. Do not use tools near a battery that could cause a spark or could contact both positive and negative terminals at the same time causing a spark
and short circuiting the battery.
7. Personal items such as rings, bracelets, necklaces, and watches which are metal should not be worn when working with a lead-acid battery.
Metal jewelry which comes in contact with a lead acid battery can cause a short circuit resulting in a sever burn.
8. Acid from a lead acid battery can be neutralize with a solution of baking soda (1 pound per gallon of water) or household ammonia (1 pint per
gallon of water)
PRIOR TO TEST
1. If removing battery for testing always follow vehicle manufacturer instructions and battery manufacturer instructions.
2. If testing battery in vehicle, remove battery cables following vehicle manufacturer instructions. Make sure vehicle engine is off.
3. Locate battery information: cold cranking amps (CCA) either on battery or vehicle manual.
4. Clean battery and battery terminals.
5. Check the battery for loose terminals or any cracks in the battery. DO NOT TEST A BATTERY THAT HAS LOOSE TERMINALS OR

2
CRACKS IN THE BATTERY CASE.
6. Check the water level in the battery. Fill the battery to the manufacturers specified level using the battery manufacturer’s instructions.
7. Do not test a battery that is frozen.
BATTERY TESTER PLACEMENT
a) Place battery tester as far away from battery as battery tester cables allow.
b) Place battery tester in location for maximum air flow through battery tester.
BATTERY TESTING INSTRUCTIONS
1. Be sure Voltmeter and Ammeter pointers are at zero. Meters not at zero can be adjusted to zero by adjusting the screw on face of meter until
meter pointer points to zero.
BATTERY TESTER CONNECTION PRECAUTIONS
1. Before connecting battery tester to the battery, make sure the Load Control Knob is in the off position. To place the Load Control Knob in
the off position, turn the Load Control Knob counter clockwise as far a possible.
2. Attach the clamps to the battery terminals. Make sure the battery tester clamp has a good connection to the battery terminal.
If steam comes out of Battery Tester: Always store the battery tester in a cool dry location. If during testing steam comes out of the battery tester then
there is moisture in the carbon pile. Using a known good battery, connect the tester to the battery and turn the Load Control Knob clockwise until the
ammeter reads 100 amps for 10 seconds to remove the moisture, then turn the Load Control Knob counterclockwise to 0. This may have to be done
several times to remove all the moisture.
2.TO TEST THE STATE OF CHARGE OF BATTERY:
a. Using “BATTERY TESTER CONNECTIONS PRECAUTIONS” above, connect the RED battery tester clamp to the POSITIVE (POS / + / P) battery post
terminal and the BLACK battery tester clamp to the NEGATIVE (NEG/ - / N) battery post terminal.
b. Turn Load Control Knob clockwise to 100 amps for 5 seconds then turn Load Control Knob counter-clockwise until the ammeter reads zero. To
determine the state of charge of the battery read the Voltmeter.
1. If the Voltmeter pointer is in green zone on the 'STATE OF CHARGE' scale, the battery can be load tested.
2. If the voltmeter pointer is to the left of green zone on the 'STATE OF CHARGE' scalethe battery voltage is too lowfor the battery to be tested. The
battery will have to be charged and then start at # 3 to determine the state of charge of the battery to determine if the battery can be load tested.
3. If after charging, the battery tester voltmeter pointer does not read in the green zone after the test, the battery is defective.
3. BATTERY LOAD TEST
Note: The battery tester creates heat during a load test. The battery tester may produce steam and odors. This is a normal occurrence.
a. Using the DC AMP Meter as a reference, turn the Load Control Knob clockwise, slowly, to one half (1/2) of the batteries cold cranking amperage
(CCA) rating for 15 seconds. An alarm will sound when the 15 second test is complete. If the alarm does not sound after 15 seconds turn the Load
Control Knob to the off position by turning it counter clockwise.
b. If the DC AMP Meter shows an increase or decrease in the amperage during the test, adjust the tester by turning the Load Control Knob to increase
or decrease the load on the battery to one half (1/2) of the batteries cold cranking amperage (CCA) rating. Do Not load the battery to more than one
half (1/2) of the batteries cold cranking amperage (CCA) rating.
c. At the end of the 15 second test, read the voltage on the voltmeter and then immediately turn the battery tester off by turning the Load Control Knob
counter clockwise until the battery tester is off and shows 0 amps on the ammeter.
d. Use the battery voltage reading taken at the end of the battery load test to determine if the battery is good or defective. Use the “Battery Load Test
Temperature Compensation Chart” on the side of the battery tester to determine if the battery is good or defective. For example: If the outside
temperature is 60 degrees Fahrenheit, a voltage reading above 9.6 volts would show the battery to be good and a voltage reading below 9.6 volts
would show the battery to be defective.
e. If smoke is emitted from any cell of the battery, the battery is defective regardless of the test results.
Multiple Tests: This battery tester creates a large amount of heat while testing a battery. Before using the battery tester to test another battery allow
enough time for the battery tester to cool down. This could be as long as 10 minutes. Not allowing the battery tester to cool down between tests will
reduce the life expectancy of the battery tester and could damage it.
3. ALTERNATOR AND REGULATOR CHARGING TEST
a. Make sure that the battery in the car tests good.
b. Using “BATTERY TESTER CONNECTIONS PRECAUTIONS” above, connect the RED battery tester clamp to the POSITIVE (POS / + / P) battery
post terminal and the BLACK battery tester clamp to the NEGATIVE (NEG/ - / N) battery post terminal.
c. With the vehicle running, the pointer on the Voltmeter should be in the green zone. If the pointer is in the red zone the alternator is not producing
adequate voltage to charge the battery.
d. Check vehicle service manual for alternator and regulator specifications.
3
WARRANTY
FJC warrants this battery tester for 6 months from date of purchase with proof of purchase. As we cannot control
the use of our products, the guarantee shall not exceed the purchase price. We make no other warranty of any
kind expressed or implied. This battery tester is warranted to be free from defects in material and workmanship
under normal use and service for 6 months after the sale of this product by FJC, Inc. FJC’s sole obligation under
this warranty shall be to repair or replace any defective product or parts thereof, which are returned to our factory.
The warranty shall not apply to any product or part which has been subject to misuse, negligence or accident.
FCJ, Inc. shall not be responsible for any special or consequential damages and the warranty as set forth is in lieu
of all other warranties either expressed or implied. However FJC, inc. makes no warranty or merchantability in
respect to this battery tester for any particular purpose other than that stated in this manual.
FJC, Inc.
101 Commercial Drive
Mooresville, NC
PO Box 499
Mount Mourne, NC 28123-0499
704-664-3587
RETURNS
All merchandise to be returned must have a prior authorization from FJC, Inc. Contact FJC, Inc. before sending
any product back to FJC.

Table of contents
Other FJC Test Equipment manuals


