Flash THERMOFLASH DIGI 2 Eco User manual

Le THERMOFLASH DIGI 2 Eco a été conçu pour vous
apporter confort et économie d’énergie. Il permet de
programmer et de réguler votre chauffage selon 3 niveaux
de température :
- Température « confort » : c’est la température que vous
souhaitez pendant vos heures de présence.
- Température «économique »: c’est la température que
vous souhaitez pendant vos absences de courte durée
ou pendant la nuit.
- Température «hors-gel »: c’est la température minimale
assurée pendant vos absences prolongées. Elle protège
votre logement des risques du gel .
Ses 3 programmes préenregistrés et son programme libre
vont vous permettre jour par jour d’adapter votre chauf-
fage àvotre mode de vie.
En parcourant cette notice vous découvrirez comment uti-
liser les différentes fonctions du THERMOFLASH DIGI 2 Eco.
PRÉSENTATION
Mise en place ou remplacement des piles
Mise àl’heure et au jour actuel
Réglage des températures
La programmation
Lecture des programmes
Mode automatique «Auto »
Mode manuel «Manu »
Modification temporaire de la température
Mode absence prolongée (vacances)
Guide de l’installateur.
THERMOFLASH DIGI 2 Eco
est pourvu d’un témoin d’usure
des piles, veuillez dès son apparition en bas àdroite de l’affi-
cheur procéder au remplacement de celles-ci (utiliser 2 piles
1,5 V alcalines LR6 - l’autonomie est d’environ 18 mois).
Lors du remplacement des piles,
THERMOFLASH DIGI 2 Eco
conserve ses programmes pendant 60 secondes.
Avant de commencer la program-
mation de votre appareil, veuillez
abaisser le capot et appuyez sur la
touche RESET àl’aide d’une pointe
de stylo.
Vous avez 2 possibilités :
- C’est la première mise en service.
- Vous venez d’appuyer sur la touche
RESET (comme ci-dessus)
- Les inscriptions
12:00 et le pointeur ▲
sous le jour 1 (lundi) clignotent.
Mettez àl’heure par les touches +/–(un appui prolongé
sur la touche accélère le défilement de l’heure).
Réglez le jour actuel par appuis successifs sur la touche
DAYS 1-7, un pointeur ▲apparaît sous le jour correspondant
(1 = lundi, 2 = mardi, 3 = mercredi etc.).
Validez avec la touche OK
Vous souhaitez modifier l’heure ou le jour : appuyez sur la
touche «MODE »jusqu’à l’apparition du pointeur ▲sous le sigle
horloge et procéder comme ci-dessus au point
,
et
.
MISE ÀL’HEURE ET AU JOUR ACTUEL
MISE EN PLACE OU REMPLACEMENT DES PILES
SOMMAIRE
0123456789101112131415161718192021222324
Auto Manu 1234567
°c
°c
°c
OK
PROG
P1-P4
DAYS
1-7
MODE
Res
timer
days
Touches +/-
pour les réglages
Température
ambiante Témoin d'usure
des piles
Absence
prolongée
(vacances)
Réglage
température
confort
Réglage
température
économique
Validation Remise
à zéro
générale
Température
« confort »
Température
« économique »
Choix du
programme
P1 à P4
Visualisation
des périodes
« confort » et
« économique »
Indicateur du
jour de
la semaine
Indicateur
d’enclenchement
du chauffage
Sélection
des modes
Sélection des jours
de la semaine
(1 = lundi, 2 = mardi...
7 = dimanche)
Indicateur
du niveau
de température
souhaité
« confort »
ou « économique »
-
+
22 23 24
Res
1234
!
Auto Manu 1234567
+
-
MODE
OK
PROG
P1-P4
DAYS
1-7
MODE
Res
u
☛☛
☛☛
☛☛
☛☛
☛☛
Les températures confort et économique sont préréglées :
Confort = 20°C Economique = 16°C.
Modification de la température confort
Appuyez sur la touche confort,
modifiez la température avec les touches +/–,
validez avec OK.
Modification de la température économique
Appuyez sur la touche économique,
modifiez la température avec les touches +/–,
validez avec OK.
Pour programmer votre semaine vous diposez de 4 pro-
grammes :
P1, P2, P3 qui sont préenregistrés et non modifiables.
P4 qui est libre, vous permet de créer un programme
personnaliséet différent pour chaque jour de la
semaine.
P1 = Température confort de 6h à23h
Température économique de 23h à6h.
P1 est affectéaux 7 jours de la semaine en standard.
S’il correspond àvotre rythme de vie restez en mode
automatique, sinon continuez.
P2 = Température confort de 6h à8h30 et de 16h30 à
23h00 Température économique de 8h30 à16h30
et de 23h00 à6h00.
P3 = Température confort de 6h à8h30 de 11h30 à13h30
et de 16h30 à23h00
Température économique de 8h30 à11h30 de 13h30
à16h30 et de 23h00 à6h00.
P4 = Programme libre vous permettant de créer 3
périodes en température confort et 3 périodes en
température économique et ceci pour chaque jour
de la semaine.
LA PROGRAMMATION
°c
°c
RÉGLAGE DES TEMPÉRATURES
Sélection d’un programme existant P1, P2, P,3 pour un jour
de la semaine (en mode programmation, toutes les modi-
fications se valident automatiquement).
exemple P2 pour Mercredi
Appuyez sur la touche PROG P1-P4 pour passer en mode
programmation.
Le N°du programme affectéau jour clignote sur la partie
droite de l’afficheur.
Appuyez sur la touche DAYS 1-7 jusqu’à l’apparition du
pointeur ▲sous le jour que vous souhaitez programmer dans
notre exemple Mercredi.
Appuyez sur la touche PROG P1-P4 jusqu’à l’apparition
dans la partie droite de l’écran du numéro de programme P2
clignotant
Appuyez sur la touche OK pour valider, le jour suivant vous
est automatiquement proposé.
Création d’un programme P4
Un profil de 24 h composéde 48 thermomètres en bas de l’af-
ficheur vous permet de visualiser aisément la composition de
votre programme.
Un thermomètre àmoitiévide
correspond à30 minutes
en température économique
Un thermomètre plein correspond à30 minutes
en température confort.
Exemple création de 3 périodes en température confort pour le
vendredi : 6h00 à8h00, 12h00 à14h00 et 18h00 à22h00 .
Depuis le mode «Auto »appuyez sur la touche PROG P1-P4
Appuyez sur la touche DAYS 1-7 jusqu’à l’apparition du
pointeur sous le jour que vous souhaitez programmer, dans
notre exemple vendredi.
Appuyez sur la touche PROG P1-P4 jusqu’à l’apparition
dans la partie droite de l’écran du numéro de programme P4
clignotant. Votre afficheur indique 0h00 et le premier thermo-
mètre clignote sur le profil de 24h.
Auto Manu 1234567
°c
°c
+
-
OK
PROG
P1-P4
DAYS
1-7
MODE
Res
☛☛
☛☛
☛☛
☛☛
☛☛
c
c
!
0123456789101112131415161718192021222324
0123456789101112131415161718192021222324
Auto Manu 1234567
°c
°c
+
-
OK
PROG
P1-P4
DAYS
1-7
MODE
Res
☛☛
☛☛
☛☛
+
-
OK
PROG
P1-P4
DAYS
1-7
MODE
Res
Auto Manu 1 2 3 4 5 6 7
°c
°c
0123456789101112131415161718192021222324
01
☛☛
☛☛
2
PROG
P1-P4
0123456789101112131415161718192021222324
0123456789101112131415161718192021222324
THERMOFLASH DIGI 2 ECO
9419.013.10/07.06

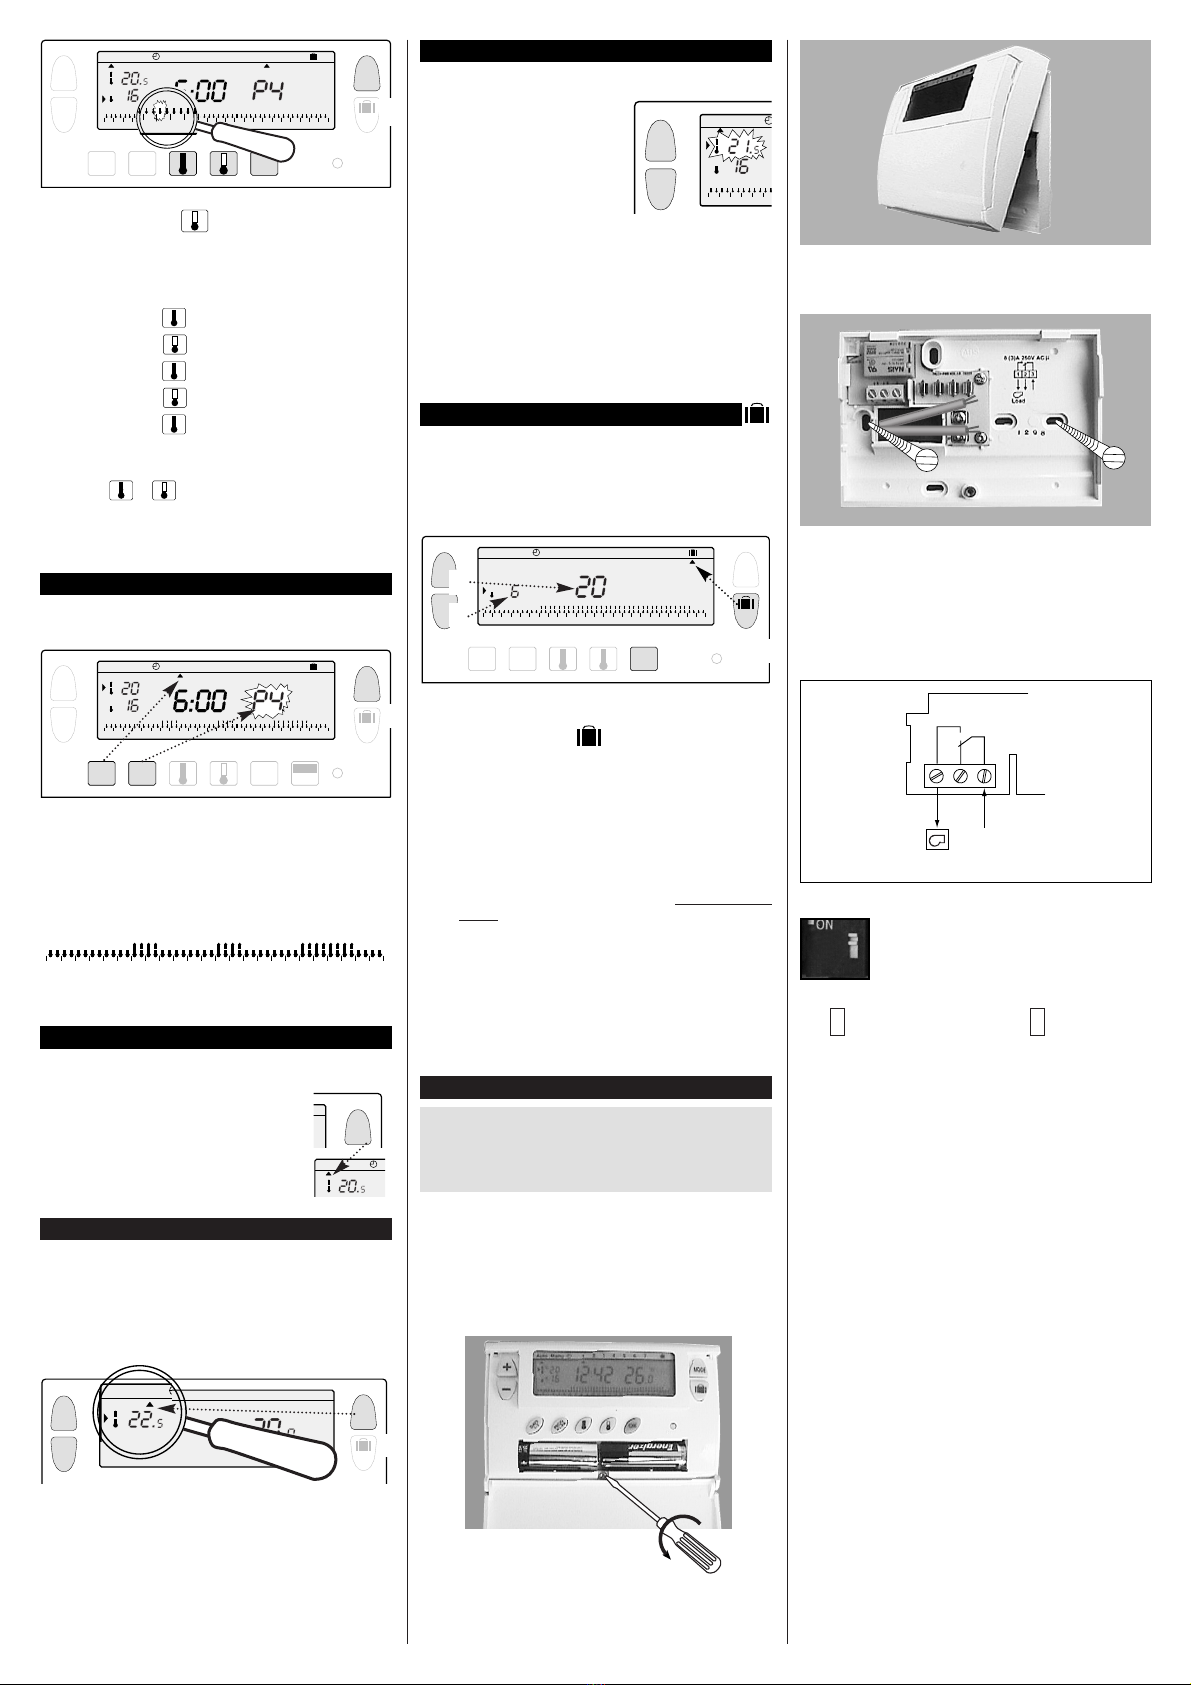
Débrochez délicatement
la face avant .
Fixez le socle au mur et raccordez l’appareil.
Si votre chaudière possède une entrée thermostat, supprimez
le pontage reliant les 2 bornes thermostat et raccordez les
bornes 1 et 3 de votre
THERMOFLASH DIGI 2 Eco
aux 2
bornes d’entrée thermostat de la chaudière (le sens de rac-
cordement est indifférent).
RÉGLAGE ÉVENTUEL
Vous pouvez enclencher ou non le système d’antiblocage de
la pompe de circulation (voir au dos de l’appareil lorsqu’il est
débroché).
Fonction anti-blocage de la pompe de circu-
lation (enclenchement de la pompe durant
1 minute toutes les 24 heures)
Arrêt fonction Marche fonction
anti-blocage anti-blocage
Replacez l’appareil sur son socle et revissez-le.
CARACTÉRISTIQUES TECHNIQUES
- Plage de réglage de la T°C confort : + 5°C à+ 30°C.
- Plage de réglage de la T°C réduite : + 5°C à+ 30°C.
- Plage de réglage de la T°C vacances + 5°C à+ 30°C.
- Plage d’affichage de la T°C ambiante : +0°C à+ 40°C
- Différentiel statique : < 0,3 degré
- Alimentation : 2 piles alcalines type LR6
- Pouvoir de coupure : 1 RT - 8 (3) A / 250 V AC
- Température de fonctionnement : 0°C à+ 50°C
- Température de stockage : –10°C à+ 65°C
- Hygrométrie : 85 % max à+ 20°C
- Degréde protection : IP 30
- Classe d’isolation : II (normes EN 60730)
- Raccordement : par bornier àvis jusqu’à 2,5 mm
2
■
■
Appuyez sur la touche plusieurs fois pour obtenir l’horaire
6h00 : chaque appui bref vous fait progresser de 30 minutes et un
appui prolongéaccélère la progression.
- Appuyez sur la touche plusieurs fois pour obtenir l’horaire 8h00
- Appuyez sur la touche plusieurs fois pour obtenir l’horaire 12h00
- Appuyez sur la touche plusieurs fois pour obtenir l’horaire 14h00
- Appuyez sur la touche plusieurs fois pour obtenir l’horaire 18h00
- Appuyez sur la touche plusieurs fois pour obtenir l’horaire 22h00
Nota : si vous avez fait une erreur (ex : 11h30 au lieu de 12h00) uti-
lisez les touches + et –pour avancer ou reculer et corriger àl’aide
des touches et .
Appuyez sur la touche «OK », le jour suivant vous est automati-
quement proposé.
Appuyez sur MODE pour repasser en mode automatique.
Vous pouvez vérifier votre programmation
Depuis le mode «Auto »appuyez sur la touche
«PROG P1-P4 ».
Avec la touche «DAYS 1-7 »sélectionnez le jour de 1 à7 et
vérifiez votre programme sur le profil de 24h en bas de l’af-
ficheur (exemple ci-dessous)
Appuyez sur «MODE »pour repasser en mode automa-
tique.
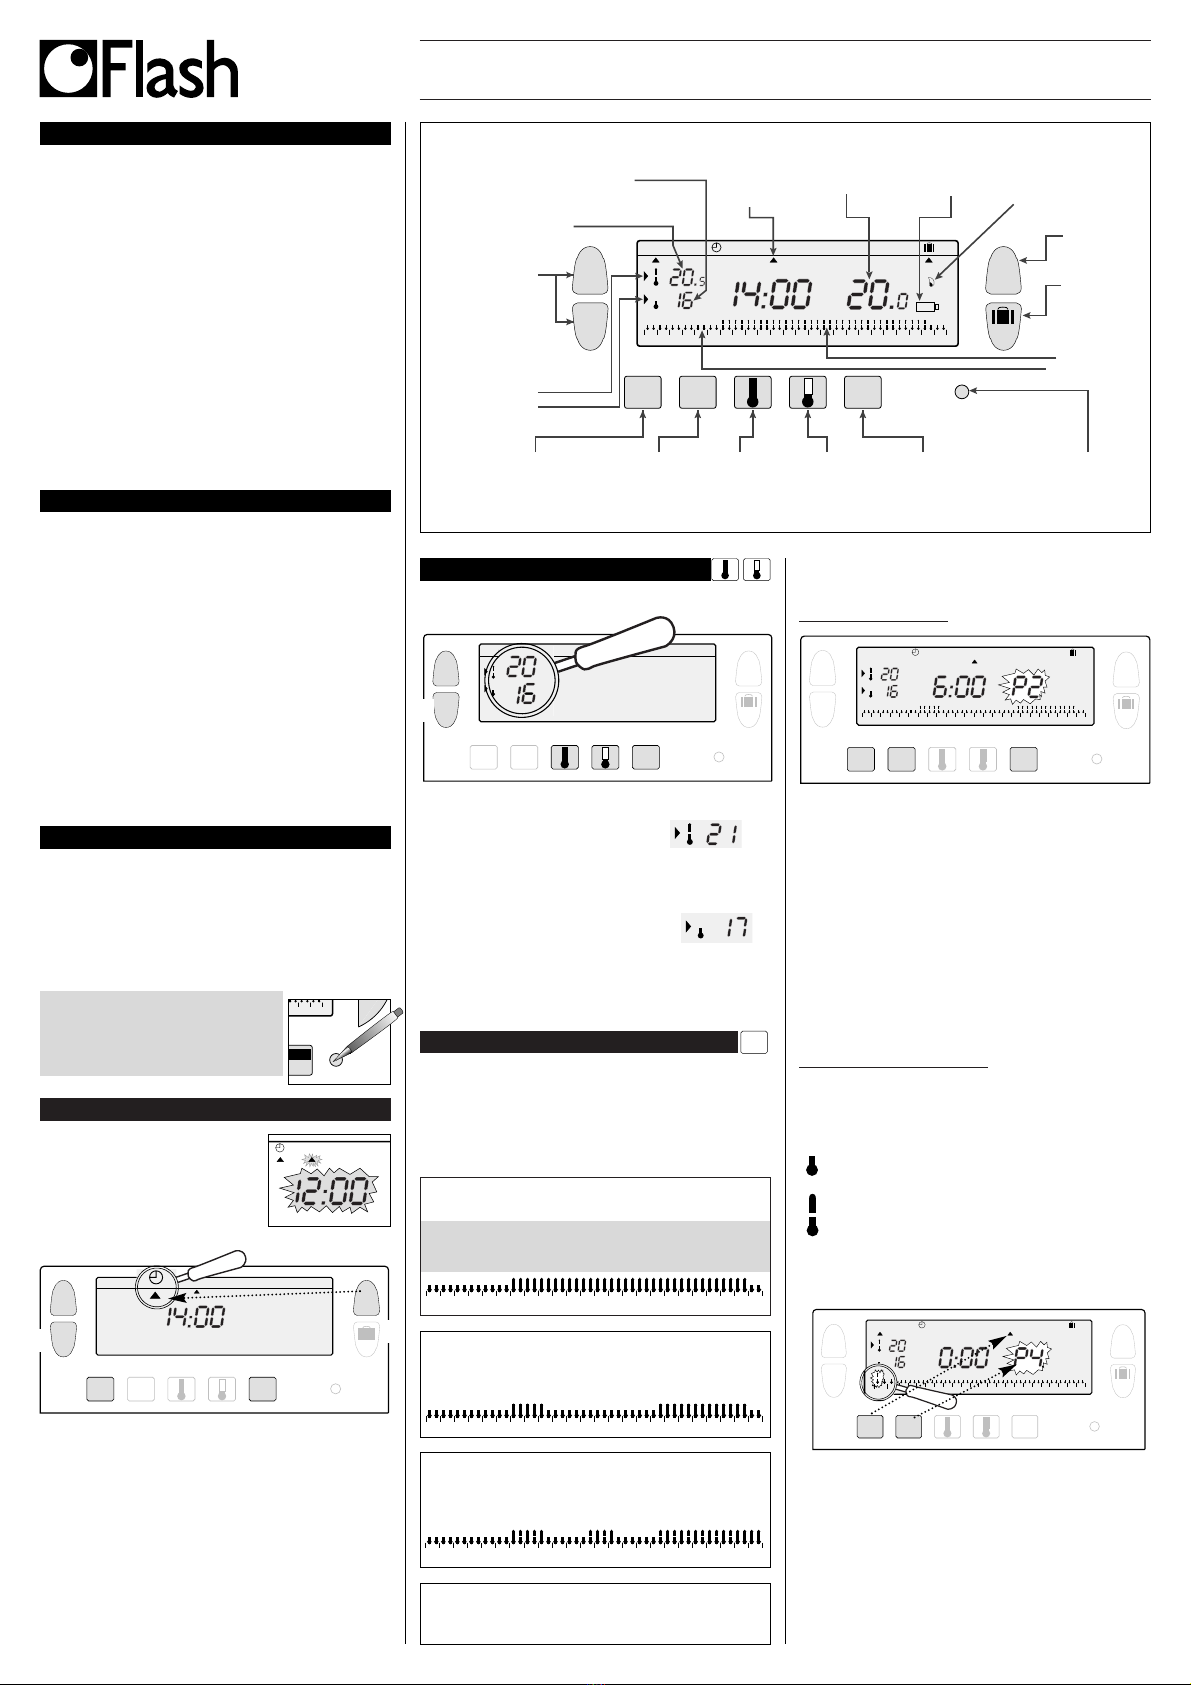
Le passage en mode automatique se fait en
appuyant sur la touche «MODE »jusqu’à l’ap-
parition du pointeur ▲sous «Auto ».
En mode automatique
THERMOFLASH DIGI 2
Eco
s’adapte àvotre rythme de vie en réalisant
le ou les programmes que vous avez choisis.
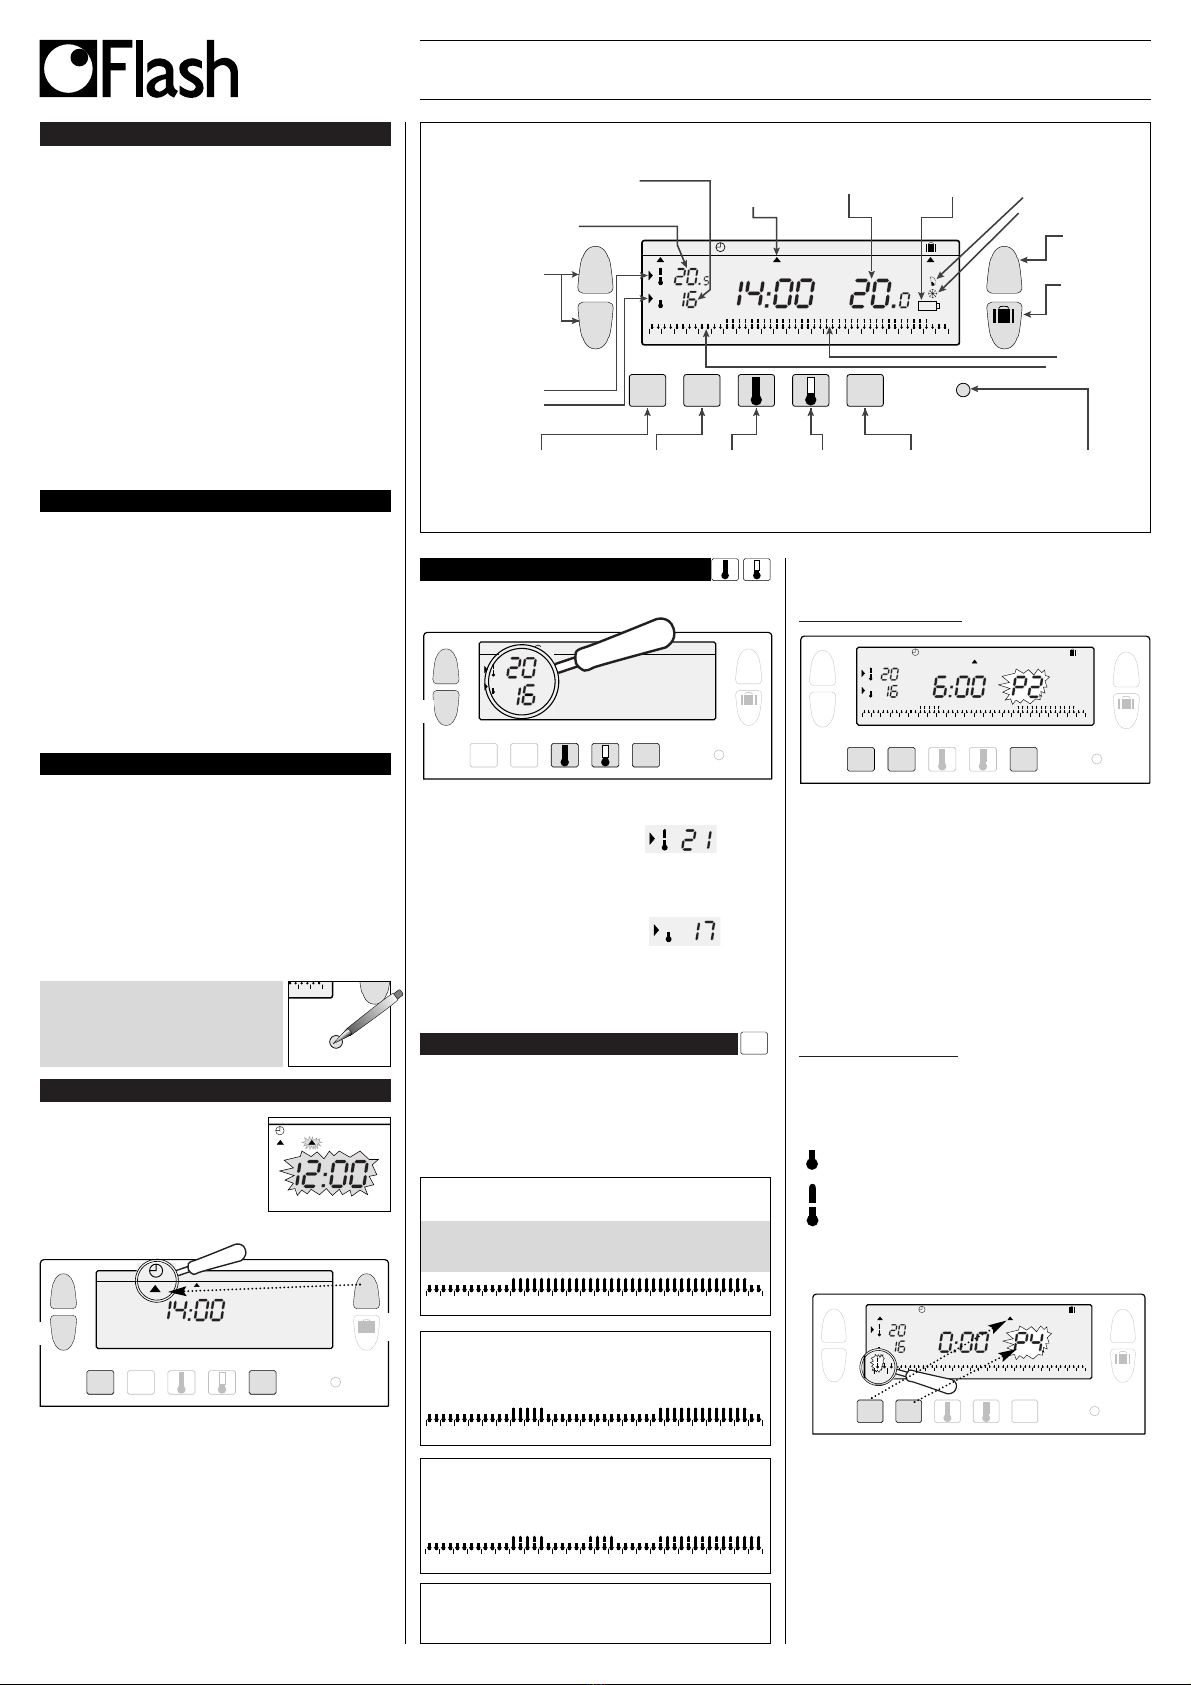
Le mode manuel transforme votre appareil en un simple ther-
mostat.
Il vous permet de maintenir une température constante dans
votre logement (réglable de 5°C à30°C).
Appuyez sur la touche «MODE »pour positionner le poin-
teur ▲sous «Manu ».
Appuyez sur + ou –pour régler la température souhaitée
(exemple 22,5°C).
Pour quitter le mode «Manu »appuyez sur «MODE »et
repositionnez le pointeur ▲sous «Auto ».
LE MODE MANUEL «Manu »
LE MODE AUTOMATIQUE «Auto »
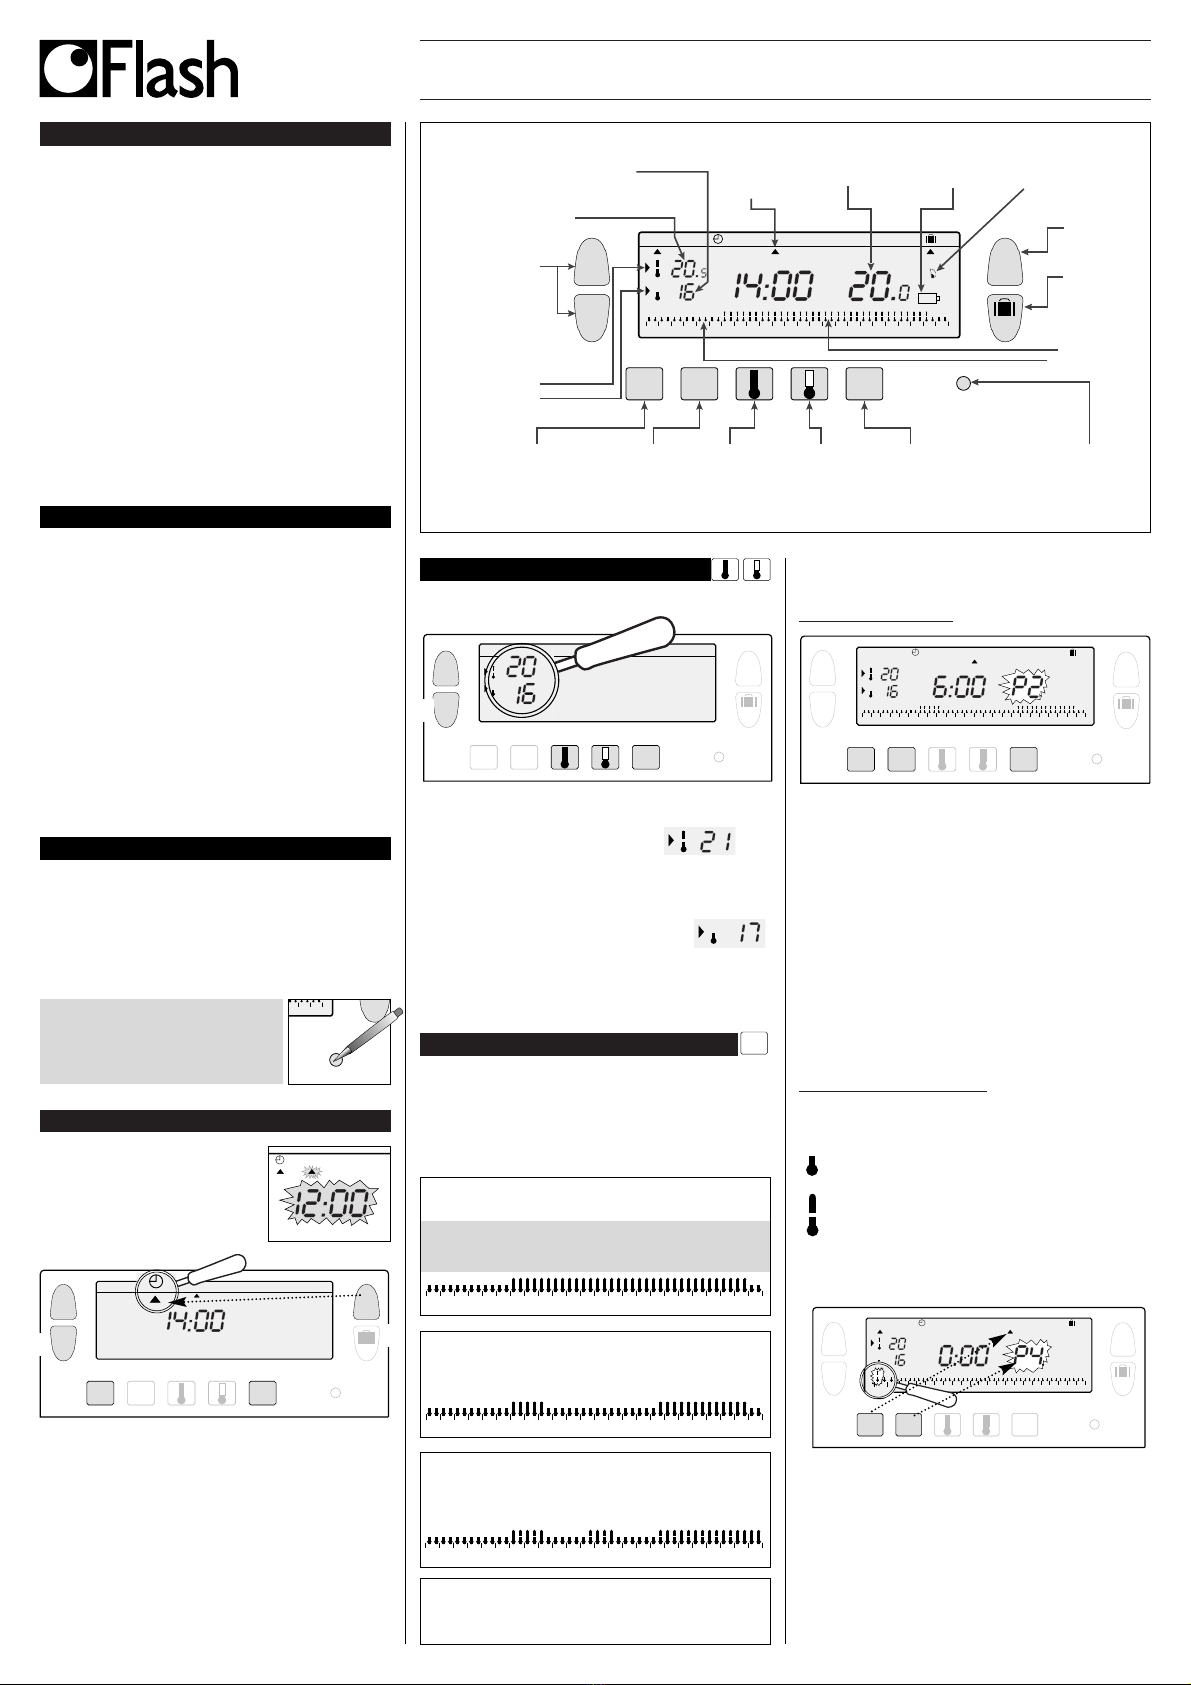
LECTURE DES PROGRAMMES
En mode automatique, cette fonction très pratique vous per-
met de modifier temporairement la
température ambiante.
- Pour augmenter la température
appuyez sur la touche + (plusieurs
appuis si nécéssaire).
- Pour abaisser la température
appuyez sur la touche –(plusieurs
appuis si nécéssaire).
L’indicateur du niveau de température en cours (confort ou
économique) se met àclignoter.
Cette modification prendra fin lors du prochain changement
de température programmée.
Pour revenir au programme initial appuyez sur «Mode »et
replacez le pointeur ▲sous «Auto ».
L’arrêt du clignotement de l’’indicateur du niveau de tempé-
rature en cours (confort ou économique) marque la fin de la
modification temporaire.
Ce mode met votre logement àl’abri des risques du gel en
maintenant une température minimum réglable dans votre
logement durant vos absences (de 1 à99 jours).
Vous pouvez programmer la durée de votre absence pour pré-
voir la remontée en température de votre logement àvotre
retour.
Appuyez sur la touche
Réglez la durée de votre absence en jour (de 1 à99 jours)
avec les touches + et –, la journée en cours compte pour
1.
Validez avec la touche «OK »
Réglez le niveau de température souhaitépendant votre
absence avec les touches + et –
Validez avec la touche «OK », restez dans ce
mode.
Pour annuler et revenir en Mode automatique appuyez
sur «MODE ».
NB Lors de la programmation des horaires de température
«confort », tenir compte de la durée nécessaire àvotre
installation de chauffage pour passer de la température
«économique »àla température «confort ».
Le
THERMOFLASH DIGI 2 Eco
, doit être installéàenviron 1,50
m. du sol, sur un mur intérieur, àl’abri du rayonnement solaire
direct et de toute source de chaleur, telle que : téléviseur,
lampe, courant d’air, etc...
Abaissez le capot, dévissez la vis.
LE MODE ABSENCE PROLONGÉE, VACANCES
MODIFICATION TEMPORAIRE DE LA TEMPÉRATURE
Auto Manu 1234567
°c
°c
+
-
MODE
OK
PROG
P1-P4
DAYS
1-7
MODE
Res
01234 89101112131415161718192021222324567
89567
Auto Manu
°c
☛☛
☛☛
Auto Manu 1234567
°c
°c
+
-
MODE
OK
PROG
P1-P4
DAYS
1-7
MODE
0000
hRes
0123456789101112131415161718192021222324
MODE
MODE
0123456789101112131415161718192021222324
☛☛
☛☛
☛☛
☛☛
☛☛
☛☛
Auto Manu
°c
°c
+
-
MODE
MODE
Auto Manu
°c
☛☛
☛☛
☛☛
Auto Manu
°c
+
-
012345
°c
☛☛
☛☛
0123456789101112131415161718192021222324
Auto Manu 1234567
°c
+
-
OK
PROG
P1-P4
DAYS
1-7
MODE
Res
days
☛☛
☛☛
☛☛
☛☛
123
Borne N°1 = sortie chauffage
2
!
GUIDE DE L’INSTALLATEUR
➥
➥
Avant toute intervention, coupez le courant !
Le schéma de câblage ne représente pas les
protections. L’installation doit être réalisée par un
professionnel dans le respect des normes en
vigueur.
!

Il THERMOFLASH DIGI 2 Eco èstato creato per appor-
tare conforto ed economizzare energia e permette di
programmare e di regolare il riscaldamento o il sistema di
aria condizionamento secondo 3 livelli di temperatura :
•
Temperatura «confort »: èla temperatura racco-
mandata quando siete in casa.
•
Temperatura «economia »: èla temperatura più
gradevole quando siete assenti per breve tempo o
durante la notte.
•
Temperatura «a riposo »èla temperatura minima
assicurata durante le assenze prolungate. Protegge
l’abitazione dai rischi del gelo.
Questi 3 programmi preregistrati e il suo programma
libero vi daranno la possibilitàdi adattare, giorno dopo
giorno, il vostro riscaldamento al vostro modo di vita.
Percorrendo questa documentazione scoprirete come
usare le differenti funzioni del THERMOFLASH DIGI 2 Eco.
INSTALLAZIONE O SOSTITUZIONE DELLE PILE
PROGRAMMAZIONE DELL’ORA E DEL GIORNO
REGOLAZIONE DELLE TEMPERATURE
LA PROGRAMMAZIONE
LETTURA DEI PROGRAMMI
I
L MODO AUTOMATICO «Auto »
MODO MANUALE «Manu »
MODIFICA TEMPORANEA DELLA TEMPERATURA
IL MODO ASSENZA PROLUNGATA. VACANZE
ISTRUZIONI PER L’INSTALLATORE.
THERMOFLASH DIGI 2 Eco
èdotato di una spia che
controlla la carica delle pile. Non appena la spia appare in
basso a destra del display, procedere alla sostituzione delle pile
(usare 2 pile 1,5 V alcaline LR6 - l’autonomia èdi circa 18 mesi).
Durante la sostituzione delle pile
THERMOFLASH DIGI 2 Eco
conserva i suoi programmi per 60 secondi.
Prima di iniziare la programmazione
del vostro apparecchio abbassate il
coperchio e premete sul tasto RESET
con la punta di una biro.
-E’la prima messa in servizio
- Voi avete premuto sul tasto RESET
come indicato sopra
- Le ore 12:00 e l’indice ▲sotto il giorno
1 (lunedì) lampeggiano.
Programmate l’ora con i tasti +/–(una pressione prolun-
gata sul tasto accelera lo scorrimento dell’ora).
Regolare il giorno con pressioni successive sul tasto
DAYS 1-7. Un indice ▲appare sotto il giorno corrispondente
(1 = lunedì, 2 = martedì, 3 = mercoledì, ecc.)
Convalidate con il tasto OK
Se volete modificare l’ora o il giorno : premere sul tasto
«MODE »fino alla comparsa dell’indice ▲sotto la sigla orolo-
gio e procedere come indicato sopra, ai punti
,
e
.
PROGRAMMAZIONE DELL’ORA E DEL GIORNO
INSTALLAZIONE O SOSTITUZIONE DELLE PILE
SOMMARIO
0123456789101112131415161718192021222324
Auto Manu 1234567
°c
°c
°c
OK
PROG
P1-P4
DAYS
1-7
MODE
Res
timer
days
Tasti +/–
per la regolazione
Temperatura
ambiente Spia usura
pile
Assenza
prolungata
(vacanze)
Regolazione
temperatura
«confort »
Regolazione
temperatura
«economia »
Convalida Ras : Rimessa
a zero
generale
Temperatura
«confort »
Temperatura
«economica »
Scelta del
programma :
da P1 a P4
Visualizzazione
dei periodi
«confort »e
«economia »
Indicatore del
giorno della
settimana
Indicatore
dell’innesto
del riscaldamento
Selezione
dei modi
Selezione dei giorni
della settimana
(1 = lunedì, 2 = martedì...
7 = domenica)
Indicatore
del livello
di temperatura
in corso
«confort »
o «economia »
-
+
22 23 24
0
00
hRes
1234
Auto Manu 1234567
+
-
MODE
OK
PROG
P1-P4
DAYS
1-7
MODE
Res
u
☛☛
☛☛
☛☛
☛☛
☛☛
Le temperature «confort »e «economia »sono preregolate :
Confort = 20 °C, Economia = 16 °C.
Modifica della temperatura «confort »:
Premere sul tasto «confort »
Modificare la temperatura con i tasti +/–
Convalidate con OK
Modifica della temperatura «economia »:
Premere sul tasto «economia »
Modificare la temperatura con i tasti +/–
Convalidare con OK
Per programmare la vostra settimana avete a disposizione 4
programmi :
P1, P2 e P3 che sono preregolati e non modificabili
P4 che èlibero e che permette di creare un pro-
gramma personalizzato e differente per ogni
giorno della settimana.
P1 = Temperatura «conforto »dalla ore 6 alle 23
Temperatura «economia »dalla ore 23 alle 6
P1 èdestinata ai 7 giorni della settimana in modo stan-
dard. Se P1 corrisponde al vostro ritmo di vita rimanete in
modo automatico, in caso contrario continuate.
P2 = Temperatura «conforto »dalle 6 alle 8,30 e dalle 16,30
alle 23
Temperatura «economia »dalle 8,30 alle 16,30 e dalle
23 alle 6
P3 = Temperatura «conforto »dalla 6 alle 8,30, dalle 11,30
alle 13,30 e dalle 16,30 alle 23
Temperatura «economia »dalle 8,30 alle 11,30, dalle
13,30 alle 16,30 e dalle 23 alle 6.
P4 = Programma libero che vi permette di creare 3 periodi
in temperatura «conforto »e 3 periodi in tempera-
tura «economia »per ogni giorno della settimana.
LA PROGRAMMAZIONE
°c
°c
REGOLAZIONE DELLE TEMPERATURE
Selezione di un programma esistente P1, P2 o P3 per un
giorno della settimana (in modo programmazione tutte le
modifiche si convalidano automaticamente).
esempio P2 per Mercoledi
Premere sul tasto PROG P1-P4 per passare in modo pro-
grammazione. Il numero del programma assegnato al giorno
lampeggia sulla destra del display.
Premere sul tasto DAY 1-7 fino alla comparsa dell’indice ▲
sotto il giorno che volete programmare. Nel nostro caso : mer-
coledì.
Premere sul tasto PROG P1-P4 fino alla comparsa a destra
del display del numero di programma P2 che lampeggia.
Premere sul tasto OK per convalidare il giorno. Il giorno
seguente èproposto automaticamente.
Creazione di un programma P4
Un profilo di 24 ore composto da 48 termometri in basso sul dis-
play vi permettono di visualizzare facilmente la composizione
del vostro programma.
Un termometro mezzo vuoto corrisponde a
30 minuti a temperatura «economia »
Un termometro pieno corrisponde a
30 minuti a temperatura «conforto ».
Esempio di creazione di 3 periodi in temperatura
«conforto »per il venerdì: dalle 6 alle 8, dalle 12 alle 14 e
dalle 18 alle 22.
Partendo dal modo «Auto »premere sul tasto PROG P1-P4
Premere sul tasto DAYS 1-7 fino alla comparsa dell’indice s
sotto il giorno che volete programmare. Nel nostro esempio :
venerdì.
Premere sul tasto PROG P1-P4 fino alla comparsa a destra
del display del numero di programma P4 che lampeggia. Il dis-
play indica 0h00 ed il primo termometro lampeggia sul profilo
di 24 ore.
Auto Manu 1234567
°c
°c
+
-
OK
PROG
P1-P4
DAYS
1-7
MODE
Res
☛☛
☛☛
☛☛
☛☛
☛☛
c
c
!
0123456789101112131415161718192021222324
0123456789101112131415161718192021222324
Auto Manu 1234567
°c
°c
+
-
OK
PROG
P1-P4
DAYS
1-7
MODE
Res
☛☛
☛☛
☛☛
+
-
OK
PROG
P1-P4
DAYS
1-7
MODE
Res
Auto Manu 1 2 3 4 5 6 7
°c
°c
0123456789101112131415161718192021222324
01
☛☛
☛☛
2
PROG
P1-P4
0123456789101112131415161718192021222324
0123456789101112131415161718192021222324
PRESENTAZIONE
THERMOFLASH DIGI 2 ECO
!

Staccare delicatamente il lato frontale.
Fissare il basamento al muro e raccordare l’apparecchio
secondo lo schema qui sotto :
Se la caldaia ha un’entrata termostato sopprimere il devia-
tore che collega i 2 morsetti termostato e raccordare i mor-
setti 1 e 3 del THERMOFLASH DIGI 2 Eco ai 2 morsetti di
entrata termostato della caldaia (il senso di raccordo èindif-
ferente).
REGOLAZIONI EVENTUALI
Potete procedere a differenti regolazioni sul
retro dell’apparecchio (sempre che sia stac-
cato)
Funzione antibloccaggio della pompa di circolazione
(innesto della pompa per 1 minuto ogni 24 ore)
Arresto funzione Funzionamento funzione
antibloccaggio antibloccaggio
Rimettere il lato frontale e riavvitare la vite.
CARATTERISTICHE TECNICHE
- Intervallo di regolazione della T°C conforto da +5 a +30°C
- Intervallo di regolazione della T°C ridotta da +5 a +30°C
- Intervallo di regolazione della T°C vacanze da +5 a +30°C
- Intervallo di visualizzazione delle T°C ambiente da 0 a +40°C
- Differenziale statico : < 0.3 gradi
- Alimentazione : 2 pile alcaline tipo LR6
- Potere di interruzione : 1 RT - 8 (3) A : 250 V AC
- Temperatura di funzionamento : da 0 a - 50°C
- Temperatura di stoccaggio : da -10 a +65°C
- Igrometria : 85% max a +20°C
- Grado di protezione : IP 30
- Classe di isolamento : II (norme EN 60730)
- Raccordo : con morsettiera a vite fino a 2,5 mm2
■
■
Premere sul tasto piùvolte fino ad arrivare alle 6. Ogni
breve pressione rappresenta un incremento di 30 minuti. La
pressione prolungata accelera la progressione.
- Premere sul tasto piùvolte fino ad arrivare alle 8
- Premere sul tasto piùvolte fino ad arrivare alle 12
- Premere sul tasto piùvolte fino ad arrivare alle 14
- Premere sul tasto piùvolte fino ad arrivare alle 16
- Premere sul tasto piùvolt e fino ad arrivare alle 22
Nota : Se avete fatto un errore (esempio : 11,30 invece di 12),
usate il tasto + e - per avanzare o retrocedere e correggete
con i tasto e .
Premere sul tasto «OK »ed il giorno seguente èproposto
automaticamente.
Premere su MODO per ritornare il modo automatico.
E’possibile verificare la programmazione :
Partendo dal modo «Auto »premere sul tasto
«PROG P1-P4 »
Con il tasto «DAYS 1-7 »selezionare il giorno da 1 a 7 e veri-
ficate la programmazione sul profilo di 24 ore sulla parte
bassa del display (vedere esempio qui sotto)
Premere su «MODE »per passare in modo automatico.
Il passaggio in modo automatico si effettua pre-
mendo sul tasto «MODE »fino alla comparsa
dell’indice ▲sotto «Auto ».
In modo automatico il THERMOFLASH DIGI 2
Eco si adatta al vostro ritmo di vita con il pro-
gramma o con i programmi da voi scelti.
Il modo manuale trasforma il vostro apparecchio in un sem-
plice termostato mantenendo una temperatura costante
dell’ambiente (regolabile da 5 a 30°C).
Premere sul tasto «MODE »per posizionare l’indice ▲sotto
«Manu »
Premere su + o su –per regolare la temperatura voluta
(esempio 22.5°C)
Per uscire dal modo «Manu »premere su «MODE »e riposi-
zionare l’indice ▲su «Auto ».
MODO MANUALE «Manu »
IL MODO AUTOMATICO «Auto »
LETTURA DEI PROGRAMMI
In modo automatico, questa fun-
zione molto pratica, vi permette di
modificare temporaneamente la
temperatura ambiente.
- Per aumentare la temperatura
premere sul tasto + (piùvolte se
necessario).
- Per abbassare la temperatura premere sul tasto –(piùvolte
se necessario).
L’indicatore del livello di temperatura in corso («conforto »o
«economia »), si mette a lampeggiare.
La modifica termineràal prossimo cambio di temperatura pro-
grammato.
Per ritornare al programma iniziale premere su «MODE »e
rimettere l’indice ▲sotto «Auto ».
L’arresto del lampeggiamento del livello di temperatura («
conforto »o «economico ») indica la fine della modifica
temporanea.
Questo modo mette la vostra abitazione al riparo da ogni
rischio di gelo, pur mantenendo una temperatura minima
regolabile durante la vostra assenza (da 1 fino a 99 giorni).
Potete programmare la durata della vostra assenza per pre-
vedere l’aumento della temperatura al vostro ritorno.
Premere sul tasto
Regolate la durata della vostra assenza in giorni (da 1 a 99)
con i tasti +e –. Il giorno in corso conta per 1.
Convalidare con il tasto «OK »
Regolate il livello di temperatura voluto durante la vostra
assenza con i tasti + e -.
Convalidate con il tasto «OK ». Rimanete in questo modo
Per annullare e ritornare in modo automatico, premere
su «MODE »
IL THERMOFLASH DIGI 2 Eco deve essere installato a 1,50 m
dal suolo su un muro interno al riparo dai raggi diretti del sole
o da ogni fonte di calore come televisore, lampade, correnti
d’aria, ecc.
Abbassare il coperchio e svitare la vite .
IL MODO ASSENZA PROLUNGATA.VACANZE
MODIFICA TEMPORANEA DELLA TEMPERATURA
Auto Manu 1234567
°c
°c
+
-
MODE
OK
PROG
P1-P4
DAYS
1-7
MODE
Res
01234 89101112131415161718192021222324567
89567
Auto Manu
°c
☛☛
☛☛
Auto Manu 1234567
°c
°c
+
-
MODE
OK
PROG
P1-P4
DAYS
1-7
MODE
0000
hRes
0123456789101112131415161718192021222324
MODE
MODE
0123456789101112131415161718192021222324
☛☛
☛☛
☛☛
☛☛
☛☛
☛☛
Auto Manu
°c
°c
+
-
MODE
MODE
Auto Manu
°c
☛☛
☛☛
☛☛
Auto Manu
°c
+
-
012345
°c
☛☛
☛☛
0123456789101112131415161718192021222324
Auto Manu 1234567
°c
+
-
OK
PROG
P1-P4
DAYS
1-7
MODE
Res
days
☛☛
☛☛
☛☛
☛☛
ISTRUZIONI PER L’INSTALLATORE
123
Morsetto n°1 = uscita riscaldamento
2
!
Prima di ogni intervento, staccate la rete elettrica,
perchélo schema di cablaggio non rappresenta
una protezione. L’installazione deve essere ese-
guita da un professionista nel rispetto delle norme
in vigore.
!
➥
➥

THERMOFLASH DIGI 2 Eco has been designed to offer you
comfort and energy savings. It allows you to programme and
adjust your heating or air conditioning according to 3 tem-
perature levels:
- "Comfort" temperature: this is the temperature for your
hours of presence.
- "Reduced" temperature: this is the temperature for your
brief absences or during the night.
- "Frost-protection" temperature: this is the minimum
temperature for long absences. It protects your dwelling
from the risk of frost.
These 3 pre-recorded programs and a blank programme will
allow you to adapt your heating each day to your life style.
This instruction leaflet introduces you to the different functions
of THERMOFLASH DIGI 2 Eco.
PRESENTATION
Inserting or re-inserting the batteries
Setting to current time and day
Temperature setting
Programming
Programme reading
"Auto" automatic mode
"Manu" manual mode
Temporary temperature modification
Prolonged absence mode (holidays)
I
nstaller's guide
THERMOFLASH DIGI 2 Eco
is equipped with a warning light
to indicate when the batteries need replacing. As soon as this
indicator lights up at the bottom right-hand side of the display
panel, replace the batteries (use two 1.5V UR6 alkaline batte-
ries - life is approximately 18 months):
Thermostat remains programmed for 60 seconds while batter-
ies are being replaced.
Remarks
We can offer you a bonus option under reference 56320 which
guarantees autonomy for twelve years (consult your installer):
Before beginning the programming of
the device, please slide cover down
and press RESET with the tip of a pen.
This procedure applies in two circum-
stances:
- You are putting the device into opera-
tion for the first time.
- You have just pressed the RESET button
(see above).
- "12:00" appears and the pointer ▲flashes under day 1.
Set the time using the +/–buttons (the numbers run off
more quickly when the button is pressed continuously).
Set the current day by pressing several times on the
1-7 button. A pointer appears under the corresponding day
(1=Monday, 2=Tuesday, 3=Wednesday, etc.)
Validate with the OK button
If you wish to change the time or the day, press the MODE
button until the pointer appears under the clock sign and con-
tinue as above for points
,
and
.
SETTING CURRENT TIME AND DAY
INSERTING OR RE-INSERTING THE BATTERIES
CONTENTS
0 1 2 3 4 5 6 7 8 9 101112131415161718192021222324
Auto Manu 1234567
¡c
¡c
¡c
OK
PROG
P1-P4
DAYS
1-7
MODE
timer
days
-
+
Res
+/–buttons for
adjusting settings
Ambient
temperature
Warning light
to indicate
battery wear
Prolonged
absence
(holidays)
Comfort
temperature
setting
Reduced
temperature
setting
RESET
"Comfort"
temperature
"Reduced"
temperature
P1 to P4
programme
selection
Viewing of
"comfort" and
"economical"
periods"
Pointer
indicating day
of the week
Mode
selection
Days of the
week selection
(1=Monday, 2=Tuesday....
7=Sunday)
Indicator for
current
temperature level
"comfort"
or "reduced"
Validation
Heating or
air conditioning
start-up indicator
22 23 24
Res
1234
!
Auto Manu 1234567
+
-
MODE
OK
PROG
P1-P4
DAYS
1-7
MODE
Res
u
☛☛
☛☛
☛☛
☛☛
☛☛
Comfort and reduced temperatures are pre-set :
Comfort = 20°C Reduced = 16°C.
Modification of comfort temperature
Press the comfort button
Modify the temperature with the +/–buttons
Validate with OK
Modification of reduced temperature
Press the reduced button
Modify the temperature with the +/–buttons
Validate with OK
You can programme your week according to 4 programme
settings:
P1, P2, P3 are pre-recorded and cannot be modified.
P4 is blank and allows you to create a personalized
programme varying according to the day of the
week.
P1 = Comfort temperature from 6 a.m. till 11 p.m.
Reduced temperature from 11 p.m. till 6 a.m.
The standard allocation of P1 is to 7 days of the week. If
this corresponds to your life style, stay in automatic mode.
Otherwise, continue.
P2 = Comfort temperature from 6 a.m. till 8.30 a.m. and from
4.30 p.m. till 11 p.m.
Reduced temperature from 8.30 a.m. till 4.30 p.m. and
from 11 p.m. till 6 a.m.
P3 = Comfort temperature from 6 a.m. till 8.30 a.m., from
11.30 a.m. till 1.30 p.m. and from 4.30 p.m. till 11 p.m.
Reduced temperature from 8.30 a.m. till 11.30 a.m.,
from 1.30 p.m. till 4.30 p.m. and from 11 p.m. till 6
a.m.
P4 = Blank programme allowing you to create 3 comfort
temperature periods and 3 reduced periods for each
day of the week.
PROGRAMMING
°c
°c
TEMPERATURE SETTING
Selection of an existing P1, P2 or P3 programme for a day
of the week (in programming mode all modifications are
automatically validated).
Example - P2 for Wednesday
Press the PROG P1-4 button to go into programming mode.
The N°of the programme assigned to the day flashes on the
right-hand side of the display panel.
Press the DAYS 1-7 button until the pointer ▲appears under
the day you wish to programme (Wednesday in our example).
Press the PROG P1-P4 button until the P2 programme
number flashes in the right side of the screen.
Press the OK button to validate. The following day is auto-
matically proposed.
Creating a P4 programme
A 24-hour profile composed of 48 thermometers at the bottom
of the display panel allows your programme composition to be
easily viewed.
A half-empty thermometer corresponds to 30 minutes at
reduced temperature.
A full thermometer corresponds to 30 minutes at com-
fort temperature.
Example - programming 3 temperature periods for Friday:
6 a.m. till 8 a.m., noon till 2 p.m. and 6 p.m. till 10 p.m.
From the "Auto" mode press the PROG P1-P4 button
Press the DAYS 1-7 button until a pointer appears under the
day you wish to programme (Friday in our example).
Press the PROG P1-P4 button until the P4 programme
number flashes in the right side of the screen. Your display panel
indicates time as 00:00 and the first thermometer flashes on the
24-hour profile.
Auto Manu 1234567
°c
°c
+
-
OK
PROG
P1-P4
DAYS
1-7
MODE
Res
☛☛
☛☛
☛☛
☛☛
☛☛
c
c
!
0123456789101112131415161718192021222324
0123456789101112131415161718192021222324
Auto Manu 1234567
°c
°c
+
-
OK
PROG
P1-P4
DAYS
1-7
MODE
Res
☛☛
☛☛
☛☛
+
-
OK
PROG
P1-P4
DAYS
1-7
MODE
Res
Auto Manu 1 2 3 4 5 6 7
°c
°c
0123456789101112131415161718192021222324
01
☛☛
☛☛
2
PROG
P1-P4
0123456789101112131415161718192021222324
0123456789101112131415161718192021222324
THERMOFLASH DIGI 2 ECO

Remove front face by unplugging it gently from
the base
Fix the base on the wall.
Connect the thermostat following the picture below.If your
boiler is equipped with a thermostat input, remove the
bypass of 2 thermostat terminals and connect them respec-
tively to terminals 1 and 3 of the
THERMOFLASH DIGI 2
Eco
, to the 2 boiler’s thermostat inputs (any connection
scheme will do) .
ADJUSTMENT OPTIONS You may
choose to put on or not the anti-lock system of
the circulation pump (see device’s back face
when it is removed)
Circulation pump anti-lock system (starts the pump for 1 min
every 24hrs)
Put back the device on its base and tighten the screw.
TECHNICAL SPECIFICATIONS
- Adjustment range for comfort T°C+5°C to +30°C
- Adjustment range for reduced T°C+5°C to +30°C
- Adjustment range for holiday T°C+5°C to +30°C
- Adjustment range for ambient T°C0°C to +40°C
- Static differential: < 0.3 degrees
- Power : 2 standard LR6 alkaline batteries
- Breaking power: Change over contact - 8 (3) A/250 V AC
- Operating temperature: 0°C to +50°C.
- Storage temperature: –10°C to +65°C
- Hygrometry : 85% max at + 20°C
- Degree of protection : IP 30
- Insulation class: II (EN 60730 standards)
- Connection : by screwed barrier up to 2.5 mm
2
.
Press the button several times to obtain 6:00. The time
to the wall displayed advances by 30 minutes for each short
press. Continuous pressing accelerates the time run-off.
- Press the button several times to obtain 8:00.
- Press the button several times to obtain 12:00.
- Press the button several times to obtain 14:00.
- Press the button several times to obtain 18:00.
- Press the button several times to obtain 22:00
N.B. If you make a mistake (e.g. 11:30 instead of 12:00) use the
+ and - buttons to advance or return and correct with the
and thermometer buttons.
Press the "OK" button. The following day automatically
appears.
Press MODE to return to automatic mode.
You can check your programming.
From "Auto" mode press the "PROG P1-P4" button.
With the "DAYS 1-7" button select the day from 1 to 7 and
check your programming on the 24-hour profile at the
bottom of the display panel (see example above).
Press "MODE" to return to automatic mode.
You pass into automatic mode by pressing the
"MODE" button until the pointer ▲appears
under "Auto".
In automatic mode
THERMOFLASH DIGI 2
Eco
adapts to your life style by running the pro-
grams you have selected.
Manual mode transforms your device into a simple thermostat.
It allows you to maintain a constant temperature in your
dwelling (set to a temperature of between 5°C and 30°C).
Press the "MODE" button to position the pointer ▲under
"Manu".
Press + or –to adjust to the desired temperature (for
instance 22.5°C).
To quit the "Manu" mode, press "MODE" and re-position the
pointer ▲under "Auto".
In automatic mode this very useful
function allows you to modify ambi-
ent temperature temporarily.
- To increase the temperature, press
the +button (several times, if nec-
essary).
- To decrease the temperature press the –button (several
times, if necessary).
TEMPORARY TEMPERATURE MODIFICATION
"Manu" MANUAL MODE
"Auto" AUTOMATIC MODE
PROGRAMME READING
The current temperature level indicator (comfort or reduced)
will begin flashing.
This modification ends with the next change in programmed
temperature.
To return to the initial programme press "Mode" and re-position
the pointer ▲under "Auto".
The current temperature level indicator (comfort or reduced)
will stop flashing when the temporary modification comes to
an end.
This mode protects your dwelling from freezing by maintaining
a minimum adjustable temperature in your dwelling during
your absences (from 1 to 99 days).
You can programme the length of your absence so that the
temperature rises for your return.
Press the case button .
Set the length of your absence in days (from 1 to 99 days)
with the +and –buttons. The current day counts as one.
Validate with the "OK" button.
Set the desired temperature level during your absence with
the + and - buttons.
Validate with the "OK" button. Remain in this mode.
To cancel and return to automatic Mode, press
"Mode".
The
THERMOFLASH DIGI 2 Eco
must be installed to an
inner wall about 1.50m up from floor level, away from direct
sunlight and any source of heat, such as: TV set, lighting,
draught, etc.
Pull cover down and remove the screw.
INSTALLER'S GUIDE
PROLONGED ABSENCE MODE (HOLIDAYS)
Auto Manu 1234567
°c
°c
+
-
MODE
OK
PROG
P1-P4
DAYS
1-7
MODE
Res
01234 89101112131415161718192021222324567
89567
Auto Manu
°c
☛☛
☛☛
Auto Manu 1234567
°c
°c
+
-
MODE
OK
PROG
P1-P4
DAYS
1-7
MODE
0000
hRes
0123456789101112131415161718192021222324
MODE
MODE
0123456789101112131415161718192021222324
☛☛
☛☛
☛☛
☛☛
☛☛
☛☛
Auto Manu
°c
°c
+
-
MODE
MODE
Auto Manu
°c
☛☛
☛☛
☛☛
Auto Manu
°c
+
-
012345
°c
☛☛
☛☛
0123456789101112131415161718192021222324
Auto Manu 1234567
°c
+
-
OK
PROG
P1-P4
DAYS
1-7
MODE
Res
days
☛☛
☛☛
☛☛
☛☛
2
!
➥
➥
■
■
Anti-lock stop feature Anti-lock start feature
Prior to any operation, cut off mains power.
The wiring system diagram does not show the pro-
tections. Installation should be carried out by quali-
fied persons and should comply with current stan-
dards.
!
123
Terminal N°1 = heating
Table of contents
Languages:
Other Flash Thermostat manuals
Popular Thermostat manuals by other brands

Honeywell
Honeywell T8000C owner's guide

Kenmore
Kenmore TSTAT0713K owner's manual

Towelrads
Towelrads SMART 43D Installation & user guide

Carrier
Carrier Aquazone 50QE900-NPWS owner's manual

Carrier
Carrier Infinity Control Home installation instructions

meitav-tec
meitav-tec FMH-220 Fan-Coil Super 3 installation manual