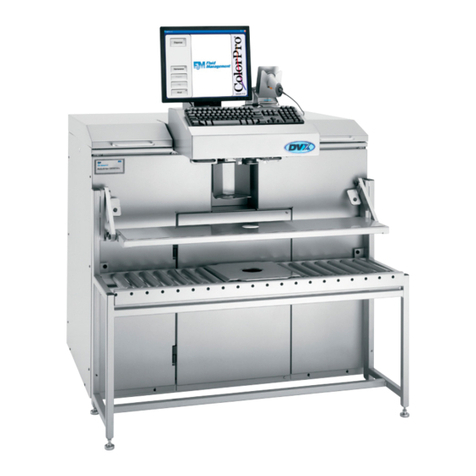
Fluid Management Accutinter 8000 Elite User manual

Accutinter 8000
Elite
| End User Guide
Getting Started
Maintenance and Care
Troubleshooting
Warranty
Part No: 35616
Rev. C
06.26.12

Your
customers have a vision,
you want to make it happen, and
Fluid Management can give you the answer.
Fluid Management is a global leader in dispensing and
mixing equipment used in the paint industry, as well as,
specialized equipment for the food and beverage, chemical,
health and beauty, and home improvement industries.
Located in the suburbs of Chicago, Illinois, Fluid Management
is a United States owned and operated company with historical roots
to the paint industry dating back to 1927. In 1996, IDEX Corporation
purchased Fluid Management giving the organization the financial
wherewithal and global footprint of a large organization while
still maintaining its deep values and history.
As industry leaders, Fluid Management provides trend-setting creativity
in the design, products, and services it offers. United with FMDirect,
our nationwide service team, we provide after-sales support around
the clock—when you need them. Being factory-direct employees,
FMDirect technicians are experts on Fluid Management equipment and
understand customer needs from start to finish.
The combination of leading edge technology, excellent service and
support, and a company prepared for the future’s ever-changing
business environment makes Fluid Management an ideal partner to
assist in providing solutions to your business needs. Thank you for
putting your trust in Fluid Management products
and making us part of your customer’s vision.

2 Accutinter 8000Elite )OXLG0DQDJHPHQW&XVWRPHU6HUYLFH
©2012 Fluid Management as published work all rights reserved.
Under the copyright laws, this material may not be copied, in whole or in part, without
the written consent of Fluid Management.
Your rights to the software are governed by the accompanying software license
agreement.
Use of Fluid Management trademarks, service marks, or logos for commercial purposes
without the prior written consent of Fluid Management may constitute trademark
infringement and unfair competition in violation of federal and state laws. Fluid
Management, FMDirect, ColorPro, DVX, Harbil, Blendorama, Accutinter, Duraow, Fast
& Fluid Management, GyroFlex, GyroMixer, Inna, MicroTint, TintMaster, V1, and VR1 are
trademarks of Fluid Management, registered in the U.S. and/or other countries.
Every eort has been made to ensure that the information in this guide is accurate.
Fluid Management is not responsible for printing or clerical errors.
Fluid Management
1023 Wheeling Road
Wheeling, Illinois 60090-5776 USA
800-462-2466
http://www.uidman.com
Published in the United States.
Mention of third-party products is for informational purposes only and constitutes
neither an endorsement nor a recommendation. Fluid Management assumes no
responsibility with regard to the performance or use of these products.

ACCUTINTER 8000ELITE
)OXLG0DQDJHPHQW&XVWRPHU6HUYLFH
Accutinter 8000Elite 3
Fluid Management Accutinter 8000Elite
2QFH\RX¶YHLQVWDOOHG\RXU$FFXWLQWHU(OLWH
'LVSHQVHUZKDW¶VQH[W",QWKLVERRNOHW\RX¶OO
QGPRUHLQIRUPDWLRQWRKHOS\RXJHWWKHPRVWIURP
\RXUQHZ)OXLG0DQDJHPHQW$FFXWLQWHU(OLWH
ACCUTINTER 8000ELITE

)OXLG0DQDJHPHQW&XVWRPHU6HUYLFH
4 Accutinter 8000Elite
Contents
$ERXWWKLV XLGH
+RZWR8VHWKLV*XLGH
)RU<RXU6DIHW\
,PSRUWDQW6DIHW\,QIRUPDWLRQ
,QIRUPDWLRQDQG,QVWUXFWLRQ/DEHOV
6DIHW\1RWLFH,QIRUPDWLRQ
*HQHUDO6DIHW\,QIRUPDWLRQ
$LU&LUFXODWLRQ
*URXQGLQJ
'DQJHU
&DULQJIRU<RXU&RPSXWHU
&RPPXQLFDWLRQ5HJXODWLRQ,QIRUPDWLRQ
HWWLQJWR.QRZ<RXU$FFXWLQWHU(OLWH
7HFKQLFDO6SHFL FDWLRQV
(QYLURQPHQWDO&RQGLWLRQV
2SWLRQDO$FFHVVRULHV
$FFXWLQWHU(OLWH)HDWXUHV
7LSVWR,PSURYH2SHUDWLRQ
HWWLQJ6WDUWHG
,QVWDOODWLRQ
8QSDFNLQJDQG6HW8S
&RQQHFWLQJWKHODEHOSULQWHURSWLRQDO
&RQQHFWLQJWKHEDUFRGHVFDQQHURSWLRQDO
3UHSDULQJDQGUH OOLQJWKHFDQLVWHUV
3UHSDULQJWKHV\VWHP
8VLQJWKHVKHOYHV
%DVLF2SHUDWLRQV
:HOFRPHWR&RORU3UR
0DLQPHQX
'LVSHQVLQJIURP)RUPXOD%RRN
0DQXDOGLVSHQVLQJ
8VLQJH[WHUQDOGDWDVRXUFHDQGGLVSHQVHTXHXLQJ
$GMXVWLQJIRUPXODV
8VLQJFRORUVFDOLQJ
3XUJLQJWKHOLQHV
6WLUULQJWKHFRORUDQWV
8VLQJ&RORU3UR+HOS
0DLQWHQDQFH&DUHDQG8VH
'DLO\ZHHNO\PRQWKO\PDLQWHQDQFH
)UHTXHQWO\$VNHG4XHVWLRQV
(TXLSPHQWWURXEOHVKRRWLQJ
&RORU3URWURXEOHVKRRWLQJ
6HUYLFH
)0'LUHFW
8SJUDGHVDQG5HSODFHPHQW3DUWV
2EWDLQ:DUUDQW\6HUYLFH
:DUUDQW\
)OXLG0DQDJHPHQW6WDWHPHQWRI/LPLWHG:DUUDQW\
,QGH[
$:

)OXLG0DQDJHPHQW&XVWRPHU6HUYLFH
Accutinter 8000Elite 5
How to Use this Guide
7KLV*XLGHLVRUJDQL]HGLQWRQLQHVHFWLRQV(DFKVHFWLRQSURYLGHVGHWDLOHGLQIRUPDWLRQ
RQ$FFXWLQWHU(OLWHWRSLFVDQGSURYLGHVDEDVLFUHIHUHQFHWKDWFDQEHXVHGWRKHOS
\RXZLWKVSHFL FLVVXHV
7KLV*XLGHSURYLGHVWKHLQIRUPDWLRQIRULQVWDOOLQJ\RXU$FFXWLQWHU(OLWH
GLVSHQVLQJIRUWKH UVWWLPHDQGXVLQJ&RORU3UR7KLVSXEOLFDWLRQDOVRLQFOXGHVEDVLF
WURXEOHVKRRWLQJVXJJHVWLRQVFXVWRPHUVHUYLFHKHOSLQIRUPDWLRQGDLO\DQGSUHYHQWDWLYH
PDLQWHQDQFHSURFHGXUHVDQGZDUUDQW\LQIRUPDWLRQ
<RXU$FFXWLQWHU(OLWHGLVSHQVHULQFOXGHVGHWDLOHGLOOXVWUDWHGODEHOVIRUKRZWR
FOHDQWKHQR]]OHVORFDWHGLQVLGHWKHWRSFDQLVWHUFRYHURIWKHPDFKLQH<RXFDQDOVR
QGGDLO\PDLQWHQDQFHLQVWUXFWLRQVLQWKLVJXLGHRQSDJH0DNHVXUHWRIROORZWKHVH
GLUHFWLRQVIRUWKHEHVWSHUIRUPDQFHRI\RXUPDFKLQH
&RORU3URKDVEDVLFLQIRUPDWLRQDERXWXVLQJ\RXU$FFXWLQWHULQWKH+HOSVHFWLRQRIWKH
VRIWZDUH
,I\RXKDYHLQWHUQHWDFFHVVWKHPRVWFXUUHQWLQIRUPDWLRQIRU\RXU$FFXWLQWHU(OLWH
LVDYDLODEOHIURPWKHZRUOGZLGHZHEDWKWWSZZZÀXLGPDQFRP
For Your Safety
&XVWRPHUVDIHW\LVLPSRUWDQW2XUSURGXFWVDUHGHVLJQHGWREHVDIHDQGHIIHFWLYH
+RZHYHUGLVSHQVHUVDUHHOHFWULFDOHTXLSPHQW7KH$FFXWLQWHUOLQHLVVDIHIDVWDQG
UHOLDEOH²GHVLJQHGWREULQJPDQ\\HDUVRIRSHUDWLRQ7KHUHDUHSUHFDXWLRQV\RXFDQ
WDNHWRDYRLGGDPDJHWRWKHHTXLSPHQWRUERGLO\LQMXU\EHIRUHRSHUDWLQJ%\FDUHIXOO\
IROORZLQJWKHLQVWUXFWLRQVLQWKLVGRFXPHQWDQGWKHZDUQLQJDQGPDLQWHQDQFHODEHOV
RQWKHPDFKLQH\RXFDQKHOSSURWHFW\RXUVHOIIURPKD]DUGVDQGFUHDWHDVDIHUZRUN
HQYLURQPHQW
(TXLSPHQWFDQEHFRPHGDPDJHGGXHWRPLVXVHRUQHJOHFW6RPHSURGXFWGDPDJHLV
VHULRXVHQRXJKWKDWWKHSURGXFWVKRXOGQRWEHXVHGDJDLQXQWLOLWKDVEHHQLQVSHFWHG
DQGLIQHFHVVDU\UHSDLUHGE\D)OXLG0DQDJHPHQWDXWKRUL]HGVHUYLFHWHFKQLFLDQ$V
ZLWKDQ\HOHFWURQLFGHYLFHSD\FORVHDWWHQWLRQWRWKHGLVSHQVHUZKHQLWLVWXUQHGRQ
2QYHU\UDUHRFFDVLRQV\RXPLJKWQRWLFHDQRGRURUVHHDSXIIRIVPRNHRUVSDUNV
YHQWIURP\RXUPDFKLQHRUKHDUVRXQGVOLNHSRSSLQJFUDFNLQJRUKLVVLQJ7KHVH
FRQGLWLRQVPLJKWPHUHO\PHDQWKDWDQLQWHUQDOHOHFWURQLFFRPSRQHQWKDVIDLOHGLQD
VDIHDQGFRQWUROOHGPDQQHU+RZHYHULWPD\LQGLFDWHDSRWHQWLDOVDIHW\LVVXH'2127
WDNHULVNVRUDWWHPSWWRGLDJQRVHWKHVLWXDWLRQ\RXUVHOI&RQWDFW)OXLG0DQDJHPHQWDW
IRUDVVLVWDQFH
About this Guide
Safety Precautions
• Read this guide and all
warning labels before
using the machine.
• Keep this guide in a safe
place.
• Read and adhere to all
Warning and Caution
labels on the machine.
• Prepare, level, and clear the
area where the machine
will be installed.
• To avoid risk of re or
injury, unplug the power
before servicing electrical
components.
• DO NOT dispense
ammable materials.
• After installing, complete
a purge and check the
plumbing.
• Check that canisters and
lines are secure and in
place.
• Plug into an approved
grounded outlet only.
Make sure the outlet meets
all national and local codes.
• DO NOT install equipment
in an area that water jet
equipment is used.
• DO NOT push any objects
into the air vents or
openings of your
equipment. Doing
so can cause re or electric
shock by shorting out
interior components.
• DO NOT • Ensure that
nothing rests on your
equipment’s cables and
that the cables are not
located where they can be
stepped on or tripped over.
NOTE: This appliance can be used by children aged from 8 years and above, and persons
with reduced physical, sensory, or mental capabilities or lack of experience and knowledge,
if they have been given supervision or instruction concerning use of the appliance in a
safe way and understand the hazards involved. Children shall not play with the appliance.
Cleaning and user maintenance shall not be made by children without supervision.

6 Accutinter 8000Elite )OXLG0DQDJHPHQW&XVWRPHU6HUYLFH
Important Safety Information
Warning
Unplug before
servicing
Warning
DO NOT use with
or near
flammables
Warning
Use a dedicated
15 amp circuit
(USA & Canada)
16 amp circuit for
all others
Information and Instruction Labels
<RXVKRXOGEHFRPHIDPLOLDUZLWKWKHLQIRUPDWLRQODEHOVDI [HGWRWKHPDFKLQHDVZHOODV
WKHZDUQLQJVFDXWLRQVDQGQRWHVZKLFKDSSHDUWKURXJKRXWWKLVJXLGH
5HDGDOOWKHZDUQLQJODEHOVRQWKHH[WHULRUDQGLQWHULRURIWKHGLVSHQVHU,IWKHODEHOV
EHFRPHGDPDJHGRUXQUHDGDEOH\RXPD\SXUFKDVHUHSODFHPHQWVIURP)OXLG
0DQDJHPHQW&XVWRPHU6HUYLFH
Safety Notice Information
7KHWZRPDLQQRWLFHVXVHGLQWKLV*XLGHDQGRQWKH
$FFXWLQWHU(OLWHDUH:DUQLQJDQG&DXWLRQ$:DUQLQJ
QRWLFHWHOOV\RXDERXWDKD]DUGWKDWFRXOGFDXVHVHULRXV
LQMXU\WR\RXRUH[WHQVLYHGDPDJHWRWKHHTXLSPHQW7KLV
LQIRUPDWLRQLVIHDWXUHGLQWKHEHJLQQLQJRIWKHJXLGHWR
HPSKDVL]HVDIHW\
:KHQ\RXVHHD:DUQLQJQRWLFHLQWKLVJXLGHUHDGLWFDUHIXOO\EHIRUHFRQWLQXLQJZLWKWKH
RSHUDWLRQRIWKHPDFKLQH7DNHDOOQHFHVVDU\SUHFDXWLRQVWRDYRLGSRWHQWLDOLQMXU\
$&DXWLRQQRWLFHWHOOV\RXDERXWDGDQJHUWKDWFRXOGFDXVH
LQMXU\WR\RXRUPLQRUGDPDJHWRWKHGLVSHQVHU:KHQ\RX
VHHD&DXWLRQQRWLFHLQWKLVJXLGHUHDGLWFDUHIXOO\DQGEH
VXUH\RXXQGHUVWDQGLWEHIRUHFRQWLQXLQJ
General Safety Information
'2127DWWHPSWWRVHUYLFHDSURGXFW\RXUVHOIXQOHVVLQVWUXFWHGWRGRVRE\)OXLG
0DQDJHPHQW&XVWRPHU6HUYLFH8VHRQO\D)OXLG0DQDJHPHQW$XWKRUL]HG6HUYLFH
7HFKQLFLDQWRUHSDLU\RXUHTXLSPHQW3OHDVHQRWHWKDWVRPHSDUWVFDQEHXSJUDGHGRU
UHSODFHGE\WKHFXVWRPHU)OXLG0DQDJHPHQWLGHQWL HVWKRVHSDUWVDVVXFKDQGSURYLGHV
GRFXPHQWDWLRQZLWKLQVWUXFWLRQVZKHQLWLVDSSURSULDWHIRUFXVWRPHUVWRUHSODFHWKRVH
SDUWV<RXPXVWFORVHO\IROORZDOOLQVWUXFWLRQVZKHQSHUIRUPLQJVXFKUHSODFHPHQWV
$/:$<6PDNHVXUHWKDWWKHSRZHULVWXUQHGRIIDQGWKDWWKHPDFKLQH
LVXQSOXJJHGEHIRUH\RXDWWHPSWWKHUHSODFHPHQW,I\RXKDYHDQ\TXHVWLRQVRUFRQFHUQV
FRQWDFW)OXLG0DQDJHPHQW&XVWRPHU6HUYLFH
Air Circulation
<RXUFRPSXWHUDQGPRQLWRUIRU\RXUGLVSHQVHUSURGXFHKHDW7KHFRPSXWHUKDV
DIDQWKDWSXOOVLQIUHVKDLUDQGIRUFHVRXWKRWDLU7KHPRQLWRUOHWVKRWDLUHVFDSHWKURXJK
YHQWV%ORFNLQJWKHDLUYHQWVFDQFDXVHRYHUKHDWLQJZKLFKPLJKWUHVXOWLQ
DPDOIXQFWLRQRUGDPDJH3ODFHWKHFRPSXWHUDQGPRQLWRUVRWKDWQRWKLQJEORFNV
WKHDLUYHQWV$OORZLQFKHVPPFOHDUDQFHDURXQGDLUYHQWV
:$51,1
+$=$5'286
(/(&75,&$/
&20321(176
&$87,21
327(17,$/
6$)(7<
+$=$5'

)OXLG0DQDJHPHQW&XVWRPHU6HUYLFH
Accutinter 8000Elite 7
Important Safety Information
Warnings
• This machine draws 10
amps at 120 ± 10% VAC.
• This machine draws 5
amps at 220/230 ±10%
VAC.
• DO NOT modify the
provided plug.
• Improper use of
grounding plug can result
in risk of electric shock.
• Hazardous moving parts.
Keep fingers and other
body parts away.
Cautions
• Check with a qualified
electrician or service
person if grounding
instructions are not
completely understood
or if in doubt as to
whether product is
properly grounded.
• DO NOT user an adapter
or extension cord with
this product.
• This unit must be plugged
into a dedicated electrical
line.
• To reduce risk of electric
shock or injury, use
indoors only.
• Never force a connector
into a port. If the connector
and port do not join
with reasonable ease,
they probably do not
match. Make sure that the
connector matches the port
and that you have
positioned the connector
correctly in relation to the
port.
Grounding
7KLVSURGXFWPXVWEHJURXQGHG,QWKHHYHQWRIDQHOHFWULFDOVKRUWFLUFXLW
JURXQGLQJUHGXFHVWKHULVNRIHOHFWULFDOVKRFNE\SURYLGLQJDQHVFDSHIRUWKH
HOHFWULFFXUUHQW7KLVSURGXFWLVHTXLSSHGZLWKDFRUGWKDWKDVDJURXQGLQJZLUH
DQGDQDSSURSULDWHJURXQGLQJSOXJ7KHSOXJPXVWEHLQVHUWHGLQWRDQRXWOHW
WKDWLVSURSHUO\LQVWDOOHGDQGJURXQGHGLQDFFRUGDQFHZLWKDOOORFDOFRGHVDQG
RUGLQDQFHV
Danger
,PSURSHULQVWDOODWLRQRIWKHJURXQGLQJSOXJFDQUHVXOWLQDULVNRIHOHFWULFVKRFN
,IUHSDLURUUHSODFHPHQWRIWKHFRUGRUSOXJLVQHFHVVDU\'2127FRQQHFWWKH
JURXQGLQJZLUHWRHLWKHUÀDWEODGHWHUPLQDO7KHLQVXODWLRQZLUHZLWKJUHHQRU
JUHHQDQG\HOORZVWULSHVRQWKHRXWHUVXUIDFHLVWKHJURXQGLQJZLUH
&KHFNZLWKDTXDOL HGHOHFWULFLDQLIWKHJURXQGLQJLQVWUXFWLRQVDUHQRW
FRPSOHWHO\XQGHUVWRRGRULILQGRXEWDERXWZKHWKHUWKHSURGXFWLVSURSHUO\
JURXQGHG'2127PRGLI\WKHSOXJSURYLGHG,ILWZLOOQRW WLQWRWKHRXWOHWKDYH
WKHSURSHURXWOHWLQVWDOOHGE\DTXDOL HGHOHFWULFLDQ
Caring for Your Computer
'LVFRQQHFWWKHSRZHUSOXJRQWKHFRPSXWHUE\SXOOLQJWKHSOXJQRWWKHFRUG
LIDQ\RIWKHIROORZLQJFRQGLWLRQVH[LVWV
<RXZDQWWRUHPRYHDQ\SDUWV
7KHSRZHUFRUGRUSOXJEHFRPHVIUD\HGRURWKHUZLVHGDPDJHG
<RXVSLOOVRPHWKLQJLQWRWKHFDVH
<RXUFRPSXWHULVH[SRVHGWRUDLQÀRRGLQJRUDQ\RWKHUH[FHVVPRLVWXUH
.HHSWKHÀDWSDQHOPRQLWRULQURRPWHPSHUDWXUHFRQGLWLRQV([FHVVLYHFROG
RUKRWFRQGLWLRQVFDQKDYHDQDGYHUVHHIIHFWRQWKHOLTXLGFU\VWDOGLVSOD\RIWKH
PRQLWRU
Communications Regulation Information
Safety and regulatory compliance Information
6HHWKHDI [HGODEHOLQJRQWKHPDFKLQH(7//LVWHGFRQIRUPVWR8/67'
&HUWL HGWR&$1&6$67'&12
FCC Compliance Statement
7KLVGHYLFHFRPSOLHVZLWKSDUWRIWKH)&&5XOHV2SHUDWLRQLVVXEMHFWWRWKH
IROORZLQJWZRFRQGLWLRQV7KLVGHYLFHPD\QRWFDXVHKDUPIXOLQWHUIHUHQFH
DQGWKLVGHYLFHPXVWDFFHSWDQ\LQWHUIHUHQFHUHFHLYHGLQFOXGLQJLQWHUIHUHQFH
WKDWPD\FDXVHXQGHVLUHGRSHUDWLRQ
NOTE: This product is for use on a dedicated nominal 120 Volt (US only)
or nominal 220 volt circuit where applicable and has a grounding plug.
NOTE: Review the weight limits referenced in your computer documentation
before placing monitor or other devices on top of your computer.

8 Accutinter 8000Elite )OXLG0DQDJHPHQW&XVWRPHU6HUYLFH
Getting to Know Your Accutinter 8000Elite
Technical Specications
Height: 43” (109 cm)
Width: 45” (114 cm)
Depth 43” (109 cm)
Weight (Empty Canisters):
700 pounds (317 kg)
Maximum power:
• 120 volts +/- 10%, 60 Hz,
10 amp
• 220/230 volts +/- 10%,
50/60 Hz, 5 amp
Environmental
Conditions*
• Operating temperature:
between 50oF(10oC) and
104oF (40oC)
• Relative humidity: between
5% and 85% without
condensation
Optional Accessories
• Computer with 17” Flat
Screen Monitor, Keyboard
& Mouse
• Label Printer
• Barcode Scanner
• Surge Protector
*NOTE: Environmental conditions are strictly based on the types
of colorants used (information provided by paint manufacturer).
The specications shown are for the machine only.
7RS&RYHUV
6SLOO7UD\V
&DQLVWHUV
JDOORQ&RQWDLQHU
3ODWIRUP
JDOORQ
&RQWDLQHU6KHOI
4XDUW3LQW
&RQWDLQHU
6KHOI
5ROOHU&RQYH\RU
RSWLRQDO6OLGH
6KHOI
0RQLWRU
.H\ERDUG
6WDQG
&RPSXWHU
6WRUDJH$UHD

)OXLG0DQDJHPHQW&XVWRPHU6HUYLFH
Accutinter 8000Elite 9
Accutinter 8000Elite Features
+LJKVSHHGGLVSHQVHLPSURYHV\RXURUGHUIXO OPHQWHI FLHQF\
'9;WHFKQRORJ\UHGXFHVIUHTXHQF\RIFDOLEUDWLRQPDLQWHQDQFHSDUWVDQGFRVWVZKLOHSURYLGLQJDPD]LQJDFFXUDF\
UHOLDELOLW\DQGUHSHDWDELOLW\ZLWKHDFKGLVSHQVH
3UHFLVLRQWLQWLQJRUGHUDIWHURUGHU
&RPSDFWIRRWSULQWVPDOOGHVLJQZLWKODUJHFDSDFLW\
5REXVWFRQYH\RUIURQWIRUTXHXLQJJDOORQFRQWDLQHUVZLWKGURSGRZQJDOORQVKHOIDQGSXOORXWTXDUWSLQWVKHOI
$XWRPDWLFQR]]OHFORVHUDQGVHDOHGFDQLVWHUOLGVSURYLGHLPSURYHGHQYLURQPHQWIRUZDWHUERUQHFRORUDQWV
$XWRPDWLFDQGPDQXDODJLWDWLRQVHWWLQJVNHHSFRORUDQWYLVFRVLW\UHDG\IRUXVH
/('ORFDWRUVLQFOXGLQJJDOORQEXQJKROHORFDWRUIRULPSURYHGFRQWDLQHUDOLJQPHQW
6WDLQOHVVVWHHOVXUIDFHVIRUHDV\FOHDQLQJ
6ZLQJRXWHOHFWURQLFVGRRUDQGFDVWHUVDOORZIRUHDVLHUVHUYLFHDQGFOHDQLQJDFFHVV
Getting to Know Your Accutinter 8000Elite
Tips to Improve Operation
&OHDQQR]]OHVGDLO\IRUFRQVLVWHQWDQGDFFXUDWHGLVSHQVH
3XUJHHDFKFRORUDQWRQFHDGD\
)ROORZWKHSUHYHQWDWLYHPDLQWHQDQFHVFKHGXOHIRU\RXU$FFXWLQWHU(OLWH
'2127XVHVROYHQWVLQ\RXU$FFXWLQWHU(OLWH
.HHS&RORU3URVRIWZDUHFXUUHQW
'2127ORDGVFUHHQVDYHUVRQWR\RXU$FFXWLQWHU(OLWHFRPSXWHUPRQLWRU$GGLQJWKLVDQGRWKHUVRIWZDUH
PD\FRQÀLFWZLWK&RORU3URDQGHIIHFWGLVSHQVHRSHUDWLRQ
8VHWKH:HOFRPHWR&RORU3URVHFWLRQRIWKLVPDQXDOIRUDQVZHUVWRTXHVWLRQVDERXW&RORU3UR
8VHWKHFRUUHFWVL]HGODEHOVIRU\RXUODEHOSULQWHURSWLRQDO

10 Accutinter 8000Elite )OXLG0DQDJHPHQW&XVWRPHU6HUYLFH
0DFKLQH
Getting Started
Installation
<RXU$FFXWLQWHU(OLWHKDVEHHQGHVLJQHGIRUTXLFNVHWXS,I\RXKDYHQHYHUXVHGDQ$FFXWLQWHU
GLVSHQVHURUDUHQHZWRSDLQWGLVSHQVHUVUHDGWKLVVHFWLRQIRULQVWUXFWLRQVRQJHWWLQJVWDUWHGDQG
LQVWDOOLQJ\RXUPDFKLQH
,I\RXDUHDQH[SHULHQFHGXVHU\RXPD\DOUHDG\NQRZHQRXJKWRJHWVWDUWHG%HVXUHWRORRNRYHUWKH
LQIRUPDWLRQLQWKH³:HOFRPHWR&RORU3UR´VHFWLRQRIWKLVJXLGHWR QGRXWPRUHDERXWWKHQHZIHDWXUHV
DQGFDSDELOLWLHVLQ&RORU3UR
.H\ERDUG
86%FDEOH
0RQLWRU
3RZHUFDEOH
0RXVH

)OXLG0DQDJHPHQW&XVWRPHU6HUYLFH
Accutinter 8000Elite 11
FIGURE 1
Getting Started
Installation
Unpacking and Set up
)ROORZWKHVWHSVRQWKHQH[WIRXUSDJHVWRVHWXS\RXU$FFXWLQWHU(OLWH
1Make sure these items are available before installing.
$FFXWLQWHU(OLWHXQLW
&RPSXWHUPRXVHDQGNH\ERDUG
/DEHOSULQWHUDQGODEHOVRSWLRQDO
%DUFRGHVFDQQHURSWLRQDO
6XUJHSURWHFWRUQRWLQFOXGHG
2Tools needed for installation.
3KLOOLSVVFUHZGULYHU
6FLVVRUVRUGLDJRQDOFXWWHUV
3Unpack the machine.
D5HPRYHWKHLQWHULRUFRQWHQWVRIWKHSDFNDJLQJ
E:KLOHXQSDFNLQJWKHPDFKLQHLQVSHFWWKHPDFKLQHIRUDQ\GDPDJHWKDWPD\
KDYHRFFXUUHGGXULQJVKLSSLQJ
Verify the contents against the packing slip. Note if any items are missing
or damaged. Call Fluid Management Customer Service at
1.800.462.2466 if any items are missing.
4
Position dispenser in permanent location.
&KRRVHDORFDWLRQIRU\RXUGLVSHQVHUWKDWLVFDSDEOHRIVXSSRUWLQJWKHZHLJKW
SRXQGV>NJ@0DNHVXUHWKHUHLVHQRXJKURRPIRUVHUYLFHSHUVRQQHO
WRKDYHDFFHVVWRWKHUHDURIWKHPDFKLQH,IWKHUHLVQRWHQRXJKURRPURXWLQH
PDLQWHQDQFHPD\EHGLI FXOWWRSHUIRUP
5Position the monitor, keyboard, and
computer.
3ODFHWKHPRQLWRUDQGNH\ERDUG
RQWKHNH\ERDUGVXSSRUWRQWKHWRS
RIWKHPDFKLQH
6HH)LJXUH
,IDQ\GDPDJHLVIRXQGQRWLI\WKHFDUULHULPPHGLDWHO\$UUDQJHIRU
LQVSHFWLRQLQRUGHUWRFODLPUHFRYHU\&ODLPVIRUGDPDJHPXVWEHPDGHE\WKH
FRQVLJQHH<287KHFDUULHUDVVXPHVIXOOUHVSRQVLELOLW\XSRQDFFHSWDQFH
RIWKHVKLSPHQWDQGZLOOQRWHQWHUWDLQDQ\FODLPVE\WKHFRQVLJQRU
• Warnings
ALWAYS shut o the power
and unplug your machine
from the AC power outlet
before servicing.
• This unit must be plugged
into a dedicated electrical
line. This includes:
• 15 amp line for 120 Volt
equipment
• 10 amp line for 220 Volt
equipment
• The surface the dispenser
sits on must be strong
enough to support its
weight of up to 1,000 lbs
(454 kg).
• Dispenser to be installed
on surface that is less than
1.5o of tilt to avoid risk of
injury
• Replace all fuses with the
exact sized replacements.
• This machine is not
explosion proof and must
not be used in a ammable
atmosphere or with
ammable materials.
• To reduce the risk of
electric shock or injury, use
indoors only.

12 Accutinter 8000Elite )OXLG0DQDJHPHQW&XVWRPHU6HUYLFH
FIGURE 2
Getting Started
Installation
6Plug in the power cord and connect all cables.
D5RXWHWKHNH\ERDUGPRQLWRUDQGPRXVHFDEOHVWRWKHUHDURIWKHPDFKLQHZKHUHWKHFRPSXWHUKDVEHHQ
SODFHG3OXJWKHPLQWRWKHDSSURSULDWHSRUWVRQWKHEDFNRIWKHFRPSXWHU
E,I\RXSXUFKDVHGWKHRSWLRQDOEDUFRGHVFDQQHUODEHOSULQWHURUDUHXVLQJDVSHFWURSKRWRPHWHUURXWH
WKHFDEOHVWRWKHUHDURIWKHPDFKLQHZKHUHWKHFRPSXWHUKDVEHHQSODFHG3OXJWKHVHFDEOHVLQWRWKH
DSSURSULDWHSRUWVRQWKHEDFNRIWKHFRPSXWHU
F&RQQHFWWKH86%FDEOHFRPLQJRXWRIWKHKROHRIPDFKLQHZKHUHWKH
FRPSXWHUKDVEHHQSODFHG$WWDFKWKH86%FDEOHWRWKHSRUWODEHOHG
³',63(16(5´RQWKHEDFNRIWKHFRPSXWHU6HH)LJXUH
G3OXJWKHSRZHUFRUGVIURPWKHPRQLWRUFRPSXWHUDQG$FFXWLQWHULQWR
WKHUHFRPPHQGHGVXUJHSURWHFWRU
H3OXJWKHVXUJHSURWHFWRULQWRDDPSGHGLFDWHGHOHFWULFDORXWOHW
7Turn on machine.
D/RFDWHWKHIURQWSDQHOEHORZWKHQR]]OHFORVHULQWKHFHQWHURIWKH
PDFKLQH
E/RFDWHDQGXQVFUHZWKHWZR3KLOLSVKHDGPDFKLQHVFUHZVSURYLGHG
F2SHQWKHIURQWSDQHODQGORFDWHRQWKHUHGWRJJOHVZLWFKQHDUWKH
ERWWRPRIWKHFRPSDUWPHQW
G7KHUHGWRJJOHVZLWFKQHHGVWREHLQWKHµ21¶SRVLWLRQRQRUµ5(6(7
SRVLWLRQIRUWKH$FFXWLQWHUWRZRUNSURSHUO\
H&ORVHWKHIURQWSDQHODQGVFUHZLQWKHWZR3KLOLSVKHDGPDFKLQH
VFUHZVSURYLGHG
8Turn on computer and monitor.
/RFDWHWKHRQRIIEXWWRQRQ\RXUFRPSXWHUDQGWXUQLWRQ5HIHUHQFHWKHFRPSXWHU¶VXVHUPDQXDOLI\RX
KDYHGLI FXOW\ORFDWLQJ
9 Locate the ColorPro icon on your desktop.
&RORU3URDQG\RXUPDQXIDFWXUHU¶VGDWDEDVHZHUHORDGHGDW)OXLG0DQDJHPHQW¶VIDFWRU\,I\RXFDQQRWORFDWH
WKH&RORU3URLFRQ&RQWDFW)OXLG0DQDJHPHQW&XVWRPHU6HUYLFH2SHQ&RORU3URE\GRXEOHFOLFNLQJRQWKH
LFRQ
10 After the machine is installed ll the canisters and update ColorPro
&RPSOHWHDQLQLWLDOPDQXDOGLVSHQVHIRUHDFKFRORUDQW
6HH³*HWWLQJ6WDUWHG3UHSDULQJDQGUH¿OOLQJWKHFDQLVWHUV´RQSDJH.

7KHODEHOSULQWHUVRIWZDUHIRUWKHODEHOSULQWHULVLQVWDOOHGRQWKHFRPSXWHUE\)OXLG0DQDJHPHQW$OO\RX
QHHG WR GR LV FRQQHFW WKH SULQWHU FDEOHV WR WKH FRPSXWHU DQG WR D GHGLFDWHG SRZHU RXWOHW 7KH RULJLQDO
SDFNDJLQJIURPWKHSULQWHUYHQGRULQFOXGHVWKHVRIWZDUHDTXLFNVWDUWJXLGHZLWKGHWDLOHGLQVWUXFWLRQVDQG
WKHQHFHVVDU\FDEOHV
Follow these steps to connect the printer:
2
a. Plug the power adapter into the power
connector on the bottom of the printer.
b. Plug the other end of the power cord into
a power outlet.
c. Plug the USB cable into the bottom of the
printer.
The blue light on the front of the printer
should be on if the printer is ready.
- Click the Print Label (F5) button to print
labels when dispensing a formula.
4
a. Unpack the printer.
b. Make sure you
have these items:
-CD - ROM
-Quick Start Guide
-Roll of labels
-USB cable
-Label printer
-Power cable
-Power adapter
c. Plug the power
cord into the power
adapter.
1
3
Plug the USB cable into the available USB
port on the back of the computer.
USB
)OXLG0DQDJHPHQW&XVWRPHU6HUYLFH
Accutinter 8000Elite 13
Getting Started
Connecting the label printer (optional)

7KH EDUFRGH VFDQQHU PXVW EH FRQQHFWHG WR WKH FRPSXWHU DQG NH\ERDUG 7KH EDUFRGH VFDQQHU LV SUH
SURJUDPPHGE\)OXLG0DQDJHPHQW$IWHUWKHEDUFRGHVFDQQHULVFRQQHFWHGWKHVFDQQHUPXVWEHHQDEOHG
WREHFRPSDWLEOHZLWK&RORU3UR7KHRULJLQDOSDFNDJLQJIURPWKHYHQGRULQFOXGHVWKHEDUFRGHVFDQQHUWKH
FDEOHDQGDTXLFNVWDUWJXLGH
Follow these steps to install the barcode scanner:
a. Unpack the barcode scanner.
b. Make sure the barcode scanner and the
cable are included.
c. Turn on the computer.
1
3
Connect the scanner cable to the keyboard
cable from the Accutinter8000Elite.
NOTE! If the keyboard cable is a USB,
add an adapter and connect the two
cables.
Plug the interface cable modular cord into
the port in the bottom of the scanner’s
handle.
2
4
Connect the scanner cable to
the purple keyboard connector
on the back of the computer
where the keyboard symbol is
marked.
14 Accutinter 8000Elite )OXLG0DQDJHPHQW&XVWRPHU6HUYLFH
Getting Started
Connecting the barcode scanner (optional)

$IWHUWKHEDUFRGHVFDQQHULVFRQQHFWHGWRWKHFRPSXWHUDQGNH\ERDUGLWPXVWEHHQDEOHGLQ&RORU3UR
Follow these steps to enable the barcode scanner:
)OXLG0DQDJHPHQW&XVWRPHU6HUYLFH
Accutinter 8000Elite 15
8After enabling the barcode scanner, you can
test the scanner by dispensing.
a. Open the Dispense menu.
b. Select a formula.
c. Click the Dispense button. If you receive
a prompt that says, “Please Scan the Base
Barcode”, you have successfully enabled
the bar code scanner.
7a. Check Print Override Base to allow
operators to manually override using
scanner.
b. Check Barcode Chip Scanning Enabled
if you are using barcodes to identify
formulas from other color chips.
a. Check the Barcode Scanning Enabled box
on the Barcoding and Extra Options tab.
b. Click Apply Changes, then click Yes and
OK.
c. Close.
6
5Locate FM_Customizer from Fluid
Management folder and launch.
a. Type in “service” when you are prompted
for the password.
b. Click Check.
Getting Started
Connecting the barcode scanner (optional)

16 Accutinter 8000Elite )OXLG0DQDJHPHQW&XVWRPHU6HUYLFH
Getting Started
Preparing and relling the canisters
$IWHU\RXUPDFKLQHLVLQVWDOOHGLQWKHSURSHUORFDWLRQ\RXQHHGWR OOWKHFDQLVWHUVZLWKFRORUDQWVR\RXFDQ
GLVSHQVHIRUWKH UVWWLPH<RXUPDFKLQHPD\EHVKLSSHGZLWKDVPDOODPRXQWRIJO\FRORUFRORUDQWLQWKH
FDQLVWHUVDOUHDG\EXW\RXQHHGWR OOWKHPZLWKWRFDSDFLW\ZLWKFRORUDQW:KHQUH OOLQJFDQLVWHUV\RXZLOO
IROORZWKHVDPHSURFHVV&DQLVWHUVFRPHLQYDU\LQJFDSDFLWLHV&KHFNWKHODEHOLQVLGHWKHWRSFRYHUIRU
FDSDFLW\DQGFRORUDQWORFDWLRQV'2127RYHU OOWKHFDQLVWHUV$IWHUWKHFDQLVWHUVDUH OOHG&RORU3URRU
\RXUPDQXIDFWXUH¶VVRIWZDUHPXVWEHXSGDWHG6HHSDJH
15DLVHWKHWRSFRYHUV
RIWKH$FFXWLQWHU
VR\RXFDQVHHWKH
FDQLVWHUVLQVLGH
25HPRYHWKH
FDSVIURPHDFK
FDQLVWHURQHDWD
WLPHDQGSUHSDUH
WR OOWKHPZLWK
FRORUDQW
Cautions
• DO NOT operate the
dispenser until it is in a
permanent location.
• DO NOT dispense if
canisters are empty
• Before dispensing colorant
for the rst time, you
must complete a manual
dispense.
• DO NOT dispense without a
container in place.
• DO NOT use shelf surface
to seal open cans.

)OXLG0DQDJHPHQW&XVWRPHU6HUYLFH
Accutinter 8000Elite 17
Main Menu
38SGDWH&RORU3URZLWKWKHFDQLVWHUOHYHOLQIRUPDWLRQ
DIWHU\RXKDYHILOOHGDOORIWKHFDQLVWHUV
4)URPWKH0DLQ0HQXVHOHFW0DLQWHQDQFH),QWKH
)LOOWDEVHOHFW$OO)
56HOHFW)LOO7R7RS)
EXWWRQ 6:KHQSURPSWHG³DUH
\RXVXUH"´FOLFN<HV76HOHFW'RQH(VFWR
UHWXUQWRWKH0DLQ0HQX
Fill Menu
Use the Fill Menu to
update the software
after you have filled
all of the canisters for
the first time. When
refilling, select All
(F2) or the correct
individual colorant.
NOTE: When refilling, update the
canisters by entering the amount of colorant
you added in the text box. Press Enter.
NOTE: Repeat entire process for each
empty canister.
Getting Started
Preparing and relling the canisters

18 Accutinter 8000Elite )OXLG0DQDJHPHQW&XVWRPHU6HUYLFH
$IWHU\RXKDYHILOOHGWKHFDQLVWHUVDQGXSGDWHGWKHVRIWZDUH\RXPXVWGRDQLQLWLDOGLVSHQVHWRPDNHVXUH
WKH$FFXWLQWHULVZRUNLQJSURSHUO\
Smart Purge
Use “Smart Purge” for daily Purging.
This will only purge colorants that
have not been recently used.
1)URPDQ\VFUHHQFKRRVH0DLQWHQDQFH)RU)
2&OLFNRQWKH
3XUJHWDE
33XUJHFRORUDQWV
&OLFNRQWKH
FRORUDQWWREH
SXUJHGRUVHOHFW
$//EXWWRQWR
SXUJHHQWLUH
V\VWHP&OLFNWKH
3XUJH)EXWWRQ
5&OLFN'LVSHQVH)
&RORUDQWVZLOOGLVSHQVH
3URPSWZLOODSSHDU
FRQILUPLQJGLVSHQVH
43ODFHDFRQWDLQHU
XQGHUQHDWKWKH
QR]]OHZLWKQR]]OH
FORVHURSHQ
6&OLFN'RQH(VF
Getting Started
Preparing the system

)OXLG0DQDJHPHQW&XVWRPHU6HUYLFH
Accutinter 8000Elite 19
For 1-gallon containers, lower the shelf
and place the container underneath the
nozzle. Use LED lights to align in center of
container.
For 5-gallon containers, place them on
the roller conveyor (or optional slide shelf)
underneath the nozzle. Use LED lights to
triangulate the container hole.
For quart and pint containers, pull out the
shelf using the two pulls and place the
container underneath nozzle. Use LED lights
to align in center of container.
Getting Started
Using the shelves
Other manuals for Accutinter 8000 Elite
1
Table of contents
Other Fluid Management Dispenser manuals

Fluid Management
Fluid Management Accutinter 1600 User manual

Fluid Management
Fluid Management Blendorama 22PC Operating instructions

Fluid Management
Fluid Management Harbil NSC80 User manual

Fluid Management
Fluid Management Accutinter 8000 Elite User manual

Fluid Management
Fluid Management Accutinter 7000HS User manual
Popular Dispenser manuals by other brands

Franke
Franke RODX600 Installation and operating instructions

Stoelting
Stoelting C111 owner's manual

Miele professional
Miele professional DOS-Modul G 60 Fitting instructions

Sanela
Sanela SLZN 59ES quick start guide

InSinkErator
InSinkErator C1300 owner's manual

KEUCO
KEUCO Plan 14987 0037 Series Instructions for use