Fly Sky FS-i6X User manual

X220 v2 User Manual
catalogue
1 product introduction.................................................................................................3
2 Remote Control Radio Transmitter........................................................................ 4
2.1 Buttons and switches................................................................................... 4
2.2 Basic operation............................................................................................. 5
2.3 Joystick functions..........................................................................................5
2.4 Display............................................................................................................7
3 Flight Guide............................................................................................................... 9
3.1 Safety instructions........................................................................................ 9
3.2 Arm/disarm and flight modes...................................................................... 9
3.3 Basic operation of drone........................................................................... 10
3.3.1 Power the drone................................................................................. 10
3.3.2 Replacement of propeller................................................................... 10
3.4 Binding......................................................................................................... 11
3.5 Pre flight inspection....................................................................................11
3.6 Frist fly.......................................................................................................... 12
3.7 Warning&security....................................................................................... 12
4 Battery......................................................................................................................14
4.1 Battery voltage............................................................................................ 14
4.2 Charging method........................................................................................ 14
4.3 Preservation method.................................................................................. 14
4.4 Warning&security....................................................................................... 15
5 Advanced operations.............................................................................................. 16
5.1 Flight controller wiring diagram................................................................ 16
5.2 Equipment wiring diagram.........................................................................16
5.3 Fpv fly........................................................................................................... 18

1 product introduction
Components
x220 v2 RTF
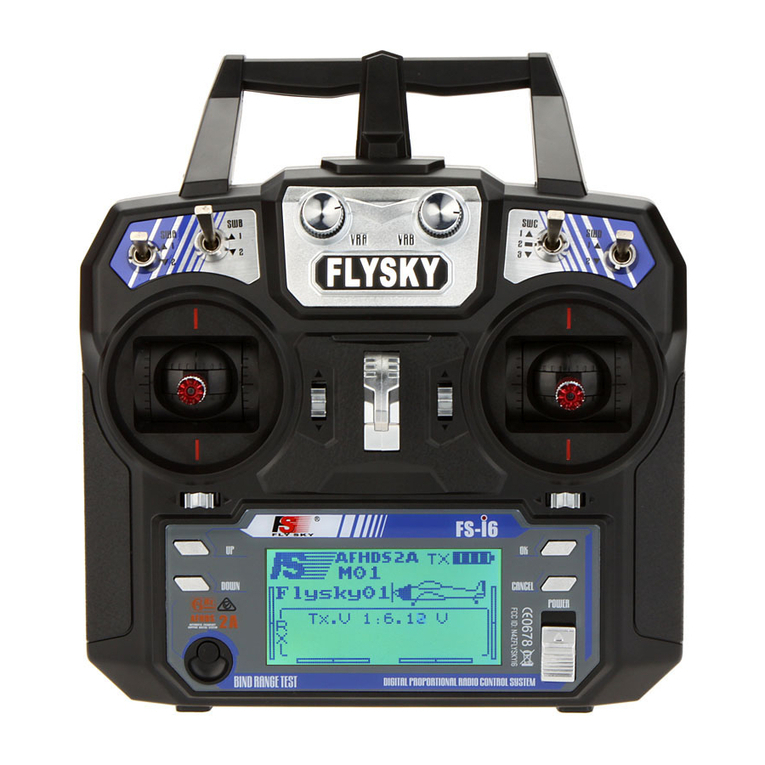
FLYSKY I6X Remote Control Radio Transmitter
Package Included:
1 x X220 V2 Frame Kit
1 x Flysky FS-i6X Remote Control
1 x Flysky FS-A8S Receiver
1 x 1500mAH 4S 14.8V Battery
2 x 2207 2550KV Motor CW
2 x 2207 2550KV Motor CCW
1 x PDB-XT60
1 x F405 DJI DUAL BEC V1 Flight Controller
4 x 30A Independent ESC
1 x FOXEER Arrow MICRO PRO Camera
1 x TC5804 PRO VTX
4 x 5046 3-blade Propeller CW
4 x 5046 3-blade Propeller CCW
1 x 30° Camera Mount (For Gopro5/6/7)
1 x Charger
1 x Antenna
2 x Battery Strap
2 x Carbon Wrench

2 Remote Control Radio Transmitter
2.1 Buttons and switches
The functions of switches, buttons and buttons are shown in the figure
below:

2.2 Basic operation
Turn on / off the remote control: push the power switch
Install the battery: open the battery compartment cover on the back of
the remote control and install the battery
2.3 Joystick functions
joystick operation is divided into left throttle and right throttle, please
check according to the type of your purchase.。
2.3.1 left throttle

As shown in the figure above:
Left joystick:
Up and down for Throttle, control the drone ascent or descent
Left and right for Yaw,Control the drone to turn left or right
Right joystick:
Up and down for Pitch,Control the drone to lean forward or backward
Left and right for Roll,Control the aircraft to tilt left or right
2.3.2 right throttle

As shown in the figure above:
Left joystick:
Up and down for Pitch,Control the drone to lean forward or backward
Left and right for Yaw,Control the drone to turn left or right
Right joystick:
Up and down for Throttle, control the drone ascent or descent
Left and right for Roll,Control the aircraft to tilt left or right
2.4 Display
Tx:The voltage of the Transmitter
Rx : Voltage of receiver ( If the drone and Transmitter not connected

successfully,it does not display)
Sig:signal intensity

3 Flight Guide
So far, you have the necessary understanding of transmitter and drone, you
can start from the flight guide
3.1 Safety instructions
The flight of the drone must comply with local laws and regulations!
Keep a safe distance in all directions around the drone to avoid collision.
Operate a drone in an open space away from people and traffic.
3.2 Arm/disarm and flight modes
Arm:The motor rotates at idle speed, and
the drone can be controlled at this time
Disram:The motor of the aircraft stops
immediately, and the drone cannot be
controlled at this time
Switch SA:Arm/Disram of drone
Drone will be disarmed if SA is down
Drone attempts to arm if the user moves switch SA up(Arming may fail If the
throttle is not at the lowest position)
To ensure your flight experience, the dronet has two flight modes:
Leve mode:
The joysticks controls the current tilt angle of thedrone. The drone will
return to horizontal flight when the joysticks are centered,Recommended for
beginners.
ACRO mode:
The joysticks controls the rotation speed of the drone. When the joystick
is centered, the drone will maintain its current angle.

Switch SB:Level/Arco mode
The flight mode is "level mode".If the switch SB is down
Theflight mode is "acro mode"If switch SB is up
3.3 Basic operation of drone
3.3.1 Power the drone
Strap the battery to the upper cover plate of the drone, connect its XT60
plug to the same plug of the aircraft, the flight control indicator lights up, and
the power supply of the drone is successful
Warning⚠:
In the case of non immediate flight such as drone maintenance, please
remove the blades when connecting the battery.
3.3.2 Replacement of propeller
Grasp the motor by hand, use the matching wrench to remove the blade
nut, pull out the blade, and replace it according to the figure below.
The blade is sharp. Pay attention to safety when disassembling the blade.
Other tools can be used if necessary.

3.4 Binding
This kit has completed the frequency matching between the transmitter
and the receiver. If you want to use another receiver or repeat bind, please
follow the following steps:
1. Turn on the transmitter power and press the bind key to enter the
code matching state.
2. Press and hold the bind key on the receiver, and connect the power to
the receiver. The flash of the indicator light on the receiver indicates that the
receiver enters the code matching state; After successful bind, the status
indicator of the receiver changes from fast flashing to slow flashing.
3. Exit the transmitter from the binding interface manually, and the status
indicator of the receiver will be on.
4. Check whether the transmitter, receiver and model work normally. If
there is any abnormality, repeat the above steps to re code.
3.5 Pre flight inspection
Make sure that all components are included and not damaged, and the
battery is installed firmly。

Confirm that the propeller and motor are installed correctly.
Make sure that the propeller does not scratch any parts.
Make sure that the transmitter and the receiver are correctly connected
Verify that (drone, transmitter) is fully charged.
Make sure you are familiar with all flight controls.
3.6 Frist fly
When everything is ready, you can start to enjoy flying
Return the throttle joystick to lowest position (refer to Section 2.3), turn
on the transmitter and check that the switch SA is down
Install and power up batteries for the aircraft
1. After confirming the safety of the environment, turn the switch SB down
(arm the drone) and start your flight
2.For the first flight, please push the throttle joystick slowly and gently to
control the drone to hover stably in front of you to adapt to the sense of
control. The tail is always facing you. When you can hover stably and control
skillfully, slowly increase the flight distance
3.7 Warning&security
1. If the drone collides with any object, turn the switch SA down(disarm
the drone) immediately.
2.Learn to control drone skillfully before flying in a larger area。
3. Battery life will be significantly shortened If you continue to fly after
displaying the low voltage warning
5 Keep the UAV away from water and do not fly in the rain. If the
equipment touches water, it may be damaged by short circuit.

6.Do not fly in bad weather.
7.Do not fly in areas not allowed by local law.。

4 Battery
4.1 Battery voltage
The battery consists of four cells. The single cell voltage of the battery
needs to be kept above 3.5V (14v for one battery)at all times and 4.2V
(16.8v for one battery)is full charge. Excessive charge or discharge will
cause serious damage to the battery. Please use the charger included in
the package for charging
4.2 Charging method
The charger included in the product has the functions of overcharge
protection and balanced charging. You can use the charger directly. The
usage is as follows:
Connect the charger to the power supply and connect the battery
to the charger
When the charger is not charged, the green light will be on; when it
is charged, the red light will be on; when it is full, the red light will be off
4.3 Preservation method

When the battery is not used for a long time, the storage voltage
should be kept at about 3.85v (15.4v for one battery)for a single cell,
and it should be placed in a cool and dry place
4.4 Warning&security
Stay away from children. If swallowed, seek medical attention
immediately.
Do not use or store the battery near the heat source, microwave oven or
open fire. Do not damage the battery violently..
Only use battery chargers that meet the specifications when charging.
Do not use or store the battery in extremely hot environment, such as in
a car in direct sunlight or hot weather. Overheating will affect the
performance of the battery and shorten the service life of the battery.
Overheated batteries can also catch fire.
If the battery has peculiar smell, heating, deformation, discoloration or
other abnormal phenomena, please stop using the battery. Recycle and
replace the battery.
Discarding batteries at will may cause a fire. Before disposal, discharge
the battery completely and handle the battery output connector with
insulating tape. Refer to local regulations before handling or recycling
batteries.

5 Advanced operations
5.1 Flight controller wiring diagram
This wiring diagram is only provided to players with rich experience,
proficient in circuit knowledge and welding skills.
You can add or change your Equipment according to this wiring diagram,
but we do not recommend it.
5.2 Equipment wiring diagram
This product only uses the flight control and PDB shown in the figure
below. Other equipment are used for demonstration. When you receive the
drone,all the required equipment has been installed.


5.3 Fpv fly
This drone includes the video transmitter for FPV flight. You can
experience FPV flight after purchasing FPV glasses. The following is the
description of the video transmitter in this product
1.Use the buttons to change the power
Long press the button for 10 seconds, then short press to switch the power
to 25MW / 200MW / 600MW
25mW
200mW
600mW
FR LED
CH LED
Solid circle means light on, hollow circle means light off
The power indicator shows the current power:
25mW
200mW
600mW
Power indicator
Flash 1,stop 3s
Flash 2,stop 3s
Flash 3,stop 3s

2.Use the buttons to change the power
Long press the button for two seconds, then short press to change the
channel
Press the key again for two seconds and then press the key to change the
frequency
Solid circle means light on, hollow circle means light off

appendix:
Detailed parameters of equipment:
Brand: Eachine
Item Name: Wizard X220 V2 5 Inch 4S FPV Racing Drone PNP
Drone Weight: 407g (with Camera Mount)
Frame Kit
Wheelbase: 225MM
Floor thickness: 2.0MM
Upper board thickness: 2.0MM
X board thickness: 2.0MM
The thickness of the side panel of the camera: 1.5MM
Arm thickness: 5.0MM
Frame material: T300 carbon fiber
Motor
Motor KV: 2550RPM/V
No-load current (Io/10V): 1.35A
Adipocytes: 3-5S
Weight: 31 grams
Maximum continuous current: 35A
Maximum continuous power: 560W
Maximum thrust: 1180g (4S/5")
Configuration: 12N/14P
Motor resistance RM: 0.0536Ω
Stator diameter: 22mm
Stator thickness: 7mm
Motor diameter: 27.7mm
Length of motor body: 19.2mm
Total shaft length: 34.2mm
Drive shaft: M5
Bolt hole spacing: 16mm

Bolt thread: M3
Propeller: 5-6 inches
PDB-XT60
Mount holes:30.5x30.5mm
BEC:NO
F405
DJIDUAL BEC
V1 Flight
Controller
CPU: STM32F405RGT6
Six axis: MPU6000
Mount holes: 30.5x30.5mm
Size: 37mm x 37mm
barometer:BMP280
BEC:5V/3A,9V/2A
Balck box :16M
Firmware version: EachineF405 (STM32F405)
OSD: Built-in BetaFlight OSD (STM32 controls the OSD
chip through SPI in DMA mode)
Receiver: Support Frsky XM / XM + receiver / for Futaba
receiver / Flysky receiver / TBS Crossfire receiver / DSMX
receiver
30A
Blheli_S 2-4S
ESC
Support PWM, Oneshot125, Oneshot42, Multishot,
Dshot300, Dshot150, Dshot600
Input voltage: 2S-4S Lipo
Continuous current: 30A
Peak current: 35A
Firmware: BLHELI-S GH-30
FOXEER
Arrow MICRO
PRO Camera
Image sensor: 1/3 inch SUPER HAD II CCD + Nextchip
2040 DSP
Pixel: PAL: 976 (H) x494 (V)
P/n system: PAL
Resolution: 600TVL (color) 650TVL (black and white)
Synchronization: internal
Minimum illumination: 0.01Lux
Other manuals for FS-i6X
1
This manual suits for next models
1
Table of contents
Other Fly Sky Transmitter manuals
