Flyer Folding Cargo User manual

Folding Cargo


Folding Cargo


Getting Started
ASSEMBLY INSTRUCTIONS
The following steps provide a general overview of the assembly process for
your eBike. It is recommended to consult a professional bicycle mechanic
for assistance with your eBike’s assembly, maintenance, and repair.
Visit flyer.radioflyer.com or contact customerservice@ radioflyer.com for
additional assistance assembling, using, repairing or maintaining your eBike.
WARNING! Incorrect assembly, maintenance, or use of your Flyer™ eBike can cause component
failure, loss of control, serious injury, or death. Please note, the assembly and first fit of your Flyer™
eBike require special tools and mechanical skills. It is highly recommended that the assembly and
adjustment are completed by a reputable bicycle mechanic when possible.
The following items are required for assembly:
•5mm allen wrench (included)
•8mm allen wrench (included)
•15mm open-ended wrench (included)
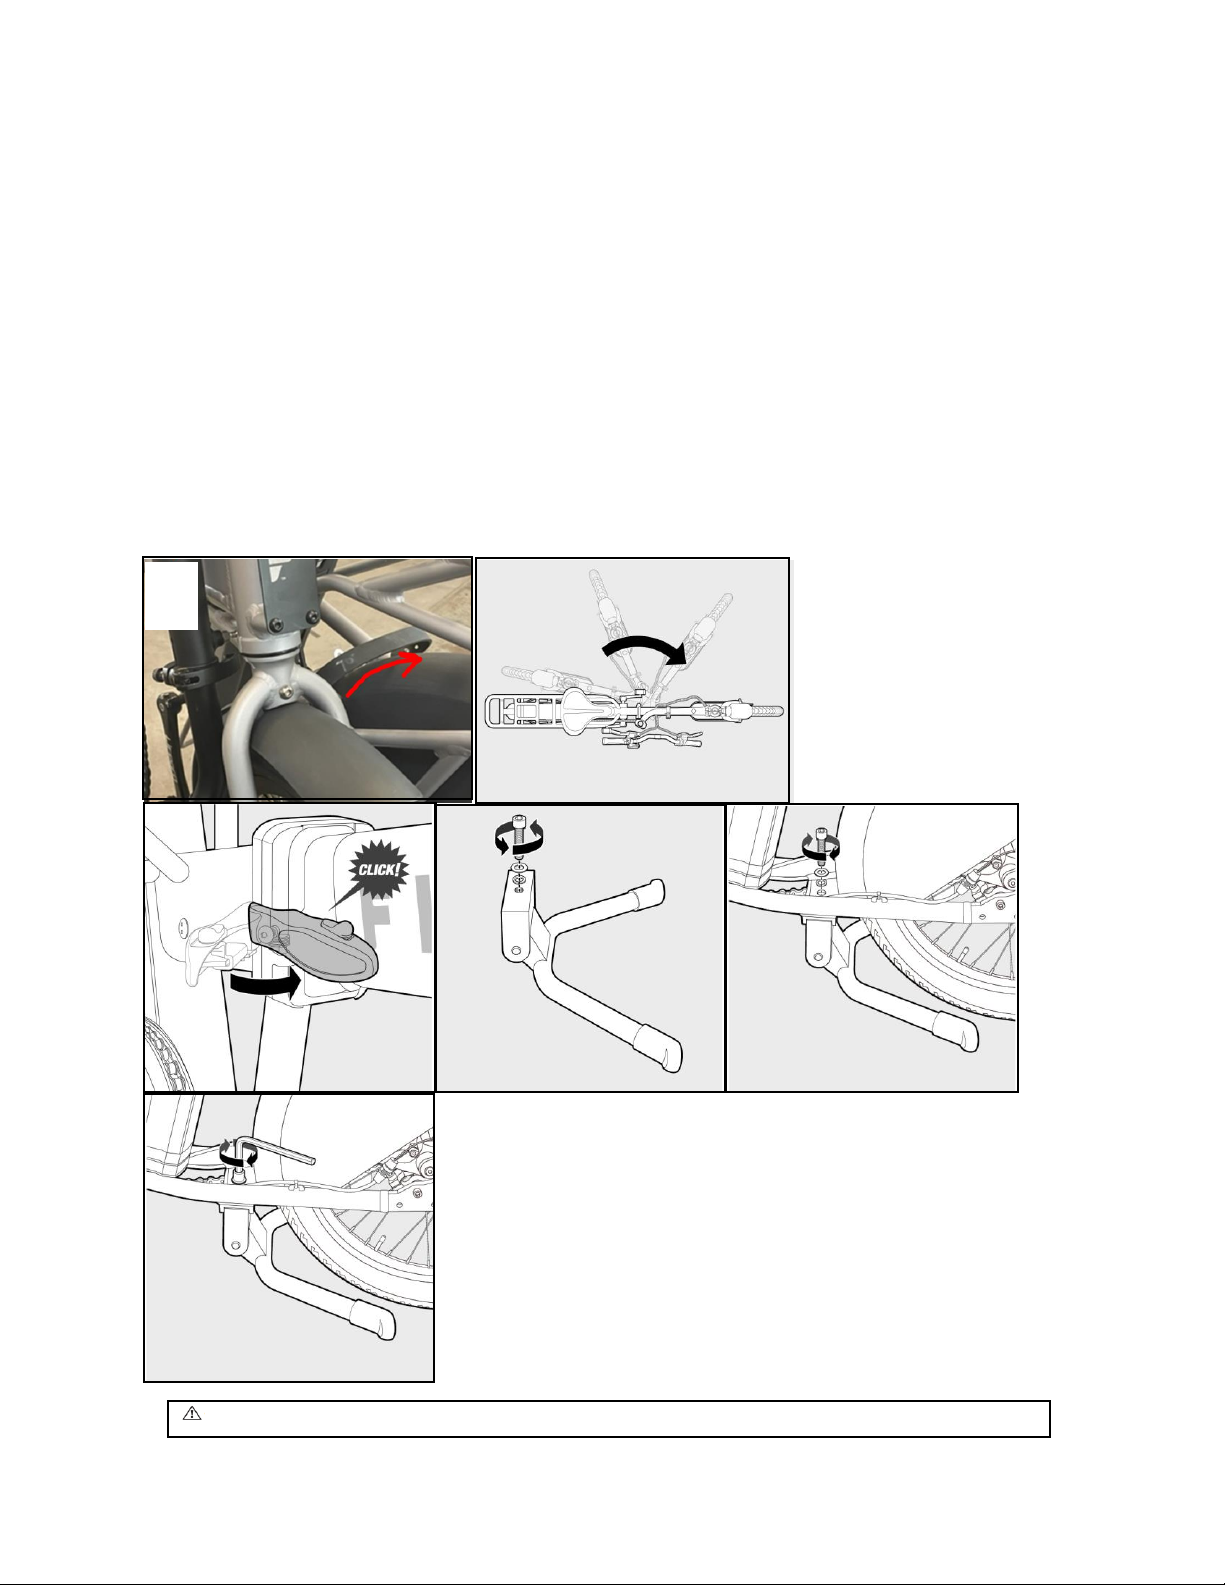
Step 1: Unpack your bike
Note: Due to the size and weight of the bike, it is recommended that two adults remove and lift the bike
from the carton.
Remove the bike from the outer carton and set it on a flat, clean surface. Lean the bike up against a rigid
wall and make sure it is stable. Remove all protective packaging material and carefully cut all zip-ties to
avoid damaging the paint. Verify that you have all of the components listed below. Contact Radio Flyer
Customer Service if any components are missing.
•Kickstand + Bolt & Washers
•Charger
•Right Pedal + Washer
•Keys
•Tool Kit

Step 2: Install kickstand
A. Release the rubber latch that holds the bike in the folded position. Re-attach this latch to the pin
located on the rear frame.
B. Unfold the bike frame until the front and rear frames are aligned.
C. Push the frame folding latch closed until you hear a click.
D. Make sure the bike is leaning against a stable surface. Unscrew the bolt and washers from the top
surface of the kickstand.
E. Align the kickstand in bracket underneath the bike frame. Make sure the legs are pointing towards the
rear wheel. Reattach the lock washer on the bolt. Then, reattach the washer on the bolt. Tighten the
bolt by hand until it is too difficult to turn.
F. Tighten the kickstand bolt to 30 N-m using a torque wrench with 8mm hex bit.
Warning: Failure to not secure the kickstand properly could cause it to fall off during riding.
A
B
F
E
D
C

Step 3: Position handlebar stem
Your Flyer™ eBike’s handlebar stem is designed to be adjusted for optimal comfort.
A. While holding the front wheel in place, rotate the stem to the rough location depicted below.
B. Align the arrow decals on the frame, stem, and fork to ensure that the Stem is assembled
straight. Check to make sure the cables are not twisted around the stem.
C. While keeping the arrows aligned, tighten the top stem bolt to 6 N-m using the 6mm allen key.
D. While keeping the arrows aligned, tighten the side stem bolts to 6 N-m using the 6mm allen key.
E. Rotate the stem up until it is straight.
F. Push the stem latch closed until you hear a click.
Warning: Failure to properly tighten the stem may result in a loss of steering and could cause
injury or death.
B
A
F
E
D
C

Step 4: Install Handlebars
A. Using the provided 4mm allen wrench, loosen the two stem clamp bolts.
B. Place the center of the handlebar in between the stem clamps. Tighten both bolts by hand making
sure the handlebar can still freely rotate. Check to see that the cables are not twisted around the stem.
C. Rotate the plastic wire harness to the position depicted below. Make sure both cable bundles are fed
through the hooks under the plastic housing.
D. Rotate the handlebar until the preferred position is achieved checking to ensure the handlebar is
centered left-to-right within the stem clamp.
E. Evenly tighten the bolts to 6 to 8 Nm using a torque wrench.
F. Ensure the gap between the stem and clamp is even.
Note: Complete assembly of the bike per the steps above. The stem and handlebar angle can be
adjusted as needed based on rider preference. Always re-tighten bolts to the specified torque values
prior to riding.
A
F
E
C
B
D

Step 5: Install headlight
A. Fully install the connector to the rear of the headlight housing. Make sure the headlight wire is
installed in the correct orientation by aligning the small rib on both connectors.
B. Adjust the angle of the headlight beam to illuminate the road ahead, while ensuring the light will not
blind or obscure the vision of oncoming traffic or pedestrians.
Note: It is not recommended to ride at night. If riding at night cannot be avoided, ensure the headlight is
always on and functioning correctly while you are riding.
A
B

Step 6: Install right pedal
A. Install washer onto the right pedal before installing.
B. Install the right pedal to the crank arm by turning the axle clockwise by hand.
C. Use the provided 15mm wrench to torque the pedal to 35 Nm.
Note: We recommend applying pedal grease to the threads prior to installation. If replacing the left
pedal, make sure to install the pedal while screwing counterclockwise.
A
C
B

Step 8: Check fastener torque values
Step 9: Inflate tires to 40-50 psi

Adjusting Seat Height
The seat height should be set based on your personal preference. The initial seat position can be set by
first placing the ball of your foot on the pedal with the crank arm in its lowest position. In this position,
your leg should be almost fully extended with a slight bend in your knee. The proper seat position is
important to avoid strain and potential injury during riding. Consult a trusted, reputable bike mechanic
or contact Flyer customer service for any questions related to the seat position and fit of your bike.
A. Open the quick release lever located under the saddle. Rotate the lever fully open to allow the seat
post to slide easily.
B. Move the seat up and down by sliding the seat post in or out of the seat tube. Set the saddle to the
desired height based on rider preference. Ensure that the seat post does not extend beyond the
“minimum seat post insertion” markings on the seat post.
C. Close the quick release lever fully against the seat post tube. This should take some force to ensure
the seat post will stay firmly in place while riding.
A
B
C

Adjusting Stem Height
The stem height should be set based on your personal preference. The proper stem position is
important to avoid back strain.
WARNING! The stem post must be inserted to the minimum insertion mark. Do not raise the
stem post beyond the minimum insertion marking on the seat post tube. If the stem post is not
inserted properly, the stem may be loose which can lead to serious injury or death.
A. Open the quick release lever located under the handlebar. Rotate the lever fully open to allow the
seat post to slide easily.
B. Move the handlebars up and down by sliding the stem post in or out of the stem tube. Set the
handlebars to the desired height based on rider preference. Ensure that the stem post does not extend
beyond the “minimum seat post insertion” markings on the seat post.
A
C
B

Proper Bike Usage**
Folding the Bike
Note: Ensure the bike is on flat ground and the kickstand is deployed before folding. Remove any
accessories attached to the bike that could inhibit the folding.
A. Slide the round switch on the frame folding latch.
B. While holding the round switch, swing the frame folding latch open.
C. Rotate the front frame 180 degrees, and make sure the front wheel rotates 180 degrees with
the front frame.
D. Slide the round switch on the stem folding latch.
E. While holding the round switch, swing the stem folding latch open.
F. Rotate the stem 180 degrees.
G. Unhook the rubber latch located under the rear rack. Secure the bike closed by wrapping the
rubber latch around the stem and hook it on to the metal peg.
G
F
A
E
D
B
C

Deploying and Retracting the Kickstand
Warning: Make sure the kickstand is deployed before loading and unloading kids or cargo from the bike.
Incorrect kickstand use could cause injury or death.
A. Push the kickstand feet to the ground with your foot.
B. While holding the kickstand against the ground, roll the bike backwards to engage the kickstand.
C. To disengage the kickstand, roll the bike forward. If there is not enough friction between the
ground and kickstand, place your foot in front of the kickstand leg before rocking the bike
forward.
A
C
B

Folding and Unfolding the Pedals
Warning: Always use the bike when the pedals are unfolded. Riding the bike with folded pedals could
cause injury or death.
A. To unfold the pedals, squeeze the plunger to disengage the lock.
B. While squeezing the plunger, rotate the pedal down until you hear a click.
C. To fold the pedals, squeeze the plunger to disengage the lock.
D. While squeezing the plunger, rotate the pedal up until the pedal is perpendicular to the ground.
A
D
C
B

Install Bluetooth tag (optional)
The bike includes a holder that can house one Bluetooth location tag as a security feature. The tag
must be purchased separately and activated prior to installation. For a list of compatible tags visit
flyer.radioflyer.com or contact customerservice@radioflyer.com
You can access the Bluetooth tag holder by removing the battery and locating the tag pocket on the
dock. Push down on the tag device until you hear a click. Some Bluetooth tags require an adhesive tape
to fit securely in the pocket.
Table of contents
Other Flyer Bicycle Accessories manuals