FUXON R-20 EB User manual

070-50193
070-50194
BEDIENUNGSANLEITUNG FÜR
RÜCKLICHT »R-20 EB«
GB Manual for »R-20 EB« rear light NL Gebruiksaanwijzing voor »R-20 EB «
achterlicht FMode d’emploi pour »R-20 EB « Feu arrière IT Istruzioni per
l’ uso »R-20 EB « fanale posteriore ES Instrucciones de funcionamiento de la
luz trasera del »R-20 EB «

DRÜCKLICHT »R-20 EB«
Technische Daten und Hinweise
uMit 3 LEDs
uGeprüft und zugelassen nach StVZO
uDie Rückstrahlerfläche des Rücklichts muss
senkrecht zur Fahrbahn und rechtwinklig
zur Fahrbahnlängsachse ausgerichtet sein.
uNennleistung: 0,6 W
uEingangspannung: 6V (6-12V) DC AC
ACHTUNG
Bei Ausfall einer Leuchtdiode muss die ge-
samte Leuchteinheit ausgetauscht werden!
Wichtig:
Die 6-12V DC Version ist mit dem Symbol
DC AC gekennzeichnet. Es wird darauf hin-
gewiesen, dass
eine Verwendung der 6-12V DC AC Version
nur an Fahrrädern mit elektrischer Tretun-
terstütztung (E-Bikes) erlaubt ist, wenn nach
entladungsbedingter Abschaltung des Unter-
stützungsantriebs noch eine ununterbroche-
ne Stromversorgung der Beleuchtungsanlage
über mindestens zwei Stunden gewährleistet
ist, oder wenn der Antriebsmotor als Licht-
maschine übergangsweise benutzt werden
kann, um auch weiterhin die Lichtanlage mit
Strom zu versorgen.
Die An-/Aus-Schaltung erfolgt über die Steu-
erungseinheit des Fahrrades mit Trethilfe.
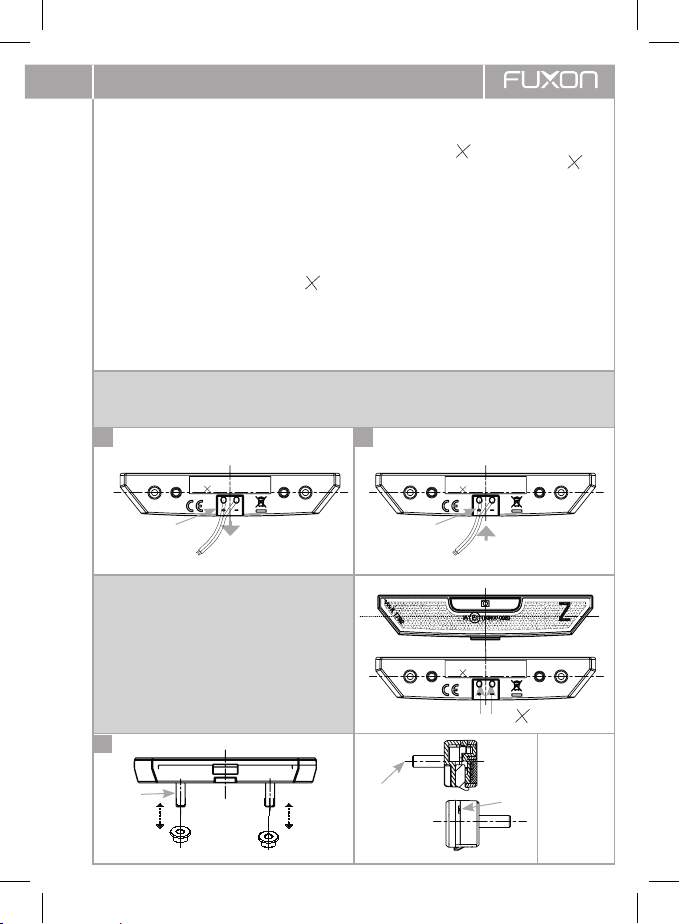
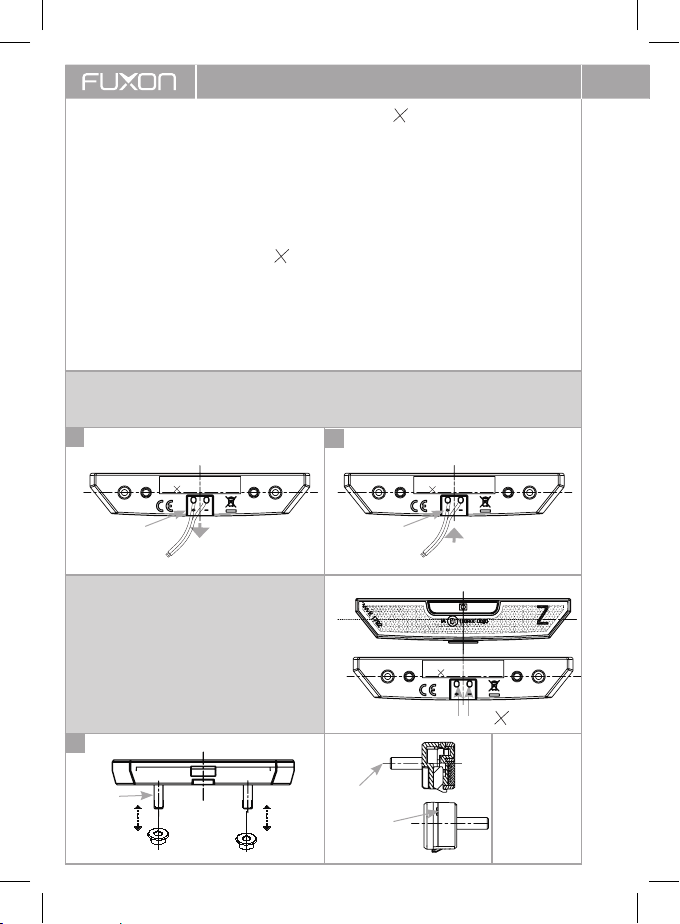
Anschluss des Rücklichts:
Ziehen Sie den Schlitten (+ und – ) aus dem Gehäuse (1), führen Sie die Kabel in die dafür
vorgesehenen Löcher ein und drücken die Kabelaufnahme wieder in das Gehäuse (2).
Befestigung des Rücklichts:
uAnbauhöhe: 250-1200 mm
uBefestigen Sie das Rücklicht mit den dafür
vorgesehenen Schrauben, Muttern und
Unterlegscheiben, am Fahrradgepäckträger.
uBei der Befestigung des Rücklichtes ist
darauf zu achten, dass die Schrauben nur
so fest angezogen werden, dass sich das
Licht nicht von selbst verstellen kann.
Achten Sie
vor jeder
Fahrt darauf,
dass das
Rücklicht
nicht ver-
deckt wird.
1
3
2
Fahrzeug-
längsachse
Schraube:
M5 x 15 2 rote LED
1 rote Haupt-LED
Input: DC AC
Powersupply
Power cable + Power cable +
Power cable - Power cable -
Schlitten Schlitten
R-20 EB
DC AC 6V (6V-12V) 0,6W R-20 EB
DC AC 6V (6V-12V) 0,6W
R-20 EB
DC AC 6V (6V-12V) 0,6W

REAR LIGHT »R-20 EB« GB
Technical facts and references
uWith 3 LEDs
uTested and approved in accordance with
the German Road Traffic Licensing Regula-
tions (StVZO)
uThe reflector surface of the taillight must
be oriented vertically to the road and at a
right angle to the longitudinal axis of the
road.
uNominal performance: 0,6 W
uInput voltage: 6V (6-12V) DC AC
PLEASE NOTE
If an LED fails, the entire light unit must
be replaced!
Important:
The 6-12 V DC version is marked with the
symbol DC AC. It should be noted that the
use of the 6-12 V DC AC version is only
permitted for bicycles with electric assisted
pedalling (e-bikes) if, following a discharge-
based shut-down of the support drive, an
uninterrupted power supply to the lighting
system is ensured for at least two hours, or
if the drive motor can be used temporarily
as a generator in order to continue to supply
power to the lighting system.
The light is switched on/off using the bike
control unit with pedal assistance.
Connecting the rear-light:
Pull the + and – slide-appliance out of the housing (1), insert the designated cables in the
particular port and then push the slide-appliance back into the housing again (2).
Atachment of the rear-light:
uMounting hight: 250-1200 mm
uAttach the rear light with the designated
screws,nuts and washers to the carrier of
the bicycle.
uWhen attaching the tail light, make sure
that the screws are tightened so tightly
that the light can not.
Before every
journey, en-
sure that the
headlight is
not covered.
1
3
2
1 red Main-LED
vehicle`s longitu-
dinal axis
Screw:
M5 x 15
2 LED red
Input: DC AC
Powersupply
Power cable + Power cable +
Power cable - Power cable -
Slide Slide
R-20 EB
DC AC 6V (6V-12V) 0,6W R-20 EB
DC AC 6V (6V-12V) 0,6W
R-20 EB
DC AC 6V (6V-12V) 0,6W

NL ACHTERLICHT »R-20 EB«
Technische gegevens en aanwijzingen
uMet 3 LEDs
uGekeurd en goedgekeurd volgens StVZO
uHet oppervlak van de achterlamp moet ver-
ticaal ten opzichte van de rijbaan en in een
rechte hoek ten opzichte van de lengteas
van de rijbaan zijn uitgelijnd.
uNominaal vermogen: 0,6 W
uInvoerspanning: 6V (6-12V) DC AC
OPGELET
Als er een lichtgevende diode uitvalt, moet de
volledige lampunit worden vervangen!
Belangrijk:
De 6 - 12 V DC-versie heeft het symbool DC
AC. Er wordt op gewezen dat een gebruik van
de 6 - 12 V DC AC-versie alleen op fietsen
met een elektrische trapondersteuning
(E-Bikes) is toegestaan, wanneer de uitscha-
keling van de ondersteuningaandrijving op
basis van de ontlading nog een ononderbro-
ken stroomvoorziening van de verlichting-
sinstallatie gedurende ten minste twee uur
waarborgt, of wanneer de aandrijfmotor
als dynamo voor de overgang kan worden
gebruikt om ook verder de lichtinstallatie van
stroom te voorzien.
De aan-/uitschakeling vindt plaats via de
regeleenheid van de fiets met traponders-
teuning.
De verlichting monteren:
Trek de slede (+ en - ) uit de behuizing (1), steek de kabels in de daarvoor bestemde gaten en
duw de kabelhouder terug in de behuizing (2).
Bevestiging van het achterlicht:
uMontagehoogte: 250-1200 mm
uBevestig het achterlicht aan de fietsen-
drager met de meegeleverde schroeven,
moeren en ringen.
uLet er bij het bevestigen van het achter-
licht op dat de schroeven alleen worden
aangedraaid, zodat het licht zich niet kan
aanpassen.
Let er voor
iedere rit
op dat de
schijnwerper
niet wordt
bedekt.
1
3
2
Langsas van
het voertuig
Schroef:
M5 x 15 2 rode LED
1 rode hoofd-LED
Input: DC AC
Powersupply
Power cable + Power cable +
Power cable - Power cable -
Slede Slede
R-20 EB
DC AC 6V (6V-12V) 0,6W R-20 EB
DC AC 6V (6V-12V) 0,6W
R-20 EB
DC AC 6V (6V-12V) 0,6W

FEU ARRIÈRE »R-20 EB« F
Données techniques et recommandations
uAvec 3 LEDs
uTesté et homologué selon les exigences de
circulation routière allemande (StVZO)
uLa surface du catadioptre de la lumière
arrière doit être perpendiculaire à la route
et à l‘axe longitudinal de la chaussée.
uPuissance: 0,6 W
uTension d‘alimentation: 6V (6-12V) DC AC
ATTENTION
Si une diode électroluminesce te tombe en
panne, toute l‘unité d‘éclairage doit être
remplacée !
Important:
La version 6-12 V DC est marquée par le
symbole DC AC. Veuillez noter que l‘utilisati-
on de la version 6-12 V DC AC est seulement
autorisée sur les vélos à assistance électri-
que au pédalage (vélos électriques) si, après
la décharge et l‘arrêt du moteur d‘assis-
tance, l‘alimentation électrique du système
d‘éclairage est maintenue pendant au moins
deux heures ou si le moteur d‘entraînement
peut être utilisé provisoirement comme
alternateur pour continuer à alimenter le
système d‘éclairage.
La fonction arrêt/marche est assurée par
l‘unité de commande du vélo à pédalage
assisté.
Installation des lumières :
Tirez le chariot (+ et - ) hors du boîtier (1), insérez les câbles dans les trous prévus à cet effet
et repoussez le porte-câble dans le boîtier (2).
Fixation du feu arrière :
uHauteur de montage : 250-1200 mm
uFixez le feu arrière sur le porte-vélos à
l‘aide des vis, écrous et rondelles fournis.
uLorsque vous fixez le feu arrière, veillez à
ce que les vis ne soient serrées que de ma-
nière à ce que le feu ne puisse pas s‘ajuster
de lui-même.
Assurez-vous
avant chaque
utilisation
que le phare
ne soit pas
recouvert.
1
3
2
1 LED principale rouge
Axe longitudinal
du véhicule
Vis:
M5 x 15
2 LED rouges
Input: DC AC
Powersupply
Power cable + Power cable +
Power cable - Power cable -
Traîneaux Traîneaux
R-20 EB
DC AC 6V (6V-12V) 0,6W R-20 EB
DC AC 6V (6V-12V) 0,6W
R-20 EB
DC AC 6V (6V-12V) 0,6W

IT FANALE POSTERIORE »R-20 EB«
Dati tecnici e avvisi
uCon 3 LEDs
uVerificato e autorizzato secondo il rego-
lamento sull‘ammissione alla circolazione
stradale (StVZO)
uLa superficie del catarifrangente del fanale
posteriore deve essere orientata in verti-
cale rispetto alla corsia e in perpendicolare
rispetto all‘asse longitudinale della corsia.
uPotenza nominale: 0,6 W
uTensione d‘ingresso: 6V (6-12V) DC AC
ATTENZIONE
In caso di guasto di un diodo luminoso deve
essere sostituita l‘intera unità luminosa!
Importante:
La versione da 6-12 V CD è contrassegnata
con il simbolo CD CA. È importante notare
che l‘utilizzo della versione 6-12 V CD CA è
consentito esclusivamente su biciclette con
supporto elettrico alla pedalata (e-bike) se,
dopo lo spegnimento dovuto allo scaricamen-
to dell‘azionamento di supporto è garantita,
ancora per almeno due ore, un‘alimentazione
di corrente ininterrotta dell‘impianto di illu-
minazione, oppure se il motore di propulsione
può essere usato transitoriamente come
dinamo.
L‘accensione/lo spegnimento avviene tramite
unità di comando della bicicletta con ausilio
alla pedalata.
Collegamento della luce posteriore:
Estrarre il carrello (+ e - ) dalla custodia (1), inserire i cavi negli appositi fori e spingere
nuovamente il portacavi nella custodia (2).
Fissaggio della luce posteriore:
uAltezza di montaggio: 250-1200 mm
uFissare la luce posteriore al portabiciclette
con le viti, i dadi e le rondelle in dotazione.
uQuando si fissa la luce posteriore, assicu-
rarsi che le viti siano serrate solo in modo
che la luce non possa regolarsi da sola.
Prima di
ogni giro
in bici, fare
attenzione
affinché il
faro non
venga
coperto.
1
3
2
Asse longitudi-
nale del veicolo
Vite:
M5 x 15 2 LED rossi
1 LED principale rosso
Input: DC AC
Powersupply
Power cable + Power cable +
Power cable - Power cable -
Il carello Il carello
R-20 EB
DC AC 6V (6V-12V) 0,6W R-20 EB
DC AC 6V (6V-12V) 0,6W
R-20 EB
DC AC 6V (6V-12V) 0,6W

LUZ TRASERA »R-20 EB« ES
Datos técnicos e indicaciones
uCon 3 LEDs
uComprobado y autorizado según el código
de circulación alemán (StVZO)
uLa superficie del foco de la luz trasera
debe estar vertical con respecto al carril y
perpendicular al eje longitudinal del carril.
uPotencia: 0,6 W
uTensión de entrada: 6V (6-12V) DC AC
¡ATENCIÓN
En caso de fallo de un diodo luminoso, hay
que cambiar toda la unidad de luz!
Importante:
La versión de 6-12 V está indicada con el
símbolo CC AC. Advertimos que la utilización
de la versión de 6-12 V CC solo se permite
en bicicletas con ayuda por motor eléctrico
(bicicletas eléctricas) si una vez desconecta-
do el accionamiento del soporte para poder
descargar, aún puede garantizarse que vaya
a haber una alimentación de corriente inin-
terrumpida para la instalación de iluminación
durante al menos dos horas o si el motor
de accionamiento tiene que utilizarse como
máquina de luz de forma transitoria para
poder seguir suministrando corriente a la
instalación de luz.
La conexión/desconexión se realiza mediante
la unidad de control de la bicicleta con ayuda
por motor.
Colocación de la iluminación:
Saque el carro (+ y - ) de la carcasa (1), introduzca los cables en los orificios previstos y
vuelva a introducir el soporte de cables en la carcasa (2).
Fijación de la luz trasera:
uAltura de montaje: 250-1200 mm
uFijar la luz trasera al portabicicletas con los
tornillos, tuercas y arandelas suministra-
das.
uAl fijar la luz trasera, asegúrese de que los
tornillos sólo estén apretados para que la
luz no pueda ajustarse por sí misma.
Antes de
montar com-
pruebe que el
faro no esté
tapado.
1
3
2
1 LED principal rojo
Eje longitudinal
del vehículo
Tornillo:
M5 x 15
2 LED rojos
Input: DC AC
Powersupply
Power cable + Power cable +
Power cable - Power cable -
Trineos Trineos
R-20 EB
DC AC 6V (6V-12V) 0,6W R-20 EB
DC AC 6V (6V-12V) 0,6W
R-20 EB
DC AC 6V (6V-12V) 0,6W

Comus International
Zweiradteile und Sportartikel Handelsgesellschaft mbH
Ettore-Bugatti-Straße 6– 14 |D-51149 Köln
This manual suits for next models
2
Table of contents
Languages:
Other FUXON Bicycle Accessories manuals

FUXON
FUXON FS-30 SL-ND User manual

FUXON
FUXON R-232 ND User manual

FUXON
FUXON 051-20445 User manual

FUXON
FUXON Triple User manual

FUXON
FUXON Quattro Plus User manual

FUXON
FUXON FS-50 SL User manual

FUXON
FUXON 051-20140 User manual

FUXON
FUXON R-20 User manual

FUXON
FUXON RL-MINI EB CLIP User manual

FUXON
FUXON FS-70 DRL User manual

FUXON
FUXON 051-20473 User manual

FUXON
FUXON FS-50 ND User manual

FUXON
FUXON Starlight II User manual

FUXON
FUXON RL-MINI EB User manual

FUXON
FUXON Calvi II User manual

FUXON
FUXON RL-MINI CLIP User manual

FUXON
FUXON Bobby User manual

FUXON
FUXON Quattro Plus User manual

FUXON
FUXON 070-50200 User manual

FUXON
FUXON Starlight II User manual