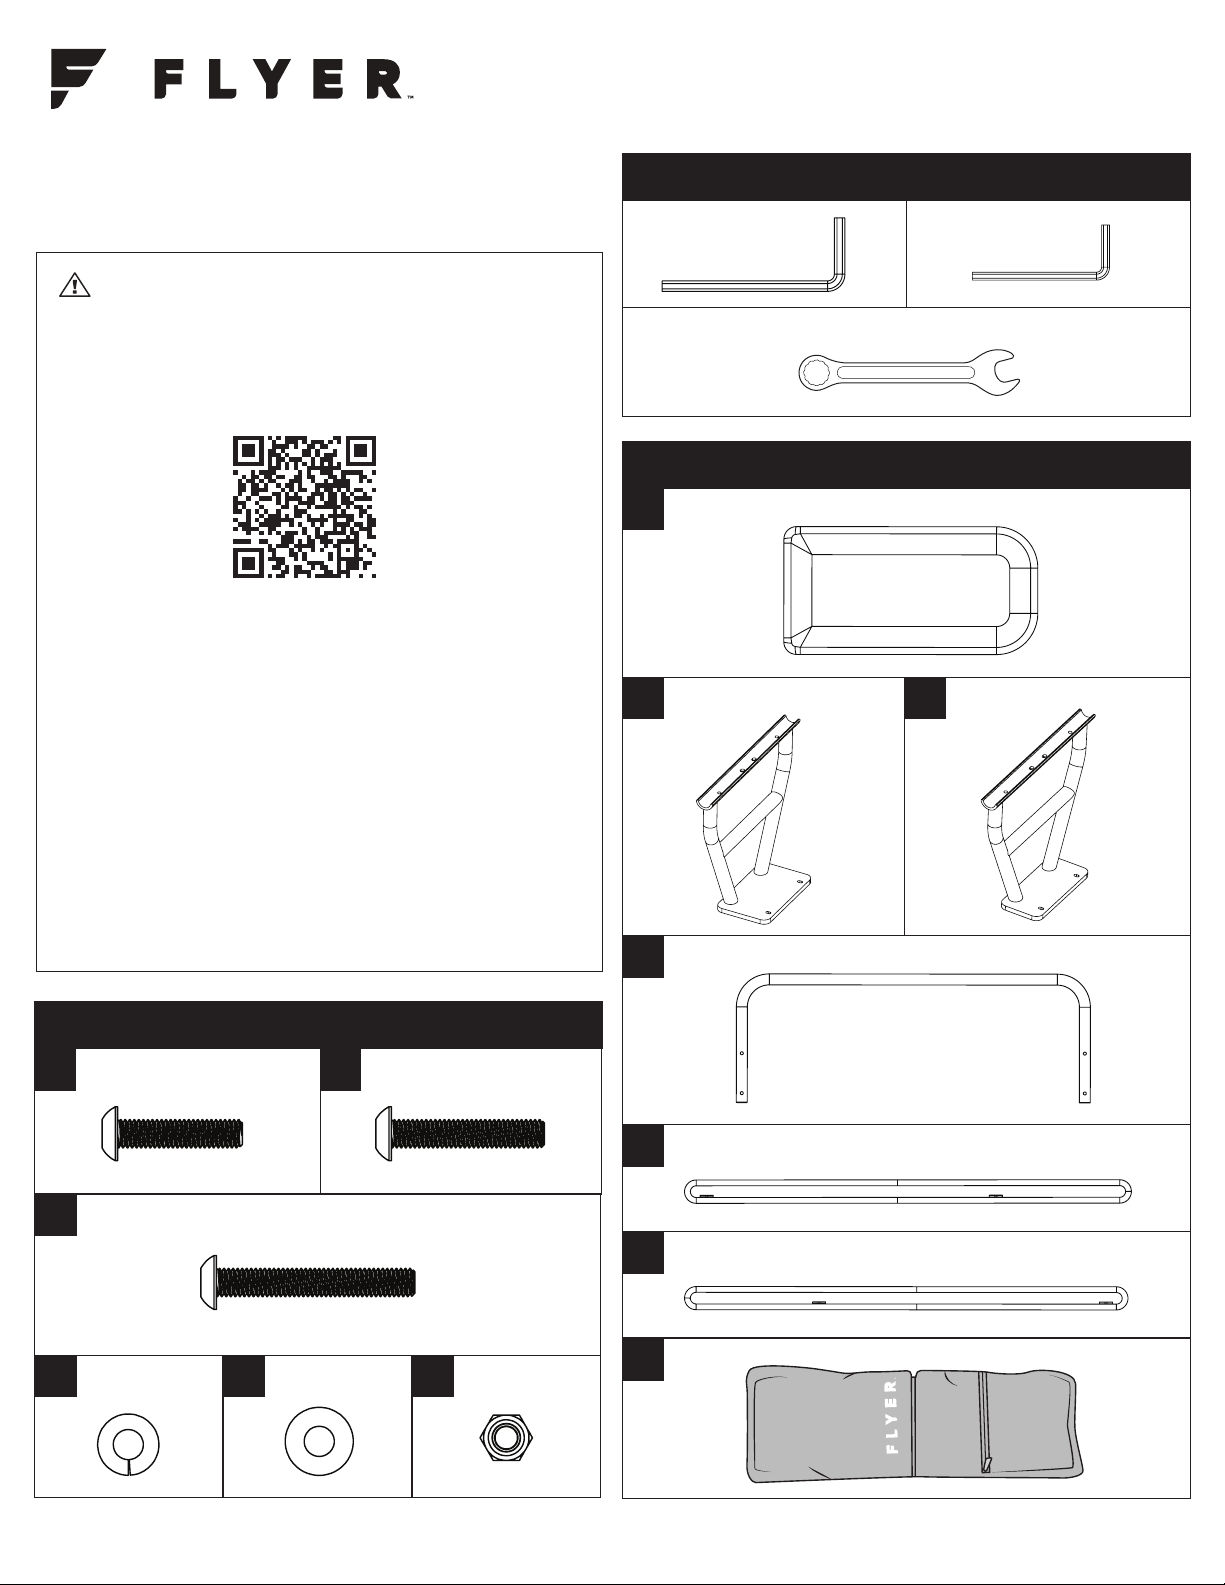
manuals.online logo
Brands
  1. Home
  2. •
  3. Brands
  4. •
  5. Flyer
  6. •
  7. Bicycle Accessories
  8. •
  9. Flyer AC804 User manual

Flyer AC804 User manual

1
HARDWARE
PARTS
TOOLS
Kid & Cargo Carrier Instruction Sheet
Model #AC804
Compatibility: FlyerTM L885
WARNING!
• Read all safety warnings and instructions before using the
product. Failure to follow warnings and instructions may result
in serious injury or death.
• You must also reference the owner’s manual that was shipped
with your Flyer™ eBike before using this accessory:
• Incorrect assembly, maintenance, or use of your Flyer™
accessory can cause component failure, loss of control,
serious injury, or death. Please note, the assembly of Flyer™
accessories require special tools and mechanical skills. It is
highly recommended that the assembly and adjustment are
completed by a reputable bicycle mechanic when possible.
• Only for use with the Flyer™ eBike.
• Adding load to accessories may lessen the stability or alter the
riding characteristics of the bicycle.
• Maximum Load Capacity: 130lbs
• Rider and children should always wear helmets that have been
approved to nationally recognized standards.
• Only carry children ages 5–10 years
• Step o of the bike and put the bike on its kickstand before
assembling, adjusting or interacting with accessories.
M4 Allen Key M3 Allen Key
Hex Wrench
4X – M5 22mm Pan Head Screw
2X – Padded Seat Assembly
2X – Hoop
1X – Fabric
1X – Steel Ring, Left
1X – Steel Ring, Right
1X – A Frame, Rear 1X – A Frame, Front
4X - M5 27mm Pan Head Screw
8X - M5 35mm Pan Head Screw
A
A
D
G
E
F
B
B C
C
8X - M5 Lock
Washers 24X – M5 Washer 8X – M5 Lock Nut
D E F
2
Constructing Kid & Cargo Carrier Frame
Installing Kid & Cargo Carrier Frame
Align the left and right hoops with the bottom support frames. Place a washer on each 35mm screw.
Feed the bolts through the holes that run through the top hoops and bottom frame.
Place an additional washer on each bolt where it extends from the bottom frame. Tighten with a locknut to 3Nm.
A. Remove both wooden seats that cover the threaded inserts.
B. Slide a lock washer onto each 22mm screw. Next, slide a washer onto each screw. Lay the Kid & Cargo Carrier on
the bike’s rear rack and align the holes. Ensure the A Frame with the larger plate is at the back of the bike. Tighten
the 4 screws by hand, then fully tighten using the Allen key to 3Nm.
AB
3
Installing Steel Rings
A. Starting with the right running board, unscrew the two interior flat head screws.
B. Align the tabs of the steel ring to the running board. The loop of the ring should face up, extending o the back
of the running board. Slide a lock washer onto each 27mm screw. Next, slide a washer onto each screw. Tighten
the 27mm screws by hand, running through the tabs and into the running boards. Once both screws are aligned
and tightened by hand, fully tighten them using the Allen Key to 3Nm.
C. Repeat steps A and B for the left running board.
AB
INCORRECT
CORRECT
4
Installing Fabric Liner in Cargo Mode
Installing Padded Seats
A. Place the fabric liner into the basket with the “Flyer” logo facing backwards.
B. Snap down the front and rear flaps.
C. Drape the side flaps over the side bar and click the 3 buckles on each side in place.
D. Zip up the 4 corners.
A. Align the metal bracket so the plastic seat and the bracket fit through the hole in the frame.
Place both seats into position by loading the plastic extrusion through the square holes in the bike’s frame.
B. Loosen the twist knob on the underside of the padded seat to remove the metal bracket and knob.
C. Reorient the metal bracket so the grooves line up with the smaller tubes on the bike frame.
D. Retighten the twist knob until the padded seat is secured firmly to the frame.
E. Repeat steps B through D for the second seat.
SNAP!
ZIP!
CLICK!
A
BC
D
BA
C
D
Ensure lips face outward
5
Your Thule seat can be used in the front or rear of the Kid & Cargo Carrier. You can use one or two Thule seats with the Carrier.
Full installation instructions for the Thule Yepp Maxi seat can be found at the following link:
A. If positioning your child seat in the front of the Carrier, thread the safety strap through the hole in the fabric and around
the seat post. Thread the strap through the rachet and tighten.
B. If positioning your child seat in the rear of the Carrier, while using another child seat in the front, loop the strap around
the metal bar of the Thule seat in front of it. Thread the strap through the rachet and tighten.
C. If positioning your child seat in the rear of the Carrier with a seat pad in front of it, thread the safety strap under the
fabric liner and loop it around the smaller bar shown below. Thread the strap through the rachet and tighten.
(Tip: It is easier to install if the front padded seat is fully removed beforehand.)
Converting to Kid Mode
Securing the Yepp Maxi Seat Safety Strap (Optional Add-on, Not Included)
A. Unzip all four corners, and unclip all six buckles.
B. On the left side, feed all three buckles through the steel ring. They should be inserted from the outside to the inside.
C. Reclip all buckles back into place.
D. Repeat steps a through c for the right side.
CLICK!
A B
C
B
A
C
WARNING! Ensure fabric flaps are clipped
into place prior to riding.

Other Flyer Bicycle Accessories manuals

Flyer Folding Cargo User manual

Flyer

Flyer Folding Cargo User manual

Flyer AC801 User manual

Flyer

Flyer AC801 User manual

Flyer AC810 User manual

Flyer

Flyer AC810 User manual

Flyer AC802 User manual

Flyer

Flyer AC802 User manual

Flyer Intelligent Technology Panasonic User manual

Flyer

Flyer Intelligent Technology Panasonic User manual

Popular Bicycle Accessories manuals by other brands

DT SWISS Forks ER instruction manual

DT SWISS

DT SWISS Forks ER instruction manual

Giant AXACT 9 quick start guide

Giant

Giant AXACT 9 quick start guide

Kuat PISTON user guide

Kuat

Kuat PISTON user guide

Veloset VS 213 Installation and operation manual

Veloset

Veloset VS 213 Installation and operation manual

Cateye MSC 2DX Quick start manual

Cateye

Cateye MSC 2DX Quick start manual

VDO Cyclecomputing Z2 instruction manual

VDO Cyclecomputing

VDO Cyclecomputing Z2 instruction manual

MSW Ride & Repair Kit With Pump instructions

MSW

MSW Ride & Repair Kit With Pump instructions

Modolo Morphos Millennium Series Mounting instructions

Modolo

Modolo Morphos Millennium Series Mounting instructions

OKBABY 10+ manual

OKBABY

OKBABY 10+ manual

BikeLogger C operating instructions

BikeLogger

BikeLogger C operating instructions

Cateye TL-LD170-R manual

Cateye

Cateye TL-LD170-R manual

BOS Suspension RARE FCV Series user manual

BOS Suspension

BOS Suspension RARE FCV Series user manual

Extend M9 Setup manual

Extend

Extend M9 Setup manual

CAMPAGNOLO BR-B0500X1 manual

CAMPAGNOLO

CAMPAGNOLO BR-B0500X1 manual

Bosch Purion BUI210 Original operating instructions

Bosch

Bosch Purion BUI210 Original operating instructions

Bike Tow Leash 1-Running-Dog BTL manual

Bike Tow Leash

Bike Tow Leash 1-Running-Dog BTL manual

Wuhan Guide iGS130 user manual

Wuhan Guide

Wuhan Guide iGS130 user manual

Rose electronics RACE ATTACK SP-FLEX General information

Rose electronics

Rose electronics RACE ATTACK SP-FLEX General information

manuals.online logo
manuals.online logoBrands
  • About & Mission
  • Contact us
  • Privacy Policy
  • Terms and Conditions

Copyright 2025 Manuals.Online. All Rights Reserved.