FM ST-G 300 User manual

Instruction Manual
Charcoal oven
Models:
ST-G 300/300S/400/400S/500/500S
ATTENTION: Please, read these instructions before using this unit.


Ed.:21 - Ver.:01 - 01/01/2021 3
Mod. B4600Humid
CONTENTS
1. SAFETY WARNINGS 4
2. WARRANTY 5
3. SAFETY INSTRUCTIONS, TRANSPORT AND MAINTENANCE 6
4. DESIGN AND COMPONENTS 8
5. INSTALLATION 9
6. INSTRUCTIONS FOR USE 11
7. CLEANING PROCEDURES 15
8. ACCESSORY ASSEMBLY 16

Ed.:21 - Ver.:01 - 01/01/2021 4
Mod. B4600Humid
1. Safety warnings___________________________________
Improper use or maintenance of this appliance, as well as non-compliance with the safety regulations specified in
this manual, will immediately void the warranty and also exempt the manufacturer from any liability.
Keep this manual for the life of the device and read it carefully before using the device.
The device is intended for professional use ONLY.
Components that have been protected by the customer and manufacturer must not be tampered with by the
installer or the end user of the device.
Installation not in accordance with the manufacturer's instructions may result in damage, injury or fatal accidents.
If the unit is to be installed on brackets, use only those supplied by FM and mount the unit according to the
instructions on the packaging.
Non-original spare parts do not guarantee the optimal functioning of the device and will result in the loss of the
warranty.
The device must be operated by appropriately trained personnel.
The nameplate of the appliance provides essential technical information when requesting maintenance or repair
work on the appliance. For this reason, it must not be removed, damaged or modified.
The device must be used only for the purpose for which it was designed.
The interior and exterior surfaces of the oven should be cleaned frequently to ensure hygiene and proper
operation of the oven. These surfaces should not be cleaned with abrasive or flammable products that could
damage the device.
A cleaning procedure other than that recommended by the manufacturer, as well as the use of products not
authorized by the manufacturer, can cause damage to both the appliance and the user.
Risk of burns
Read these warnings carefully and follow its indications when the oven is working or not completely cooled
down.
Touch only the control elements of the appliance and the door opening handle. Avoid touching any other
external parts of the appliance, as these can reach high temperatures.
When moving or handling any component of the device, always use thermal mittens or similar.
To open the appliance door, open it slowly and be careful of the high temperature vapors coming out of the
cooking chamber.
Risk of fire
If you do not clean the appliance properly and as often as necessary, you run the risk of causing the grease and
food residues that accumulate in the cooking chamber to combust.
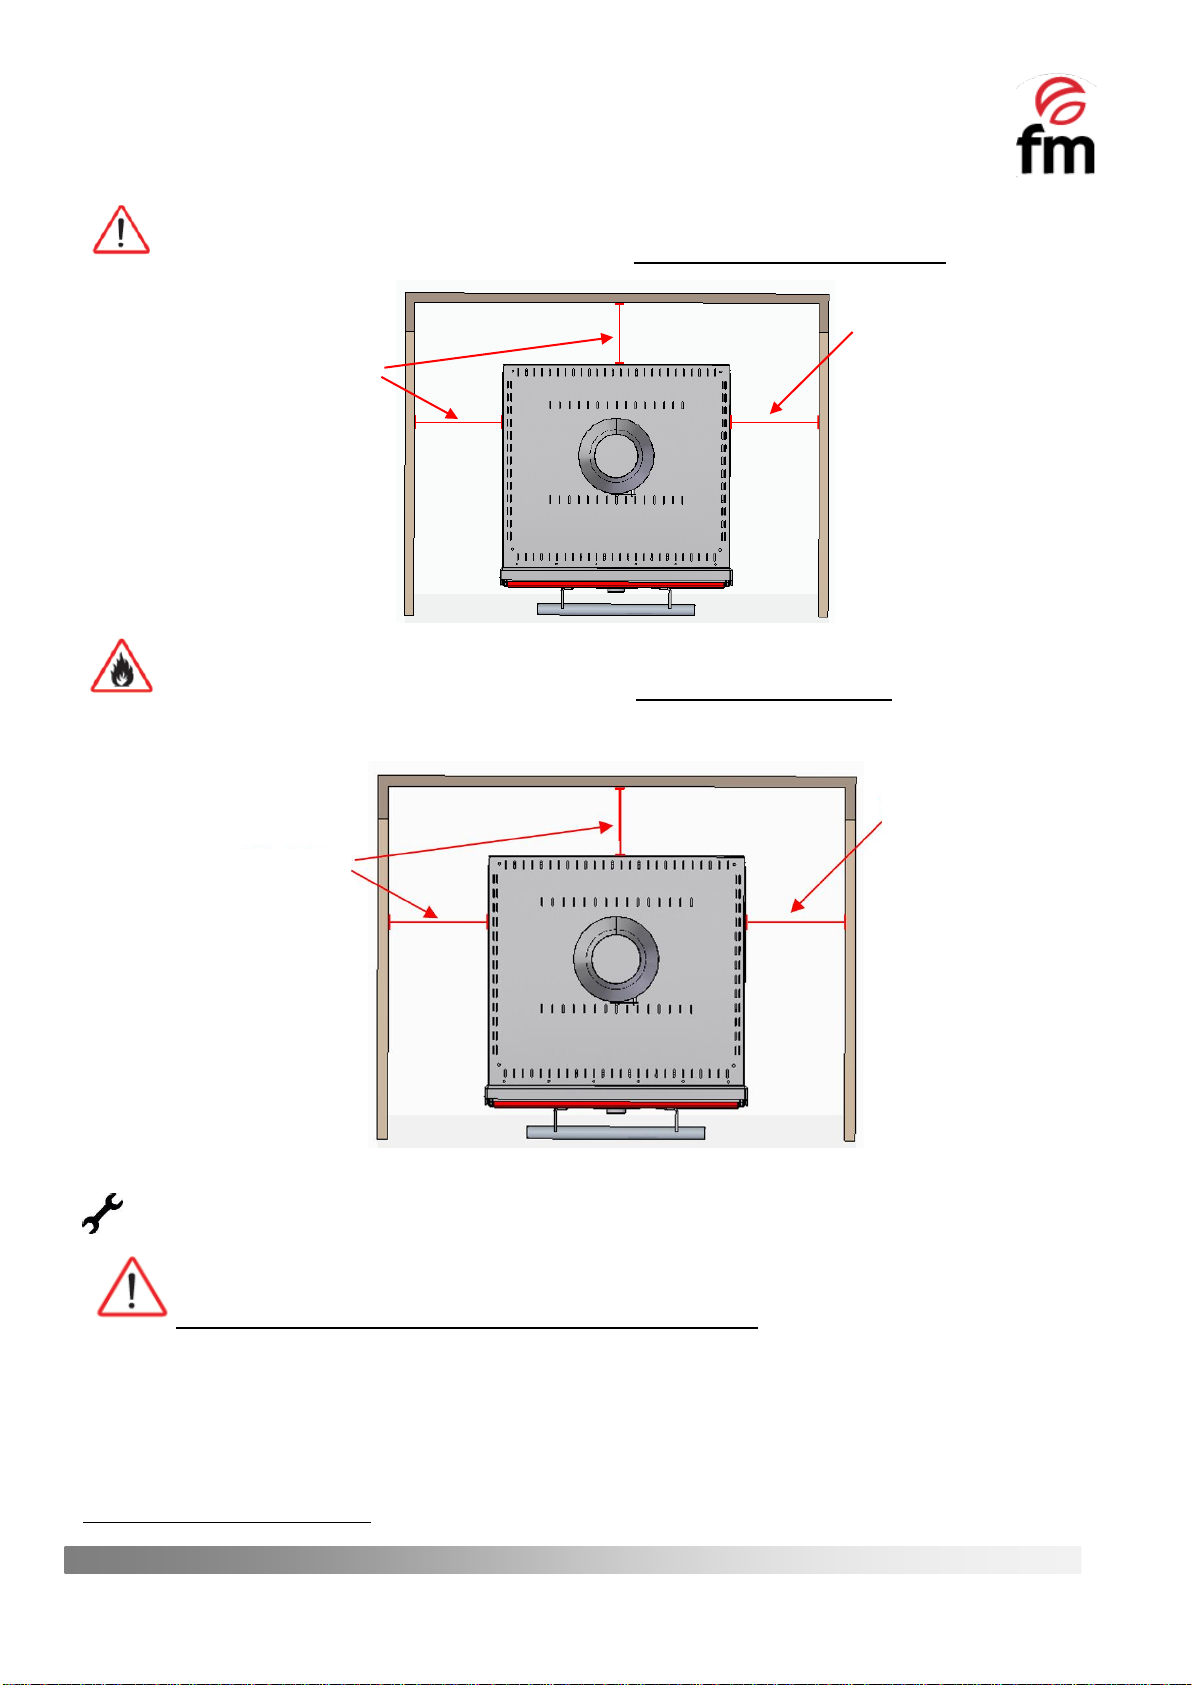
The recommended safety distances from this furnace must be strictly adhered to. Otherwise fires may occur due
to excessive proximity to highly flammable materials.
The recommended safety distances should be kept clear of any material intended to be used as thermal
insulation.
Whenever the furnace contains an active charge of charcoal, the door must remain closed.
Never pour ashes into containers made of flammable or thermo deformable material.
Failure to comply with these safety regulations exempts FM from any liability and also
renders the warranty completely invalid.

Ed.:21 - Ver.:01 - 01/01/2021 5
Mod. B4600Humid
2. Warranty
The warranty period is 12 months from the date of purchase of the unit.
The warranty does not cover damages to the glass, lamps, door seals, damage to the insulating material or
damage caused by improper installation or maintenance, lack of maintenance, improper repair or misuse.
To process the repair of a unit under warranty or for any other query, please contact your distributor and refer to
the following description table:
Distributor: Destionation country:
Modelo del aparato:
Serial number:
Nombre:
Date of the request:
Fault description:
Address:
Contact telephone number:
Working hours:
Improper adjustment, installation, service or maintenance of the unit may lead to damages to the goods or
persons. For this reason, please, read this manual thoroughly before starting the unit.

Ed.:21 - Ver.:01 - 01/01/2021 6
Mod. B4600Humid
3. Safety instructions, transport and maintenance
3.1 Unpacking
Visible damages: When receiving the material, enter a detailed description of the break in the PDA or in the delivery
note.
General comments such as “damaged packaging” or “damage can be seen”, etc. will not be accepted. Clear
photographs showing the damaged good and packaging must be provided.
Hidden damages: When receiving the material and within 24 hours after reception, once the hidden damage has
been checked, photographs showing the damaged good and its corresponding packaging must be provided. The
transport agency label must be clearly visible. Photographs showing the content only and exclusively will not be
accepted.
In either case, transport incidences should be reported to FM Industrial to manage the replacement of the
machine.
If visible damages are detected when receiving the packaged machine, indicate “hits to the oven” at the time of
the delivery, take photos of the damages and transport agency label on the packaging. Please, contact FM Industrial
immediately.
If package is apparently in good conditions, and damages are detected when unpacking, place the original
packaging again on the machine, take pictures of the packaging and transport agency label on the packaging. Next, unpack
again and take photos of damages to the machine. Please, contact FM Industrial immediately.
3.2 Transport
Before transporting the unit to its installation site, make sure that:
- Fits through the access door to the area where the installation is to be carried out.
- The floor withstands its weight.
Transport should only and exclusively be carried out by mechanical means, such as a pallet Jack, and always on a pallet.
3.3 Preliminary operations
Remove the protection film from the unit. Clean the adhesive residues with an appropriate solvent. Never use
abrasive or acid products or tools that may damage the surface.
3.4 Placing of the unit
Place the device in the chosen work place, always respecting the safety distances indicated later in this section.
The room must be conditioned and comply with the safety and installation regulations in force in the country where
the equipment is to be used.
The device must be protected against the influence of external atmospheric agents
The humidity of the room should never exceed 70%.

Ed.:21 - Ver.:01 - 01/01/2021 7
Mod. B4600Humid
Example of equipment placement in relation to NON-FLAMMABLE PRODUCTS.
1
Example of equipment placement in relation to FLAMMABLE PRODUCTS.1
For maintenance operations, it is recommended to maintain a working clearance of about 500 mm.
THIS OVEN IS NOT SUITABLE FOR BUILT-IN INSTALLATION.
1
The image shown in this scheme is of a generic type. The external appearance of the device may not correspond to the one purchased.
Min. 120mm
Min. 120mm
Min. 300mm
Min. 300mm

Ed.:21 - Ver.:01 - 01/01/2021 8
Mod. B4600Humid
4. Design and components____________________________________
SPARK
ARRESTER CAP
(Optional accessory)
FIREWALL
(Optional accessory)
DRAUGHT-
DIVERTER
(with regulator)
Ashtray drawer
Up-draught air
inlet
Grease tray
Temperature
indicator
Flame
arrester
deflector

Ed.:21 - Ver.:01 - 01/01/2021 9
Mod. B4600Humid
5. Installation _________________
Warnings
The oven shall be placed on a surface made of non-flammable material (stainless steel, stone, marbel, etc…).
Before using the oven, do not forget to remove all plastic coatings that protect the oven’s outer casings.
Before the first braising, it is recommended to carry out an initial ignition of the oven under vacuum (without
introducing any food inside the oven).
5.1 Assembly of components
1. DRAUGHT-DIVERTER: Insert this component into the flue located on the top cover of the oven. The adjustment
of this component with respect to the diameter of the flue hole means that no additional fastening system is
required for its installation.
2. FIREWALL (optional accessory): insert this component into the outlet section of the draught-diverter. The
adjustment of this component with respect to the diameter of the draught-diverter outlet hole means that no
additional fastening system is required for installation.

Ed.:21 - Ver.:01 - 01/01/2021 10
Mod. B4600Humid
3. SPARK ARRESTER CAP (optional accessory): insert this component into the outlet section of the firewall. The
adjustment of this component with respect to the diameter of the firewall outlet opening means that no
additional fastening system is required for installation.
5.2 Smoke outlet
The gases resulting from the combustion of the charcoal must be exhausted to the outside by means of a natural
draught chimney or by placing the oven under an extraction hood.
OVEN WITH INDEPENDENT EXIT TO THE OUTSIDE (CHIMNEY WITH NATURAL DRAUGHT)
- The duct shall be as straight as possible and shall have an outlet to the outside of the room, having as its
connection point or origin the smoke outlet of the oven.
- The pipe should have a diameter of 120 mm, preferably made of stainless steel and with thermal insulation as
the combustion gases can reach high temperatures.
- The installation of a chimney cap at the end of the chimney is recommended in order to prevent rainwater from
entering the appliance and to prevent possible back draughts caused by strong winds.
OVEN INSTALLED UNDER EXTRACTION HOOD
- The hood shall be provided with a ducted outlet to the outside.
- The hood shall be in proper working order and the suction rate of the hood shall not be reduced by lack of
maintenance of its components. If the hood uses filters to purify the aspirated air, these must be in perfect state
of cleanliness in order for the performance of the hood to be optimal.
NEVER connect the oven flue to ducts shared with other appliances.

Ed.:21 - Ver.:01 - 01/01/2021 11
Mod. B4600Humid
6. Instructions for use __________________
Read these instructions carefully before operating the appliance.
If the oven is installed under an extractor hood, activate the hood before loading the charcoal.
6.1 Coal loading
The quantities of coal to be loaded into the chamber will depend on the model of the kiln, and are estimated in the
following table:
OVEN MODEL
QUANTITY OF COAL (kg)
ST-G300/ST-G300 S
≈3*
ST-G400/ST-G400 S
≈5*
ST-G500/ST-G500 S
≈7*
*The quantities specified in this table are indicative and approximate.
To load the charcoal, remove the grill and pour the charcoal into the base of the inner chamber in such a way that the
charcoal is arranged in a pyramid shape with the apex in the centre of the inner chamber.
6.2 Ignition and braising
Do not use any flammable liquids (petrol, alcohol, etc…) to carry out the charcoal ignition procedure.
During the ignition procedure, do not insert the grill or any other utensil into the oven chamber.
1. Open the inlet and outlet air draught to al 100%
Maximum air inlet
opening indicator
Maximum air
inlet opening
indicator

Ed.:21 - Ver.:01 - 01/01/2021 12
Mod. B4600Humid
2. Distribute 3-4 ignition pads evenly OVER THE CHARGE LOAD, trying to place one in the central area and the rest
in the side areas of the carge.
3. Closet he door and wait approximately 30/40 minutes (depending on your oven model) until the embers are
fully lit.
4. Closet the air inlet draught completely and keep the air outlet draught 100% open for 10/15 minutes.
5. Open the door and check the total absence of flames and the complete burning of the charcoal, verifying that
there are no unburnt pieces of charcoal remaining.
6. Use the poker to evenly distribute the charcoal over the base of the inner chamber.
7. Place the grill in the oven. The height at which it is inserted will always depend on the type of food to be cooked.
8. During the roasting process, the air outlet draught must remain open in the middle position, while the air inlet
draught must be completely closed. If the charcoal smoke escapes through the door, the exhaust flue must be
opened 100% until the smoke disappears.
Open 100%
Closed 100%
10/15 minutes

Ed.:21 - Ver.:01 - 01/01/2021 13
Mod. B4600Humid
6.3 Charcoal refilling
1. Open the door and remove the grill.
2. Open both the top and bottom draught to 100%.
3. Stir and expand the embers over the base of the inner chamber to reactivate them.
4. Add the required amount of charcoal to the coals previously spread out.
5. Resume the ignition process from point 2 of the previous section.
50% Open
100% Closed
Food cooking time
100% Open
100% Open

Ed.:21 - Ver.:01 - 01/01/2021 14
Mod. B4600Humid
6.4 Post-brazing
1. Once the food has been cooked, close both the upper and lower flue (if open) 100% and wait for the remaining
embers to cool down.
2. If it is possible to reuse leftover embers from a previous cooking process, start lighting the oven from point 1 of
the previous paragraph.
100% Closed
100% Closed

Ed.:21 - Ver.:01 - 01/01/2021 15
Mod. B4600Humid
7. Cleaning procedures___________________
Before carrying out any maintenance or cleaning, make sure that the oven is completely cool.
NEVER use chemicals not recommended by the manufacturer to clean the oven.
NEVER spray the oven directly with water.
CLEANING TASKS ON A DAILY BASIS
Exterior surfaces + front: Use a previously dampened cloth insisting mainly on the areas susceptible to
greater accumulation of grease. If necessary, it is possible to use a grease remover product.
Grease collection tray: remove and clean with a previously dampened cloth. If necessary, it is possible
to use a grease remover product.
Grill: remove and clean with a previously dampened cloth. If necessary, it is possible to use a grease
remover product.
Flame arrester deflector: remove and clean with the brush included with the oven. If necessary, it is
possible to use a grease remover product.
Ashtray drawer: remove and clean with the brush included with the oven. If necessary, it is possible to
use a grease remover product.
CLEANING TASKS ON A WEEKLY BASIS
Inner chamber base grids: remove and clean with the brush included with the oven. If necessary, it is
possible to use a grease remover. It is recommended to perform this procedure thoroughly, in order to
guarantee a correct air circulation from the air inlet draught to the air outlet draught. It is also advisable
to rotate the position of the grides in the base, i.e. alternate the center grates to a side position, and
one of the side grates to the center position. In this way, we will be able to extend their useful life.
Firewall: remove and clean trying to remove the soot with small blows, using a resistant wooden or
plastic utensil to do so. DO NOT USE WATER to prevent soot from adhering to the soot surface.
Spark Arrester Cap: remove and clean trying to remove the soot with small blows, using a resistant
wooden or plastic utensil to do so. DO NOT USE WATER to prevent soot from adhering to the soot
surface.
Grids
Alternate position weekly

8. Accessory assembly _______________________________
8.1 Oven - cabinet assembly
1. Remove the back cover of the cabinet, which will be used later as a trim to cover the joint between the oven and
the oven:
2. Remove the adjusters from the oven legs:
3. Insert the threaded bolts of the legs into the holes provided in the cabinet for this purpose:

Ed.:21 - Ver.:01 - 01/01/2021 17
Mod. B4600Humid
4. Replace the leg adjusters removed in step 2 to secure the connection between the oven and the cabinet. To do
this, screw them onto the exposed bolt at the bottom of the oven leg brackets:
5. Screw the rear trim to cover the resulting gap between the cabinet and the oven. To do this, remove the screws
from the rear oven cover that match the position of the holes in the trim:

Ed.:21 - Ver.:01 - 01/01/2021 18
Mod. B4600Humid
8.2 Oven –support assembly
1. Remove the adjusters from the oven legs:
2. Insert the threaded bolts of the legs into the holes provided in the bracket for this purpose:
3. Replace the leg adjusters removed in step 2 to secure the connection between the oven and the cabinet. To do
this, screw them onto the exposed bolt at the bottom of the oven leg brackets:

Ed.:21 - Ver.:01 - 01/01/2021 19
Mod. B4600Humid
8.3 Oven - temperature control unit assembly
1. Remove the screws provided on the oven cover for fastening the temperature control unit:
2. Locate the temperature control unit in place, matching the temperature control unit's fixing brackets with the
anchor points on the oven cover. Subsequently, screw the temperature control unit to secure the temperature
control unit to the oven cover:

Ed.:21 - Ver.:01 - 01/01/2021 20
Mod. B4600Humid
This manual suits for next models
5
Table of contents
Other FM Oven manuals
Popular Oven manuals by other brands

Fisher & Paykel
Fisher & Paykel OB30SDPTDB1 quick start guide

AEG
AEG Competence 5308 B operating instructions

Angelo Po
Angelo Po FX 82 E2T Use and installation manual

Axia
Axia KAS3UTUE-12A owner's manual

Electrolux
Electrolux EOB 966 Instruction booklet

Bosch
Bosch CMG656B 1M Series User manual and installation instructions