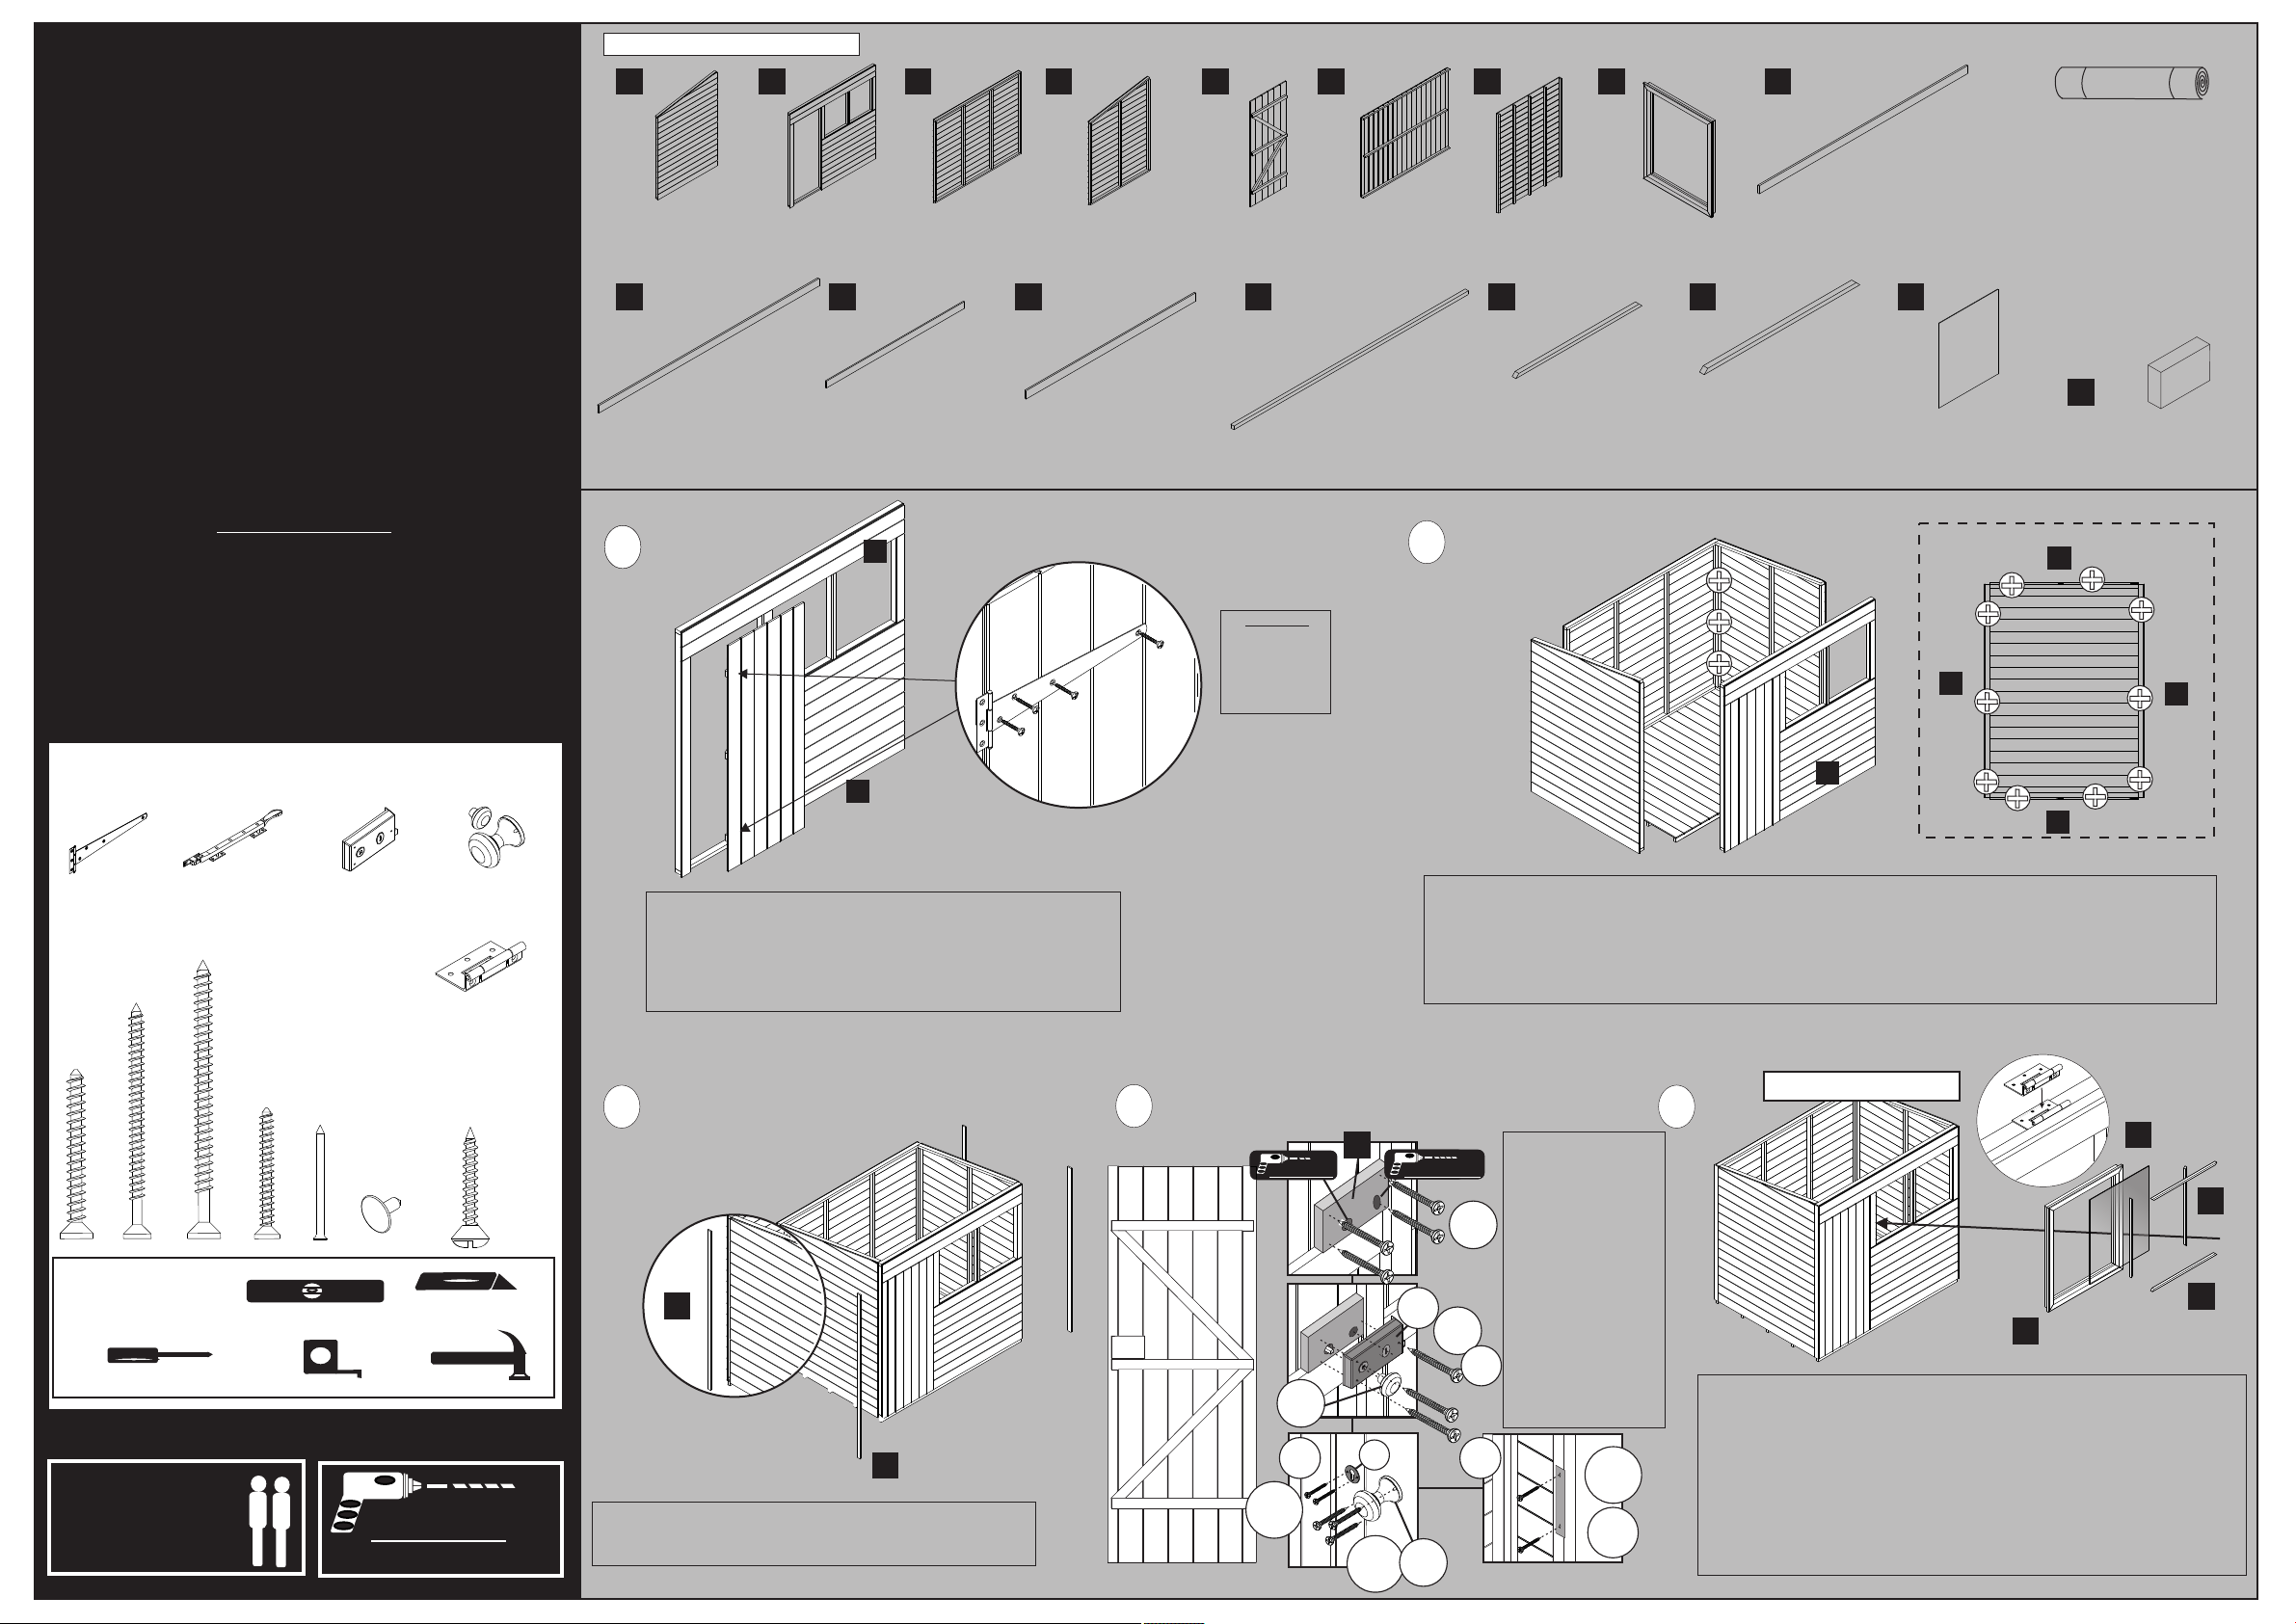
manuals.online logo
Brands
  1. Home
  2. •
  3. Brands
  4. •
  5. Forest
  6. •
  7. Garden House
  8. •
  9. Forest Tongue & Groove Pent Shed User manual

Forest Tongue & Groove Pent Shed User manual

Tongue and Groove
7' x 5' Pent Shed
Issue 0219
MTGPSH75RHS
RIGHT SIDE PANEL
MTGPSH75V2 PARTS LIST
MTGSH64DR
DOOR
MTGPSH75RF
ROOF QTY 1
Place the corner strips so that they are flush and cover
the joins between the panels. Fix each in place using
3x30mm screws.
Top View
2
11
MTGPSH75FR
FRONT PANEL
Place and secure two hinges to the door so that they line up with
the battens on the reverse, using 25mm Security Screws for each.
Place the door into the door end ensuring that the door is square.
Fix the doors in place using 3x25mm Security Screws for the
smaller section of each hinge.
3
Fixing Pack (MTGPSH75V2FP) Not to Scale
POZI DRIVE SCREWDRIVER TAPE MEASURE HAMMER
J
IMPORTANT, RETAIN FOR FUTURE REFERENCE;
READ CAREFULLY
Check all parts prior to assembly
This buildings is pressure treated to ensure longevity of all
timber components and to protect against rot. This may leave
a colour difference on some parts that will even out as the
moisture content stabilises. This will not require additional
treatment.
- Timber is a natural material. It will shrink and swell as a
result of varying moisture content.
- Please keep all plastic bags and small parts away from
children
- The roof of this building is not a load bearing structure.
- This product must be built on a solid level base.
Technical Help line: 0333 7777 089 8.30 am and 5.00
pm Monday to Friday.
In line with your statutory rights, please check all parts prior
to assembly, as assembly of damaged parts may be deemed
to be acceptance and this may affect the remedies you are
entitled to. If the product is not constructed in accordance
with the instructions, or is altered in anyway (e.g. painted),
the manufacturer cannot be held liable for any resulting
damage.
Important : Assembly of
this shed requires a
minimum of two adults.
HAMMER
Must Pre drill for
each screw used.
ROOF FELT
57121945PPT
CORNER STRIP 1945mm
QTY 2
MTGPSH75BK
BACK SIDE
MTGPSH75LHS
LEFT SIDE PANEL
70122086PPT
BARGE BOARD 2086mm
QTY 1
57121717PPT
CORNER STRIP 1717mm
QTY 2
FELT81RED
FELT QTY 1 ROLL
28282062PPT
DRIP STRIP 2062mm
MTGPSH75FL
FLOOR
A
SHARP KNIFE
FOR ROOFING FELT
B
E
B
4
A
B
C
D
Place the panels on top of the floor. Make sure that all the panels are tight and flush before fixing
them to each other using 3x50mm screws.
When the panels are secured to each other, make sure they are square before fixing to the floor
using 2x50mm screws for each side panel and 3x50mm screws for the front and back panels. Take
care position the screws so the locate into the floor bearers underneath.
I
70121650PPT
BARGE BOARD 1650mm
QTY 2
MTGWIN
WINDOW QTY2
XT623502
ACRYLIC SHEET
QTY 2
15120629PAII45PT
629mm BEADING
QTY 4
15120508PAII45PT
504mm BEADING
QTY 4
40mm Screw Qty 16
30mm Screw Qty 40
10mm Felt Tacks
Qty 100
25mm Countersunk
Security Screws Qty 14
50mm Screw Qty 25
25mm Panel Pins Qty 28
25mm Screw Qty 23
REQUIRED TOOLS :
(NOT SUPPLIED)
SPIRIT LEVEL
SHARP KNIFE
FOR ROOFING FELT
Attention:
Take care when
placing the
screws. These
can not be
backed out.
H
Place the acrylic sheet inside the window frame and position the
beading so that each section fits flush and keeps the sheet tight. Fix
each piece using 3 x Panel Pins.
For the opening window fix two cranked hinges to the top of the
window so that it sits in the rebate. Fix the smaller section of the hinge
to the window using 2 x 25mm screws for each. Open up the hinges
and fix the remaining section of each hinge to the top of the window
panel using another 3 x 25mm screws for each hinge.
O
N
P
5Opening Window
Secure block to back of
Door using 50mm screws.
Use Rim lock to line up
and drill 2 holes thought
block and door.
Fix rim lock to the block
using screws supplied.
Place door handle though
20mmm hole and secure
using 25mm screws.
Cover 2nd hole with
escutcheon and fix into
place.
Inside attach a striking
plate
DRI LL 20mm HOL EDRI LL 20mm HOL E DRI LL 25x10mm HOL E
RIM-
LOCK
HANDLE
FRONT
3x
25mm
Screws
HANDLE
escut-
cheon
3x
50mm
Screws
Supplied
With
Rim-lock
INSIDE 2x
25mm
Screws
Striking
Plate
4x
40mm
Screws
Q
2x
25mm
Screws
Cranked Hinge
Qty 2
Rimlock with
Striking Plate
Qty 1
Door Handle
Set with Pin
Qty 1
‘T’ Hinge
Qty 2
Casement
Stay
Qty 2
BC D E F G H I
J K L M NN NO NP
80380140PPT
DOOR BLOCK
QTY 1
Q
11
Forest Garden Ltd, Unit 288 Hartlebury Trading Estate, Hartlebury, Worcestershire, DY10 4JB
Maintenance.
Regularly check that all fixings are secure.
Regularly check the quality of the roofing felt and that it is free of holes and splits.
Biocidal Product Regulation (EU 528/2012) Article 58 Information
This article contains timber treated with Celcure AC-500, incorporating biocidal products to give protection against wood destroying insects & wood rotting fungi.
Contains: Basic copper carbonate (Copper (II) carbonate – Copper (II) hydroxide (1:1)), Boric acid, Benzalkonium chloride.
Wear gloves when handling freshly treated wood. Avoid breathing dust when cutting treated or untreated wood. Dispose of off-cuts responsibly – do not burn.
78
Place the Drip Strip against the front end above door and windows and
secure using 4 x 50mm screws.
Place the roof section on to the shed so that the battens overhang at the front and back
of the building and the sides of the roof are flush with the side panels.
Fix the roof section in place using 4 x 30mm screws at each end and 2 x 40mm screw
for both the front and back screwing through the board into the top of the panels.
9
Place the 1650mm barge board against the sides of the shed. Make sure that
these are in line with the top of the shed and fix each in place ace using 4 x
30mm screws spaced evenly.
Position the remaining 2086mm barge board across the front of the shed,
again so it is in line with the roof, and is flush on the sides. Fix this in place
using 4 x 30mm screws spaced evenly.
10
Cut the roof felt in to two equal lengths and place the first sheet on top of the roof
at the back of the shed making sure there is equal overhang at the sides and
approximately 50mm at the back. Fix the felt in place using the felt tacks spaced in
150mm intervals. Fold and tack the corners.
Repeat for the other sheet making sure it overlaps the first and use felt nails to
fasten the seam.
Fix felt along edge using felt tacks - Trim any overhang felt
F
K
L
M
ATTENTION:
1.THE ROOF IS NOT LOAD
BEARING.
2.TAKE CARE WHEN
CUTTING THE ROOF FELT.
THE ROOF IS NOT LOAD
BEARING
6
12mm Offset
Place and fix the Casement Stay centrally against the inside of the opening
window and make sure it is offset at least 12mm from the to top of the frame so
as not to hit the acrylic sheet. Fix in place using 2 x 25mm screws.
Mark the position of the holes of the casement stay when the window is closed
before fixing the pins in place using the 25mm screws provided.
Before glazing the remaining window place the window frame into the window side
and fix it to the framing using 8 x 40mm screws, making sure that the screw heads
are flush. (Pre-drill)
Glaze the window the same as you have done previously in step 5.

This manual suits for next models

1

Other Forest Garden House manuals

Forest TPA46 User manual

Forest

Forest TPA46 User manual

Forest LINPL12090S User manual

Forest

Forest LINPL12090S User manual

Forest FRA58 User manual

Forest

Forest FRA58 User manual

Forest MODULAR PERGOLA User manual

Forest

Forest MODULAR PERGOLA User manual

Forest BECKWOOD SHED User manual

Forest

Forest BECKWOOD SHED User manual

Forest SCP90FP User manual

Forest

Forest SCP90FP User manual

Forest SLATTED PALMA ARBOUR User manual

Forest

Forest SLATTED PALMA ARBOUR User manual

Forest LGSTFP User manual

Forest

Forest LGSTFP User manual

Forest CORNLINPL160 User manual

Forest

Forest CORNLINPL160 User manual

Forest CORNER SHED User manual

Forest

Forest CORNER SHED User manual

Forest SDP63GBARFP User manual

Forest

Forest SDP63GBARFP User manual

Forest Xtend 4.0 Manual

Forest

Forest Xtend 4.0 Manual

Forest XTEND 3.0 Manual

Forest

Forest XTEND 3.0 Manual

Forest Xtend 2.5 Manual

Forest

Forest Xtend 2.5 Manual

Forest OPCS88 User manual

Forest

Forest OPCS88 User manual

Forest LEAN-TO KIT User manual

Forest

Forest LEAN-TO KIT User manual

Forest TPA68 User manual

Forest

Forest TPA68 User manual

Forest OPCSUM77 User manual

Forest

Forest OPCSUM77 User manual

Forest SLATTED DINING PERGOLA User manual

Forest

Forest SLATTED DINING PERGOLA User manual

Forest HANBURY FLAT TOP ARCH User manual

Forest

Forest HANBURY FLAT TOP ARCH User manual

Forest TPCSUM88 User manual

Forest

Forest TPCSUM88 User manual

Forest Timberdale 8 x 12 ft Tongue & Groove Shed User manual

Forest

Forest Timberdale 8 x 12 ft Tongue & Groove Shed User manual

Forest PENT SUMMERHOUSE 6x4 User manual

Forest

Forest PENT SUMMERHOUSE 6x4 User manual

Forest OPCSUM88 User manual

Forest

Forest OPCSUM88 User manual

Popular Garden House manuals by other brands

Mercia Garden Products 02DTSHAX05051W-V1-PEFC General instructions

Mercia Garden Products

Mercia Garden Products 02DTSHAX05051W-V1-PEFC General instructions

Palmako Winter Cabin installation manual

Palmako

Palmako Winter Cabin installation manual

Lemeks Palmako FRG44-4132 installation manual

Lemeks

Lemeks Palmako FRG44-4132 installation manual

Lemeks Palmako FR28-3232-9 Assembly, installation and maintenance manual

Lemeks

Lemeks Palmako FR28-3232-9 Assembly, installation and maintenance manual

Rowlinson Garden Products 4x6 Overlap Double Door Shed Assembly instructions

Rowlinson Garden Products

Rowlinson Garden Products 4x6 Overlap Double Door Shed Assembly instructions

Karibu DAHME 3 manual

Karibu

Karibu DAHME 3 manual

Dunster House TERMINATOR E10-5940TM-45 installation manual

Dunster House

Dunster House TERMINATOR E10-5940TM-45 installation manual

Décor et Jardin 62243S900 Assembly Notice

Décor et Jardin

Décor et Jardin 62243S900 Assembly Notice

Duratuf Fendalton Assembly instructions

Duratuf

Duratuf Fendalton Assembly instructions

Lillevilla 688 Assembly and Maintenance

Lillevilla

Lillevilla 688 Assembly and Maintenance

Reynolds Building Systems Roanoke Assembly Book

Reynolds Building Systems

Reynolds Building Systems Roanoke Assembly Book

telluria ELEGANTO 3024 PHR Assembly instructions

telluria

telluria ELEGANTO 3024 PHR Assembly instructions

Luoman Lillevilla 342 Assembly and Maintenance

Luoman

Luoman Lillevilla 342 Assembly and Maintenance

Outdoor Life Products Mosel 1 Assembly instructions

Outdoor Life Products

Outdoor Life Products Mosel 1 Assembly instructions

Palmako Lara FRAB28-4529 installation manual

Palmako

Palmako Lara FRAB28-4529 installation manual

STILLA Willow 12x8 Assembly instructions

STILLA

STILLA Willow 12x8 Assembly instructions

Mercia Garden Products 01DTOVRA1006SDFW-V1 manual

Mercia Garden Products

Mercia Garden Products 01DTOVRA1006SDFW-V1 manual

Rowlinson Garden Products Ryton 8 x 8 Octagonal Summerhouse Assembly instructions

Rowlinson Garden Products

Rowlinson Garden Products Ryton 8 x 8 Octagonal Summerhouse Assembly instructions

manuals.online logo
manuals.online logoBrands
  • About & Mission
  • Contact us
  • Privacy Policy
  • Terms and Conditions

Copyright 2025 Manuals.Online. All Rights Reserved.